Articles in this section
Creating FAQs in Vtiger CRM
Feature Availability
Vtiger Editions: One Pilot | One Growth | One Professional | One Enterprise | One AI
Introduction
FAQ, or Frequently Asked Questions, are commonly asked questions about a process or a business. FAQs are written in pairs of questions and answers. You can create an FAQ from your customers' questions if you think it might be useful to other customers. For example, How do I sign up for Vtiger CRM? may be a frequently asked question.
These FAQs can be uploaded on a portal or a website that all your customers have access to.
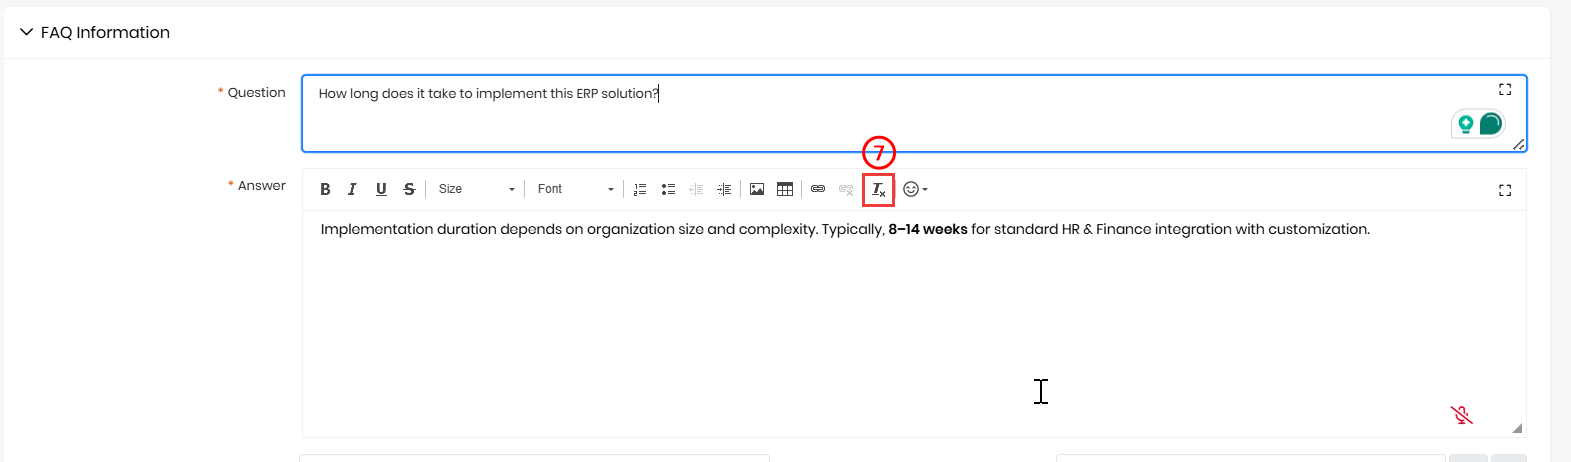
FAQ Editor in Vtiger
The FAQ editor allows you to:
- Add the question and answer
- Format the content by adding different font styles, headings, font sizes, colors, numbers, and bullets.
Actions in FAQ Summary View
You can perform the following actions in the FAQ Summary View:
- Create - You can add a new FAQ using the Add FAQ button.
- Edit - When you hover on the title of the FAQ, you will find the edit icon. By clicking the edit icon, you can edit the title of the FAQ and save it.
- Follow - By clicking the follow icon, you can follow and unfollow a FAQ.
- Add Tags - You can add tags by choosing from the drop-down or creating your own tags.
- Open in a new tab - You can open an FAQ in a new tab.
- Click to copy the direct link - This is the direct link to the FAQ. By clicking this icon, a URL copied successfully message will be displayed. You can now share this link with others.
Statuses in FAQ Editor
While you create an FAQ, the FAQ will be set to Draft. Once it is created, you can add the following statuses:
- Draft - The FAQ is written and not completed yet.
- To be reviewed - The FAQ is written and ready to be reviewed for technical and grammatical errors.
- Reviewed - The FAQ has been reviewed (by the concerned person for technical review, grammar review, etc.)
- Published - The FAQ has been reviewed and published on the website for customers to view.
- To be deleted - The FAQ that needs to be deleted.
- Obsolete - The FAQ is not required anymore.
Note: Customers can see an FAQ only when its Status field is set to Published.
FAQ Visibility
The following are the different visibilities available:
- Public - When visibility is set to public, the FAQ is visible to everyone on the internet.
- Logged-in Contacts - When visibility is set to logged-in contacts, the FAQ is visible to all the contacts who are currently signed in or using the CRM at that moment
- Employees - When visibility is set to employees, the FAQ is only visible to your organization's employees.
- Bot Only - When visibility is set to the bot, the FAQ is only visible to the bot for training.
Categories for an FAQ
Categories help you organize FAQs into structured groups, making it easier for agents and customers to find the information they need. Each FAQ can be assigned a Category and a Subcategory, allowing for well-organized classification and improved searchability.
Benefits of FAQs
The benefits of creating FAQs in Vtiger CRM are:
- Efficient Customer Support - FAQs offer instant answers to common questions, minimizing the need for customers to reach out to your support team for basic inquiries.
- Time-Saving - By addressing frequently asked questions upfront, FAQs allow your support team to focus on resolving more complex customer issues.
- Consistency - FAQs deliver uniform and accurate information, ensuring standardized responses to common queries and reducing the chance of miscommunication.
- Self-Service Options - Customers value self-service tools that provide quick solutions. FAQs empower them to find answers independently, enhancing satisfaction and overall user experience
In this article, you will learn about:
- Creating an FAQ
- Editing an FAQ
- Enhancing an FAQ
- Converting Cases into the FAQ
- Sharing FAQs via Email
- Viewing FAQs details
- Accessing Published FAQs
Key Terminology
|
|
|
|
|
|
|
|
|
|
|
|
|
|
|
|
|
|
|
|
|
Creating FAQs in Vtiger CRM
You can create FAQs using the following methods:
- + Add FAQ
- Quick Create
- Importing
- Using Workflows
Let us now learn about each method.
Creating an FAQ Using + Add FAQ
You can create an FAQ manually in the CRM, through Import, or from Workflows.
Follow these steps to create an FAQ manually in the CRM:
- Log in to the CRM.
- Click main Menu.
- Go to the Help desk.
- Select FAQ. The FAQ List View opens.
- Click +Add FAQ. The Add FAQ window opens.
- Click View full form. The Details View opens.
- Enter or select the following information:
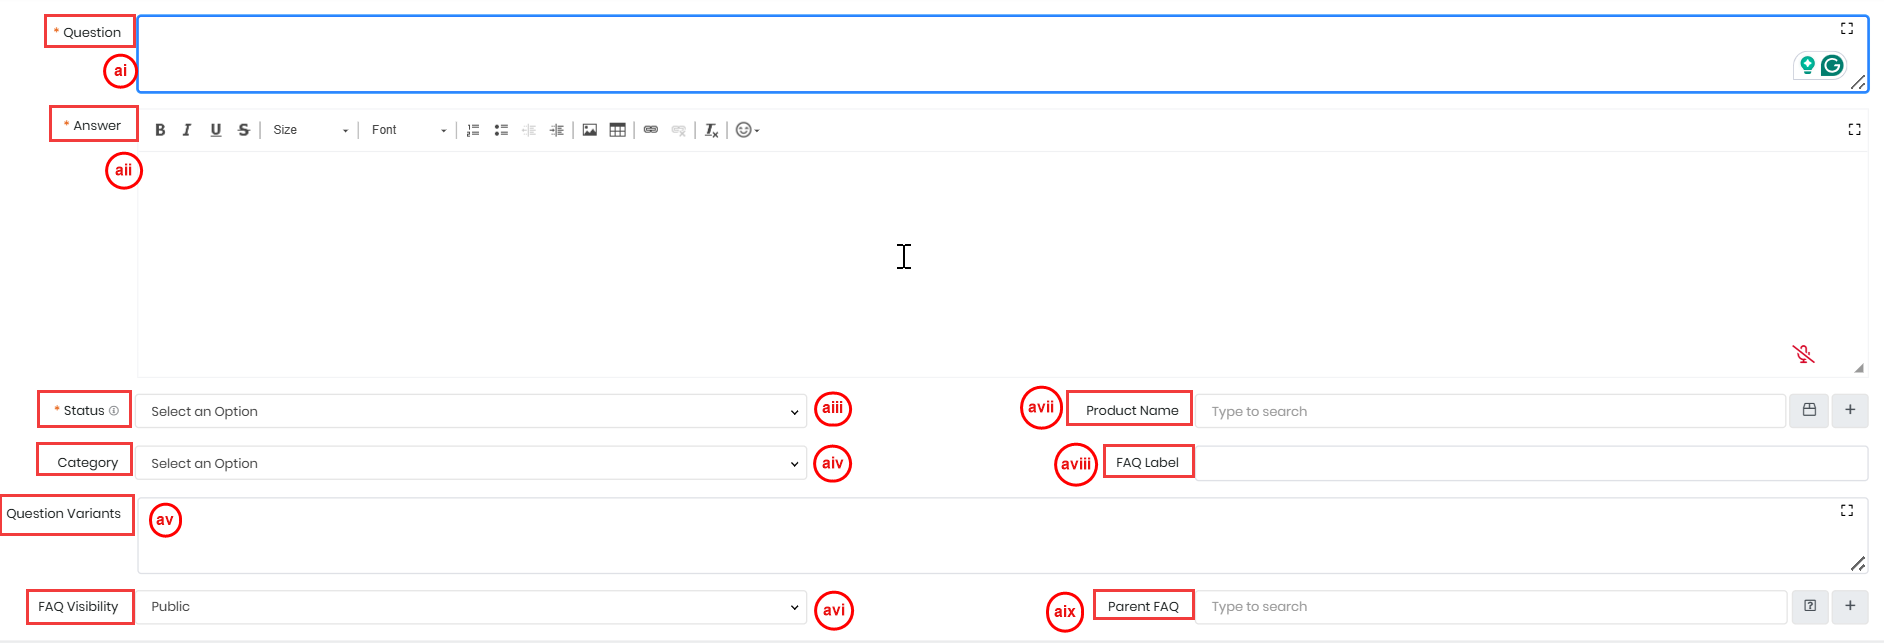
- FAQ Information:
- Question - Type the Question in the Question field.
- Answer -Type the Answer in the Answer field.
- Status - Select a Status from the drop-down.
- Draft - The FAQ has been written but has not yet been completed.
- To be reviewed - The FAQ is written and ready to be reviewed for technical and grammatical errors.
- Reviewed - The FAQ has been reviewed (by the concerned person for technical review, grammar review, etc.)
- Published -The FAQ has been reviewed and published on the website for customers to view.
- To be deleted - The FAQ that needs to be deleted.
- Obsolete - The FAQ is no longer required.
- Junk - The FAQ is irrelevant, incorrect, or unusable and serves no purpose.
- Category - Add Question variants.
- Question Variants - Enter alternate versions of the question.
- FAQ Visibility - Set the visibility preferences for the FAQ.
- Product Name - Mention the product related to the FAQ.
- FAQ Label - Specify labels or tags for the FAQ.
- Parent FAQ - Specify the parent FAQ, if applicable.
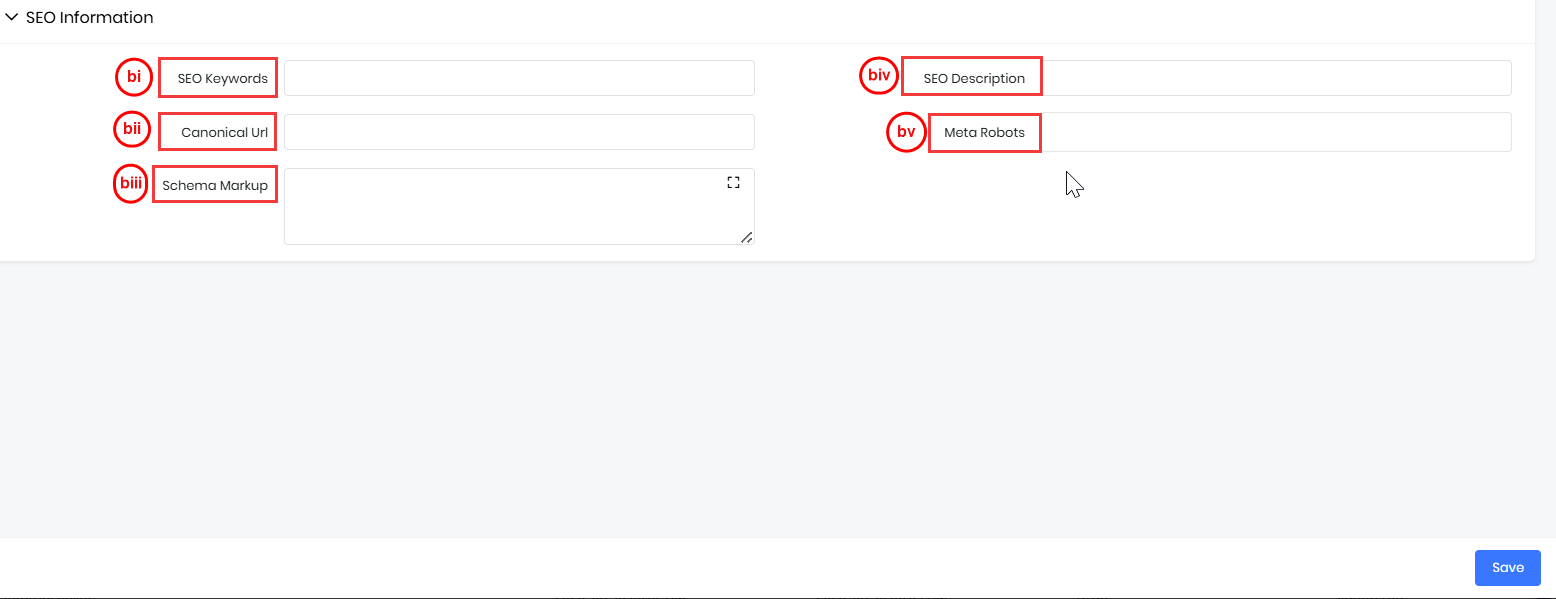
- SEO Information:
- SEO Keywords - Add keywords that help people find the FAQ on search engines.
- Canonical URL - Enter the main URL to tell search engines which version of the page to focus on.
- Schema Markup - Add extra details to help search engines better understand the FAQ and show it more clearly in results.
- SEO Description - Write a short summary of the FAQ that will show up in search engine results.
- Meta Robots - Set rules for search engines, like whether they can show the FAQ in results or follow its links.
- Click Save.
An FAQ will be created and saved in the CRM.
Note: You can add mandatory details first and add the other details to the FAQ later.
Quick Create
You can also create an FAQ using the Quick Create option. This method is useful when you want to add an FAQ quickly without navigating to the module.
Click the Quick Create (+) icon from the top menu bar and select FAQ from the list. A compact FAQ creation form appears, where you can enter the Question, Answer, and other essential details. Once saved, the FAQ record is added directly to the FAQs module.
To learn more about Quick Create, click here.
Import
Apart from manually creating an FAQ, you can create an FAQ by importing it. When you have a large number of FAQ to write, it is not easy to publish them manually by writing one at a time. In this case, you can import the FAQ from your local computer. Write all your FAQs in an XLS or CSV file on your local computer. The column names in the file must be the same as the field names in the CRM. For example, to map the Question field in the CRM to the question in your XLS or CSV document, you must create a column called Question.
To learn more about importing, click here.
Workflow
You can automate the creation of FAQs through Workflows. A workflow has three main components:
- Trigger - What causes the workflow to execute
- Conditions - The conditions that must be met to create an FAQ
- Action - Creating a FAQ
For example, you can create a workflow for this scenario - When a case is closed, and its Title ends with a question mark, create an FAQ. You can copy the Case Title to the Question and the Case Summary to the Answer.
To learn more about Workflows, click here.
Mailroom
If you receive emails that must be converted to FAQ, you can achieve that through Mailroom automation. To do this, you must set up the following:
- Mailroom rules for FAQ
- Auto-forwarding in your email client
When you do the above, all the emails landing in your email client are auto-forwarded to the mailroom. The mailroom will then scan your incoming emails and create FAQ records. For example, when an email’s subject contains the phrase - ‘How can I’, you can automatically convert the email to an FAQ.
To learn more about Mailroom, click here.
To learn more about Auto-forwarding, click here.
Editing an FAQ
You can update an FAQ to keep the information accurate and relevant for agents and customers. Editing helps you correct mistakes, improve clarity, add new details, or update outdated steps. When editing an FAQ, you can modify various fields based on what needs to be improved.
You can edit an FAQ in two ways:
- From the List View
- From the Summary View
From the List View
Follow these steps to edit an FAQ from the List View:
- Log in to the CRM.
- Click main Menu.
- Go to the Help desk > Agent Enablement > FAQ. The FAQ List View opens.
- Hover over the FAQ you want to edit.

- Click Edit from the quick action options. The Editing FAQ page opens.
- Make the necessary changes in the required sections.
- Click Save.
From the Summary View
- Log in to the CRM.
- Click main Menu.
- Go to the Help desk > Agent Enablement > FAQ. The FAQ List View opens.
- Click on the FAQ you want to edit. The Summary View of the record opens.
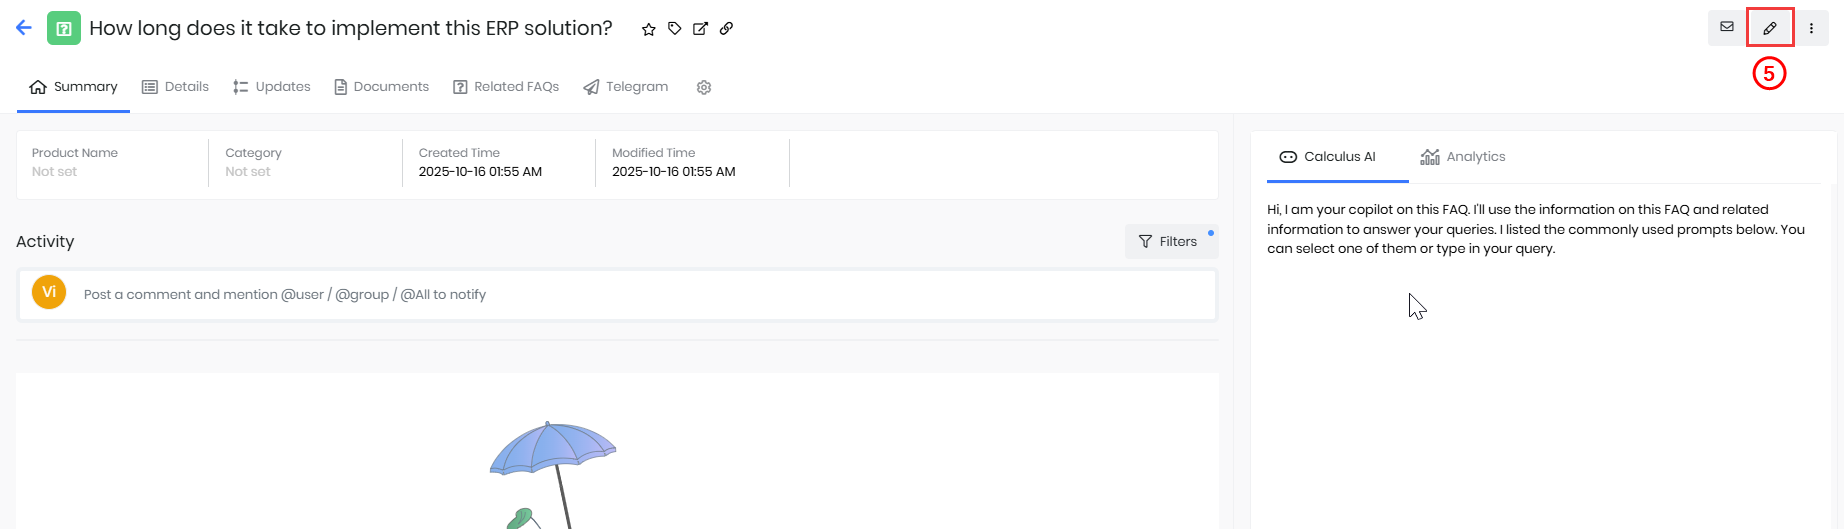
- Click Edit in the top right corner. The Editing FAQ page opens.
- Make the necessary changes in the required sections.
- Click Save.
Enhancing an FAQ
Now that you have created an FAQ, you can enhance it to add value. Based on the type of information you want to display, you can add tables, screenshots, images, and links to other articles, websites, etc. This can be useful when you have to make references to a screen or an external help document, or a website.
Adding screenshots
Follow these steps to add a screenshot to an FAQ:
- Log in to the CRM.
- Click main Menu.
- Go to the Help desk > Agent Enablement > FAQ. The FAQ List View opens.
- Click and open the FAQ to which you want to add the screenshots.
- Click Edit. The Editing FAQ page opens.
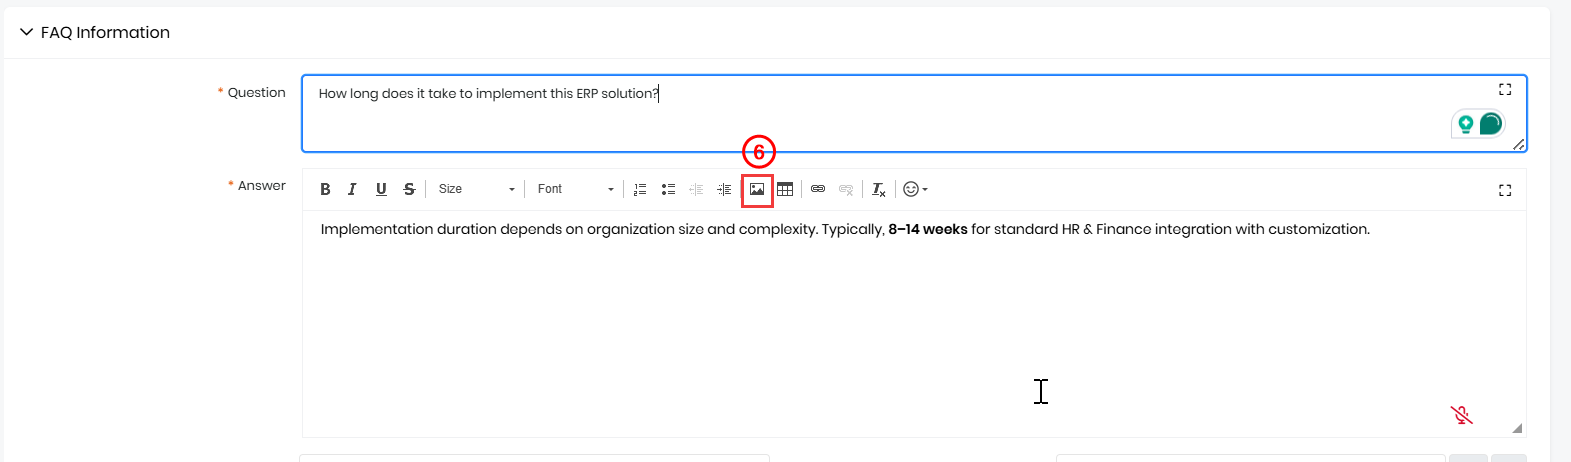
- Click Image in the Answer textbox.
- Click the Upload tab.
- Click Choose File to browse and select the image on your local computer.
- Click Send it to the Server.
- Specify image properties such as the alternative text, height, and width of the image, alignment, etc., in the Image Info tab (optional).
- Click OK.
The screenshot will be added to the FAQ.
Adding links
Follow these steps to add a link to an external document:
- Log in to the CRM.
- Click main Menu.
- Go to the Help desk > Agent Enablement > FAQ. The FAQ List View opens.
- Click and open the FAQ to which you want to add the Links.
- Click Edit. The Editing FAQ page opens.
- Select the text you want to link the external document to in the Answer textbox.
- Click Link in the toolbar.
- Type the URL of the external document in the URL field under the Link Info tab.
- Click OK.
A hyperlink in blue will be added to the text you selected. This indicates that the link is embedded in the text.
Converting Cases into the FAQ
When customers ask you common questions, you can make an FAQ out of the questions and display it in the Customer Portal. But when the same question is asked through a case, then you can convert the case into an FAQ.
Follow these steps to convert a case into an FAQ:
- Log in to the CRM.
- Click the main Menu.
- Go to the Help desk.
- Go to the Cases. The Cases List View opens.
- Select and open the Case that you want to convert into an FAQ.

- Click More on the top right of the Summary View.
- Select Convert to FAQ.
An FAQ will be automatically created. The case title is copied as the question and in the Case’s comments as the answer. You can view the newly created FAQ under Main Menu > Help desk > FAQ.
To learn more about Cases, click here.
Sharing FAQs via Email
You can send FAQs while composing a new email, replying to an existing one, or responding to a specific case. For this example, we will send an email to a Case.
Follow these steps to share FAQs:
- Log in to the CRM.
- Click the main Menu.
- Go to the Cases. The Cases List View opens.
- Open the Case record you want to email. The Case Summary View opens.
- Click Email on the top right corner. The Compose Mail window opens.
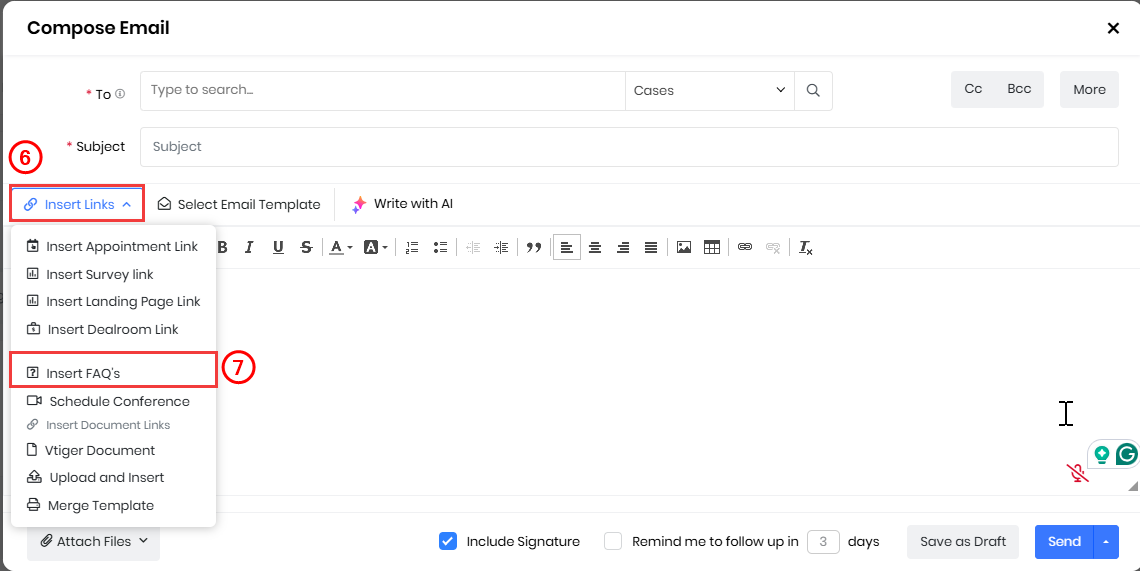
- Click Insert Links.
- Select Insert FAQs from the drop-down. The Insert FAQs window opens.
- Enter or select the following information to insert dd FAQs:
- Search Bar - Use the Search Bar to find the FAQ you need by typing keywords or selecting a category.
- Categories - Click the Categories and pick the category that matches your topic to see related FAQs.
- Copy - Select and click to copy the FAQ and paste it into your email where needed.
- Insert - Select and click Insert to add the FAQ automatically, and it will appear in the email.
- Click Send.
Views in the FAQ Feature
You can access all your FAQs by navigating to Main Menu > Help Desk> Agent Enablement > FAQ. The system offers four viewing options: List View, Kanban View, Calendar View, and Grid View. By default, FAQs are displayed in List View. You can use the Before and After Picklist values in the Date field of the FAQ module to filter records based on specific time periods. For example, selecting Before 31/12/2024 will exclude records added after this date, while selecting After 31/12/2024 will display only records added after this date.
You can easily switch between the List, Kanban, and Calendar Views using the icons at the top right, next to the +Add FAQ button.
List View
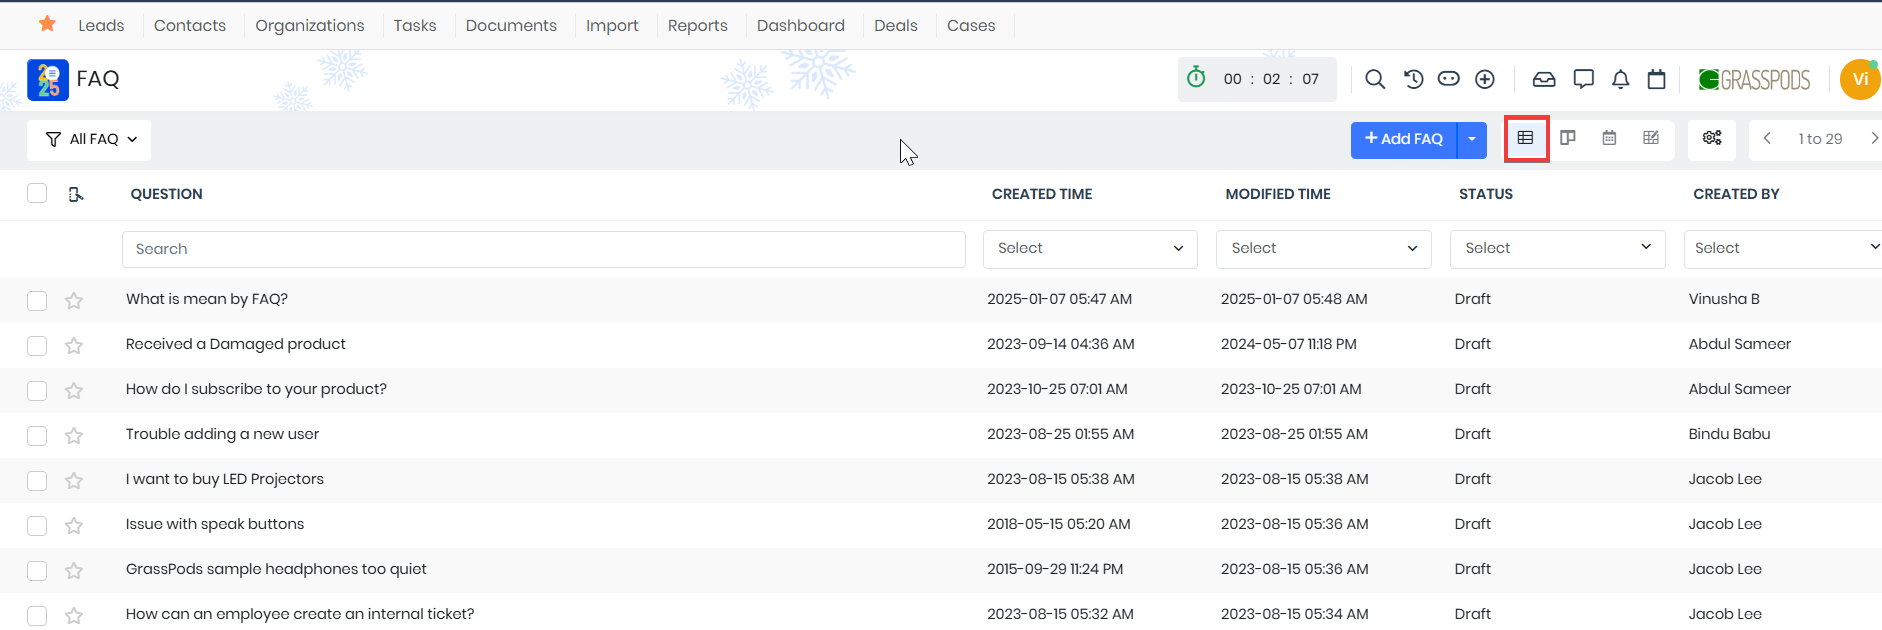
The List View provides a complete list of all FAQs, making viewing and managing them easy. By clicking on the column headers, you can sort FAQs by various criteria, such as date or name. This view allows you to perform quick actions.
To learn more about the List View, click here.
Summary View
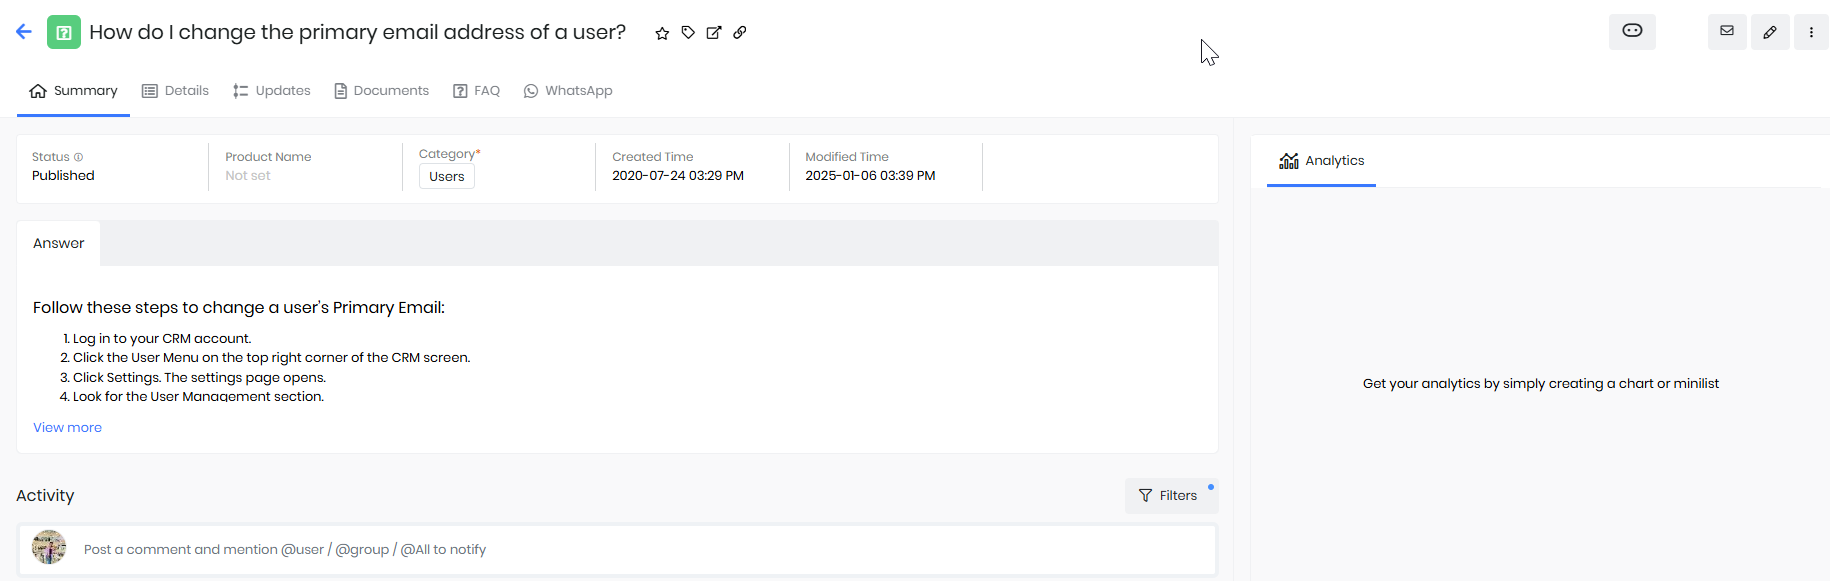
The Summary View gives you a detailed overview of an individual FAQ, presenting all essential information on a single page. In this view, you can review key details, such as the FAQ's status, associated product, category, and other metadata, depending on the module. You can also take action like editing the FAQ and changing its status from one convenient location.
To learn more about the Summary View, Click here.
Kanban View
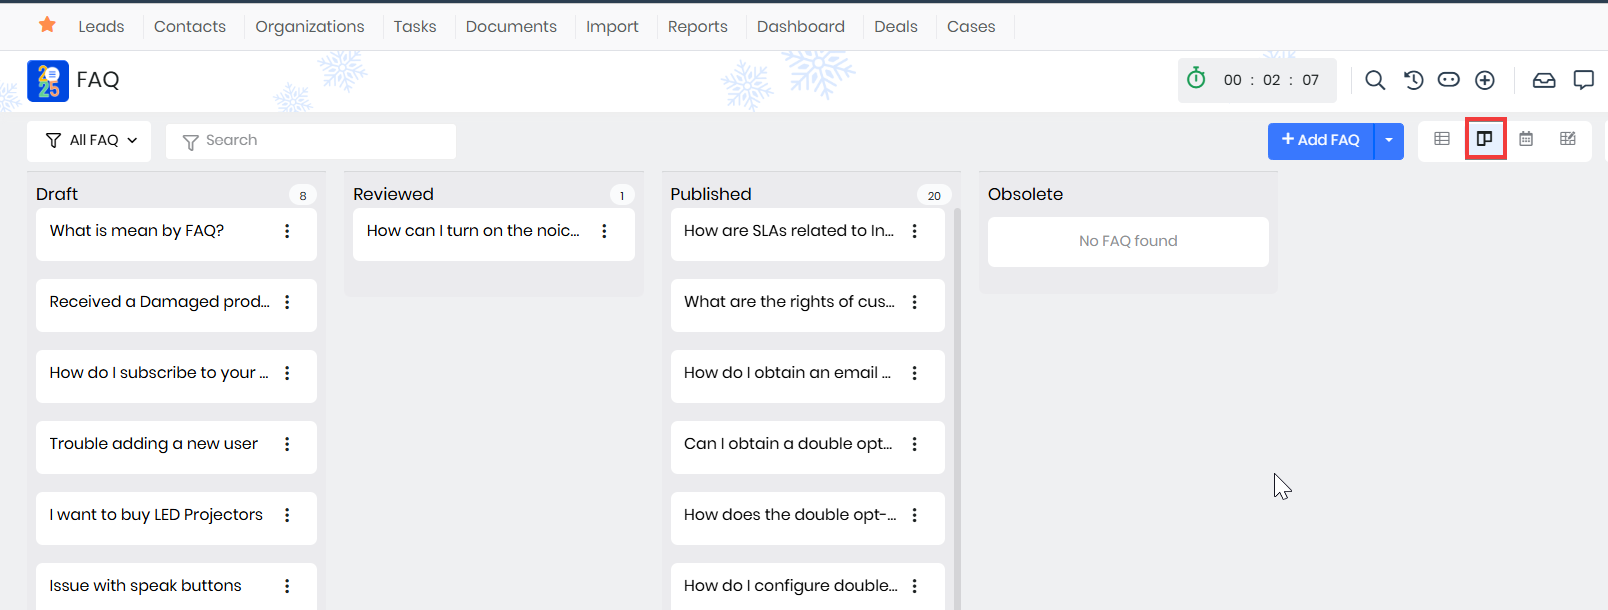
The Kanban View displays FAQs as individual cards arranged in columns based on their current status. Each column represents a specific status, such as Draft, Published, To be Reviewed, Reviewed, Obsolete, Junk, or Deleted. This visual layout helps you track the progress and manage FAQs at a glance. You can easily update an FAQ’s status by dragging and dropping it into the appropriate column.
To learn more about the Kanban View, click here.
Calendar View

The Calendar View shows FAQs organized by their creation or modification dates, displayed in a clear calendar layout. You can navigate past and upcoming FAQs using the navigation arrows. Clicking on a specific FAQ reveals the owner, creation date, status, and more details. In this view, you can take several actions, such as:
- Adding comments or sticky notes to the FAQ.
- Opening the FAQ in a new window.
- Editing the FAQ’s details.
To learn more about the Calendar View, click here.
Grid View
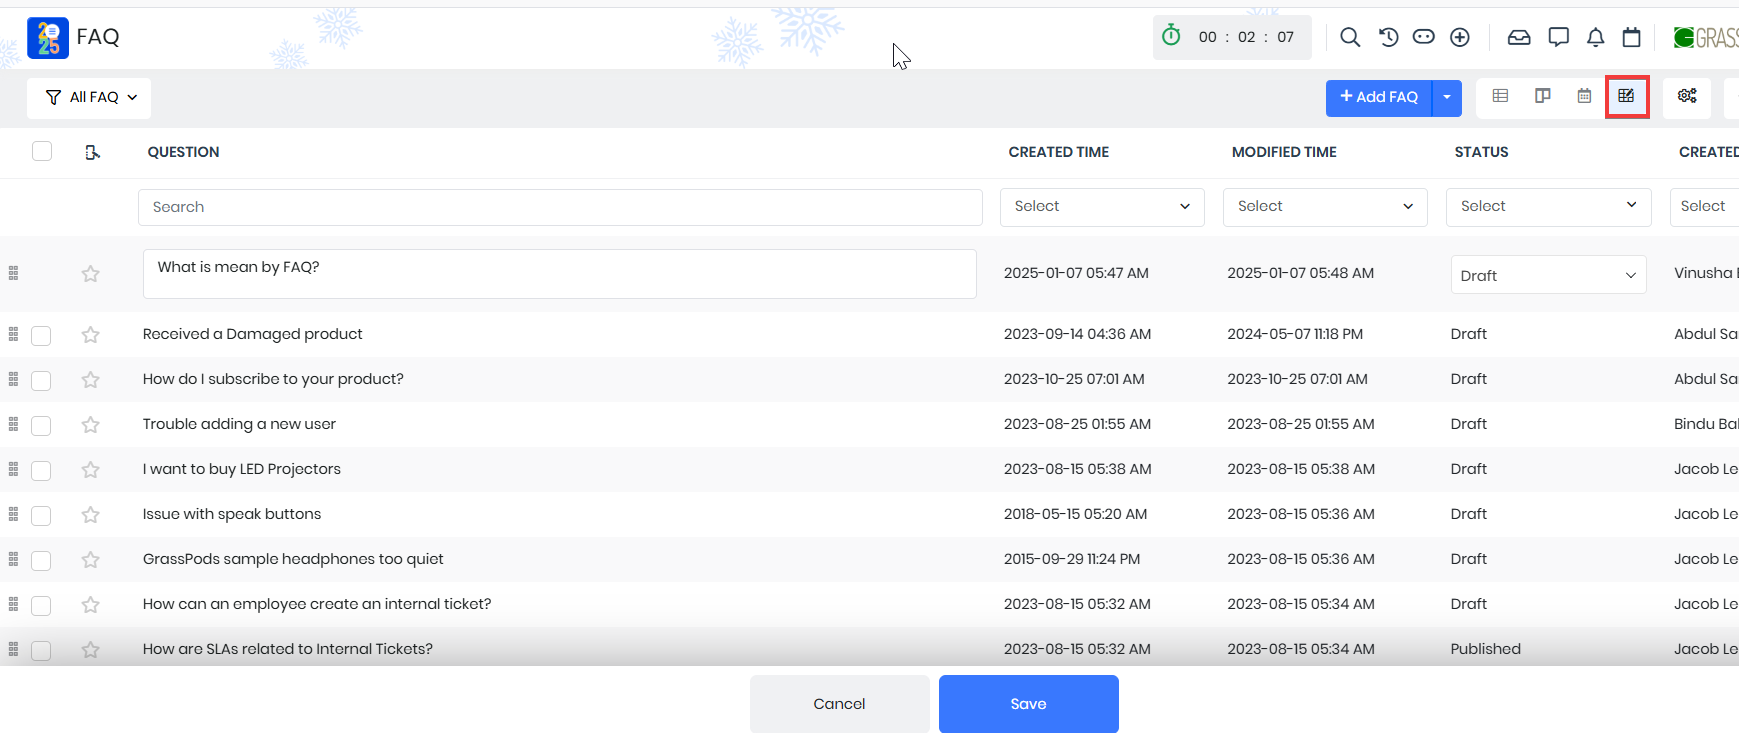
The Grid View provides a spreadsheet-like layout for managing FAQs. Each FAQ is displayed as a row, with its details organized into editable cells. This view is ideal for bulk editing, as you can quickly update multiple FAQs without opening each one individually. You can add or modify details such as tags, categories, and statuses directly within the grid for efficient FAQ management.
To learn more about the Grid View, click here.
Accessing Published FAQs
Your customers or contacts can view the FAQ in the Customer Portal and in the Live Chat widget on your website. Let us learn about them in detail.
Customer Portal
The customer portal has all the information that might interest the customers of an organization. It is the one-stop destination for your customers to create a case, view the status of their cases, access the FAQ, etc.
Giving customers access to the customer portal: To give customers access to the portal, you must enable the Portal User field in Contacts. When you do this, your customers will receive credentials at their contact email address, using which they can log in to the customer portal.
To learn more about the Customer Portal, click here.
Live Chat widget
The Live Chat widget provides quick help to your customers. Your customers can type in their queries, and the Chat widget will refer to your FAQs and provide them with the relevant answers. Your customers can also talk to an agent from the Live Chat widget. For your customers to use Live chat, you must enable the Live Chat widget on your website. The Live Chat widget will be hosted on your website, through which the customers can seek help.
To learn more about Live Chat, click here.