Articles in this section
LMS Instructor Console
Introduction
Vtiger CRM’s LMS is a training tool that is built into the CRM. It helps you:
- Add and manage content (videos, documents, PowerPoints, etc.) in the form of lessons, courses, quizzes, etc.
- Publish and manage content as courses on a portal for customers and the public.
- Publish and manage content as concepts in the CRM for your employees.
- Manage and track users who use the content.
LMS Interfaces
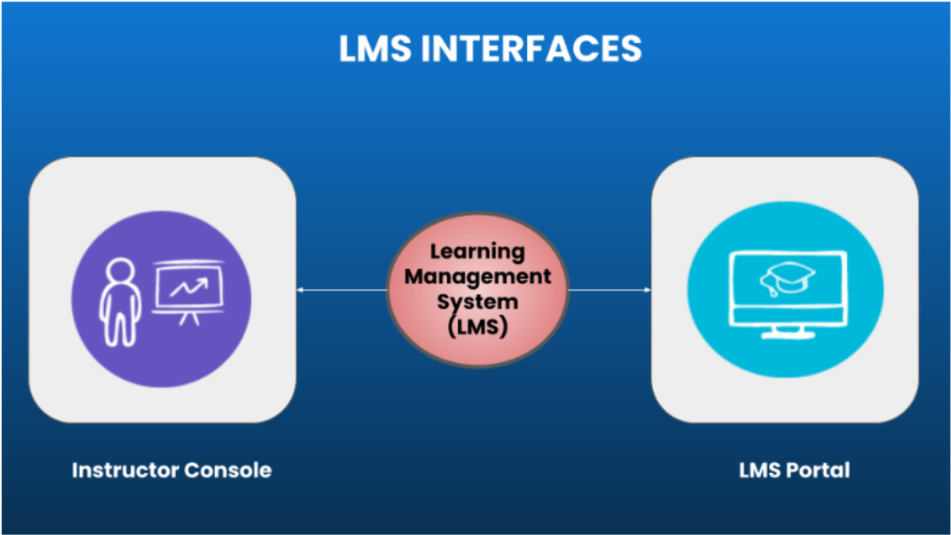
Vtiger CRM LMS has two main interfaces - the Instructor Console and the LMS Portal. Vtiger CRM users (Admin and Non-Admin users) have access to both the Instructor Console and LMS Portal. They can create and publish courses and concepts, exercises, quizzes, and questions via the LMS Instructor Console. Non-Vtiger CRM users who have been added as Contacts can access only the LMS portal and access published content (like a course).
LMS Instructor Console
- You can use the Instructor Console to create and publish learning content or courses. You can publish courses, concepts, exercises, quizzes, and questions. Content can be in the form of videos, documents, PowerPoint presentations, etc. The content that you publish from the Instructor Console is displayed in the LMS Portal.
- It helps you create or link concepts, exercises, quizzes, and questions for a course. Published courses in the Instructor Console are displayed in the LMS Portal.
- You can be an instructor or a course creator, or any CRM user who wants to share content.
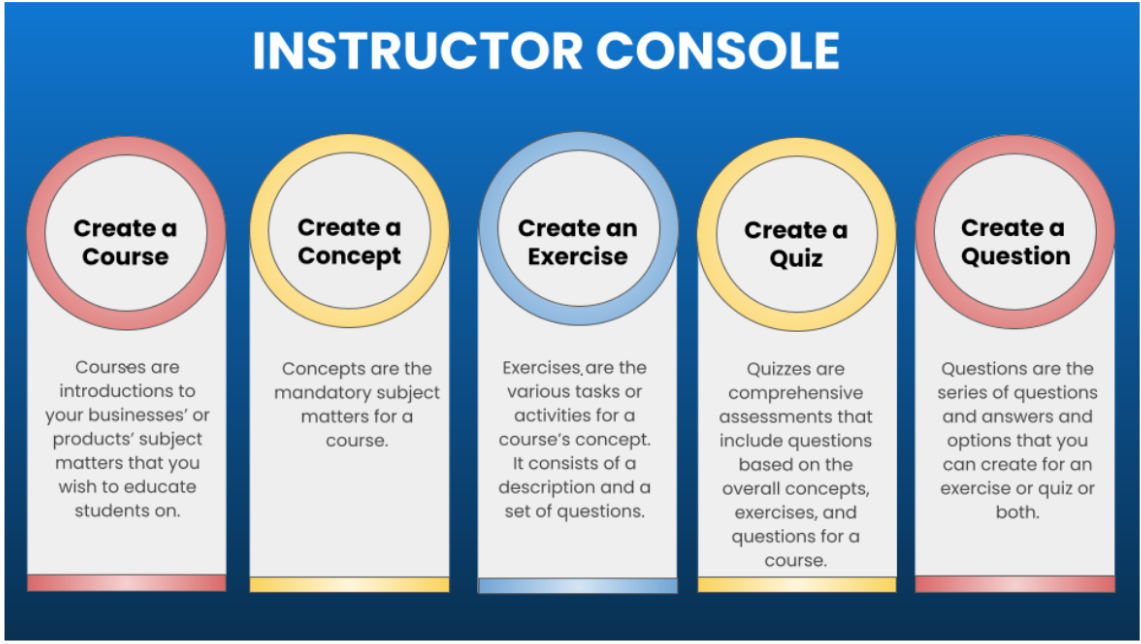
- These key components come with their own modules:
- Courses - Lets you create an introduction for a course.
- Concepts - Lets you create concepts for a course.
- Exercises - Lets you create exercise questions for a course’s concepts.
- Quiz - Lets you create quiz questions for a course.
- Questions - Lets you create questions for a course’s exercises or quiz.
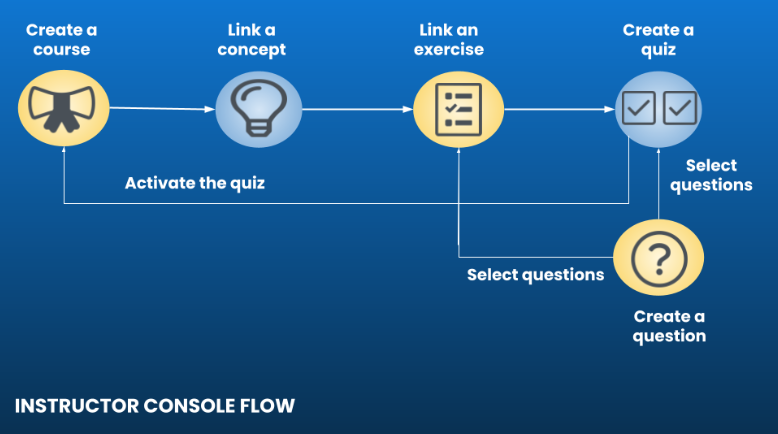
- The Instructor Console lets you publish the different components of a course, as shown below:
Features
Using Instructor Console, you can:
- Create customized training programs.
- Create a repository of learning content by publishing courses, concepts, exercises, quizzes, and questions anytime.
- Link multiple concepts, exercises, quizzes, and questions for a course.
- Upload embedded video content for courses.
- View automated maximum score allocation for exercise or quiz questions.
- Review answers for exercise or quiz questions submitted by students.
- Allot scores to answers for exercise or quiz questions submitted by students.
- Choose difficulty levels for questions such as Easy, Medium, and Difficult.
- View automated Weightage% allotted for a question based on its difficulty level.
- Customize passing thresholds for exercises and quizzes.
- Activate or inactivate a quiz for a course.
- Add course completion certificates.
-
In this article, you will learn about the:
- Installing the LMS Add-on
- Using the Instructor Console
- Viewing Courses
LMS Portal
- The student console is called the LMS Portal. It is for students to log in and access content to learn. Students can be your employees or customers. They can enroll for a course from the LMS Portal. For certification courses, students are awarded an accredited course completion certificate.
- Vtiger LMS allows the following types of students to enroll:
- Users - Vtiger CRM users (Admin or Non-Admin users) who can access it via the CRM.
- Contacts - Customers, Leads, or non-Vtiger CRM users who are added as Contacts to Vtiger CRM. The LMS Portal is accessible to Contacts via the LMS Portal link.
- You can share the LMS Portal link with your contacts via email, through the company website, etc.
- Note: You can also share the LMS Portal link via individual emails, workflow emails, and your business accounts on social platforms such as Facebook, Twitter, WhatsApp, etc.
- The LMS Portal link is ‘yourcrminstanceURL/myapps/lms’. For instance: https://vtigerecs.od1.vtiger.com/myapps/lms/
- Once a contact clicks the LMS Portal link, they will be directed to the LMS Portal.
LMS Components
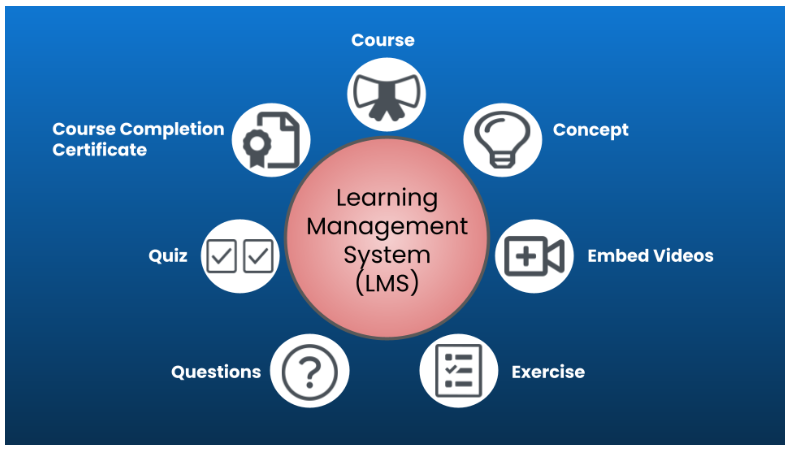
The LMS allows you to publish content through different components, which come with their own modules. The LMS Components are:
- Course - Courses are subjects or topics you want to educate your employees or customers about.
- Concept - Concepts are chapters or lessons with detailed explanations or descriptions that make up a course.
- Embedded Videos - You can add concepts to a course in the form of videos. You can embed a concept video URL and publish it for a course.
- Exercise - Exercises are the questions-answers learning or practice activities created at the concept level.
- Quiz - A quiz is an overall assessment of a course based on the course introduction, concepts, and exercises for a course.
- Course Completion Certificate - Course completion certificates are accredited certificates awarded to students on successful completion of a course. These are print template certificates that you can add to a course. This will be available in the LMS Portal for students to download once they complete a course.
LMS Tree Structure
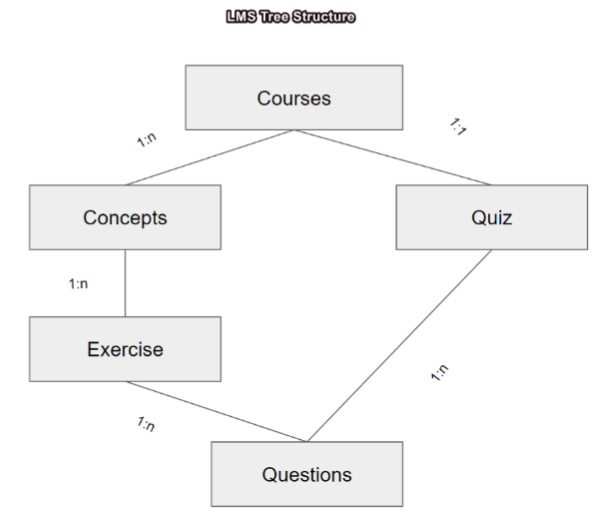
You will understand the relationship between different LMS components and how they are linked together. Vtiger CRM LMS has the following tree structure:
- Course - A course consists of concepts (lessons). It can have multiple concepts and it can be published independently.
- Concepts - A concept or a lesson discusses a subject and may consist of multiple exercises. You have to link a concept to a course to publish it on the portal. Alternatively, you can also publish a concept individually as a course if you do not want to add it to a course.
- Exercises - An exercise consists of multiple questions, and exercises are added to a concept. You have to link an exercise to a concept to publish it.
- Quiz - A quiz consists of multiple questions and is linked to a course. A course can have only one quiz. You have to link the quiz to a course and activate the quiz to publish it.
- Questions - You can add as many questions and link them to an exercise, a quiz, or both. You can add questions in the following formats:
- Multiple choice questions
- Radio button
- Text/descriptive
- Checkboxes
- Agree/Disagree
Key Terminology
| Key Term | Definition |
| LMS | LMS is a software application that helps you publish content, manage training programs, and track user progress. It is an online tool that facilitates the hosting of learning activities and training management. |
| Instructor Console | The Instructor Console helps you create courses. It helps you create or link concepts, exercises, quizzes, and questions for a course. Published courses in the Instructor Console are displayed in the LMS Portal. |
| LMS Portal | Vtiger CRM’s LMS Portal is a learning platform for students or learners. Published Courses by LMS course creators are displayed here. |
| Course | Courses are subjects or topics you want to educate your employees or customers about. |
| Concept | Concepts are chapters or lessons with detailed explanations or descriptions that make up a course. |
| Exercise | Exercises are the questions-answers learning or practice activities created at the concept level. |
| Quiz | A quiz is an overall assessment of a course based on the course introduction, concepts, and exercises for a course. |
| Question | You can add questions to your Exercise or Quiz for every lesson in the LMS. |
| Course Completion Certificate | They are certificates that you can add to a course and award to students who complete a course. |
Installing the LMS
To access the LMS Admin users must first install the Vtiger LMS Extension from Vtiger’s Extension Store.
Follow these steps to install the Vtiger LMS Add-on:
- Log into your CRM account.
- Click the Main Menu.
- Click Add-ons on the bottom left corner of the screen. The Add-ons page opens.

- Look for the Vtiger LMS Extension.
- Click Install.
- Click Yes to confirm.
After successful installation, you will see a success message on the top right corner of the screen. You can access LMS in the Main Menu > Apps > LMS.
Using the Instructor Console
In this section, you will learn how to use the Instructor Console to publish a course.
Publishing a course in the Instructor Console involves the following:
- Publishing a Course
- Linking and publishing a concept for a course
- Creating, linking, and publishing an exercise for a course
- Creating, linking, and publishing a quiz
- Activating a quiz for a course
- Creating and adding questions
Publishing a Course
Courses are the subjects or topics about your products or services that you wish to educate students on. They can also be other subjects like soft skills, company policies, etc.
Publishing a course in the Instructor Console involves the following:
- Adding concepts, exercises, and quizzes to a course
- Adding and uploading content in the form of text, audio, and video (embed video) files.
- Adding categories for your courses.
- Viewing exercise or quiz responses once students start the course in the LMS Portal.
- Provide Certification:
- Provide a course completion certificate to students on successful completion of a course.
- This will be available for students in the LMS Portal to instantly download once they complete a course.
Note: A course need not have concepts all the time. You can publish a course without a concept or a quiz.
Publishing a Course Without a Concept
Step 1: Adding a course without a concept
Follow these steps to add a course:
- Log in to your CRM account.
- Click the Main Menu.
- Go to LMS.
- Click Courses. The Courses List View Opens.
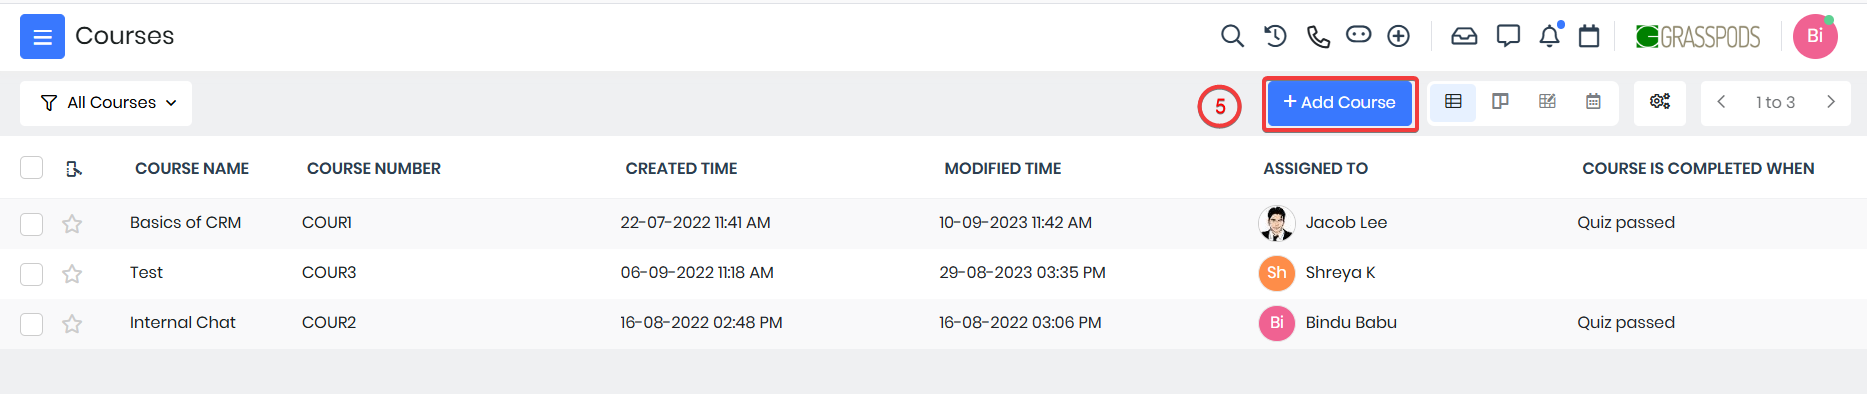
- Click + Add Course. The Add Course window opens.
- Note: You can fill in the details in the Add Course window and revisit it later to add other information. Or, you can click View Full form to display the full form and enter all the details related to a course.
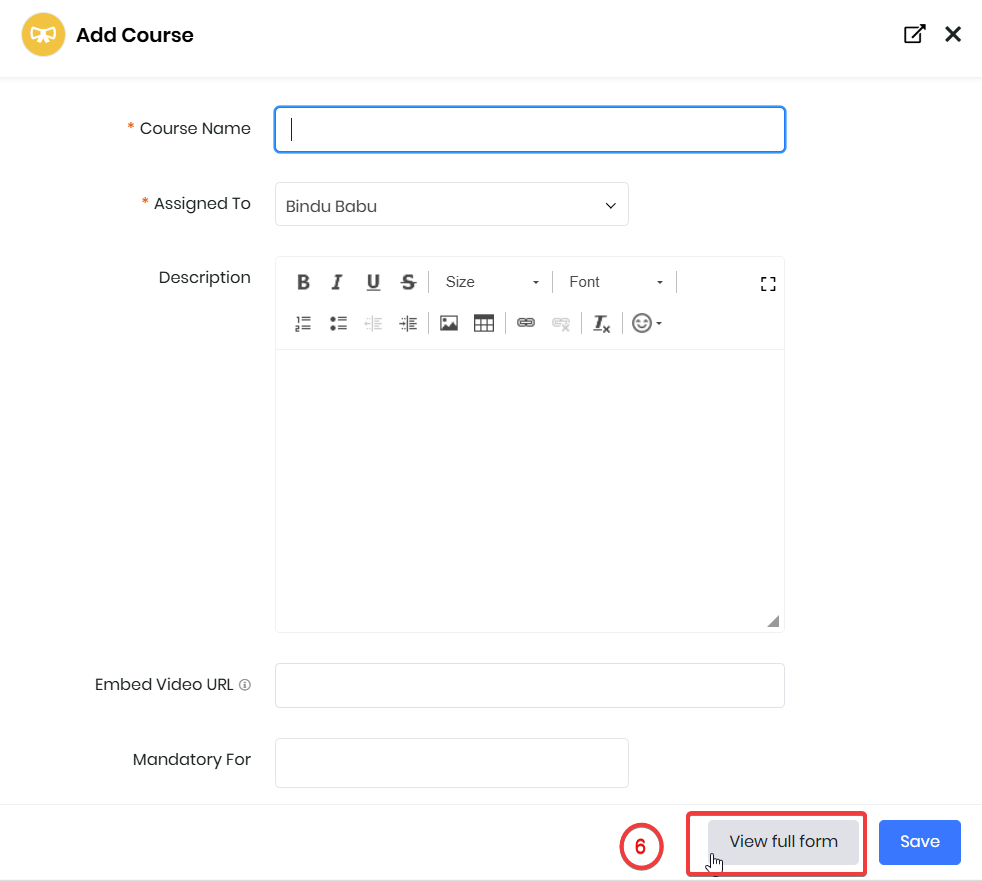
- Click View Full Form. The Creating Course window opens.
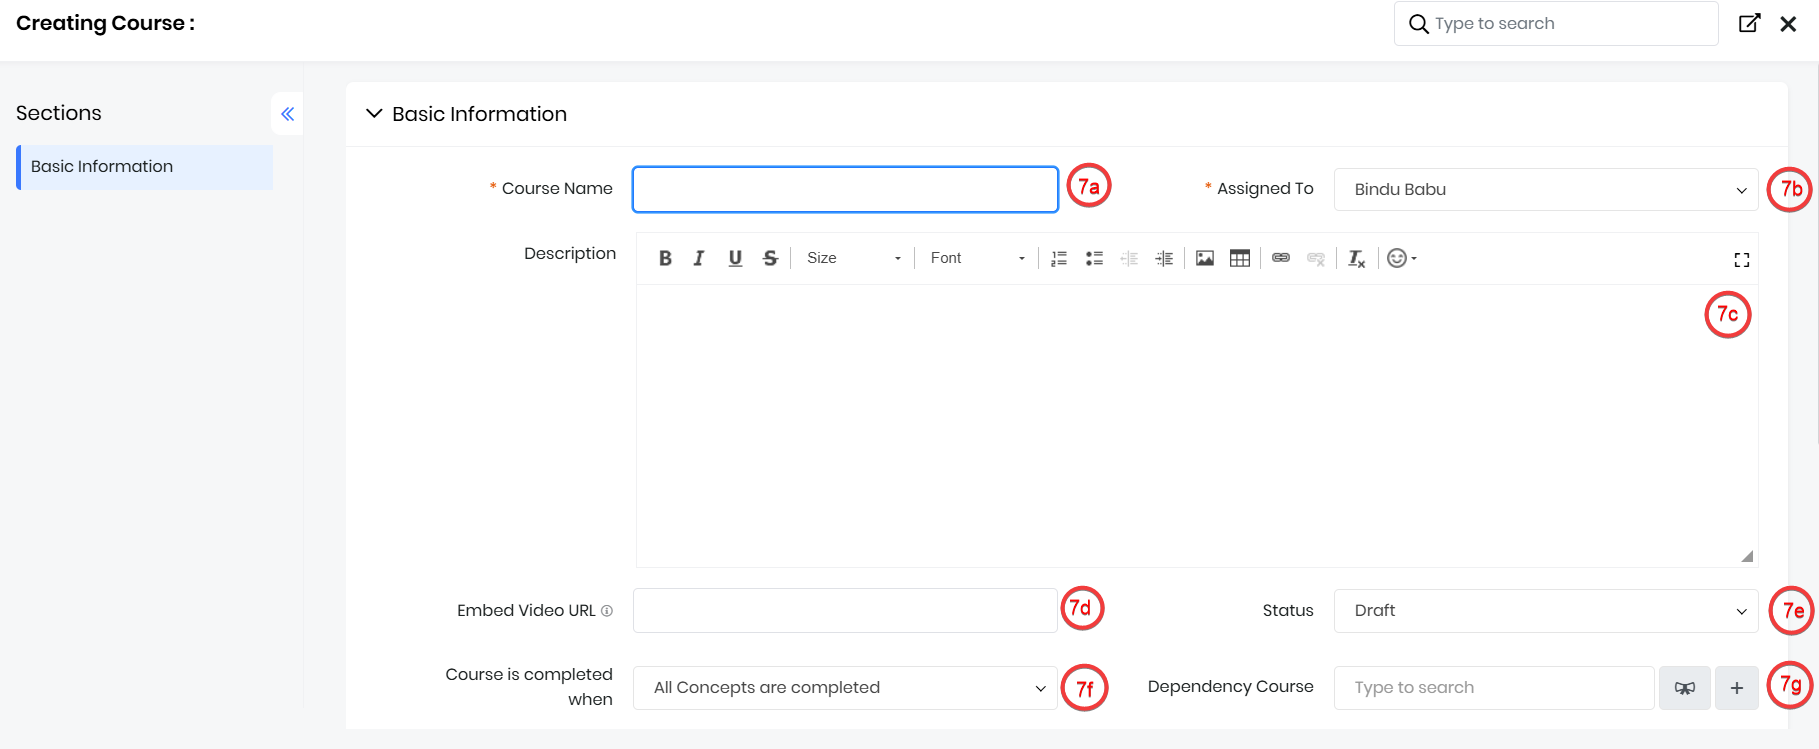
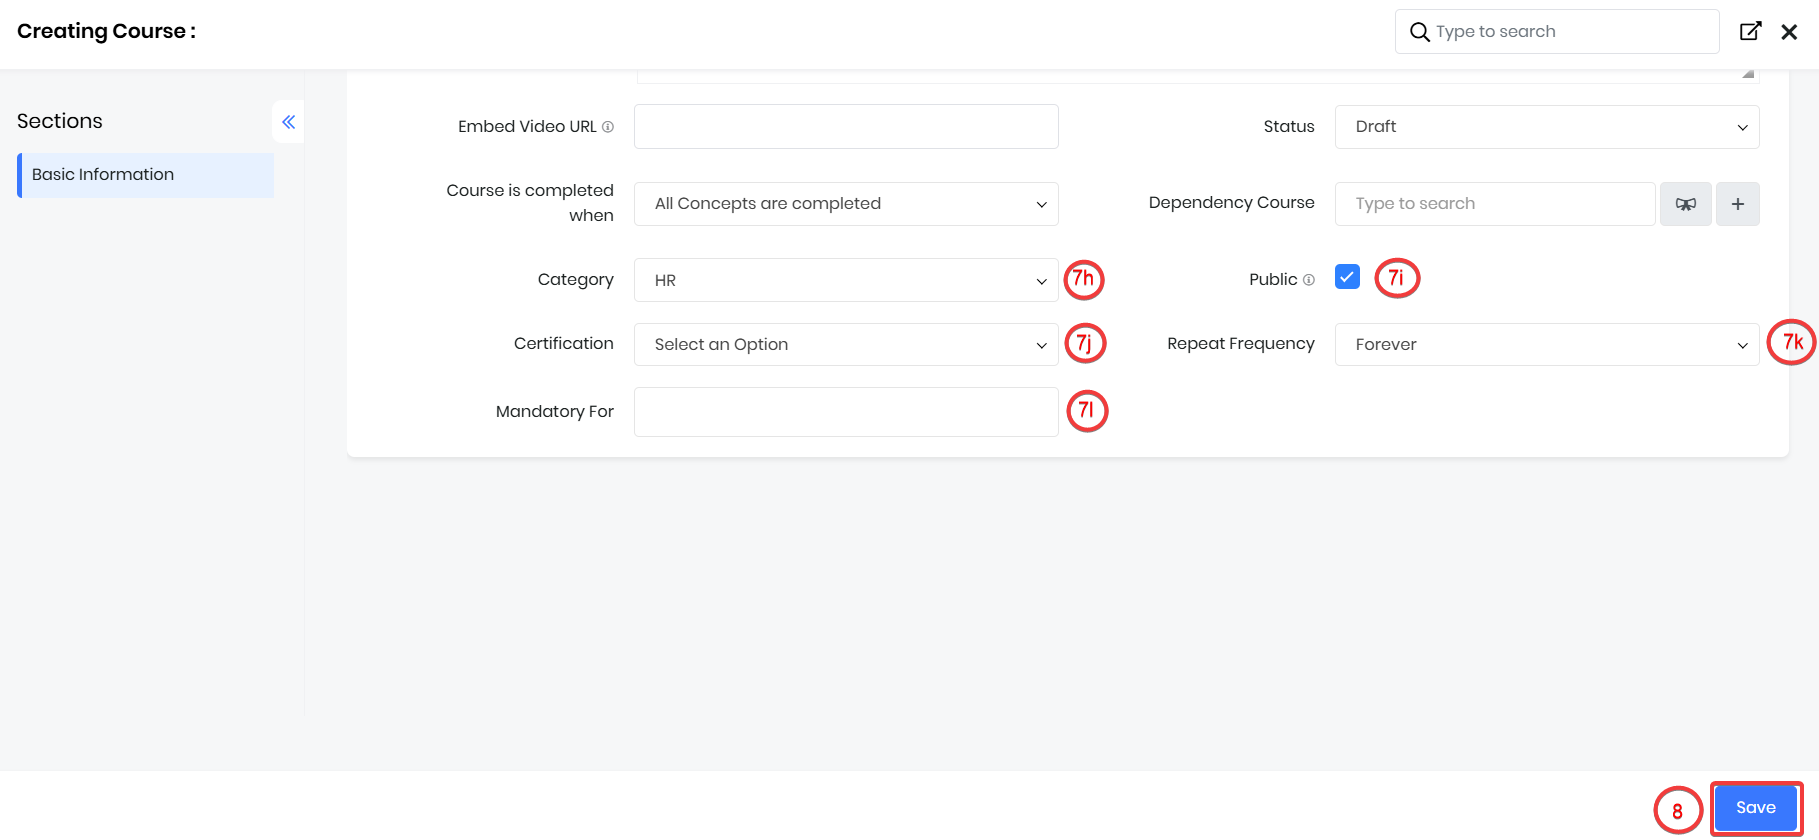
- Enter or select the following information in the Basic Information section:
- Course Name - Name of the course.
- Assigned To - Owner of the course.
- Description - Description of the course.
- Embed Video URL - Embed the video URL of the course video.
- Status - Select one of the statuses below:
- Draft - Save the course and edit it later.
- Published - Publish the course.
- Inactive - Save the course, but save it in the inactive status.
- Course is completed when - Select one of the following conditions to decide when a student has completed the course:
- Complete all concepts - Completes all concepts for the course.
- Pass the quiz - Passes the quiz for the course.
- Complete all concepts & pass the quiz - Completes all concepts and passes the quiz for the course.
- Dependency Course - This is the course that has to be completed before taking up a course.
- Category - The category to which the course belongs. These course categories will be displayed on the LMS Portal homepage.
- Public - Check this box if you want the course to be available for both users and contacts. Unchecking this will make the course private and available only to contacts.
- Certification - The course completion certificate print template is created for the course.
- Mandatory For - The user or group who should compulsorily take up the course.
- Repeat Frequency - The number of times users can retake the course.
- Click Save.
You have now successfully added a course. At this stage, you can add concepts (lessons), exercises, etc., or you can publish the course by directly adding a video by embedding it.
Step 2: Publishing a Course
Follow these steps to publish a course:
- Log in to the CRM.
- Click the Main Menu.
- Go to LMS.
- Click Courses. The Courses List View Opens.
- Click the course you want to publish. The Summary View of the course opens.
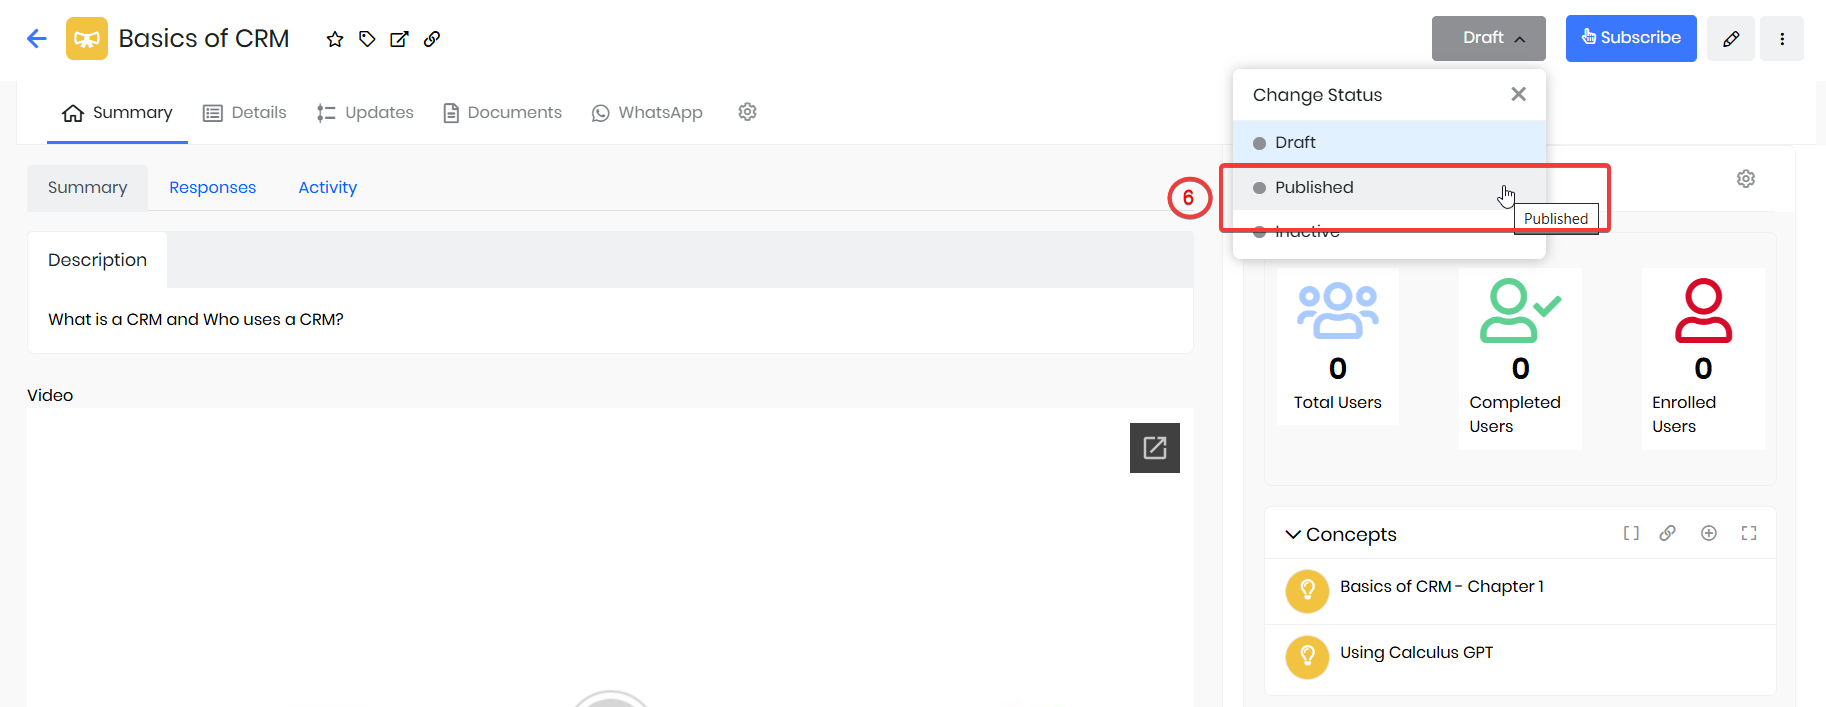
- Click the Status drop-down.
- Note: A course will be in Draft status before it is published. Only published courses are available on your portal.
- Change the status to Published.
The published course will now be available on the LMS Portal.
Adding Concepts to a Course
Concepts are lessons or chapters that discuss the subject in detail for a course. You can have multiple concepts for a course, and a course can have multiple exercises.
Note: You will have to first add questions in the Question module and link the questions to the Exercise, Concept, and Course.
Adding a concept
Follow these steps to add a concept:
- Log in to the CRM.
- Click the Main Menu.
- Go to LMS.
- Click Concepts. The Concepts List View opens.
- Click + Add Concept. The Add Concept window opens.
- Click View Full Form. The Create Concept window opens.
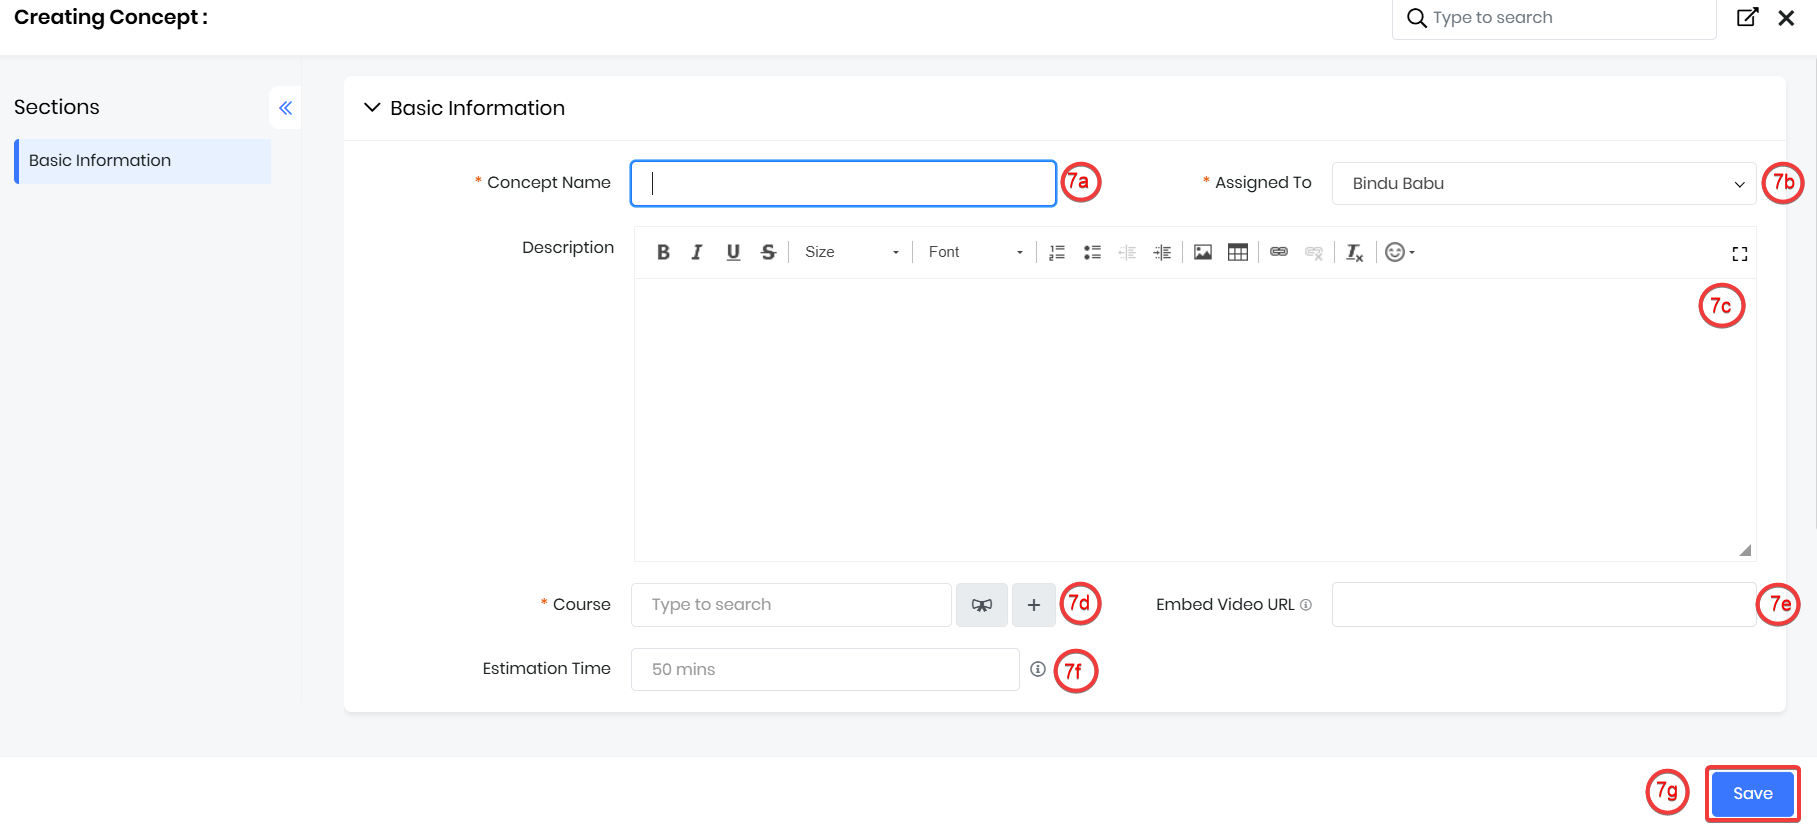
- Enter or select the following information in the Basic Information section -
- Concept Name - Name of the concept.
- Assigned To - Owner of the concept.
- Description - Description of the concept.
- Course - Select or create the course you are creating the concept.
- Embed Video URL - Embed the video URL of the concept video.
- Estimation Time - The duration the concept can be completed.
- Click Save.
After successfully adding a concept, you will see a success message in the top right corner of the screen. The Concept will also be displayed in the Concepts List View.
Adding an Exercise to a Concept
Exercises are assessments that you can add to a concept. You first need to add questions and link them to the exercise, concept, and course in the Questions module. You can add multiple questions to an exercise in different formats, such as:
- Question and answer (text)
- Multiple choice with a:
- Checkbox
- Dropdown
- Radio button
- Agree and Disagree
Exercise questions are of two patterns:
- Random - The LMS autoselects the specified number of questions from the Questions module.
- Fixed - You can select questions from the Questions module.
For an exercise:
- You can set a minimum pass percentage.
- Students can attempt multiple times to pass it.
- View responses for it
- Review submitted answers
- Allot scores for students' answers individually
In this section, you will learn about:
- Adding exercises to a concept
- Viewing responses, review, and allot scores for exercise questions
Adding an exercise
Follow these steps to add an exercise:
- Log in to your CRM account.
- Click the Main Menu.
- Go to LMS.
- Click Exercises. The Exercises List View opens.
- Click +Add Exercise. The Add Exercise window opens.
- Click View Full Form
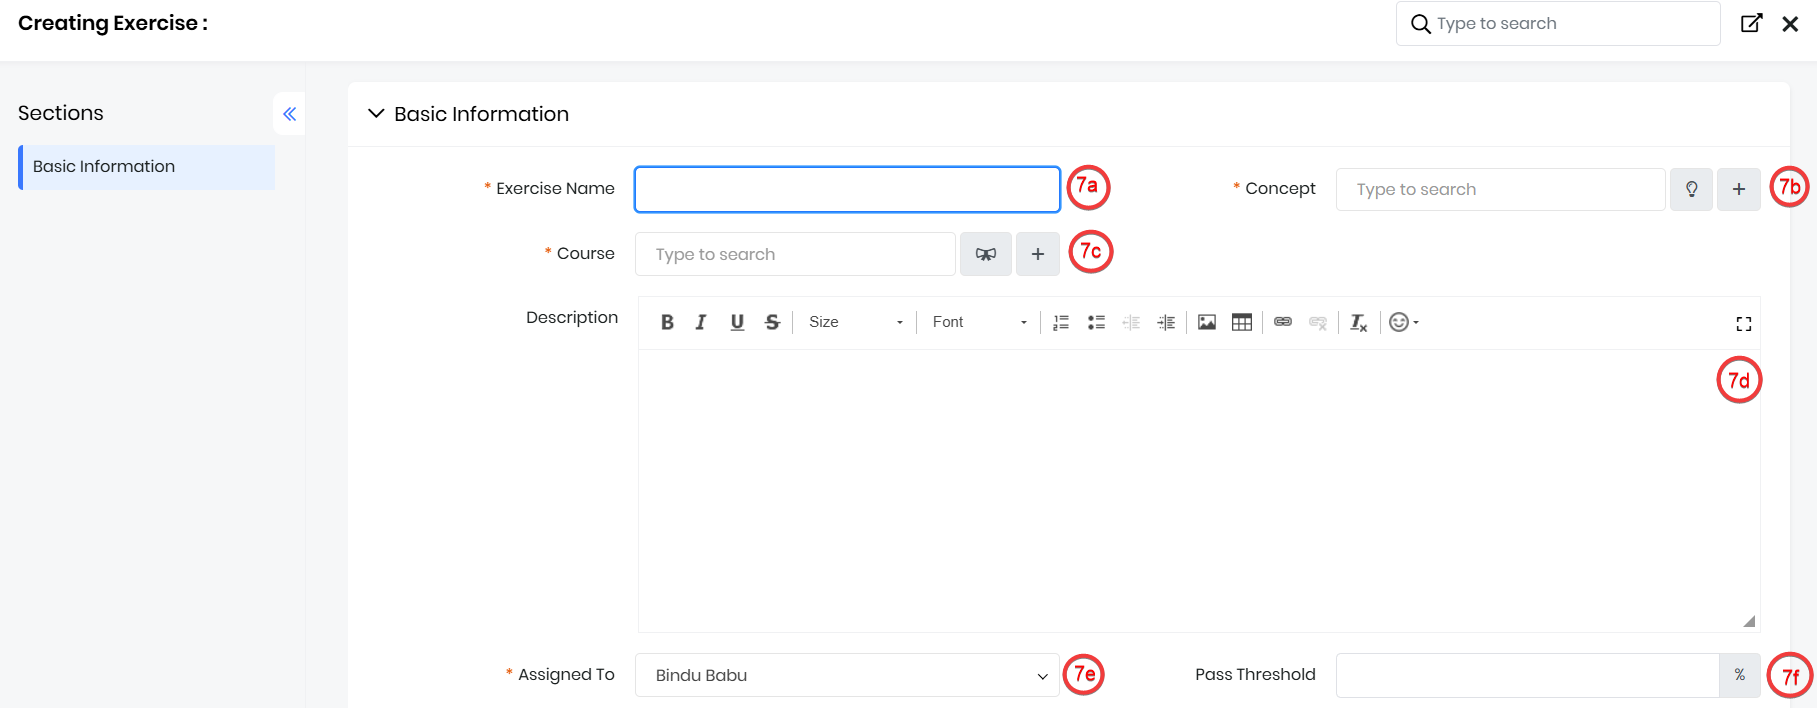
- Enter or select the following information in the Basic Information section-
- Exercise Name - Name of the exercise.
- Concept - Select or create a concept for which you are creating the exercise.
- Course - The related course is selected.
- Description - Description of the exercise.
- Assigned To - Owner of the exercise.
- Pass Threshold - The minimum pass percentage for students to pass the exercise.
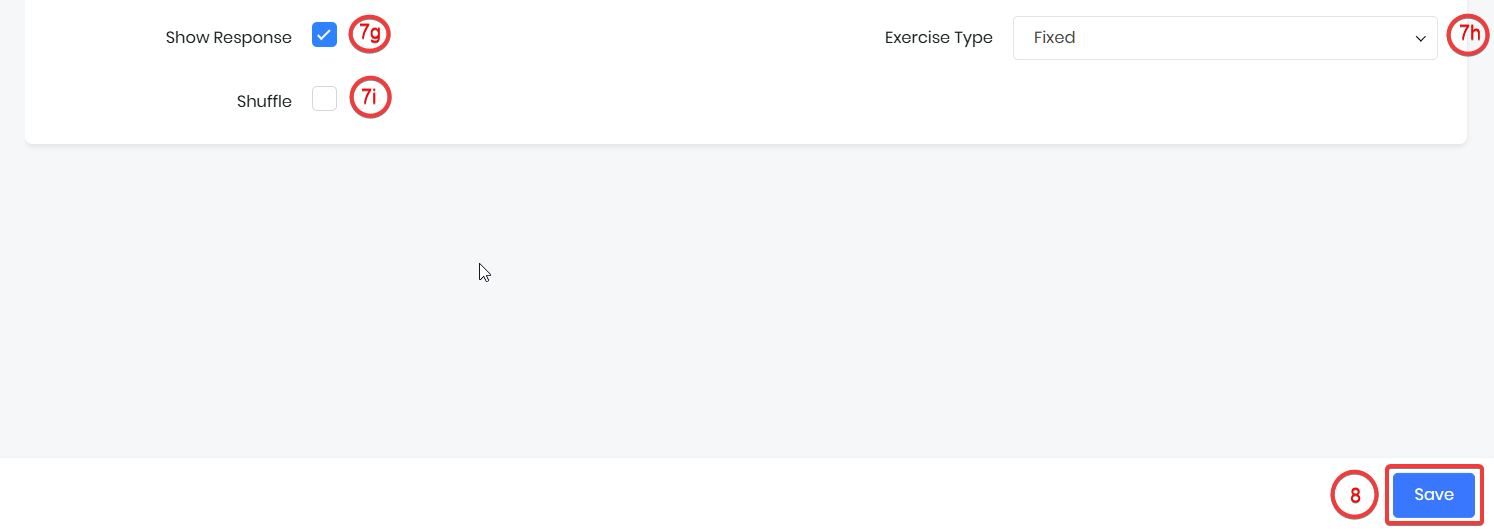
- Show Response - Enable the checkbox if you want students to view their responses after submitting the exercise.
- Exercise Type - Select one of the following options:
- Fixed - If you want to select questions of your choice for the exercise. If you select Fixed, you will have to go to the Summary View of the exercise record to select questions of your choice.
- Random - Select the Number of Questions that you want the system to select.
- Shuffle - Enable the checkbox if you want questions to be shuffled and displayed for the exercise each time a student attempts it in the LMS Portal.
- Click Save.
After successfully adding the exercise, you will see a success message in the top right corner of your screen.
Note:
- When you select the Random option, the CRM auto-selects and publishes questions only linked to the course and concept you chose for the exercise.
- Only questions with the Scope Exercise and Exercise & Quiz will be auto-selected.
Viewing Response for your Exercise
If you are an instructor or the administrator or the one who added an exercise, you will receive a desktop and email notification when students, in the LMS Portal, submit their answers for Textarea or File Upload exercise question types.Once you publish an exercise and students submit their answers, you can do the following in the Summary View of the Exercise record:
Linking an Exercise
Follow these steps to link an exercise to a concept:
- Log in to the CRM.
- Click the Main Menu.
- Go to LMS.
- Go to Concepts. The List View opens.
- Click on the Concept to which you want to link an Exercise. The Summary View opens.
- Click the Exercises tab at the top.
- Click the Link icon (Link Exercises). The Link Exercises window opens up.
- Select the required exercise.
- Click the Link button.
After successfully linking an exercise to a concept, you will see a success message on the top-right corner of the screen.
Adding Exercises
Follow these steps to add an exercise to a concept:
- Login to your CRM account.
- Click the Main Menu.
- Go to LMS.
- Click Concepts.
- Click on the Concept for which you want to add an exercise. The Summary View opens.
- Click the Exercises tab in the top menu bar.
- Click Add Exercise.
- Create an exercise.
- Enter or select the following information in the Basic Information section -
- Exercise Name - Name of the exercise.
- Concept - Select or create a concept for which you are creating the exercise.
- Course - The related course is selected.
- Description - Description of the exercise.
- Assigned To - Owner of the exercise.
- Pass Threshold - The minimum pass percentage for students to pass the exercise.
- Show Response - Enable the checkbox if you want students to view their responses after submitting the exercise.
- Exercise Type - Select one of the following options:
- Fixed - If you want to select questions of your choice for the exercise. If you select Fixed, you will have to go to the Summary View of the exercise record to select questions of your choice.
- Random - Select the Number of Questions that you want the system to select.
- Shuffle - Enable the checkbox if you want questions to be shuffled and displayed for the exercise each time a student attempts it in the LMS Portal.
- Click Save.
After successfully adding the exercise to the Concept, you will see a success message at the top right corner of the screen.
Viewing Exercises
Follow these steps to view exercises available for a concept:
- Log in to the CRM.
- Click the Main Menu.
- Go to LMS.
- Click Concepts.
- Click a concept. You will be directed to the Summary View.
- Select Exercises in the widgets bar on the right corner of the screen.
- Click the Record Lists icon. The Exercises window opens up. You can view the exercises available for the concept.
- You can perform the following actions:
- Link Exercises: Click to link an exercise.
- Add Exercises: Click to add an exercise.
Editing Exercises
Follow these steps to edit an exercise:
- Log in to your CRM account.
- Click the Main Menu.
- Go to LMS.
- Click Concepts.
- Click a concept. You will be directed to the Summary View.
- Select Exercises in the widgets bar on the right corner of the screen.
- Hover over an exercise you want to edit. The More icon pops up.
- Click the Edit icon. You will be directed to the Detailed View.
- Edit the exercise.
- Click Save. If your edits were saved successfully, the following success message is displayed: Record updated.
After successfully editing an exercise for a concept, you will see a success message on the top-right corner of the screen.
Unlinking Exercises
Follow these steps to unlink an exercise from a concept:
- Log in to your CRM account.
- Click the Main Menu.
- Go to LMS.
- Click Concepts.
- Click a concept. You will be directed to the Summary View.
- Click the Exercises tab in the top menu bar.
- Hover over an exercise you want to edit. The More icon pops up.
- Click the Unlink icon. The following pop-up is displayed: Are you sure you want to unlink?
- Click OK.
After successfully unlinking an exercise for a concept, you will see a success message on the top-right corner of the screen.
Adding a Quiz to a Course
A Quiz is a set of questions that you create for a course. It is a comprehensive assessment that includes questions based on the overall course content - course introduction, concepts, and exercises for the course. You can have only one quiz for a course. You need to activate a quiz for the quiz to be available for a course on the LMS Portal.
Quiz questions:
- Are of two types:
- Random - LMS autoselects the specified number of questions from the Questions module.
- Fixed - You can select questions from the Questions module.
- Have automated weightage % and maximum score allotted.
- Need to be added in the Questions module.
For a quiz:
- You can set:
- A minimum pass percentage.
- The number of times students can attempt it (retries).
- The wait time between every retry.
- Once students submit answers for it in the LMS Portal, you can:
- View responses for it
- Review submitted answers
- Allot scores for students' answers individually
In this section, you will learn how to:
- Add a Quiz to a Course
- Activate a quiz for a course
- Review quiz responses
- Review and allot scores for a quiz
Adding a Quiz to a Course
Follow these steps to create a quiz:
- Log in to your CRM account.
- Click the Main Menu.
- Go to LMS.
- Click Quiz. The Quiz List View opens.
- Click + Add Quiz.
- Enter or select the following information in the Basic Information section:
- Name - Name of the quiz.
- Assigned To - Owner of the quiz.
- Description - Description of the quiz.
- Quiz Type - Select one of the following options:
- Fixed - If you want to select questions of your choice for the quiz. If you select Fixed, you will have to go to the Summary View of the quiz record to select questions of your choice. To learn how to select questions for a fixed quiz type, click here.
- Random - Select the Number of Questions that you want the system to select.
- Note: Selecting Random auto-selects and publishes questions only linked to the course and concept that you have chosen for the quiz. Only questions with the Scope Quiz and Exercise & Quiz will be auto-selected. To learn how to add questions and link them to a quiz, click here.
- Pass Percentage - The minimum pass percentage for students to pass the quiz.
- Shuffle - Check this if you want questions to be shuffled and displayed for the quiz each time a student attempts it in the LMS Portal.
- Course - Select or create a course you are creating the quiz.
- Wait Between Retries - The duration students should wait before they can re-attempt the quiz.
- Retries -The number of times students can re-attempt the quiz.
- Time Limit - The duration to complete the quiz.
- Show Response - Enable to show responses after the quiz.
- Click Save.
After successfully adding a quiz, you will see a success message in the top right corner of the screen.
Publishing a quiz
Once you create a quiz, you will have to activate it to publish it for a course in the course’s One View.
Note:
- You can add questions and create a quiz, but it won’t be available for students till it is activated.
- You can always add and publish a quiz for a course at a later date and not simultaneously.
- The quizzes you create for a course are displayed under the course’s One View > Quiz.
Follow these steps to publish a quiz:
- Log in to your CRM account.
- Click the Main Menu.
- Go to LMS.
- Click Courses.
- Select a course for which you want to publish the quiz. You will be directed to the Summary View
- Click the Quiz Status dropdown on the required quiz record in the One View.
- Click Active to activate it.
After successful activation, you will see a success message in the top right corner of the screen.
Responses, Review, and Score Allocation for quiz questions
Once you publish a quiz question and students submit answers for it in the LMS Portal, you can do the following for it in the Summary View of the quiz record.
| Note: If you are an instructor, you will receive a desktop and email notification when students in the LMS Portal complete a quiz for a course. |
Reviewing responses for a quiz
You can view responses to a quiz from the Summary View of the selected quiz. The Summary View displays three tabs - Questions, Responses, and Review.
Viewing Responses
Once you publish a quiz and students submit their responses in the LMS Portal, you can view the responses in the Summary View of the quiz record.
Follow these steps to view responses for a quiz:
- Log in to your CRM account.
- Click the Main Menu.
- Click LMS
- Click Quiz.
- Select a quiz for which you need to review the responses. This takes you to the Summary View of the selected quiz. The Summary View displays three tabs - Questions, Responses, and Review.
- Click the Responses tab. The Response tab for a quiz displays the following details:
- Student Name - Name of the student.
- Student Type - Student type, User, or Contact.
- Submission Time - The time the exercise was submitted.
- Score - Student’s score for the quiz.
- Passed - Displays the following result for the quiz:
- Passed - This column displays a green tick mark if the student has passed the quiz.
- Failed - This column displays a red cross mark if the student has failed the quiz.
- Answers - Displays the Show Responses (Eye) icon for every student or user who has submitted the Quiz. Clicking on it will display the response details for the selected student.
- Click on the required response to see details:
- Question - Quiz questions.
- Answer - Student’s answer to the questions.
- Score - Student's score for a question.
- Maximum score - The maximum score for a question.
- Right Answers - Right answers to the questions.
Note: Responses are available only for published quizzes.
Reviewing Responses
Once you publish a quiz and students submit the quiz in the LMS Portal, you can view the review option for it in the Summary View of the quiz record.
Follow these steps to review:
- Log in to your CRM account.
- Click the Main Menu.
- Click LMS
- Click Quiz.
- Select a quiz. This takes you to the Summary View.
- Click the Review tab. Reviewing a quiz lets you view the following details of the student who has submitted the exercise:
- Student Name - Name of the student.
- Type - Student type, User, or Contact.
- Submission Time - The time the quiz was submitted.
- Name - Name of the quiz.
- Status - Displays:
- Need to Review - If you have yet to review and allot scores for students’ submitted answers to the quiz questions.
- Reviewed - If you have finished reviewing and allotting scores for students’ submitted answers to the quiz questions.
Reviewing and allotting scores for the Responses
If you have created a question that requires a student or user to submit an answer by typing out the answer, or requires them to upload a file. Once you publish a quiz and students submit the quiz in the LMS Portal, you receive it for review and allotting scores if the quiz questions are of the following question types:
- Textarea
- File upload
Note: For answers submitted by students for quiz questions with other question types, LMS auto reviews and allots scores based on the answers selected by the instructor in the Questions module > Answer field.
Follow these steps to review and allot a score for a quiz question:
- Log in to your CRM account.
- Click the Main Menu.
- Click LMS
- Click Quiz.
- Select a quiz. This takes you to the Summary View.
- Click the Review tab.
- Under Status, click Need To Review. You will be directed to the quiz window, where you can view:
- Score bar - To allot a score to a student’s answer:
- Click the score bar dropdown.
- Select a score ranging from 1 - 10.
- Click Save.
- Score bar - To allot a score to a student’s answer:
Note: For a quiz question, once you review and allot a score for a student’s submitted answer, you will not be able to edit it again. By default, the Status is set to Reviewed.
Adding Questions to a Concept and Quiz
Questions are a set of questions and answers that you create for a concept or course. You can create questions for an exercise and a quiz and then link them to the concept or course you publish.
Scope
The Scope for a question lets you decide whether you want to create a question for an exercise, a quiz, or both. You have to first add all questions to the Questions module while selecting the Scope. By selecting the Scope, you decide whether a question will appear in an exercise or a quiz, or both.
Question Types
You can create questions of the following types (formats):
- Textarea: Consists of a textbox. Along with text formatting options.
- Radio: Consists of a list of options for a question with radio buttons.
- Checkbox: Consists of a list of options for a question with checkboxes.
- Dropdown: Consists of a dropdown with options for a question.
- AgreeDisagree: Consists of an AgreeDisagree bar with various Agree/Disagree options for a question.
- File Upload: Lets you upload files (text, audio, and video).
Reviewing responses to questions
- For question types Textarea and File Upload:
- Instructors will have to manually review and score answers submitted by students in the LMS Portal.
- For other question types:
- LMS auto reviews and scores answers against the options you have recorded.
Questions Formats
- Questions have three types of difficulty levels:
- Easy
- Medium
- Difficult
- Automated weightage % and maximum score allotted.
- For a question, you must select the following for it:
- Question type
- The right answer
- Options
Note: For question types, Textarea, and File Upload, selecting the right answer and options is not required.
Weightage % for a Question
Weightage% is by default calculated by LMS and updated based on the difficulty level of the question. The weightage % for the difficulty levels of questions is as follows:
- Easy - difficulty level (auto-generated)
- Medium - difficulty level doubles
- Hard - difficulty level triples
For instance, the weightage % for three selected questions, with the below difficulty levels, are as follows:
- Easy - 10%
- Medium - 20% (10 * 2)
- Hard - 30% (10 * 3)
Irrespective of the number of questions you select, LMS always equalizes the overall weightage % of questions for an exercise to 100%.
Note:Choosing a difficulty level for a question will automate the weightage % for it. The automated weightage% is the maximum score% allotted for the question. The maximum score % for the question will be displayed in the LMS Portal if linked to published courses’ exercises or quizzes.
Adding Questions to Exercises and Quizzes
Note: Keep your questions and answers ready in a Google Document, Notepad, Word Document, etc.
Follow these steps to add a question:
- Log in to your CRM account.
- Click the Main Menu.
- Go to LMS.
- Click Questions.
- Click +Add Question.
- Enter or select the following information:
- Question Type - You can select and/or add questions in any of the formats below.
- Textarea - This is a question and answer format requiring the instructor to review and assess student responses.
- Enter your question - Type your question in the textbox.
- Radio – Multiple choice question with radio buttons for selection.
- Enter your question - Enter the question in the textbox.
- Enter Option - Enter the different multiple question options in the Enter Option textbox.
- Click +Add Option to add more options.
- Answer - Select the correct option (answer) from the drop-down.
- Checkbox - Multiple choice questions with checkboxes for selection.
- Enter your question - Enter the question in the textbox.
- Enter Option - Enter the different multiple question options in the Enter Option textbox.
- Click +Add Option to add more options.
- Answer - Select the correct option (answer) from the drop-down.
- Dropdown - Multiple choice questions with a drop-down for selection.
- Enter your question - Enter the question in the textbox.
- Enter Option - Enter the different multiple question options in the Enter Option textbox.
- Click +Add Option to add more options.
- Answer - Select the correct option (answer) from the drop-down.
- Agree/Disagree - Questions with five agree/disagree options.
- Enter your question - Enter the question in the textbox.
- Answer - Select the correct option (answer) from the drop-down options (Strongly Disagree, Disagree, Neutral, Agree, Strongly Agree)
- File Upload - This is a question-and-answer format requiring the instructor to review and assess student responses. Students will have to upload answers in any file format.
- Enter your question - Type your question in the textbox.
- Textarea - This is a question and answer format requiring the instructor to review and assess student responses.
- Scope - Select one of the following options.
- Exercise - If you want the question to be available only for the exercise.
- Quiz - If you want the question to be available only for the quiz.
- Exercise & Quiz - If you want the question available for both the exercise and quiz.
- Difficulty Level - Select one of the following difficulty levels for questions:
- Easy
- Medium
- Hard
- Note: Choosing a difficulty level for a question will automate the weightage % for it. The automated weightage % is the maximum score % allotted for the question.
- Course - Select or create the course you are creating the question.
- Concept - Select or create the concept for which you are creating the question.
- Assigned To - Owner of the question.
- Click Save.
After successful addition of a question, you will see a success message in the top right corner of your screen.
Automated maximum score allocation for a question
In this section, you will understand how LMS automates the maximum score allocation to a question.
Note: The maximum score% is the same as the maximum score for a question.
- Log in to your CRM account.
- Click the Main Menu.
- Go to LMS.
- Click Questions.
- Click +Add Question.
- Enter the required information.
- Choose a difficulty level for a question.
- The chosen difficulty level auto-calculates the weightage % for the question as follows:
- Easy - difficulty level (auto-generated)
- Medium - difficulty level doubles
- Hard - difficulty level triples
- Click Save.
Note:
- An automated weightage % is displayed for the question.
- The weightage % of the question is the maximum score % allotted for the question.
- The maximum score % for the question will be displayed in the LMS Portal if linked to published courses’ exercises or quizzes. It will be displayed in their respective question and response windows.
Evaluating answers to varied question types
Automated evaluation
Students in the LMS Portal submit their answers to exercise or quiz questions. LMS auto reviews and allots scores to students' submitted answers. This is based on the answers selected by the instructor in the Answer field while adding a question. This auto-evaluation is available only for the following question types:
- AgreeDisagree
- Checkbox
- Dropdown
- Radio
Instructor evaluation
Students in the LMS Portal submit their answers to exercise or quiz questions. The instructor reviews and allots scores to students' submitted answers. The student’s answer is reviewed and allotted a score in the Exercises or Quiz module > Summary View > Review.
As an instructor, you need to evaluate the following question types:
- File Upload
- Textarea
If you are an instructor, to learn how to evaluate the File Upload and Textarea question types, click here.
Using One View for Courses
The Courses One View displays concepts, exercises, quizzes, certification, and dependency courses linked to a course. You can also perform the following actions for each of these components in the One View:
- Link concepts, exercises, and quizzes to a course and other actions
- Add concepts, exercises, and quizzes
- View and edit certifications (if any)
- View and edit a dependency course (if any)
Actions available are:
- Link
- Add
- Sort
- View
- Edit
- Unlink
Note: You can customize what you can view in the One View of a course. To learn how to customize a module’s One View, click here.
Follow these steps to go to the One View of a course:
- Log in to your CRM account.
- Click the Main Menu.
- Go to LMS.
- Click Courses.
- Click a course for which you need to see the components. The Summary View opens.
- The One View section is displayed by default.
- Click One View in the widgets bar on the right corner of the screen if it is not.
You are now in the One View of a course. In the One View of a course record, you can perform the following actions:
- Linking concepts, exercises, and quizzes to a course and other actions
- Certification actions
- Dependency Course actions
Linking concepts
Follow these steps to link a concept to a course:
- Log in to your CRM account.
- Click the Main Menu.
- Go to LMS.
- Click Courses. The Courses List View opens.
- Click a course. The Summary View opens
- Click One View.
- Click the Link icon on the Concepts block. The Link Concepts window opens up.
- Select the required concept.
- Click the Link button.
After successfully linking a concept to a course, you will see a success message on the screen.
Adding concepts
Follow these steps to add a concept to a course:
- Log in to your CRM account.
- Click the Main Menu.
- Go to LMS.
- Click Courses. The Courses List View opens.
- Click a course. The Summary View opens.
- Click One View.
- Click the Add icon on the Concepts block.
- Create a concept. Here, the Course detail is auto-filled.
- Click Save. If the concept was saved successfully, the following success message is displayed: Concept Created!
Sorting concepts
Follow these steps to sort (reorder) concepts for a course:
- Log in to your CRM account.
- Click the Main Menu.
- Go to LMS.
- Click Courses. The Courses List View opens.
- Click a course. The Summary View opens.
- Click One View.
- Click the Sort icon on the Concepts block. The Concepts window opens up, which lists concepts available for the course.
- Drag and drop the Reorder icon to reorder concepts.
- Click Save. If the reordered concepts were saved successfully the following success message is displayed: Sequence updated successfully.
Viewing concepts
Follow these steps to view concepts available for a course:
- Log in to your CRM account.
- Click the Main Menu.
- Go to LMS.
- Click Courses. The Courses List View opens.
- Click a course. The Summary View opens.
- Click One View.
- Click the Record Lists icon in the Concepts block. The Concept window opens up.
- You can view the concepts available for the course.
It also provides the Link Concepts and Add Concepts buttons. Clicking these buttons, you can link or add concepts from the Concepts window.
Editing concepts
Follow these steps to edit a concept:
- Log in to your CRM account.
- Click the Main Menu.
- Go to LMS.
- Click Courses. The Courses List View opens.
- Click a course. The Summary View opens.
- Click One View.
- Hover your mouse over a concept that you want to edit. The More icon pops up.
- Click the Edit icon. You will be directed to the Detailed View.
- Edit the concept.
- Click Save. If your edits were saved successfully, the following success message is displayed: Record updated!
Unlinking concepts
Follow these steps to unlink a concept from a course:
- Log in to your CRM account.
- Click the Main Menu.
- Go to LMS.
- Click Courses. The Courses List View opens.
- Click a course. The Summary View opens.
- Click One View.
- Hover your mouse on a concept that you want to unlink. The More icon pops up.
- Click the Unlink icon.
After successfully unlinking a concept for a course, you will see a success message on the screen.
Note: The above actions and procedures illustrated for Concepts remain the same for Linking, Adding, Sorting, Viewing, Editing, and Unlinking Exercises and Quizzes for a Course in its One View.
Embedding a Video URL
If you are using a video in your course, you need to add or embed the video URL while creating the course. You can add videos at both the concept and course levels.
What is a video URL?
It is a URL (sometimes referred to as a link) you generate for a video. The URL can be used to publish the video on public platforms and portals for users to display and view.
What is embedding?
Embedding refers to integrating links, images, videos, gifs, and other content into social media posts or other web media. Embedded content appears as part of a post and supplies a visual element that encourages increased click-through and engagement. For example, the videos you see on YouTube, Vimeo, etc., are published only after you add or embed, or upload the video URL on these sites.
What is an embedded video URL in the LMS?
If you are creating a course with a video, you need to generate the URL and embed it in the course. When you publish a course, the video will be available on the introduction of the course.
Generating a Video URL
Once you have created a video you want to upload for a course, save the video on your system (your local device, like your laptop) or online (like Google Drive). Now, you can generate the URL for videos for both of these sources. You can also copy the URLs from videos published on platforms like YouTube or Vimeo.
Generating a URL for a Video Saved on your Drive
Follow these steps to create a video URL that you can embed for a course:
- Open the Drive location where you have the video uploaded.
- Note: If you have a video file in your local drive, upload it to your online storage drive.
- Double-click on the Play button.
- Click the More button on the top right corner.
- Click Open in new window.
- Click More in the new window.
- Click Embed item.
- Copy the highlighted part of the URL to a notepad.
Generating a URL for a video published on YouTube or Vimeo
Follow these steps to create a video URL that you can embed for a course:
- Go to the website where you have created the video. For instance, consider YouTube. Open YouTube.
- Play the video.
- Click Share. This takes you to the Share window.
- Click Embed. This takes you to the Embed Video window.
- Copy the highlighted part of the URL to a notepad.
You can add this video to your course or concept by pasting this URL in the Embed Video URL field.
Course Completion Certificate
In this section, you will learn how to create a course completion certificate. If you want to add a course completion certificate for a course, you should first create a course completion certificate print template in the Print Templates module in Vtiger CRM. Once you have created it, it appears under Certification for a course.
Follow these steps to create a course completion certificate print template:
- Log in to your CRM account.
- Click the Main Menu.
- Click Tools.
- Click Print Templates.
- Create a course completion certificate print template for the Courses module.
- Go to the Courses module.
- Create or select a course.
- Go to Certification.
- Select the course completion certificate.
- Click Save.
After successfully adding a course completion certificate for a course, you will see a success message at the top right corner of the screen.
Customizing a Course Category
In this section, you will learn how to customize course categories. The custom course categories you create will be displayed in the LMS Portal for students (users and contacts).
Follow these steps to customize a course category:
- Log in to your CRM account.
- Click the User Menu.
- Click Settings.
- Go to Configuration.
- Click Picklist Field Values.
- Select the information below:
- Select Module - Courses.
- Select Picklist in LMS Courses - Category.
- Click +Add Value.
- Enter or select the information below:
- Item value: Enter the name of the customized course category.
- Select color: Select a color if required.
- Click Save.
After successfully customizing a course category, you will see a success message in the top right corner of the screen.
To know more about Picklist Field Values, click here.
Viewing Responses for Published Courses
Once you publish a course and students begin the course in the LMS Portal, you can view responses for it in the Summary View of the course record.
Follow these steps to view responses:
- Log in to your CRM account.
- Click the Main Menu.
- Click LMS.
- Go to Courses.
- Select a course. This takes you to the Summary View.
- Click the Responses tab. Response for a course lets you view the following details of the student who has begun the course:
- Student name - Name of the student.
- Status - Course completion statuses:
- In Progress - When a course is in progress.
- Completed - When a course is completed.
- Progress - Course completion percentage.
Note: Responses are available only for published courses.
You have now successfully viewed responses for a course.
Publishing Questions for Exercise Type - Fixed
If you have published an exercise whose exercise type is fixed, then the next step is to select or link questions of your choice for the exercise. After you have published an exercise whose exercise type is fixed, you will be directed to its Summary View.
Follow these steps to select questions for an exercise:
- Log in to your CRM account.
- Click the Main Menu.
- Click LMS.
- Click Exercises.
- Select the required exercise from the List View.
- Click the Questions tab in the Summary View of the exercise record.
- Click the Select Questions button. You will be directed to the Link Questions window.
- Select the required questions by selecting the checkboxes beside the questions.
- Note: Only questions with the Scope - Exercise and Exercise & Quiz will be displayed in the Link Questions window.
- Click the Link button. You can drag and drop to rearrange the questions.
- Click Save.
If selected questions were saved successfully, you can see a success message in the top right corner of the screen. The selected questions will be displayed in the Summary View of the exercise record under Questions.
Viewing Responses for a Published Exercise
Responses
Once you publish an exercise and students submit it in the LMS Portal, you can view responses for it in the Summary View of the exercise record.
Follow these steps to view responses for an exercise:
- Log in to your CRM account.
- Click the Main Menu.
- Click LMS.
- Click Exercises.
- Select an exercise. This takes you to the Summary View.
- Click the Responses tab. The tab displays the following details of the student who has submitted the exercise:
- Student Name - Name of the student.
- Type - Student type, User, or Contact.
- Submission Time - The time the exercise was submitted.
- Attempted - Number of exercise questions attempted by the student.
- Correct Answers - Number of correct answers.
- Answers - Displays the Eye icon. Clicking it you will be directed to the window where you can view:
- Question - Exercise questions.
- Answer - Student’s answers to the questions.
- Score - Student's score for a question.
- Maximum score - The maximum score for a question.
- Right Answer - Right answers to the questions.
Note: Responses are available only for published exercises.
Review
Once you publish an exercise and a student submits the exercise in the LMS Portal. You can use the review option in the Summary View of the exercise record to view the responses.
Follow these steps to review an exercise:
- Log in to your CRM account.
- Click the Main Menu.
- Click LMS.
- Click Exercises.
- Select an exercise. This takes you to the Summary View.
- Click the Review tab. Review for an exercise lets you view the following details of the student who has submitted the exercise:
- Student Name - Name of the student.
- Type - Student type, User, or Contact.
- Submission Time - The time the exercise was submitted.
- Name - Name of the exercise.
- Status - Displays:
- Need to Review - If you have yet to review and allot scores for students’ submitted answers to the exercise questions.
- Reviewed - If you have finished reviewing and allotting scores for students’ submitted answers to the exercise questions.
Reviewing and Allotting Scores for Exercises
Once you publish an exercise and students submit the exercise in the LMS Portal, you receive it for review and allotting scores if the exercise questions are of the following question types:
- Textarea
- File upload
Note: For answers submitted by students for exercise questions with other question types, LMS auto reviews and allots scores based on the answers selected by the instructor in the Questions module > Answer field.
Follow these steps to review and allot a score for an exercise:
- Log in to your CRM account.
- Click the Main Menu.
- Click LMS.
- Click Exercises.
- Select an exercise. This takes you to the Summary View.
- Click the Review tab.
- Under Status, click Need To Review. You will be directed to the exercise window, where you can view:
- Questions - Exercise questions.
- Answers - Student's answers to the questions.
- Score bar - To allot a score to a student’s answer:
- Click the score bar dropdown.
- Select a score ranging from 1 - 10.
- Click Save.
Note: For an exercise question, once you review and allot a score for a student’s submitted answer, you will not be able to edit it again. The Status changes to Reviewed.
Publishing Questions for Quiz Type - Fixed
If you have created a quiz whose quiz type is fixed, then the next step is to select questions of your choice for the quiz. After you have created a quiz whose quiz type is fixed, you will be redirected to its Summary View.
Follow these steps to select questions for a quiz:
- Log in to your CRM account.
- Click the Main Menu.
- Click LMS
- Click Quiz.
- Select a quiz from the List View.
- Click the Questions tab in the Summary View of the quiz record.
- Click Select Questions. You will be directed to the Link Questions window.
- Select the required questions by selecting the checkboxes beside the questions.
- Note: Only questions with the Scope Quiz and Exercise & Quiz will be displayed in the Link Questions window.
- Click the Link button. You can drag and drop to rearrange the questions.
- Click Save.
If selected questions were saved successfully, the Success notification is displayed. The selected questions will be displayed in the Summary View of the exercise record under Questions.