Whitelisting Vtiger to Configure Gmail Inbox
Feature Availability
Vtiger Editions: One Pilot | One Growth | One Professional | One Enterprise | One AI
Introduction
Whitelisting in Vtiger CRM allows you to add specific email addresses or domains to an approved list, ensuring that emails from trusted sources are always delivered successfully.
This helps prevent important messages from clients, customers, partners, or internal teams from being incorrectly marked as spam or blocked by Gmail filters. By configuring whitelisting in G Suite, you can maintain reliable email communication and ensure that critical emails are never missed.
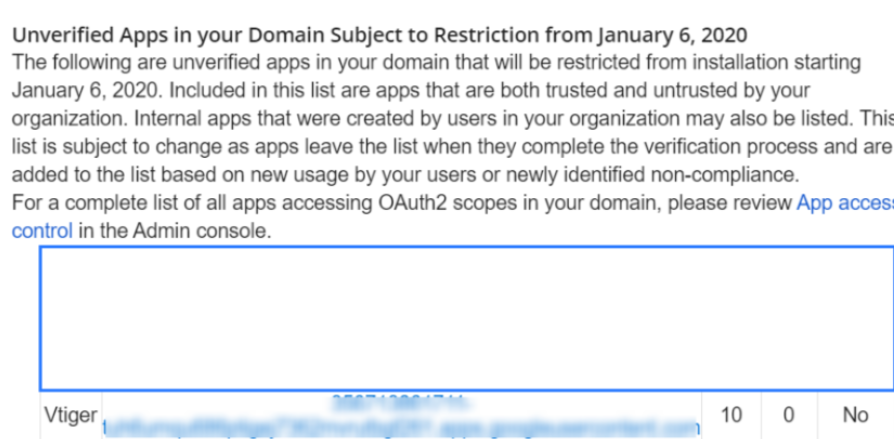
Note: From 6th January 2020 onwards, configuring Gmail Inbox 2-way sync with Vtiger will be unavailable if you have not Whitelisted Vtiger as a trusted app.
To learn more about Whitelisting, click here
Importance of Whitelisting Vtiger CRM on Google Workspace
Whitelisting Vtiger CRM in Google Workspace ensures that emails sent from the CRM system are delivered reliably to recipients' inboxes without being marked as spam or blocked by email filters.
This is particularly relevant for businesses that use Vtiger CRM to manage customer communications, sales processes, and other interactions via email.
Gmail Inbox 2-way sync
The Gmail Inbox 2-way sync feature in Vtiger lets you sync your Gmail emails with Vtiger and vice versa. This way, you can access your conversations in both Vtiger and Gmail. Also, emails coming to your Gmail ID will automatically be attached to CRM records when you enable Gmail 2-way sync.
Note: Google may send a notification stating that the app is unverified or subject to restrictions.
Benefits
The following are the benefits of Whitelisting:
- Reliable Email Delivery: Whitelisting ensures that emails sent from Vtiger CRM consistently reach recipients’ inboxes, including important messages like sales proposals, support responses, and business updates.
- Reduced Spam Filtering: By whitelisting Vtiger CRM, legitimate emails are less likely to be marked as spam or blocked by email filters.
- Improved Customer Engagement: Reliable email delivery helps maintain timely communication with customers, leading to better engagement and higher customer satisfaction.
In this article, you will learn about:
- Creating a new app
- Managing multiple third-party services
- Changing access to the third-party app
Key Terminology
|
|
|
|
| Whitelisting allows specific email addresses, domains, IPs, or apps to be trusted and delivered without restriction. |
|
| Google Workspace is Google’s cloud-based productivity suite that includes Gmail, Drive, Docs, Calendar, Chat, and Meet. |
|
| Gmail inbox two-way sync keeps emails and labels synchronized between Gmail and another application. |
|
| Spam filters automatically detect and block unwanted or suspicious emails from reaching the inbox. |
Adding a New App
You can log in to your Gmail account using your Admin credentials.
Follow these steps to add a new app:
- Log in to your Google Admin console, as shown above.
- Go to Security.
- Go to Access and Data Control > API Controls from the Admin console homepage.
- Click Manage Third-Party App Access.
- Click Add app.
- Click the OAuth App Name Or Client ID. The Configure an OAuth app window opens.
- Enter the following information in the App tab.
- Client ID: 356713861711-tuh6umqu686ptigej7362mvrutbgf261.apps.googleusercontent.com
- Click Search. The app name appears in the App name field.
- Click Select. You will be taken to the OAuth client IDs tab.
- Enable the OAuth Client ID checkbox. You will be directed to the Scope tab.
- Select the users for whom you want to configure access.
- Click Continue. You will be directed to the Access to Google Data tab.
- Click the Trusted option to access Google Data.
- Click Continue.
- Click Finish.
The new app will now be verified and shown in green.
Managing Multiple Third-party Services
Managing multiple third-party services allows you to maintain better visibility and control over connected applications. Follow these steps to manage multiple third-party services.
- Log in to your Google Admin console.
- Go to Security.
- Go to Access and Data Control.
- Go to API Controls from the Admin console homepage.
- Click Manage Google Services under App access control. The App Access Control window opens.
- Select Add a filter to filter this list. Select from the following criteria:
- Google services: Select a service from the list, such as Drive or Gmail, and click Apply.
- Google services access: Select Unrestricted or Restricted and click Apply.
- Accessed apps: Specify a range for the number of allowed apps and click Apply.
- Users: Specify a range for the number of users and click Apply.
Changing access to your Third-party app
You can change a third-party app’s access from Trusted to Limited or Blocked, depending on how much access you want to allow. This gives you easy control over which apps can access your system.
Follow these steps to change the access:
- Log in to your Google Admin console.
- Go to Security > Access and Data Control> API Controls from the admin console homepage.
- Select Manage Third-party Access. The App Access Control window opens.
- Click Change Access. You are taken to the Scope tab.
- Select the users for whom you want to configure access.
- Click Next. You will be taken to the Access to Google Data tab.
- Enable any of the radio buttons as per your access preference. Note: You can enable either Trusted, Limited, or Blocked access to Google data.
- Click Next. You will be taken to the Review tab.
- Review the information you have added or modified so far.
- Click Change Access.
Note:
- This configuration is only for G Suite and cannot be applied to other public (free) Gmail accounts.
- If you change an app's status from trusted to limited and it has no active users, it will be removed from the list. You must add it again, or a user must activate it.
To learn more about the Whitelisting process, click here.
Troubleshooting Tips
Here are some common issues users encounter while whitelisting Vtiger on G Suite.
-
An App is blocked error appears while setting up the outgoing email server or inbox using Gmail or Microsoft accounts.
Make sure the Vtiger IP address is whitelisted in your Gmail/Google and Microsoft Office account settings. This allows the app to connect successfully without being blocked.
To learn more about whitelisting Vtiger in your outgoing mail server, click here.
-
The app is still blocked even after whitelisting the Vtiger IP address.
Check if your browser or any Chrome extension is blocking the app. Try turning off extensions or using a different browser.