Articles in this section
Email Campaigns for Marketing
Feature Availability
Vtiger Editions: One Pilot | One Growth | One Professional | One Enterprise | One AI
Introduction
An email campaign is a planned sequence of emails sent to a targeted audience with a specific purpose, whether it’s to promote a product, nurture leads, or share valuable updates. Unlike standalone emails, campaigns are structured and often automated, helping businesses deliver consistent messages at the right time.
For example:
- A retail brand might design a holiday campaign with emails announcing discounts, highlighting bestsellers, and sending final reminders before the sale ends.
- A real estate consultancy could set up an autoresponder campaign that begins with a warm welcome email, followed by curated property listings, and later, a client success story.
- A software company may run a campaign to onboard new users, sharing setup guides, feature highlights, and webinar invites over a series of emails.
Email Campaigns in Vtiger CRM
Vtiger CRM allows you to create two types of email campaigns:
Regular
Regular email campaigns are the promotional emails that you send to your contacts. You can send them immediately or at a scheduled time. For example, if you are selling some of your products at a discount and you want to let your customers know, you can send them an email campaign.
Autoresponder Email Campaigns
Autoresponder email campaigns are the emails that you send in response to the contact's reaction to your previous email campaign. They are sent automatically when triggered at the scheduled date and time. You must set up trigger conditions, the date, and the time at which they must be sent.
For example, you send a Christmas offer to your customers through an email campaign. When they buy a product from the offer, you send them an autoresponder email with a Thank You note. The autoresponder is triggered automatically when they buy a product from the offer mentioned in the email.
Note:
- You can identify regular and autoresponder email campaigns by their icons.
- When you access the Email Campaigns page for the first time, you will be prompted to review and accept the terms and conditions before you can begin using email campaigns for marketing purposes.
Different Statuses of an Email Campaign
Regular Email Campaigns
The Status field of a regular email campaign can take the following values:
- Draft: When the campaign is created (drafted) but not sent or scheduled.
- Sending: When the campaign is sent but is yet to be delivered.
- Queued: When the campaign is scheduled.
- Completed: When the campaign is successfully sent
- Draft: When the campaign is created (drafted) but not sent.
- Started: When the campaign is started or sent at the selected time.
- Stopped: When the campaign is stopped.
Features of Email Campaigns
The key features of using Email Campaigns in Vtiger CRM are:
- Targeted Campaigns: Send emails to specific segments of leads, contacts, or organizations.
- Personalization: Use merge tags to insert dynamic details like recipient name, company, or custom fields.
- Predefined Templates: Design emails quickly with ready-to-use or custom templates.
- Scheduling: Plan and schedule campaigns to be sent at the right time.
- Bulk Emailing: Send emails to a large group of recipients at once.
- Tracking and Analytics: Monitor campaign performance with metrics like open rates, click rates, and bounce rates.
Benefits
The benefits of using email campaigns for marketing are:
- Reach and Targeting: Email campaigns instantly allow you to reach a large audience. With a well-maintained email list, you have the potential to connect with a broad base of customers, prospects, or subscribers who have shown interest in your products or services.
- Cost-Effective: Email marketing is more cost-effective than traditional methods like direct mail or print advertising.
- Targeted and Personalized Messaging: By sending personalized emails, you can create a more tailored and relevant experience for each recipient, increasing the chances of engagement and conversion.
- Increased Engagement and Customer Relationships: Email campaigns allow you to engage with your audience regularly.
- Prerequisites for sending an email campaign
- Creating a regular campaign
- Scheduling a regular email campaign
- Canceling or rescheduling a scheduled campaign
- Creating an autoresponder email campaign
- Duplicating an email campaign
- Managing email campaign credits
- Viewing campaign metrics
- Tracking email campaign performance
- Viewing email campaign reports
- Viewing customer touchpoints
- Troubleshooting tips for email campaigns
Key Terminology
|
|
|
|
|
|
|
|
|
|
|
|
|
|
|
|
|
|
|
|
|
|
|
|
|
|
|
|
|
|
Prerequisites for Sending an Email Campaign
Opt-in - A contact’s consent to receive emails
Before you send an email campaign, you must set the email opt-in required for delivery. When a contact opts in, it means that you have their consent to send them marketing emails.
Different Types of Opt-in
You can see the Email Opt-in field in a contact record. Here are the different values it can take:
- None: Set automatically when a contact’s primary email is edited or changed.
- Single opt-in (user): Set manually by a user when a contact agrees to receive marketing emails or automatically when a contact is created.
- Single opt-in (webform): Set automatically when contacts submit a web form with the email marketing checkbox selected.
- Double opt-in: Set automatically when a contact clicks the double opt-in email link.
- Opted out (user): Set manually by a user when a contact requests to opt out of email marketing.
- Opted out (contact): Set automatically when a contact unsubscribes from their email preferences page.
Opt-In Types that Allow Email Campaigns
Vtiger delivers email campaigns only to contacts with the opt-in set to:
- Single opt-in (user)
- Single opt-in (webform)
- Double opt-in
Note: You cannot send marketing emails to contacts with the Email Opt-in field set to None, Opted out (user), or Opted out (contact).
Double opt-in
A double opt-in is a confirmation of a subscriber’s wish to receive your email campaigns. To obtain the subscriber's confirmation, you must:
- Send a request confirmation email.
- Explain in the subject of the email that the subscriber must click the link in the email to permit you to send them marketing emails.
If the subscriber clicks the link in the email, they are double-opted in, confirming that they have agreed to receive email marketing. This ensures that you can legally send your marketing emails to them.
Follow these steps to set the required email opt-in:
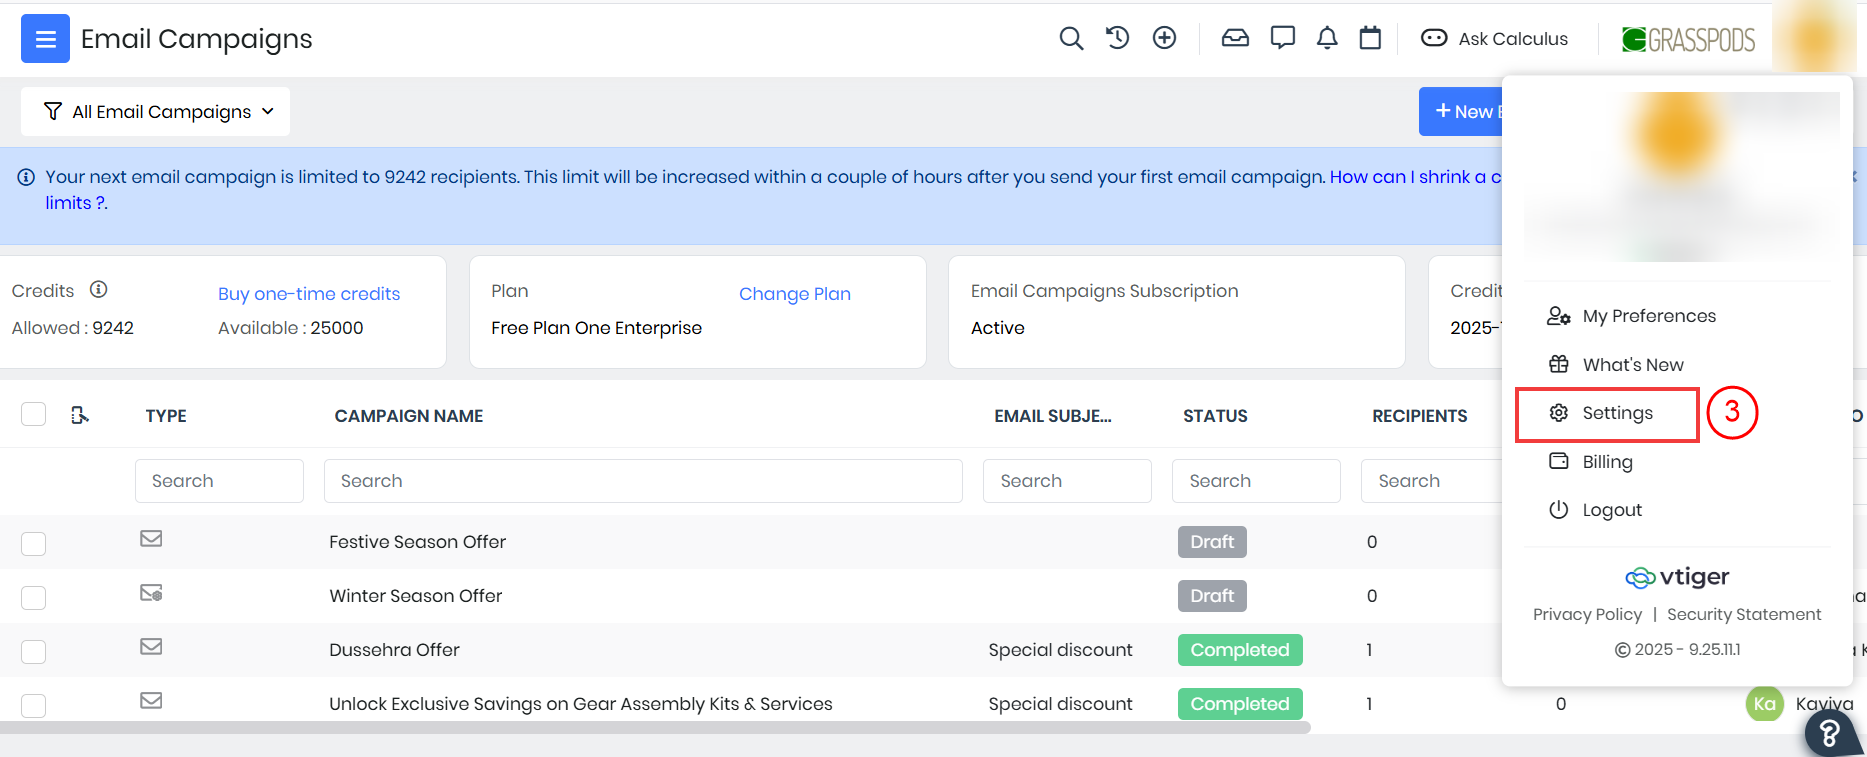
- Log in to the CRM.
- Go to the User Profile in the top right corner of the screen
- Click Settings. The Settings page opens.
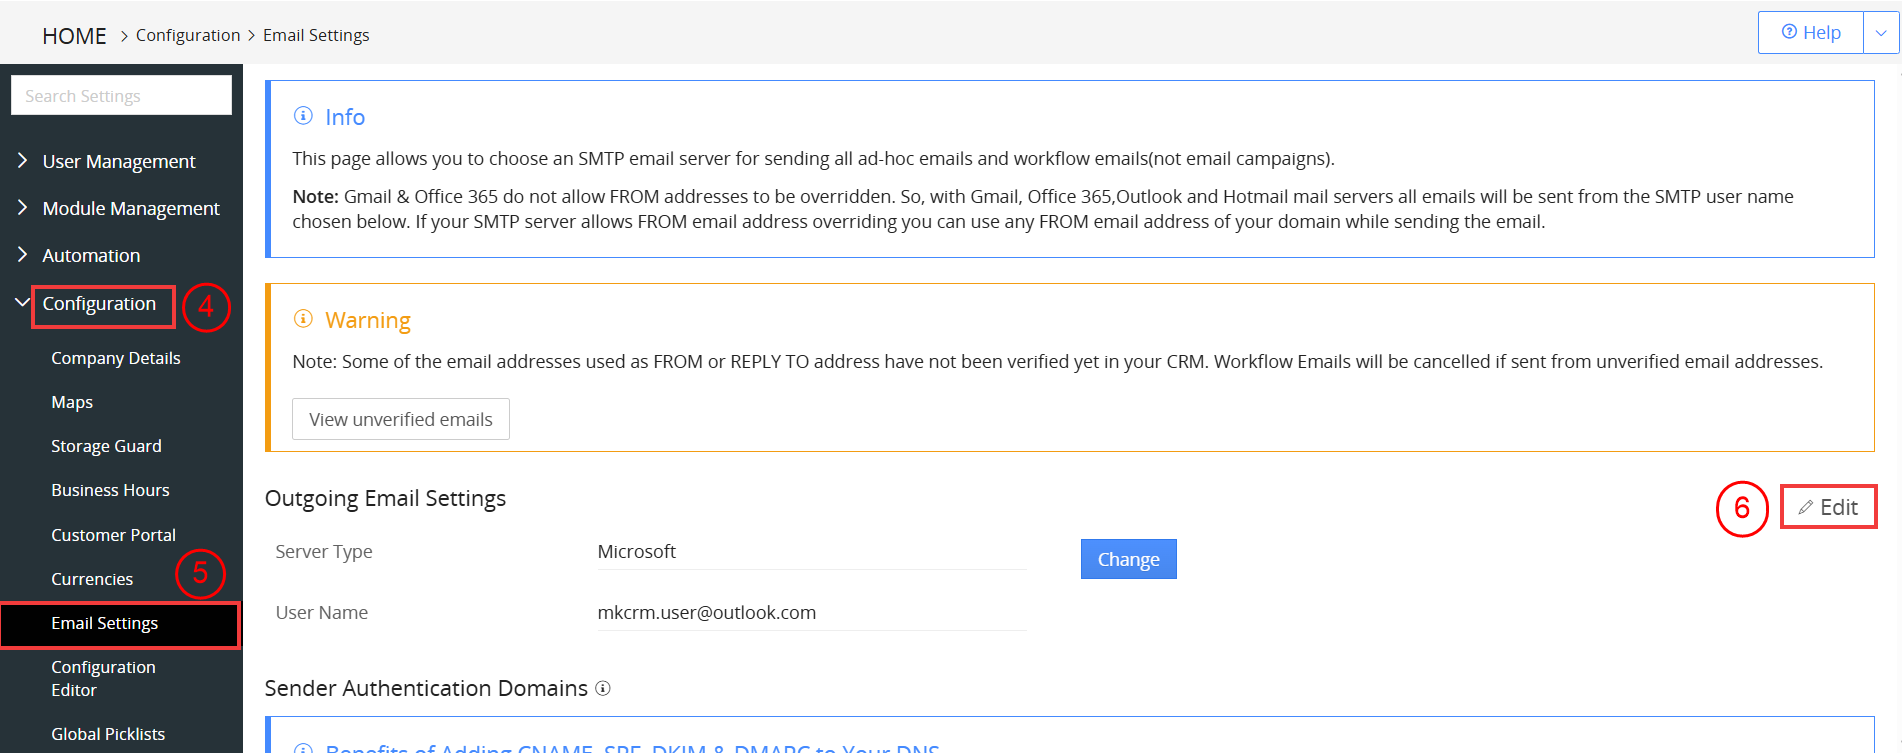
- Look for the Configuration section.
- Select Email Settings. The Email Settings page opens.
- Click Edit.
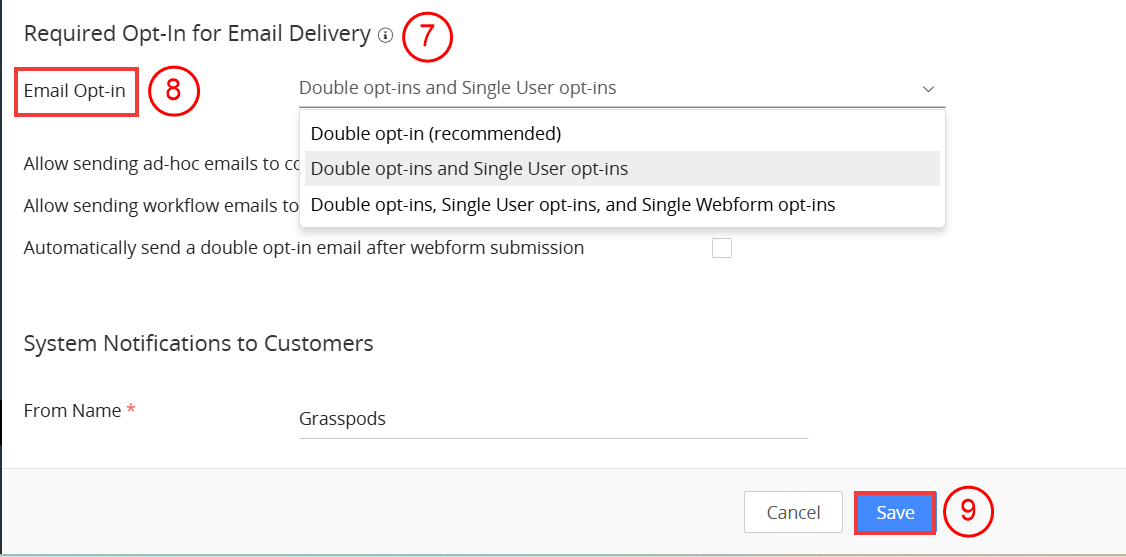
- Scroll down to the Required Opt-in for Email Delivery setting.
- Choose the suitable opt-ins from the Email Opt-ins drop-down.
- Click Save.
Ensuring Email Delivery for Opted-out Contacts
You must configure some settings to ensure that your ad hoc, workflow, and other emails get delivered to your contacts who have opted out of marketing emails.
Follow these steps to ensure email delivery:
- Log in to the CRM.
- Go to the User Profile at the top right corner of the screen.
- Click Settings. The Settings page opens.
- Look for the Configuration section.
- Select Email Settings. The Email Settings page opens.
- Click Edit.
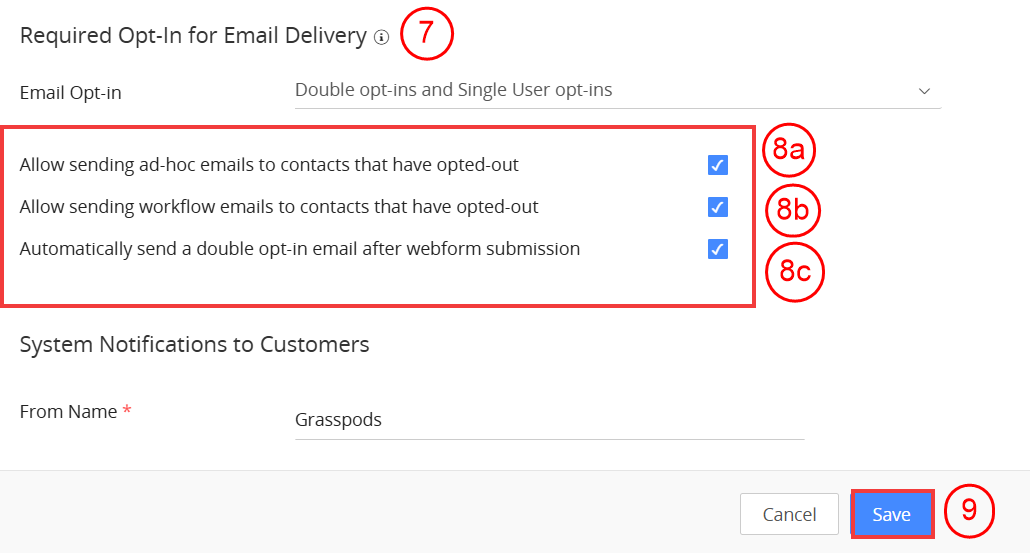
- Go to the Required Opt-in for Email Delivery section.
- Enable the following checkboxes:
- Allow sending ad-hoc emails to contacts that have opted out
- Allows sending workflow emails to contacts that have opted out
- Automatically send a double opt-in email after web form submission
- Click Save.
Soft Bounces and Hard Bounces
- Soft bounces occur when emails are dispatched, but the recipient’s mailbox is temporarily down or the server is full.
- Hard bounces are emails that are permanently undelivered. Typos in the email address or invalid domain names cause hard bounces.
Note:
- When a hard bounce occurs on a contact’s email address, then the Email Opt-in field in the contact record changes to Opted out (contact).
- When a soft bounce occurs on a contact’s email address five times, then the Email Opt-in field in the contact record changes to Opted out (contact).
Data Protection Regulation or GDPR
Email Templates
Vtiger offers a built-in template designer that allows you to create reusable email templates from scratch.
The Email Templates module provides various tools to help you design, customize, and personalize your templates, ensuring professional and consistent communication for every campaign.
To learn more about email templates in Vtiger CRM, click here.
Marketing Lists
A marketing list is a selected group of leads, contacts, or organizations targeted by your email campaign. You can either create a new marketing list or select an existing one while setting up your campaign.
Properly segmented marketing lists help ensure your messages reach the right audience and improve engagement.
To learn more about creating a marketing list, click here.
Creating a Regular Email Campaign
Follow these steps to create a regular email campaign:
- Log in to the CRM.
- Click the main Menu.
- Go to Marketing > Email Campaigns.
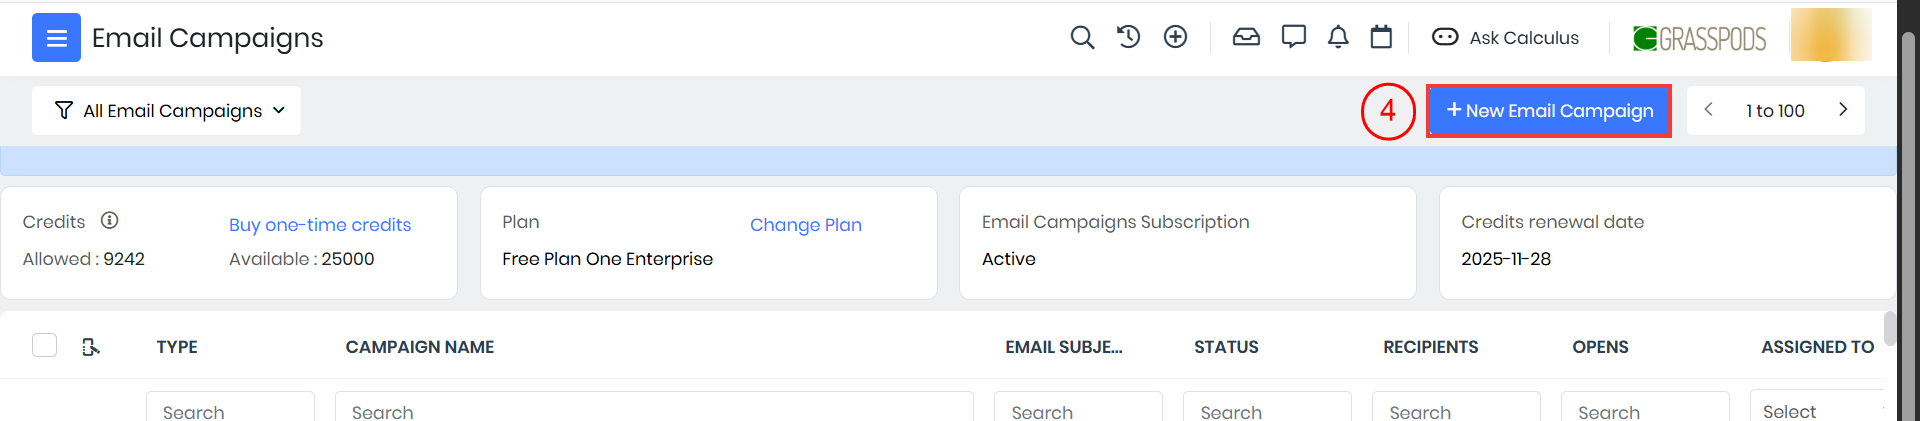
- Click +New Email Campaign. The Add Email Campaign window opens.
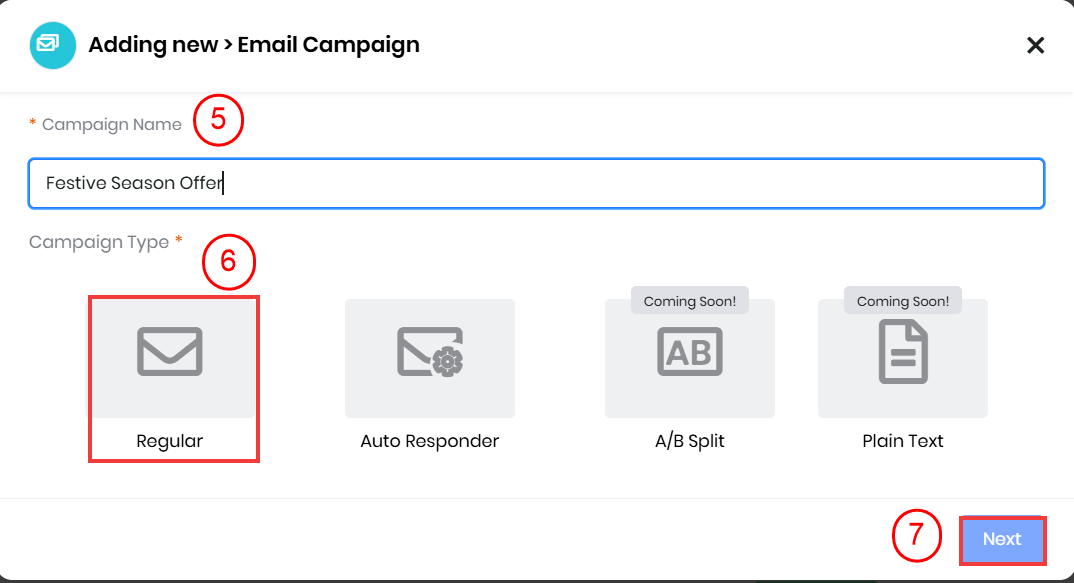
- Enter the Campaign Name.
- Select Regular.
- Click Next. The email campaign gets created in Draft mode.
- Enter or select the following information:
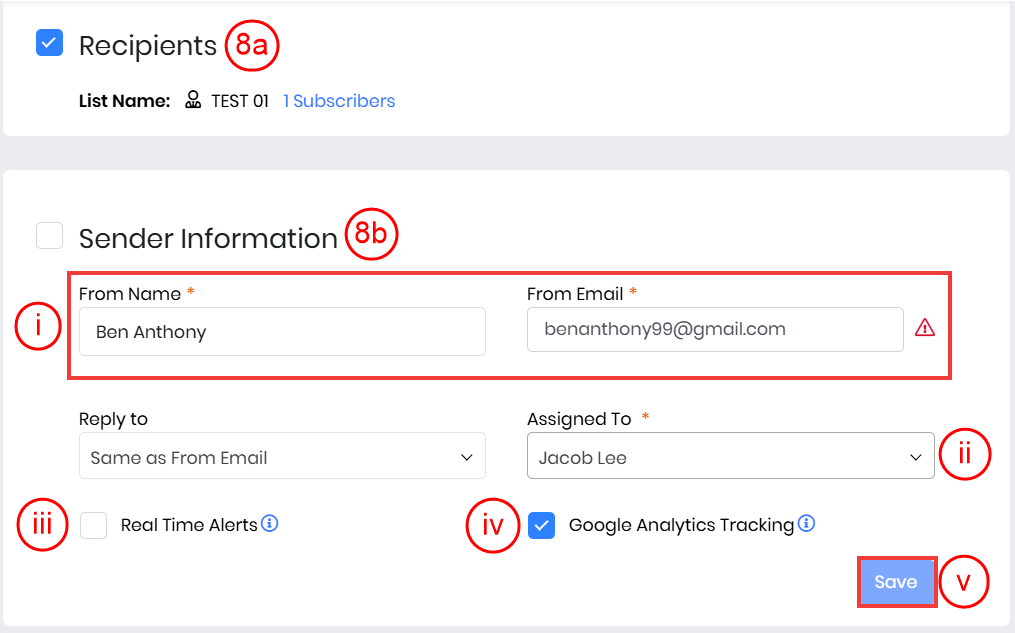
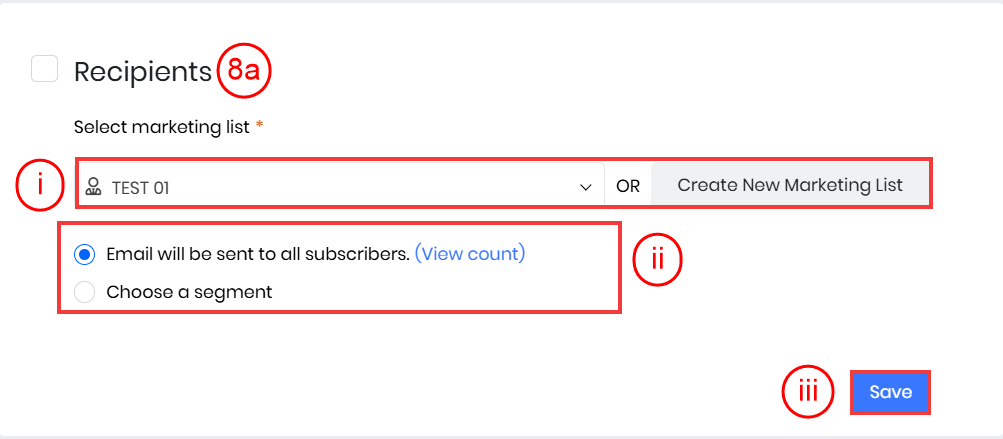
- Recipients
- Select a marketing list from the drop-down or click Create New Marketing List to create a new one.
- Enable Email will be sent to all subscribers to send the email campaign to all subscribers on the marketing list.
- Enable Choose a segment to send the email campaign to a filtered list of subscribers on the marketing list.
- Click Create a segment to filter the list of subscribers by applying specific conditions.
- Click Save.
- Sender Information
- Enter From Name, From Email, and Reply-To email address. Note: You must verify the From Email before sending an email campaign.
- Assign the email campaign to a user under the Assigned To field.
- Enable Real-Time Alerts to receive alerts when the recipients open the email.
- Enable Google Analytics Tracking to allow Google Analytics to track the clicks on links in the email body.
- Click Save.
- Recipients

- Content
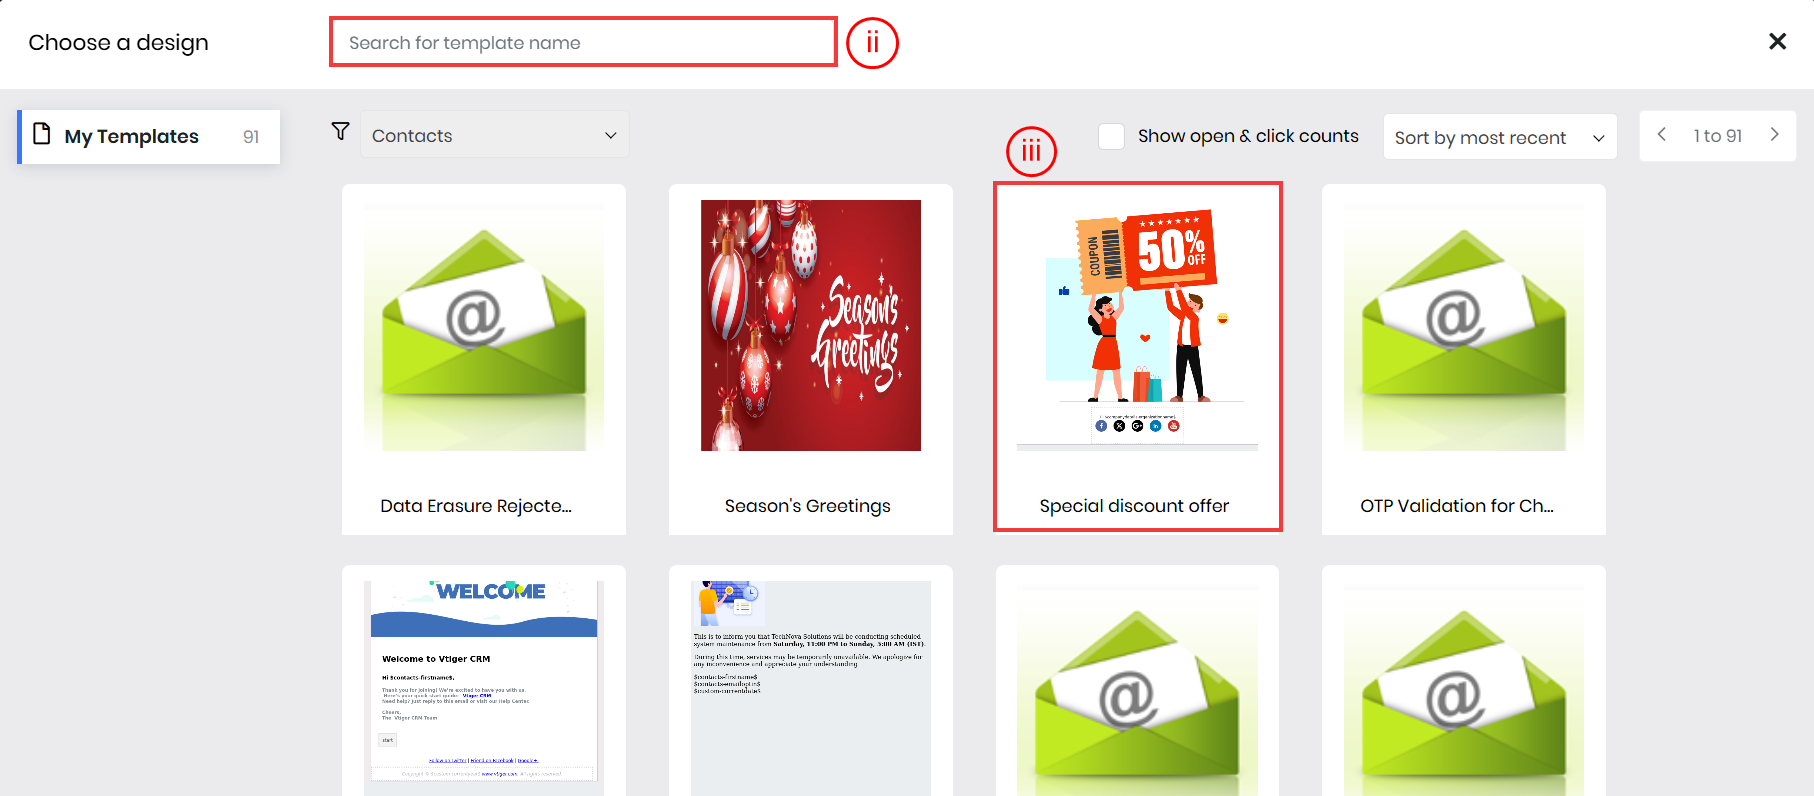
- Click Select Template or Design from scratch to choose an email template for your emails.
- Find your desired template using the search bar.
- Select a template.
- Edit the template if required.
- Click Done. An unsubscribe link is added to the bottom of the email.

- Click Design from scratch.
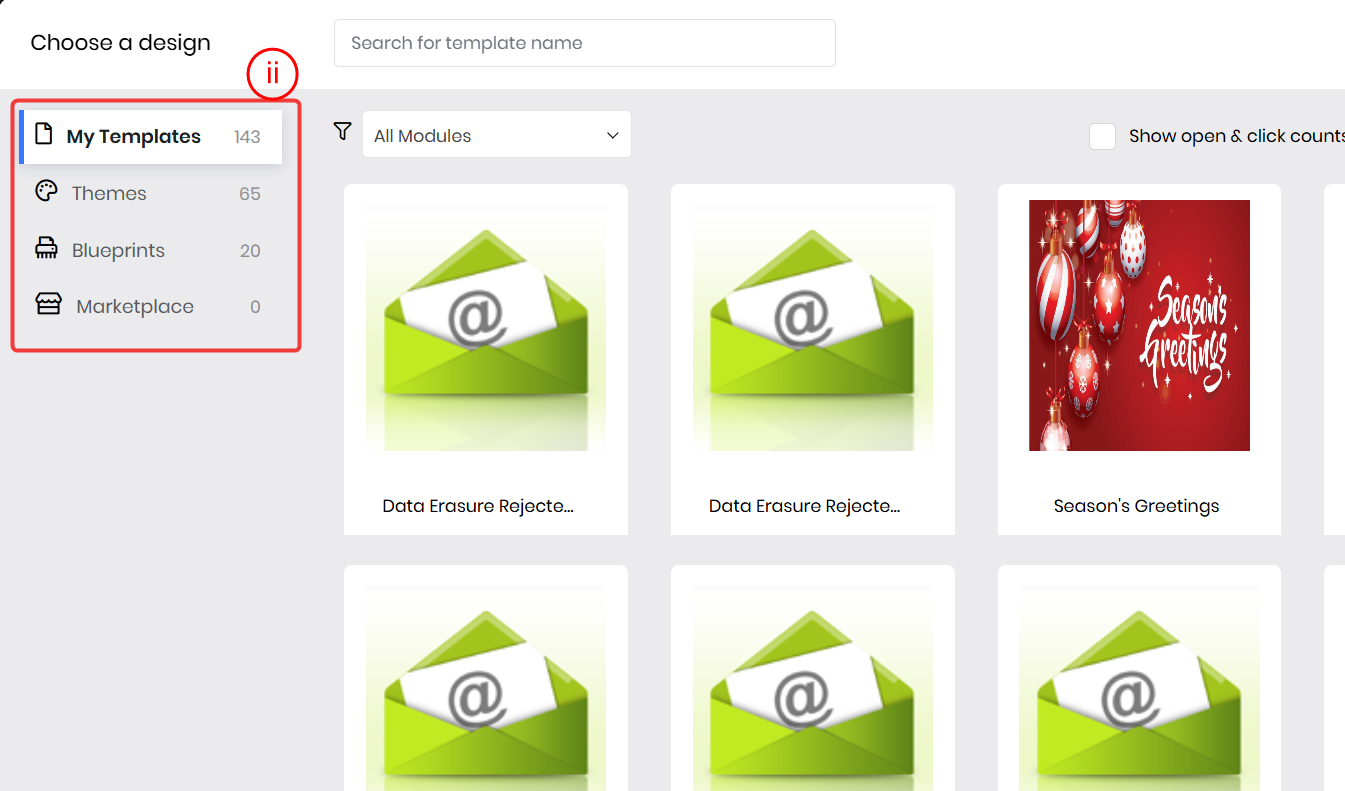
- Click one of these tabs: Themes, Blueprints, My Templates, or Marketplace. You can create a template by picking one of these options.
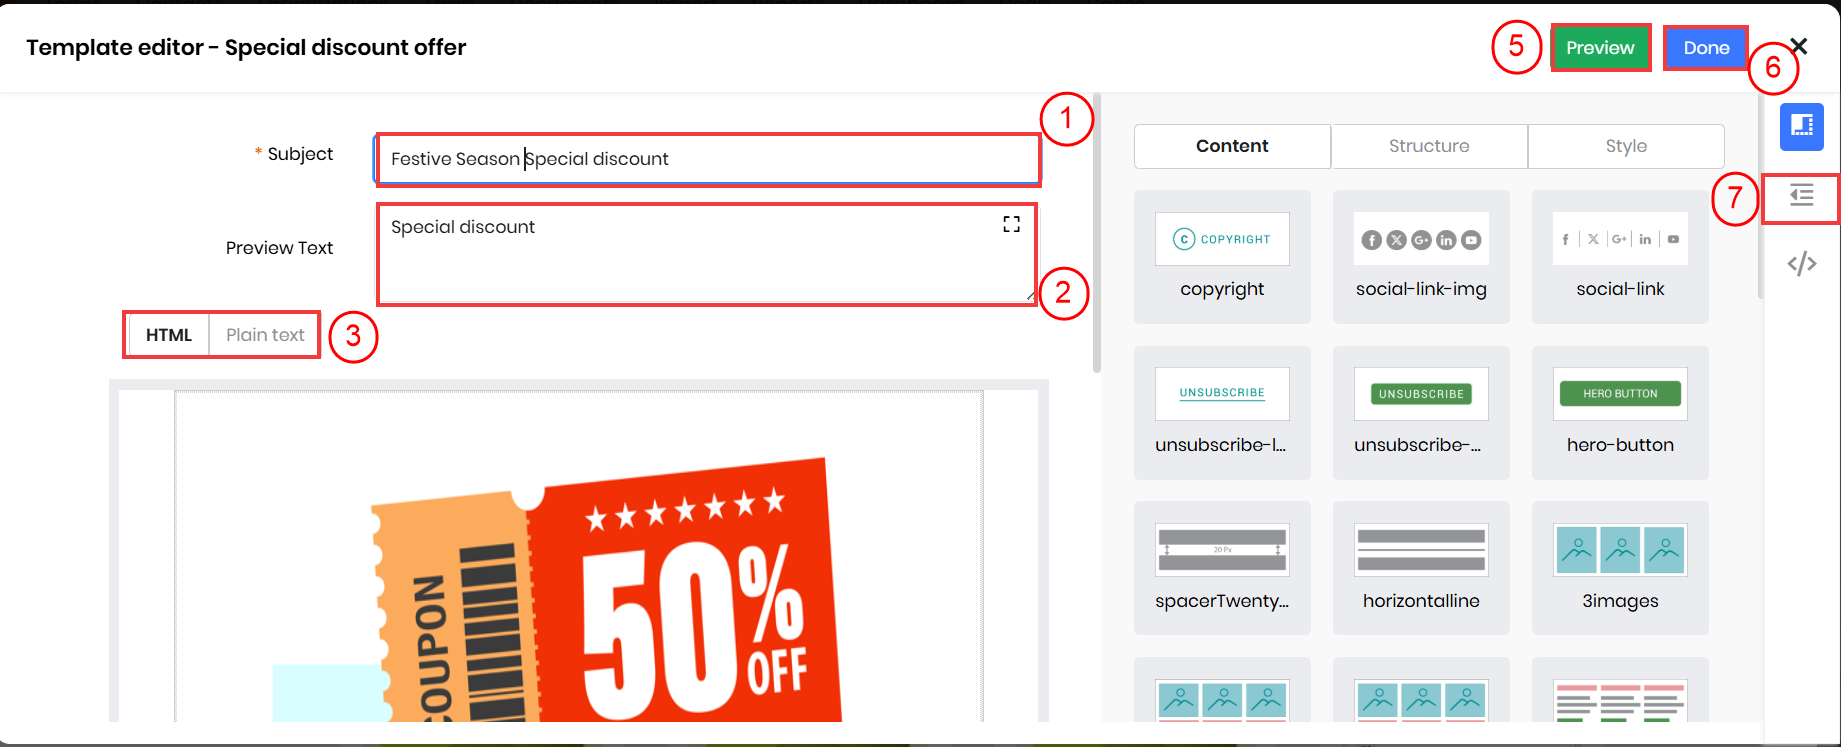
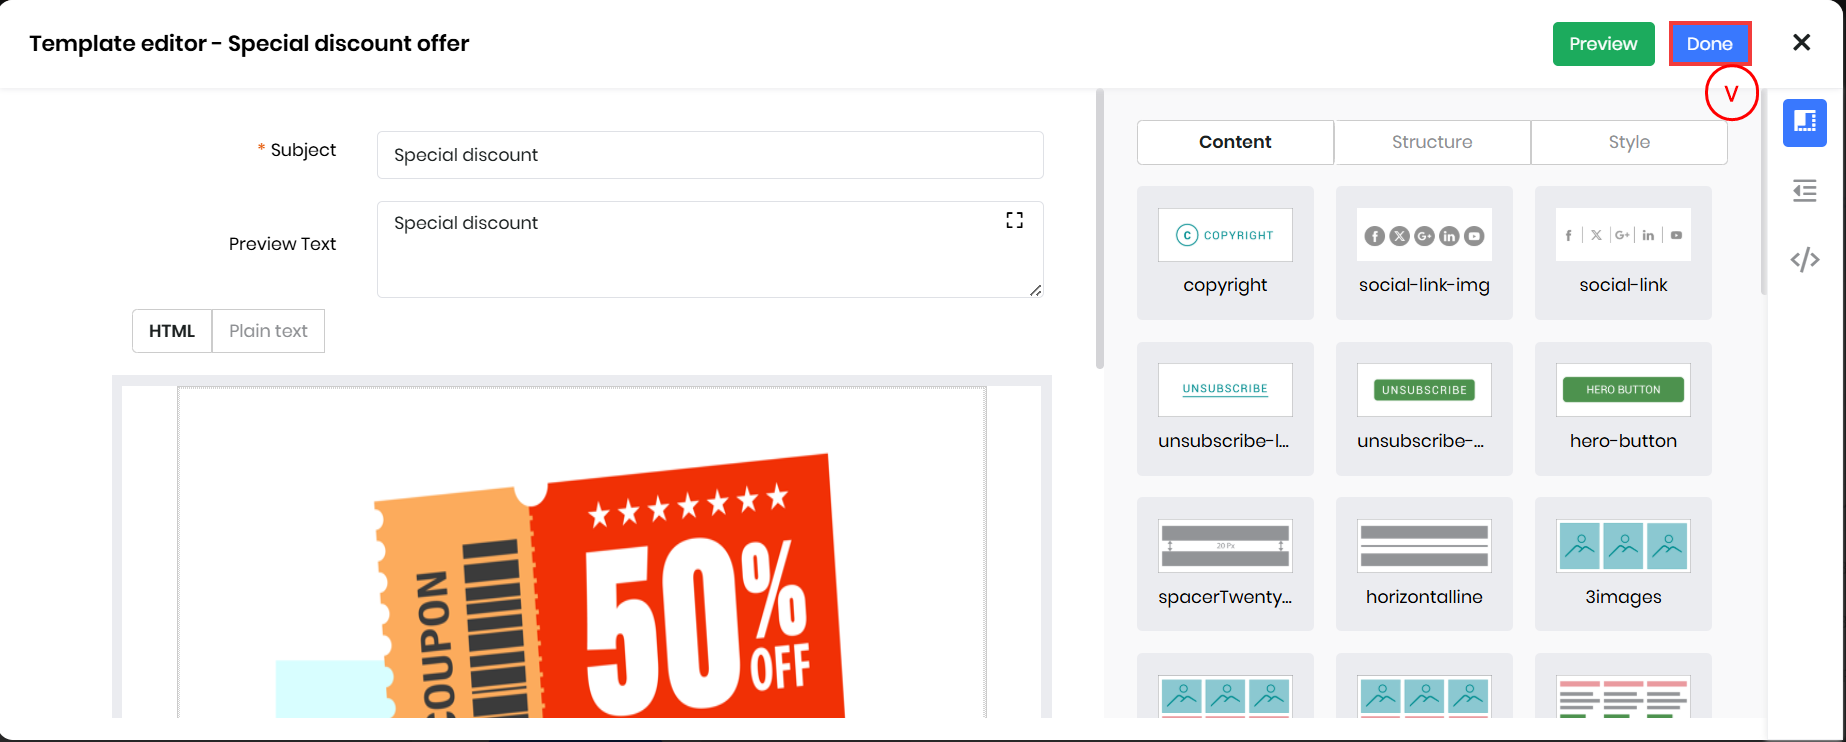
- Enter or select the following information:
- Subject: Enter a subject for your email campaign.
- Preview Text: Enter the required preview text.
- HTML or Plain Text: Use either to add email content.
- Insert Links: Click to add links to other documents or websites.
- Merge Tags: Use merge tags to add HTML tags.
- Click Preview to preview your email.
- Click Done after designing the template. An unsubscribe link is added to the bottom of the email.
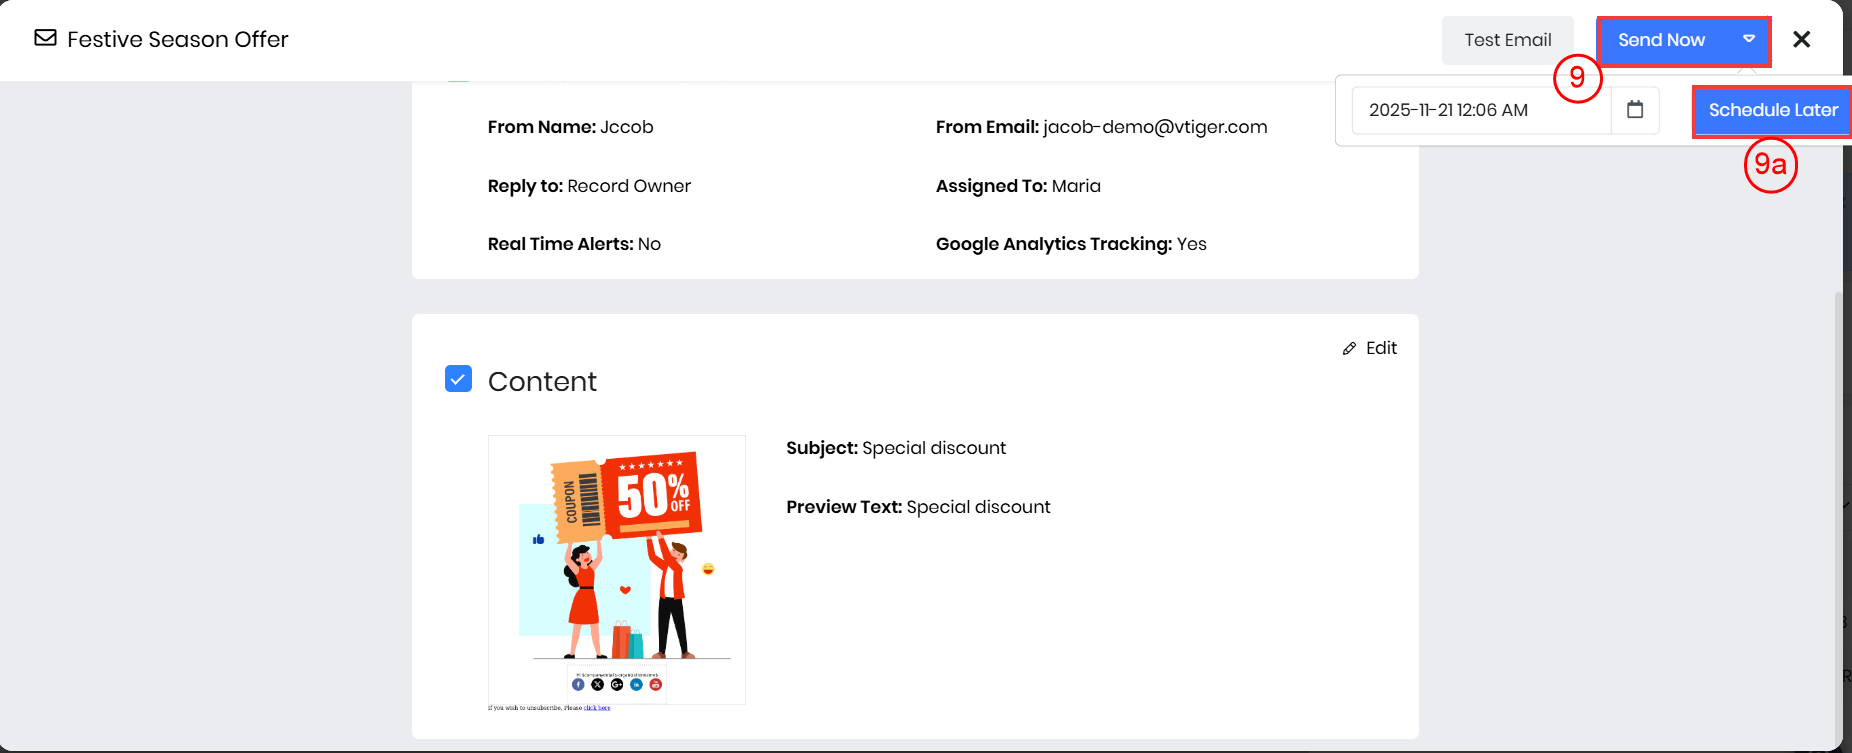
- Click Send Now.
You can also test an email campaign before sending it to your contacts. Click the Test Email button at the top. The email campaign will be sent to your username configured as the Primary Email in My Preferences.
Note:
- You must verify the From Email before sending an email campaign.
- When you use the Email Campaign API, it automatically includes the subject and body of the email template linked to the campaign. This means you can see the full email content without sending another API request.
- To retrieve the entire email content, simply include the BODY section in your API retrieval request.
Scheduling a Regular Email Campaign
You can schedule the email campaign for a later date and time if you don’t want to send it right away. The email campaign will be sent to the subscribers at the chosen time.
Follow these steps to schedule an email campaign:
- Log in to the CRM.
- Click the main Menu.
- Go to Marketing > Email Campaigns.
-
Click +New Email Campaign. The Add Email Campaign window opens.
- Enter the Campaign Name.
- Select Regular.
- Click Next. The email campaign gets created in Draft mode.
- Enter or select the following information:
- Recipients
- Select a marketing list from the drop-down or click Create New Marketing List to create a new one.
- Enable Email will be sent to all subscribers to send the email campaign to all subscribers on the marketing list.
- Enable Choose a segment to send the email campaign to a filtered list of subscribers on the marketing list.
- Click Create a segment to filter the list of subscribers by applying specific conditions.
- Click Save.
- Sender Information
- Enter From Name, From Email, and Reply-To email address. Note: You must verify the From Email before sending an email campaign.
- Assign the email campaign to a user under the Assigned To field.
- Enable Real-Time Alerts to receive alerts when the recipients open the email.
- Enable Google Analytics Tracking to allow Google Analytics to track the clicks on links in the email body.
- Click Save.
- Recipients

- Content
- Click Select Template or Design from scratch to choose an email template for your emails.
- Look for your desired template by using the search bar.
- Select a template.
- Edit the template if required.
- Click Done after designing the template. An unsubscribe link is added to the bottom of the email.
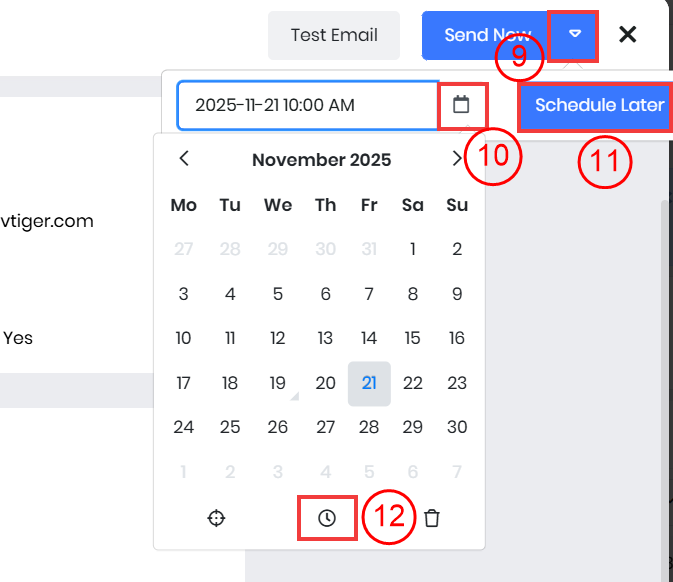
- Click the downward arrow beside Send Now in the top-right corner.
- Click the Calendar icon to pick a date.
- Click the Clock icon to pick a time.
- Click Schedule Later.
- Log in to the CRM.
- Go to the User Profile in the top right corner of the screen.
- Click Settings. The Settings page opens.
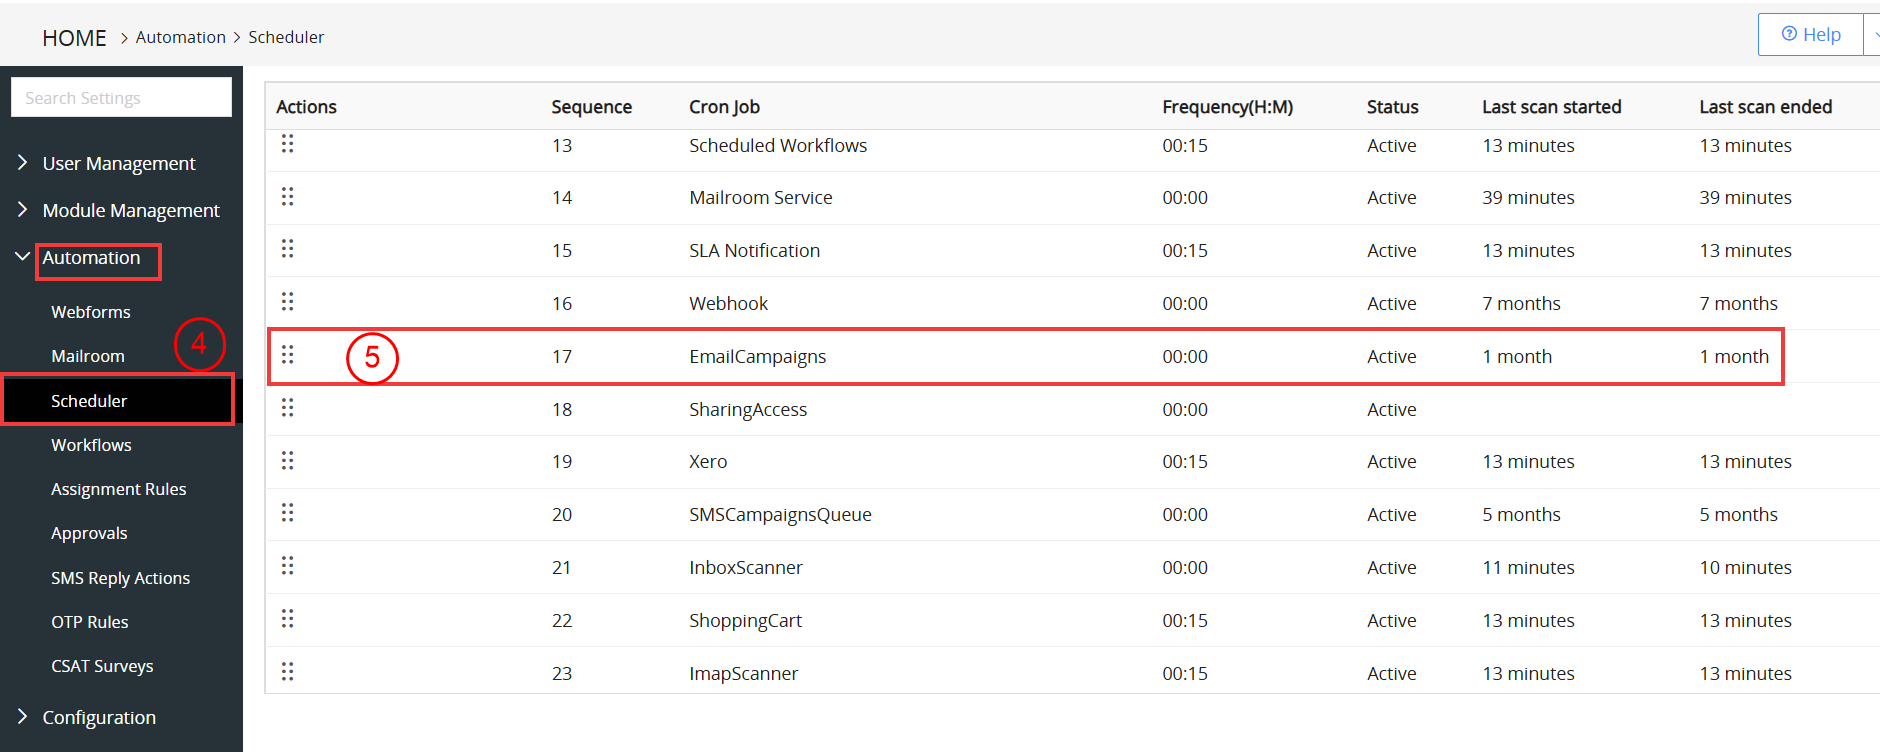
- Go to Automation > Scheduler. A list of schedulers will be displayed.
- Hover over Email Campaigns to view the cron job for email campaigns.
Canceling or Rescheduling a Scheduled Campaign
If you no longer want to send a scheduled email campaign, you can cancel it. If you want to change the time of a campaign, you can reschedule it.
Note: When you cancel a scheduled campaign, its status changes to Draft, and you will get your email credits back.
Follow these steps to reschedule or cancel a scheduled campaign:
- Log in to the CRM.
- Click the main Menu.
- Go to Marketing > Email Campaigns.
- Open a Scheduled Campaign.
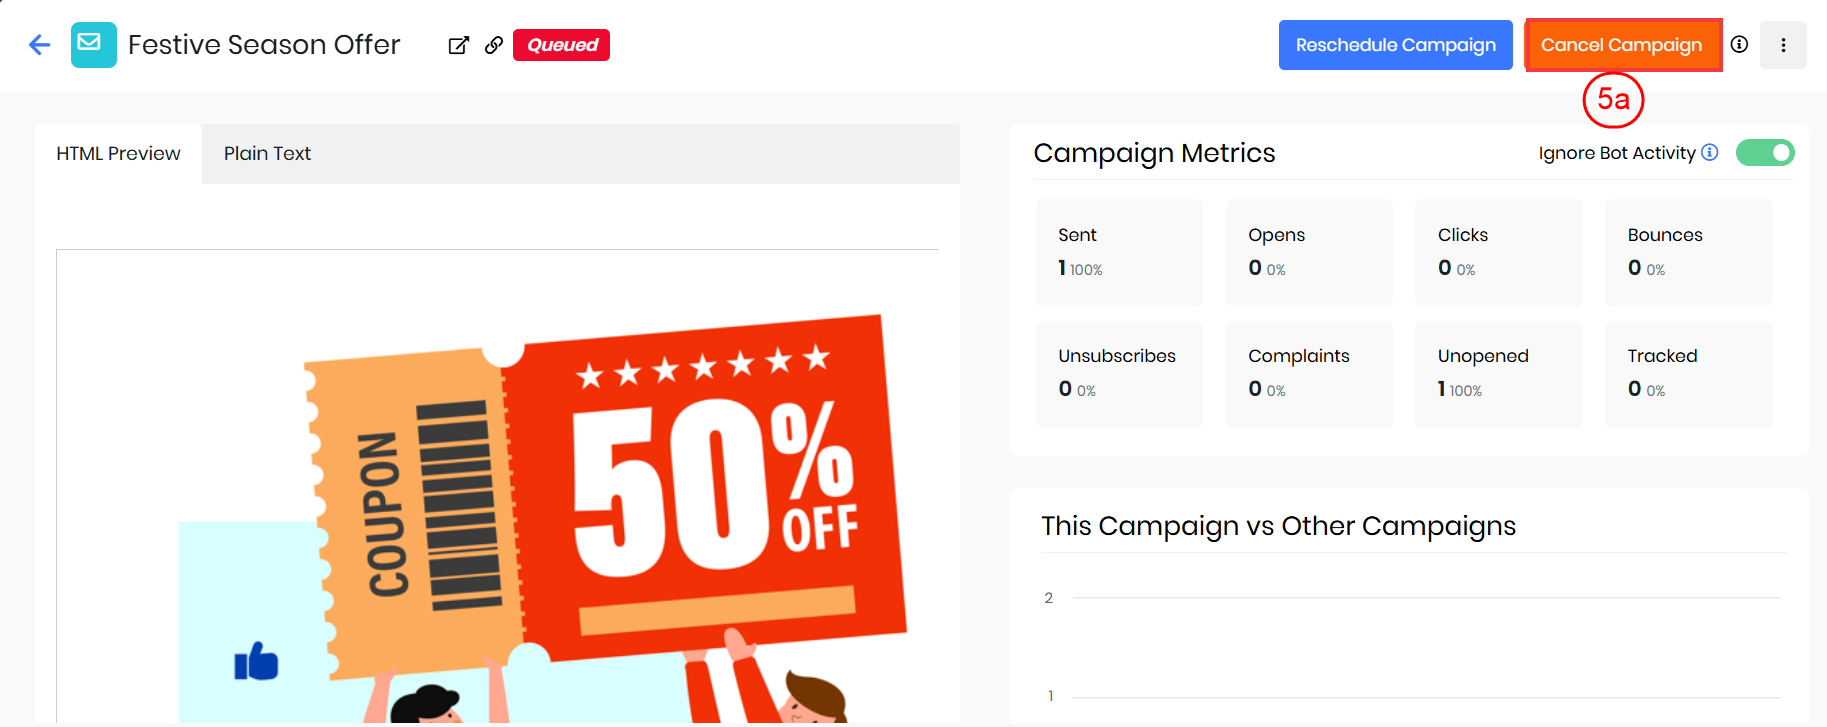
- Click:
- The Cancel Campaign button to cancel it.
- Click Confirm to confirm the cancellation.
- The Cancel Campaign button to cancel it.
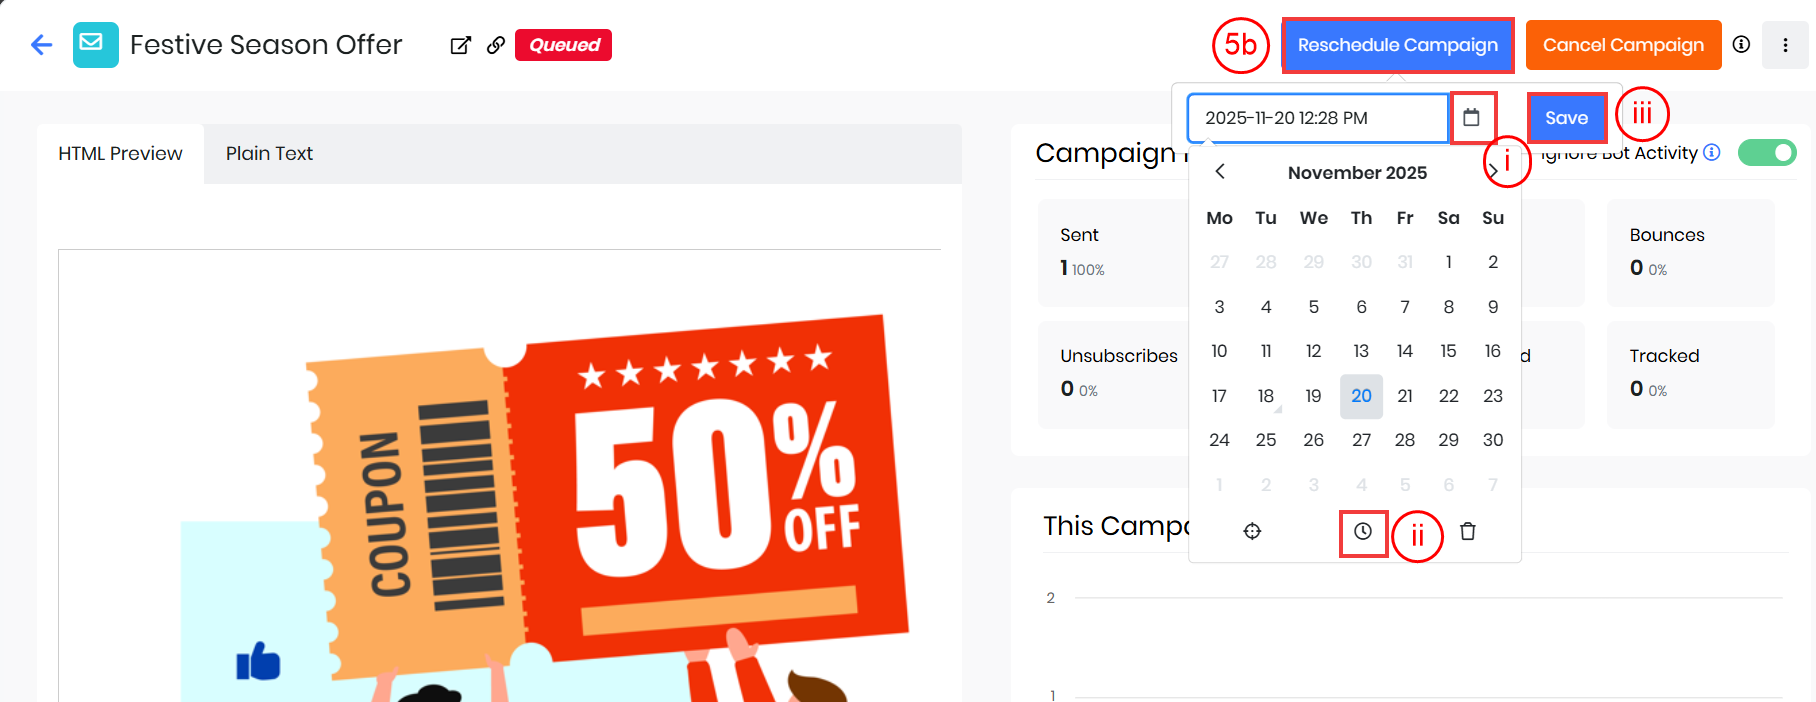
- The Reschedule button to reschedule it.
- Click the Calendar icon to pick a date.
- Click the Clock icon to pick a time.
- Click Save.
Let us now look at creating and managing autoresponder email campaigns.
Creating an Autoresponder Email Campaign
Autoresponder email campaigns are sent automatically when triggered and scheduled. You must set up the trigger conditions and the date and time at which the autoresponder must be sent.
Follow these steps to create an autoresponder email campaign:
- Log in to the CRM.
- Click the main Menu.
- Go to Marketing > Email Campaigns.
- Click +New Email Campaign. The Add Email Campaign window opens.

- Enter the Campaign Name.
- Select Autoresponder.
- Click Next.
- Enter or select the following information:
- Recipients
- Select a marketing list from the drop-down or click Create New Marketing List to create a new one.
- Enable Email will be sent to all subscribers to send the email campaign to all subscribers on the marketing list.
- Enable Choose a segment to send the email campaign to a filtered list of subscribers on the marketing list.
- Click Create a segment to filter the list of subscribers by applying specific conditions.
- Click Save.
- Recipients

- Sender Information
- Enter From Name, From Email, and Reply-To email address. Note: You must verify the From Email before sending an email campaign.
- Assign the email campaign to a user under the Assigned To field.
- Enable Real-Time Alerts to receive alerts when the recipients open the email.
- Enable Google Analytics Tracking to allow Google Analytics to track the clicks on links in the email body.
- Click Save.
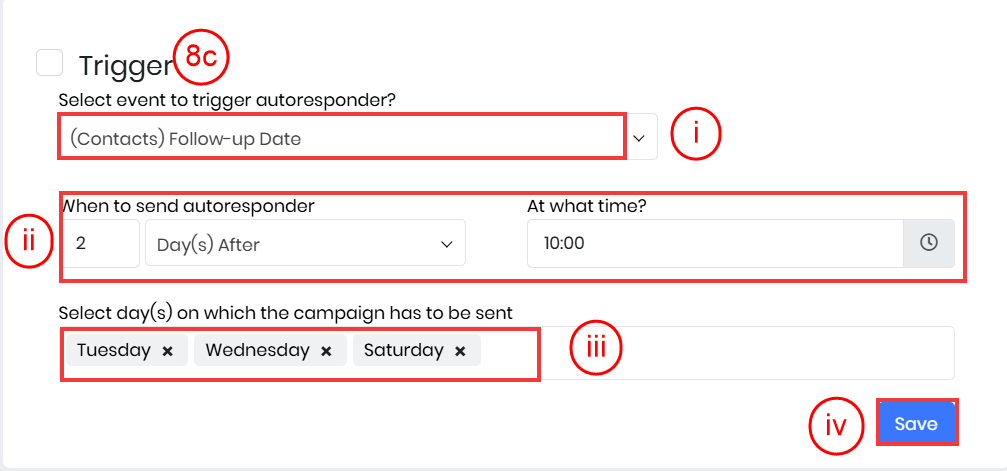
- Trigger
- Select event to trigger autoresponder: Choose what must trigger the autoresponder. For example, when a recipient clicks a link in the previous campaign, opens the previous campaign, etc.
- When to send: Choose how many days, hours, weeks, minutes, etc., after the previous campaign, the autoresponder must be triggered.
- Select the day(s) on which the campaign has to be sent: Select all the days.
- Click Save.

- Content
- Click Select Template or Design from scratch to choose an email template for your emails. To learn more about creating or editing email templates, click here.
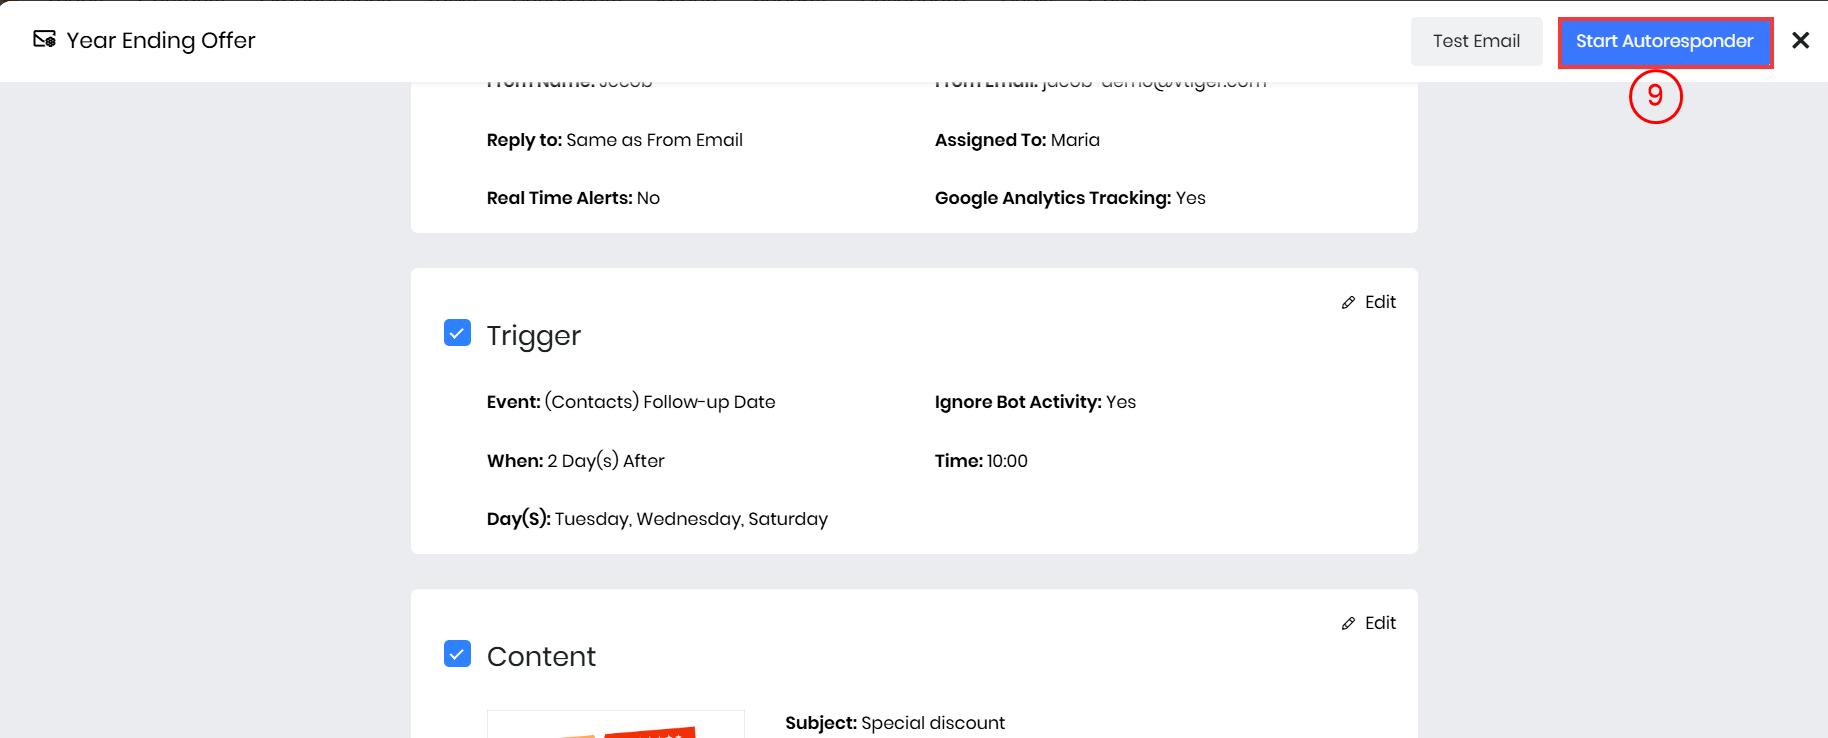
- Click Start Autoresponder.

- Click Ok to confirm.
Note:
- When an autoresponder has started, you will see the Started sign beside the email campaign name. An autoresponder is sent only on the date and time you select in the Trigger.
- An autoresponder campaign is sent only after its cron job runs. It runs every 15 minutes. Go to Settings > Automation > Scheduler > AutoResponder Campaigns to view the cron job.
Stopping an Autoresponder Email Campaign
Follow these steps to stop an autoresponder email campaign:
- Log in to the CRM.
- Click the main Menu.
- Go to Marketing > Email Campaigns.
- Open the autoresponder campaign that you want to stop.

- Click the Stop Campaign at the top.
- Click Ok to confirm.
When you stop an autoresponder, its status changes to Stopped.
Duplicating an Email Campaign
You can reuse the details of an email campaign by duplicating it. When you duplicate an email campaign, you must change the email campaign name.
Follow these steps to duplicate an email campaign:
- Log in to the CRM.
- Click the main Menu.
- Go to Marketing. > Email Campaigns.
- Open an email campaign.
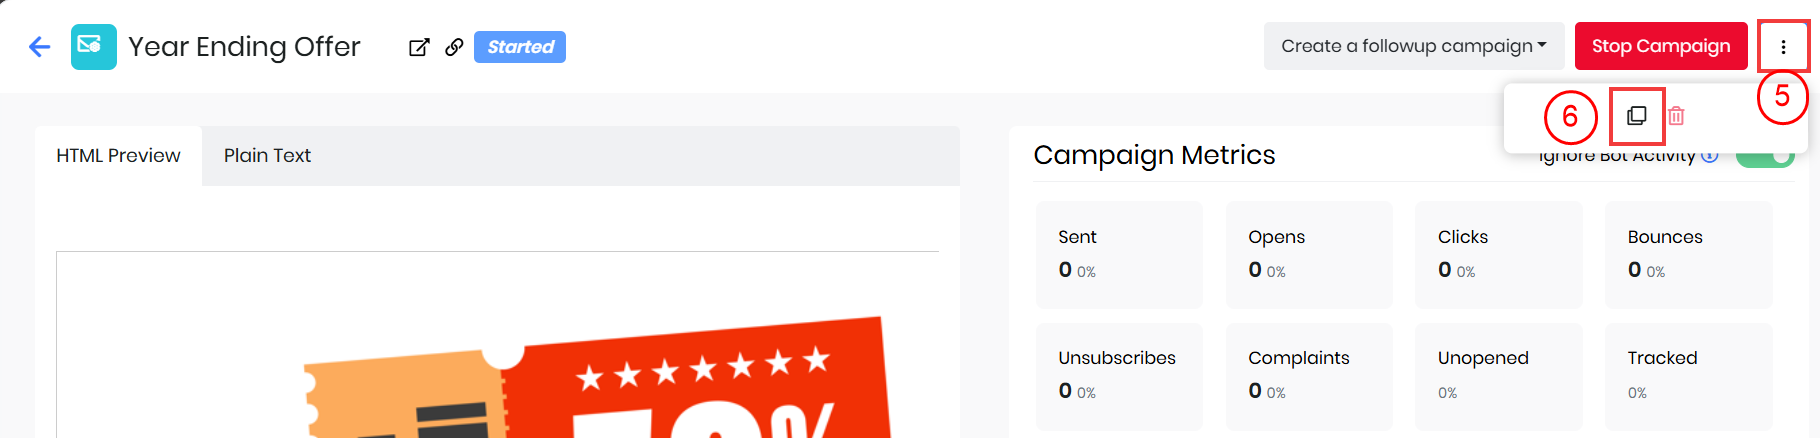
- Click the More icon in the top-right corner.
- Click the Duplicate icon.

- Enter the new email campaign name.
- Click Save.
This creates a new campaign with the same details as the previous campaign.
Viewing Campaign Metrics
You can find an email campaign’s metrics in the campaign record. Follow these steps to view the email campaign metrics:
- Log in to the CRM.
- Click the main Menu.
- Go to Marketing > Email Campaigns.
- Open an email campaign.
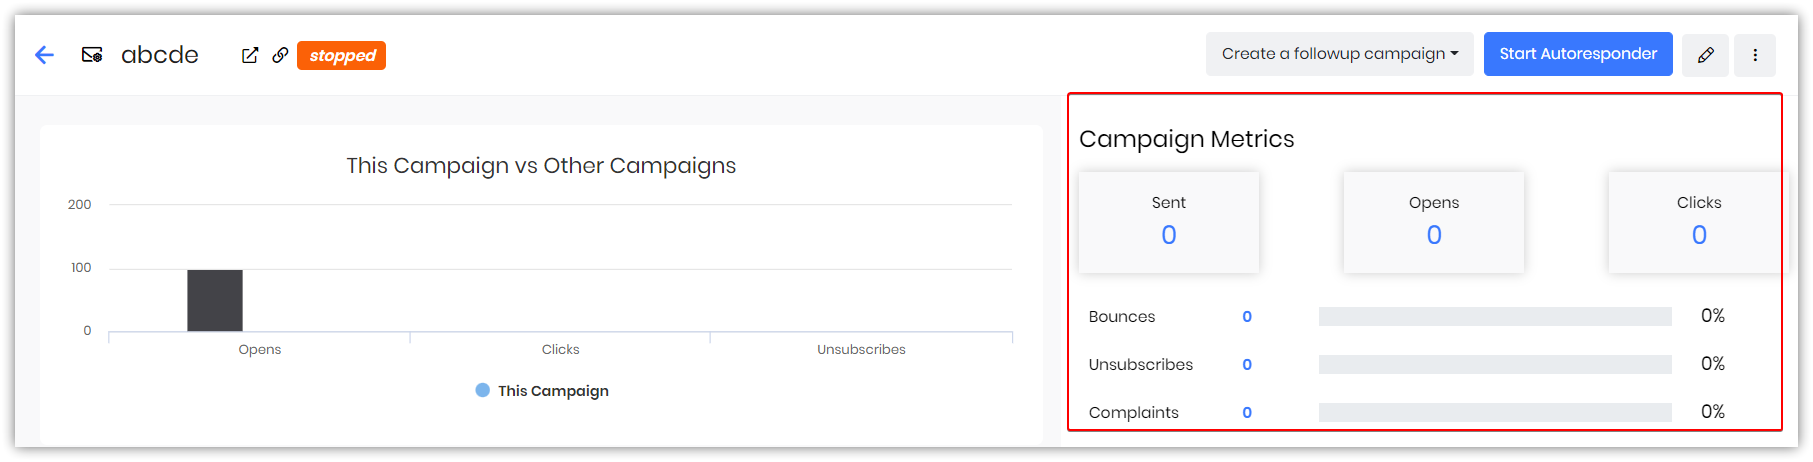
You can see the campaign metrics on the right-hand side. You can view the following details:
- Sent: Number of emails sent through the campaign
- Opens: Number of unique opens
- Clicks: Number of click actions (on any link) in the email
- Bounces: Number of emails that have bounced
- Unsubscribes: Number of recipients who have unsubscribed from the email campaign
- Complaints: Number of emails that were reported as spam
- Unopened: Number of unopened emails
Note: You can export the metrics – Sent, Opens, and Clicks – individually by hovering on the numbers and clicking the Export icon.
Tracking Email Campaign Performance
You can track detailed performance metrics for both Regular and Auto-responder email campaigns. The system provides clear insights into user interactions, including clicks, opens, bounces, and unsubscribes.
- Clicks: View who clicked on each link and how many times.
- Click the Count under the Clicks column to see detailed recipient and link-level click data.
-
- Opens: Displays how many recipients opened the email.
- Click the Opens column to see a list of users and the number of times they opened the email.
-
- Unsubscribes: Shows which users unsubscribed and when.
- Click the Unsubscribed On column for more details.
-
- Bounces: Shows both hard (permanent) and soft (temporary) bounces.
- Click the Bounces column to view affected email addresses and bounce types.
-
Viewing Email Campaign Reports
To view the details of the contacts to whom you have sent the campaign, contacts who have opened the campaign, etc., you can use Reports in Email Campaigns.
- Email Campaign reports will display module header fields, existing fields, and related data. You can:
- Sort, rearrange, add, or delete fields that are present in the Email Campaign metric reports.
- Verify reports for email campaigns with these parameters: Click, Open, Sent, Bounce, Unopened, Unsubscribed, and Complaints.
- View the bounce reason for bounced emails in your email campaign reports.
- Email campaign reports will display the Bounce Reason (for both Hard and Soft bounces) under the Bounce List.
- Report downloads will also display the reason for the bounce.
Follow these steps to view and download email campaign reports:
- Log in to the CRM.
- Click the main Menu.
- Go to Marketing > Email Campaigns.
- Open an email campaign.
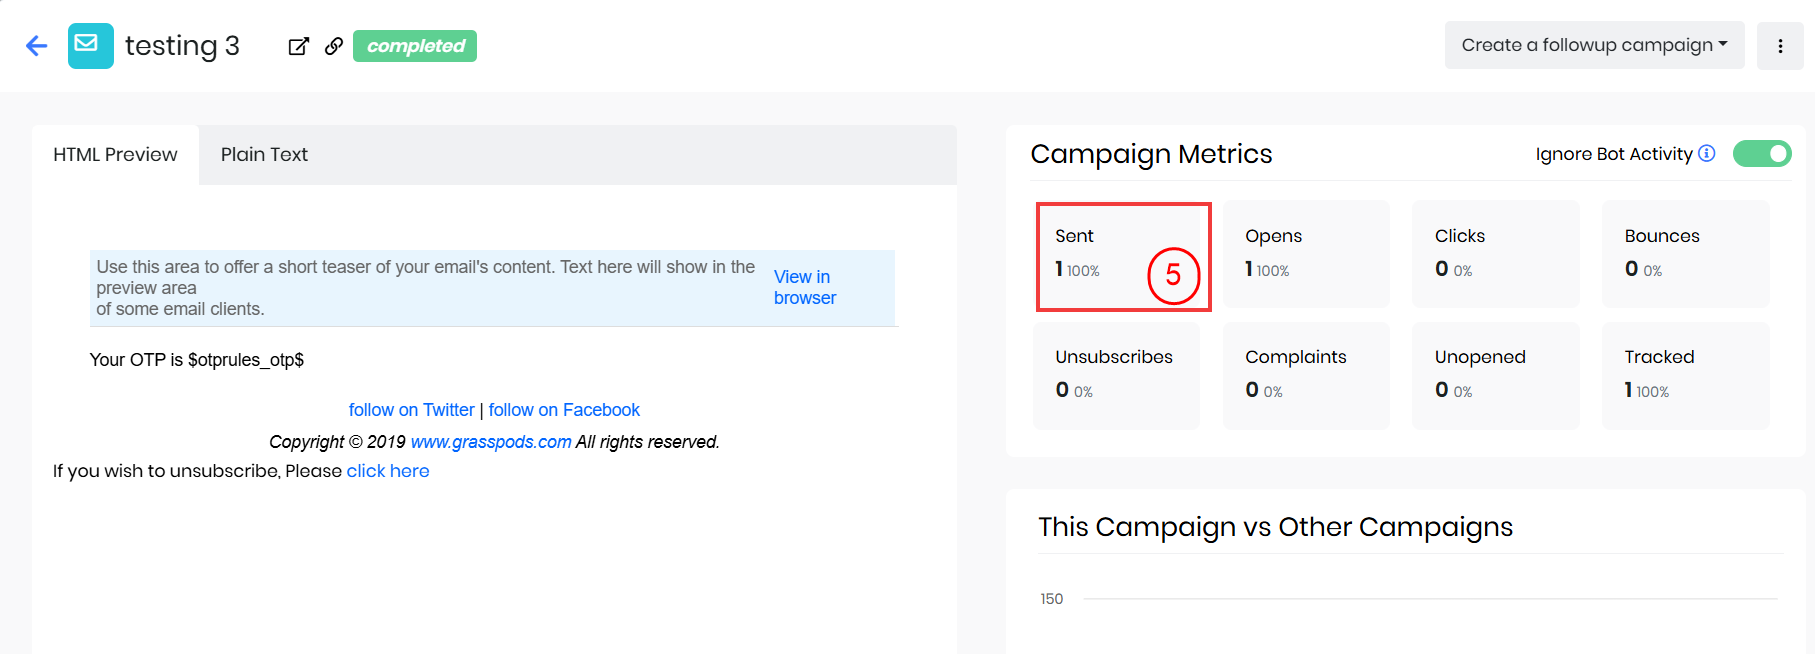
- Click a number under Campaign Metrics. For example, click the number under Sent. You will see the Reports page.
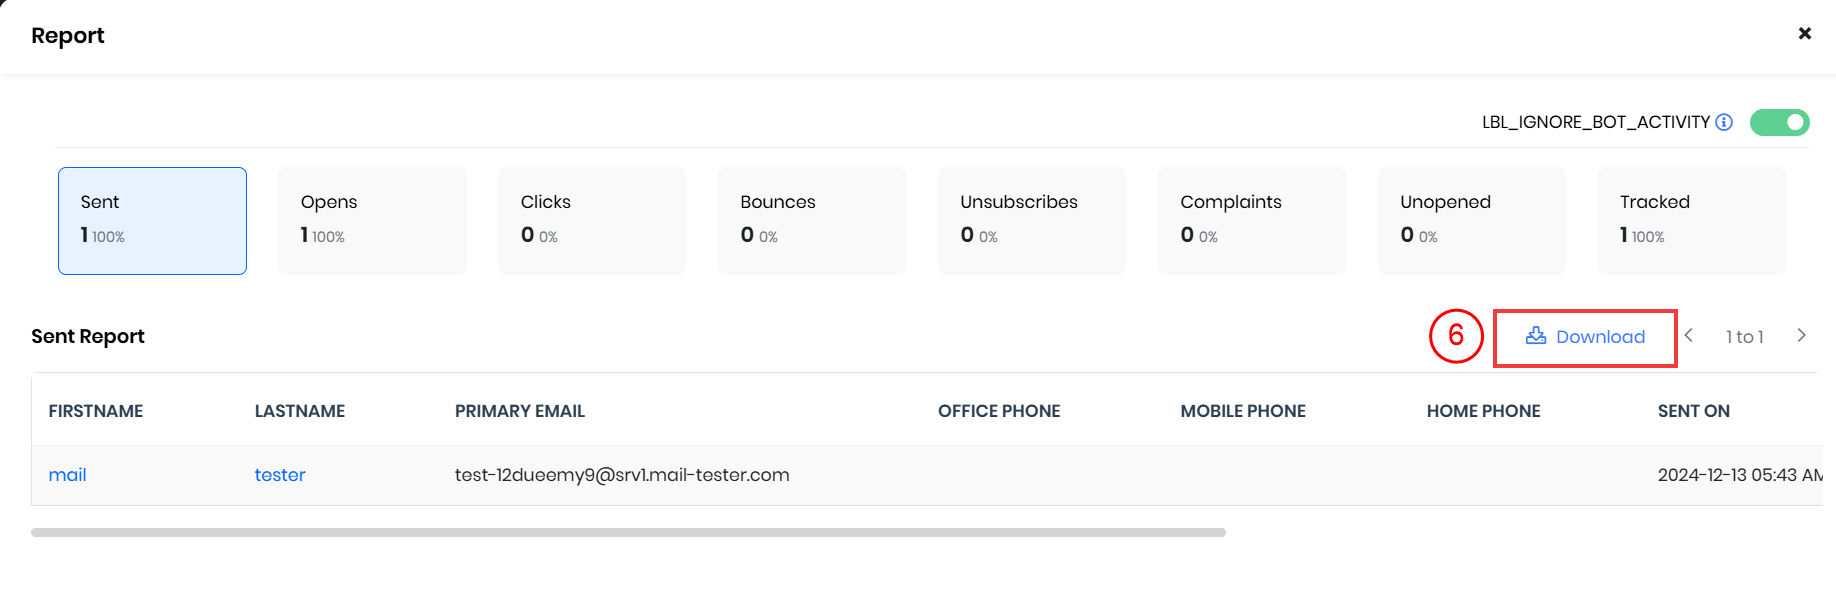
- Click Download to download the selected report.
Disabling Download Report
The Download Report option is enabled by default for all users. Admins can enable or disable the option based on the users.
Tracking Email Campaign Activity
When you send out an email campaign and enable email tracking, you can get updates about the recipients’ activities on the emails. These updates are available under the Activity section of a Contacts Summary View.
Follow these steps to track touchpoints for email campaigns:
- Log in to the CRM.
- Click the main Menu.
- Go to Essentials > Contacts. The Contacts page opens
- Open a Contact record. The Summary View opens.

- Click Filters in the Activity section.
- Tick the Email Campaigns checkbox under Customer Touchpoints.
You will see updates, such as when the contact opened your email, clicked a link in your email, etc., in the Activity section.
Note: You can enable email tracking for email campaigns by going to the main Menu > Essentials > Actions.
Filtering Bot Activity in Campaign Metrics
The Ignore Bot Activity option helps improve the accuracy of your campaign metrics by filtering out interactions generated by automated systems, such as email security scanners.
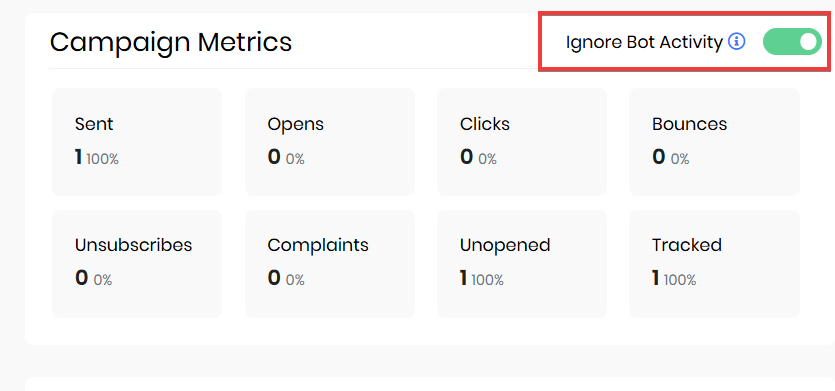
When enabled:
- Bot-generated opens and clicks are excluded from primary metrics.
- Separate metrics, such as Bot Opens and Bot Clicks, are displayed.
This ensures that your campaign performance reflects genuine user engagement, allowing for more reliable analysis.
Viewing a Contact’s Email Campaign History
Follow these steps to view the list of email campaigns sent to a Contact:- Log in to the CRM.
- Click the main Menu.
- Go to Essentials > Contacts. The Contacts page opens.
- Open a Contact record.
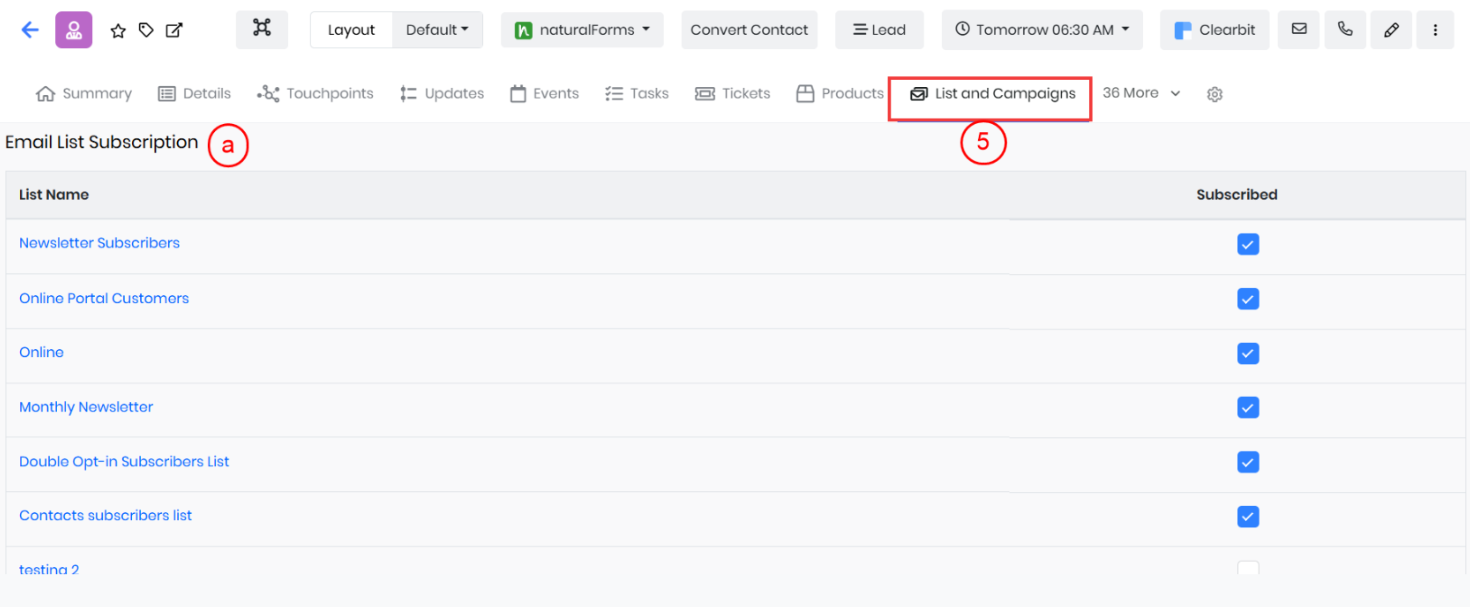
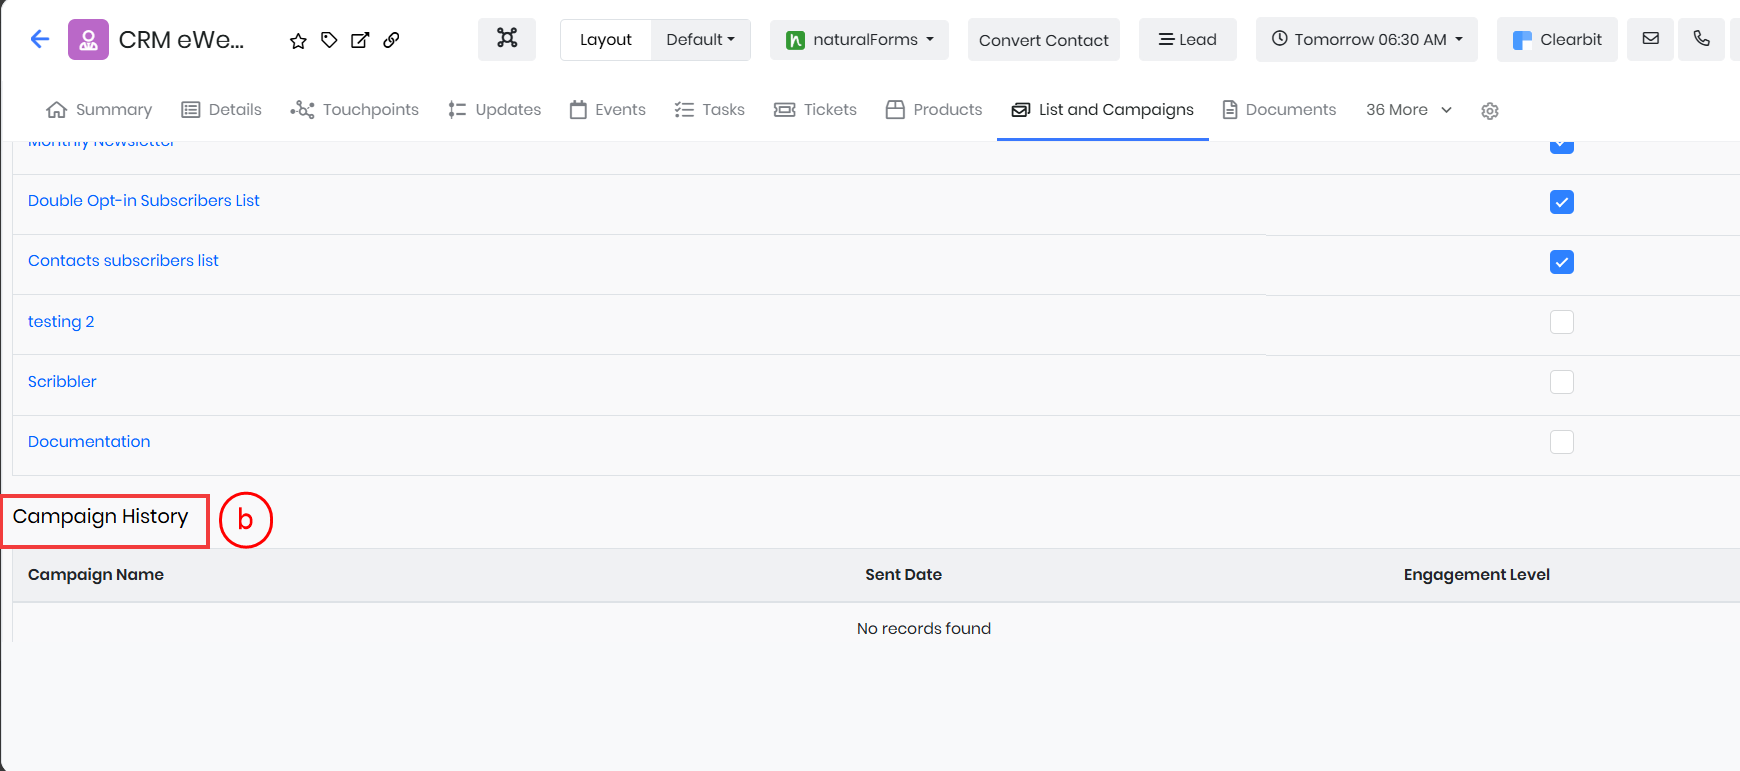
- Select the List and Campaigns tab on the right sidebar of the Contacts Summary View. This will display all email list subscriptions and campaign history related to the contact. You will find the following information:
- Email List Subscription: Displays the marketing lists from which the contact has subscribed or unsubscribed.
- Campaign History: Displays the email campaigns sent to the contact and the date they were sent.
- Engagement Level is the overall engagement of the subscribers on the email campaign.
Viewing Email Campaign Account Details

Email Campaign Credits
Available vs. Allowed credits
- Available credits are the total email campaign credits that you have.
- Allowed credits are the number of email campaign credits you are currently allowed. To learn more about Email Campaign limits, click here.
- Click Buy one-time credits to buy more credits (1 credit = 1 email).
- Buying extra credits doesn’t require changing your current plan.
- Purchased credits expire in 12 months. Additionally, purchased credits are only used after the free credits or credits from the current plan have been exhausted.
Email Campaign Credits Plan
Email Campaign Subscriptions
Canceling Email Campaign Subscriptions
- Log in to the CRM.
- Click User Profile in the top-right corner.
- Go to Billing. The Billing page opens.
- Go to the Email Marketing Plan block.
- Click Cancel Subscription.
Note: Email campaign subscription is always active when using the Free Plan.
Credits renewal date
This is the date when you must renew your email campaign credits. The subscription becomes Inactive if you do not renew your credits by this date.
Troubleshooting Tips
Here are some common issues users may encounter while using Email Campaigns:
Error:
- Microsoft Outlook does not display images correctly in emails when they are sent in HTML format, which is used for other email clients, such as Gmail, Windows Mail, Yahoo Mail, etc.
- The Style tag does not work in Microsoft Outlook. So, you must use the Align, Width, and Height attributes separately in your code.
Syntax that works in other email clients:
Syntax that works in all email clients, including Outlook: