Articles in this section
JioMeet Integration with Vtiger CRM
Introduction
JioMeet is a video-communication app developed by Reliance and is now accessible in Vtiger CRM.

|
So how does JioMeet work with Vtiger CRM?
Simply install the Conference extension and configure JioMeet in Vtiger CRM. And while you are setting up a meeting event, select the type of meeting as JioMeet. Send the JioMeet link through an email, as an event alert, through the Webchats window, etc., directly from the CRM.
Features
Following are the features offered by JioMeet:
- Calls can last up to 23 hours and 30 minutes.
- Calling features and functionalities are free of cost.
- Users can switch devices during a meeting.
- Users can extend the host’s video call using a double-tap option.
- Enable sign-in by mobile number or email ID.
- Highlight nine active users at a time on a single screen.
Commendable, isn't it? You can use JioMeet directly in the following modules of Vtiger CRM:
- Events
- Contacts
- Deals
- Live Chats
Feature Availability
Benefits
Following are the benefits of integrating JioMeet into Vtiger CRM:
- Schedule customer meetings directly from the CRM.
- Host sales demos, training sessions, weekly sales meetings, and other events from the CRM.
- Create meeting records and save minutes of meeting for future reference.
- Connect from any device as JioMeet provides a device-independent network.
- Witness enhanced meeting experience with optimized user experience and HD video quality.
- Secure all conference meetings with highly protected encryption and a strong password that guarantees complete secrecy and keeps data secure.
In this article, you will learn how to integrate and use JioMeet in Vtiger CRM. Let us get started.
Integration and using JioMeet with Vtiger CRM involve the following:
- Installing Conference application from Add-Ons.
- Signing into JioMeet through Vtiger CRM.
- Enabling the sync between JioMeet and Vtiger CRM.
- Creating a JioMeet meeting from Events, Contacts, Deals, Emails and Webchats module.
- Receiving the meeting record link from Jio.
- Deleting a scheduled JioMeet meeting.
- Deactivating JioMeet integration.
Key Terminology
|
|
|
|
|
|
|
|
|
|
|
|
Integrating JioMeet in Vtiger CRM
To integrate JioMeet with Vtiger CRM, you must have an active JioMeet account.
Integrating JioMeet with Vtiger CRM involves the following:
- Step 1: Installing the Conference add-on in Vtiger CRM.
- Step 2: Signing into JioMeet through Vtiger CRM.
Step 1: Installing Conference Application
Follow these steps to install the Conference application:
- Log in to your CRM.
- Click the Main Menu.
- Click Settings.
- Go to Extensions.
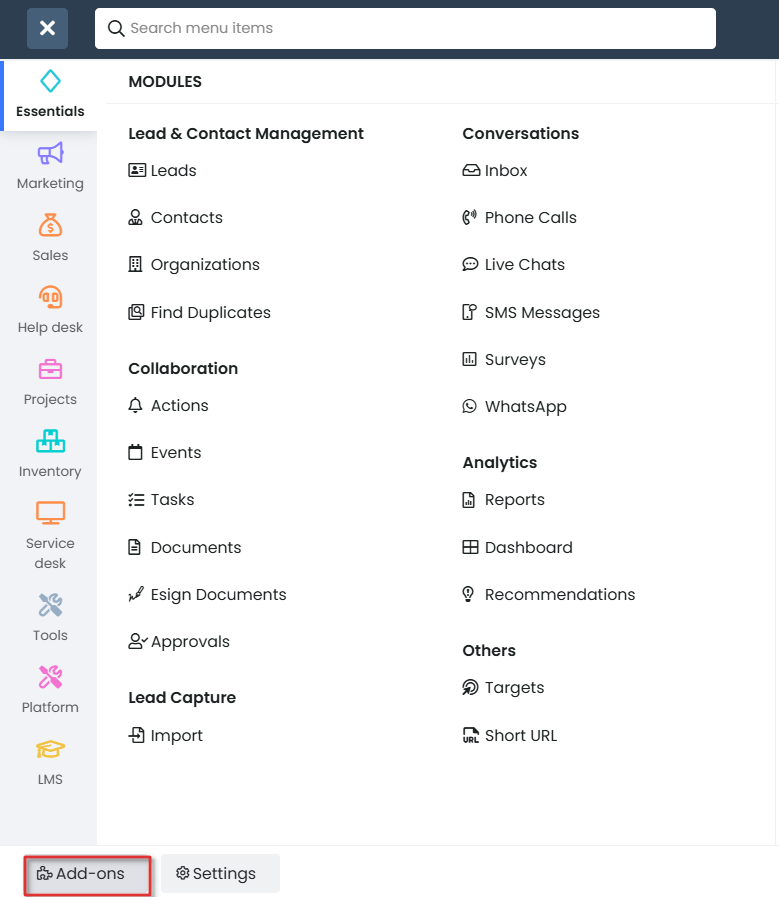
- Click Add-Ons.
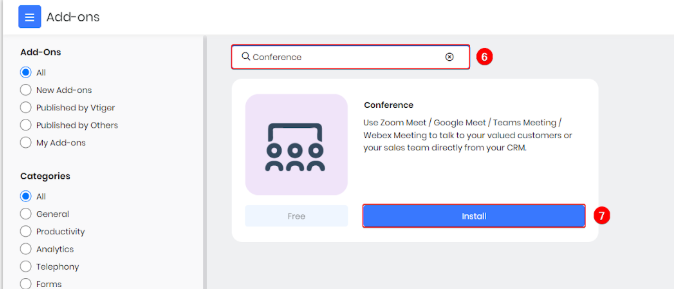
- Search for Conference.
- Click Install.
Now you can sign into multiple video calling applications such as JioMeet, Google Meet, Teams Meeting, etc., and start using them inside Vtiger CRM.
Step 2: Signing into JioMeet Through Vtiger CRM
JioMeet is secured and needs OAuth to integrate into Vtiger CRM. You will need to generate JioMeet Client ID and Client Secret to get API tokens. These tokens are used to set up OAuth. To learn more about OAuth APIs and Meeting Management APIs, click here.
Follow these steps to sign in to JioMeet through Vtiger CRM:
- Log in to your CRM account.
- Click the Main Menu.
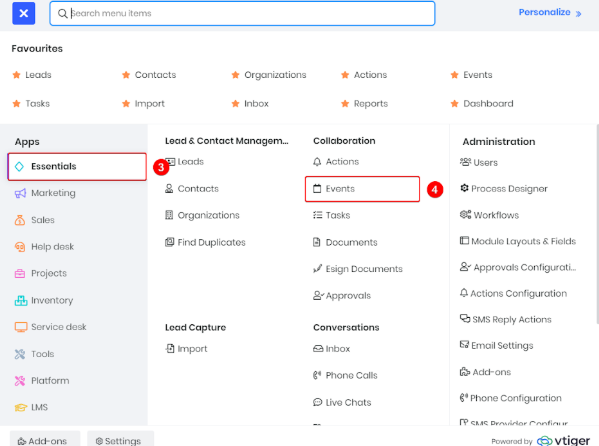
- Click Essentials.
- Select Events.
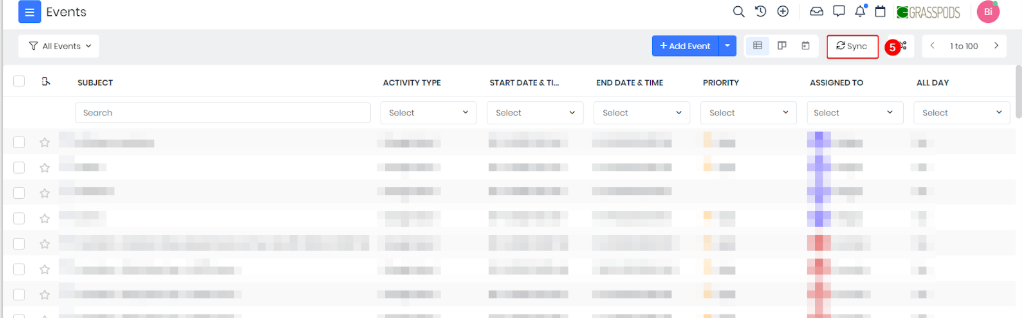
- Click Sync.

- Click Sign in beside the JioMeet application.
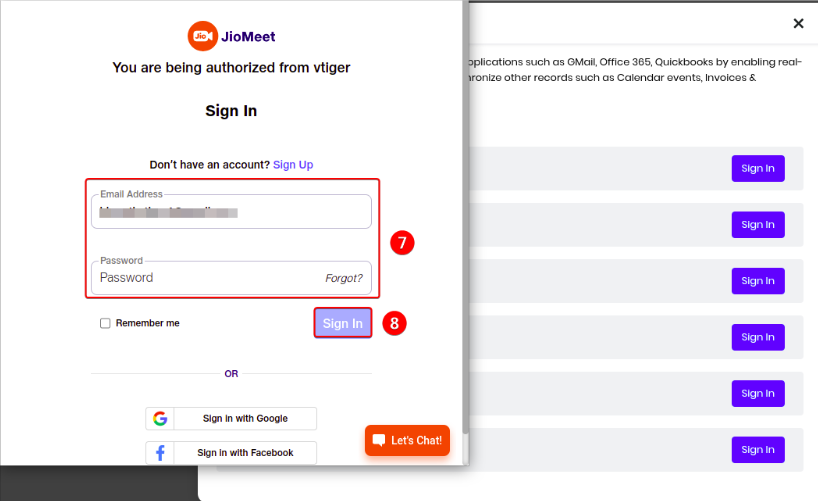
- Enter your credentials in the JioMeet sign-in window - Username and Password.
- Click Sign in.
You are now authorized to use JioMeet from Vtiger CRM. You can now create meetings and fetch details from the relevant records to send invites and remind the participants of the scheduled meeting.
Using JioMeet
Now that you have activated JioMeet by installing the Conference application, you can now get started using it.
JioMeet is available in the following modules as different options:
- Contacts - Schedule Conference option
- Deals - Schedule Conference option
- Emails - Insert Links option
- Events - Activity Type dropdown
- Live Chats - Schedule Conference option
|
|
Creating a JioMeet Meeting from Events
Follow these steps to create a JioMeet meeting from the Events module:
- Log in to your CRM account.
- Click the Main Menu.
- Go to Essentials.
- Select Events.
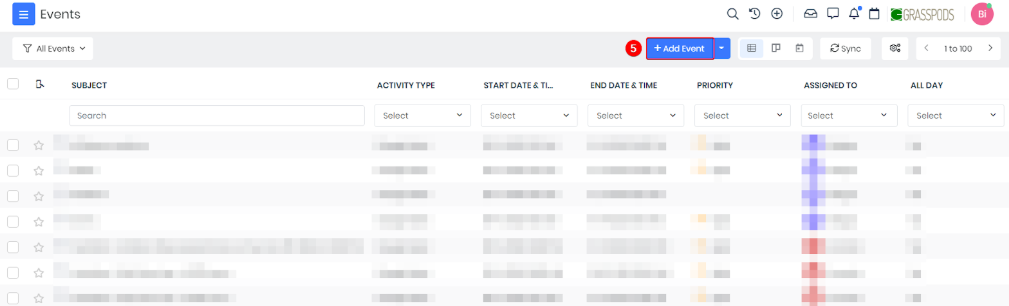
- Click +Add Event.
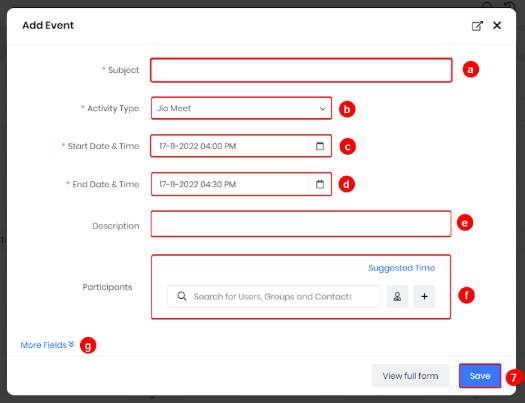
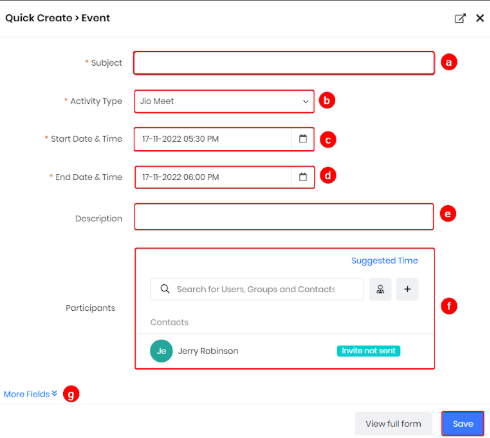
- Enter or select the following information:
- Event Name: Enter a Name for the event.
- Activity Type: Select JioMeet from the drop-down.
- Start Date & Time: Enter the starting date and time of the event.
- End Date & Time: Enter the ending date and time of the event.
- Description: Enter a description for the event.
- Participants: Select the participants for the event.
- Click More Fields or View full form to add other details like Agenda, Location, etc.
- Click Save.
- Click Send to send invite emails to the participants.
If the participants accept the email invitation, an event is added and a reminder is set on their calendars.
|
|
Creating a JioMeet Meeting from Contacts or Deals
You can send the JioMeet Meeting link from an individual contact or deal record. The recipient can accept your request and click on the link you sent to join the meeting. Now let us see how you can accomplish this.
|
|
Let us consider the Contacts module here. The same steps also apply to the Deals module.
Follow these steps to create a JioMeet Meeting from the Contacts module:
- Log in to your CRM account.
- Click the Main Menu.
- Go to Essentials.
- Select Contacts.
- Open any contact record.
- Click the More icon on the top right corner of the record.
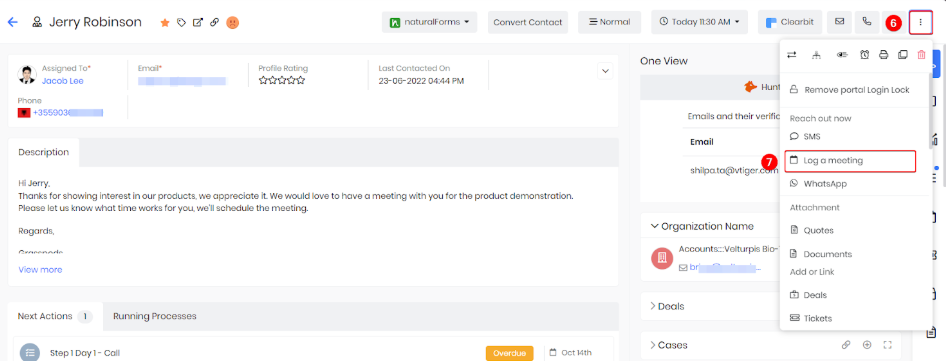
- Select Log a meeting from the drop-down.
- Enter or select the following information:
- Event Name: Enter a Name for the event.
- Activity Type: Select JioMeet from the drop-down.
- Start Date & Time: Enter the start date and time of the event.
- End Date & Time: Enter the end date and time of the event.
- Description: Enter a description for the event.
- Participants: Select the participants for the event.
- Click More Fields or View full form to add other details like Agenda, Location, etc.
- Click Save.
- Click Send to send the invite to the contact. The event is sent to all contacts if you have added more than one contact.
|
|
Sending a JioMeet meeting link from an email
You can send a JioMeet meeting link to your contacts or co-workers from the Compose Email window. For example, let us send a meeting link from the Deals module.
Follow these steps to create a JioMeet Meeting from the Deals module:
- Log in to your CRM account.
- Click the Main Menu.
- Go to Sales.
- Select Deals.
- Open any deal record.
- Click the Email icon on the top right corner of the record.
- Select Email Preferences as per requirement.
- Click Proceed.
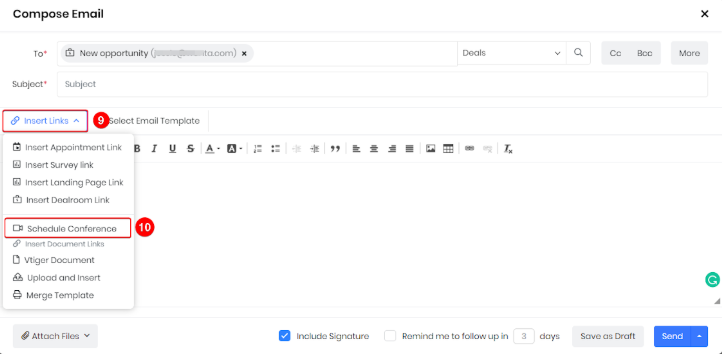
- Click the Insert Links dropdown from the Compose Email window.
- Select the Schedule Conference option.
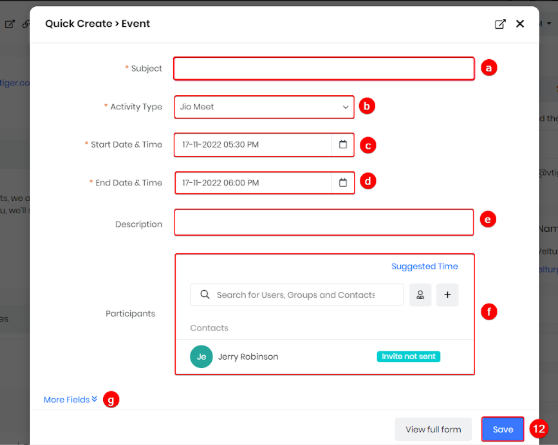
- Enter or select the following information:
- Event Name: Enter a Name for the event.
- Activity Type: Select JioMeet from the drop-down.
- Start Date & Time: Enter the start date and time of the event.
- End Date & Time: Enter the end date and time of the event.
- Description: Enter a description for the event.
- Participants: Select the participants for the event.
- Click More Fields or View full form to add other details like Agenda, Location, etc.
- Click Save. Your email now has all the meeting information.

- Add email content in the text window.
- Click Send.
|
|
|
|
Creating a JioMeet Meeting from Live Chats
Good news for Customer Support teams! You can now set up a meeting with a customer you are interacting with in the CRM.
Follow these steps to create a JioMeet Meeting from the Live Chats module:
- Log in to your CRM account.
- Click the Main Menu.
- Go to Help desk.
- Select Live Chats.
- In the Live Chat console, click the required conversation.
- Click More in the top right corner.
- Select Log a Meeting from the dropdown.
- Enter or select the following details in the Schedule Conference window:
- Event Name: Enter a Name for the event.
- Activity Type: Select JioMeet from the drop-down.
- Start Date & Time: Enter the start date and time of the event.
- End Date & Time: Enter the end date and time of the event.
- Description: Enter a description for the event.
- Participants: Select the participants for the event.
- Click More Fields or View full form to add other details like Agenda, Location, etc.
- Click Save.
- You can send the JioMeet Meeting link from:
- The conversation in Live Chats, or,
- An Email compose window
Meeting Record Link in the CRM
When a user changes the event status to Held, Vtiger CRM connects to Jio and fetches the meeting recording URL if the meeting was recorded. This URL appears in the Recording Link field in the CRM’s event record.
Deleting a Scheduled JioMeet Meeting
You can delete a scheduled JioMeet meeting just by deleting the Event record created to schedule the meeting.
Follow these steps to delete a scheduled JioMeet Meeting:
- Log in to your CRM account.
- Click the Main Menu.
- Go to Essentials.
- Select Events.
- Open the Event record created for the scheduled meeting.
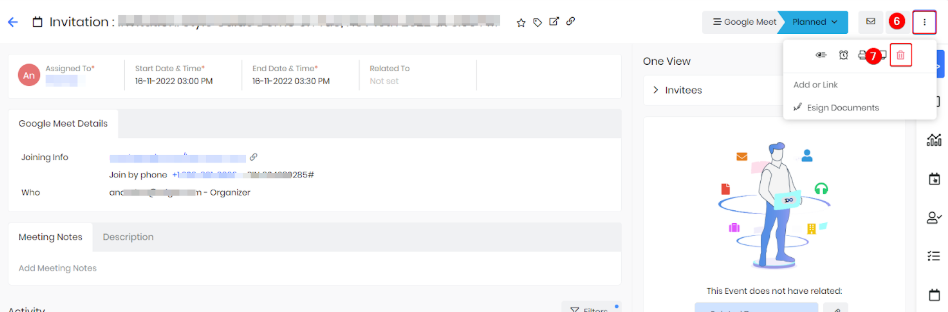
- Click the More button on the top right corner of the screen.
- Click the Delete icon.
- Click Yes, delete.
As soon as the Event record is deleted, the scheduled JioMeet Meeting will be cancelled and the meeting link will be disabled.
Deactivating JioMeet
To deactivate JioMeet in your CRM
- First, revoke access to JioMeet from Events > Sync.
- Then uninstall the Conference extension.
Revoking JioMeet’s Sync Access
If you wish to remove the JioMeet application’s access to sync records from the CRM, go back to the Sync window and revoke JioMeet’s access to sync with Vtiger CRM.
Follow these steps to revoke JioMeet’s access to sync:
- Log in to your CRM account.
- Click the Main Menu.
- Go to Essentials.
- Select Events.
- Click the Sync button.

- Click Revoke Access beside JioMeet.
The JioMeet application’s access to sync events and other records is now revoked.
|
|