Articles in this section
Basic Navigation in Vtiger CRM
Introduction
Vtiger CRM is a customer relationship management (CRM) software that empowers businesses to streamline their sales, marketing, and customer support processes.
With its comprehensive suite of features and user-friendly interface, Vtiger CRM has gained popularity among organizations of all sizes. This article will explore the key features, benefits, and Vtiger CRM.
Vtiger CRM stands out for its intuitive and user-friendly interface, making it easy for new and experienced users to navigate the system. The software prioritizes simplicity without compromising functionality.
Navigation in Vtiger CRM
Vtiger CRM is easy to navigate. The design and functionality give you the following benefits:
- Efficiency: Easy navigation allows users to quickly access different modules, features, and records within the CRM system.
- User Adoption: Complex or confusing navigation can hinder user adoption and acceptance of the CRM system.
- Productivity: Easy navigation contributes to increased productivity..
- User Satisfaction: A well-designed navigation system enhances user satisfaction.
- Reduced Training Needs: Intuitive navigation minimizes the learning curve for new users.
- Error Reduction: Confusing navigation can lead to accidental errors, such as selecting incorrect records or performing unintended actions.
In this article, you will learn how to navigate through Vtiger CRM:
- Logging into Vtiger CRM
- Navigating the Dashboard
- Performing different actions in a module
- Performing different actions in a record
- Accessing different views in the CRM
Logging into Vtiger CRM
After successfully creating a Vtiger account, you can log in to your CRM account and start managing your business and customers. You can log into the CRM in different ways:
- Username and Password
- Google ID
Via Username and Password
Follow these steps to log in to Vtiger CRM:
- Go to your web browser and enter the following address.
- Enter or Select information for the following:
- Username: Enter your CRM account username.
- Password: Enter your CRM account password.
- Click Sign in.
Via Google ID
Follow these steps to log in to Vtiger CRM via Google ID:- Go to your web browser and enter the following address.
- Click Sign in with Google.
- Select your Google account used to create the CRM account. You will be automatically logged into your CRM account.
Navigating the Dashboard
Once you log in to your CRM account, the user will land on the Dashboard by default.
You can customize the CRM by adding the page you want to land on as a default. For example, if you are a salesperson, you can make the Sales Dashboard the default landing page.
Images in this section will show you the different actions available on the Dashboard.
The Dashboard
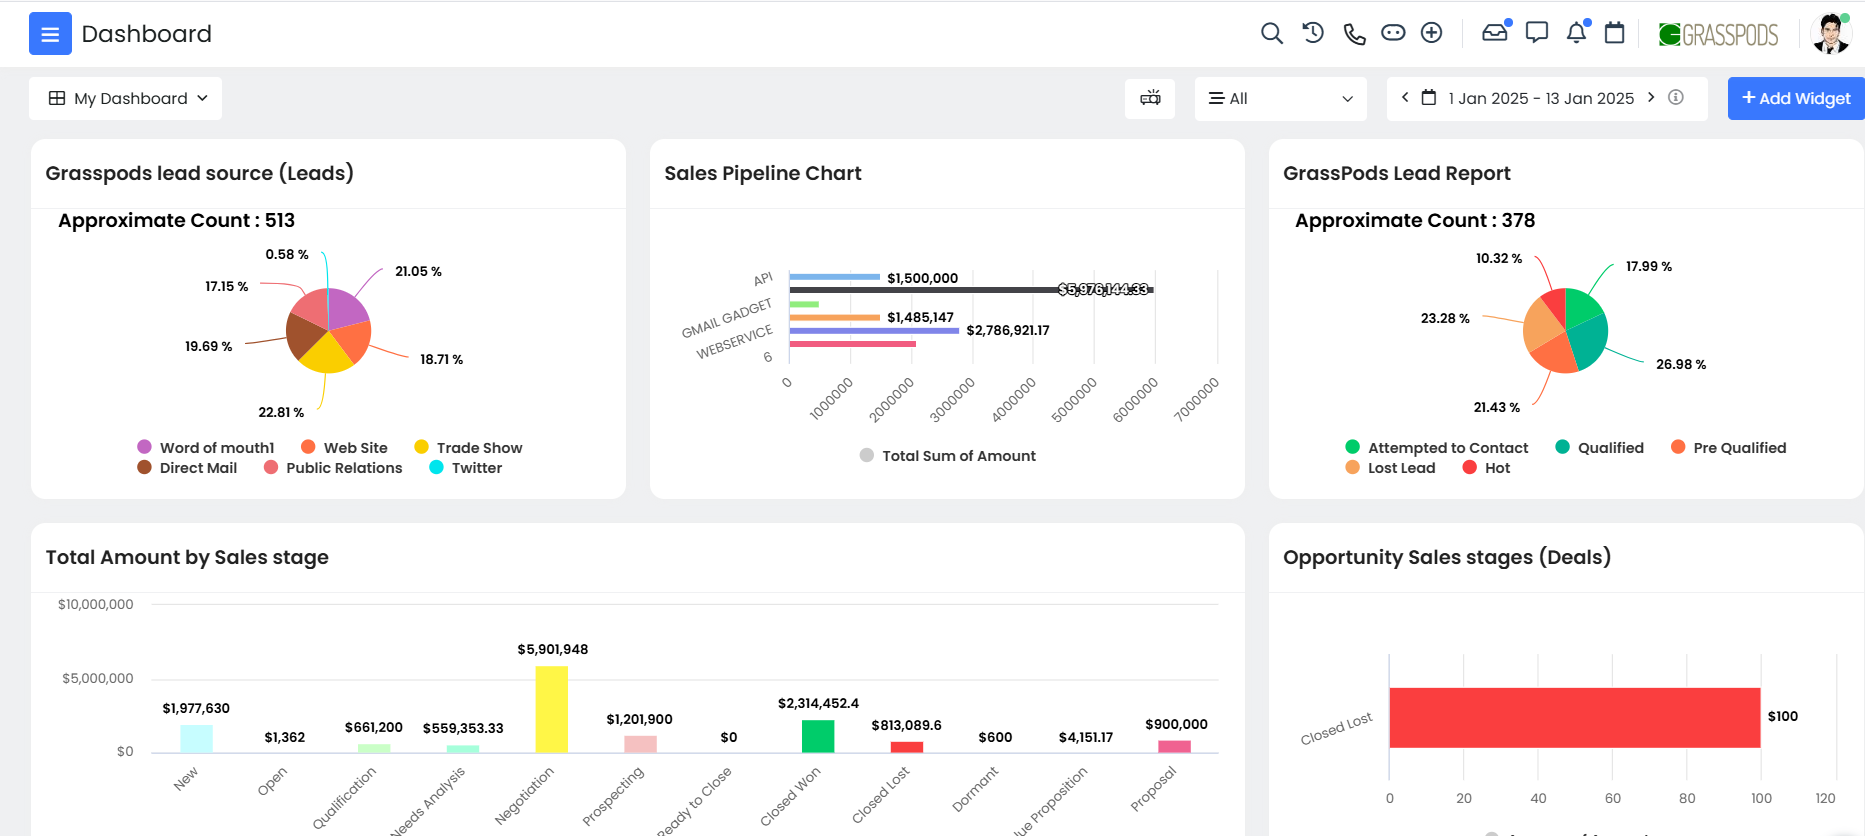
The Dashboard gives users a centralized and customizable overview of their CRM activities and important information. It gives users a comprehensive and customizable overview of their CRM data, activities, and performance metrics.
Now let's break down this screen into smaller sections:
Top Section

Following are the actions in the top section:
- Favourites: Displays a few modules for easy access (customizable using the Personalize option).
- Search Bar: You can search for the required modules from the Main Menu.
- Personalize: You can customize the modules in the favourite and Main Menu with easy drag and drop action.
- Frequently Used: Displays the most frequently used modules.
App Section
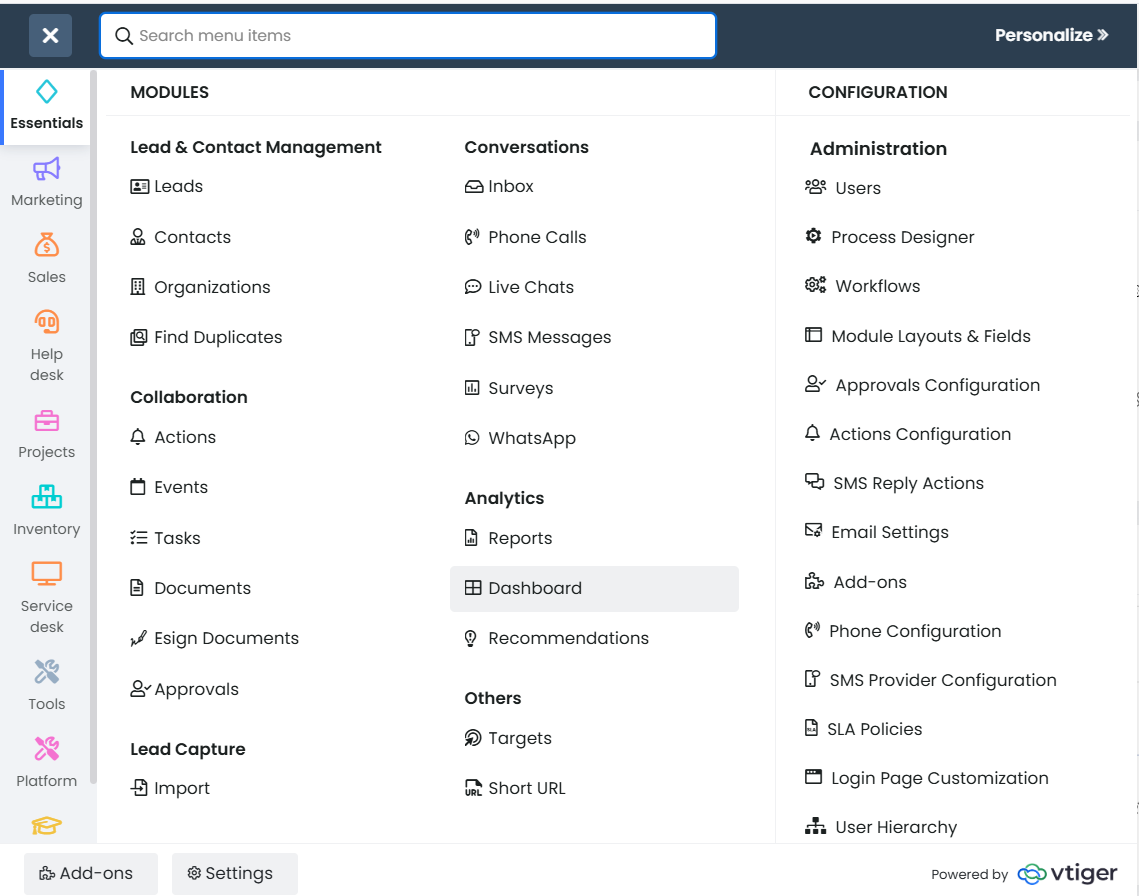
The App section displays all the apps, modules, and features in the subscription edition you signed up for.
Below the apps are the shortcuts to Add-ons and Settings sections.
Following are the actions in the app section:
- Main Menu: Located at the top or side of the dashboard, the navigation menu allows users to access various modules and features of the CRM, such as Contacts, Leads, Opportunities, Calendar, Tasks, and more. It provides quick access to different sections of the CRM system.
- Add-ons: Takes you to the Vtiger Extension Store > Add-ons, where you can find different third-party applications to iterate with the CRM.
- Settings: Takes you to the CRM settings page, where you can configure and set up the CRM.
Right Section

Following are the actions in the right section:
- Global Search: Allows you to search for CRM records using keywords.
- History: Displays your recent actions and activities.
- Ask Calculus AI: You can quickly chat with the Vtiger AI bot to find solutions.
- Quick Create: Vtiger CRM often provides a set of quick action buttons or shortcuts on the dashboard, allowing users to perform common tasks or actions without navigating through multiple pages. These actions include creating new records, adding tasks, scheduling events, or sending emails.
- Inbox: Allows you to check your email inbox.
- Internal Chat: Allows you to chat with your internal team and other workmates.
- Actions: Displays all broadcasts, updates, engagements, mentions, and planned events.
- Calendar: The Calendar View display upcoming events, meetings, or tasks. It visualizes scheduled activities, allowing users to manage their time efficiently and stay organized.
- Logo: Displays your company logo.
- User Menu: Displays options like My preferences, CRM settings, Log out button, and more. These will be discussed in detail below
- Help Center: Allows you to ask questions and assists you through different CRM processes using the FAQs and help articles from the Vtiger Knowledge Base. Help Center displays FAQs relative to the module and screen you are visiting in the CRM. You can minimize this pop-up and expand it again. The pop-up will display the same information and steps as before. For example, if a user on the Sales Dashboard page opts to minimize the pop-up and then reopen it later, the pop-up will display the steps related to the Sales Dashboard.
Navigating in a Module Screen
Records are displayed in the List View for a module in the CRM. Other views available for a record are Summary View and Detail View.
Let us discuss these in detail:
Before getting into actions in a record, understand the different Views available in a record.
Following are the different Views available in a record:
- List View: The List View is a tabular representation of records within a module. It presents a condensed view of multiple records in a table format, with each row representing an individual record and columns displaying key fields or attributes.
- Summary View: The Summary View displays an overview of a single record. It presents the most important details and key fields of a record in a compact format, allowing users to access a record's information at a glance quickly. For example, the Summary View of a contact record typically includes essential information like the record's name, contact details, status, and relevant summary fields.
- Detailed View: The Detailed View offers a comprehensive display of all the information associated with a specific record. It provides an expanded view of the record, including all the fields, related information, activities, and history. Users can access and modify various fields, add notes, attach files, view related records, and perform other detailed actions within the Detailed View.
- One View: The One View, also known as the 360-degree view, provides a holistic perspective on a record by consolidating all relevant information, activities, and interactions associated with that record. It offers a comprehensive and unified view by combining data from multiple modules, such as contacts, leads, opportunities, and communication history, into a single, integrated display. The One View enables users to completely understand the record's history, relationships, and interactions, empowering them to make informed decisions and engage effectively with the associated entity.
Apart from the Dashboard actions, many more are available inside a module.
For example, consider the Contacts module. Click the Essentials > Contacts module.
|
|
Navigation in the List View
Following are the actions available inside the Contacts module’s List View:
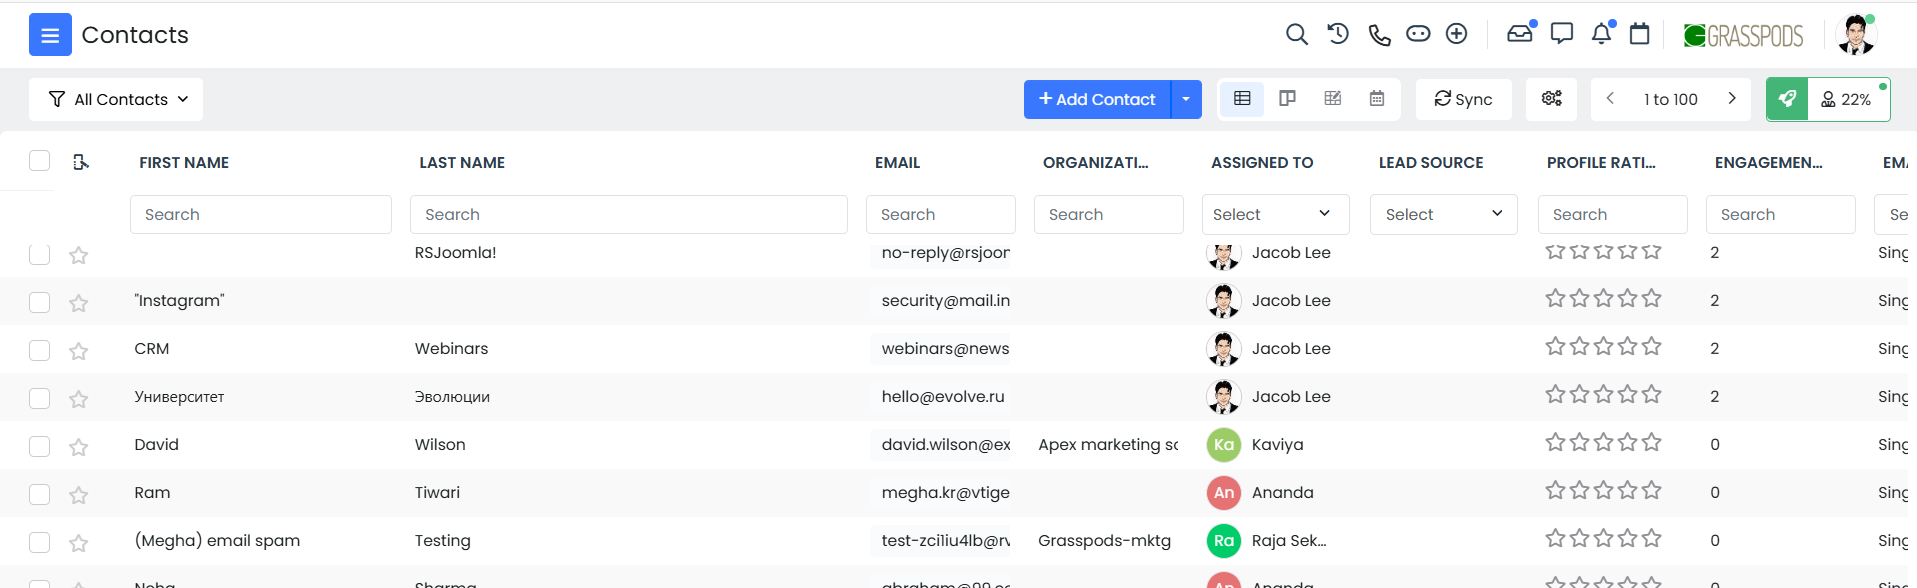
- Filters: Use these filters to sort the records based on time, date, and assigned users. You can also add custom filters to the list.
- +Add Contact: Click the button to add new records.
- Drop-down: Click the drop-down to select other available actions (specific to a module).
- Views: Select from the different views available such as List View, Kanban View, Grid View, and Calendar View.
- Sync: Click the button to sync data from third-party integrations.
- Settings: Click for a list of settings. (Specific to a module)
- List Size: Click to navigate through the list size.
- Checkbox: Click the checkbox beside a record to select and perform actions such as edit, delete, export, print, and more.
- Columns: Hover over a column to perform the following actions.
- Adjust the size of the column.
- Sort the records in ascending or descending order.
- Search Fields: Use these fields to search for specific records based on organizations, names, assigned users, and more.
- Star Icon: Click the star icon beside the required records to follow important records. Once you follow a record, you will receive notifications for updates made to the record.
- Opening a Record: Click on the record to view the record in detail.
- Quick actions icons: Hover over the required contact record to find quick actions such as Call, Email, SMS, and more.
Note: The actions available here are similar to other models, such as the Leads, Organizations, and Deals. Other modules available n the CRM may have different actions and layout set-ups based on their functionality.
Navigating in a Record Summary View
In Vtiger CRM, a record refers to an individual entry or data point representing a specific entity, such as a contact, lead, opportunity, account, or any other module within the CRM system. Each record contains a collection of fields and information related to that particular entity.
Now let's break down this screen into smaller sections:
Section 1
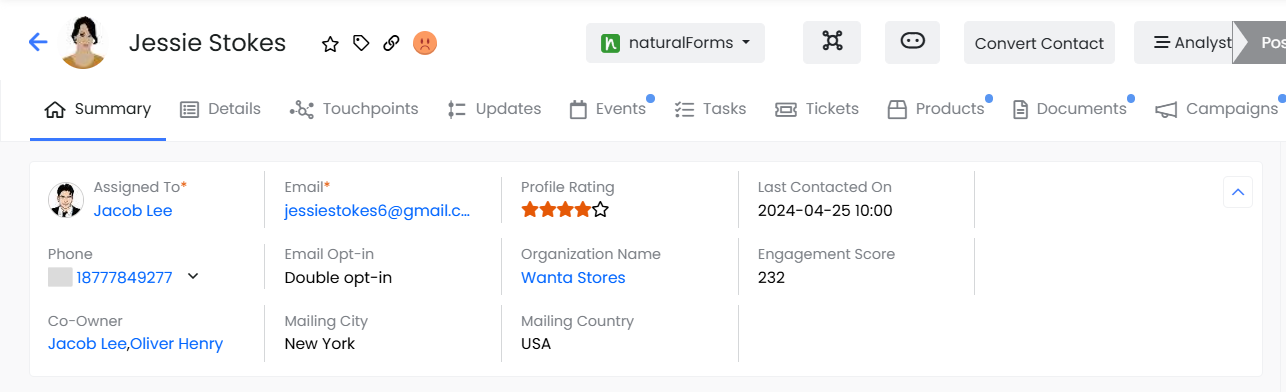
Following are actions in the top section:
- Record Name: Displays the name of the record. In this case, the contact name.
- Star icon: Click the star icon to follow the record. Once you follow a record, you will receive notifications for updates made to the record.
- Tags icon: Click to add a tag to the record.
- Open icon: Opens the record in a new window.
- Link icon: Click to copy the record link.
- Third-Party Integration: Displays the synced third-party integration, if any.
- Contact Conversion: Allows you to convert the contact type.
- Contact Type: Displays the contact type. The contact type can be a Lead, Customer, Vendor, etc.
- Best Time to Contact: Displays the best time to connect with the contact if added.
- Lead Source: Displays the source of the contact.
- Email: You can connect with the contact via different email service providers.
- Phone: You can connect with the contact via different call service providers.
- Phone: You can connect with the contact via different call service providers.
- More: This option lists actions such as Print, Transfer Ownership, Obtain Consent, and more.
- Edit: Allows you to edit information related to the contact.
Section 2

Following are the actions in the left section:
- Assigned To: Displays the name and number of the User assigned to the contact.
- Email: Displays the email of the contact.
- Profile Rating: Displays the profile rating based on recent conversations.
- Last Contacted On: Displays the time and date of the last conversation.
- Description tab: Displays a description of the contact if added.
- Actions tab: Displays the previous and planned actions.
- Touch Points: Displays all the interactions with the contact, such as Web Chats, Phone Calls interactions, Cases, and Events.
- Filters: You can filter the activities related to the contact as per your preference.
- Activity tab: It allows you to add comments and displays all the activities related to the contact.
Section 3
Following are the actions in the right section:
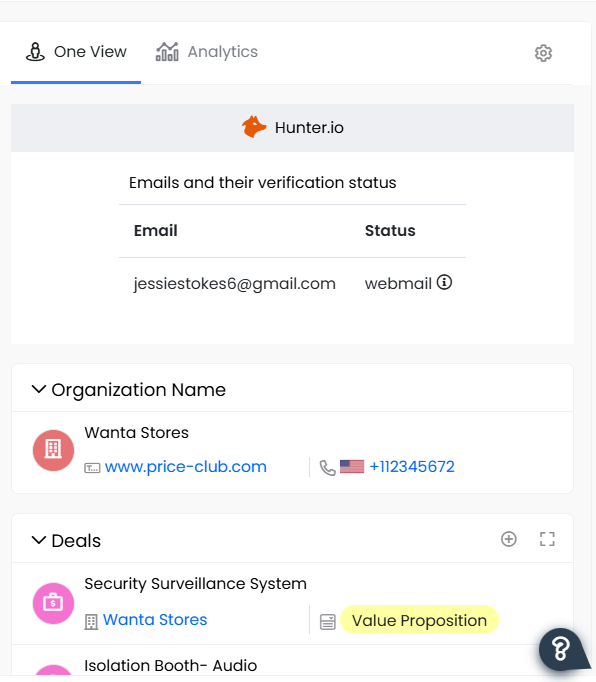
- Related tab: This section displays the information in One View by default. One View displays all the contact-related records from the CRM, such as Deals, Cases, Quotes, and more, in one place and, therefore, the name, One View.
- Other tabs: Hover over the other tab to display other tabs such as Analytics, related Documents, Products, and more, replacing the One View on the view board. One View can also be replaced with the Detailed View, which displays all the contact record details.
|
|