Articles in this section
Using Microsoft Teams in Vtiger CRM
Feature Availability
Vtiger Editions: One Pilot | One Growth | One Professional | One Enterprise | One AI
Introduction
Microsoft Teams is a collaboration and video communication app developed by Microsoft. You can use Microsoft Teams to connect and collaborate with your contacts and coworkers through video meetings and calls.
Integrating Teams with Vtiger CRM lets you create meeting events with Teams meeting links. You can send these invites to your customers or team members directly from the CRM.
Note: You can integrate Microsoft Teams with Vtiger CRM only if you have Microsoft Work or School accounts. Personal Microsoft accounts are not supported.
Microsoft Teams Integration in Vtiger CRM
Microsoft Teams is a part of the Conference Add-on.
When you create a calendar event in Vtiger, you can select Microsoft Teams Meeting as the Activity Type. A meeting link is generated and can be shared with participants through email, event alerts, live chats, and more.
Teams is available in the following Vtiger CRM modules:
- Events – via the Activity Type dropdown
- Contacts – via the Schedule Conference option
- Deals – via the Schedule Conference option
- Emails – via Insert Links > Schedule Conference
- Live Chats – via the More > Schedule Conference option
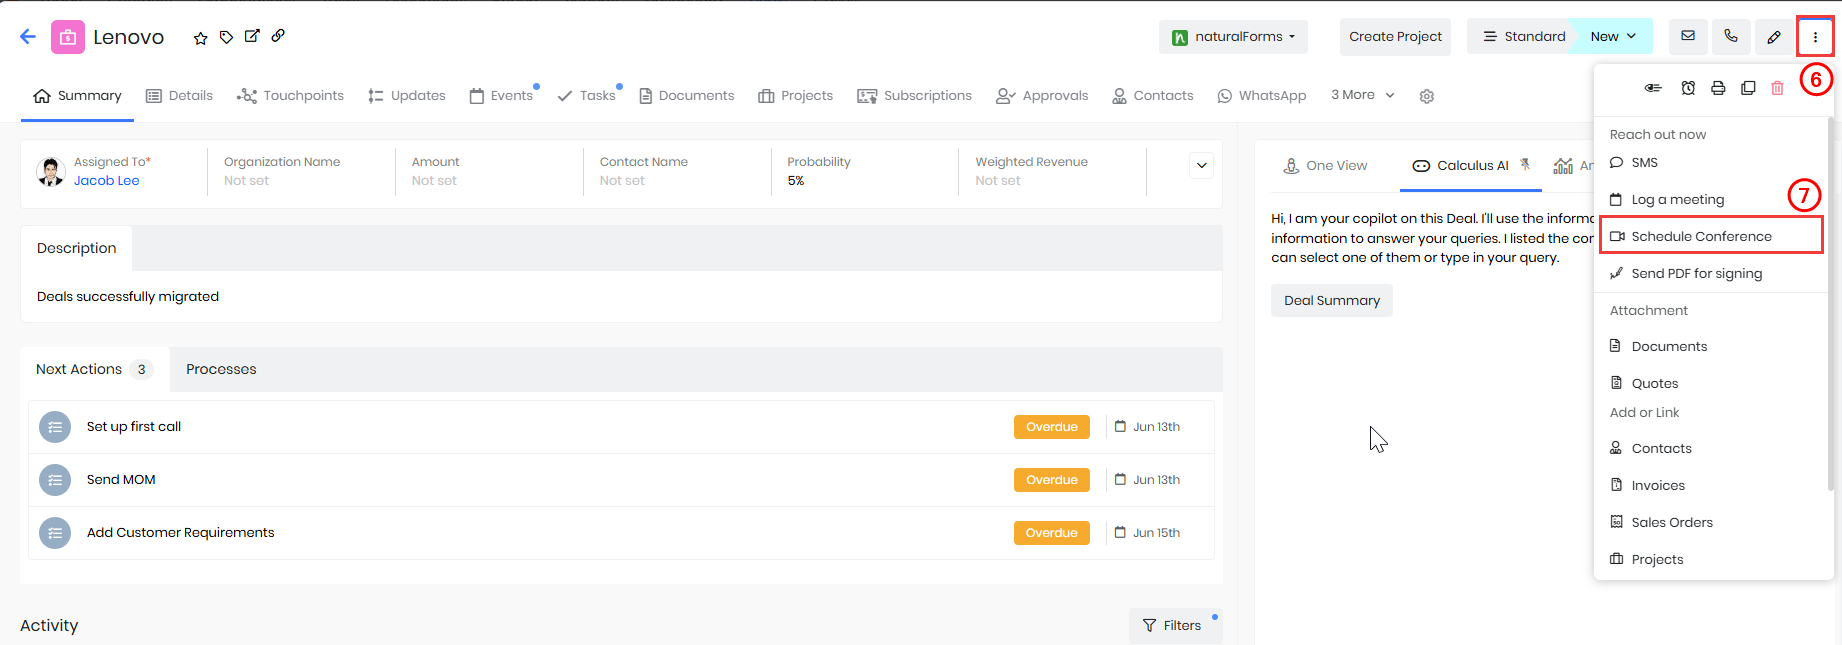
You can also use the Schedule Conference option to create a Microsoft Teams meeting. This option is available in Emails, Contacts, Deals, etc.
Features available in Microsoft Teams meetings:
The following features are supported when hosting a Microsoft Teams meeting:
- Host meetings for up to 1000 participants (depending on license)
- Send meeting links from various CRM modules via email, chat, etc.
- Share screens, presentations, and documents
- Record meetings with cloud storage support
- Use background blur or virtual backgrounds
- Collaborate in a meeting with chat and file sharing
- Access meeting attendance reports (Graph API required)
Benefits
The benefits of integrating Microsoft Teams with Vtiger CRM are:
- Create an event and send the invite with the Teams meeting link from the CRM.
- Easy sharing of meeting details via email, chats, and calendar events.
- Record meetings, transcripts, etc.
- Host meetings with up to 1000 participants (depending on your Microsoft license).
- Centralized access to an event record for meeting links, participant data, and status updates in the CRM.
In this article, you will learn about:
- Installing Microsoft Teams
- Adding and syncing Microsoft Teams with Vtiger CRM
- Using Microsoft Teams in Events
- Viewing Microsoft Teams Events Records
- Revoking access to Microsoft Teams
- Deactivating Microsoft Teams from Vtiger
- Syncing Teams Events with Google Calendar
Installing Microsoft Teams
Microsoft Teams is not available by default in Vtiger CRM. You must install it from the Extensions > Add-ons.
Follow these steps to install Microsoft Teams:
- Log in to the CRM.
- Click the User Menu on the top right corner.
- Click the Settings. The Settings page opens.
- Go to the Extensions section.
- Click Add-ons. The Add-ons page opens.
- Search for Conference. The Conference Add-on appears.
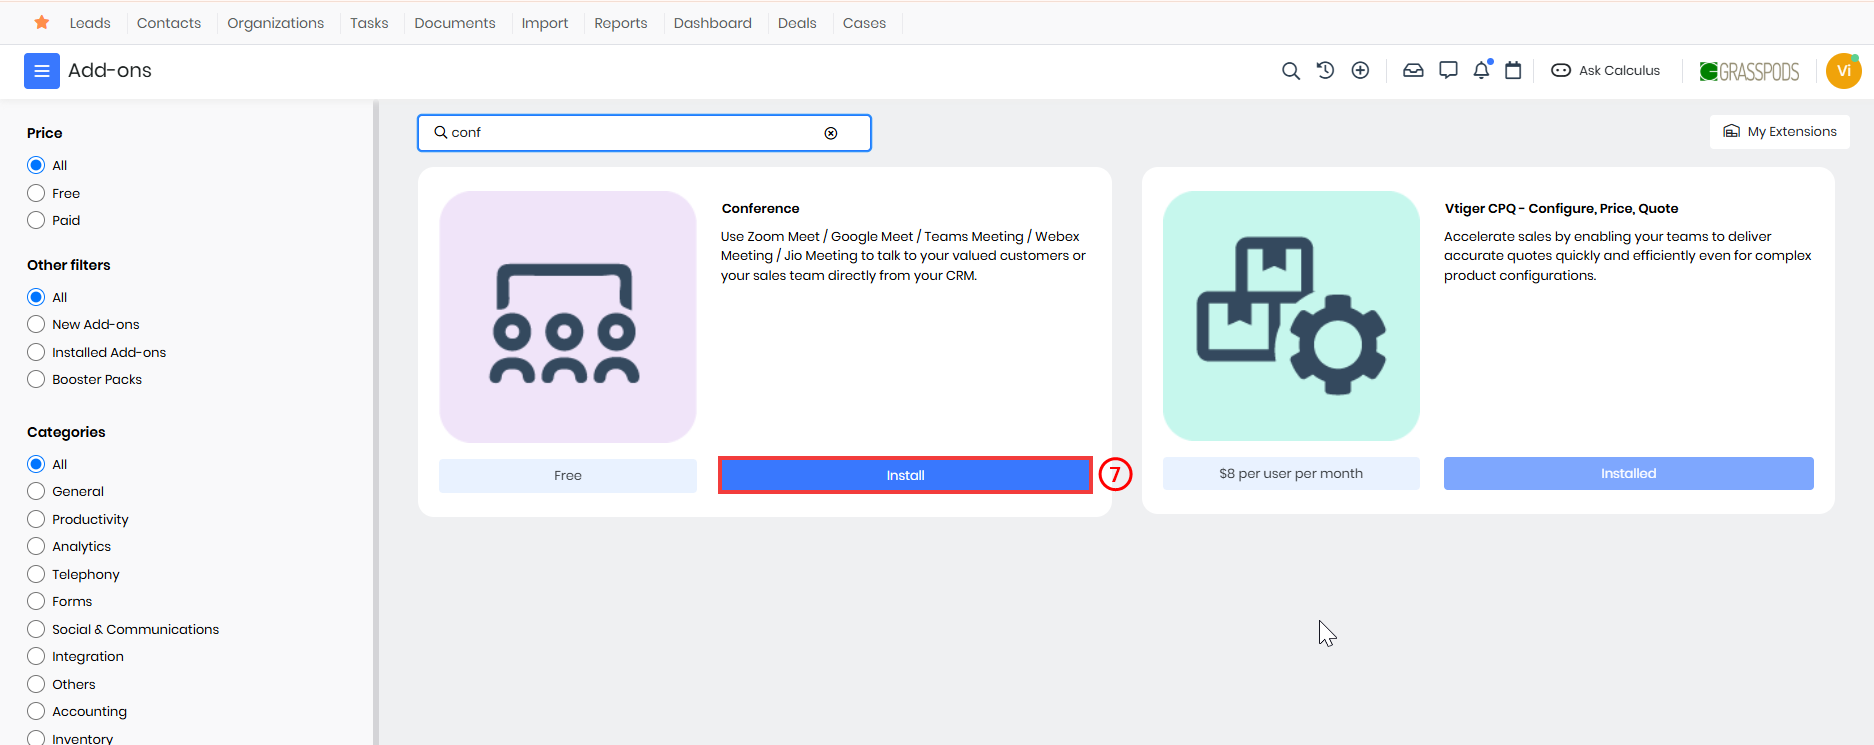
- Click the Install button.
Microsoft Teams is now installed in your CRM account.
Adding a Microsoft Teams Account to Vtiger CRM
Before scheduling meetings, you must connect your Microsoft Teams account with Vtiger CRM and grant permissions.
Follow these steps to add Microsoft Teams to Vtiger:
- Log in to the CRM.
- Go to Main Menu.
- Select Essentials > Events. The Events page opens.
- Click the Sync button on the top right. The Sync window opens.
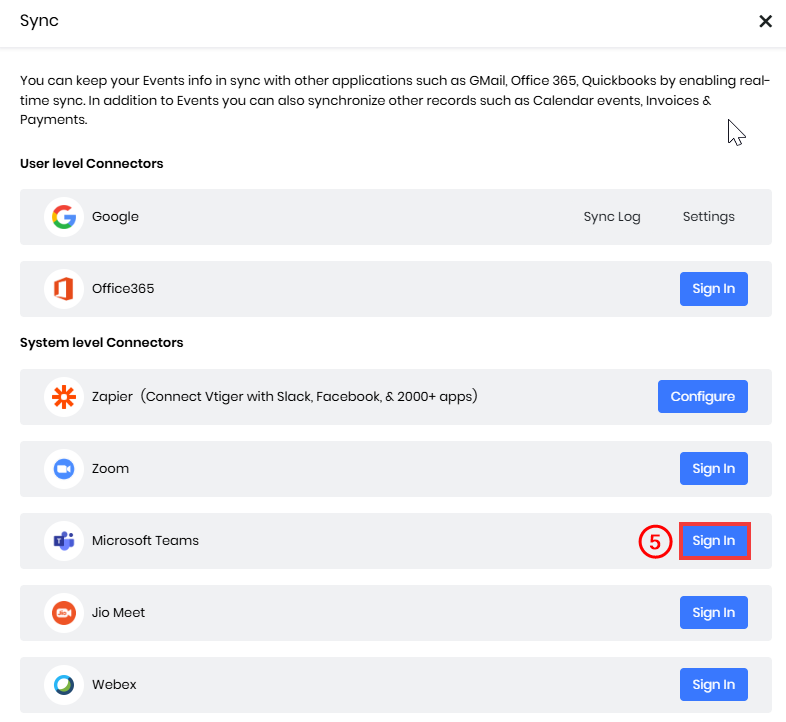
- Click Sign In next to Microsoft Teams. A Microsoft login screen appears.
- Enter your Microsoft credentials.
- Grant necessary permissions to complete the authorization.
- Click Sign In.
Your Teams account is now connected to Vtiger CRM.
Using Microsoft Teams
Since Microsoft Teams is primarily used as a mode of communication, let us see where it is available in the CRM. Microsoft Teams is available as:
- Activity Type dropdown in Events
- Schedule Conference option in Contacts
- Schedule Conference option in Deals
- Schedule a conference and insert it in your email via the Insert Links option.
- Schedule Conference option in Livechats
When you schedule a meeting using Microsoft Teams:
- Creating a Teams meeting via the Events module generates a corresponding Event record in the CRM.
- Scheduling a meeting through the Schedule Conference option in Contacts or Deals also creates a linked Event record in the CRM with the Teams meeting details.
- Conference option in Contacts or Deals also creates a linked Event record in the CRM with the Teams meeting details
From Events
To use Teams through Events, select the Activity Type as Teams Meetings.
Follow these steps to use Teams Meeting:
- Log in to the CRM.
- Go to the Main Menu.
- Click the Essentials > Events. The Events page opens.
- Click the + Add Event button. The Add Event window opens.
- Click the View Full Form button.
- Enter or select the following details to create a new Event -
- Subject: Enter the subject of the Event.
- Activity Type: Select the Teams Meeting as the activity type from the drop-down menu.
- Start Date & Time: Specify when the Event should start by selecting the appropriate date and time.
- End Date & Time: Define when the Event will conclude by setting the end date and time.
- Description: Provide a detailed explanation of the Event, outlining its purpose.
- Participants: Add participants who will be attending the Event. You can select participants by clicking the User icon and, if necessary, quickly create new contacts by clicking the Plus icon.
- Assigned To: Choose the individual or team to whom the Event should be assigned from the drop-down.
- Status: Indicate the current status of the Event by selecting options such as Held, Incomplete, Planned, etc.
- Priority: Specify the priority of the Event, whether it is High, Medium, or Low Priority. So you can prioritize tasks accordingly.
- Location: Add the Location.
- Event Image: Add an image for the Event by clicking Browse and selecting one from your device.
- All Day: Select this checkbox if the Event will last all day.
- Mutual: Enable this checkbox if the Event is mutual
- Related To: If the Event is associated with any module, such as Deals or Internal Tickets, you can select it from the dropdown menu and select the particular record in the search bar.
- Organization Name: Add the name of the organization.
- View full form: Click to enter or select details for the following sections:
- Event Details
- Reminder Details
- Recurrence Details
- Description Details
- Related To
- Invitees
- Click Save.
An Event record with a Microsoft Teams meeting link is created and stored in the Events folder in the CRM.
From Contacts
You can send the Team meeting link from an individual Contact record.
The recipient will accept your request and click on the link you sent to join the meeting.
Follow these steps to create a Teams meeting from the Contacts module:
- Log in to the CRM.
- Click the Main Menu.
- Go to Essentials.
- Select Lead & Contact Management > Contacts. The Contacts page opens.
- Select and click to open the Contact record for whom you want to set up a meeting. The Summary View opens.
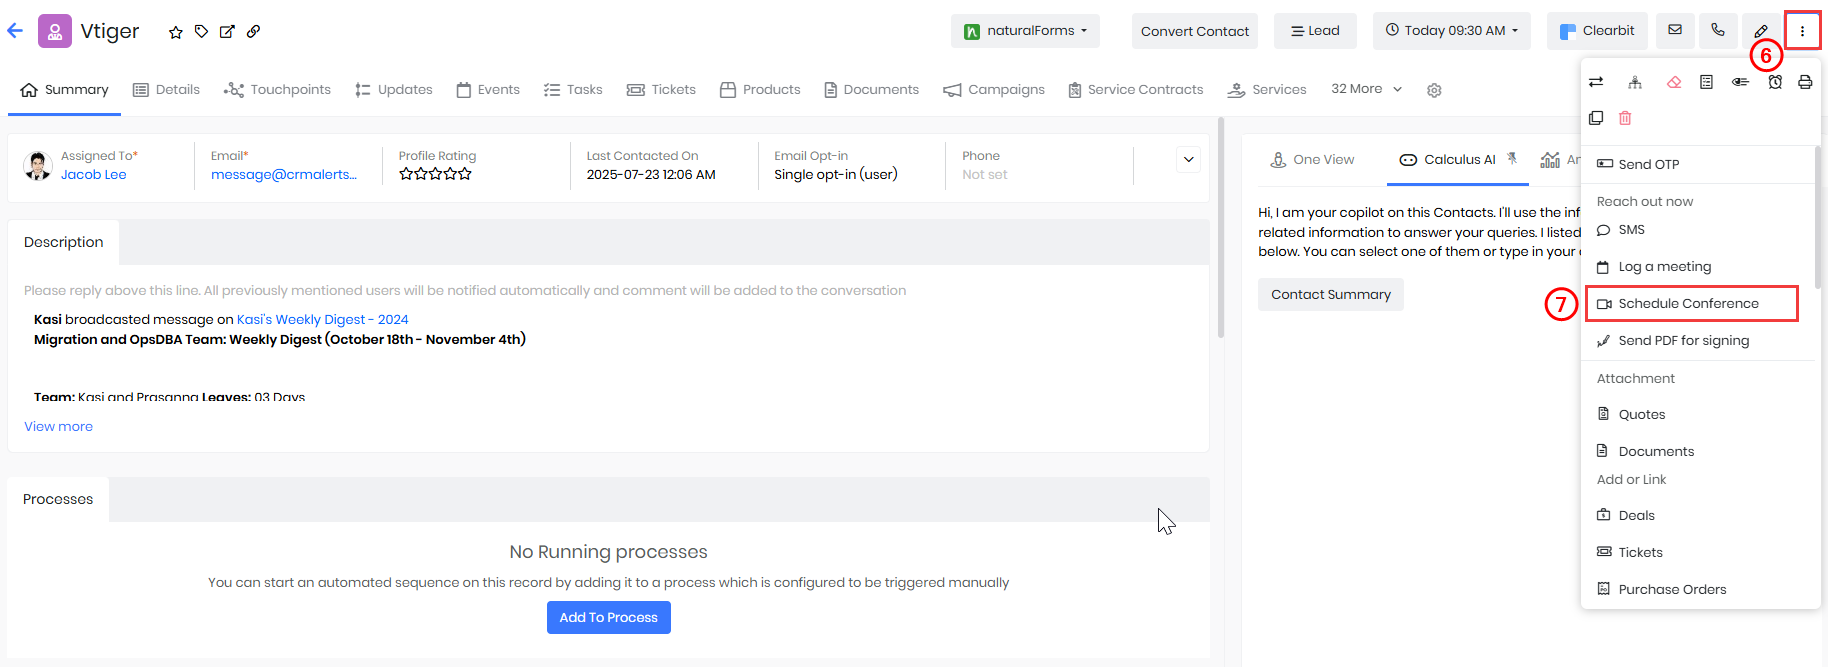
- Click More.
- Select the Schedule Conference option in the dropdown. The Schedule Conference window opens.
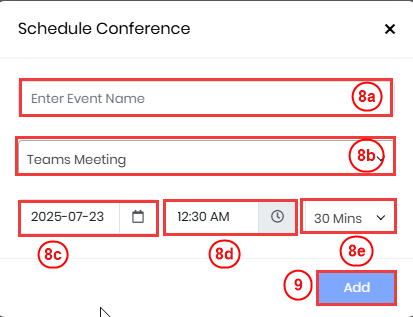
- Enter or select the following information -
- Event Name: Enter a name for your meeting.
- Activity Type: Select Teams Meeting.
- Start Date: Choose the date on which the meeting should be scheduled.
- Start Time: Select the time at which the meeting should begin.
- Duration: Enter the expected duration of the meeting (e.g., 30 minutes, 1 hour).
- Click Add. Click Add. A Do you want to send invite email to all invitees? Pop-up window opens.
- Click Yes to send the meeting invite to all participants, or No if you prefer not to send the invite.
- Click Send
Once the meeting is scheduled, the event will be displayed under the Actions section of the Contact record, and an Event record will be created in the CRM with the Microsoft Teams meeting details.
From Deals
You can send the Team meeting link from an individual Deal record.
The recipient will accept your request and click on the link you sent to join the meeting.
Follow these steps to create a Teams meeting from the Contacts module:
- Log in to the CRM.
- Click the Main Menu.
- Go to Sales.
- Select Pipeline Management > Deals. The Deals page opens.
- Select and click to open the Deal record for whom you want to set up a meeting. The Summary View opens.
- Click More on the top right corner of the record.
- Select the Schedule Conference option in the dropdown. The Schedule Conference window opens.
- Enter or select the following information -
- Event Name: Enter a name for your meeting.
- Activity Type: Select Teams Meeting as the activity type from the dropdown.
- Start Date: Choose the date on which the meeting should be scheduled.
- Start Time: Select the time at which the meeting should begin.
- Duration: Enter the expected duration of the meeting (e.g., 30 minutes, 1 hour).
- Click Add. Click Add. A Do you want to send invite email to all invitees? Pop-up window opens.
- Click Yes to send the meeting invite to all participants, or No if you prefer not to send the invite.
- Click Send.
Once the meeting is scheduled, the event will be displayed under the Actions section of the Deal record and an Event record is created in the CRM with the Microsoft Teams meeting details.
From Emails
You can insert and send a Team meeting link to your contacts or co-workers from the Compose Email window (everywhere in the CRM). You can send the link from:
- The List View of a record
- The Summary View of a record
Let us consider this example from the Deals module.
Follow these steps to create a Team meeting from the Deals module:
- Log in to the CRM.
- Click the Main Menu.
- Go to Sales.
- Select Pipeline Management > Deals. The Deals List View opens.
- From List View -
- Hover over the Deal record to whom you want Deal record for whom you want to set up a meeting.
- Click Email. The Compose Email window appears.
- Click the Insert Links dropdown from the Compose Email window.
- Select the Schedule Conference option.
- Enter or select the following information -
- Event Name: Enter a name for your meeting.
- Activity Type: Select Teams Meeting.
- Start Date: Choose the date on which the meeting should be scheduled.
- Start Time: Select the time at which the meeting should begin.
- Duration: Enter the expected duration of the meeting (e.g., 30 minutes, 1 hour).
- Click Add. A Do you want to send invite email to all invitees? Pop-up window opens.
- Click Yes to send the meeting invite to all participants, or No if you prefer not to send the invite
- The meeting information is added to your email.
- Add email content in the text window.
- Click Send.
- From Summary View -
- Click on a Deal record to whom you want Deal record for whom you want to set up a meeting. The Summary View opens.
- Click Email located at the top right corner of the record.
- Select the Schedule Conference option.
- Enter or select the following information -
- Event Name: Enter a name for your meeting.
- Activity Type: Select Teams Meeting.
- Start Date: Choose the date on which the meeting should be scheduled.
- Start Time: Select the time at which the meeting should begin.
- Duration: Enter the expected duration of the meeting (e.g., 30 minutes, 1 hour).
- Click Add. Click Add. A Do you want to send invite email to all invitees? Pop-up window opens.
- Click Yes to send the meeting invite to all participants, or No if you prefer not to send the invite.
- The meeting information is added to your email.
- Add email content in the text window.
- Click Send.
- From List View -
An Event record is created in the CRM with the Microsoft Teams meeting details. You can view the sent email in the Activity section of the respective record.
Note: You can also select an existing email template by clicking the Select Email Template button instead of typing it from scratch. To know more about Email Templates, click here.
From Live Chats
Follow these steps to create a Teams meeting from the Live Chats module:
- Log in to the CRM.
- Click the Main Menu.
- Go to Help desk.
- Select Customer Issues > Live Chats. The Live Chat page opens.
- In the Live Chat console, click on any conversation.
- Click More on the top right of the conversation.
- Click Accept.
- Click More on the top right of the conversation.
- Select the Schedule Conference option. The Schedule Conference window opens.
- Enter or select the following details in the Schedule Conference window -
- Event Name: Enter a name for your meeting.
- Activity Type: Select Teams Meeting as the activity type from the dropdown.
- Start Date: Choose the date on which the meeting should be scheduled.
- Start Time: Select the time at which the meeting should begin.
- Duration: Enter the expected duration of the meeting (e.g., 30 minutes, 1 hour).
- Select the following options to send the Teams Meeting link -
- Send via Email: The link will be emailed to the primary email.
- Send in Chat: The link will be shared within an active Live chat conversation.
Viewing Microsoft Teams Event Records
You can view all events scheduled via Microsoft Teams directly from the Events module in Vtiger CRM. This helps you track upcoming meetings and access join links quickly.
Follow these steps to view Microsoft Teams Events in Vtiger:
- Log in to the CRM.
- Go to the Main Menu.
- Click the Essentials >Events. The Events page opens.
- In the Activity search bar, type Microsoft Teams.
The list displays all Events that were scheduled using Microsoft Teams as the conference provider.
Participant Status in the CRM
You can track the status of each participant to check if they have responded to your meeting invite. The available participant statuses include:
- Accepted – The participant has accepted the invite.
- Queued – The invite is pending response.
- Joined – The participant has attended the meeting.
When an Event is marked as Held, Vtiger CRM fetches the list of participants from Microsoft Teams and updates the invitee status to Joined for those who attended the meeting.
Note: Participants who joined the meeting but were not originally invited will not be listed in the CRM. This feature is available only for Microsoft Teams plans that include Graph API and Meeting Attendance Reports.
Meeting Recording Link in the CRM
If the meeting was recorded in Microsoft Teams and the Event is marked as Held in Vtiger, the recording URL is automatically stored in the Recording Link field in the record's Details View.
Note: Your Microsoft Teams plan must support cloud recordings for this feature to work.
Revoking Access to Microsoft Teams
If you no longer wish to keep the Teams integration active, you can revoke access from within Vtiger CRM.
Follow these steps to revoke access to the Microsoft Team account:
- Log in to the CRM.
- Go to Main Menu.
- Select Essentials > Events. The Events page opens.
- Click the Sync button on the top right. The Sync window opens.
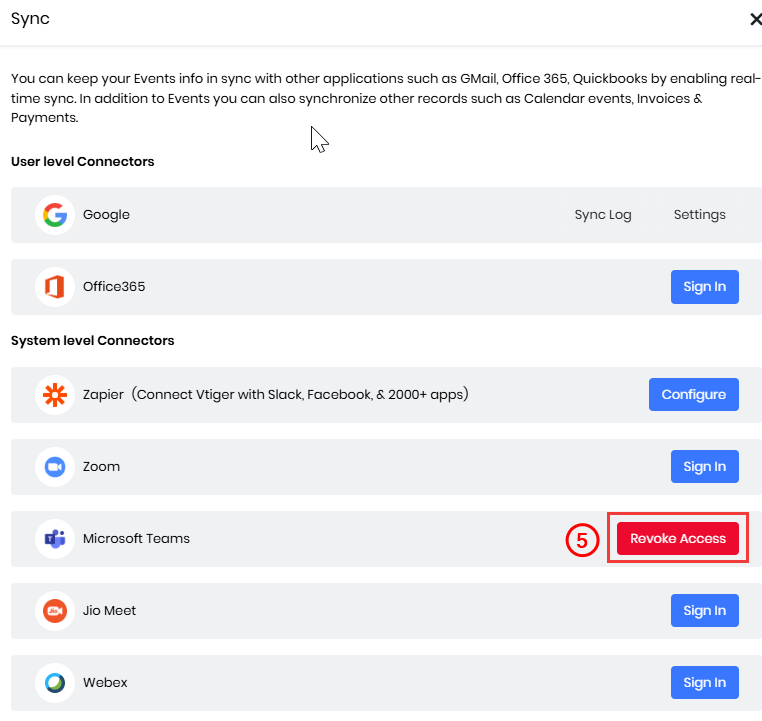
- Click Revoke Access next to Microsoft Teams. A confirmation window opens.
- Click Revoke Access.
Your Teams account is now disconnected from the CRM. Event records already created will still be available in the CRM and will retain the meeting details.
Deactivating Microsoft Teams
To deactivate Teams in your CRM, you must uninstall the Conference extension. Follow these steps to uninstall the Conference extension from your CRM:
- Log in to the CRM.
- Click the User Menu on the top right corner.
- Click the Settings. The Settings page opens.
- Go to the Extensions section.
- Click Add-ons. The Add-ons page opens.
- Search Conference.
- Click the Uninstall button.
Note:
- Once you uninstall the Conference extension, along with Zoom , Webex Meetings, and Google Meet options will not be available when creating new meetings via Events.
- Existing Event records will remain in the CRM, and past meeting recordings and links will be accessible.
Syncing Teams Events with Google Calendar
You can sync Teams meetings Events created in Vtiger with Google Calendar, so attendees using Google Calendar can view meeting info in their calendar.
Follow these steps to sync Teams Events with Google Calendar:
- Log in to the CRM.
- Go to Main Menu.
- Click Essentials > Events. The Events page opens.
- Click the Sync button. The Sync window opens.
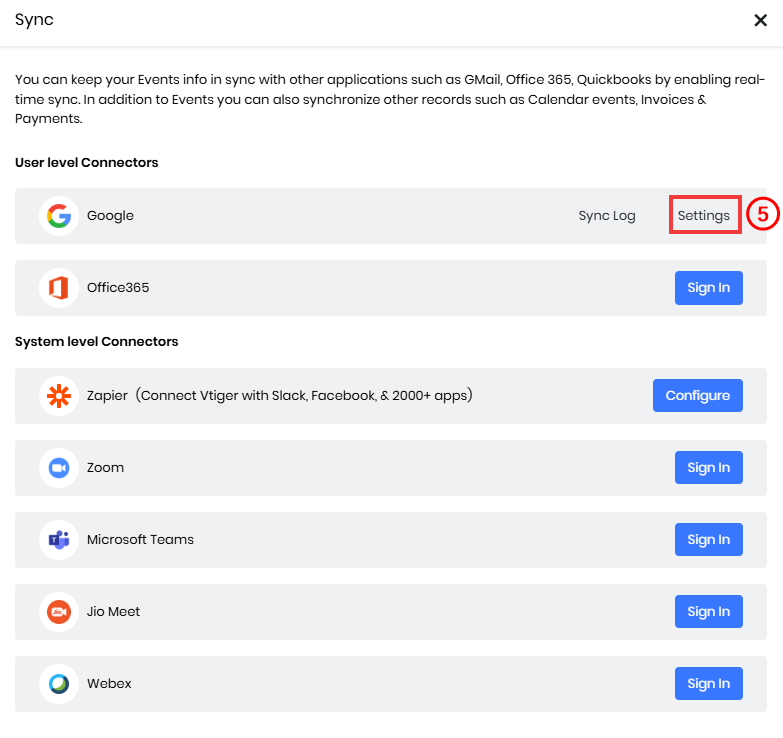
- Click Settings next to Google. The Sync window opens.
- Enter or select the following information in the Sync window:
- Google Data - Enter the data that needs to be synced.
- Sync Direction - Enter the direction that data needs to flow.
- Enable Events Sync - Enable the toggle to start syncing.
- Sync From - Enter the date from which data has to be synced.
- Note - All the events from the Sync From date to the current day will be synced.
- Click Save.
To learn more about Syncing Events with Google Calendar, click here.
Troubleshooting Tips
Unable to connect the Microsoft Teams account in Vtiger CRM
- Double-check that you are using valid Microsoft Work or School credentials.
- Ensure pop-ups are enabled in your browser to allow Microsoft login windows.
Participants’ join status not updated
- Make sure the Event status is marked as Held in the CRM.
- This feature is only available with Microsoft Teams plans that support Graph API and Meeting Attendance Reports.
Google Calendar sync issues
- Ensure both Google Calendar and Microsoft Teams accounts are properly connected.
- Check if the Enable Events Sync toggle is turned on in the Google Sync settings.
- Reauthorize the Google integration if sync issues persist.
Microsoft Teams authentication errors
This issue typically occurs when Vtiger CRM is unable to connect to Microsoft Teams due to token or permission issues. Common causes include:
- Expired Access Token – The OAuth token from the initial authentication has expired.
- Revoked Permissions – The user or admin has revoked the app’s permissions from their Microsoft account.
- Password Changed – If the password for the linked Microsoft account was recently changed, the token becomes invalid.
- Consent Removed from Microsoft Tenant – The Microsoft admin removed the app’s access or changed policies that impact token validity.
- CRM Token Cache Issue – The token stored in CRM sync settings may be corrupted due to a session mismatch or other reasons.
Error: Invalid credentials. Revoke access and add again while creating a Teams Meeting
This message appears when you try to create an Event with Activity Type is Teams Meeting, but the Microsoft Teams credentials stored in Vtiger CRM are no longer valid.
Follow these steps to revoke access:
- Log in to the CRM.
- Go to Main Menu.
- Select Essentials > Events. The Events page opens.
- Click the Sync button on the top right. The Sync window opens.
- Click Revoke Access next to Microsoft Teams. A confirmation window opens.
- Click Revoke Access.