Articles in this section
Quality Audit
Feature Availability
Vtiger Editions: One Professional | One Enterprise | One AI
Click here to view the availability of Quality Audit and other features for different editions of Vtiger CRM.
Introduction
Quality Audit is the systematic monitoring process of an organization’s quality. An internal or external quality auditor or audit team typically carries out a quality audit.
Vtiger’s Quality Audit Feature
The Quality Audit feature in Vtiger helps you audit organizations and businesses. It helps you keep track of operations, identify potential risks, and take necessary precautions in advance. Using the Quality Audit feature, you can:
- Create, customize, and publish questions at any time.
- Easily upload embedded videos and images for sections.
- Assign a maximum score for questions.
- Review answers for questions submitted by auditors.
- Allot scores to answers for exercises or quizzes submitted by auditors.
- Generate Forms for each template.
The Quality Audit feature is available under the Main Menu > Service Desk app.
Quality Audit Process - An Overview
Let us see how this process works.
The auditing process consists of the following steps:
- Create audit templates that include the template name and frequency.
- Set the specific time and frequency for generating the templates.
- Assign templates to individual auditors, organizations, or groups.
- Automatically create internal tickets from a form when an auditor identifies an issue.
- Add sections, questions, and scoring criteria to the questions.
- Automatically generate forms based on the frequency of updates.
- Ensure audit forms are available in both the Audit Forms List View and the designated auditors' mobile apps.
- Generate valuable insights based on audit scores.
The Quality Audit process consists of five major components: Audit templates, Questions, Audit Forms, Internal Tickets, the Mobile App, and Audit Insights.
Audit Templates
An Audit Template is a customizable framework in the CRM that contains all the details needed for generating Audit Forms. In Vtiger CRM, you can create these forms automatically or manually, with manual generation currently available only for the Field Sales module.
Key components of an Audit Template include:
- Frequency: Specify how often Audit Forms are automatically generated (daily, weekly, monthly, or yearly) or select the Manual option to generate them on specific dates.
- Recurrence: Determine how often forms are created for selected days or months, allowing continuous generation over a specified period.
- Conditions: Select from lists created in the Organization module and choose the relevant fields for the audit conditions.
- Auditor: Assign one or more auditors from a drop-down list. When a group is selected, assignments occur on a round-robin basis.
- Questions: Include relevant questions and scoring criteria for the audit, organized into sections. You can prioritize critical sections, and overall scores are derived from individual section scores.
- Audit Forms: These forms are auto-generated from templates and accessible via the mobile app for auditing purposes.
- Mobile App: Auditors can log in to view forms categorized by status (In Progress, Today, Overdue, Completed, and Upcoming) and conduct audits using forms found under the Today category. They can also add scores, comments, images, and videos.
- Audit Insights: Generate charts or reports that provide insights into auditor and outlet activities, performance metrics, and best practices.
Benefits of Quality Audit
Vtiger CRM Quality Audit helps you in:
- Identifying potential issues early.
- Identifying areas (or risks) where improvements need to be made.
- Improving the overall effectiveness of the organization
- Identifying if the final product is fit for use and meets customer requirements.
- Avoiding lawsuits by ensuring that the organization meets all legal/regulatory needs.
In this article, you will learn about:
- Creating Audit Templates
- Adding custom questions to a template.
- Assigning scores for questions.
- Generating Audit Forms for each template.
- Using the Audit Forms on the mobile app.
- Generating insights after the auditing is completed.
Key Terminology
| Field Name | Description |
| Audit | The examination or inspection of a company’s accounts. |
| Auditor | An auditor is an authorized person appointed by a company to review its accounts and ensure they are in accordance with tax laws. |
| Recurrence | The number of times you want an Audit From to be generated. |
| Round-robin | A method of assigning records or assigning tasks to users or employees in the CRM. In the round-robin method, records or tasks are assigned consecutively on a rotational basis. |
Accessing the Quality Audit Module
The Quality Module is available under the main Menu > Service desk in the CRM.
Follow these steps to access the Quality Audit module:
- Log in to the CRM.
- Go to the main Menu.
- Go to the Service desk.
- Select Quality Audit.
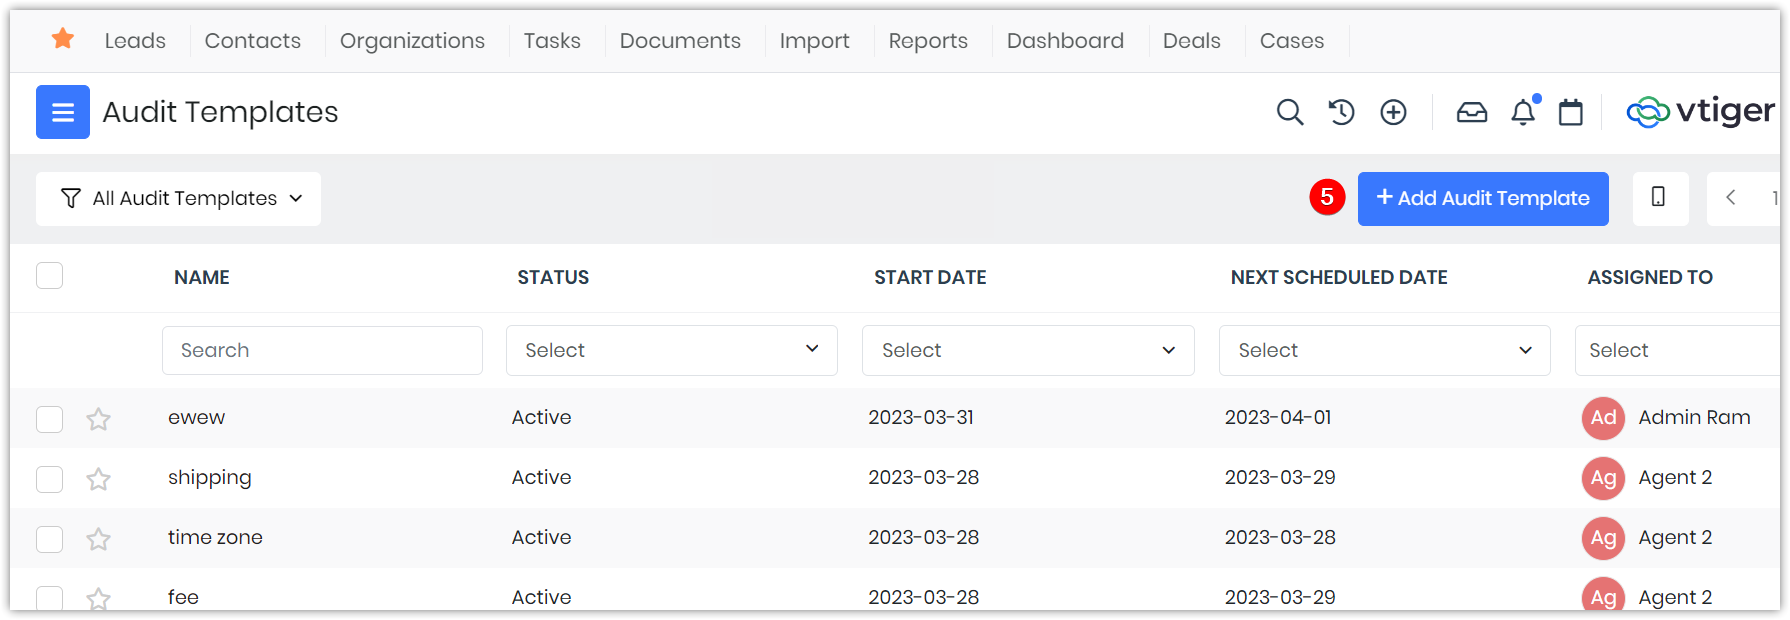
You can access Audit Templates, Audit Forms, and Audit Insights from here.
Creating Audit Templates
You require Audit Templates to generate Audit Forms. Hence, you create them first in the Quality Audit process. You can specify the following in an Audit Template: Audit template Name, Assigned to, Start Dates, Frequency, Repeat, and Number of frequencies in the template. You also add the required questions for auditing and their corresponding scores. The Audit Form is generated based on the frequency you set in the template.
Creating an Audit Template requires the following:
- Step 1: Adding Audit Template details
- Step 2: Adding Questions
Step 1: Adding Audit Template details
Follow these steps to create an Audit Template: (All fields marked with an asterisk are mandatory).
- Log in to CRM.
- Go to the main Menu.
- Go to the Service Desk.
- Click Audit Templates.
-
Click +Add Audit Template on the top right. The Audit Template form opens.
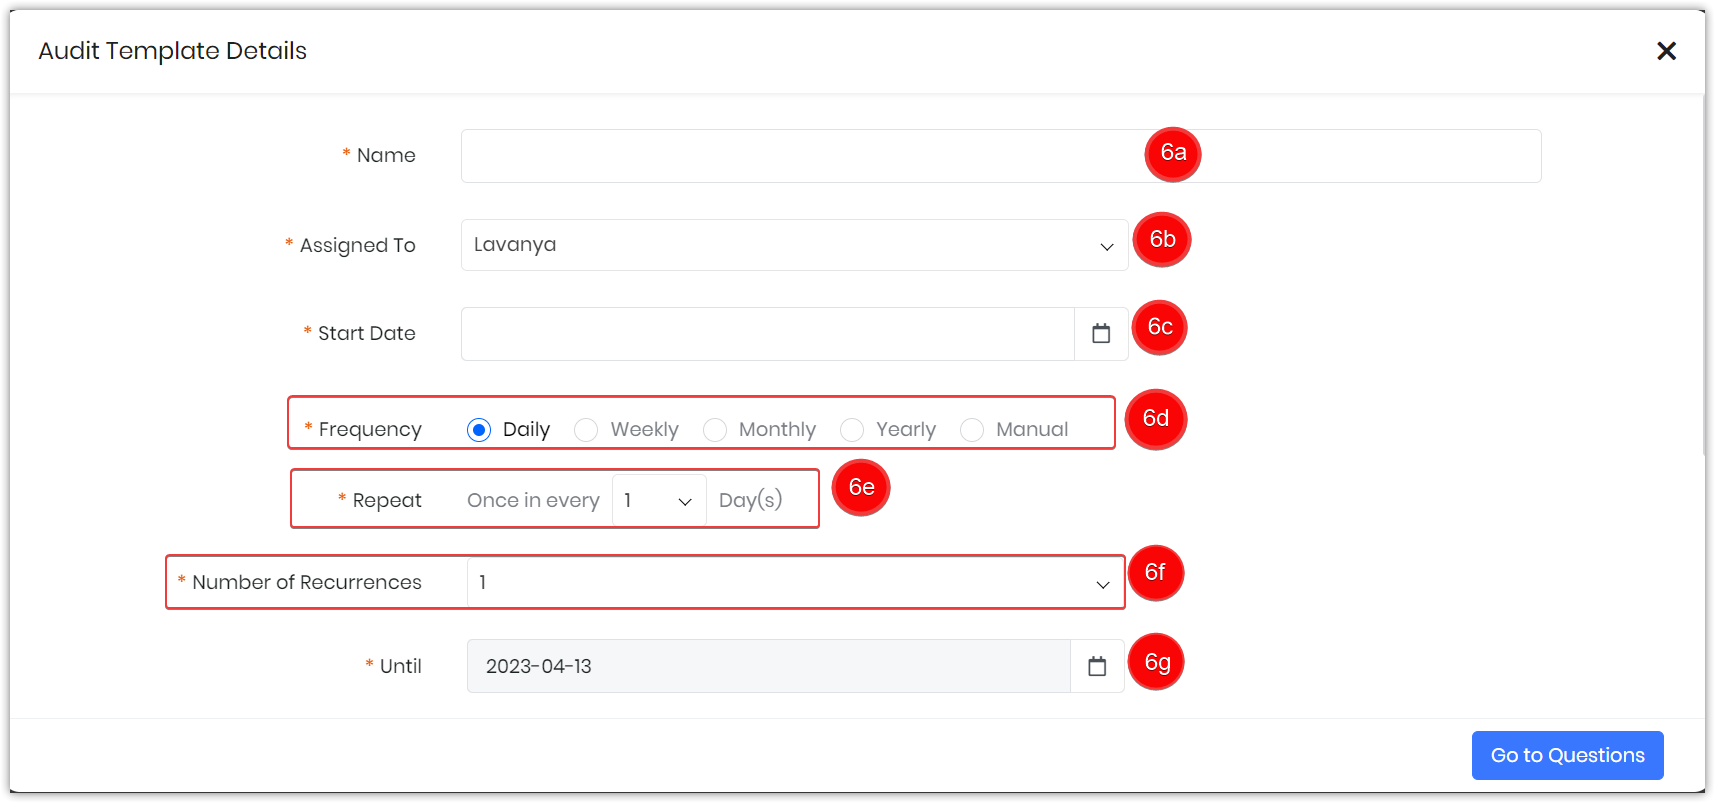
- Add the following information in the Basic Information window:
- Audit Name: Add the name of the Audit Template.
- Assigned To: Add the instructor or administrator’s name.
- Start Date: Select the date you want to start the template.
- You can click on the calendar icon to select the date.
- Enable Recurrence: Turn the toggle on to repeat the audit.
- Frequency: Select the frequency at which the Audit Templates are updated. You can select from Daily, Weekly, Monthly, Yearly, and Manual options.
- Repeat: If you want users to repeat a course, select the repetition frequency. You can repeat the occurrence of a template once every 30 days.
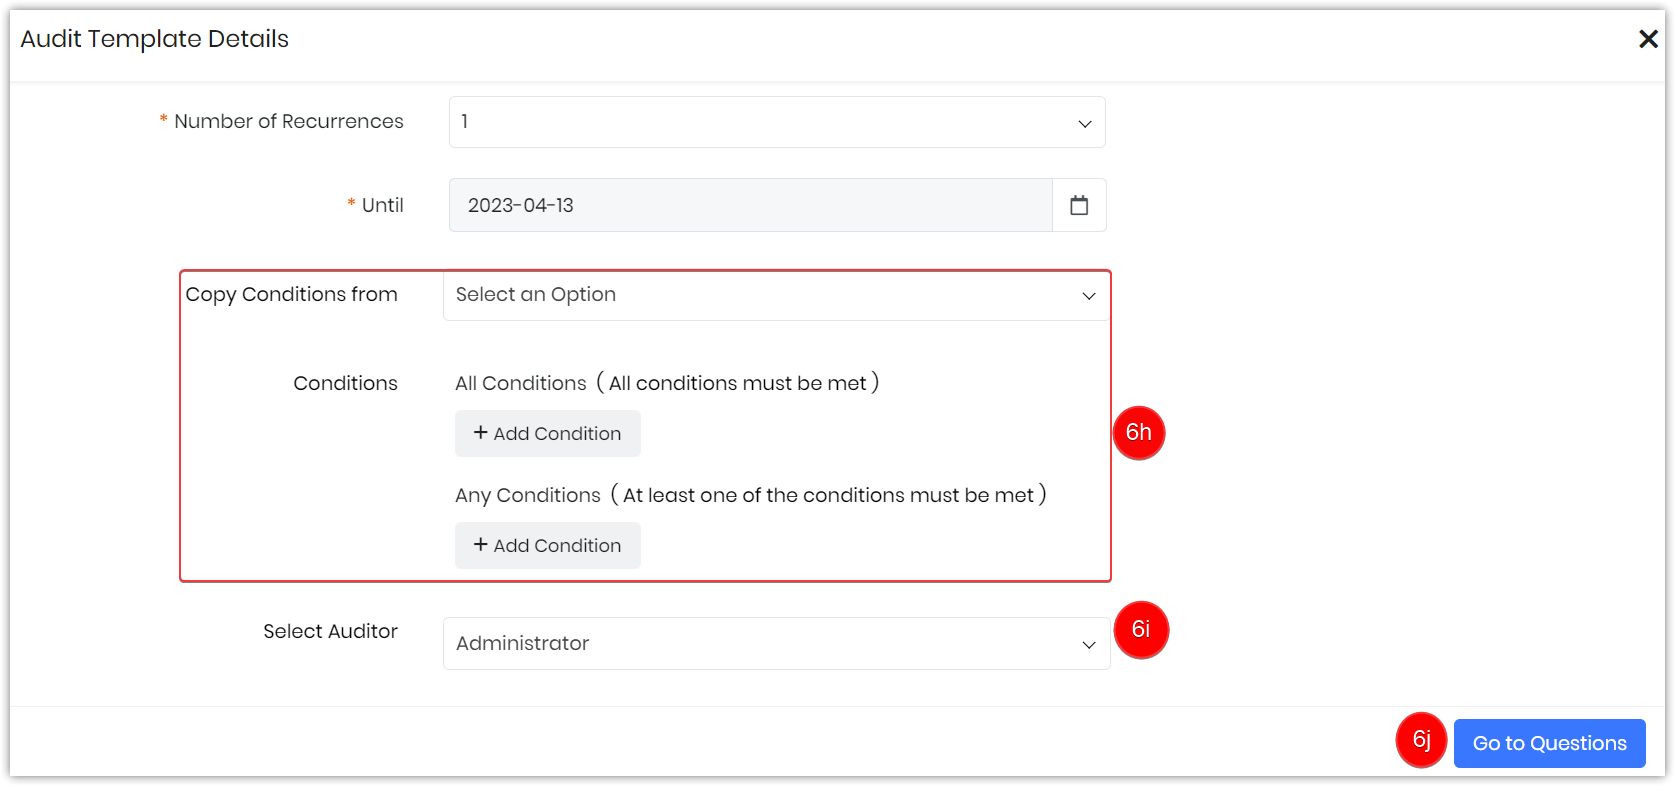
- Number of Recurrences: You can choose the Number of recurrences based on your requirements.
- Until: Based on the start date and frequency, the date in this field will be fixed.
- Conditions:
- Select any list of Load conditions.
- Conditions will be auto-picked.
- Select Auditor: Select User or Group from the drop-down.
- Go to Questions: Add questions for the Audit.
- Click Add Section.
- Add Section Title.
- The section is passed if the section score is: Choose Greater than or less than from the drop-down.
- Enter the value in the box.
- Enable the Critical check box if the section is critical. An audit is considered failed if the critical criteria are not met.
- Enable Repeat to repeat the section.
- If enabled, during the audit:
- An Add More button is shown to allow repeating that section.
- Each repeat instance also has a Delete option.
- Scoring Logic
- For Section Score: Calculated the same way for each occurrence of the section.
- For Audit Score:
- When sections are repeated, the total maximum possible audit score increases.
- The minimum passing threshold must scale proportionally to the number of students.
- Use cross-multiplication to find the new threshold: Original Max Score: Original Min Pass Score = New Max Score: New Min Pass Score.
- Note: Since repeating sections increases the overall maximum possible score of the Audit, the logic to determine whether an Audit is a pass or fail must also scale accordingly.
- If enabled, during the audit:
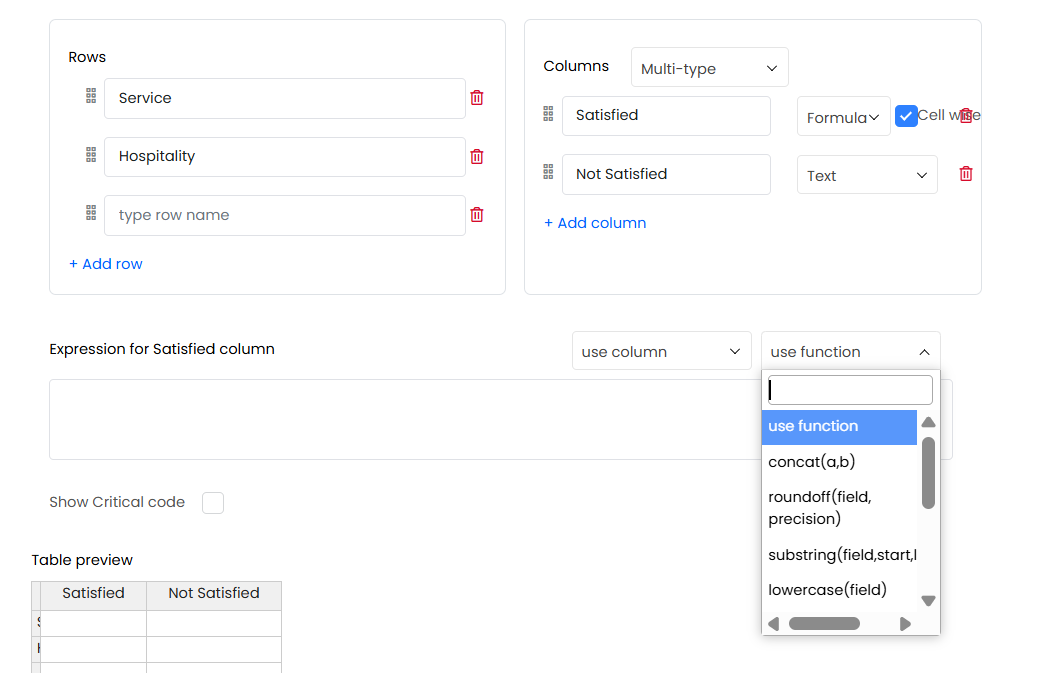
- Question type: You can select among the Radio Button, Checkbox, Rating, Agree/Disagree, Text, Text Area, Date, Time, Phone, Input Table, File Upload, Signature, and Star Rating from the left and drag and drop below the section title.
- Enter the question in the Question field.
- Click +Add Option to add sub-options. For example, if the Radio button is selected, you can add other options for No and Maybe.
- Auditor Actions: Click the icons beside the option fields to enable them: Comment, Image, and Video.
- Select the value in the box available next to the icons.
- Select the Internal Ticket icon to raise Internal Tickets.
- Enter the Audit Total Score condition. (Optional).
- Enable Mandatory to mandate a question.
- Click Save.
Setting Character Limits for Text Questions
You can set character limits for questions that use the Text field type in an Audit form. The default character limit (0–255) can be modified based on your requirements to control the length of responses.
Note: The minimum character limit you set must be greater than or equal to the minimum characters allowed.
You can configure the rows and columns where rows are text fields. You can choose columns to be Text, Radio Button, Checkbox, Dropdown, or Multi-Type, where you can additionally select the formula type in the Multi-Type option.
Accessing Audit Forms
Follow these steps to access the Audit Forms:
- Go to the Main Menu.
- Go to the Service desk.
- Go to Quality Audit.
- Select Audit Forms.
Note: Audit forms are automatically generated when the cron job runs. You don’t have the option to add Audit Forms. The questions and answers added to the template will be available in the Forms.
Viewing Audit Forms
You can view the Audit Forms records in the Audit Forms module. The following is the information you can view in the Audit Forms module:
- Audit Form name: Name of the Audit Form.
- Assigned to: Owner of the Audit Form record.
- Start Date: The date the audit commenced.
- Status: Status of the Audit Form record.
- New
- In Progress
- Rescheduled
- Completed
- Audit Status: Status of the Audit.
- Passed
- Failed
- Expired
- Audit Date, Branch, Auditor, Brand Name, and Zone
Pause, Resume, Timer, and Timelog options in Audit Forms
The Pause and Resume feature lets you pause and resume your audit multiple times. Each time the form is paused:
- All responses are saved.
- The form moves to a new Paused tab in the mobile app, and the Auditor is directed to the Today's tab.
When you set an audit to pause status, you can view the time spent on that audit in the Paused tab. This functionality helps auditors check into and work on multiple audit forms simultaneously.
Editing an Audit Form
You can edit an Audit Form in two ways:
- From the List View
- From the Summary View
From the List View
Follow these steps to edit an Audit Form from the List View:
- Log in to the CRM.
- Go to the Main Menu.
- Go to the Service desk > Quality Audit.
- Select Audit Forms. The Audit Forms page opens.
- Hover over the Audit Form you want to edit.
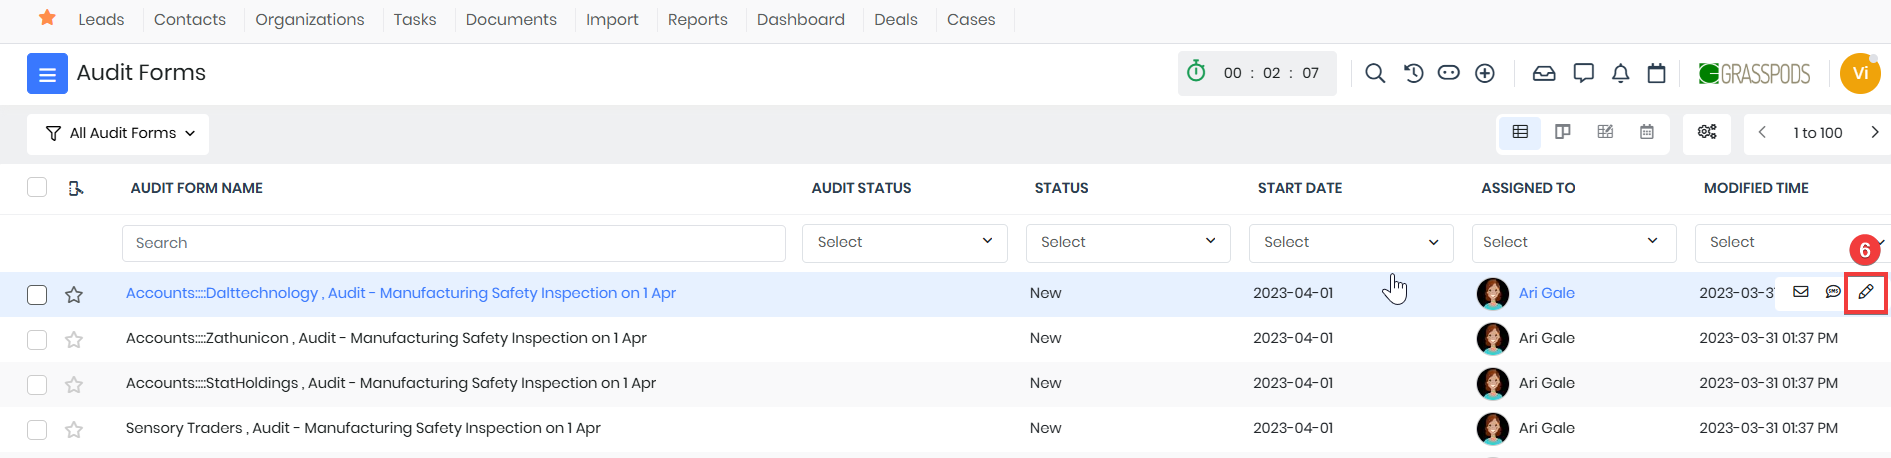
- Click Edit from the quick action options. The Editing Audit page opens.
- Make the necessary changes in the required sections.
- Click Save.
From the Summary View
- Log in to the CRM.
- Go to the Main Menu.
- Go to the Service desk > Quality Audit.
- Select Audit Forms. The Audit Forms page opens.
- Click on the FAQ you want to edit. The Summary View of the record opens.

- Click Edit in the top right corner. The Editing FAQ page opens.
- Make the necessary changes in the required sections.
- Click Save.
Note: Only specific fields in the Audit Form can be edited.
Customizing the Audit Forms
Follow these steps to customize the audit Form:
- Log in to the CRM.
- Go to the Main Menu.
- Go to the Service desk > Quality Audit.
- Select Audit Forms. The Audit Forms page opens.
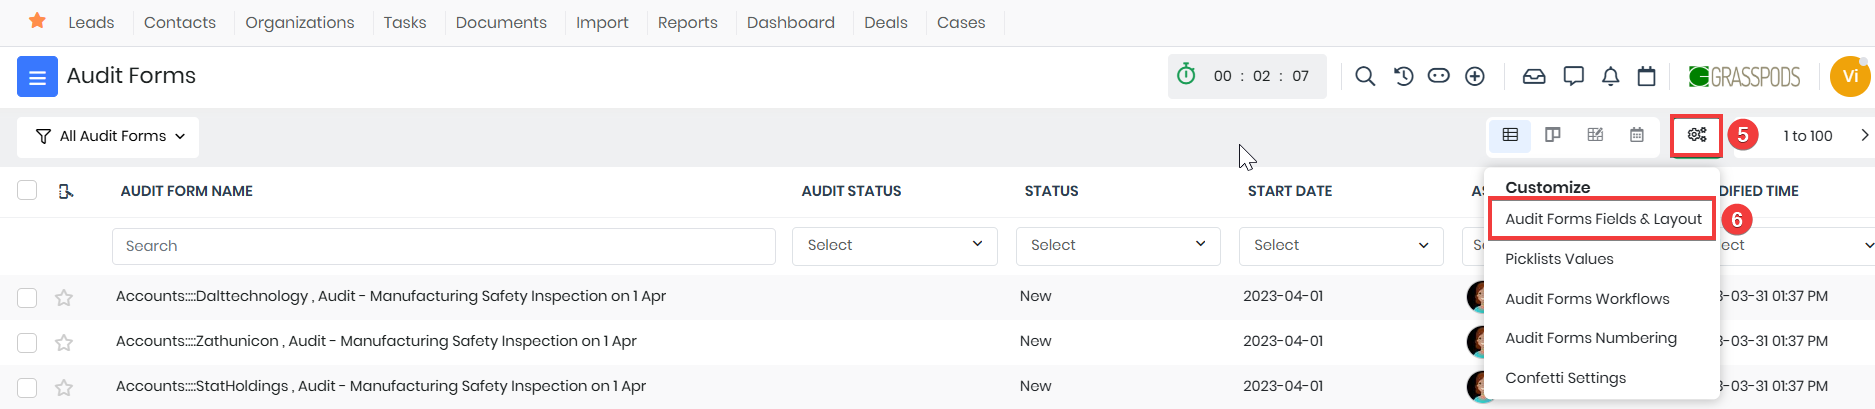
- Click Settings.
- Select Audit Forms Fields & Layout. The Module Layouts & Fields page opens.
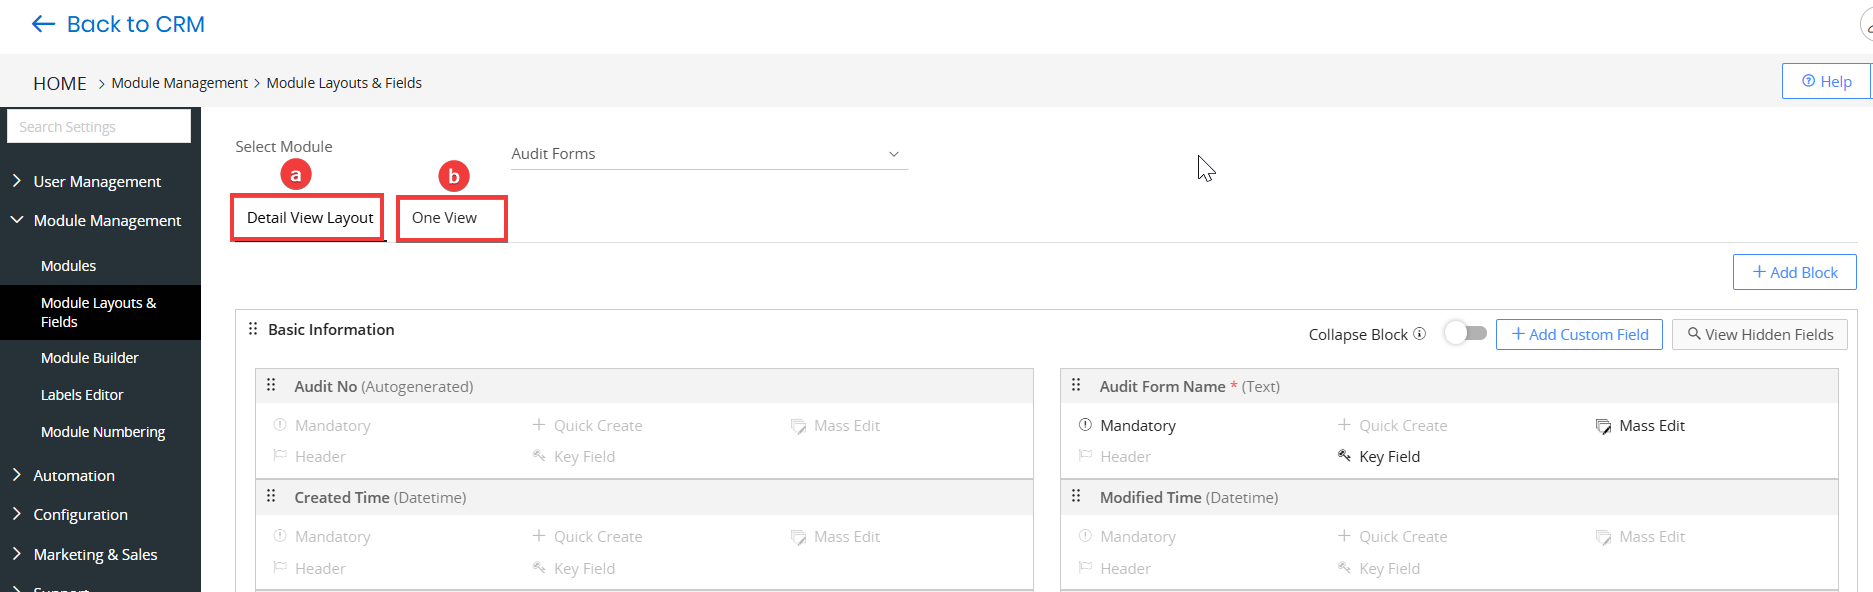
- Enter or select the following details to customize the Audit Forms:
- Default View Layout
- One View
To learn more about Module Layouts & Fields, click here.
Note:
- Adding Relationships and Duplicate Prevention are not allowed in the Audit Forms module.
- Picklist values cannot be added to the Status field.
- Status and Audit Status are default, hardcoded picklist fields that cannot be edited and are not displayed in dependent fields.
- Audit forms will be generated with random placeholder values if a field is mandatory.
Accessing Quality Insights
The purpose of audit insights is to identify and discuss common recurring issues, shortcomings, and good practice examples identified through our financial statement and performance audit work.Follow these steps to access Quality Insights:
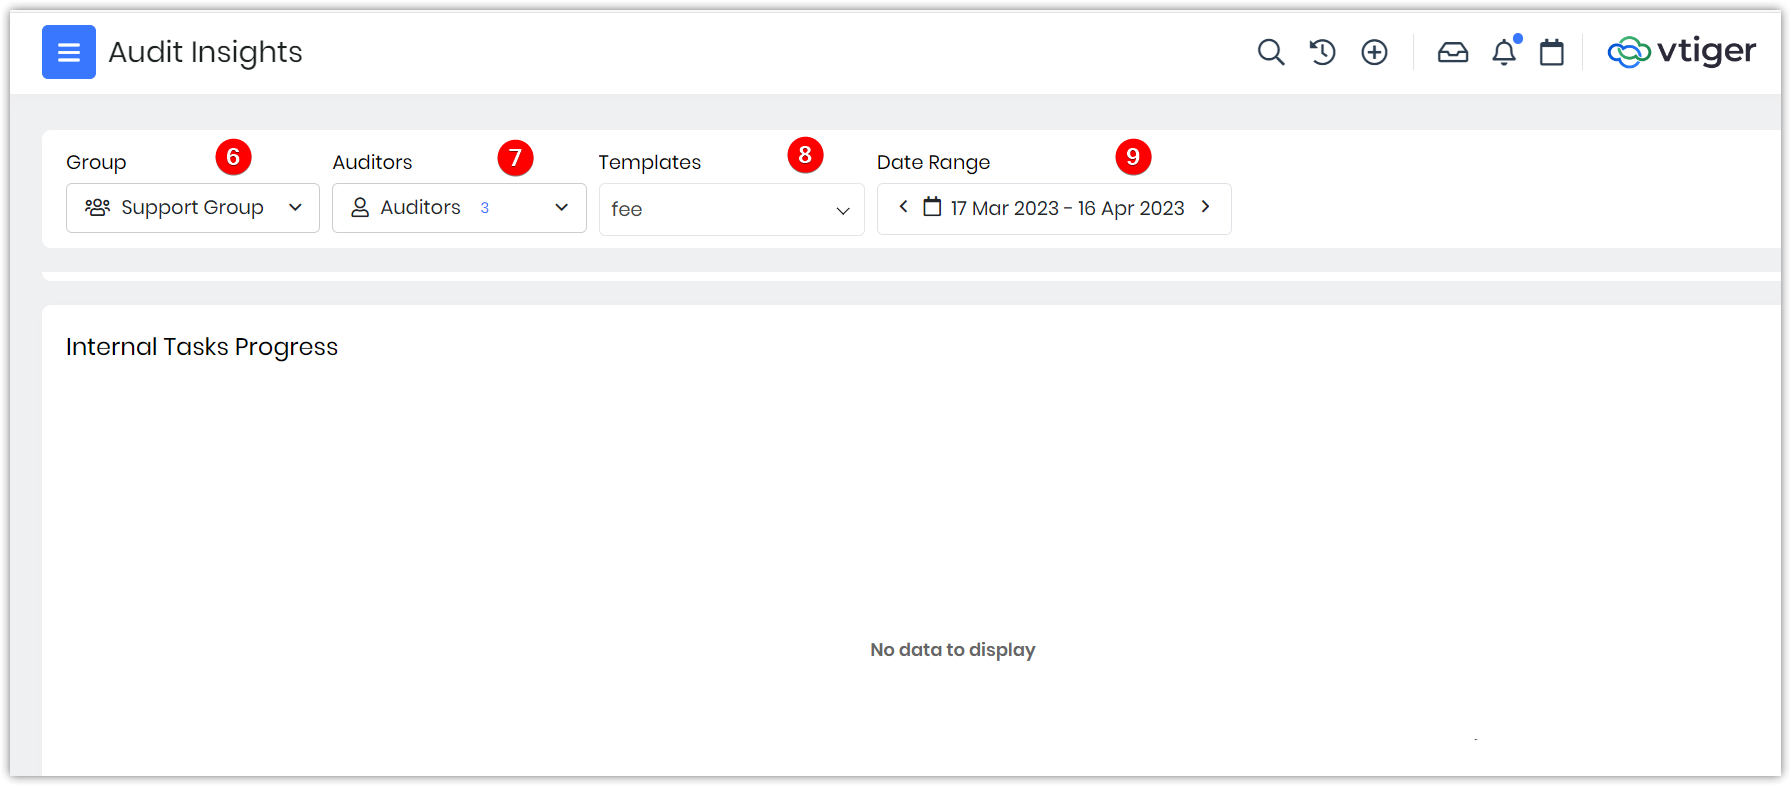
- Log in to the CRM.
- Go to the Main Menu.
- Go to the Service Desk.
- Go to Quality Audit.
- Select Audit Insights.
- Select the Group.
- Select Auditors from the drop-down.
- Select the Template from the drop-down.
- Select the desired date range from the drop-down menu.
Quality Audit in the Mobile App
You can access Quality Audit and create Audit Templates and Audit Forms in the mobile app. You can install the Quality Audit mobile app using the following URL format: instanceURL/myapps/qa.Minimum requirements for a Mobile device:
- Operating System: Android 10 or iOS 15
- RAM: 4 GB
- Storage: At least 2 GB free space for app and offline data
- Display: 5.0” screen, 720p resolution
Installing the Quality Audit app in the Mobile app
Follow the steps below to install the Quality Audit app on your mobile device:- Log in to your CRM.
- Enter your instance URL followed by myapps/qa.
- Click More.
- Select Install App.
- Select the Audit app to install.
Actions possible in the Mobile app
As an auditor, you can generate forms and conduct audits using the Quality Audit feature in the mobile app.- For each question selected, the auditor has the option to add a comment, up to 5 images, and 1 video.
- If the actions (Comment, Image, and Video) are marked/selected in the template, then you must mandatorily add a comment, at least one image, and 1 video.
- You can add live images and videos from the app through the camera, but you cannot upload files from the gallery.
- The added images and video can be modified or deleted.
- The app will have different sections, and the number of forms in each section is set in the Configuration Editor (Maximum entries per page in List View).
- The following are the different audit statuses:
- In Progress: When an audit form is being audited, no other form can be opened/audited; there can be only 1 In Progress form.
- Pending: Forms with partial audits from earlier dates will be available.
- Completed: This section contains the forms submitted by the auditor.
Question Types
The Quality Audit mobile app supports the following Question Types:- Radio Button – Allows the selection of a single option.
- Checkbox – Allows multiple selections.
- Rating – Enables rating on a numeric or visual scale.
- Agree/Disagree – Provides binary options such as Yes/No or Agree/Disagree.
- Text – For short text-based responses.
- Text Area – For longer descriptive answers.
- Date – To capture a date value.
- Time – To capture a time value.
- Phone – To record phone numbers.
- Input Table – To enter structured data in a table format.
- File Upload – To attach files related to the audit.
- Signature – To capture digital signatures.
- Star Rating – To rate items using a star-based system.