Articles in this section
AI Agent Builder
Feature Availability
Vtiger Editions: One Growth | One Professional | One Enterprise | One AI
Introduction
The AI Agent Builder lets businesses and developers create intelligent agents to understand and answer user queries using AI and Natural Language Processing (NLP). AI Agents can connect effortlessly with CRM systems, databases, and other tools to ensure access to the most recent data.
AI Agent Builder in Vtiger CRM
The Agent Builder in Vtiger lets you build, test, and deploy autonomous AI-powered Agents to perform various tasks. These AI Agents answer questions, create records, update records, add custom fields, and provide intelligent assistance in real-time for users and customers.
By integrating LLMs and information within the CRM, Agent Builder allows organizations to improve customer experiences and reduce manual effort.
Key Features
The following are the key features of AI Agent Builder in Vtiger CRM:
- Custom AI Agents - Build AI agents tailored to specific business needs by defining their roles, instructions, and behaviors.
- Prompt Builder - Use the Prompt Builder to create structured prompts for AI agents.
- Playground environment - Test AI agent responses in a controlled Playground environment to troubleshoot and improve their behavior before deployment.
- Multiple Query Sources - AI agents can process queries from different sources, including emails, chats, and CRM records.
Benefits
The benefits of using the Best Time to Contact feature are
- Reduces manual effort by automating repetitive tasks.
- Streamlines workflows and improves overall efficiency.
- Enables quicker responses to customers and internal requests.
- Ensures tasks are performed uniformly every time.
- Provides quicker resolutions to customer issues.
In this article, you will learn about:
- Generative AI Designer in Vtiger CRM
- Building an AI Agent in Vtiger CRM
- Using the AI Agent Playground
- Editing and deleting an Agent
Key Terminology
|
|
|
|
|
|
|
|
|
|
|
|
|
|
|
Overview of the Generative AI Designer
The Generative AI Designer is a centralized hub to create, manage, and optimize AI Agents and knowledge-based responses in Vtiger CRM. It integrates with RAG (Retrieval-Augmented Generation) models to fetch relevant CRM and document data before generating answers, making it ideal for customer support, knowledge management, and sales enablement.
Key Components of Generative AI
-
Gen AI Setup
- RAG Models:
- Used to retrieve relevant CRM records and documents before generating AI responses.
- Ideal for knowledge-based answers, support cases, and sales-related queries.
- Examples:
- Cases RAG Model: Finds similar support cases.
- Articles/FAQs RAG Model: Generates answers from the knowledge base.
- AI Agents:
- Smart assistants are trained on specific topics with predefined actions.
- Example: Case Agent
- Topics: Case creation, case summary, case reply
- Actions: Prompt user for input, create case via API, summarize case
- Prompt Builder:
- Customize AI responses by defining tone, structure, and context.
- Use prompts for tasks like summarization, email drafts, and status reports.
- Prompts are reusable across multiple agents and chatflows for consistent AI behavior.
- Chatflows:
- Build guided conversational experiences for clients on websites or messaging apps (e.g., WhatsApp).
- Supports multi-step processes, data entry, and CRM navigation with AI-driven dynamic responses.
- Data Shield:
- Masks sensitive or irrelevant information (e.g., email addresses, social security numbers) before sending data to AI models, ensuring compliance.
- RAG Models:
-
GenAI Analytics:
- Provides visual reports and graphs to monitor bot performance over time.
- Helps identify trends, improvement areas, and overall effectiveness of AI Agents.
-
GenAI Queries:
- View all AI interactions, including queries marked as good, rejected, or needing improvement, to refine AI performance.
-
GenAI Token Usage:
- Tracks the number of AI tokens consumed per query and by each user.
- Helps monitor usage, control costs, and optimize AI queries efficiently.
Building an AI Agent
Building an AI agent in Vtiger enables you to automate processes and deliver intelligent assistance tailored to your specific business requirements.
The Agent Builder can perform various actions, including summarizing information, managing leave events, and creating case records.
Let us get started with how to build an AI Agent.
Follow these steps to build an AI Agent:
- Log in to the CRM.
- Click main Menu.
- Go to Platform.
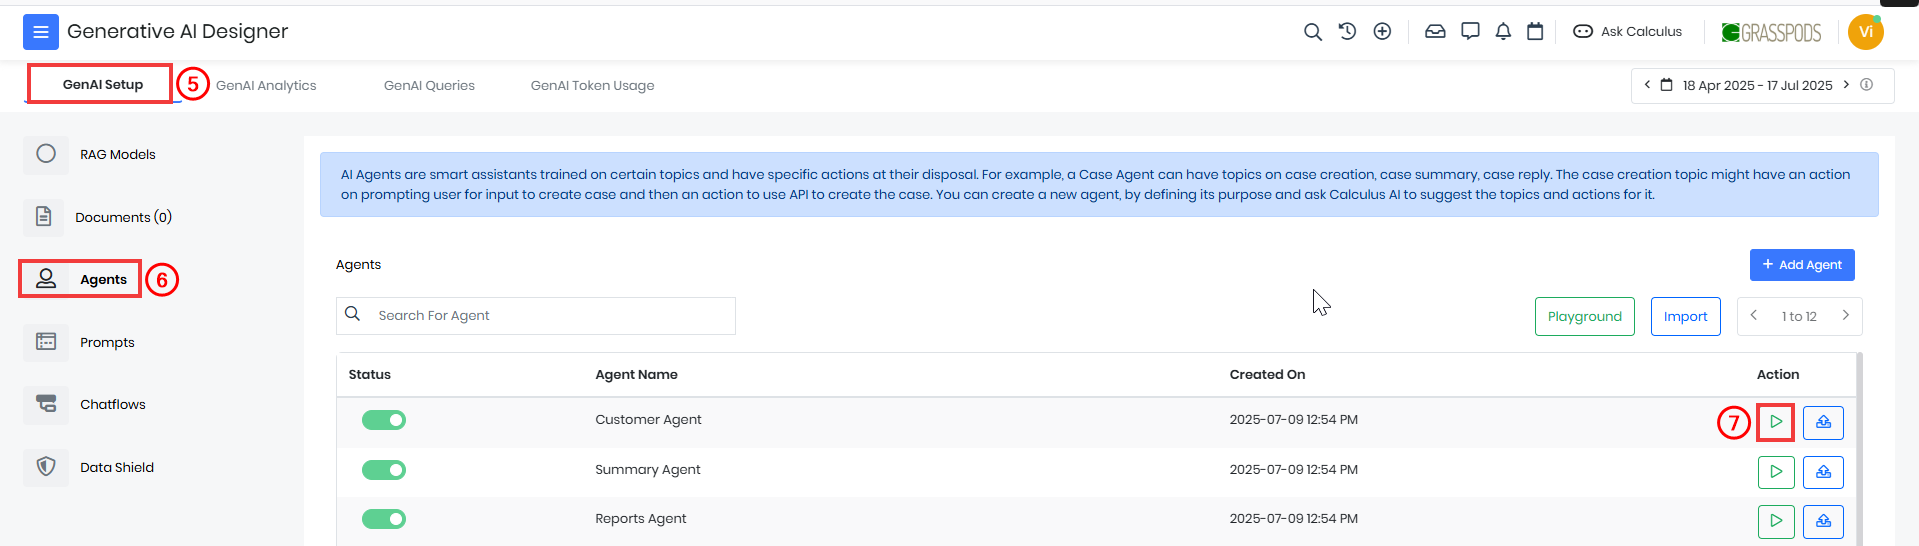
- Select Generative AI Designer. The Generative AI Designer page opens.
- Click on the GenAI Setup tab.
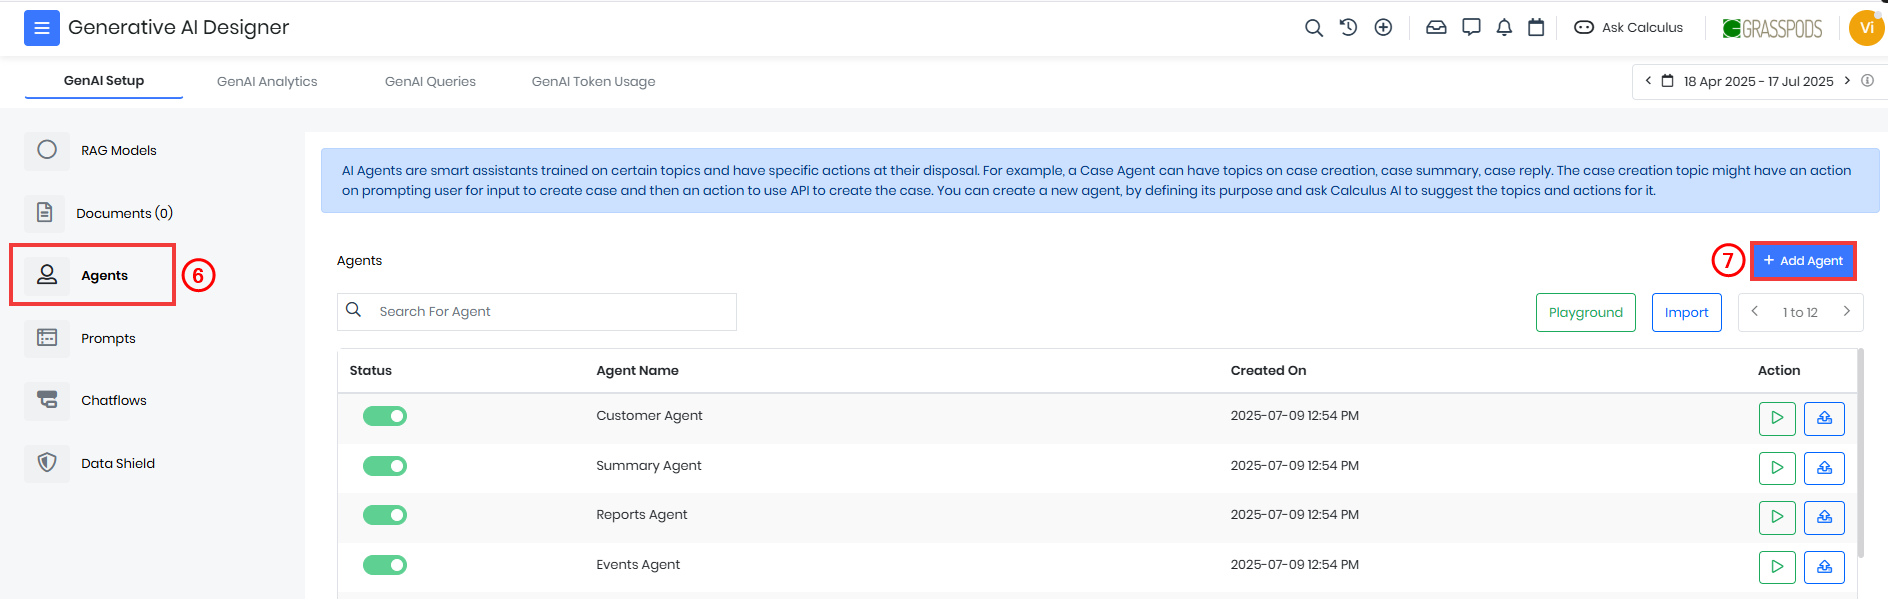
- Select Agents from the left side menu.
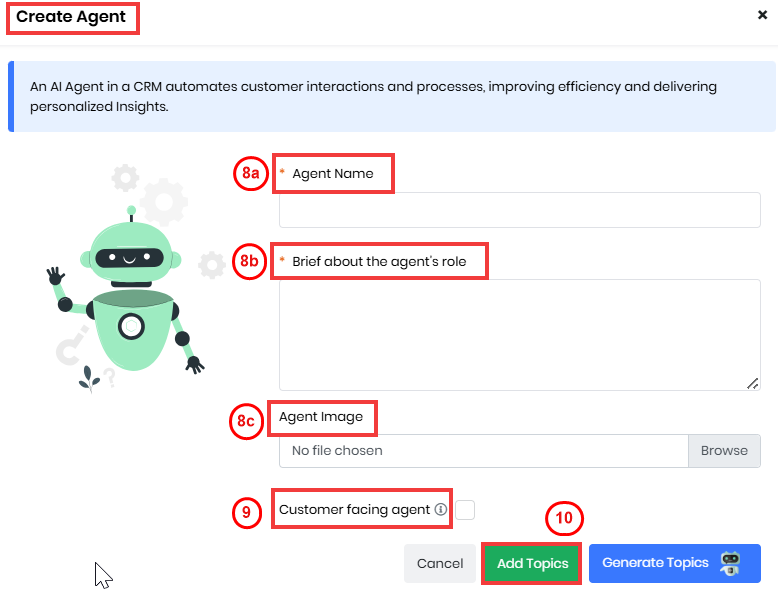
- Click on +Add Agent. The Create Agent window opens.
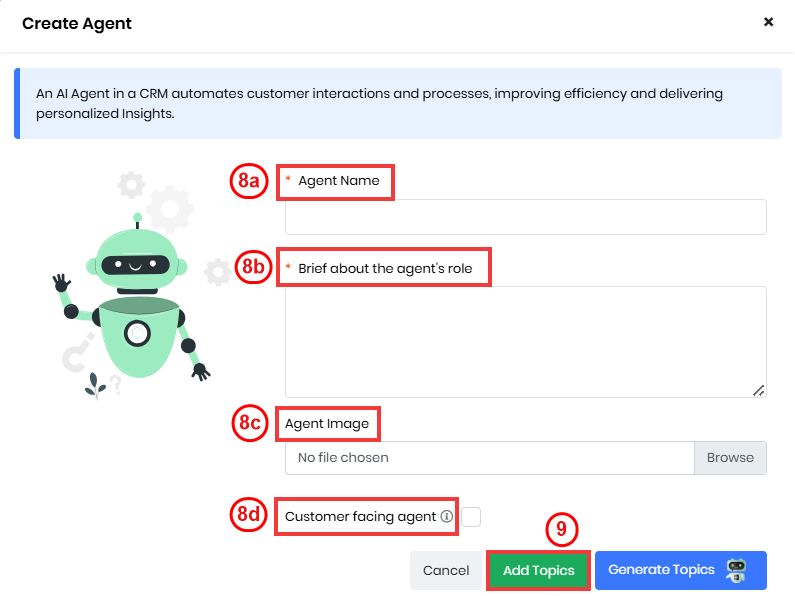
- Enter or select the following information:
- Agent Name: Enter the name of your AI-powered assistant designed to perform specific tasks.
- Brief about the agent's role: Enter a brief summary of your bot’s capabilities, key features, and how it benefits users.
- Agent Image: Insert an image that represents your bot.
- Customer Facing Agent: Enable the checkbox if the agent will be involved only in the Live Chat
- Click Add Topics. A Create Agent page opens.
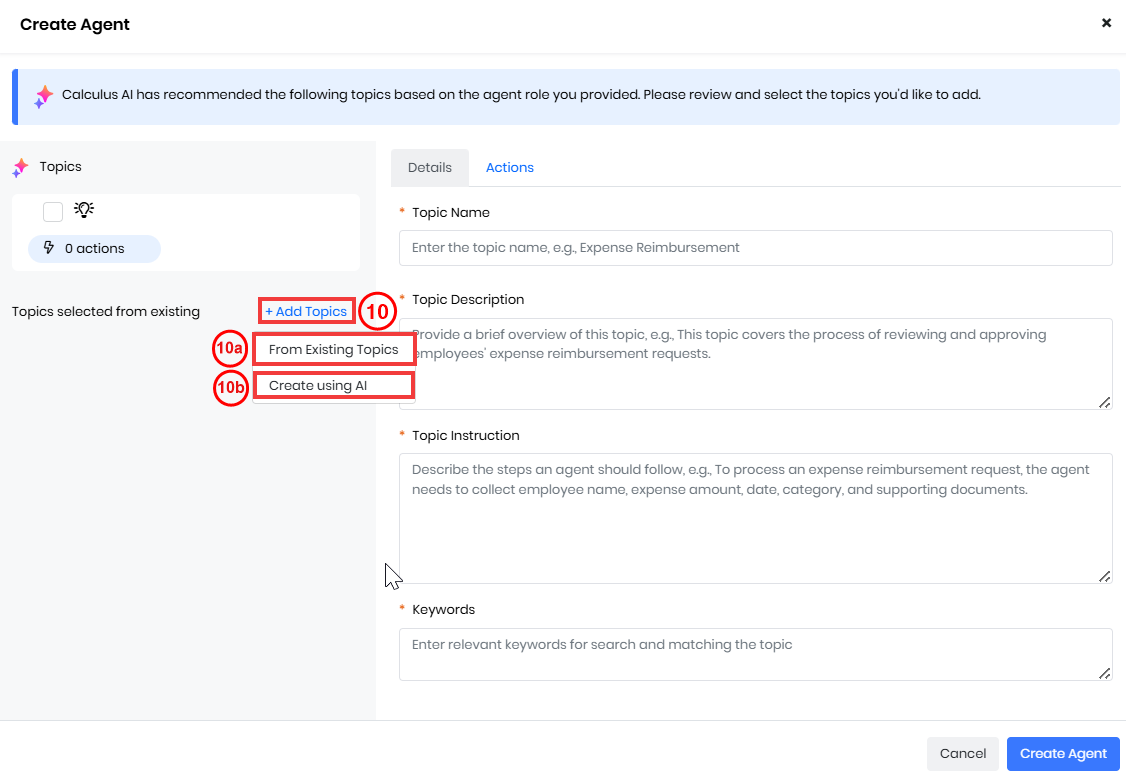
- Select +Add Topics.
- Select From Existing Topics to add an existing topic.
- A list of available topics will appear.
- Enable the checkbox next to the topics you want to add.
- Select Create using AI to create a new topic. The Create topic window opens.
- Topic Name: Enter the name of the new topic.
- Brief about the topic's role: Describe the purpose or role of this topic.
- Click Next. Calculus AI will auto-fill the topic details section based on the provided name and role.
- Select From Existing Topics to add an existing topic.
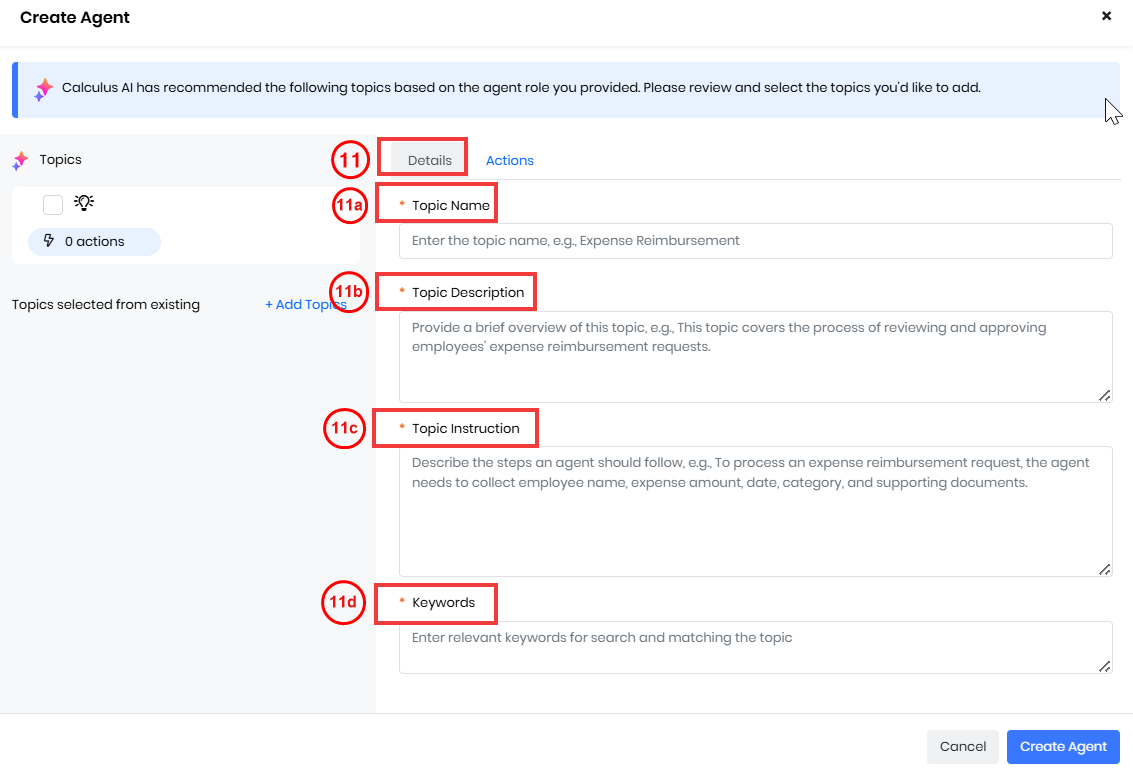
- Enter or select the following information in the Details tab to create a topic :
- Topic Name: Enter the title of the topic.
- Topic Description: Enter a brief summary explaining what the topic is about.
- Topic Instruction: Enter the directions for handling the topic.
- Keywords: Enter the important terms or phrases associated with the topic.
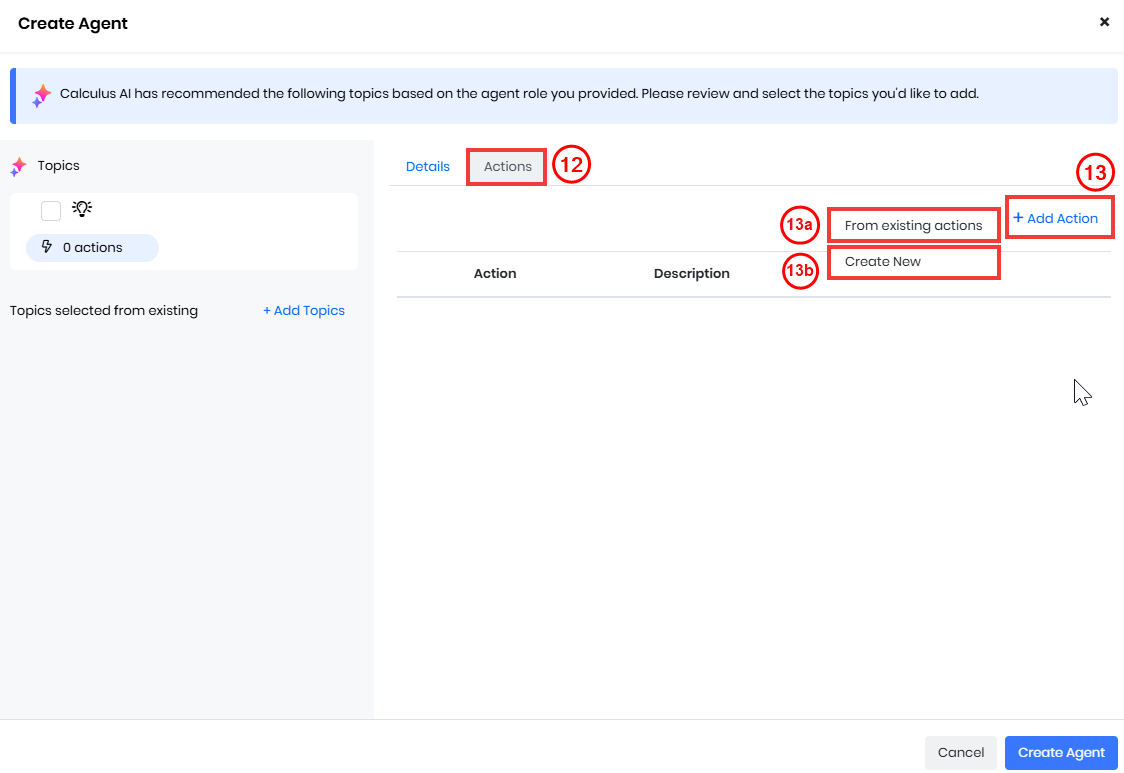
- Click the Actions tab to add an action based on your needs.
- Select +Add Action to add an Action:
- Select From existing actions to add an existing action.
- Select Create new to create a new Action.

- Select or enter the following information to create a new Action:
- Action Name: Enter the title of the action.
- Description: Enter a brief explanation of what the action does.
- Action Type: Select the category of the action.
- API: Select an API to create and manage agents through API integration. Note: You can update any records and fields using the UPDATE API action
- Select API: Select from the dropdown list of available APIs.
- Prompt: Select Prompt Builder to generate and improve responses.
- Select Prompt: Select from the dropdown list of existing prompts.
- Reports: Select Reports for the agents to generate and provide insights.
- API: Select an API to create and manage agents through API integration. Note: You can update any records and fields using the UPDATE API action
- Click Save. An Action will now be created.
- Click Create Agent.
Your AI agent is now ready to optimize tasks and provide intelligent support.
AI Agent Playground
An AI Agent Playground helps you to view the sequence of actions performed by an AI Agent to respond to a query. You can use this information to troubleshoot, update the actions and topics, and improve the responses.
Follow these steps to open the playground:
- Log in to your CRM account.
- Click main Menu.
- Go to Platform.
- Select Generative AI Designer. The Generative AI Designer page opens.
- Click on the GenAI Setup tab.
- Select Agents to view the list of agents.
- Click on the Playground icon for the agent you want to troubleshoot.
By following these steps, you can easily access the Playground and review your agent.
Let us look at an example of a Contacts management agent to see how the playground works.
Follow these steps to access information on any Contacts record in the Playground:
- Log in to the CRM.
- Click Main Menu.
- Go to Platform.
- Select Generative AI Designer. The Generative AI Designer page opens.
- Click on the GenAI Setup tab.
- Select Agents to view the list of agents.
- Select the Contacts Agent to access the required Contacts information.
- Click on the Playground icon beside the Contacts Agent. The Playground screen will appear.
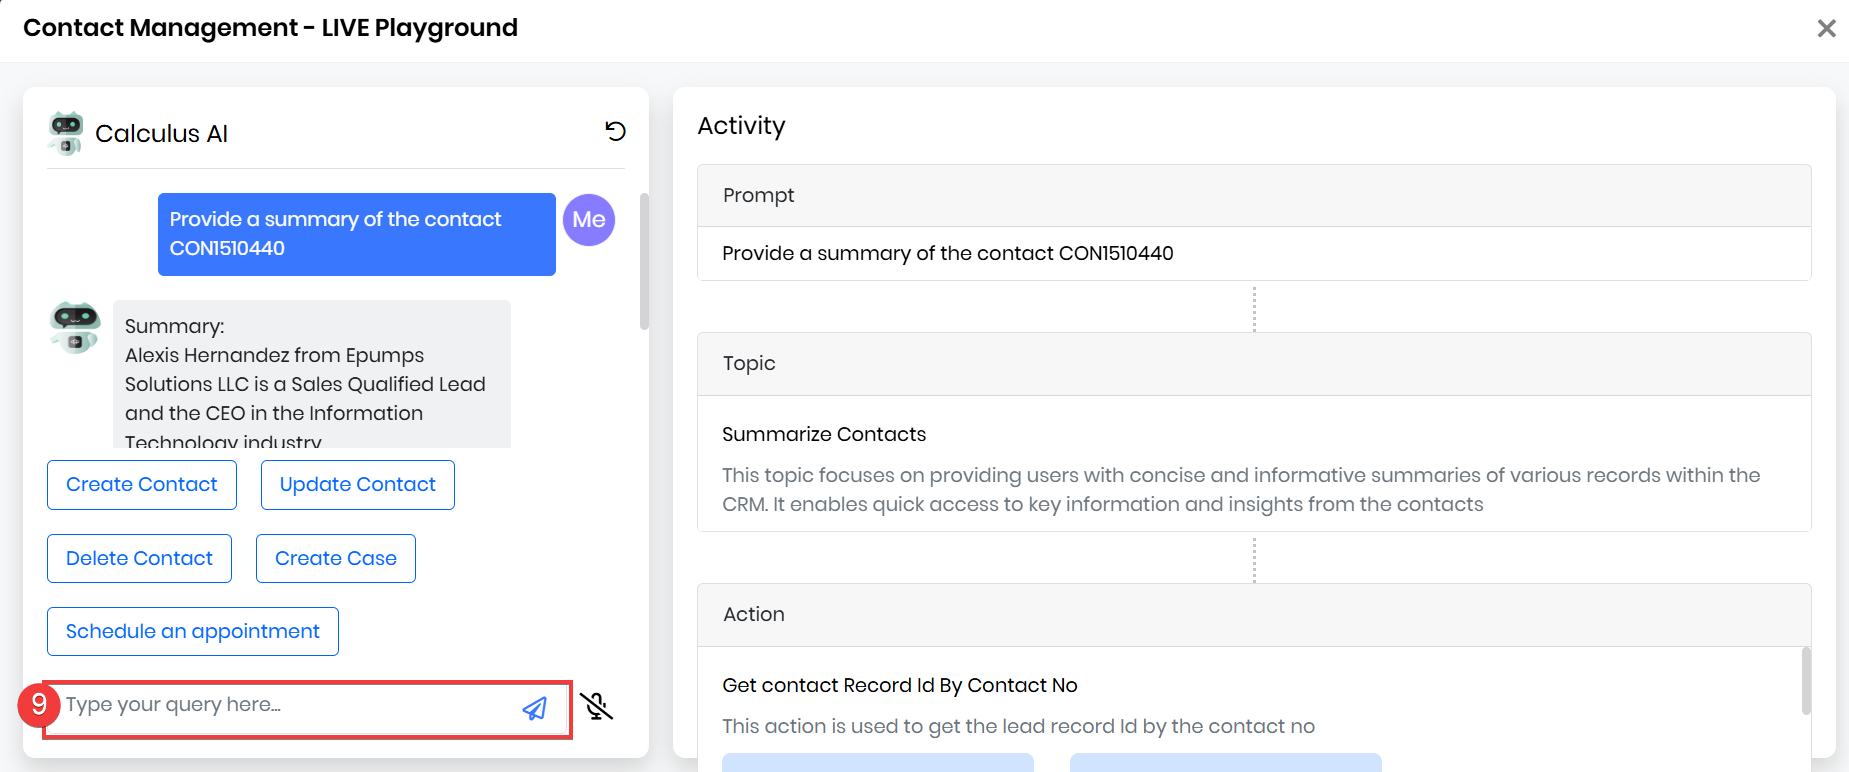
- Enter a query in the prompt to obtain the contact information you need. The Calculus AI will read the prompt and provide the necessary details. To learn more about Calculus AI, click here.
- The Activity section will display the following details:
- Prompt: The input or question to initiate the action.
- Topic: The subject of the action.
- Action: The specific task or response taken based on the prompt and topic.
Users can efficiently retrieve specific contact information through natural language queries using the Generative AI Designer and the Contacts Agent within the Playground.
Using AI Agent for Live Chats
You can use AI Agents in Live Chat to handle customer questions automatically. With Chatflows, you can send questions straight to the AI, so customers get fast and consistent answers.
For instance, if a customer wants to check the status of their case, the AI Agent can instantly provide an update using information from your CRM.
- When a customer initiates a new issue through Live Chat, the AI Agent automatically creates a case in the CRM using the details shared during the conversation.
- If a customer asks a question, the AI Agent delivers relevant answers by pulling from your knowledge base or a set of predefined responses, ensuring accurate support at any time.
- Whenever a record is created via Live Chat by an AI Agent, it is automatically associated with the corresponding visitor record, maintaining complete context for future interactions.
- Log in to the CRM.
- Click main Menu.
- Go to Platform.
- Select Generative AI Designer. The Generative AI Designer page opens.
- Click GenAI Setup.
- Select Agents to view the list of agents.
- Click on +Add Agent. The Create Agent window opens.
- Enter or select the following information:
- Bot Name: Enter the name of your AI-powered assistant designed to perform specific tasks.
- Bot Description: Enter a brief summary of your bot’s capabilities, key features, and how it benefits users.
- Bot Image: Insert an image that represents your bot.
- Enable the checkbox Customer facing agent
- Click Add Topics. A Create Agent page opens.
- Select +Add Topics.
- Select Create using AI to create a new topic. The Create topic window opens.
- Topic Name: Enter the name of the new topic.
- Brief about the topic's role: Describe the purpose or role of this topic.
- Click Next. Calculus AI will auto-fill the topic details section based on the provided name and role.
- Select Create using AI to create a new topic. The Create topic window opens.
- Enter or select the following information in the Details tab to create a topic :
- Topic Name: Enter the title of the topic.
- Topic Description: Enter a brief summary explaining what the topic is about.
- Topic Instruction: Enter the directions for handling the topic.
- Keywords: Enter the important terms or phrases associated with the topic.
- Click the Actions tab to add an action based on your needs.
- Select +Add Action to add an Action:
- Select From existing actions to add an existing action.
- Select Create new to create a new Action.
- Select or enter the following information to create a new Action:
- Action Name: Enter the title of the action.
- Description: Enter a brief explanation of what the action does.
- Action Type: Select the category of the action.
- API: Select an API to create and manage agents through API integration.
- Prompt: Select Prompt Builder to generate and improve responses.
- Reports: Select Reports for the agents to generate and provide insights.
- Click Save. An Action will now be created.
- Click Create Agent.
After adding and saving the necessary APIs to your agent, it becomes ready to respond. When a conversation is initiated via Live Chat, the agent will automatically provide the appropriate response.
Managing AI Agents
Editing an Agent
You can modify your Agent's behavior based on the specific actions to be performed.
Follow these steps to edit an Agent:
- Log in to the CRM.
- Click main Menu.
- Go to the Platform.
- Select Generative AI Designer. The Generative AI Designer page opens.
- Click GenAI Setup tab.
- Select Agents to view the list of agents.
- Select the Agent that you want to modify from the list of agents.
The selected agent can be modified based on the specific actions.
Exporting an Agent
Follow these steps to export an Agent:
- Log in to the CRM.
- Click main Menu.
- Go to Platform.
- Select Generative AI Designer. The Generative AI Designer page opens.
- Click GenAI Setup tab.
- Select the Agent you want to export.
- Click Export.
Exported agent data is available in JSON format.
Importing an Agent
You can import an Agent using a JSON file.
Follow these steps to import an Agent:
- Log in to the CRM.
- Click main Menu.
- Go to Platform.
- Select Generative AI Designer. The Generative AI Designer page opens.
- Click GenAI Setup tab.
- Agents.
- Click the Import. The Importing Agent window opens.
- Note: The Import Agent window displays a sample JSON format for your reference.
- Click Browse to select and upload a JSON file from your system.
- Use the JSON window to manually enter JSON data.
- Click Add Agent.
Note: Once added, the imported agent will appear under Generative AI > Agents and will be set to Active by default.
Deleting an Agent
You can delete an agent when it is no longer needed for any actions.
Follow these steps to delete an Agent:
- Log in to the CRM.
- Click main Menu.
- Go to Platform.
- Select Generative AI Designer. The Generative AI Designer page opens.
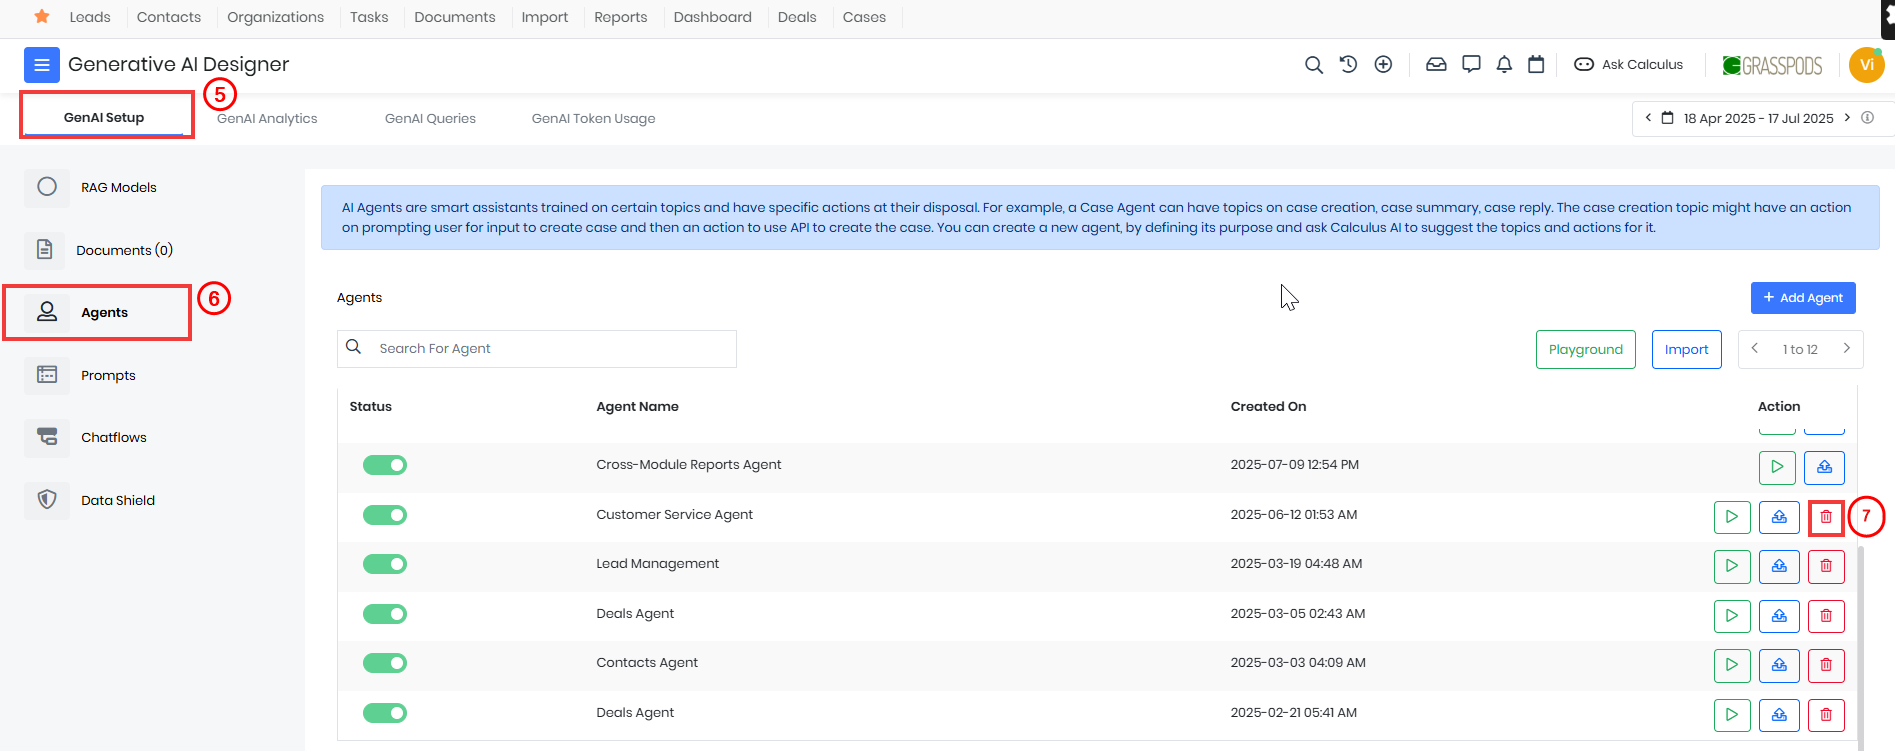
- Click on the GenAI Setup tab.
- Select the Agent that you want to delete.
- Click the delete icon beside the selected Agent.
- Select Yes for the confirmation message.