Articles in this section
Ozonetel CCaaS Integration with Vtiger CRM
Feature Availability
Vtiger Editions: One Pilot | One Growth | One Professional | One Enterprise | One AI
Introduction
Ozonetel CCaaS is a cloud-based telephony platform designed for call centers and growing businesses. It allows teams to manage inbound, outbound, and blended calls efficiently from a single platform. The solution supports quick agent logins, intelligent call routing, and fully customizable IVR flows.
It also provides live dashboards and real-time reports to monitor performance and improve customer interactions. With its open API framework, Ozonetel CCaaS makes it easy to connect with other business tools and automate workflows.
Ozonetel CCaaS Integration with Vtiger CRM
The integration of Ozonetel CCaaS with Vtiger CRM allows businesses to manage all calls directly within the CRM. It helps teams handle incoming and outgoing calls more efficiently while keeping track of customer information.
With this integration, you can:
- Initiate calls directly from contact records within Vtiger CRM.
- Automatically display incoming call notifications with customer details.
- Record and monitor calls for quality assurance and training purposes.
- Add notes during or after calls and access them from the phone call records.
- Capture customer feedback by rating their experience post-call.
Ozonetel CCaaS provides a user-friendly phone call gateway, allowing agents to leverage key features of Vtiger CRM’s Phone Call module, including:
- Incoming calls
- Outgoing calls
- Call notes
- Customer sentiments
- Call recordings
Note: The agent’s phone device can be either a physical phone or a softphone, providing flexibility in how calls are handled.
Prerequisites
To integrate Ozonetel CAServices with Vtiger CRM, you must:
- Have an active business account with Ozonetel.
- Enable the Ozonetel CCaaS extension in Vtiger CRM.
- Enable the phone device.
Note:
- On integration, Ozonetel CCaaS will be available under the Phone Calls module.
- Using Ozonetel, all incoming and outgoing calls are connected through your phone device. To enable this, you need to register your phone number in the following places:
- Ozonetel Portal
- My Preferences > Ozonetel Extension
Benefits
The benefits of integrating Ozonetel CCaaS Telephony are:
- Seamless Call Handling: Place outgoing calls and receive incoming calls directly through Vtiger CRM using agents’ phone devices.
- Enhanced Agent Productivity: Route calls simultaneously to multiple agents, ensuring that no call is missed.
- Centralized Customer Interaction: Log all call-related data, including call notes, recordings, and customer sentiments, in CRM for easy tracking
- Better Insights and Analytics: Track call performance, agent productivity, and customer interactions directly from Vtiger CRM dashboards.
Key Terminology
|
|
|
|
|
|
|
|
|
|
|
|
|
|
|
|
|
|
|
|
|
|
|
|
|
|
|
|
|
|
In this article, you will learn about:
- Installing Ozonetel CCaaS Telephony
- Integrating Ozonetel CCaaS with Vtiger CRM
- Configuring Ozonetel CCaaS Agent Login
- Placing Outgoing Phone Calls
- Receiving Incoming Calls
Installing Ozonetel CCaaS Telephony
Using Ozonetel CCaaS in Vtiger CRM involves the following:
- Installing Ozonetel CCaaS from the Extension Store
- Integrating Ozonetel CCaaS with Vtiger CRM
- Creating Ozonetel Agent Login
- Placing outgoing calls
- Receiving incoming calls
- Using the Phone Calls module features
Ozonetel CCaaS is a third-party app that you must install from Vtiger’s Extension Store.
Note: You can install extensions only if you are an Admin user in the CRM.
Follow these steps to install the Ozonetel CCaaS extension:
- Log in to the CRM
- Click the User Menu.
- Click Settings. The settings page opens.
- Look for Extensions.
- Click Add-ons.
- Look for Ozonetel CCaaS Telephony.
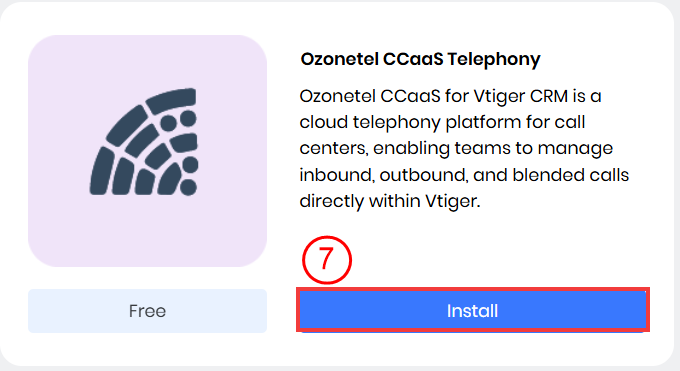
- Click Install.
- Click Yes to confirm the installation.
A message appears confirming that the Ozonetel CCaaS gateway has been successfully added.
Integrating Ozonetel CCaaS with Vtiger CRM
In this section, we will explore the process of integrating Ozonetel CCaaS with Vtiger CRM.
You can integrate and use Ozonetel with Vtiger CRM in these two phases:
- Phase 1: Ozonetel Configuration
- Phase 2: Ozonetel CCaaS Integration with Vtiger CRM
Note: These steps require you to navigate back and forth between the Vtiger CRM screen and the Ozonetel app.
Phase 1: Ozonetel Configuration
This phase is configured in the Ozonetel portal. Ozonetel Configuration requires:
- Step 1: Accessing the Ozonetel website
- Step 2: Getting started with Ozonetel
- Step 3: Filling the Signup form
- Step 4: Retrieving Email Content
- Step 5: Logging in to the Ozonetel account
Step 1: Accessing the Ozonetel Website
Follow these steps to access the Ozonetel website:
- Open your preferred web browser (e.g., Chrome, Edge).
- In the address bar, type: https://ozonetel.com.
- Click Enter to open the Ozonetel homepage.
Step 2: Getting Started with Ozonetel
Follow these steps to get started with Ozonetel:
- Click Get Started on the homepage.
- You will be redirected to the signup form page.
Step 3: Filling the Signup Form
- Enter or select the following information in the signup form:
- Full Name: Enter your name.
- Email Address: Enter a valid email to receive the activation details.
- Phone Number: Include your country code (e.g., +91).
- Company Name: Enter your organization’s name or your name.
- Country / Region: Select your country.
- Number of Agents: Choose the relevant range (e.g., 1–5 for testing).
- After completing the form, click Submit.
Step 4: Retrieving Email Content
After submitting the form, you will receive a Welcome or Activation email from Ozonetel. Follow these steps to retrieve the email content:
- Open the email address you entered when signing up for Ozonetel.
- Look for the Welcome or Activation email.
- This email contains the following details:
- Login URL: Example: https://in1.ozonetel.com
- Username / Account ID: Used to log in to your Ozonetel dashboard.
- Temporary Password: You will use this to log in initially; you may be prompted to change it.
- Base URL: The Base URL is required for CRM integration and is specific to your region.
Note:
- Copy the Base URL, Username, and temporary password to a Notepad so you can easily use them during setup.
- You can contact the Ozonetel support team to request a new email if you missed the original one.
Step 5: Logging in to the Ozonetel account
Follow these steps to log in to the Ozonetel account:
- Open the Login URL provided in the activation email.
- Enter your Username and Password.
- Click Login.
- If prompted, update your password for security.
Once logged in, you will land on the Ozonetel Dashboard.
Phase 2: Ozonetel CCaaS Integration with Vtiger CRM
Integrating Ozonetel CCaaS gateway with Vtiger CRM requires:
- Step 1: Ozonetel CCaaS Configuration in Vtiger CRM
- Step 2: Integrating Ozonetel CCaaS with Vtiger CRM
Step 1: Ozonetel CCaaS Configuration in Vtiger CRM
This step is configured in the Vtiger CRM Phone Configuration and My Preferences page. Note: In this step, you will have to enter the copied API Key, etc.
Follow these steps to configure Ozonetel in Vtiger CRM:
- Log in to the CRM.
- Click the User Menu.
- Click Settings. The settings page opens.
- Look for Extensions.
- Click Phone Configuration.
- Click +Add Gateway.
- Under Gateway, select Ozonetel CCaaS.
- Enter or select the following information:
- Gateway Status: Select Active.
- Default Gateway: Select Yes.
- ozonetel_mode: Select Online.
- API Key: Paste the copied API Key.
- Username: Paste the copied Username.
- base_url: Paste the copied base_url.
- label: Enter the label as OzonetelCCaaS.
- Your Caller ID: Paste the copied DID.
- status_callback: URL is displayed by default.
- Incoming_callback: URL is displayed by default. Note: Copy the above URLs to a Notepad or a document.
- Country: Select your country.
- Click Save. If the Ozonetel gateway was added successfully, the Success message is displayed.
- Click your Profile icon in Vtiger CRM.
- Click My Preferences.
- Enter information for the following fields:
- Under Employee information:
- Home Phone: Paste the copied Campaign Name.
- Under Employee information:
- Under Phone Preferences:
- Agent ID: Paste the copied Agent ID.
Step 2: Adding the Ozonetel TAP Script in Module Designer
Before completing the integration, you need to add the Ozonetel TAP Script in the Module Designer. This script enables phone call activities within selected modules in Vtiger.
Follow these steps to add the Ozonetel TAP script in the module designer:
- Log in to the CRM.
- Click the main Menu.
- Go to Platform > Module Designer. The module designer page opens.
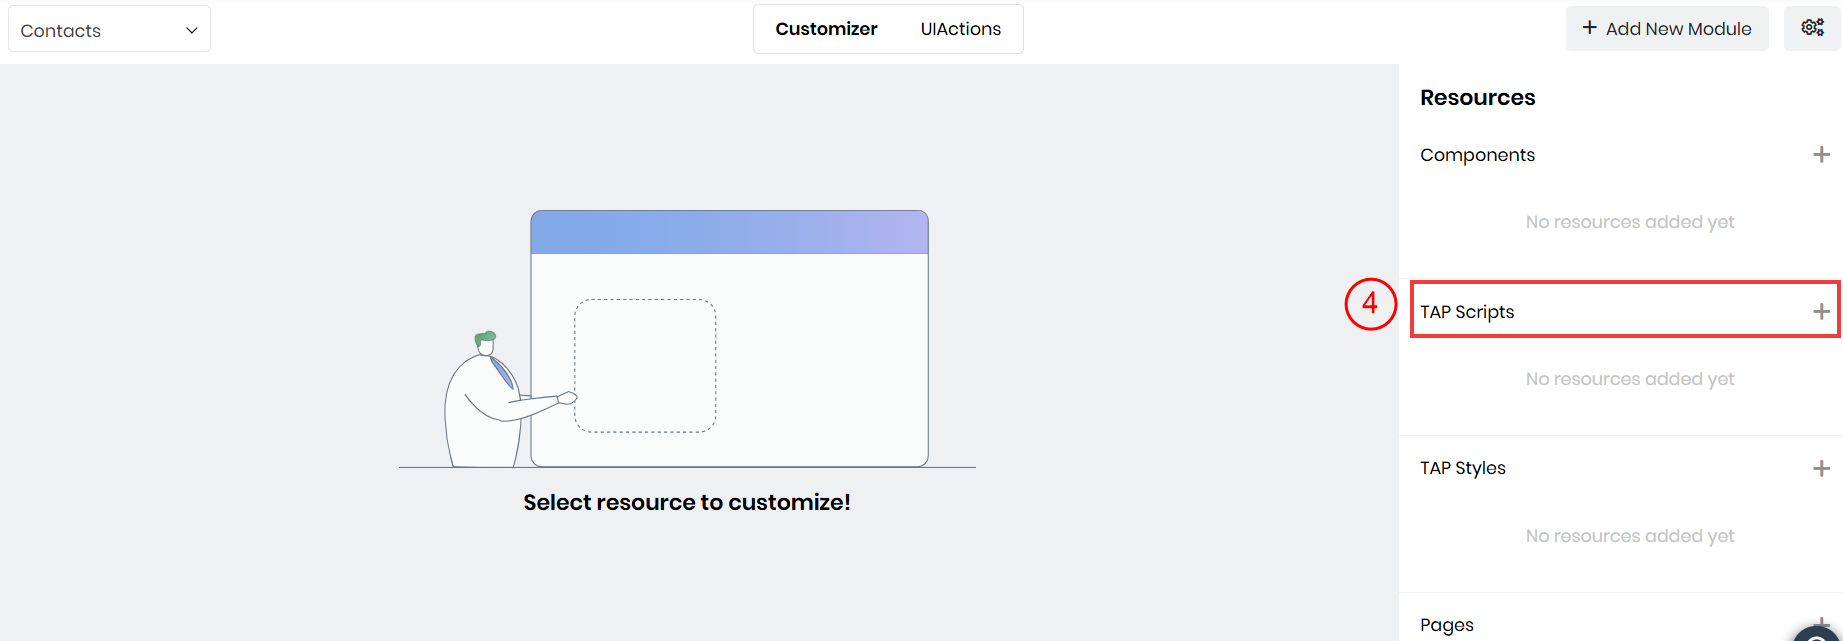
- In the Customizer tab, click the Add icon next to TAP Scripts.
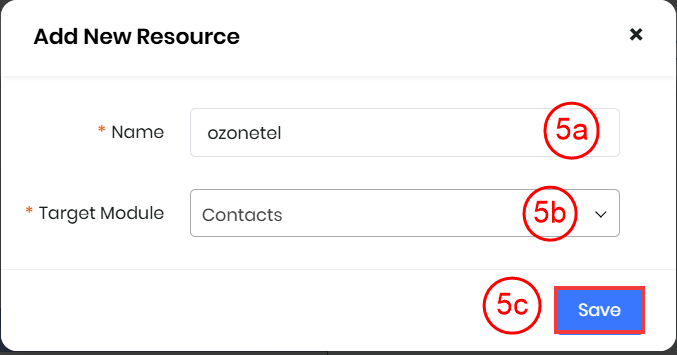
- Enter or select the following information:
- Name: Enter the TAP Script name as ozonetel.
- Target Module: Select Contacts.
- Click Save.
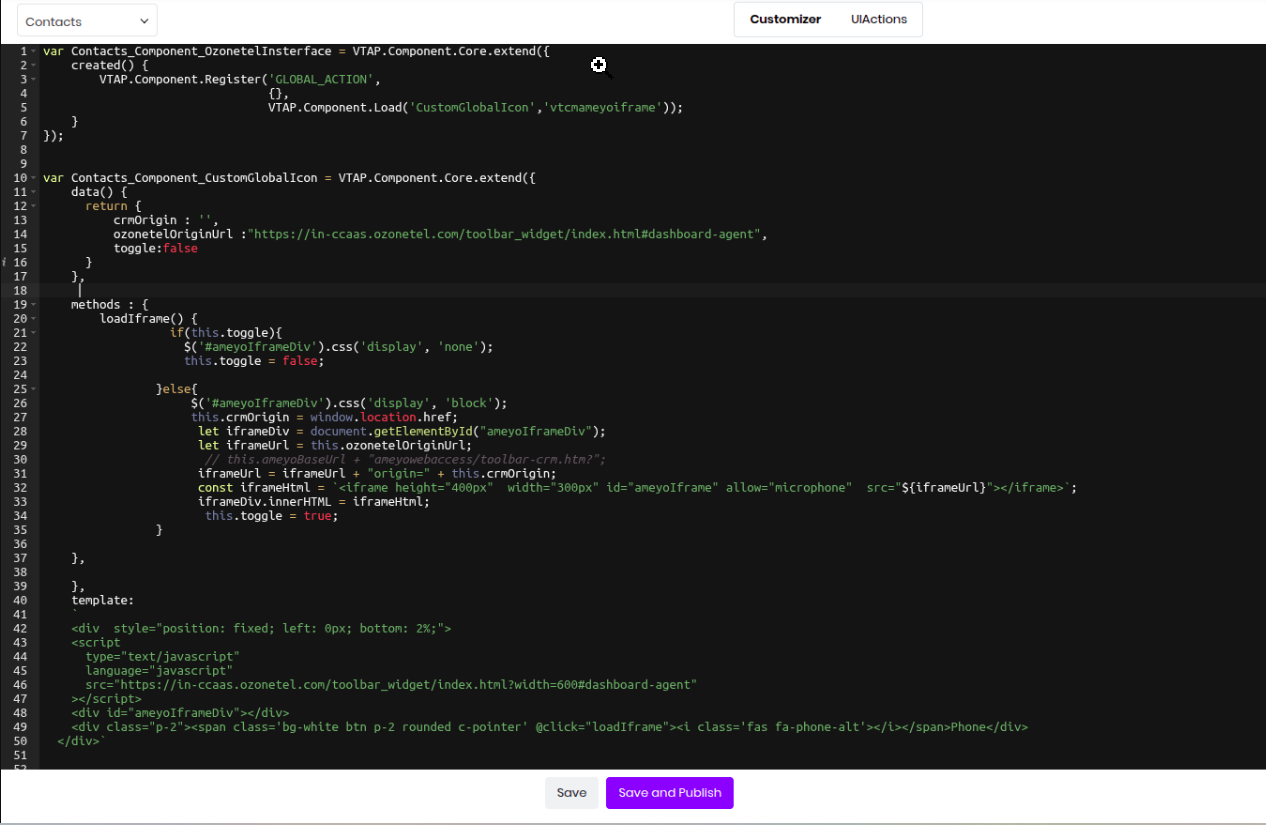
- Enter the Ozonetel TAP Script to enable integration.
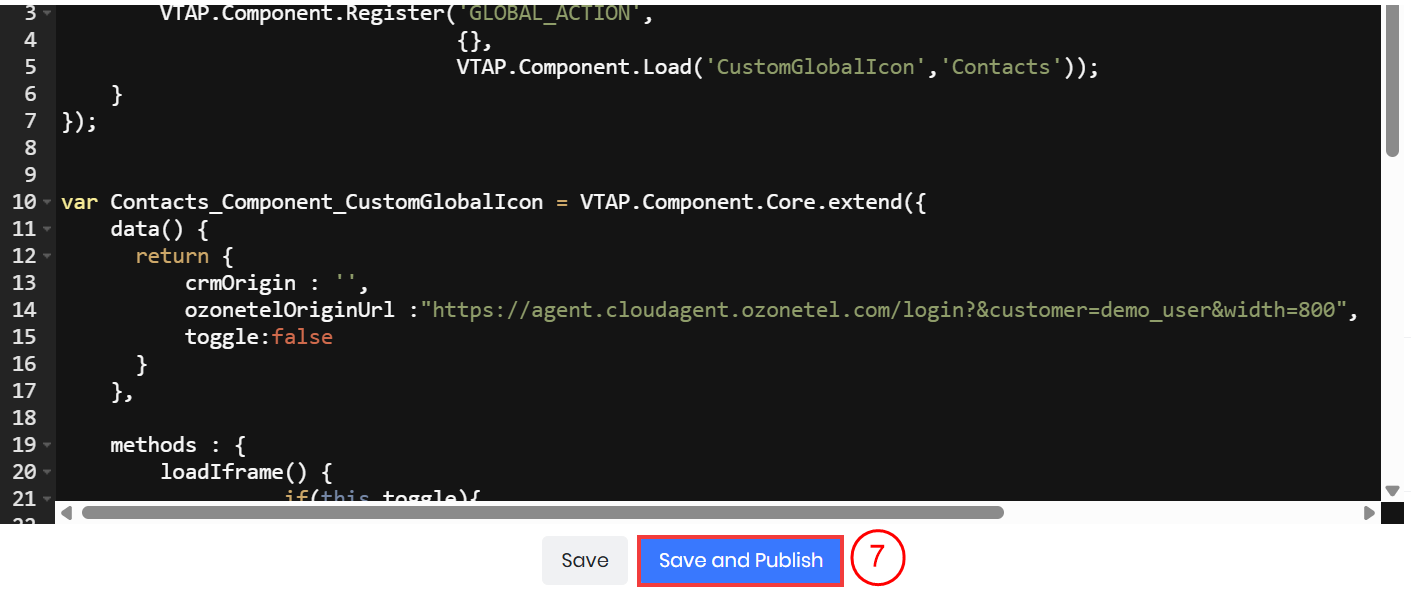
- Click Save and Publish to apply the changes.
Once saved, the TAP Script activates the Ozonetel integration for the Contacts module, enabling call pop-ups and call activity tracking directly within Vtiger.
Step 3: Integrating Ozonetel CCaaS with Vtiger CRM
After completing the configuration, you need to set up both Inbound and Outbound campaigns in Ozonetel for the integration to work correctly.
Step 3.1: Setting Up the Inbound Campaign
Follow these steps to set up the inbound campaign:
- Log in to the CloudAgent homepage.
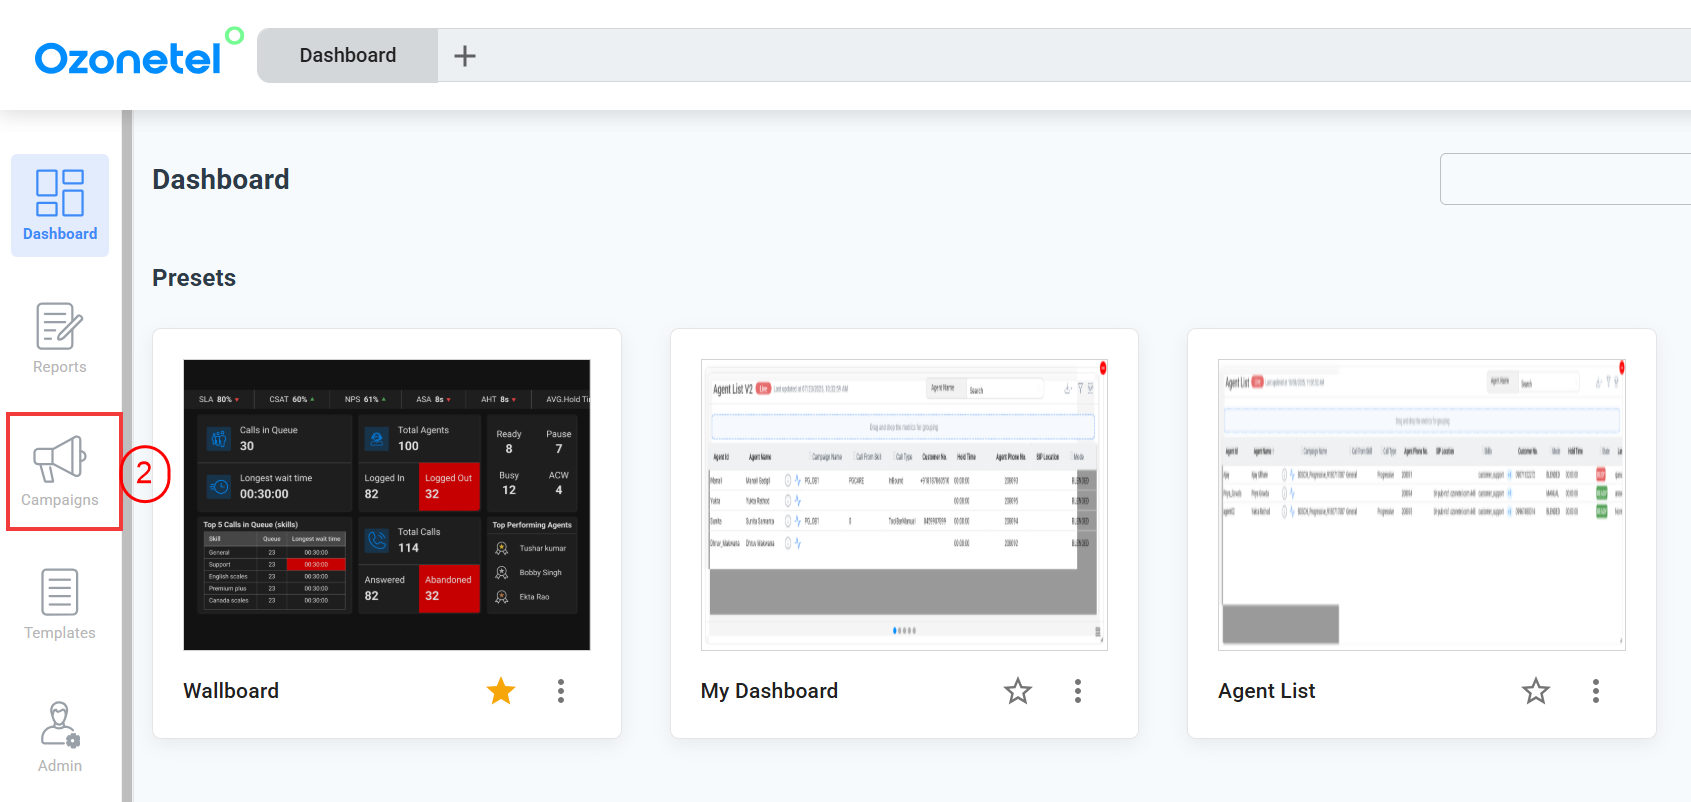
- Go to the Campaigns tab from the left panel of the screen. The Campaigns page opens.
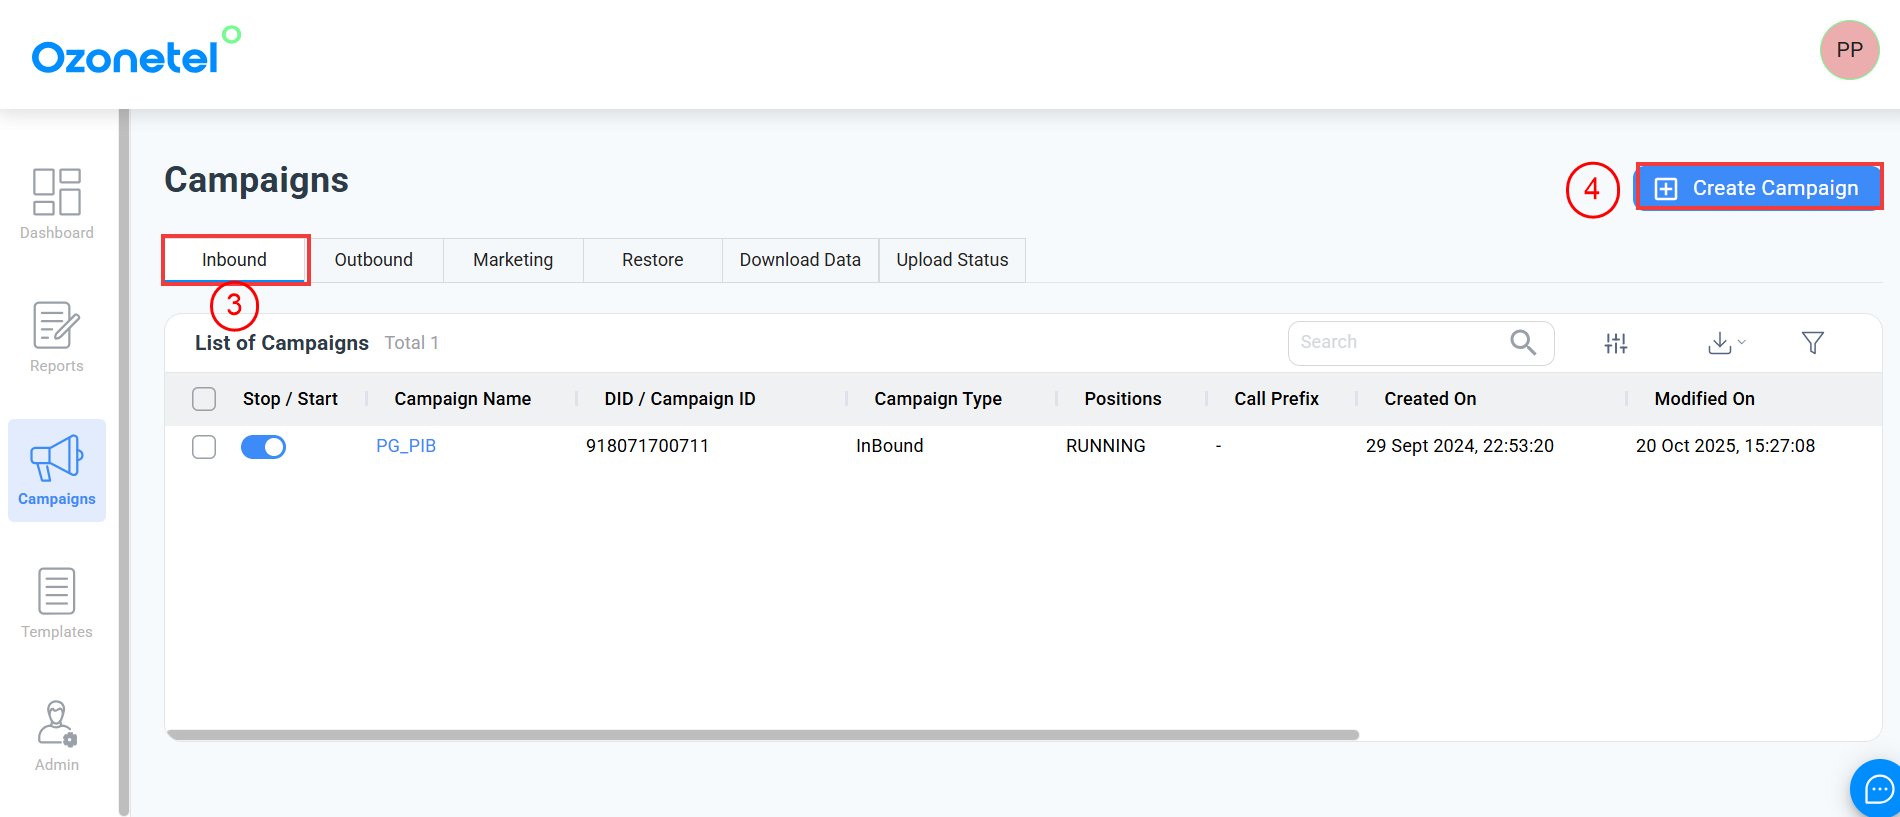
- Select Inbound Campaigns.
- Click Create Campaign. A Create Inbound Campaign page opens.
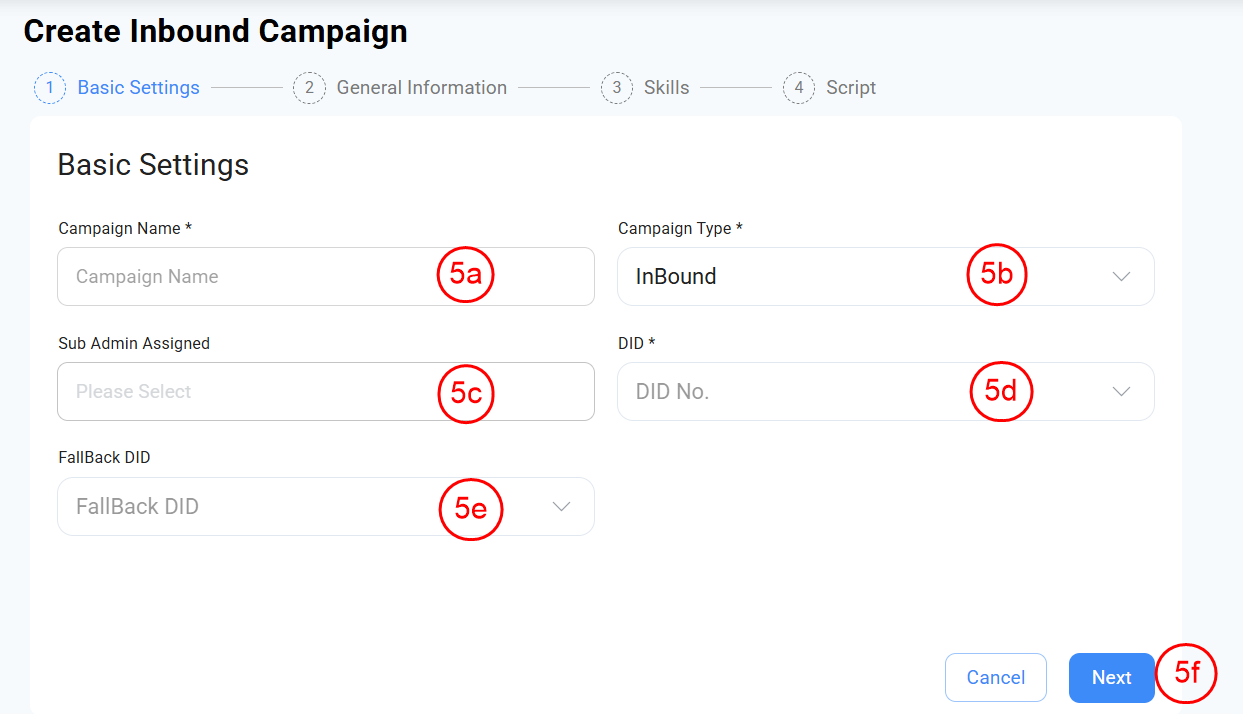
- Enter or select the following information in the Settings tab:
- Campaign Name: Enter a unique name for your inbound campaign.
- Campaign Type: Select Inbound from the drop-down list.
- DID: Enter the Direct Inward Dialing number for the campaign.
- Sub Admin Assigned: Assign a sub-admin user to manage the campaign.
- Fallback DID: Provide a backup number to route calls when the primary DID is unavailable.
- Click Next.
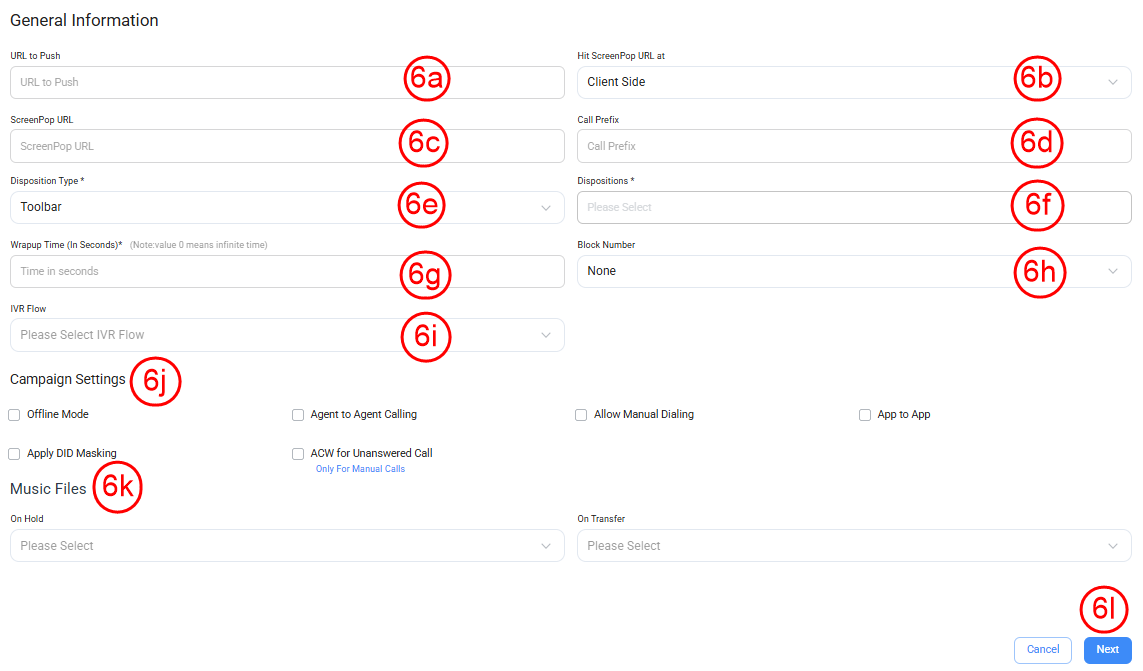
- Enter or select the following in the General Information tab:
- URL to Push: Paste the copied status_callback URL (copied from Vtiger CRM) in the Callback URL field under System Settings.
- Hit ScreenPop URL at: Paste the copied incoming_callback URL (copied from Vtiger CRM) and add &CallerID= at the end of the URL.
- Call Prefix: Enter any dialing prefix required for outbound calls.
- ScreenPop URL: Provide the URL used to display caller information in Vtiger.
- Disposition Type: Choose how agents will record call outcomes.
- Dispositions: Add possible outcomes for calls (e.g., Interested, Callback, Not Reachable).
- Wrap-up Time: Set the duration given to agents after a call ends for notes or updates.
- Block Number: Enable this to block specific incoming numbers if needed.
- IVR Flow: Select the IVR flow linked with this campaign.
- Enable or disable Campaign Settings as per your requirements.
- Enter or select the following in the Music Files section:
- On Hold: Select the audio file to play when the caller is on hold.
- On Transfer: Select the audio file to play while transferring a call.
- Click Next.
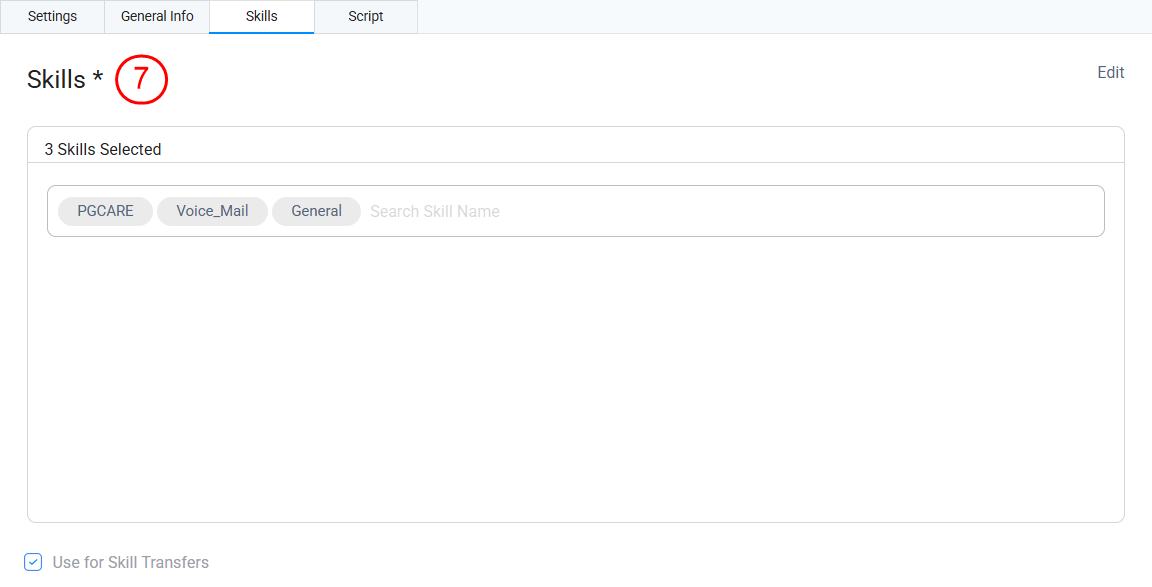
- In the Skills tab, choose the relevant skills for your campaign from the drop-down list.
- Click Next.

- In the Scripts tab, enter the campaign script that agents will use during customer interactions.
- Click Save to complete the setup.
Once you have saved the changes, a confirmation message will appear indicating that your outbound campaign has been successfully configured. To edit a campaign, select it from the list of campaigns and make the necessary changes.
Step 3.2: Setting Up the Outbound Campaign
Follow these steps to set up the outbound campaign:
- Log in to the CloudAgent homepage.
- Go to the Campaigns tab from the left panel of the screen. The Campaigns page opens.
- Select Outbound Campaigns.
- Click Create Campaign.
- Enter or select the following information in the Settings tab:
- Campaign Name: Enter a unique name for your inbound campaign.
- Campaign Type: Select Inbound from the drop-down list.
- DID: Enter the Direct Inward Dialing number for the campaign.
- Sub Admin Assigned: Assign a sub-admin user to manage the campaign.
- Fallback DID: Provide a backup number to route calls when the primary DID is unavailable.
- Click Next.
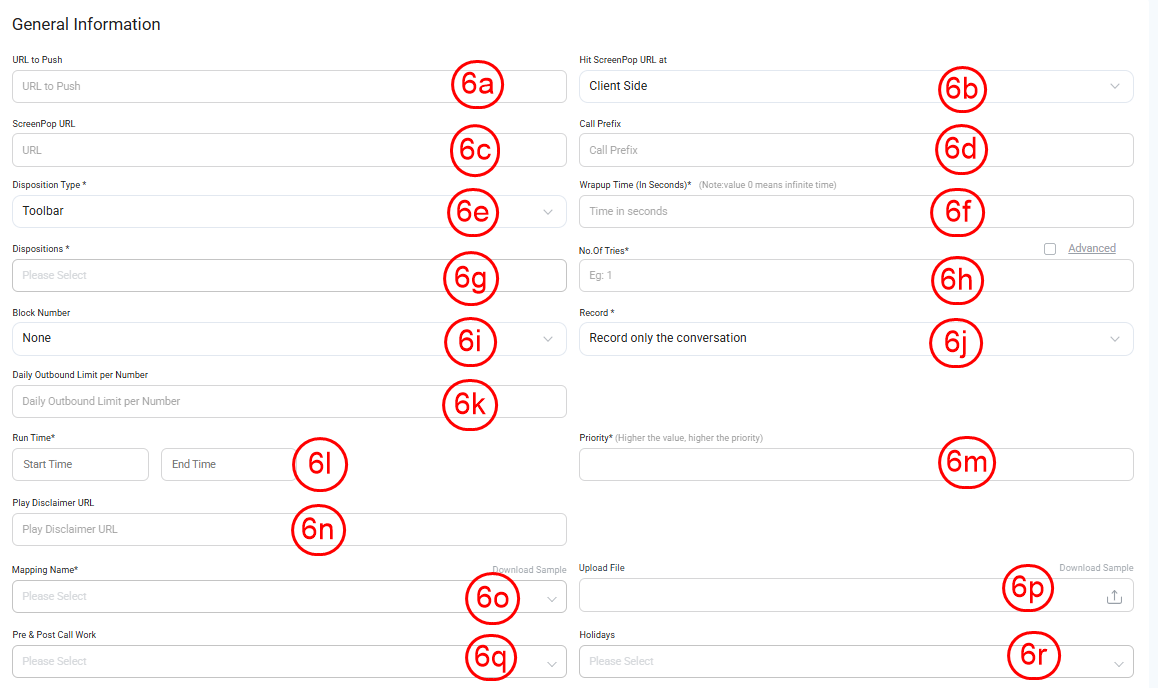
- Enter or select the following in the General Information tab:
- URL to Push: Paste the copied status_callback URL (copied from Vtiger CRM) in the Callback URL field under System Settings.
- Hit ScreenPop URL at: Paste the copied incoming_callback URL (copied from Vtiger CRM) and add &CallerID= at the end of the URL.
- Call Prefix: Enter any dialing prefix required for outbound calls.
- ScreenPop URL: Provide the URL used to display caller information in Vtiger.
- Disposition Type: Choose how agents will record call outcomes.
- Dispositions: Add possible outcomes for calls (e.g., Interested, Callback, Not Reachable).
- Wrap-up Time: Set the duration given to agents after a call ends for notes or updates.
- Number of Tries: Set how many times the system should retry calling a customer if the first attempt fails.
- Block Number: Enable this to block specific incoming numbers if needed.
- Play Disclaimer URL: Provide an audio file URL for disclaimers before connecting the call.
- Record: Choose whether to record inbound calls.
- Daily Outbound Limit per Number: Define the maximum number of outbound calls per day.
- Run Time: Specify the time range during which outbound calls can be made.
- Priority: Choose the campaign’s importance level to decide which calls are made first.
- Dial Interval: Set the time gap between each call attempt.
- Customer Ringing Time: Define how long the customer’s phone should ring before ending the call.
- Mapping Name: Select the mapping configuration that links call data with CRM records.
- Holiday: Enter the days when the campaign should not run or make calls.
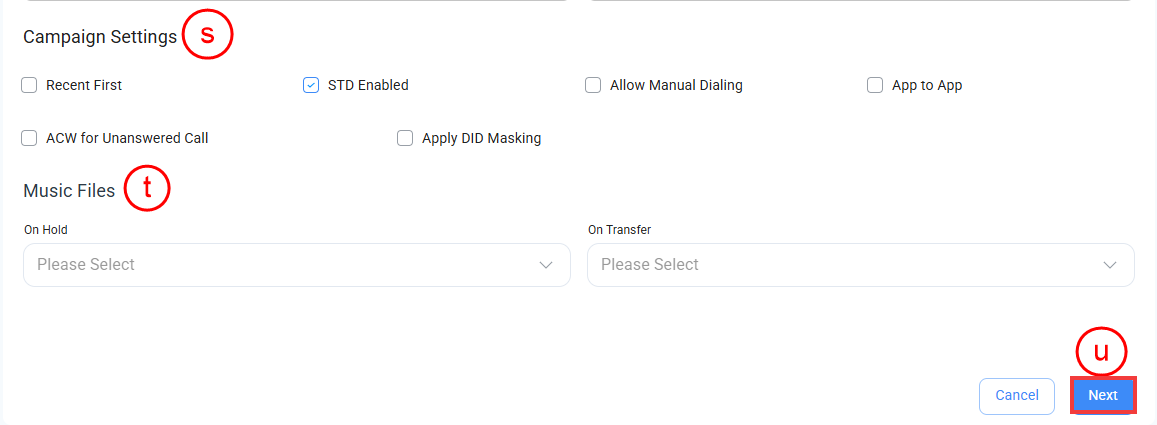
- Enable or disable Campaign Settings as per your requirements.
- Enter or select the following in the Music Files section:
- On Hold: Select the audio file to play when the caller is on hold.
- On Transfer: Select the audio file to play while transferring a call.
- Click Next.
- In the Skills tab, choose the relevant skills for your campaign from the drop-down list.
- Click Next.
- In the Scripts tab, enter the campaign script that agents will use during customer interactions.
- Click Save to complete the setup.
Once you have saved the changes, a confirmation message will appear indicating that your outbound campaign has been successfully configured.
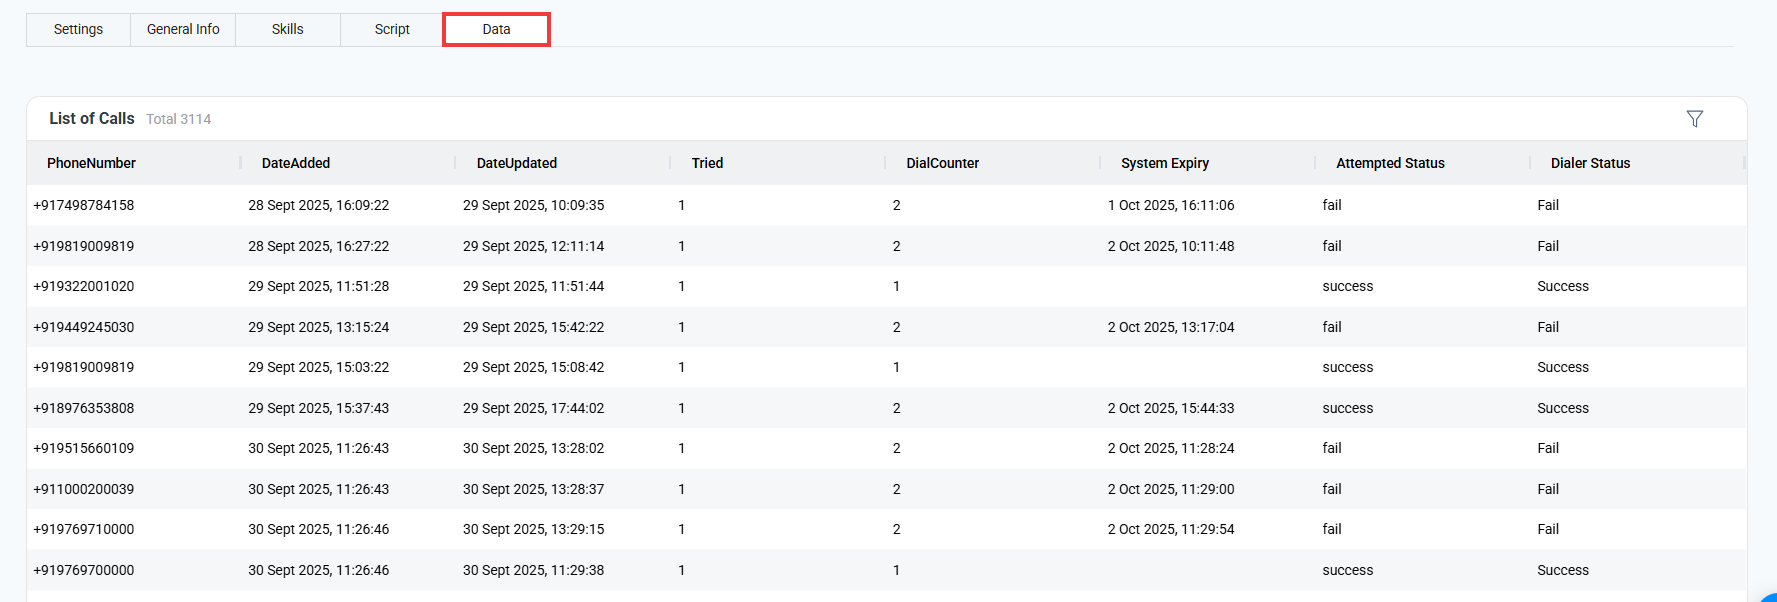
- You can view the list of all calls made under the Data tab, which displays detailed call information and status.
- To edit a campaign, select it from the list of campaigns and make the necessary changes.
Configuring Ozonetel CCaaS Agent Login
After you have successfully integrated Ozonetel CCaaS , you must configure the Ozonetel Agent Login portal for agents to use Ozonetel to make phone calls in Vtiger CRM.
Follow these steps to configure the agent details in the Ozonetel Agent Login portal:
- Go to Ozonetel Portal. You will be directed to the login screen.
- Select Agent Login. You will be directed to the Agent Portal.
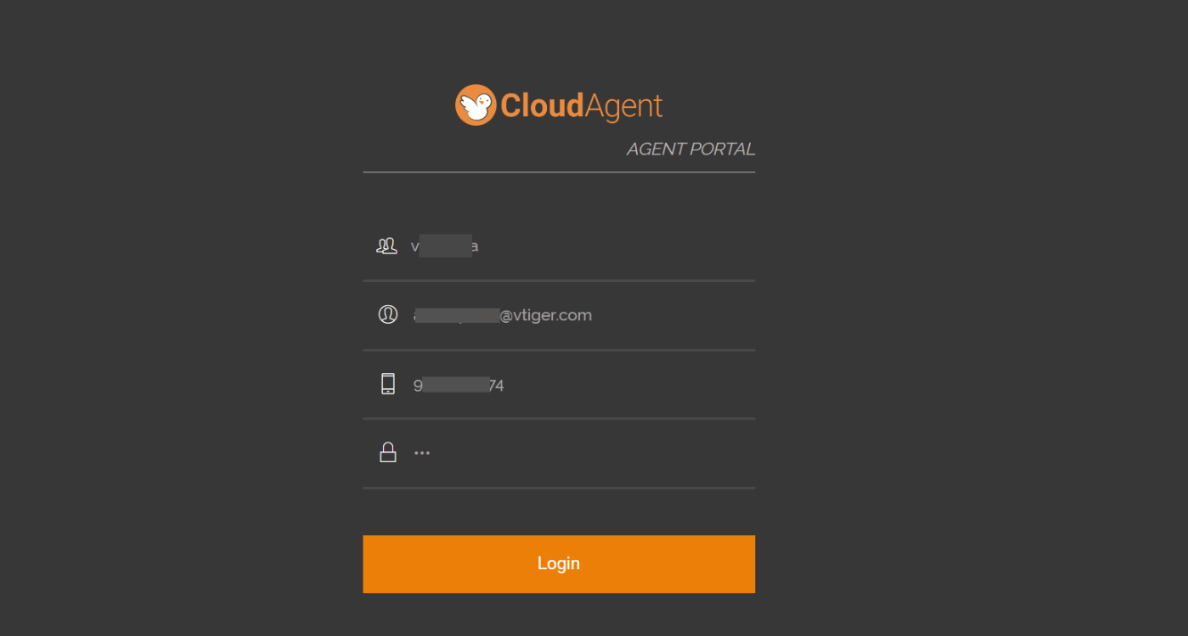
- Enter or select the following information:
- Customer: Ozonetel username (same as Admin Login account).
- Agent Id: Agent email ID.
- Phone Number: Agent’s phone device’s phone number.
- Pin: Agent Password.
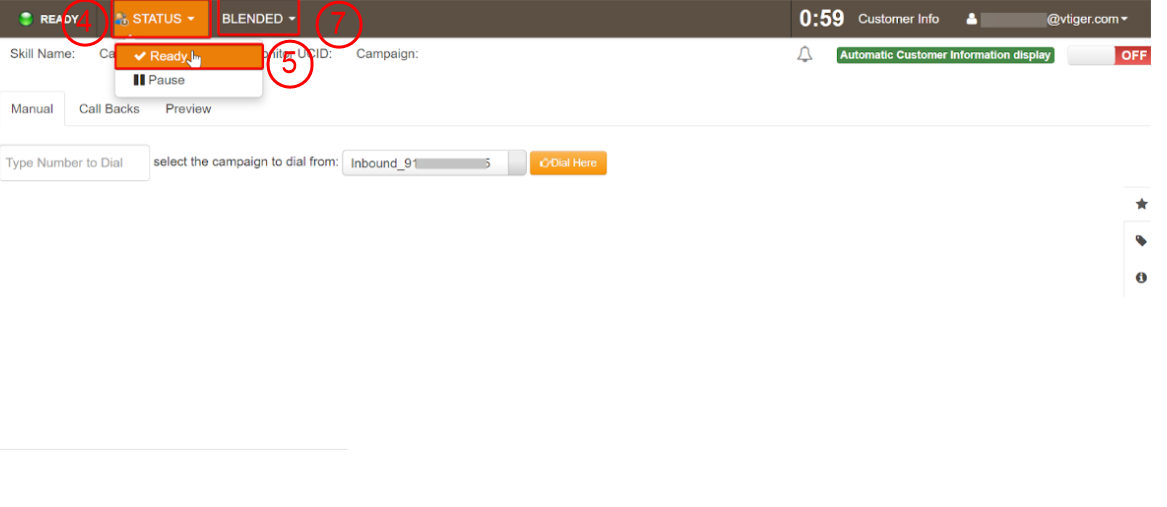
- Click the Status tab in the top left corner of the screen.
- Select Ready.
- Click the Inbound tab on the top left corner of the screen.
- Select Blended.
Note: While making phone calls using Ozonetel in Vtiger CRM, the Agent should always be logged in to the Ozonetel Agent Login page.
Placing Outgoing Phone Calls
You can place a call to your customers directly from the CRM using any of the following options:
- The Phone Call icon
- By clicking the phone number
- Using the Dialer feature
Placing a Call Using the Phone Call Icon or Phone Number
Follow these steps to place a phone call using Ozonetel CCaaS in Vtiger CRM.
- Log in to the CRM.
- Click the main Menu.
- Go to Essentials.
- Go to Contacts (or any module where you want to place a phone call).
- Go to the contact record to whom you want to place a phone call.
- Hover your mouse on the contact record and click the phone icon.
Or
- Click on the phone number of a contact under the Phone column in the List View. You will be directed to the pop-up below.
- The call is now connecting to the agent’s phone device.
- You will receive the above notification alerting the agent to receive the call on his or her phone device.
- Once the agent receives the call, the call is connected to the contact.
- The Agent and the customer can now have a phone conversation.
You have now successfully placed an outgoing phone call using Ozonetel CCaaS in Vtiger CRM.
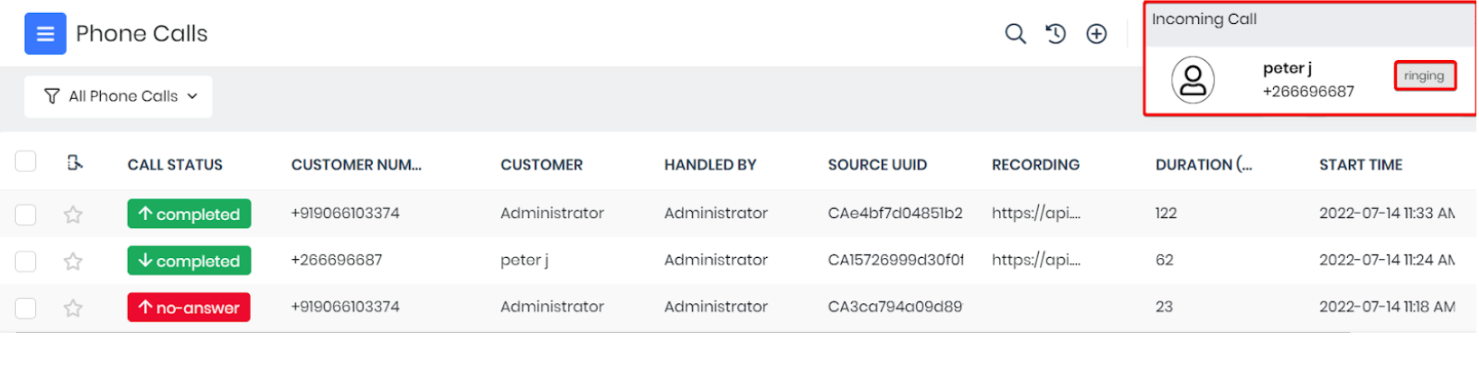
Receiving Incoming Phone Calls
Vtiger CRM does not support receiving calls directly from Ozonetel. Instead, you receive notifications via pop-up messages. These pop-ups alert you about incoming calls and automatically match the caller’s number with the corresponding contact, lead, organization, or vendor record in the CRM.
- If a matching number exists, then the contact, lead, organization, or vendor’s name is displayed in the pop-up.
- If a matching number does not exist, you are prompted to enter the caller's email ID in the pop-up to create a new contact record.
Follow these steps to receive an incoming call using Ozonetel in Vtiger CRM.
- Log in to the CRM.

- Once a customer calls, the agent receives it on their phone device. A pop-up is displayed in Vtiger CRM with a status ringing.
- Once the agent receives the call, you will be directed to the pop-up with the status in-progress. The agent and the customer can now have a phone conversation.
You have now successfully placed an incoming phone call using Ozonetel in Vtiger CRM. Agents will get a pop-up window with call details when they place an outbound call, just like the pop-up that appears for incoming calls.
If you have multiple agents handling phone calls, such as a customer care team, then the incoming call pop-up is displayed to all agents who have configured the extension number in their Preferences. When an agent answers a call, the pop-up disappears for other agents.
From the incoming call pop-up, you can:
- Search or Create a contact if there is no matching contact for an incoming call.
- Create a deal or a case from the incoming call pop-up.
- Transfer calls to other Agents.
- Add call notes.
Also, you can view recent call logs in related touchpoints of the contact’s record.
Reference
- Phone Calls Module Overview
- Phone Calls Generic API
- Phone Calls API Usage
- Vtiger Integration with Plivo
- Vtiger Integration with Exotel
- Twilio Integration with Vtiger Phonecalls
- Tata Tele Services Integration with Vtiger
- Vtiger Integration with Asterisk
- Vtiger Integration with Knowlarity
- Vtiger Integration with Telzio
- 3CX Phone Integration with Vtiger
- VICIdial Integration
- Vtiger Integration with Duocom