Articles in this section
Vtiger Integration with Asterisk
Feature Availability
Vtiger Editions: One Pilot | One Growth | One Professional | One Enterprise | One AI
Introduction
The Phone Calls module in Vtiger lets you:
- Integrate with different service providers.
- Make and receive calls from the CRM.
- Track, manage, and log every phone call with your leads, customers, and team members—ensuring no critical conversation slips through the cracks.
- Create records for every phone call made or received.
- Integrate services such as Live Chat, email, call logging, purchase history, feedback surveying, support tickets, and more.
Asterisk Integration with Vtiger CRM
Integrating Ducom with Vtiger's Phone Calls module allows you to make and receive calls seamlessly within the CRM platform. With Vtiger's comprehensive CRM capabilities, you can streamline call management, automate follow-ups, and maintain detailed call logs. This integration:
- Supports simultaneous call routing to multiple agents.
- Lets you use Vtiger CRM’s Phone Call module features such as -
- Incoming calls
- Outgoing calls
- Call notes
- Customer sentiments
- Call recordings
You can integrate Asterisk ver. 1.4 and 1.6 (without Vtiger Connector) and Asterisk ver. 1.8 - 11 (with Vtiger Connector).
Set up two types of gateways with Asterisk
- Normal gateway - To set this up, you must configure an extension phone number in the agent’s preferences. When you call a client, it connects to the extension number first. Agents must receive the call on the extension number to connect with the client.
- Client gateway - Outgoing calls directly connect to the clients when you use client gateways. You can set up client gateways only with Asterisk and Plivo.
To integrate Asterisk with Vtiger you need to:
- Have an active Asterisk account. If you do not have an account, you must sign up with Asterisk and create one.
- Provide your Asterisk credentials during the configuration process in Vtiger.
- Install Vtiger’s Phone Calls module.
- Integrate your Asterisk phone number with the Phone Calls module in Vtiger.
Other Telephony Gateways in Vtiger CRM
Vtiger CRM’s integrated telephony helps to connect with the following:Benefits of Using the Phone Calls Feature
The benefits of using the Phone Calls module are:
- Lower investments - Integrated telephony (web-based) comes at a cheaper cost regarding hardware and handling, as calls are routed through your internet.
- Optimized resources - Vastly beneficial, especially if you are a small business with a few employees and do not want to invest more in communication.
- Better control and coordination - You can control and coordinate your communication with a single platform. No more worries about working with too many devices and losing out on contact.
- Flexibility - Call from anywhere and anytime. You or your employees can work from the office, at home, or on the road. You can log in at different times and not worry about changes in weather or social conditions.
- Increased volume of calls - Provides more lines of communication and enables handling many calls.
- Increased productivity and efficiency - You will have a single platform, your computer, to track customer data and communicate with them. You don’t have to switch between multiple applications and devices to see data, making a phone call much more efficient.
Installing Phone Calls
To use the Phone Calls module, you must first install it from the Extension Store. You can access the Extension Store if you are an Admin user.
Follow these steps to install Phone Calls:
- Log in to CRM.
- Click the User Menu on the top right corner of the screen.
- Click Settings.
- Look for the Extensions section.
- Select Extension Store.
- Search for Phone Calls using the search bar.
- Click Install.
After you install the module, you can see it under Main Menu > Essentials > Conversations (as shown in the above image).
To learn more about the Phone Calls module in Vtiger, click here.
Configuring Asterisk
Configuring Asterisk requires you to do the following:
- Step 1: Set up Asterisk as a Normal Gateway
- Step 2: Configuring Asterisk server information
- Step 3: Configuring extension number for users
Note:
- You can only configure Asterisk and other gateways if you are an Admin user.
- To set up the gateway, log in to your Asterisk account and Vtiger CRM in different windows or tabs and keep both open as you will be required to navigate back and forth between these apps.
Normal Gateway
Let us first see how Asterisk works as a normal gateway.
- CRM admins must subscribe to the Asterisk service and get their Asterisk Number.
- CRM admins must configure Asterisk in the CRM.
- Individual sales and support representatives must set up their Asterisk Extension Number in their CRM preferences.
- Incoming calls - When a customer calls on the Asterisk Number, the call is routed to all the sales and support representatives. Any one of the representatives can attend the call.
- Outgoing calls - When a sales and support representative calls a customer, the call is first routed to the representative’s own extension number. The representative must receive the call on their extension number, after which it connects to the customer.
Step 1: Set up Asterisk as a Normal Gateway
Note: You will be performing these steps in Vtiger CRM.
Follow these steps to set up Asterisk as a Normal Gateway:
- Log in to CRM.
- Click on the User Menu in the top right corner of the screen.
- Click Settings.
- Look for Extensions.
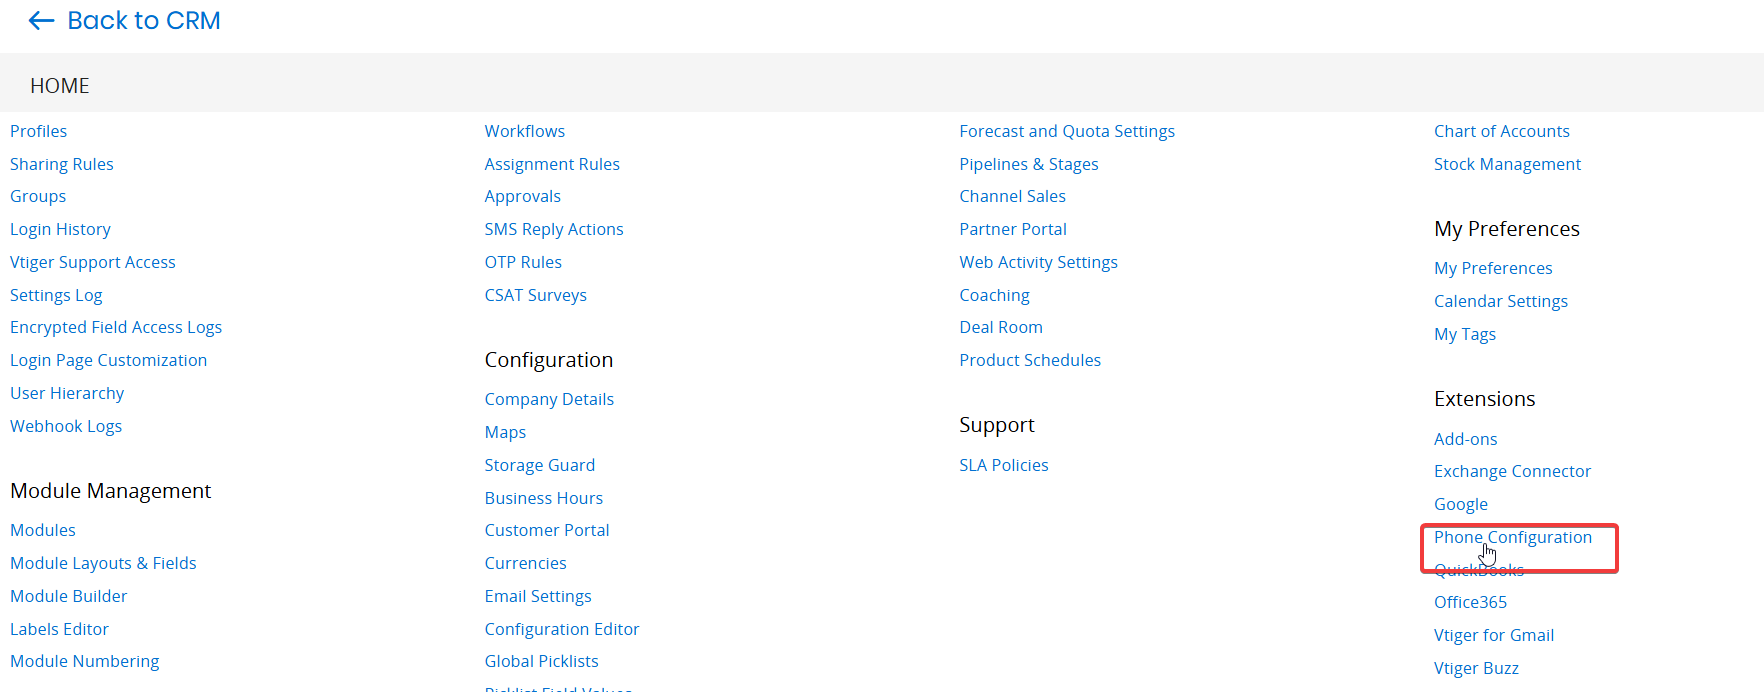
- Select Phone Configuration. The Phone Configuration window opens.

- Click +Add Gateway. The Gateway Configuration window opens.

- Select Asterisk from the Gateway drop-down.
- Select Active from the Gateway Status drop-down. This activates the gateway for incoming and outgoing calls.
- Set the gateway as default by selecting Yes from the Default Gateway drop-down. Note: This step is optional.
Step 2: Configure your Asterisk Server information

- Vtiger Asterisk App URL - Configure the server name where Vtiger Asterisk Connector is installed as shown: Syntax : Protocol://Asterisk_Server_IP:Port.
- Note: The image displays only sample data. Please refer to your Asterisk account details for the correct data.
|
|
|
|
|
|
|
|
|
|
|
|
|
|
|
|
|
|
|
|
|
|
|
|
|
|
|
|
|
|
-
Click Save.
Step 3: Configure the extension number for each user
Configure the extension number on the User Preferences page for each user who handles incoming and outgoing calls from the CRM.
- Log in to your CRM account.
- Click on the User Profile on the right side of the screen.
- Open My Preferences.
- Configure the user number in the Asterisk Extension field under the Asterisk Configuration block.
- Number format: Enter the number format.
- Extension: [Extension_number] For example, 1002.
Once the configuration is completed on both sides, i.e., Vtiger and Asterisk, you are ready to make and receive calls in the CRM.
Viewing Phone Call Logs
Every phone call you make or receive is saved with all the details as a Phone Call record. You can view Phone Call logs for these details. The log of the calls (incoming and outgoing) is listed under Main Menu > Essentials > Phone Calls. You can view the following details on this screen:
- Call status, customer number, which agent or rep handled the call (mentioned in Handled By and Assigned To fields), call duration, etc.
- Details for each call can be seen when you open the call record, such as -
- Links to the voice recording
- Call notes
- Call transfer details
- Call directions, etc.
You can create a list of all your phone calls, such as missed calls, completed calls, etc., from the List View.
To learn how to create a list, click here.
Viewing Phone Call Status Values
Call status values to define the status of the calls being handled. You can see the following call statuses in the CRM.
- Ringing: For inbound calls, before the call is routed.
- In-progress: For inbound calls, after an agent or a rep picks up the call. For outbound calls, when a rep initiates a call.
- Completed: For inbound and outbound calls, after a call is completed.
- Voicemail: For inbound calls, if a call goes to voicemail.
- Hang-up: For inbound calls, if a customer hangs up the call before it is routed to a rep.
- No-answer: When it is not answered and there is no voicemail for an outbound call.
Vtiger Asterisk Connector
The Vtiger Asterisk Connector application acts as a gateway to connect to Vtiger CRM from the Asterisk Server. The Connector makes it easy for Vtiger and Asterisk to interact over HTTP for incoming or outgoing calls.
Vtiger Asterisk Connector provides the following features:
- Connect to Vtiger and notify the incoming call.
- Accept commands from Vtiger and forward it to Asterisk (Click-to-Call).
- Call recording file management.
Installation Prerequisites
- Asterisk 1.8 onwards
- Java 1.8 onwards
- Vtiger Details [Copy these details from the Vtiger CRM PhoneCalls settings page]
- VtigerServerURL - https://yourondemand.od1.vtiger.com
- VtigerSecretKey - [Copy this detail from Vtiger CRM Settings > Extensions > Phone Calls page]
Installing Vtiger Asterisk Connector
- Click on the link to download Vtiger Asterisk Connector.
- Unzip the application package (VtigerAsteriskConnector.zip) to any path in the Asterisk Server.
- Update VtigerAsteriskConnector/VtigerAsteriskConnector properties.
For the Asterisk Server
|
|
|
|
|
|
|
|
|
|
|
|
|
|
|
|
|
|
|
|
|
For Vtiger
|
|
|
|
|
|
Changes Required in Asterisk Server
- Edit Asterisk Extensions configuration file: (extensions.conf)
Add the above two contexts in extensions.conf OR include the below dial plan within the existing context (both inbound and outbound context).
exten => _X.,1,Agi(agi://0.0.0.0/incoming.agi)
Note:
- _X = pattern to accept any number as an extension
- 0.0.0.0 = VtigerAskteriskConnector_ServerIP (or the one configured in VtigerAskteriskConnector/VtigerAskteriskConnector.properties)
- DID = DID provided by your service provider.
-
Edit the Asterisk cdr configuration file: (cdr_manager.conf) and modify the Enabled field as shown below:
;--- START --- enabled = yes ;--- END ---
-
Edit Asterisk Manager configuration file: (manager.conf)
Add Vtiger IP in the ACL (Access Control List) under the username configured in VtigerAskteriskConnector/VtigerAskteriskConnector.properties as shown below:
;--- START --- permit = Vtiger_IP/255.255.255.0 ;--- END --- -
Add Asterisk server IP under the permit field as Vtiger Connector uses the same IP for AMI login.
;--- START --- permit = ASTERISK_IP/255.255.255.0 ;--- END ---
Configuration Example
-
Trunks: Select any one of the outbound trunk, say “XYZ” from FreePBX.
Context
-
Outbound Calls: [Should be part of trunk = XYZ]
Add new context for handling outbound calls.
; --- START ---- [vtiger_outbound] exten => _X.,1,Agi(agi://0.0.0.0/incoming.agi) ; --- END ---Or
Include dial plan within the existing context below, say Outgoing
exten => _X.,1,Agi(agi://0.0.0.0/incoming.agi)
-
Inbound Calls
Add new context for handling inbound calls. And make this context as default in FreePBX Settings > Asterisk SIP Settings > Default Context = vtiger_inbound.
; --- START ---- [vtiger_inbound] exten => 123456789,1,Agi(agi://0.0.0.0/incoming.agi) exten => _X.,1,Agi(agi://0.0.0.0/incoming.agi) ; --- END ---
where 123456789 - Inbound DID
Or
Include the dial plan within the existing inbound context below, say from-internal, assuming all incoming calls are routed to this context.
[from-internal] … … exten => _X.,1,Agi(agi://0.0.0.0/incoming.agi)
- For incoming calls, the Asterisk server will not send the start time and end time to the CRM when it is still in ringing or ongoing progress state. To create a Phone call record in the CRM, you need to fill in the start time, as the current time on CRM is set as default. After the call is completed, the Asterisk server notifies CRM about the call details, including the actual start time and end time of the phone call. You can view the call details in the respective Phone call record.
- The record ID is sent to the provider when triggering a call via Asterisk prov
Asterisk Manager Settings
AMI users added to the connector config file should have the following permissions.
;---------START---------- read = all,system,call,log,verbose,command,agent,user,config, originate write = all,system,call,log,verbose,command,agent,user,config, originate ;---------STOP
xx.xx.xx.xxx is our Vtiger Server IP, added under permit field.
permit = xx.xx.xx.xxx/255.255.255.0
yy.yy.yy.yyy is our Asterisk server IP, added under the permit field.
permit = yy.yy.yy.yyy/255.255.255.0
Vtiger Settings
- Go to CRM Settings > Extensions > Phone Calls.
- Add the following configuration:
- Vtiger Asterisk App URL = http://127.0.0.1: (the port you picked)
- Refer VtigerAsteriskConnector config file.
- ServerIP = 127.0.0.1 ServerPort = 56002 [pick a unused port] AsteriskServerIP = 127.0.0.1 AsteriskServerPort = 5038 AsteriskUserName =admin AsteriskPassword = xxxxxxxxx
- Outbound Context = Vtiger_outbound.
- It must match a context in extensions.conf, in that context, you must have exten => _X.,1,agi(agi://0.0.0.0/incoming.agi).
- Outbound Trunk = XYZ
- It must match the trunk name added in FreePBX.
- Vtiger Asterisk App URL = http://127.0.0.1: (the port you picked)