Articles in this section
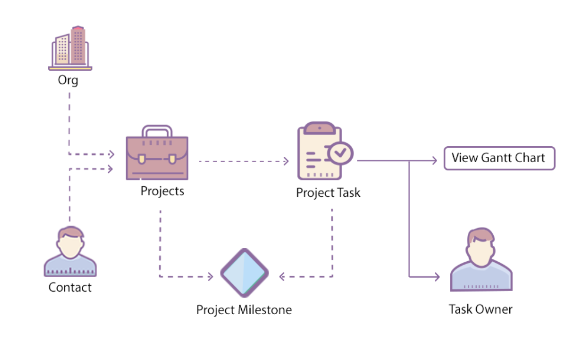
Projects in Vtiger CRM
Feature Availability
Vtiger Editions: One Pilot | One Growth | One Professional | One Enterprise | One AI
Introduction to Projects
A project encompasses structured endeavours with defined objectives, timelines, budgets, and progress tracking. Success relies on clearly outlining goals, budgets, timelines, and resource allocation, alongside fostering collaboration among team members through interactive commenting features.
Feature Availability
In this article, you will learn about:
- Creating a project
- Actions possible in the Projects module
- Viewing project-related information
Creating a Project
Listed below are the ways in which you can create a project.
From Projects’ List View
You can use the +Add Project button to create a new Project. You can find it in the top right corner of the Projects’ List View.
Follow the steps below to create a Project:
- Log in to the CRM
- Click the Main Menu.
- Go to the Projects tab.
- Select the Projects module.
- Click the +Add Project button.
- Fill in all the necessary details.
- Click Save to create the project.
- Click Save and Continue if you want to add some more details.
From Quick Create
Projects can also be created by clicking the + button in the top right-hand corner of the screen.
Follow these steps to create a record using Quick Create:
- Click the + icon displayed on the top right side of your screen.
- Type Project in the Search field.
- Select Project.
- Enter all the mandatory details.
- Click:
- Save to save the record.
- Save and Continue to save the record and go to its Deep Dive View to enter other details.
- Clicking Cancel discards all the information you entered.
To know more about Quick Create, click here.
From Deals
Follow these steps to add a project from the Deals module:
- Log in to the CRM.
- Click the Main Menu.
- Go to Sales.
- Select the Deals module.
- Open any particular deal.
- Hower on the Related tab.
- Click on Projects.
- Click the Add or Create button.
- Enter all the details.
- Click Save.
| Note: Projects can be created from contacts and organizations. |
Actions Possible in the Projects Module
You can perform the following actions on a project you have created:
- Generate related documents
- Create a quote
- Create a project milestone
- Create a case
- Create an invoice
- Export
- Change the template of a project
Generate related documents
Add a Document
Use Vtiger’s Documents module to solve the problems of organizing and sharing! It acts as a repository for all the documents you create or those your customers or sales team share with you.
Follow these steps to add a document:
- Log in to the CRM.
- Click the Main Menu.
- Go to Sales.
- Select the Deals module.
- Open any particular deal.
- Hower on the Related tab.
- Select Documents.
- Click the Add or Create button.
- Here, you see two options on your screen:
- Select Documents
- If you want to add an existing document, select this option.
- Hover over a record in the list of all existing documents to display the radio buttons.
- Click the radio button on the left side of the record to select the record.
- Click Add Selected button present below of the list.
- Create Documents
- If you want to add a new document, select this option.
- Fill all the necessary details.
- Click Save.
- Select Documents
Create a Quote
A Quote is a formal document presented by the company’s sales team to a potential customer, upon request for quotation. It contains a detailed list of products and services, prices, taxes, terms, and discounts.
Follow these steps to add a quote:
- Log in to the CRM.
- Click the Main Menu.
- Go to Sales.
- Select the Deals module.
- Open any particular deal.
- Hower on the Related tab.
- Select Quotes.
- Click the Add or Create button.
- In the list of all the existing quotes, hover over a record to display the radio button.
- Select the quote by clicking the radio button.
- Click the Add Selected button at the bottom of the list.
The linked quote will be displayed in the Sales Ops Widget in the Summary View of the project record. To know more about Quotes, click here.
Create a Project Milestone
Project Milestones determine the phase of great significance within the Project. In a real-time scenario, like stones are placed beside roads stating the portion of the journey has been completed, similarly, Project Milestones also indicate important achievements in the Project. It gives you an idea of how the project is advancing.
Follow these steps to add a project milestone:
- Log in to the CRM.
- Click the Main Menu.
- Go to Sales.
- Select the Deals module.
- Open any particular deal.
- Hower on the Related tab.
- Select Project Milestones.
- Click the Add or Create button.
- Fill all the necessary details.
- Click Save if you want to create the record.
- Click Save and Continue if you want to enter more information.
Create a Case
A case is an issue or a request raised by a customer. When a customer raises an issue, you can create a case record in the CRM.
Follow these steps to add a case:- Log in to the CRM.
- Click the Main Menu.
- Go to Sales.
- Select the Deals module.
- Open any particular deal.
- Hower on the Related tab.
- Select Cases.
- Click the Add or Create button.
- Here, you see two options on your screen:
- Select Cases
- If you want to add an existing case, select this option.
- Hover over a record in the list of all existing cases to display the radio buttons.
- Click the radio button on the left side of the record to select the record.
- Click the Add Selected button present below the list.
- Create Cases
- If you want to add a new case, select this option.
- Fill in all the necessary details.
- Click Save.
- Select Cases
Create an Invoice
An invoice is a non-negotiable itemized statement issued for the products or services rendered to the customer.
Follow these steps to add an invoice:
- Log in to the CRM.
- Click the Main Menu.
- Go to Sales.
- Select the Deals module.
- Open any particular deal.
- Hower on the Related tab.
- Select Invoice.
- Click the Add or Create button.
- Select Invoices. Here, you see two options on your screen:
- Select Invoices, if you want to add an existing invoice.
- Hover over a record in the list of all existing invoices to display the radio buttons.
- Click the radio button on the left side of the record to select the record.
- Click the Add Selected button present below the list.
- Create Invoices
- If you want to add a new invoice, select this option.
- Fill in all the necessary details.
- Click Save.
- Select Invoices. Here, you see two options on your screen:
The linked invoice will be seen in the Sales Ops Widget in the Summary View of the project record. To know more about Invoices, click here.
Export
Follow these steps to export a project:
- Log in to the CRM.
- Click the Menu Menu.
- Go to the Projects tab.
- Select the Project module.
- In the List View, hover over any project record to display the radio button on the left side.
- Click the radio button.
- Click the Export button.
- Select any one of the following options:
- Export Selected Records - This option will export only the selected record.
- Export data on the current page - This option will export the records to the current page.
- Export all data - This option will export all the data in all the pages of the Projects module.
The exported record will be saved on your local system.
Follow these steps to print a project :
- Click the Menu Menu.
- Go to the Projects tab.
- Select the Project module.
- Open any project record.
- Click the More button.
- Click the Print button.
- You can perform any of the below options:
- Edit & Export - You can edit the project and export it to your local system.
- Email with PDF - You can email the project record as a PDF to the contact.
- Print - You can print the project and keep a hard copy.
- Save as PDF - You can save the project as a PDF on your local system.
Changing the template of a project
Follow these steps to change the template of a project:
- Click the Menu Menu.
- Go to the Projects tab.
- Select the Project module.
- Open any project record.
- Click the More button.
- Click the Print button.
- Select any template from the list of all available templates.
- You can use any of the options below to view the applied template on the project record.
- Edit & Export- You can edit the project and export it to your local system.
- Email with PDF- You can email the project record as a PDF to the contact.
- Print- You can print the project and keep a hard copy
- Save as PDF- You can save the project as a PDF on your local system.
Viewing Project-Related Information
List View in Projects
List View sorts and lists all Projects based on the last modified Project.
- Columns in List View - The columns that are visible by default in the List View are :
- Project Name- Displays the name of the project.
- Related To- Displays the organization to which the project is related to.
- Start Date- Displays the date on which the project was started.
- Target End Date- Displays the target date on which the project will end.
- Actual End Date- Displays the date when the project actually ended.
- Target Budget-Displays the amount that is reserved for the project.
- Progress- Displays the progress of the project.
- Status- Displays the status at which the project is running.
- Assigned To - Displays the user to whom the project is assigned to.
- Contact Name - Displays the organization to which the project is related to.
- List actions
- You can perform many quick actions such as Edit, Export, Delete, Follow, etc. on the Project records in the List View.
- To learn more about List View actions in Vtiger CRM, click here.
Summary View
- The Summary View appears when you click a particular record from the List View. It displays a collection of all the key information about the record.
The Summary View can be divided into four sections. Each section has a particular functionality. - Summary View Actions
- Follow: You can follow any project record to get updates on all the activities performed on that record.
- Tags: You can add tag names to the record to identify the record easily.
- Print: You can print the project or save it as a PDF for future reference.
- Duplicate: You can duplicate the current record and have all the details reflected in a new record.
- Delete: You can delete a record by clicking this button.
- Activity: This section lists all the activities performed on that particular record. You can also add filters and view specific activities.
- Widgets
- Tasks-All the tasks related to the project are displayed here. You can also add a new task from here by clicking the + button.
- Events- All the events related to the project are displayed here. You can also add a new event from here by clicking the + button.
- Analytics-You can view all the metrics related to the Project in the form of charts, mini-lists, etc. You can also create new ones here.
- Project Milestones- You can view all the milestones related to that particular project here.
- Documents - You can create a new document or add an existing document to the Project. All the details of the related document are displayed here.
- Sales Ops- You can view or add related quotes and invoices to the project record.
- Issues- You can view or add related cases to the project record.
Details View
You can view and edit all the information about the project record by clicking the Details View icon in the record's Summary View.