Articles in this section
Managing Quotes
Feature Availability
Vtiger Edition: One Professional | One EnterpriseIntroduction to Quotes
A quote is a formal document presented by the company's sales team to a potential customer upon request. It contains details about products and services, prices, taxes, terms, and discounts.
In a Deal Journey, a Quote is generated with Deal Revenue Line Items and shared with the potential customer for their review. You can revise a Quote based on the customer's requested changes to discounts or terms and conditions. Once the quote is reviewed and accepted by the customer, the deal advances to the next stage.
Key Terminology
|
|
|
|
|
|
|
|
|
|
|
|
|
|
|
|
|
You can enter the billing address manually or by clicking the Select an option drop-down and selecting one of these options:
|
|
|
You can enter the shipping address manually or by clicking the Select an option drop-down and selecting one of these options:
|
|
|
|
|
|
|
Creating a Quote
You can create a Quote from:
- The Quotes module
- The Deals module
- Quick Create
From the Quotes module
You can use the +Add Quote button on the top right corner of the Quotes List View to create a new quote.- Log in to the CRM.
- Click Main Menu.
- Go to Sales.
- Select the Quotes module. The Quotes List View opens.
- Click +Add Quote.
- Fill in all the necessary details.
- Click Save.
From Deals
You can create a quote through a deal with the More icon. This option lets you add a quote by either creating one from scratch or duplicating a recently created quote.
Follow these steps to add a quote from the More icon in deals:
- Log in to the CRM.
- Click Main Menu.
- Go to Sales.
- Select the Deals module. The Deals List View opens (It can be another view depending on the View you have set as default).
- Open any particular deal. Go to its Summary View
- In the Summary View, click the More icon on the right-hand side, top corner of the screen.
- Click the Add or Create.
- Click on Quotes.
- Enter all the necessary details.
- Click Save.
This newly created Quote will be linked to the Deal.
Using Quick Create
You can also use the + Quick Create feature available on all screens of the CRM.
Adding Line Item Records
You can create Line Item records, such as a new product/service or a new section in an existing quote, by editing the Item Details block.
How to add a new Product or Service
Follow these steps to add Line item records:
- Log in to the CRM.
- Click the Main Menu.
- Go to Sales.
- Select Quotes
- Select and open the record you want to add Line Items to. The Summary View opens.
- Click Edit. The Edit page opens.
- Go to the Line Items section.
- Enter or select the following information to add the Line Items:
- Add Product or Service row: Click to add the product or service to the Deal record.
- More: Click More next to the line item number.
- Add Product Row: Add a new product line next to an existing line item.
- Add Service Row: Add a new service line next to an existing line item.
- Add Section: Adds a new section to group related line items.
- Click Save.
Note: The More option becomes visible only when more than one line item is added
Refer to the Quote Configuration section in this document to understand Tax management, Price books, etc.
How to add a new Section
Follow these steps to add a new Section:
- Log in to the CRM.
- Click the Main Menu.
- Go to Sales.
- Select Quotes.
- Select a quote to edit.
- Click Edit.
- Go to the Item Details block.
- Enter or select the following information to add Sections:
- Add section: Click to add a new Section.
- More: Click More next to the line item number.
- Add Section: Click to add a new section to group related line items.
- Click Save.
Note: The More option becomes visible only when more than one line item is added.
Adding Multiple Items
You can add multiple items to a purchase or a sales order from a quote
Here are your options if you want to add more than five items:
- Option 1: Select multiple items to delete while creating a Purchase Order.
- Option 2: Select the related Vendor in the Line Item of a quote, and while converting the Quote to PO, create different Purchase Orders for different Vendors.
- Available items for you to select when you are creating an inventory record, either from an inventory record or from non-inventory modules like contacts, organizations, and vendors.
- Sections and the sections to be copied to the record being created, if you are creating an inventory record from another inventory record.
Adding a picklist field to the Line Item block
Please follow the steps below to add a picklist field to the Line Item block:
- Log in to the CRM.
- Go to the Main Menu.
- Click Settings.
- Select the Module Layouts and Fields under the Module Management tab.
- Select Quotes module.
- Scroll down to the Item Details block.
- Click Add Custom Field.
- Select Field type as Picklist.
- Add picklist values.
- Click Save.
Editing a picklist value in the Line Item block
Please follow the steps below to edit picklist values in the Line Item block:
- Log in to the CRM.
- Go to the Main Menu.
- Click Settings.
- Select Picklist Field Values under the Configurations tab.
- Select Quotes module.
- Select the Picklist Field.
- Click +Add Value to add custom values
- Enter the value details.
- Click Save.
Note:
- If you delete a value from the Picklist Editor, it must be replaced in all line items of the Inventory record.
- Role-based Picklist field value assignment is not available.
Configuring your Quote
You can configure Taxes, Tax regions, Shipping Charges (if any), and Terms and Conditions from the Settings > Inventory Management section. These actions are limited to the Admin role.
Note: Refer to the Tax Management article to learn how to set up Taxes and other Settings.
- Tax regions: Taxes can be set based on a region. Regions are set up in the Tax Settings screen.
- Currency: It is the same as the currency defined in the Dealal. Quote Line item currency is the same as the record level currency.
- Tax mode:
- Group Taxes: If there are multiple products/services in the inventory, group taxes help in populating tax rates according to specific tax calculations.
- Individual Taxes: You can enable this option while creating a Quote. You can apply taxes for individual items in a Quote by clicking the Configure button in the Quote.
- Note: The default Tax mode is set based on the option set in the Tax Management page by the administrator. This can be overridden on a Quote level from the Quote Configuration pop-up.
- Price Books: Price Books allow you to define different prices for Products and Services. The prices of the items can vary at any time depending on the customers and their needs. When a Price Book is selected or changed, the system updates the unit prices of all line items based on the selected Price Book.
- To learn more about Price Books, click here.
- Discounts
- Group Discounts: Similar to Group Taxes, Group Discounts are applied to Products (or) Services on the Quote level.
- Individual Discounts: Contrary to group discounts, Vtiger CRM provides an option to apply Discounts on an individual item based on its List Price.
- Shipping Charges: Shipping Charges are the additional amount charged by the company's sales team for shipping the product to the customer.
- Adjustments: This option allows you to round off the total amount to the next value or the previous value based on the decimal number.
- Note: You can customize and add or remove fields by going to the Module Layouts and Fields under the Settings page
Apply Tax to All Line Items
When using the Individual Tax mode, taxes are calculated separately for each line item in an inventory record. To simplify tax updates across multiple items, the Apply for all items option lets you apply the same tax percentage to all applicable line items at once.
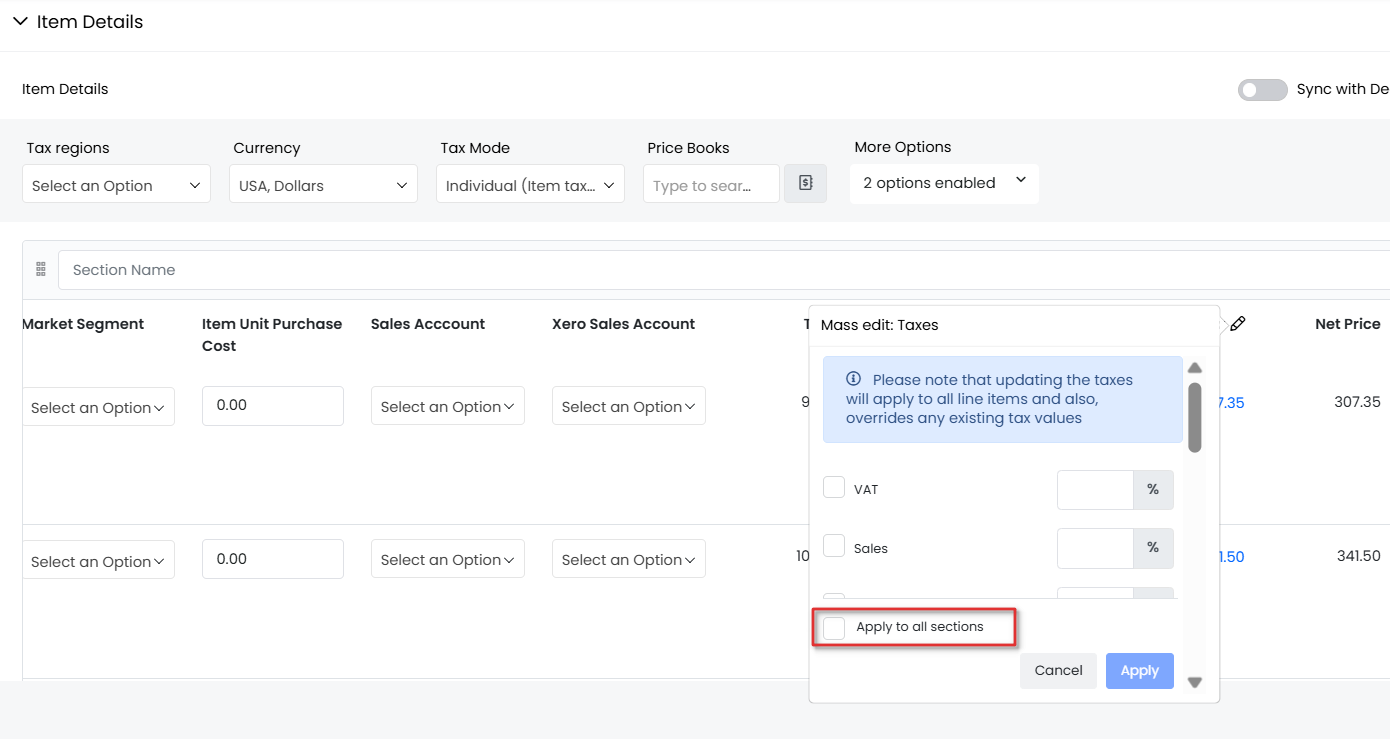
For example, when the Individual Tax mode is enabled, the CRM applies the selected tax to each product individually. If you modify the tax percentage for a specific line item, the Apply to all sections option appears. By selecting this option, the updated tax percentage is applied to all line items for which that tax is enabled.
This feature helps maintain consistency and reduces the need to manually update tax values for every item in the record.
Synchronizing your Quote with a Deal
When you enable the Sync with Deal button, all line items in the Quote will be synced with the Deal to which they are related. This helps you avoid manual errors and prevents duplication of data entry.
Note: There can be many quotes related to a deal, but only onQuotete can be synced.
To know more about deal revenue line items and quote syncing, click here.
Actions Possible on a Quote
You can perform the following actions on a quote:
Share a Quote
You can share a quote with a customer by sending a link to the Quote or by sending the Quote itself as an attachment.
As a link
Follow these steps to share the Quote as a link:
- Log in to the CRM.
- Click the Main Menu.
- Go to Sales.
- Select the Quotes module. The Quotes List View opens.
- Select a quote. The Summary View opens.
- Click the More icon.
- Select Share.
- Select Share as link.
- A mail compose window opens with the quote link.
- Enter the recipient's details.
- Click Send.
As an attachment
Follow these steps to share the quote as an attachment:
- Log in to the CRM.
- Click the Main Menu.
- Go to Sales.
- Select the Quotes module. The Quotes List View opens.
- Open a quote. The Summary View opens.
- Click the More icon.
- Select Share.
- Select the Share as attachment.
- A mail compose window opens with the quote attachment.
- Enter the recipient's details.
- Click Send.
Generating related documents
Generating a Sales Order
The company's sales team issues the Sales Order (SO) to the customer. You can generate a sales order for products and/or services. Vtiger CRM gives the option of generating Sales orders from within the Quote.
Follow these steps to generate an SO:
- Log in to the CRM.
- Click the Main Menu.
- Go to Sales.
- Select the Quotes module. The Quotes List View opens.
- Open a quote. The Summary View opens.
- Click the More icon.
- Select Add or Create.
- Select Sales Orders.
- Fill in all the necessary details.
- Click Save.
The SO will be created and linked to the Quote.
Generating a Purchase Order
A Purchase order (PO), is the first official offer issued by a customer to the company's sales team indicating types, quantities, and agreed prices for products or services.
Follow these steps to generate a PO:
- Log in to the CRM.
- Click the Main Menu.
- Go to Sales.
- Select the Quotes module. The Quotes List View opens.
- Open a quote. The Summary View opens.
- Click the More icon.
- Select Add or Create.
- Select Purchase Orders.
- Fill in all the necessary details.
- Click Save.
The PO will be created and linked to the Quote.
Generating an Invoice
An Invoice is a non-negotiable itemized statement issued for the products or services rendered to the customer.
Follow these steps to generate an Invoice:
- Log in to the CRM.
- Click the Main Menu.
- Go to Sales.
- Select the Quotes module. The Quotes List View opens.
- Open a quote. The Summary View opens.
- Select Add or Create.
- Select Invoices.
- Fill in all the necessary details.
- Click Save.
The invoice will be created and linked to the quote.
Generating a Subscription
A subscription is the amount of money that a customer pays regularly to receive a product or service.
Follow these steps to generate a Subscription:
- Log in to the CRM.
- Click the Main Menu.
- Go to Sales.
- Select the Quotes module. The Quotes List View opens.
- Open a quote. The Summary View opens.
- Select Add or Create.
- Select Subscriptions.
- Fill in all the necessary details.
- Click Save.
The subscription will be created and linked to the quote.
Quoting a quote
- Follow these steps to export a quote:
- Log in to the CRM.
- Click the Main Menu.
- Go to Sales.
- Select the Quotes module. The Quotes List View opens.
- In the List View, hover over any quote record to display the radio button on the left side.
- Click the radio button.
- Click the Export button.
- Select any one of the following options:
- Export Selected Records: This option will export only the selected record.
- Export data in the current page: This option will export the records on the current page.
- Export all data: This option will export all the data in all the pages of the Project Tasks module.
- The exported record will be saved on your local system
Printing a quote
Follow these steps to print a quote :- Log in to the CRM.
- Click the Main Menu.
- Go to Sales.
- Select the Quotes module. The Quotes List View opens.
- Open a quote. The Summary View opens.
- Click the More icon.
- Click the Print button. You can perform any of the following options:
- Edit & Export - You can edit the Quote and export it to your local system.
- Email with PDF - You can email the quote record as a PDF to the contact.
- Print - You can print the quote and keep a hard copy.
- Save as PDF - You can save the Quote as a PDF on your local system.
This is particularly useful when an Organization has multiple addresses stored in the system.
To ensure the correct address is displayed:
- Add multiple addresses to the related Organization record.
- In the Quote, go to Shipping Address > use the Copy Shipping Address From field to select the appropriate address.
Note: In case you are facing an issue due to missing incompatible fonts in Chrome, turn off the embedded PDF in Chrome and download the same so it can be viewed in Acrobat or a suitable PDF viewer.
Follow these steps below to automatically download PDFs in Chrome:
- Open the Chrome browser settings.
- Click Privacy and Security.
- Click Site Settings.
- Select Additional Content Settings.
- Select PDF Documents.
- Set the Default behavior to Download PDFs.
Changing the template of a quote
There are two ways in which you can change the template of a quote - from the Print Quote screen and from the Settings widget.
From the Print Quote Screen
Follow these steps to change the template of a quote from the print quote screen: (This is a temporary change only until the quote is printed.)
- Log in to the CRM.
- Click the Menu icon.
- Go to the Sales tab.
- Select the Quotes module.
- Open any quote.
- Click the More button.
- Click the Print button.
- Select the template you want from the list of all templates.
- You can perform any of the following options:
- Edit & Export- You can quote the quote and export it to your local system.
- Email with PDF- You can email the quote record as a PDF to the contact.
- Print- You can quote the quote and keep a hard copy.
- Save as PDF- You can quote the quote as a PDF on your local system.
From the Settings Widget
Follow these steps to change the template quote from the Settings Widget: (This is a permanent change and will be applied immediately.)
- Log in to the CRM.
- Click the Menu icon.
- Go to the Sales tab.
- Select the Quotes module. The Quotes List View opens.
- Open a quote. The Summary View opens.
- Go to the Settings Widget.
- Click the Template applied drop-down.
- Select the template of your choice.
The template will be applied. The quote will be applied instantly.
Reports for Quotes
You can create Reports for the Quotes module that include key margin and cost fields as non-line-item totals.
When creating or running reports for Invoices and Quotes, you can now select and view totals for the following fields:
- Overall Purchase Cost
- Margin Total
- Margin Percentage Total
- Markup Percentage Total
These values are non-line-item fields and are calculated as aggregate totals per record rather than per item.
Ways of Viewing Quote Records
List View in Quotes
List View is the default view that sorts and lists all quotes in chronological order, based on the most recently quoted quote.
Columns in List View
The columns that are visible by default in the List View are :
- Subject: Displays the name. Quote the quote.
- Deal Name: Displays the name of the deal to which the quote is created.
- Quote Stage: Displays the stage at which the quote is present.
- Valid Until: Displays the date until the quote is valid.
- Organization Name: Displays the name of the organization.
- Assigned To: Displays the user to whom the quote is assigned.
- Total Displays the amount mentioned.
List View actions
You can perform many quick actions, such as Edit, Delete, Call, Follow, etc., on the quote records in the List View.
To learn more about List View actions in Vtiger CRM, click here.
Summary View
Summary View is the View that appears when you click a particular record from the List View. The Summary View displays a collection of all the key information of the record.The Summary View can be divided into four sections. Each section has a particular functionality.
- Summary View Actions
- Follow: You can follow any Price Book record to get updates on all the activities performed on that record.
- Tags: You can add tag names to the record to identify the record quickly.
- Print: You can quote the Quote or save it as a PDF for future reference.
- Duplicate: You can duplicate the current record and have all the details reflected into a new record.
- Delete: You can delete a record by clicking this button.
- Quote document: The quoted quote will be visible here.
- More
- Clicking on the More icon on the right-hand top corner will display the following:
- Reach out now: You can get in touch with the contact via email, call, or SMS at the moment.
- Reach out later: You can schedule an email, event, or task with the contact.
- Add or Create: You can add or create other modules related to the quote.
- Share: You can quote as a link or as an attachment.
- Clicking on the More icon on the right-hand top corner will display the following:
- Widgets
- One View: All the modules related to the Quote are displayed here.
- Tasks: All the tasks related to the quote are displayed here. You can also do a new task from here by clicking the + button.
- Events: All the events related to the quote are displayed here. You can also see a new event from here by clicking the + button.
- Activity: All the activities are displayed here. Here you can add comments related to the quote.
- Analytics: You can view all the metrics related to the quote in the form of charts, mini-lists, etc. You can also create new ones here.
- Documents: You can create a new document or add an existing document. Quotethe quote. All the related document details are displayed here.
- Sales Ops: You can view the subscriptions, link to the quote, or create a new subscription.
- Settings: You can change the template. Quote the quote here.
Details View
You can view and edit all the information about the Quote record by clicking the Details View tab in the Summary View of the record.
Grid View
Grid View is a table-like layout that shows data in rows and columns, similar to a spreadsheet. It lets you view and edit multiple records at once on the same page. You can edit specific field details in a record, just as you would edit a cell in a spreadsheet. The view resembles the List View but allows additional actions like editing, rearranging columns, and bulk updates.
One View in Quotes
One View widget is a one-stop destination to view all the important modules related to Quotes. One View widget in the Quotes module will show the following details:
- Related Contact details: Parent contact details
- Related Organization details: Parent company Acme details are shown in this widget
- Related Deal data: Parent deal from Quote. This quote is created
- Related SO: The Related SO details generate this quote
To learn more about One View in Vtiger CRM, click here.