Articles in this section
Event Check-in for the Field Sales team
Feature Availability
Vtiger Editions: One Professional | One Enterprise
Introduction
If your business relies on field sales representatives for on-site customer visits, you need accurate tracking and real-time visibility into meetings. Vtiger Mobile App's GPS-enabled features allow your sales agents to plan customer visits, navigate to event locations, and perform secure check-in and check-out actions using geo-tagging.
With real-time location tracking and geofence validation, sales managers can monitor field activity, generate visit reports, and improve operational accountability. Sales agents can also use check-in data to submit expense claims and track time.
Key Features
The key features of GPS-enabled Onsite Events in the Vtiger Mobile App are:
- Geo-tagged Check-in and Check-out: Capture accurate location details at the start and end of onsite meetings.
- Geofence Validation: Automatically detect whether a check-in occurs within the event location's defined radius.
- Navigation Support: Get directions to the event location directly from the app.
- Real-time Visit Updates: Managers receive instant updates when agents check in or complete meetings.
- Visit Reports: Access standard reports, including check-in summaries and exception reports for geofence violations.
- Meeting Notes & Follow-ups: Add quick notes and schedule follow-up meetings after marking an event as held.
Benefits
The benefits of using GPS-enabled Onsite Events in Vtiger 360 are:
- Improved Field Transparency: Managers gain real-time visibility into sales activities.
- Increased Accountability: Geo-tagging ensures accurate verification of onsite visits.
- Better Time Management: Agents can track actual meeting durations.
- Accurate Expense Reporting: Check-in and check-out logs support travel and reimbursement claims.
- Enhanced Productivity: Streamlined navigation and quick event actions reduce manual tracking.
In this article, you will learn about:
- Configuring GPS settings
- Creating an on-site Event
- On-site Event actions
- Check-in process
- Check-in and check-out details
- Event Reports
- Troubleshooting Tips
Key Terminology
|
|
|
|
|
|
|
|
|
|
|
|
|
|
|
|
|
|
|
|
|
|
|
|
|
|
|
|
|
|
|
|
|
|
|
|
|
|
|
|
|
|
|
|
|
Configuring GPS settings
Please follow these simple steps to view and configure GPS settings on the Vtiger CRM website.
- Log in to the CRM.
- Go to the main Menu.
- Click Settings.
- Click Configuration under the Mobile App section. The mobile configurations page opens.
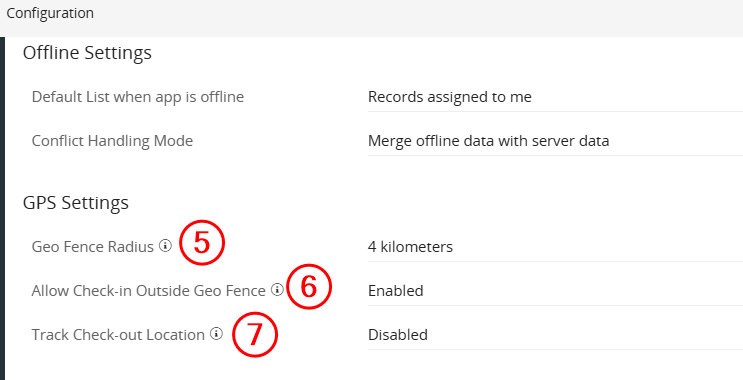
- Set the Geofence Radius (in kilometers or miles).
- Enable Allow Check-in Outside Geo Fence to allow check-ins outside the geofence.
- Enable Track Check-out Location to track the check-out location.
- When enabled, you get a Check for the geo fence during checkout option that lets you follow the geo fence setting used for check-in.
Note:
- Only admins can access and configure GPS settings in the web app.
- The configured radius here determines whether a check-in is inside or outside the geofence for the target location.
Creating an On-site Event
From the Vtiger CRM website version
Follow the steps below to create an On-site event from the browser:
- Log in to the CRM.
- Go to the main Menu.
- Click Events in the Essentials tab.
- Click Add Event.
- Enter the following information:
- Subject: Enter the subject of the event.
- Activity Type: Select the type of activity as Onsite Event.
- Start Date & Time: Specify when the event should start by selecting the appropriate date and time.
- End Date & Time: Define when the event will conclude by setting the end date and time.
- Description: Provide a detailed explanation of the event, outlining its purpose.
- Participants: Add the attendees to the event. You can select participants by clicking the User icon and, if necessary, quickly create new contacts by clicking the Plus icon.
- Assigned To: Choose the individual or team to whom the event should be assigned from the drop-down.
- Status: Indicate the event's current status by selecting options such as Held, Incomplete, Planned, etc.
- Priority: Specify the event's priority: High, Medium, or Low. So you can prioritize tasks accordingly.
- Location: Enter the event Location.
- Event Image: Add an event image by clicking Browse and selecting one from your device.
- All Day: Select this checkbox if the event will last all day.
- Mutual: Enable this checkbox if the event is mutual
- Related To: If the event is associated with any module, such as Deals or Internal Tickets, you can select it from the dropdown menu and select the particular record in the search bar.
- Organization Name: Add the name of the organization.
- View full form: Click to enter or select details for the following sections:
- Event Details
- Reminder Details
- Recurrence Details
- Description Details
- Related To
- Invitees
- Click Save.
From the Vtiger CRM Mobile App
Follow the steps below to create an On-site event from the Vtiger CRM mobile app:
- Log in to the Vtiger CRM mobile app.
- Go to the Calendar tab.
- Click the + icon to add an event.
- Enter the following information:
- Subject
- Activity Type: Onsite Event
- Start Date and Time
- Assigned To
- Status
- End Date and Time
- Priority
- Location
- Participants
- Click Save.
Note: If your contact's address is recorded in the contacts or organizations module, the location is automatically pulled from there.
Actions in the Onsite Events
The following actions can be performed for onsite Events:
- Navigating to the Event Location.
- Checking in to the Event.
- Checking out of the Event.
- Rescheduling and Cancelling an Onsite Event.
Navigating to the Event Location
Follow the steps below to navigate to the On-site event location:
- Log in to the Vtiger CRM mobile app. The Dashboard opens, and the Actions block lists today's events and tasks.
- Open the scheduled onsite event.
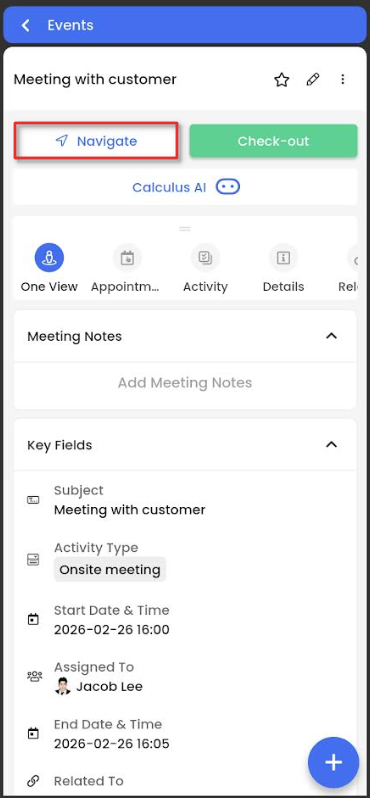
- Click Navigate. The default map app opens on the mobile.
- Click Directions to navigate to the event location.
Note: You can also see the list of events scheduled from the Calendar tab.
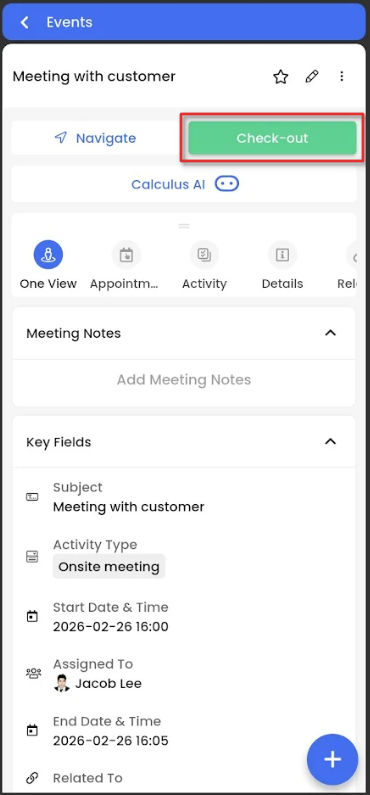
Checking in to the Event
When an onsite event is in planned status, you can check in to the event from the Vtiger CRM mobile app.
Follow the steps below to check into an onsite event:
- Log in to the Vtiger CRM mobile app. The Dashboard opens, and the Actions block lists today's events and tasks.
- Open the scheduled onsite event.
- Click Check-in. The Check-in in progress dialog box will pop up.
You are now successfully checked into the onsite event. The onsite meeting and geo-tagging of the event location tracking have started.
Note:
- To detect the device's current location for check-in, the device's GPS must be enabled.
- You can check in to an on-site event from the Calendar tab, too.
- You can reschedule the event to a later date when it is in planned status, moving it forward by 1, 2, or 3 days, or to a custom date/time.
Geofence Violation
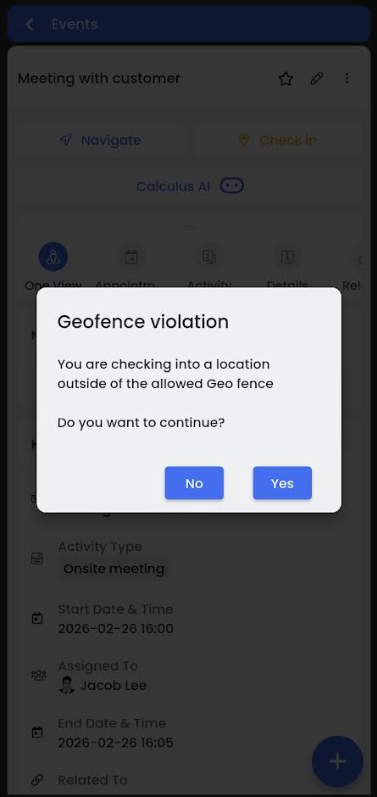
When you check in to an event outside the geofence, a warning is displayed indicating that the check-in will be marked as a violation.

If the Geofence radius is disabled, you aren't allowed to check in outside the radius.
Note: You can still proceed with check-in by confirming it outside the geofence location. The event status is set to Checked-in once the check-in action is completed.
Note:
- Only Event owners can check in to the Onsite Events.
- Multiple check-ins are not allowed at the same time.
Checking out of the Event
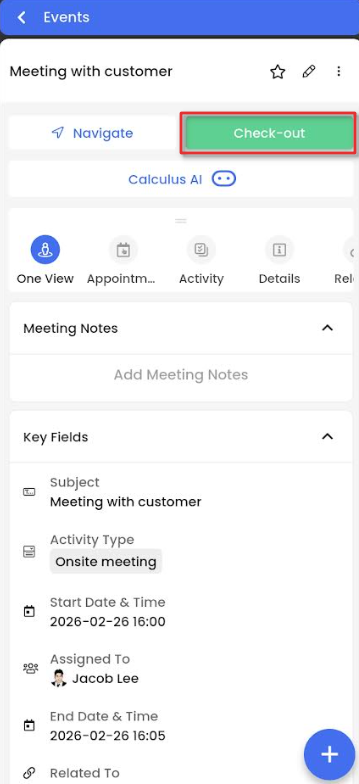
You can check out of the event after your onsite meeting is done. Follow the steps below to check out of the event:
- Log in to the Vtiger CRM mobile app. The home tab opens by default. The Dashboard opens, and the Actions block lists today's events and tasks.
- Open the checked-in onsite event.
- Click Check-out. The Comment box opens to add the meeting notes.
- Note: If you have other dependent fields, they will be listed for you to add information.
- Click Save.
Check-in and Check-out Details
The check-in details block in the Event record captures information related to the last check-in.
Following are the information is stored in the Check-in and Check-out Details block:
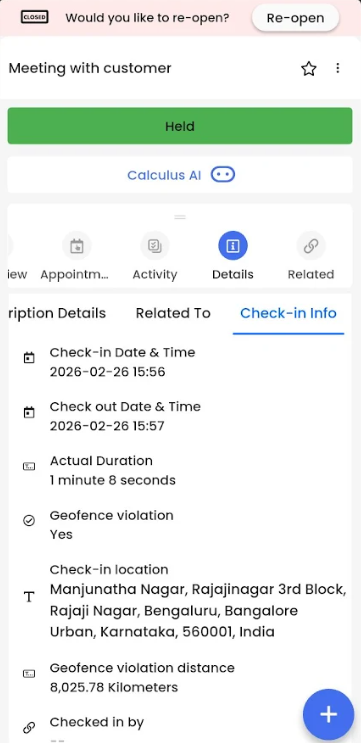
- Check-in Date & Time: The event check-in date and time.
- Check-out Date & Time: The event check-out date and time.
- Actual Duration: The actual duration of the onsite event, irrespective of the time set up during the event creation.
- Geofence Violation: Displays Yes if you check in out of the geofence radius(if enabled), else displays No.
- Check-in location: The actual location of the event check-in.
- Geofence Violation Distance: Total distance between the check-in location and the location set up in the event record.
- Checked in by: Displays the CRM user name who checked in to the location only during the event.
- Note: The field value is erased after the user checks out of the event.
- Check-out Location: The actual location you checked out.
Check-out Comments
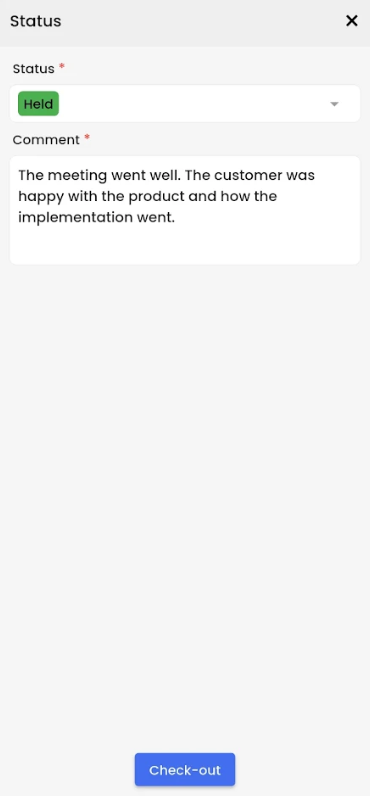
When you check out of an onsite event, the Vtiger CRM mobile app allows you to add a comment. You can use this for adding the minutes of a meeting or any other meeting notes.
You can see this comment along with the automatically linked Check-out location information under the Activity section.
Rescheduling and Cancelling an Onsite Event
You can reschedule or cancel your onsite events through the Vtiger CRM website and the Vtiger CRM mobile app.
Follow the steps below to reschedule or cancel your event from the website version:
- Log in to the Vtiger CRM.
- Go to the main Menu.
- Click Events under the Essentials tab. The Events List View opens.
- Open a scheduled event. The Events Summary View opens.
- In the Summary View, change the Event Status to:
- Reschedule: To reschedule the event. Add the rescheduled date and time.
- Cancel: To cancel the event.
Follow the steps below to reschedule or cancel your event from the website version:
- Log in to the Vtiger CRM mobile app. The home tab opens by default. The Dashboard opens, and the Actions block lists today's events and tasks.
- Open a scheduled event.
- Click Edit.
- Change the Event Status to:
- Reschedule: To reschedule the event. Add the rescheduled date and time.
- Cancel: To cancel the event.
- Click Save.
Onsite Event Reports
The following reports are available by default:
- Agent check-in report: Agent visit report detailing check-in and check-out.
- Agent check-in exception report: Agent visit report detailing check-ins outside the geofence radius.
Troubleshooting Tips
If you face any issue with check-in, please change your location mode in your Android device from High accuracy to Device only.