Articles in this section
Leads Module in Vtiger
Feature Availability
Vtiger Editions: One Pilot | One Growth | One Professional | One Enterprise
Introduction
A lead is a potential customer of your business. It can be associated with a company you want to do business with.
Leads are frequently generated through marketing activities such as website sign-ups, queries, or referrals, and are an essential beginning point in the sales cycle. There are cold, warm, and hot leads, each signifying different stages in potential customer interest and requiring various levels of engagement. Leads are essential for increasing sales and revenue since they represent potential clients.
Let’s understand lead management in Vtiger CRM.
Lead Management in Vtiger CRM
The Leads module in Vtiger CRM lets you manage your leads from end to end. It encompasses the entire lifecycle of a lead, from capturing information to converting the lead into a potential customer. Vtiger CRM offers:
- Lead generation
- Lead scoring
- Provides powerful analytics and reporting tools, making it easy to track lead conversions, analyze sales funnels, identify top-performing lead sources, and forecast future sales.
- Customization options to match business needs, such as Custom Fields that capture lead data.
- Custom Views filter leads by criteria.
- Custom Lead Stages that adapt to sales processes.
Key Features
The key features of the Leads module are:
- Centralized database for storing lead information.
- Integration with multiple channels for lead capture.
- Tools for lead nurturing, scoring, and assignment.
- Automation features for follow-ups and conversions.
Benefits
The benefits of using the Leads module are:
- Reduces manual work by automation, allowing teams to focus on high-priority leads.
- Ensures alignment between marketing and sales teams.
- Accommodates businesses of all sizes and adapts to evolving needs.
- Prioritize leads by factors like engagement and behavior.
- Boosts revenue by automating follow-ups, managing leads efficiently, and offering relevant information to convert leads into customers.
In this article, you will learn about:
- Enabling the Leads module
- Creating a new Lead
- Accessing and Viewing Lead records
- Converting a Lead into a Deal
- Exporting and deleting Lead records
Key Terminology
| Fields | Description |
| First Name | First name of a lead. |
| Last Name | Last name of a lead. This is a mandatory field. |
| Company | The lead’s company name. |
| Designation | The role of the lead in their company. |
| Industry | The industry that the company belongs to. |
| Primary Email | Email address of the lead. |
| Email Opt-in | Users explicitly permit businesses to send promotional emails. Enable it if the lead wants to receive emails. |
| Assigned to | Assigning a user to a lead record makes them the owner of the record. |
| Lead Source | Refers to a specific channel, platform, or method through which a lead is acquired. |
Enabling the Leads Module
Enabling the Leads module in Vtiger CRM allows you to capture, track, and manage potential customers efficiently.
Follow these steps to enable the Leads module:
- Log in to your CRM account
- Click the Main Menu.
- Click the Settings button at the bottom.
- Look for the Module Management section.
- Select Modules.
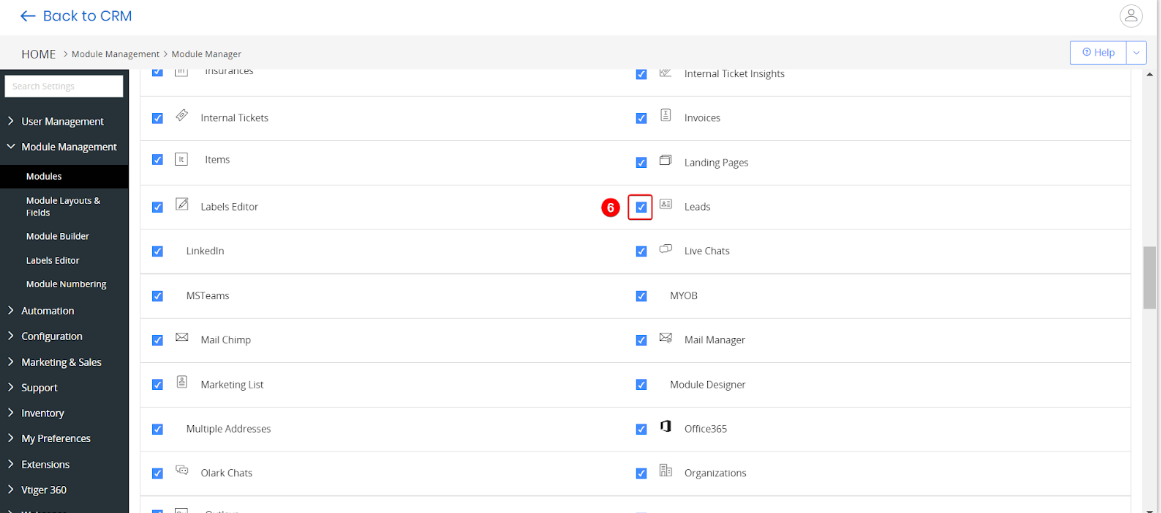
- Find the Leads module and enable the checkbox. The Leads module will now be enabled.
Now that we have the module ready, let’s get started with the process of creating a lead!
Creating a Lead
You can create a lead record in the following ways:
- From the Leads module
- Syncing from IndiaMART
- Using Quick Create
- By importing
Let’s have a look at all the methods.
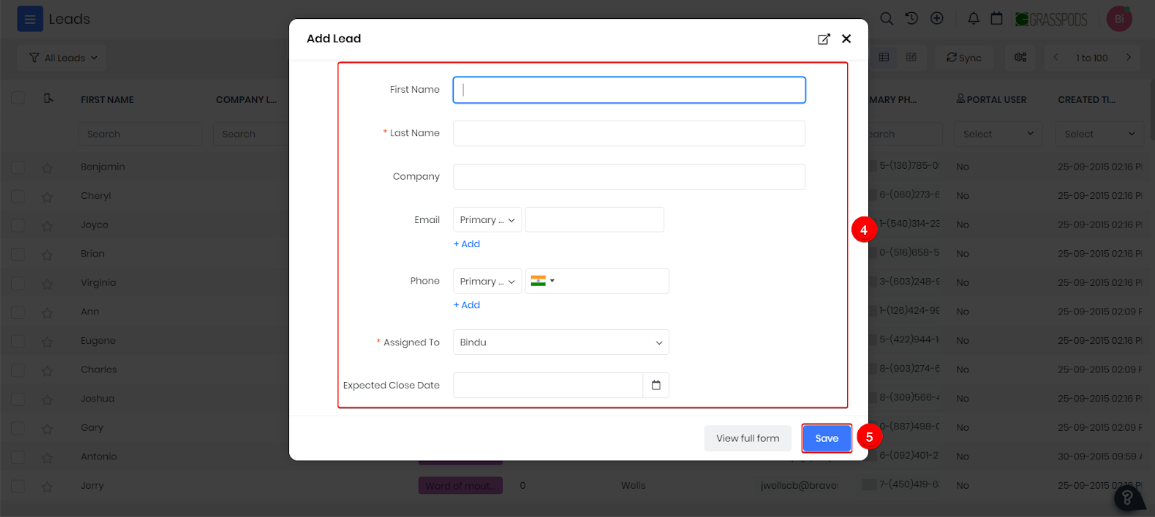
From the Leads module
Follow these steps to create a lead from the Leads module:
- Log in to the CRM.
- Click the Main Menu.
- Go to Essentials.
- Select Leads.
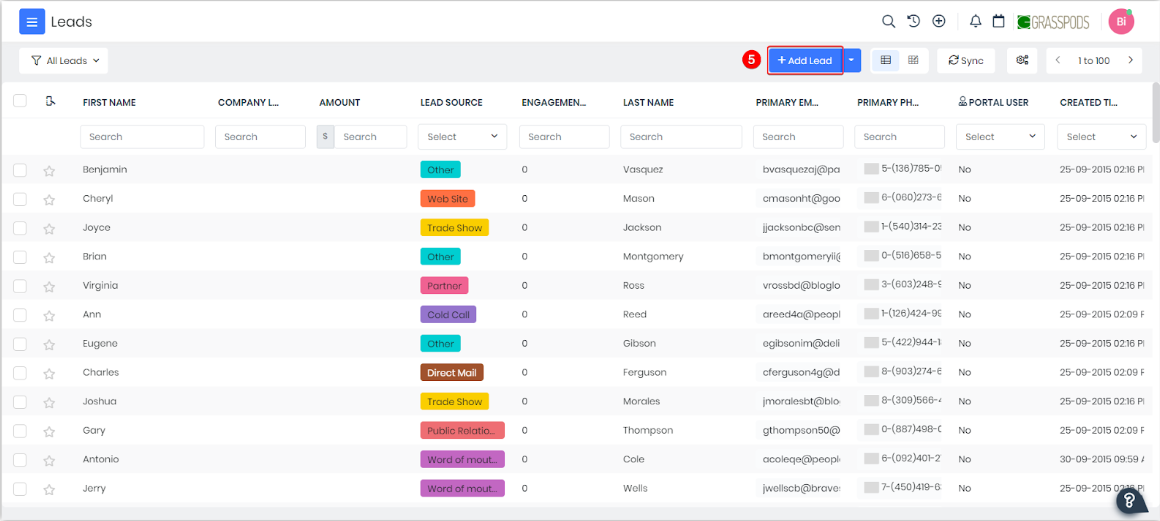
- Click +Add Lead.
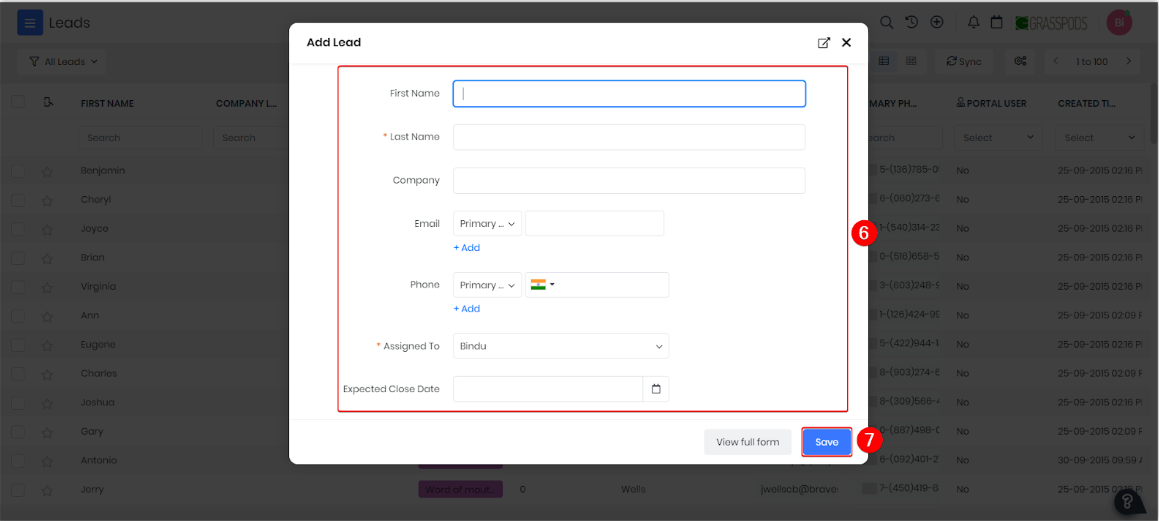
- Fill out all the necessary fields.
- You can fill out only the mandatory fields (marked with *) or all the essential fields.
- Click View full form to see all the fields.
- Click Save. A Lead record will be created.
Using Quick Create
Quick Create is a handy option for creating records anywhere in the CRM. You can identify Quick Create by the + icon on the top bar of your CRM screen.
Follow these steps to create a lead using Quick Create:
- Log in to the CRM.
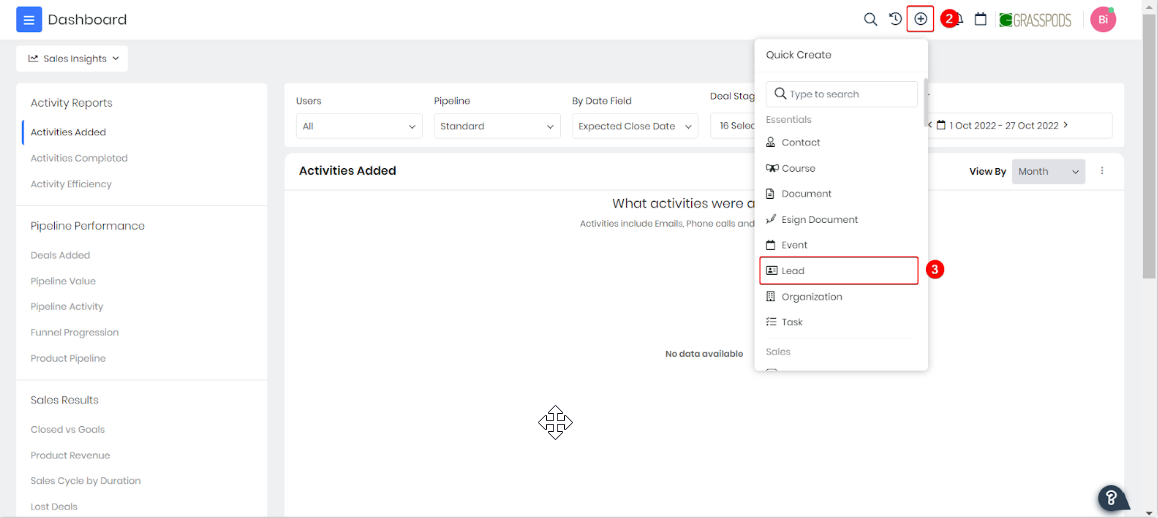
- Click the + icon at the top of your CRM screen.
- Select Leads under Essentials.
- Fill out the necessary fields.
- You can fill out only the mandatory fields (marked with *) or all the essential fields.
- Click View full form to see all the fields.
- Click Save.
By Importing
Importing leads into Vtiger CRM lets you easily transfer lead data from external sources to your CRM. You can import leads from a local CSV or ICS file into Vtiger CRM. To learn more about the importing process, click here.
From Incoming messages
- If the Lead module is enabled, you can create a lead from incoming SMS, WhatsApp, Facebook, or Instagram messages.
- The message sender is created as a lead only if a contact is not found in the CRM, and all incoming messages will be linked to the same lead.
Note:
- Message senders will be created as Contacts by default with the Contact Type as Lead.
- If a Lead or Contact is present, the SMS, WhatsApp, Facebook, Instagram DM, Twitter, or Website is added to the related record
- Last Contacted On shows the date you last contacted a record in the Leads module.
- The Source column in Touchpoints shows how emails or SMS messages were sent, like CRM, Workflow, Approval, and Mailroom.
- Last Contacted Via shows the channel and Source (e.g., email or SMS) used to contact the record, as listed below.
- Workflow – Emails
- Approvals – Emails
- Process – Emails
- Workflow-SMSNotifier
- Approval-SMSNotifier
- Process-SMS
- Invitation-Email – For calendar invite emails.
- For calendar invite emails, the Last Contacted Via field updates as Invitation-Emails, but no Touchpoints entry is created since no email record is generated.
Syncing from IndiaMART
You can sync your leads' data into Vtiger CRM using IndiaMART and store it there. To learn more about IndiaMART integration, click here.
Converting a Lead
When a lead is qualified and determined to be a potential sale, you can convert it into a deal. You can also create an organization record simultaneously to store their company's information.
Follow these steps to convert a lead:
- Log in to the CRM.
- Click the Main Menu.
- Go to Essentials.
- Select Leads.
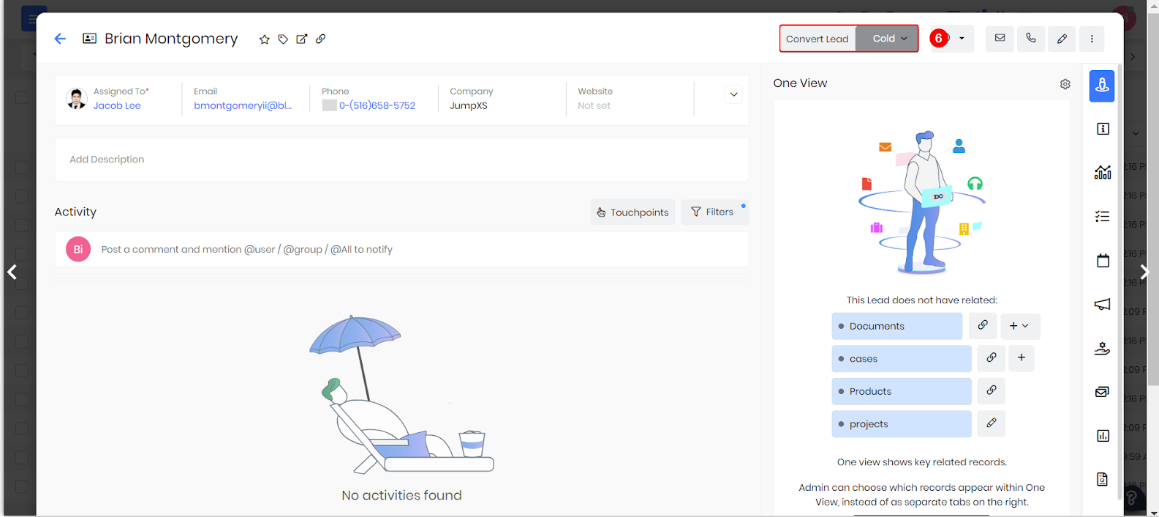
- Open the lead that you want to convert.
- Click the Convert Lead button on the top of the Summary View.
- Enter all the mandatory information in the following sections:
- Create Contact: Enter the name, email address, lifecycle stage, and other information.
- Create Organization: Enter the lead’s organization name, industry, etc.
- Create Deal: Enter deal name, deal amount, expected close date, pipeline name, etc.
- Transfer related records to: Choose where to transfer the lead’s related records.
- Click Save.
Note: When converting a lead, creating an organization or a deal is optional.
Exporting Leads
You can export lead information in bulk from the List View. Leads are exported into a CSV file. Choose which records to export with the following options:
- Export selected records - You can use this option when you have chosen a set of records.
- Export records in the current page - Use this option to export only the leads on the current page of the List View.
- Export all data - This option allows you to export all the lead records in the CRM.
Follow these steps to export leads:
- Log in to the CRM.
- Click the Main Menu.
- Go to Essentials.
- Select Leads.

- Select records on the List View by hovering over the left corner of the lead rows.
- You can select only the records that you want to export.
- You can hover over the left side of the leftmost column to select all the records.
- Click the Export icon on the toolbar on the column names' top-left.
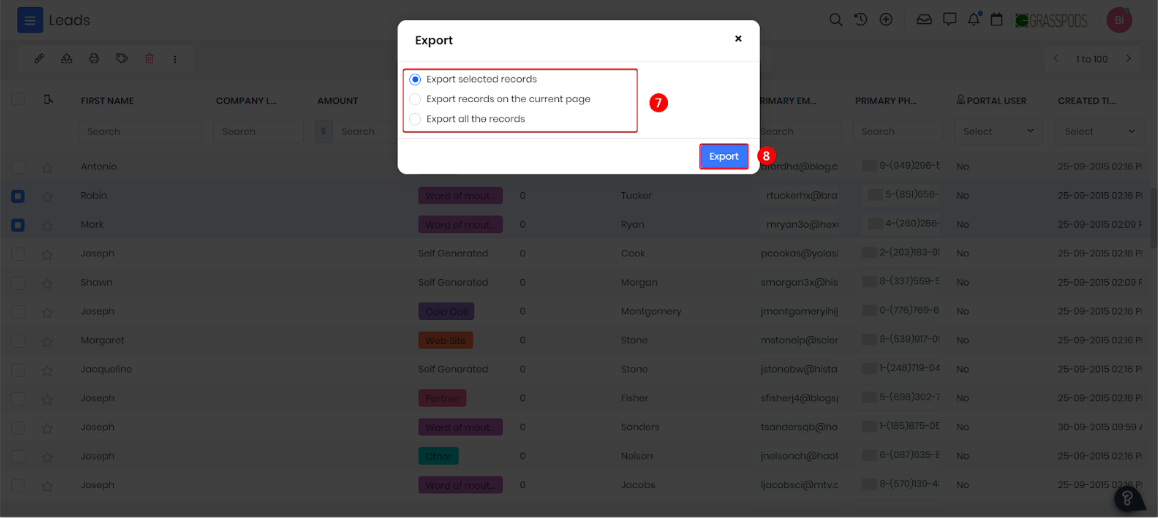
- Choose one of the export options. (explained above)
- Click Export. The selected records will be exported.
Mass Deleting Leads
Mass deleting lead records allows you to efficiently manage and clean up your database by removing multiple leads at once. You can delete multiple lead records at once.
Follow these steps to delete lead records in mass:
- Log in to the CRM.
- Click the Main Menu.
- Go to Essentials.
- Select Leads.
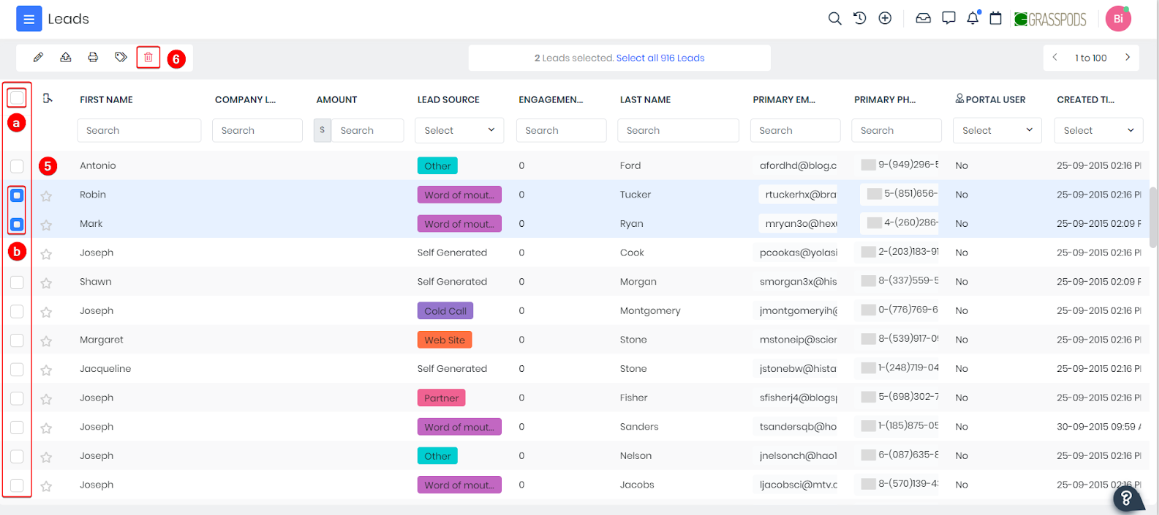
- Select records on the List View by hovering over the left corner of the lead rows.
- You can select only the records that you want to export.
- You can hover over the left side of the leftmost column to select all the records.
- Click the Delete icon in the toolbar on the top left.
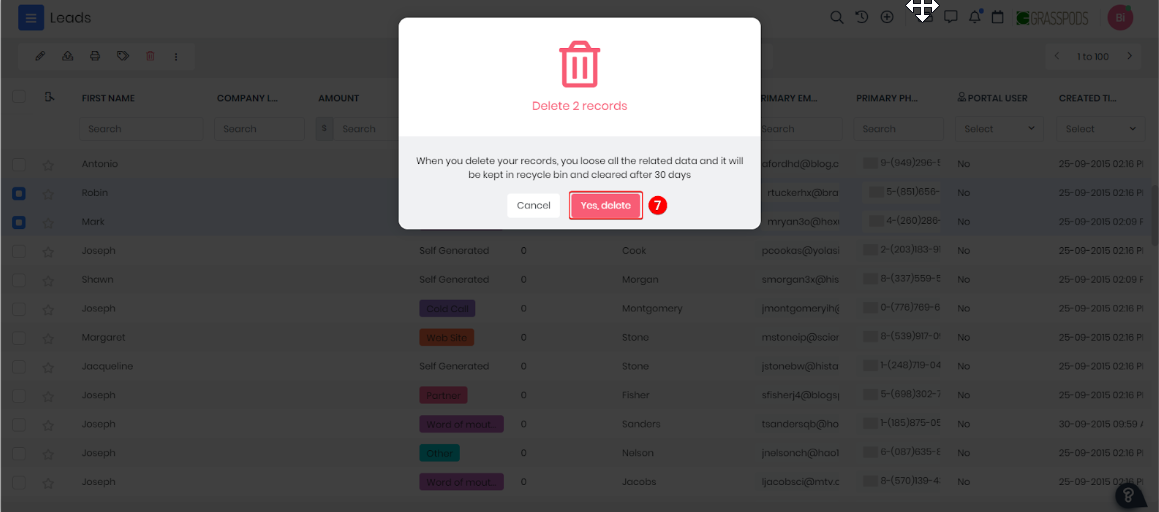
-
Click Yes, delete to confirm. The selected records will be deleted.
Viewing Lead Records
You can view your lead records in two ways:List View
The List View is what you see when you land on the leads module from the Main Menu (Main Menu > Essentials > Leads). In the List View, you can see lead information in columnar format. You can also perform actions such as export, mass edit, merge, etc., on lead records. To learn more about the List View, click here.
Summary View
The Summary View is what you see when you open a lead record. It offers a birds-eye view of a lead’s information, such as its related records, updates made, etc. Here are a few essential features of the Summary View:
- Header section - This is the part below the lead name. It shows the Header fields you set up under Module Layouts & Fields for Leads to deliver critical information.
- Best time to contact - This is located beside the Convert Lead button. It uses customer touchpoints, such as emails, meetings, etc., to show the best time to reach out to a lead.
- Related tabs - The tabs you see on the right side display the related information of a lead, such as documents, quotes, invoices, etc.
- Activity section - It shows internal comments (@mentions and conversations you have with other CRM users), customer touchpoints, and other record updates.
- More icon - the More icon on the top-right corner of a lead record shows all the nice-to-haves such as options to
- The time zone for leads ensures that date and time information in automated emails and SMS messages is displayed based on the lead's specific time zone rather than the assigned user's time zone.
- In the Details View of a Lead record, the Last Contacted On field displays the date when the record was last contacted
- The Source column in Touchpoints shows how emails or SMS messages were sent, like CRM, Workflow, Approval, and Mailroom.
- Last Contacted Via shows the channel and Source (e.g., email or SMS) used to contact the record.
- Workflow – Emails
- Approvals – Emails
- Process – Emails
- Workflow-SMSNotifier
- Approval-SMSNotifier
- Process-SMS
- Invitation-Email – For calendar invite emails.
- For calendar invite emails, the Last Contacted Via field updates as Invitation-Emails, but no Touchpoints entry is created since no email record is generated
Personal Information (PI) Tagging with Privacy Guard
When the Privacy Guard Add-on is installed, PI (Personally-Identifying) tagging for the First Name field becomes available.- In the Leads, you can mark the First Name field as personally-identifying by enabling the Personally-Identifying checkbox in the field settings.
- This tagging ensures the field is treated as sensitive data, helping your organization comply with data privacy regulations.
- Once marked, the system allows for automated data erase of the First Name field after a defined retention period, supporting your contact data privacy and compliance efforts.
Note: This can also be applied to other relevant fields that contain personally-identifying information.
References
Check out the following links for related information:
- Lead & Contact Management Overview
- Contact Management
- IndiaMART Integration
- Deal Management Overview