Articles in this section
Vtiger Surveys
Feature Availability
Vtiger Editions: One Growth | One Professional | One Enterprise | One AI
Introduction
The Surveys module in Vtiger CRM helps you create and manage surveys without any hassle.
With Surveys, you can:
- Create basic or detailed surveys using an easy-to-use interface.
- Send the survey internally to your employees.
- Send the survey externally to your customers and contacts.
- Collect feedback, inputs, and experiences easily, and store the responses in the CRM.
Note: Surveys is a paid Add-on.
Key Features of Surveys
Survey Types
You can create two types of surveys in Vtiger.
- Internal surveys - These surveys are accessible only to your CRM users.
- External surveys - You can send these surveys to non-CRM users, such as your customers, vendors, etc.
Question Types
You can add multiple questions to a survey. The following are the question types that Vtiger supports:
- Text - For short answers
- Radio Button - For multiple-choice questions
- Checkbox - For multi-select questions
- Dropdown - For selecting answers from a list of options
- Text Area - For long-form answers
- Rating - For a 1-10 rating
- NPS (Net Promoter Score) - For NPS questions with a rating of 1-10
- Agree/Disagree - For yes/no type of answers
Benefits of Using the Surveys Module in Vtiger CRM
The benefits of using the Surveys module in Vitger are:
- Collect valuable feedback: Easily gather opinions from customers, employees, or partners to understand their needs and improve your services.
- Flexible distribution channels: Share surveys through email, public links, or directly within the CRM, making it easy to reach the right audience.
- Customizable survey design: Create simple or complex surveys using different question types and logic to match your specific goals.
- Real-Time insights: Get instant access to survey responses and analyze trends to make faster, smarter business decisions.
- Improve engagement: Show your audience that you care about their input, which builds trust and encourages ongoing interaction.
- Internal & External Use: Use surveys for internal team feedback or customer satisfaction—suitable for multiple use cases across your organization.
In this article, you will learn about:
- Installing Surveys
- Creating and Sending Surveys
- Adding Logic to Questions
- Sending Internal Survey Link
- Creating and Publishing an External Survey
- Sending an External Survey
- Editing a Survey
- Viewing Survey Responses
- Closing a Survey
- Deleting a Survey
Key Terminology
|
|
|
|
|
|
|
|
|
|
|
|
|
|
|
|
|
|
|
|
|
|
|
|
Installing Surveys
The Surveys module is an Add-on available in the Add-on Store. You must install it to use it.
Follow these steps to install Surveys:
- Log in to the CRM.
- Click the Main Menu.
- Click the Add-ons button on the bottom left. The Add-on opens.
- Search for Surveys.
- Click Install. A confirmation window opens.
- Click Yes to confirm the installation.
Once installed, you can find it under Main Menu > Essentials.
Internal Survey
Internal surveys are designed to collect feedback from CRM users within your organization.
Note: Users must be logged into the CRM to access and respond to internal surveys.
- Step 1: Creating an External Survey
- Step 2: Sending an External Survey
Creating an Internal Survey
CRM users must log in to the CRM to take an internal survey.
Follow these steps to create an internal survey:
- Log in to the CRM.
- Click the Main Menu.
- Select Essentials > Surveys. The Surveys List View opens.
- Click +Add Survey. The Add Survey window opens.
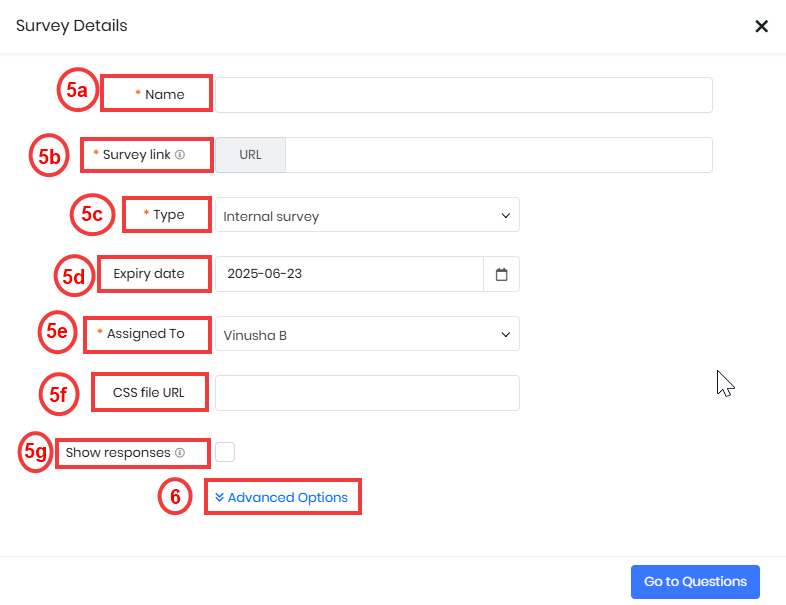
- Enter or select the following information to create a Survey:
- Name - Enter the survey name.
- Survey link - This is automatically generated after you enter the survey name.
- Type - Choose Internal as the survey type.
- Expiry date - The survey will become inactive after this date.
- Assigned To - This is the owner of the survey.
- CSS file URL - Enter the CSS file URL you want to use to style the survey page. This is optional.
- Show responses - Enable the checkmark if you want the survey takers to be able to see their answers.
- Click Advanced Options.
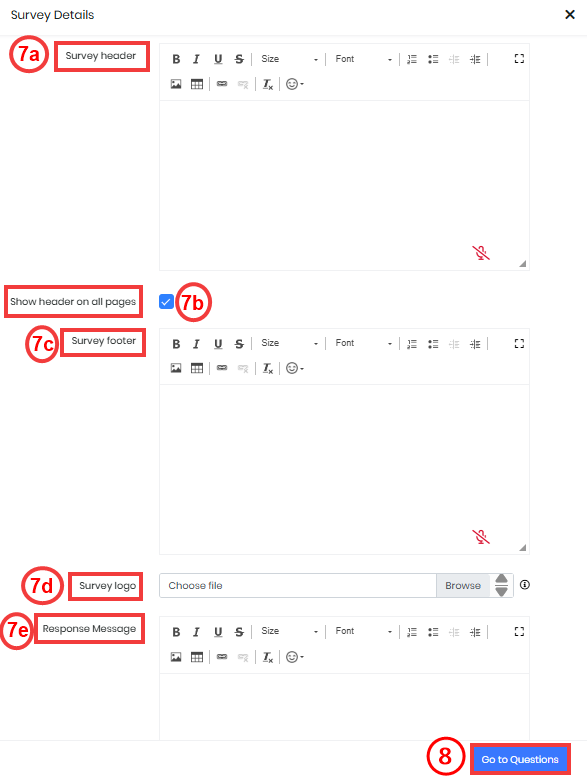
- Enter or select the following information:
- Survey Header - Enter the text that should appear in the page header.
- Show header on all pages - Enable this checkbox to display the header on every page of the survey.
- Survey footer - Enter the text that must appear on the page footer.
- Survey logo - You can insert a logo of size up to 2 MB here. For example, the company logo.
- Response Messages -Enter the message that should be displayed after survey submission.
- Click Go to Questions. The Questions page opens.

- +Add page details - Click to add the following details.
- Page Title - Add a title for the page.
- Description - Add description.
- Questions - Add different question types by dragging them from the left.
- Hover over the Questions to perform the following actions:
- Drag and Drop - Rearrange the order of questions by dragging them up or down.
- Duplicate - Create an exact copy of a question to reuse or modify.
- Delete - Remove the question from the survey.
- Logic - Add conditions to control when this question or a page appears based on previous responses.
- Mandatory - Enable the checkbox to ensure the question must be answered before submitting the survey.
- For the radio button, checkbox, and dropdown questions, you must also enter the answer options.
- Hover over the Questions to perform the following actions:
- +Add page - Click to add another page.
- Preview - Click to see how the survey will appear to respondents before publishing it.
- Survey Details - Click to go back and edit the title, description, or visibility settings for the survey.
- Save as Draft - Click to save the survey and edit it later
- Save & Publish - When you save and publish a survey, it becomes active and accessible.
When you save and publish a survey, it becomes active and accessible. You can share the link with the respondents.
Note: The option to select questions or pages in the logic configuration is available only if more than one question or more than one page has been added to the survey.
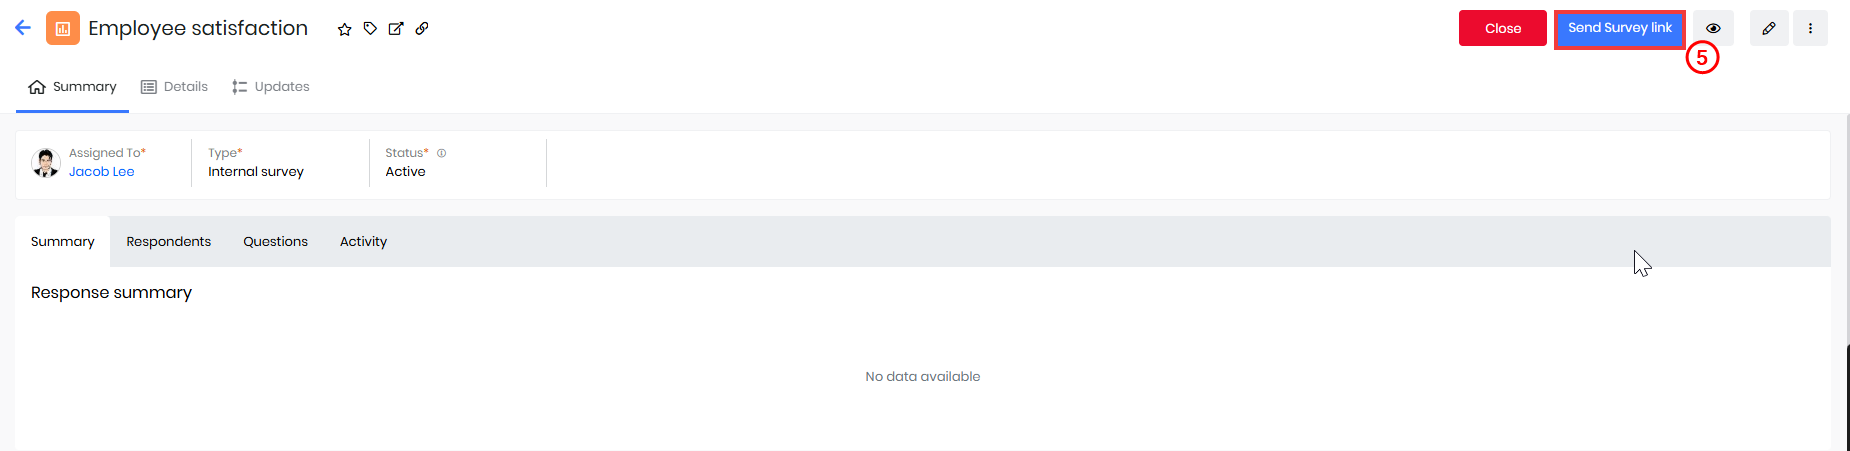
Sending an Internal Survey
After you create an internal survey, a link is generated. CRM users can use the link to take the survey. You can broadcast the survey link as a comment to the CRM users.
Follow these steps to broadcast a survey link:
- Log in to the CRM.
- Click the Main Menu.
- Select Essentials > Surveys. The Surveys List View opens.
- Open a Survey.

- Click the Send Survey Link button shown at the top. The Comment window opens.
- Enter or edit the broadcast message.
- Click Comment to broadcast the link to the CRM users.
External Survey
External surveys in Vtiger CRM allow you to collect feedback from individuals outside your organization, such as customers, partners, or prospects.
- Step 1: Creating an External Survey
- Step 2: Sending an External Survey
Creating an External Survey
In addition to the details you enter in an External survey, you also have the following options in external surveys:
- Enabling captcha
- Taking anonymous responses
- Creating contacts
Follow these steps to create an External Survey:
- Log in to the CRM.
- Click the Main Menu.
- Select Essentials > Surveys. The Surveys List View opens.
- Click +Add Survey. The Add Survey window opens.
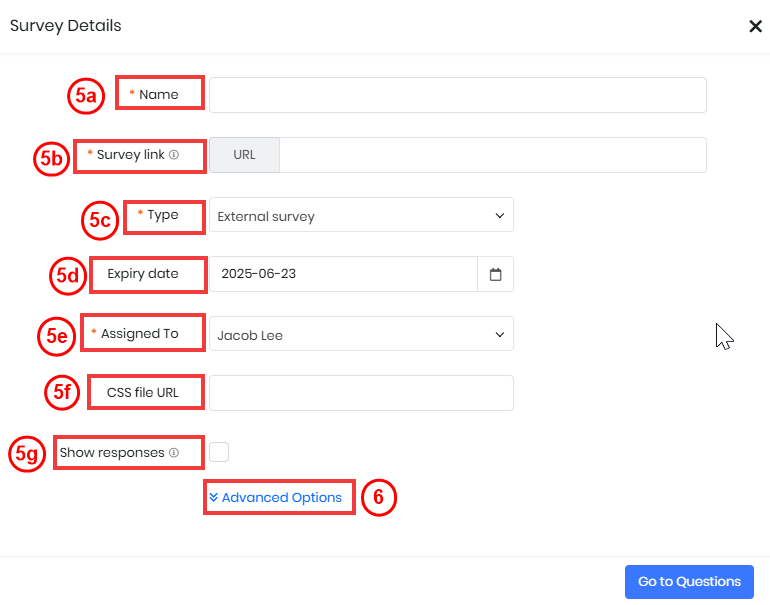
- Enter or select the following information to create a Survey:
- Name - Enter the survey name.
- Survey link - Enter the link to the survey.
- Type - Choose Internal as the survey type.
- Expiry date - The survey will become inactive after this date.
- Assigned To - This is the owner of the survey.
- CSS file URL - Enter the CSS file URL you want to use to style the survey page. This is optional.
- Show responses - Enable the checkmark if you want the survey takers to be able to see their answers.
- Click Advanced Options.
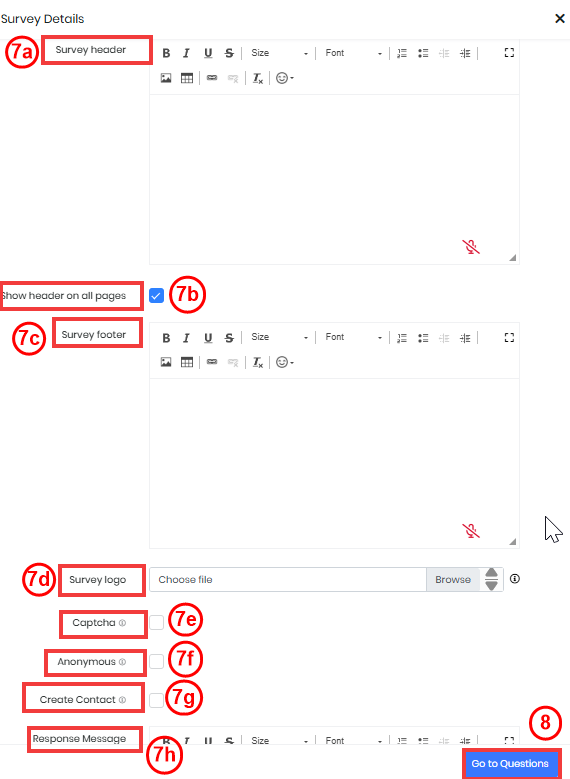
- Enter or select the following information:
- Survey Header - Enter the text that should appear in the page header.
- Show header on all pages - Enable this checkbox to display the header on every page of the survey.
- Survey footer - Enter the text that must appear on the page footer.
- Survey logo - You can insert a logo of size up to 2 MB here. For example, the company logo.
- Captcha - If you enable this, the respondents must submit a captcha before submitting the survey response. This helps in avoiding spam responses and bots.
- Anonymous - If you enable this, responses will become anonymous.
- Create contact - If you enable this, contact records are created in the CRM using the respondents’ details.
- Response Message - Enter the message that should be displayed after survey submission.
- Click Go to Questions. The Questions page opens.
- +Add page details - Click to add the following details.
- Page Title - Add a title for the page.
- Description - Add description.
- Questions - Add different question types by dragging them from the left.
- Hover over the Questions to perform the following actions:
- Drag and Drop - Rearrange the order of questions by dragging them up or down.
- Duplicate - Create an exact copy of a question to reuse or modify.
- Delete - Remove the question from the survey.
- Logic - Add conditions to control when this question or a page appears based on previous responses.
- Mandatory - Enable the checkbox to ensure the question must be answered before submitting the survey.
- For the radio button, checkbox, and dropdown questions, you must also enter the answer options.
- Hover over the Questions to perform the following actions:
- +Add page - Click to add another page.
- Preview - Click to see how the survey will appear to respondents before publishing it.
- Survey Details - Click to go back and edit the title, description, or visibility settings for the survey.
- Save as Draft - Click to save the survey and edit it later
- Save & Publish - When you save and publish a survey, it becomes active and accessible.
When you save and publish a survey, it becomes active and accessible. You can share the link with the respondents.
Note:
- A survey captures the email address of respondents if the Anonymous field is disabled.
- You cannot enable both the Anonymous and Create Contact fields simultaneously because an email address is needed to create a Contact.
Sending an External Survey
After you create an external survey, it is available to be sent via email. The survey link is automatically embedded in the email. Respondents can access the survey by clicking the link in the email.
Follow these steps to send a survey link:
- Log in to the CRM.
- Click the Main Menu.
- Select Essentials > Surveys. The Surveys List View opens.
- Open a survey.
- Click the Send Survey Link button. The Compose Email window opens.
- Enter the To address of the recipient.
- Fill in all the mandatory fields.
- Click Send.
Note: You can also insert survey links directly from the Compose Email window.
Adding Logic to Questions
You can use Conditions to logic on every survey question. When a piece of logic holds good for a question, you can show another question or a survey page.
Use Case
Let’s consider an example to understand how to create conditional logic between questions or pages.
Assume you add the following three questions to a survey:
- Q1: Which type of software do you currently use?
- CRM
- Project Management
- Accounting
- HR
- Q2: How satisfied are you with your current CRM system?
- Very Satisfied
- Satisfied
- Neutral
- Dissatisfied
- Very Dissatisfied
- Q3: What key features do you use in the CRM system?
- Contact Management
- Sales Pipeline
- Email Marketing
- Reports & Dashboards
To make Q2 and Q3 appear only when the respondent selects CRM in Q1, you can set the following logic:
- If the answer to Q1 is Equal To CRM > Show Q2 or Q3
You can apply similar logic to display specific questions or entire pages based on respondents’ answers.
Note: The option to select questions or pages in the logic configuration is available only if more than one question or more than one page has been added to the survey.
Follow these steps to add logic to a question:
- Log in to the CRM.
- Click the Main Menu.
- Select Essentials > Surveys. The Surveys List View opens.
- Open a Survey.
- Click the Edit icon shown on the top right.
- Click Go to Questions.
- Hover over a question and click the Logic icon shown in the top-right corner. The Logic window opens.
- Click +Add Logic.
- Enter the logic.
- Click Save.
Editing a Survey
You can only make edits to Active surveys. Closed surveys cannot be modified.
Follow these steps to edit a Survey:
- Log in to the CRM.
- Click the Main Menu.
- Select Essentials > Surveys. The Surveys List View opens.

- Editing a Survey from the List View.
- Hover over the Survey record.
- Click the Edit icon. The Editing CSAT Survey page opens.
- Edit the required information in your survey.

- Editing a Survey from the Summary View.
- Open a Survey record.
- Click on the Edit icon. The Editing CSAT Survey page opens.
- Edit the required information in your survey.
Viewing Survey Responses
You can view a survey’s responses on the survey record. A survey response contains a response summary and individual responses.
Follow these steps to view a survey’s responses:
- Log in to the CRM.
- Click the Main Menu.
- Select Essentials > Surveys. The Surveys List View opens.
- Open a Survey. The Survey Summary View opens.
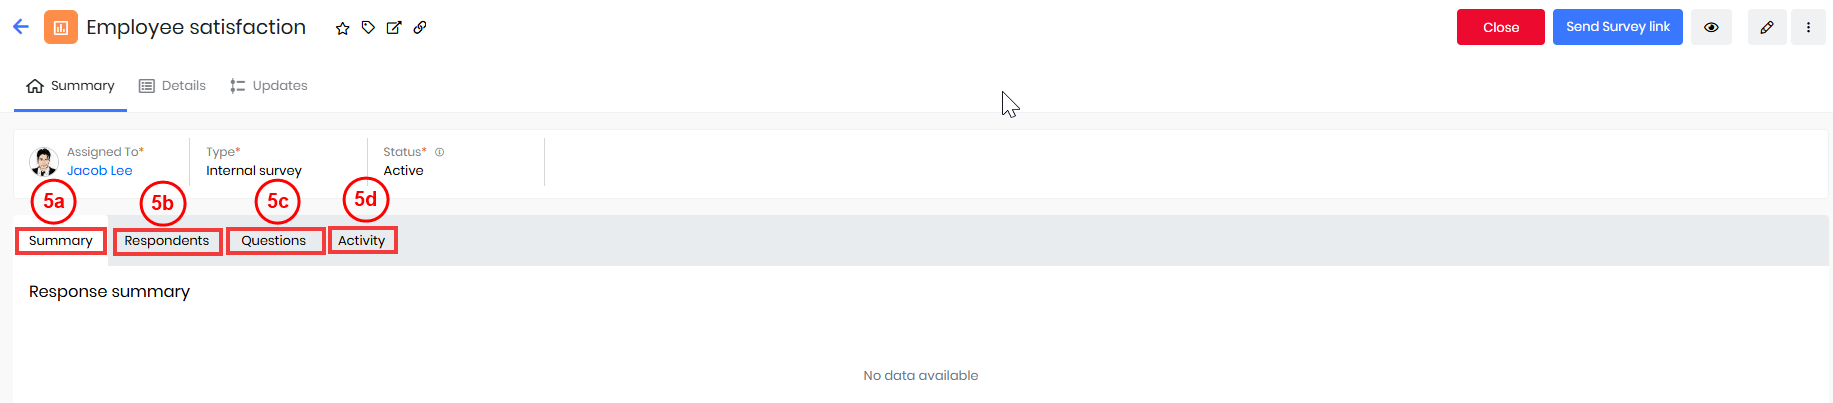
- View the following details of the record:
- Summary
- Response summary - Shows a breakdown of the types of responses received.
- Responses Volume - Indicates the total number of responses submitted.
- Questions - Displays all the questions added to the survey.
- Answered
- Skipped
- Respondents - Lists the participants who submitted responses, along with the time and their responses.
- Questions - Displays all the questions added to the survey, along with their answer options, if any.
- Activity - Displays all activity related to the survey record, including updates and interactions.
- Summary
Closing a Survey
When you no longer want people to take a survey, you can close it. When someone tries to open a closed survey, they will see this message: This survey is no longer accepting submissions.
Follow these steps to close a survey:
- Log in to the CRM.
- Click the Main Menu.
- Select Essentials > Surveys. The Surveys
- Open a survey.

- Click the Close button on the top right.
To reopen a survey, click the Re-open button shown on the survey record.
Deleting a Survey
When you no longer want people to take a survey, you can delete it. When someone tries to open a deleted survey, they will see this message: This survey is no longer accepting submissions.
- Log in to the CRM.
- Click the Main Menu.
- Select Essentials > Surveys. The Surveys List View opens.

- Deleting a Survey from the List View:
- Hover over and select the survey you want to delete.
- Click the record.
- Click Delete. The Delete records window opens.
- Click Yes, Delete.

- Deleting a Survey from the Summary View:
- Open a CSAT Survey record from the List View.
- Click More.
- Click Delete. The Delete records window opens.
- Click Yes, Delete.
Note: You cannot delete a survey that is in Active status. Only surveys marked as Closed can be deleted.
Troubleshooting Tips
Issue: Survey shows as No longer available when accessed.
Solution: The survey may be Closed or Deleted. Only active and published surveys can be accessed through the link.
Issue: Responses not recorded or saved.
Solution: Check if the survey has expired or if the submission logic is broken. Extend the expiry date or validate the logic setup and question configuration.
Issue: Unable to delete a survey
Solution: Ensure the status of the survey is set to Closed. Surveys with an Active status cannot be deleted.