Articles in this section
Email Templates
Feature Availability
Vtiger Editions: One Pilot | One Growth | One Professional | One Enterprise | One AI
Introduction
An email template is a ready-made, preformatted email layout that helps you create professional emails quickly. Instead of designing from scratch, you can simply update the template with your own content—such as text, colors, logos, and styles, to match your needs.
Email templates save both time and effort. They are especially useful for:
- Introducing new products or services
- Running marketing campaigns
- Announcing offers and discounts
- Sending seasonal greetings
These templates can be reused or customized for future campaigns, making them flexible and efficient. With templates, you can also reach all your leads, contacts, and partners at once with consistent, well-designed communication.
Email Templates in Vtiger
Vtiger provides an in-built template designer that lets you create reusable email templates from scratch. The Email Templates module offers several tools to help you design and customize your templates, including:
- A flexible drag-and-drop editor
- A highly customizable HTML editor
- Simple blueprints
- A merge tag editor
With these options, you can design professional and engaging emails in just a few minutes. You can also add your own images, styles, tags, or even custom HTML code.
The Vtiger Advantage!
- Design templates for campaigns, offers, and discounts, newsletters, transaction processing, monthly updates, maintenance alerts, etc.
- Use our preloaded 40+ templates to create and customize a template of your own.
- Create a new template from scratch with the drag-and-drop editor or using HTML-CSS.
Now, create eye-catching emails in minutes using custom images, styles, merge tags, HTML code, etc.
Features of Email Templates in Vtiger CRM
The Email Templates editor in Vtiger makes designing professional emails quick and simple. You can:
- Drag and Drop Components: Effortlessly build your template by dragging and dropping elements such as text blocks, images, logos, and more.
- Use the HTML Editor: For more control, you can switch to the HTML coding section to customize fonts, sizes, colors, styles, and layouts.
- Format and Personalize: Add branding elements like company logos, choose styles that match your brand identity, and personalize content using merge tags.
- Use Templates Across CRM: Once created, these templates are saved in the CRM and can be reused for email campaigns or sent as individual emails to leads and contacts.
Use Case: Sending Consistent Welcome Emails to New Leads
Imagine your sales team regularly adds new leads to Vtiger. Each time, they need to send a welcome email with details about your company, products, or next steps.
Instead of writing the same email manually every time, you can create an Email Template called New Lead Welcome Email.
With this template:
- The email is ready-made with consistent messaging.
- Lead details like First Name, Company Name, or Assigned To can be filled automatically using merge fields.
- Any team member can send the same polished, professional email with just one click.
- It saves time, avoids mistakes, and ensures every lead gets the same high-quality first impression.
Benefits
The benefits of using Vtiger Email Templates are:
- Design for Different Needs: Create templates for campaigns, newsletters, offers and discounts, transaction updates, monthly reports, maintenance alerts, and more.
- Ready-to-Use Templates: Access over 40 prebuilt templates that you can quickly customize to fit your requirements.
- Flexible Creation Options: Build a new template from scratch using the drag-and-drop editor or work directly with HTML/CSS for advanced customization
- Customizable Content: Add text, images, and style elements easily, and format your content with HTML and CSS to match your branding
In this article, you will learn about:
- Creating Email Templates
- Using Email Templates
- Editing Email Templates
- Duplicating and deleting Email Templates
- Viewing Email Templates
- Reports in the Email Templates module
Key Terminology
|
|
|
|
|
|
|
|
|
|
|
|
|
|
|
|
|
|
|
|
|
|
|
|
|
|
|
|
|
|
|
|
|
Creating an Email Template
You can create or choose default templates for sending out emails. While Vtiger provides you with preloaded templates, you can customize them further by editing the content in the content editor section, as well as the Source Code panel using HTML code. You can also create a template from the Email Campaigns module.
You have different options for creating email templates:
- Themes: Vtiger comes preloaded with more than 50+ theme-based templates like holidays, education, promotional emails, product-related emails, etc. The themed options show you exactly how your emails will look after you create them.
- Blueprints: Select one of the available blueprints to create a template of your own. Blueprints provide you with a basic view of how content can be presented in your emails.
- My templates: Vtiger provides you with free templates preloaded with content under this tab.
- By coding: You can create your templates by using HTML code. You can either write your own code or copy the code from existing templates before editing it. You can import an HTML file directly instead of typing out your own code.
Follow the steps below to create an email template:
- Log in to the CRM.
- Go to the main Menu > Marketing.
- Select Email Templates from Marketing Enablement. The List View of Email Templates opens.

- Click +Add Email Template from the top-right corner of the screen. The Select Template window opens.
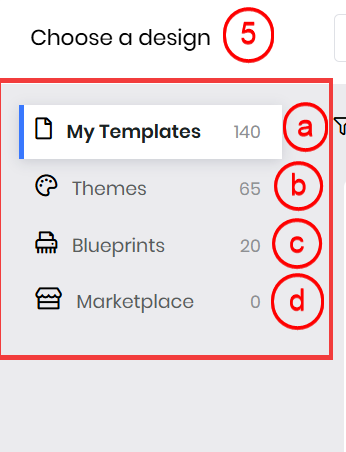
- Select one of the options from the following:
- Themes: Ready-made designs you can use for your emails.
- Blueprints: Simple layouts to build basic email structures.
- My templates: Free templates preloaded with content.
- By coding: Create your templates by using HTML code.
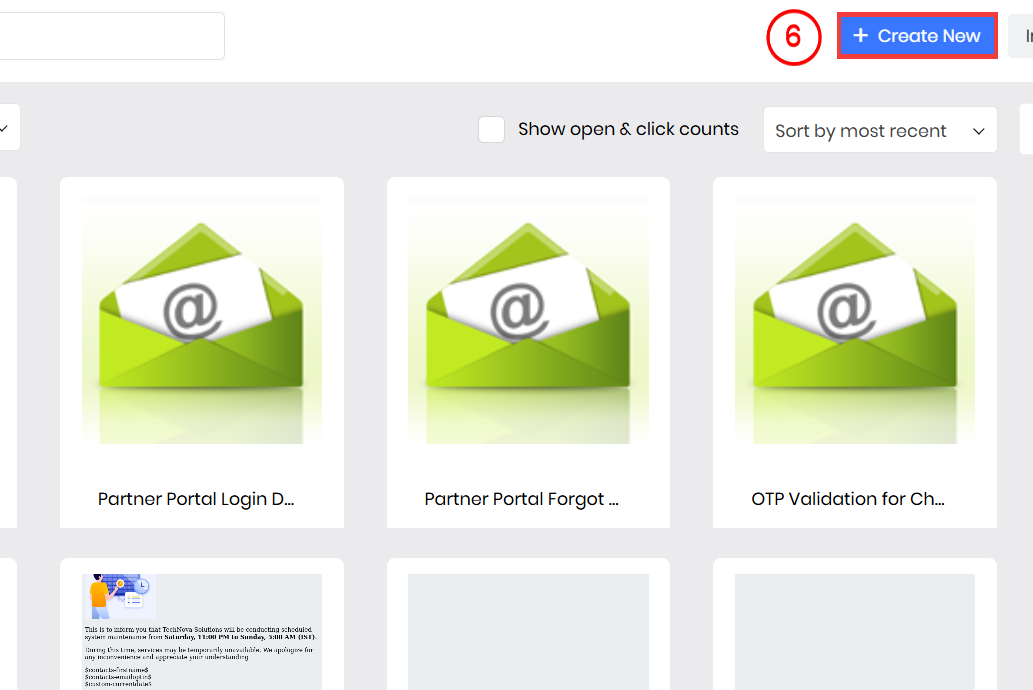
- Click +Create New after selecting a template option. A Create Email Template window opens.
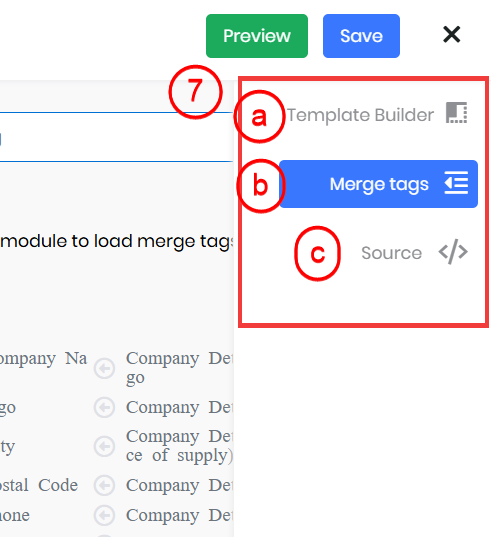
- Select how you want to design your template from the options below:
- Template Builder: Create professional templates quickly by dragging and dropping blocks like text, images, and buttons.
- Merge Tags: Insert dynamic fields like First Name, Last Name, or Company to personalize your emails.
- HTML Source Code: Customize the email by directly editing the HTML code.
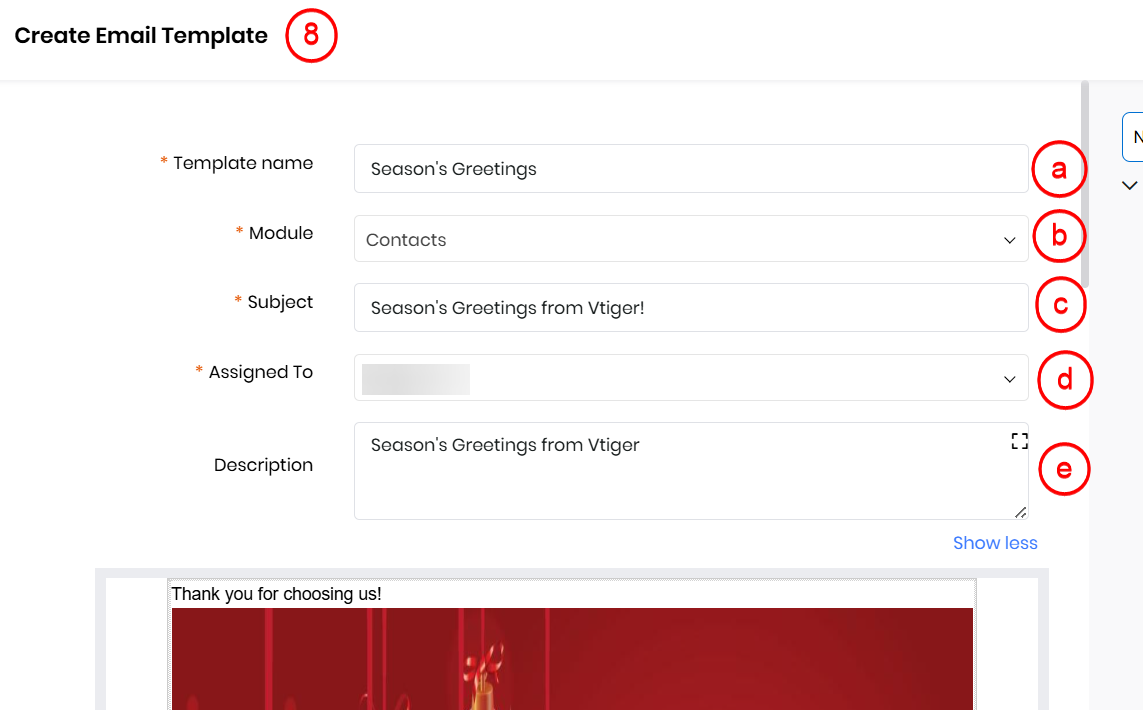
- Enter or select the following details after choosing a design:
- Template Name: Enter the name of the email template.
- Module: Select the module where the template will be used.
- Subject: Enter the subject line for the email.
- Assigned To: Choose the user who will own this template.
- Description: Add a short note or purpose for the template.
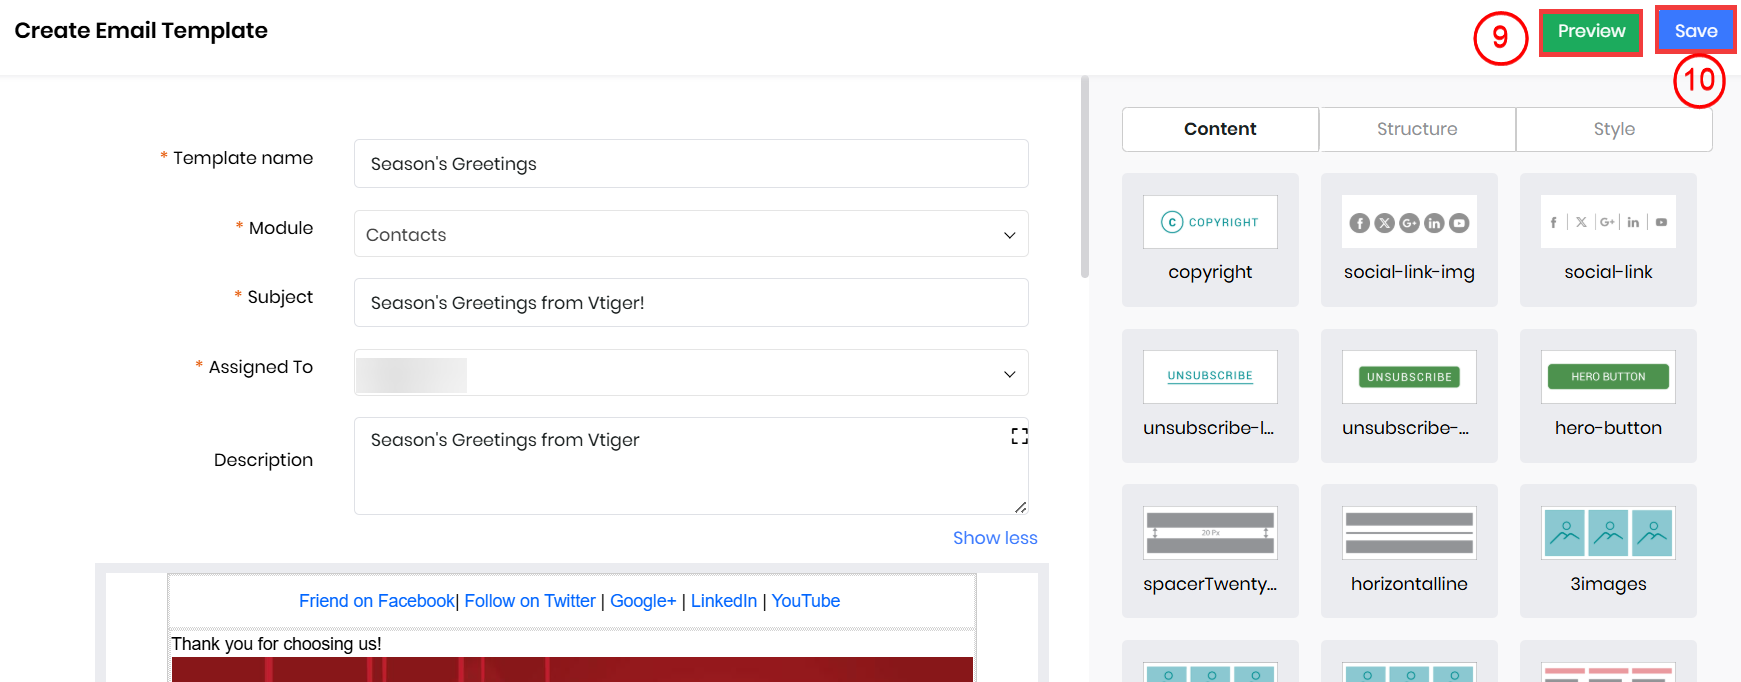
- Click Preview to view the template in both Desktop and Mobile versions.
- Click Save to save your template.
Note:
- The Template Name is available as a link, so you can use the right click and open the template in a new tab.
- You can import an HTML file from your system and personalize it as required.
- All your personalized templates will be saved in the My Templates folder and will also be available in the Email Templates List View.
Using an Email Template
Now that you have created an email template, here’s how you can use it in your email. We can use the template in the compose window of various modules, such as the Contacts module, for Email Campaigns, etc.
Follow these steps to insert an email template into your emails:
- Log in to the CRM.
- Go to Essentials > Conversations.
- Click Inbox.

- Click Compose.
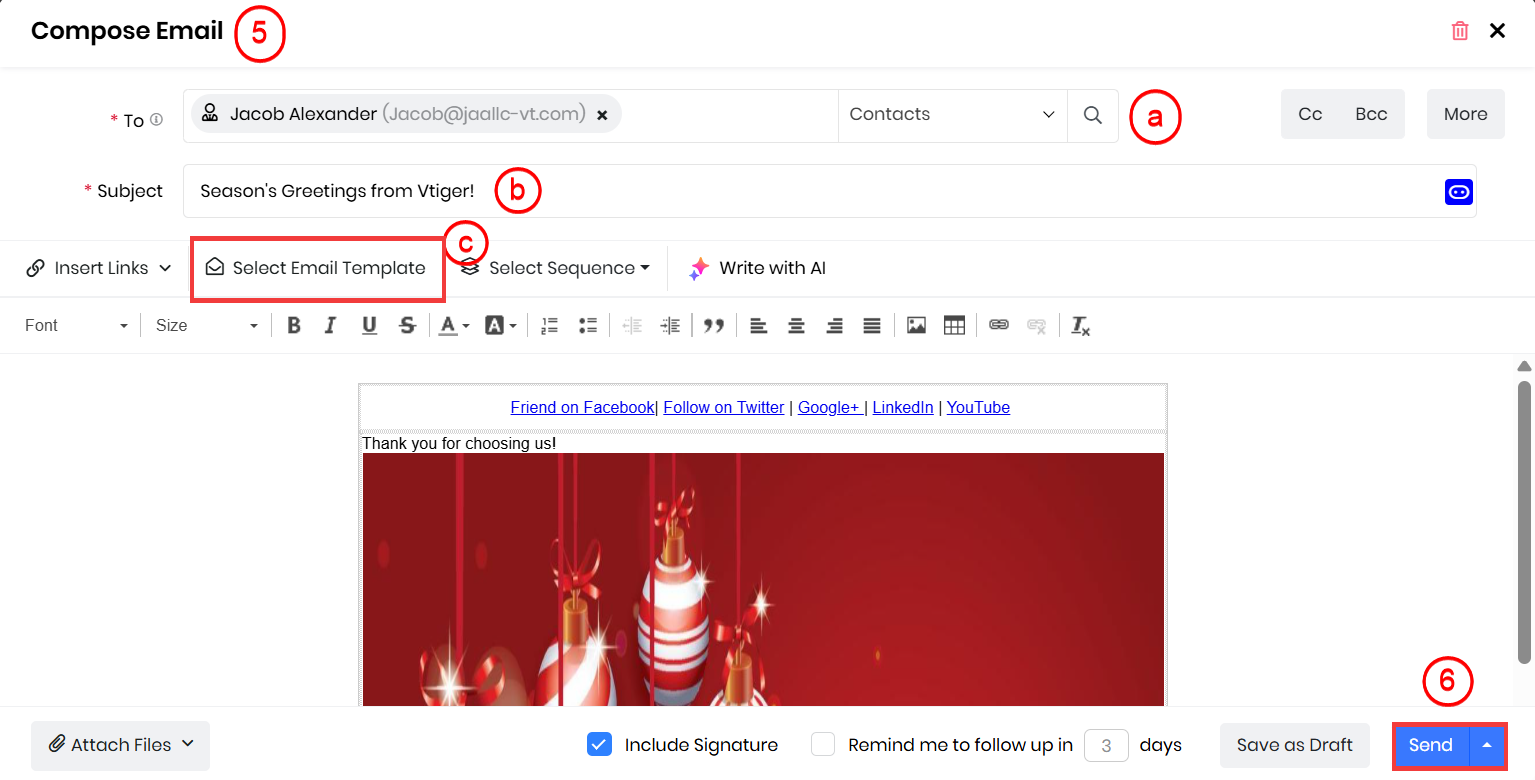
- Enter or select the following details:
- To: Enter the recipient’s email address to whom you want to send the email. Note:
- Type the first three letters to bring up the details.
- You also need to select the relevant module in the drop-down beside the search field.
- Subject: Enter the subject for the email.
- Email Template: Search for the required template using Template Name. You can also search for the template using the Module Name. The email section is populated by the selected email template.
- To: Enter the recipient’s email address to whom you want to send the email. Note:
- Click Send.
The created email template will be sent to the recipient you choose.
Editing an Email Template
On saving, if you still want to make changes to a template, you can edit the details and add information. You can edit a template by editing the HTML source code in the Source panel on the right side of the screen. You can also use Merge tags for each of the selected modules.
Editing a template using HTML source code
If you know HTML coding, then you can play around with the fonts, colors, etc, in your template.
You can code your own template or import the HTML file from your system. You can add multiple links and images and format the document without worrying about distortion in the final document.
- The Template Name will be available as a link, so you can right-click and open the template in a new tab.
- You can:
- Use the Expand icon to open the HTML editor in full mode.
- Expand the sidebar to show the names of the related tabs when you hover.
Merging Tags
- If you have defined tags for your modules, then you can use the Merge Tags section to add tags.
- Selected tags are added to the Subject section.
- Always include fields of the associated module as well as general fields such as Current Date and Time, Company Details, Portal Details, etc. in the template.
Follow these steps to edit an email template:
- Log in to the CRM.
- Go to the main Menu > Marketing.
- Select Email Templates from Marketing Enablement. A List View of Email Templates opens.
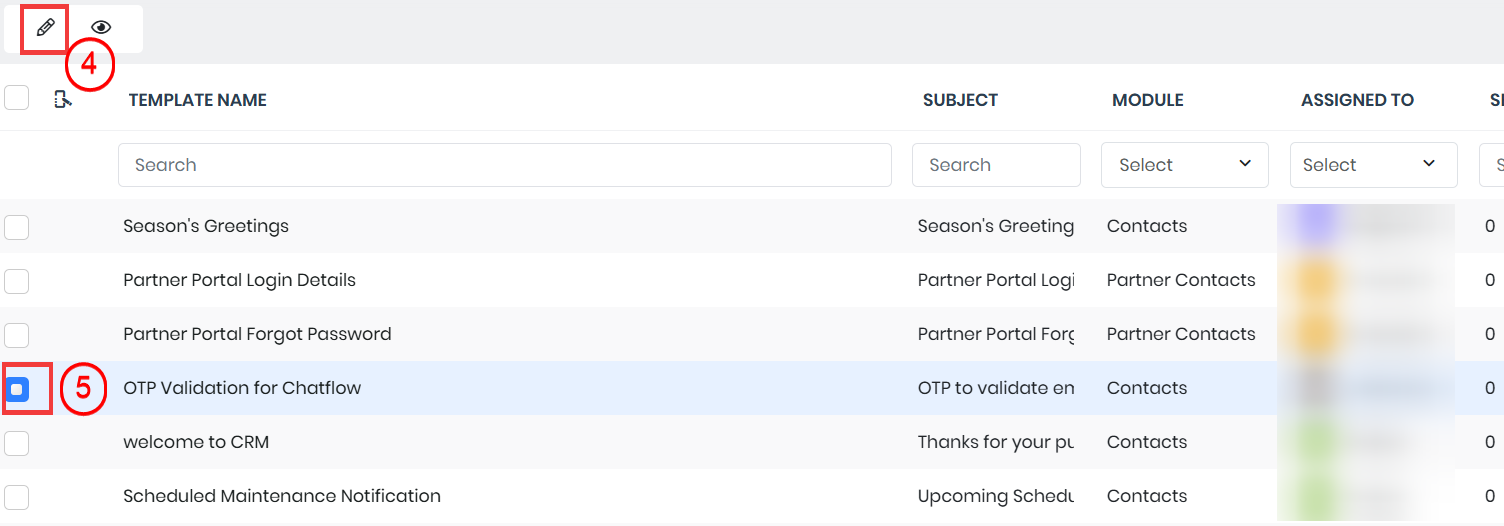
- Select the template you want to edit by clicking on the radio button.
- Click the Edit icon.
- Edit the required details.
- Edit the email section.
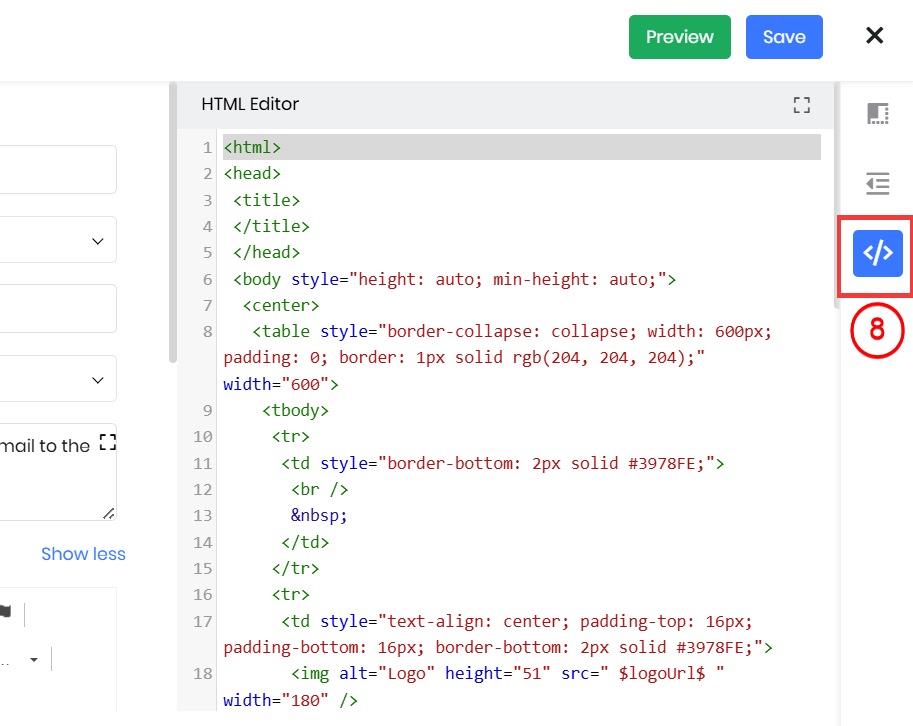
- Use the HTML Coding section to make detailed edits.
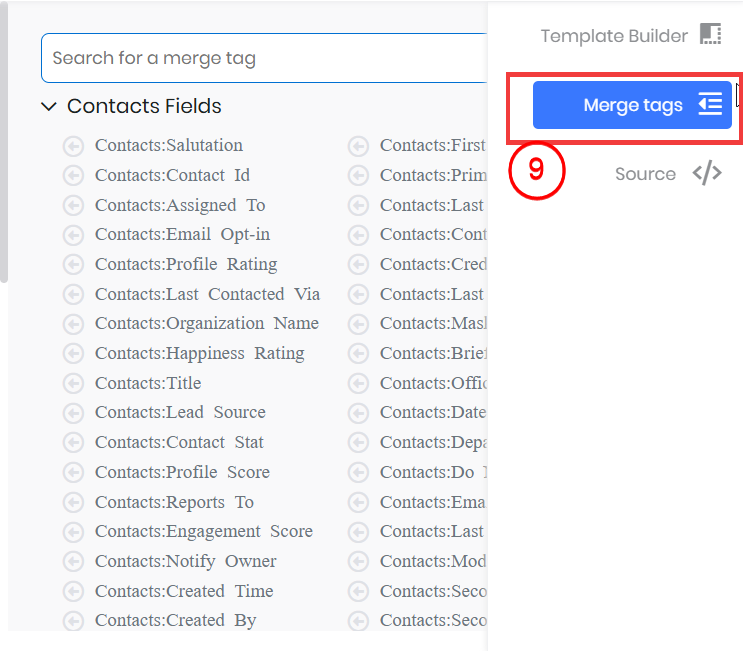
- Place the cursor at the desired location in the body or subject to insert a merge tag. The system displays an alert if the cursor is not placed properly.
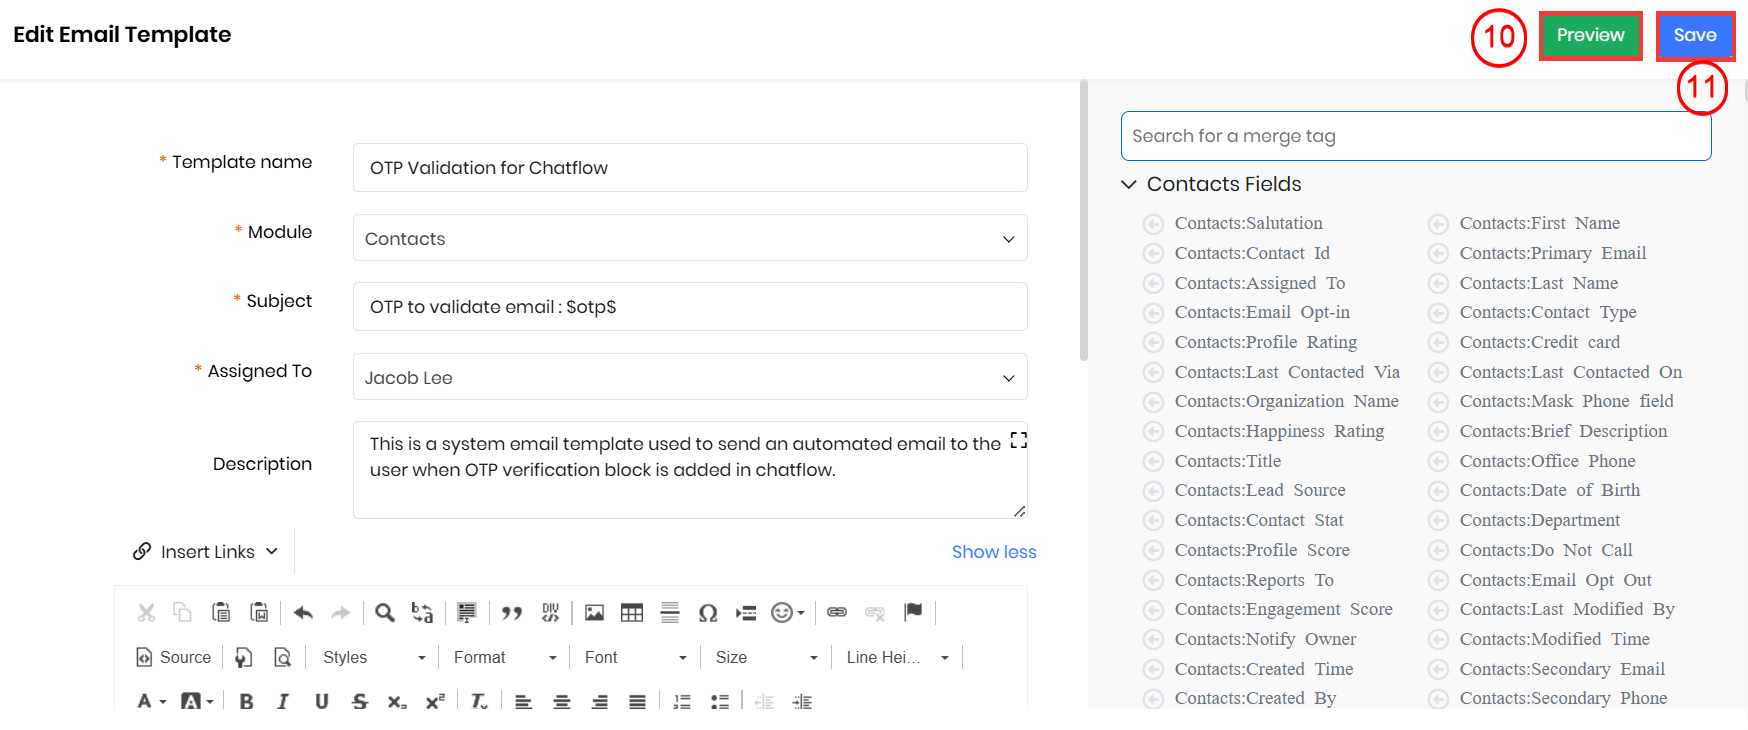
- Click Preview to see how the edited email template looks.
- Click Save.
Note:
- Always save your template after you have created or edited a document.
- You can use the Created by User merge tag to automatically insert the sender's email signature, which is taken from the My Preferences section of their CRM profile.
- This merge tag can be used across all modules that support email templates.
Duplicating Email Templates
Follow these steps to duplicate an email template:
- Log in to the CRM.
- Go to the main Menu > Marketing.
- Select Email Templates from Marketing Enablement. A List View of Email Templates opens.
- Select the email template you want to duplicate. The Details view of the email template opens.

- Click the Duplicate icon from the three-dot menu.
- Change the required details.
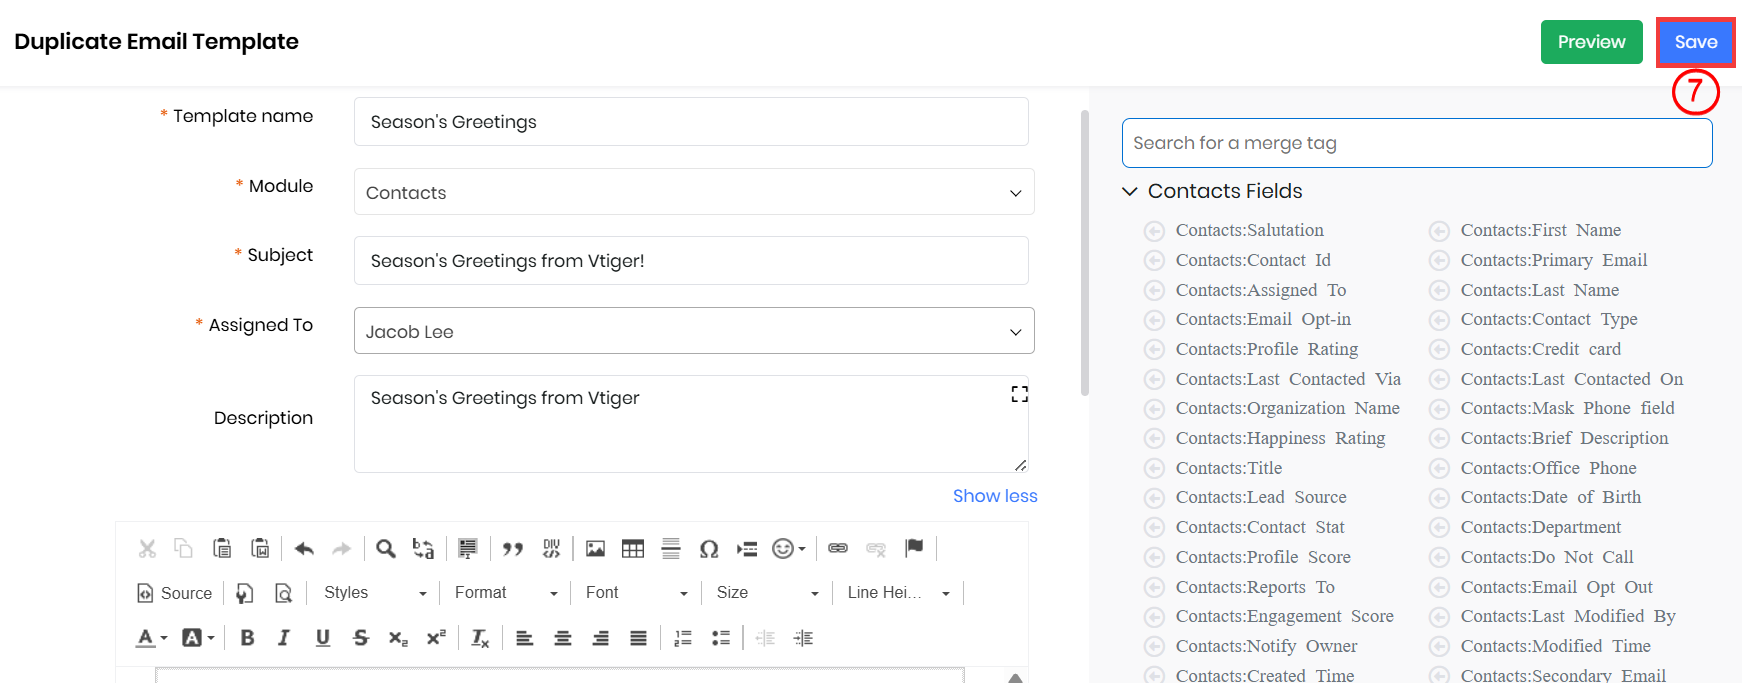
- Click Save.
Deleting Email Templates
Before you delete an email template, you should know the following:
- Deleting an email template will also delete its report of usage, opens, and clicks. The email template cannot be restored after deletion.
- Deleted email templates will not be stored in the Recycle bin.
Follow these steps to delete an email template:
- Log in to the CRM.
- Go to the main Menu > Marketing.
- Select Email Templates from Marketing Enablement. A List View of Email Templates opens.
- Select the email template that you want to delete by clicking the radio button.
- Click the Delete icon.
- A confirmation message to delete the template pops up.
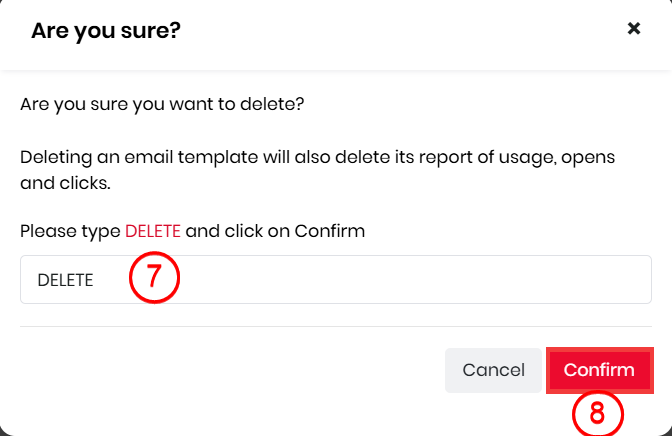
- Type DELETE in the confirmation box.
- Click Confirm
The selected email template will be deleted.
Note:
- Deleted records will be kept in the recycle bin and cleared after 30 days.
- Email templates cannot be restored after deletion. Once templates are deleted, you cannot use them or create reports on usage details (Opens, Clicks, Sent).
Viewing Email Templates
You can find and view all your templates in the List View by going to Marketing > Email Templates.
In the List View, you will see the following information for the displayed templates:
- Template Name: Name of the template.
- Subject: Subject of the email.
- Assigned To: Displays the user responsible for the email template
- Module Name: Name of the module the template is associated with.
- Tracking status: In the List view of the Email Template, you can track email templates by using the following statuses:
- Sent: The number of emails that were sent.
- Opens: The number of emails that were opened.
- Clicks: The number of links in the email that were opened.
- You can also use the Search by option to search for a template. You can search for a template based on the name, subject, sent to, emails that were opened, and the links that were clicked on.
List View Actions
The following actions can be performed in the List View of the Email Templates;
- Edit: Open the template to update or modify its content, design, subject line, or formatting as needed.
- Preview: View how the email template will appear on desktop and mobile before sending it out
- Delete: Permanently remove the template from the system if it is no longer required.
When you open an email template from the List View, the system provides the following details:
- Preview: Displays a visual representation of the email template so you can check its appearance before sending it.
- Details: Lists all the key information related to the email template, including its name, subject line, assigned user, and description.
- Reports: Shows performance statistics such as the number of emails sent, opened, and clicked. It also provides a pie chart for a quick visual summary of engagement.
The following actions can be performed in an email template record:
- Open in New Tab: Opens the email template in a separate browser tab for easy viewing.
- Click to copy direct link: Copy the direct link to the template so you can share it with others.
- Edit: Allows you to make changes to the selected email template
- Duplicate: Creates a copy of the existing template that you can modify as needed
- Delete: Permanently removes the selected email template from the system
Reports in the Email Templates Module
Email template records allow you to generate detailed reports, giving you insights into metrics such as Direct Emails and Email Campaigns that have been sent.
- The number of emails sent, opened, and clicked on.
- Details about Direct Email and Email Campaigns.
- Pie chart representation of the template used details
Follow these steps to display a report from an email template record:
- Log in to the CRM.
- Go to the main Menu > Marketing.
- Select Email Templates from Marketing Enablement. A List View of Email Templates opens.
- Select the template for which you want to view a report.
- Click the Reports tab to display the reports.
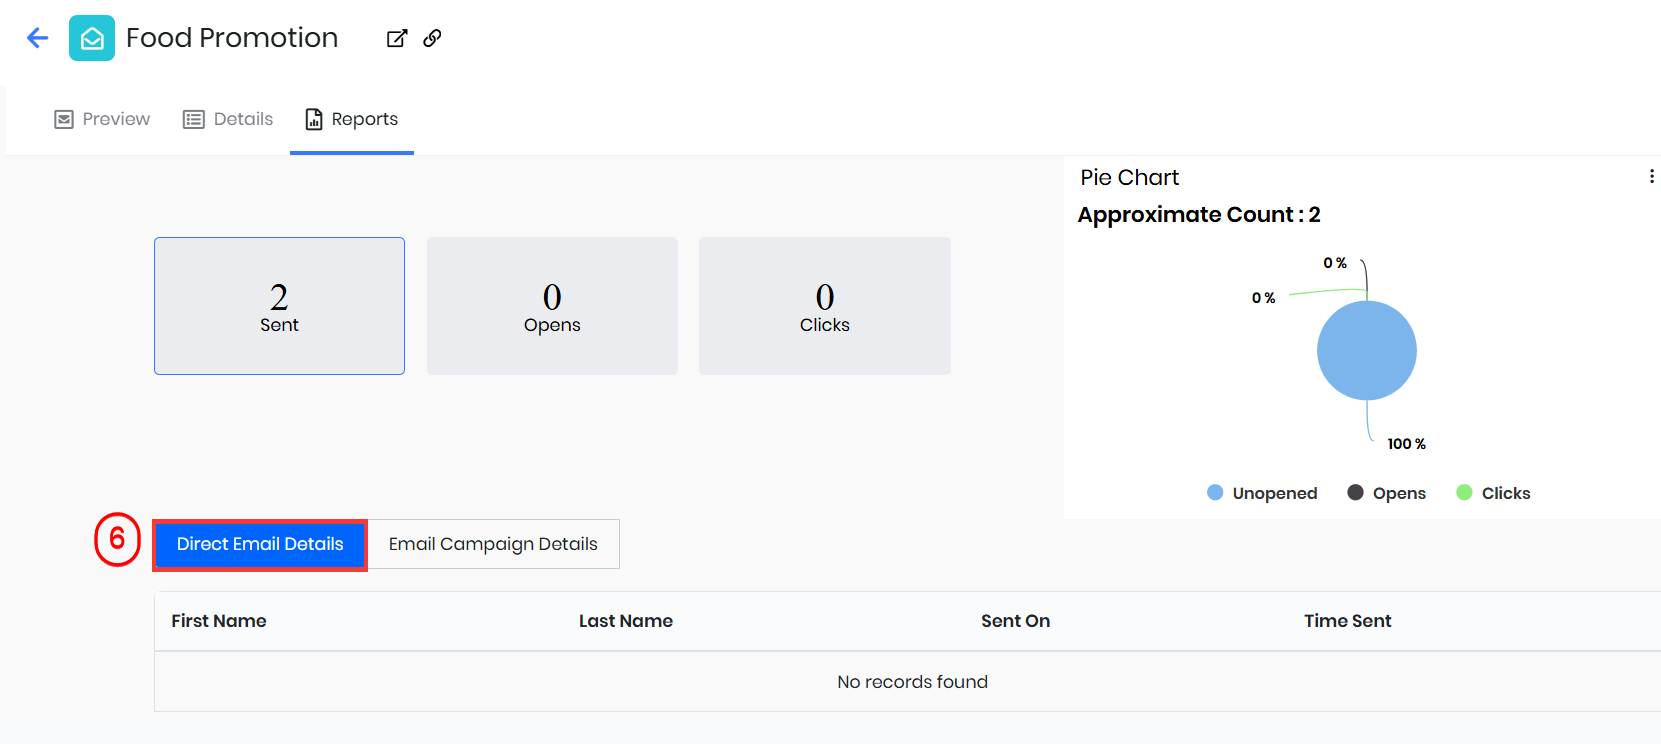
- Click the records link under the Direct Email Details to open the related contact records in a new tab.
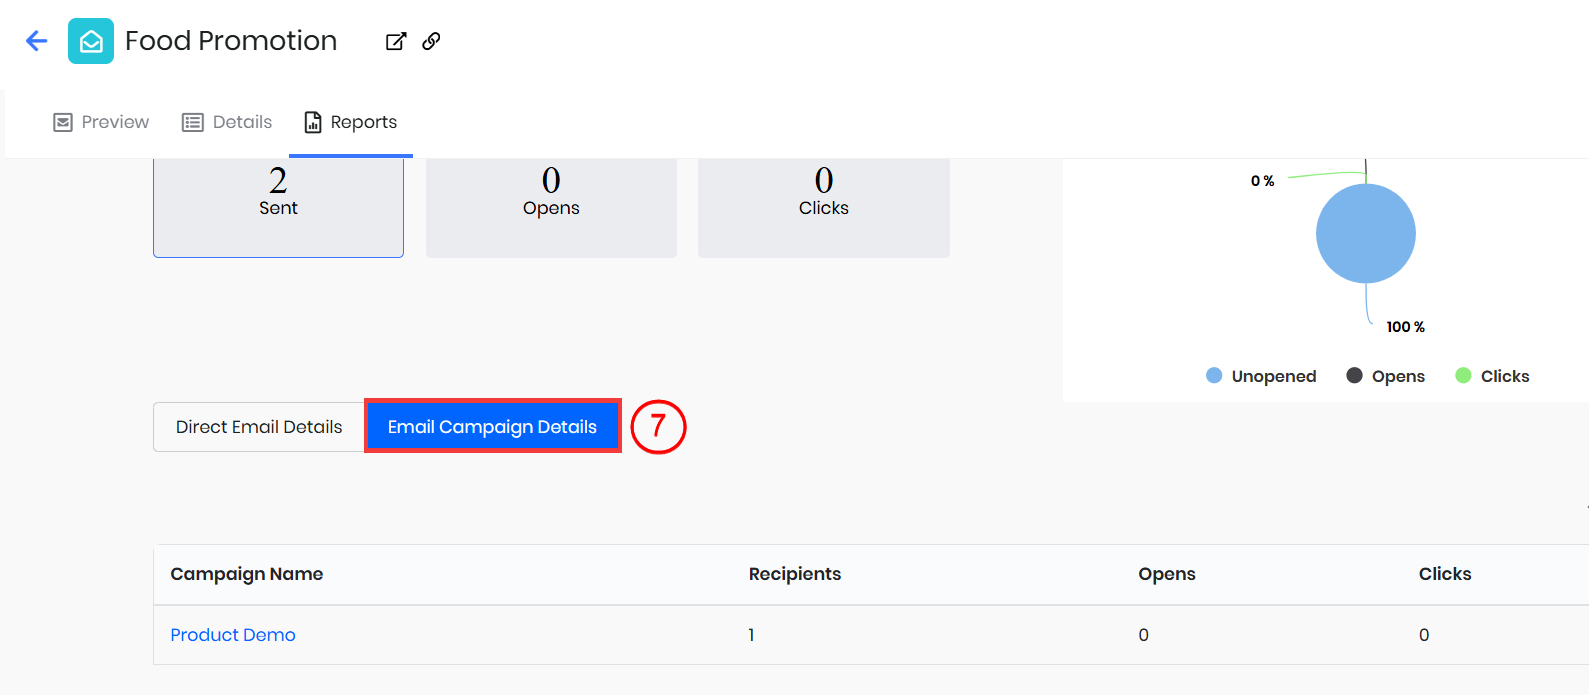
- Click the records link under the Email campaign details to open the related Email Campaign records in a new tab.
You can also use the Print Chart icon of the report window to:
- Print a chart
- Download PNG/JPEG image
- Download PDF document
- Download SVG vector image
You can also download the template usage details in the CSV format under the Sent, Opens, and Clicks in the Report tab.
Publishing Email Templates
- You can publish Email Templates that you create in the Vtiger Marketplace.
- The published templates will then be available from the Add-Ons page to download and use for other customers.
- This is available only in the Developer edition.
Troubleshooting Tips
Here are some common problems you may face and how to fix them quickly.
- Template not showing in the list: Make sure the template is saved and not kept in draft mode. Refresh the page or check your filters.
- Merge tags not working: Verify that you’ve selected the correct module and that the field values exist for the contact or record you’re sending to.
- Formatting issues: If styles look broken, review the HTML code in the source editor or rebuild the design in the drag-and-drop editor.
- Images not displaying: Ensure the images are uploaded properly and that you’re using the correct link.
- Emails landing in spam: Check if your subject line, links, or content trigger spam filters. Also, confirm that your domain has SPF, DKIM, and DMARC properly set up.
- Unable to save template: Make sure all mandatory fields like Template Name and Subject are filled.
- Template not available while sending email: Confirm that the template is linked to the correct module (Leads, Contacts, Deals, etc.).