Articles in this section
Zoho Sign Integration
Feature Availability
Vtiger Editions: One Professional | One Enterprise | One AI
Introduction

Zoho Sign is a cloud-based digital signature app for businesses. Zoho Sign allows you to sign paperwork or send documents for signatures electronically without depending on actual paper documents.
The Esign Documents module is used to send documents for signatures from Vtiger CRM. All the documents you have sent for signatures are created as records and displayed in the List View of this module.
Zoho Sign with Vtiger CRM
You can now integrate Zoho Sign with Vtiger CRM.. Once installed, Zoho Sign will be a part of the Esign Documents module in the CRM. You can send quotes, invoices, contracts, etc., to your contacts, associates, and team members for digital signatures directly from the CRM. With this integration, you will be able to use the features of Zoho Sign such as the following:
- Add multiple signatories to your documents.
- Decide the order in which signatories will have to sign. For example, approvals.
- Create personalized templates by adding brand images, logos, copyright, and email addresses.
- Track and monitor the document status and signee details.
You will also be set up alerts in the CRM to tell you when a document is due for signature.
Benefits of using Zoho Sign
The following are some of the benefits of using Zoho Sign integration in Esign Documents:
- Decreases the dependency on actual paper documents.
- Enhances convenience with secure, well-integrated access.
- Improves efficiency by reducing turnaround time.
- Saves costs by shifting to email-based document delivery, removing the need for postal and courier services.
In this article, you will learn about:
- Prerequisites for using Zoho Sign
- Installing Zoho Sign
- Configuring Zoho Sign with Vtiger CRM
- Sending documents for digital signatures using Zoho Sign
- Revoke Access
Key Terminology
|
|
|
|
|
|
|
|
|
|
|
|
|
|
|
|
|
|
|
|
|
|
|
|
Prerequisites
To integrate Zoho Sign and use it with Vtiger CRM Esign documents:
- You must have a business account with Zoho.
- Your business account with Zoho should be Active.
- You must enable Esign Extension in Vtiger CRM.
Installing Esign Extension
To use Zoho Sign with Vtiger Esign Documents, you need to first install the Esign Extension.
Follow these steps to install the Esign Extension:
- Log in to your CRM account.
- Click the User Menu.
- Click Add-ons on the bottom left corner of the screen.
- Look for the Esign Extension.
- Click Install.
You have now installed the Esign Extension. With this, you can integrate Zoho Sign with Vtiger Esign Documents.
Integrating Zoho Sign with Vtiger CRM
Let us learn how to integrate Zoho Sign with the Vtiger Esign Documents module. This process involves navigation between Vtiger CRM and Zoho Sign screens.
Follow these steps to configure Zoho Sign with Vtiger CRM:
- Step 1: Zoho API Console Configurations
- Step 2: Retrieving Client ID and Client Secret
- Step 3: Go to Vtiger CRM Esign Documents Module
- Step 4: Configure Zoho Sign with Vtiger Esign Documents
Step 1: Zoho API Console Configurations
Follow these steps for Zoho API Console configuration:
-
Log in to Zoho API Console - https://api-console.zoho.in/
Note:
- zoho.eu - for European DC
- zoho.com.au - for Australian DC
- zoho.com - for American DC
- Click your Zoho account if displayed, or if your account is not displayed:
- Click +Add Client.
- Select Server-based Applications.

-
You will be directed to the Zoho API Console screen.
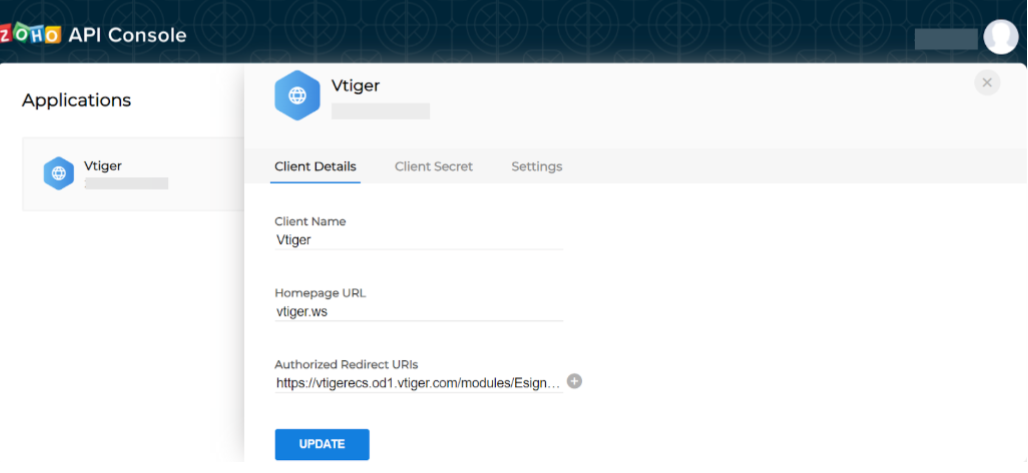
- Enter or select the following information:
- Client Name - Your Zoho account username.
- Homepage URL - Name of the main page of your website. For instance, with Vtiger CRM the Homepage URL would be vtiger.ws
- Authorized Redirect URLs - The callback URL, which is your instance URL + Zoho Sign callback URL. For instance, with Vtiger CRM the Homepage URL would be :

- Click Create.
- Click Update if you are updating the instance URL information.
Step 2: Retrieving Client ID and Client Secret
-
Click the Client Secret tab.

- Copy Client ID and Client Secret using the copy icon. (To a Notepad or a document)
- Now, go to Vtiger CRM.
Step 3: Go to Vtiger CRM Esign Documents Module
Follow these steps to access the Vtiger CRM Esign Documents Module:
- Log in to the CRM.
- Click the Main Menu.
- Click Essentials.
- Look for Collaboration.
- Select Esign Documents. The Esign Documents opens.

You will now be directed to the Esign Documents module.
Step 4: Configure Zoho Sign with Vtiger Esign Documents
Follow these steps to configure Zoho Sign with Vtiger Esign Documents:
-
Click Configure Service.

-
Select Zoho Sign.

-
Add Configuration Details page opens.

- Paste the copied Client ID in the Client ID field.
- Paste the copied Client Secret in the Client Secret field.
- Enter the subject of the email in the Email Subject field.
- Click Authenticate. You will be directed to the Zoho Sign sign-in screen.
- Enter your Zoho account email address in the Sign In field.
- Click Next. You will be directed to the ZohoSign screen.

- Click Accept. The Esign Documents page opens.
With this, you now have successfully configured Zoho with the Vtiger CRM Esign Documents module.
Sending Documents for Digital Signatures Using Zoho Sign CRM
Let us learn how to send documents for digital signatures using Zoho Sign from the CRM.
To send a document for e-signatures, you need to add or select the following information:
- Who should sign the document - The contact to whom you want to send the documents for signature.
- What documents should be signed - The documents you want to send for signature.
- Email address of the recipient.
Sending a Document for Signing
Signing the document requires you to do the following steps:
- Step 1: Send an Esign document using Zoho Sign in Vtiger CRM
- Step 2: Signing the document in Zoho Sign
Now, follow these steps to send an Esign document using Zoho Sign.
Step 1: Send an Esign document using Zoho Sign in Vtiger CRM
Follow these steps to send an Esign document using Zoho Sign in Vtiger CRM:
- Log in to the CRM.
- Click the Main Menu.
- Click Essentials.
- Look for Collaboration.
- Select Esign Documents. The Esign Documents page opens.

- Click +Add Esign Document.
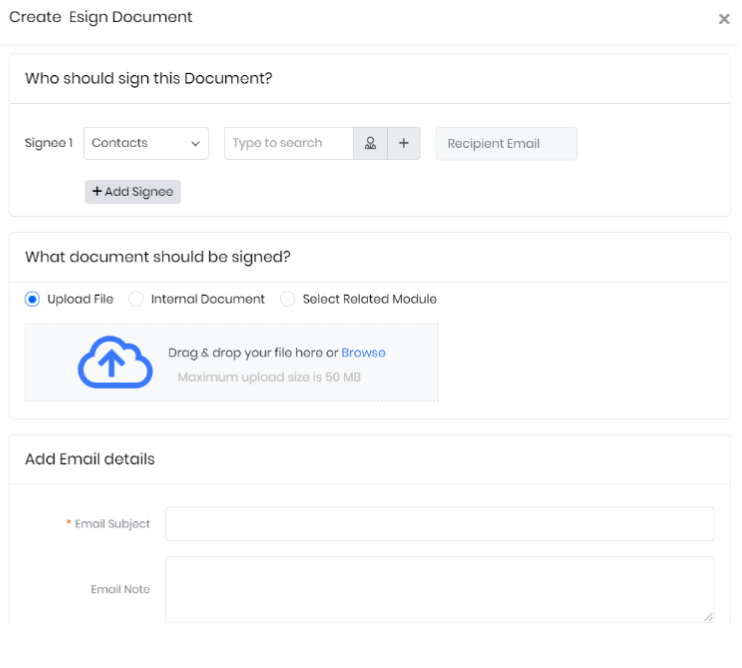
- The Create Esign Document screen is displayed.
- Select the following in the Who should sign this Document? section:
- Select the module where the Signee 1 (contact) is available.
- Select the Signee 1 contact from the displayed CRM contacts list.
- Once the Signee 1 contact is selected, their respective email will appear by default.
- Use the +Add Signee button to add additional (multiple) signees to the document.
- Select the following in the What Documents should be signed section. You can choose where to save the document.
- Select Upload File if the document you want to upload is on your system. You can use browse and upload the file from its location or use the drag and drop action.
- Select Internal Document if the file is on CRM.
- Select Select Related Module if the file is on any specific CRM module.
- You can upload only one document at a time.
- File size - not more than 50 MB.
- File formats - pdf, text, ms word, png, jpeg, vnd.openxmlformats-officedocument.spreadsheetml.sheet, vnd.ms-excel.
- Enter the following In the Add Email Details section:
- Enter the Email Subject in the Email Subject field.
- Enter the Email Note in the Email Note field.

- Click Save and Send for Signature.
Step 2: Signing the document in Zoho Sign
Follow these steps to send an Esign document in Zoho Sign:
- You will be directed to the Zoho Sign screen, which allows you to position the signee's signature.

- Drag and Drop the Signature tab or any other tabs from the Fields section into the document wherever desired. This lets your signee add their signature on the document where you have positioned it.
- Click Send. You will be directed to the Esign Documents List View. The Esign Documents List View displays all the documents you have sent and their status as records. The document you recently sent will be displayed with the status as Sent.
With this, you have successfully sent an Esign Document using Zoho Sign.

Adding Multiple Signatories to a Document
The following applies when using Zoho Sign for digital signatures:
- You can add a maximum of 3 signees by clicking +Add Signee.
- When you have multiple signees, the second and third signee will be able to sign only after the first signee signs,
- When you have multiple signees, the second and third signee will not be able to sign if the first signee discards the document.
- You can use the Delete icon to delete the signees added, prior to sending the documents for signature and not once sent.
Esign Documents List View
Let us understand the List View of the Esign Documents module.
All the documents you have sent for signatures from the Esign Documents module are displayed in the Esign Documents List View.
You can view the following on the List View:

- All the Esign Documents listed with their respective status.
- Add Esign Document - This lets you create a new esign document.
- Configure Service - This lets you configure the required Esign portal service settings.
Esign Documents Record Statuses
Let us understand the different Zoho Sign Esign Documents record statuses.

The following statuses are available for an Esign Document record:
- Created - When you draft and save a document that you need to send
- Sent - When you successfully send a document
- Delivered - When your signee has successfully received a document
- Seen - When your signee has only seen the document
- Signed - When the signee signs the document record.
- Completed - When the document is signed by all your signees
- Declined - When the signee refuses to sign the document
- Cancelled - When your signee has discarded the document
- Processing - When the document is yet to be signed by all your signees
Esign Documents Summary View
Let us understand the Summary View of an Esign Documents record.
Follow these steps to view the Summary View of a Esign Document:
- Log in to the CRM.
- Click the Main Menu.
- Click Essentials.
- Look for Collaboration.
- Select Esign Documents. The Esign Documents page opens.
- Click on a record in the Esign Documents List View. The Summary View of the record opens.
- View the following information In the Details View:
- Name -Signee name.
- Recipient Email - Signee email address.
- Sent On - The day you sent the Esign Document.
- Signed On - The day the Esign Document was signed by the signee.
- Status - Esign Document status.
- Activity Section - you can comment and view the comments you received and commented for the specific Esign Document.
- One View - View the Signee details for the specific contact or organization as shown below.
- Email Details - View the subject and note in the email sent.
- Attachments - View the documents you sent and received.
- Updates - Track all status changes, including when the document was created, sent, signed, or received—along with user names and timestamps.
- WhatsApp -View the WhatsApp message history related to the signature process, including sent notifications and delivery status
Note:
You can disable Zoho Sign from the Esign Documents module by clicking Revoke Access. The Revoke Access button is available in the List View.Revoke Access to Zoho Sign
Revoking access removes the CRM's connection to your current Esign account, allowing you to sign in with a different Esign account when needed.
Follow these steps to revoke access to OneDrive:
- Log in to the CRM.
- Click the Main Menu.
- Go to Essentials > Esign Documents. The Esign Documents page opens.
- Click Settings.
- Select Revoke Access.
- A confirmation window with the Are you sure you want to revoke access message opens.
- Click Ok. The Access Revoke message appears.