Articles in this section
Adding Multiple Signatories in Esign Documents
Feature Availability
Vtiger Editions: One Professional | One Enterprise | One AI
Introduction

In many business processes, it is common to require signatures from multiple stakeholders on a single document, whether it's a sales agreement, service contract, or internal approval form. These signatures may need to follow a particular order for legal or procedural reasons. The Esign Documents feature in Vtiger CRM simplifies this workflow by allowing users to send documents for electronic signatures using integrations like DocuSign and Zoho Sign, while also supporting multiple signatories in a defined sequence. This ensures a smooth and efficient signing process, all within your CRM environment.
To learn more about Esign Document, click here.
To learn more about DocuSign Integration, click here.
To learn more about Zoho Sign Integration, click here.
Requirements
You will need the following to use the Multiple Signatories feature:
- The Esign Documents add-on must be installed from the Extension Store.
- An active integration must be set up with either:
- DocuSign
- Zoho Sign
Benefits of adding multiple signatories for Esign Documents
The following are the benefits of adding multiple signatories for Esign Documents:
- Define a clear signing order to ensure documents follow an organized approval flow.
- Add up to three signees on a single document for multi-party agreements.
- Automatically route documents to the next signee once the previous one signs.
In this article, you will learn about:
- Add Multiple Signatories in Esign Documents
Add Multiple Signatories in Esign Documents
Follow these steps to add multiple signatories in esign documents:
- Log in to the CRM.
- Click the Main Menu.
- Click Essentials.
- Click Collaboration > Esign Documents. The Esign Documents module opens.
- Click +Add Esign Document. The Create Esign Document window opens.
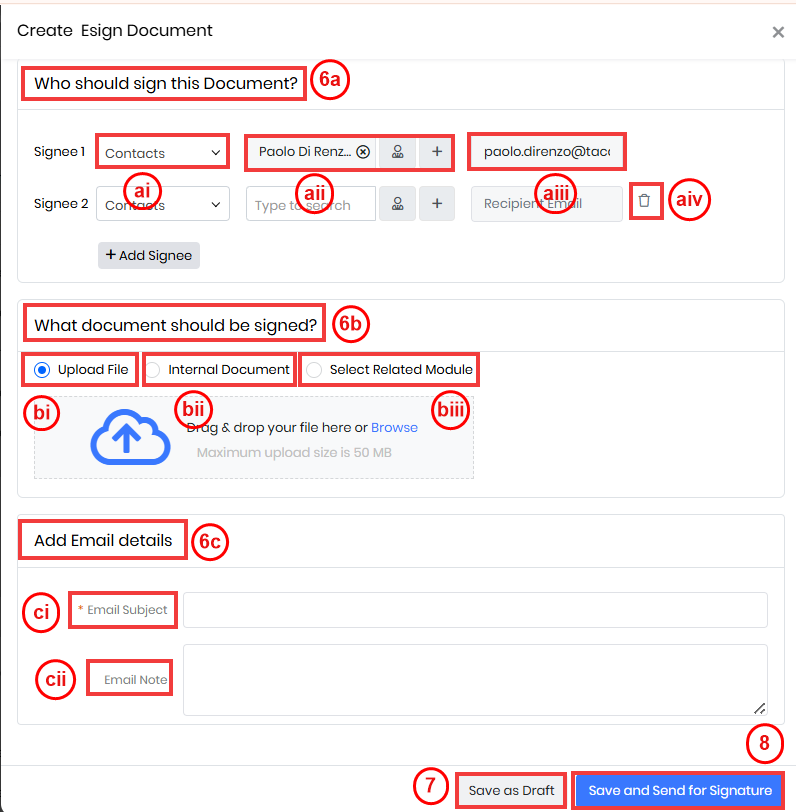
- Enter or select information in the following sections:
- Who should sign this Document?
- Module: Select the module where Signee 1 is available (Contacts, Leads, Organizations, Vendors, or Users).
- Record: Select or create the Signee 1 record from the chosen module.
- Email: The email field will auto-fill based on the selected record.
- +Add Signee: Click to add Signee 2 or Signee 3. Repeat the same selections for each.
- Delete Signee: Click the delete icon next to the email address to remove a signee.
- Note: Signees will receive the document in the order they are listed
- What document should be signed?
- Upload File: Select this option if the document is on your local system. You can browse and upload the file or use drag-and-drop.
- Internal Document: Select this if the document is already stored in the Documents module.
- Select Related Module: Choose this option if the document is linked to a specific CRM module.
- Module: Select the related CRM module from the drop-down list.
- Record: Choose the specific record related to the selected module.
- Template: Select the template associated with the chosen record
- Note:
- You can upload only one document at a time.
- File size limit: 50 MB
- Supported formats: pdf, text, doc, docx, png, jpeg, xlsx, xls
- Note:
- Add email details:
- Email Subject: Enter the subject line for the e-signature email.
- Email Note: Add any additional instructions or messages for the signees.
- Who should sign this Document?
- Click Save as Draft to send the document for signature later.
- Click Save and Send for Signature. The following options displays:
- Send Document: Sends the document directly to the recipient. The recipient will place their own signature tag where they want to sign.
- Add Tag and Send Document: Lets you place the signature tags yourself, so the recipient can simply review and sign where instructed.
Once the document is sent, the document is delivered to Signee 1 via email. After they sign, it is automatically routed to Signee 2, and then Signee 3.
Note:
- A maximum of three signees can be added to a single Esign Document.
- Signees will receive the document sequentially, in the order they are added.
- The signing process will stop if the first signee discards the document.
- Signed copies are automatically stored in the Esign Documents module and linked to related CRM records.