Articles in this section
Managing your Documents
Feature Availability
Vtiger Editions: One Pilot | One Growth | One Professional | One Enterprise | One AI
Introduction
The Documents module in Vtiger CRM serves as a centralized repository for storing, organizing, and managing all business-related files. Whether you are sharing sales proposals, marketing brochures, contracts, or product manuals, this module ensures that your team has easy access. Documents can be uploaded manually, linked from cloud storage services, or generated automatically through Vtiger features like email attachments or record-based documents.
A key feature of the module is its folder-based organization, supported by a tree structure displayed on the left-hand side of the screen in both List View and Thumbnail View. This structure allows you to easily browse, create, edit, or delete folders. Vtiger supports a three-level folder hierarchy—if a fourth-level folder is created, it is automatically placed under the first folder, maintaining a clean and manageable structure.
Use Case
Sales
Sales reps often share proposals or agreements through emails, leading to version confusion and no visibility into customer engagement. With Vtiger Documents, files are centralized, version-controlled, and trackable. Reps can share secure links and get real-time insights on document views, enabling faster and smarter follow-ups.
Marketing
Marketing teams share content with sales, but rarely get feedback or know its impact on deals. With Vtiger Documents, marketing can track how materials are used, measure engagement, and refine content based on real data, creating a tighter feedback loop with sales.
Benefits of the Documents Module in Vtiger CRM
The following are the benefits of the Documents module:
- Centralized Storage: Store and manage all important documents in one secure location.
- Organized Access: Use folders to categorize files for better navigation and retrieval.
- Quick Actions: View, download, and link documents directly from the Summary View.
- Cross-Module Linking: Associate documents with records across CRM modules for better context.
- Support for Multiple Formats: Upload various file types such as PDF, DOCX, PPTX, JPEG, and more.
In this article, you will learn about:
- Viewing Documents
- Creating a New Folder
- Adding a New Document
- Uploading a Document
- Linking an External Document
- Importing Documents
- Uploading Multiple Files
- Sharing a Document
- Editing a Document
- Preview a Document
- Downloading a Document
- Document Insights
- Managing OTP Verifications for Documents
- Deleting a Document
Viewing Documents
You can access all your Documents by navigating to Main Menu > Essentials > Documents. The system offers three viewing options: List View, Thumbnail View, and Summary View. By default, Documents are displayed in List View.
You can easily switch between the List and Thumbnail Views using the icons at the top right, next to the +Add button.
List View
The List View provides a comprehensive list of all your documents. You can sort these Documents by date, name, modified time, and more by clicking the column headers. In this view, you can perform quick actions such as share, Edit, Download, Print, and preview, etc.
To learn more about the List View, click here.
Thumbnail View
The Thumbnail View of the Documents module conveniently allows you to access and manage your files with a visual preview. Recently opened or modified documents are displayed at the top under Recent Files.
For documents that include a PDF file, you can perform key actions such as Share, Edit, Delete, and Download. If the file is in another format, the available actions include Edit, Delete, and Download. For document records without an attached file, you can still edit or delete the entry.
Summary View
The Summary View offers a complete snapshot of a document, displaying key information like title, folder, assigned user, and file details. You can perform actions such as editing, downloading, or sharing the document.
The Activity section displays updates and comments related to the document. You can use Calculus AI for additional insights and apply filters to view specific data like internal comments or changes.
The One View gives a consolidated view of the document, showing all related details for easy access and better management.
To learn more about the Summary View, click here.
Creating a New Folder
Organizing your documents effectively starts with creating dedicated folders. In Vtiger CRM, you can easily create a new folder to manage your files systematically.
You can create a new folder in the following ways:
- Using the + Add button in the Documents List or Thumbnail View
- Using Quick Create
Now, we will learn about each method in detail.
Using the + Add button
Follow these steps to create a new folder using the +Add button:
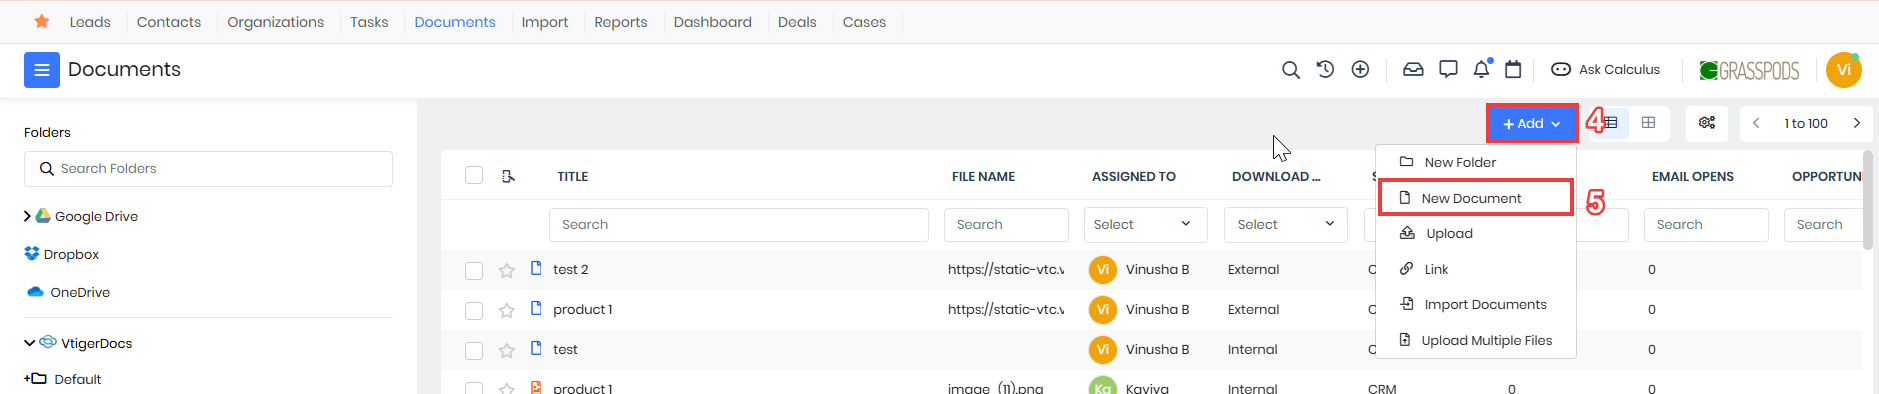
- Log in to the CRM.
- Click the Main Menu.
- Go to Essentials > Documents. The Documents page opens.
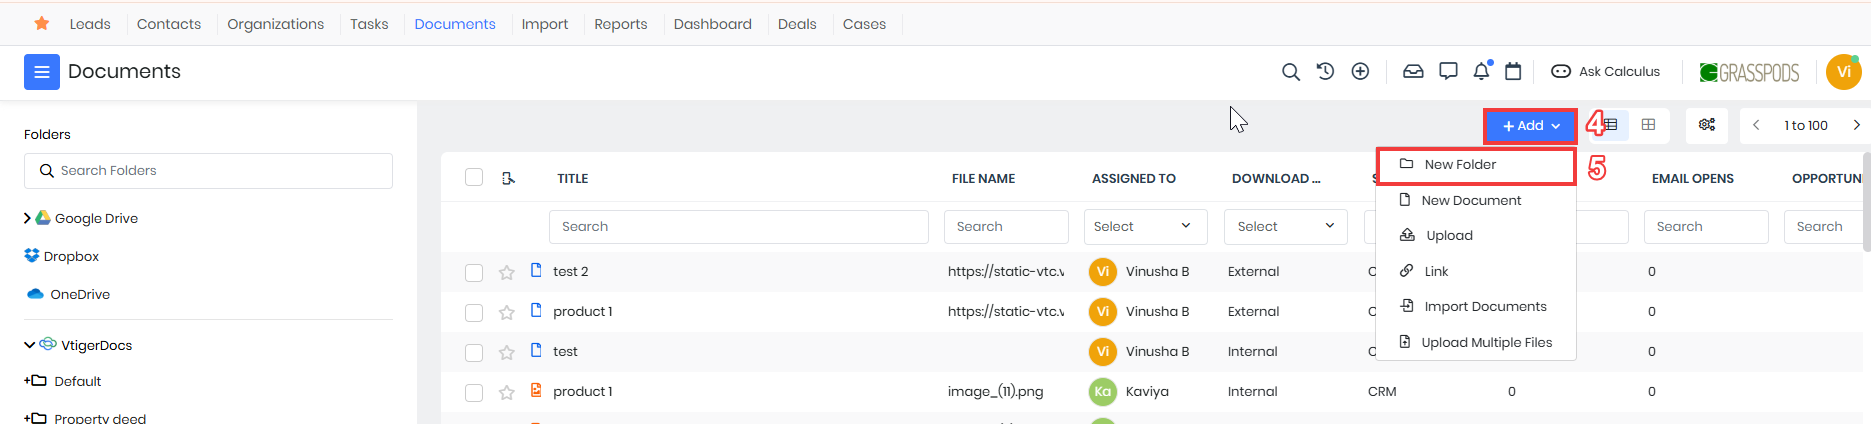
- Click +Add.
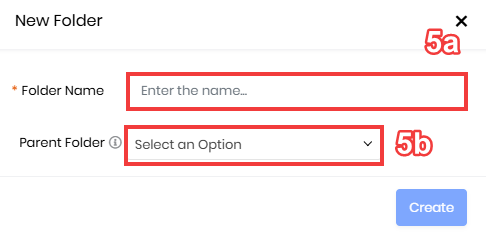
- Select New Folder from the drop-down. The New Folder window opens.
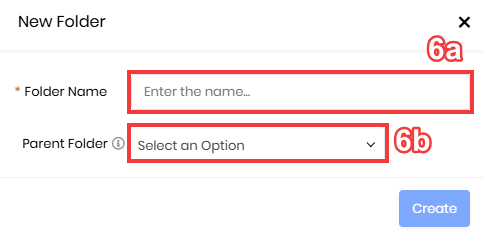
- Enter or select the following information to create a new folder:
- Folder Name: Enter the folder name.
- Parent Folder: Select a parent folder from the drop-down if you want to create a subfolder.
- Click Create.
Using Quick Create
Follow these steps to create a new folder using the quick create:
- Log in to the CRM.
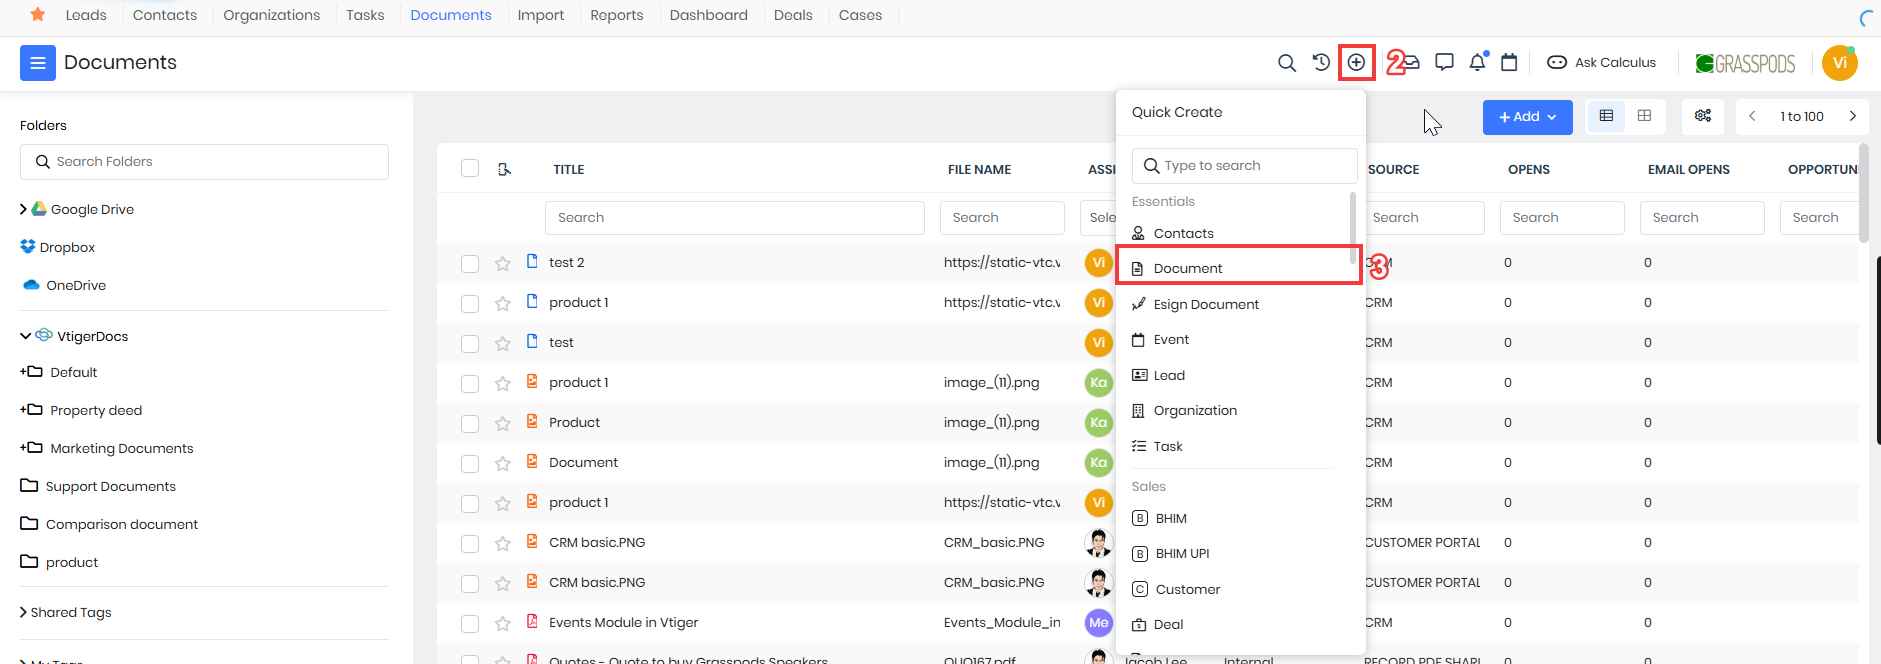
- Click the Quick Create icon located on the top right side of your screen.
- Select Documents. The Create window opens.
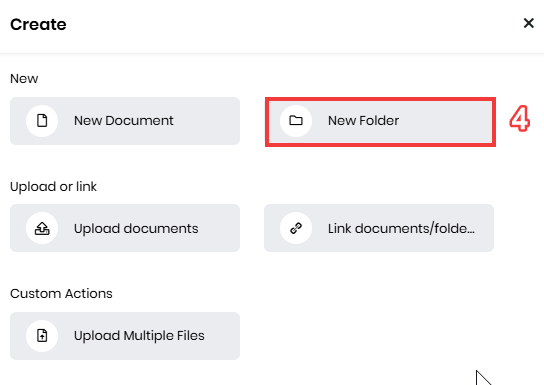
- Select New Folder. The New Folder window opens.
- Enter or select the following information to create a new folder:
- Folder Name: Enter the folder name.
- Parent Folder: Select a parent folder from the drop-down if you want to create a subfolder.
- Click Create.
Once saved, the new folder will appear on the left side of the folder tree. If a Parent Folder was selected, the new folder will be displayed as its subfolder. You can start adding relevant documents to the newly created folder for better organization.
Adding a New Document
You can add documents in the following ways:
- Using the + Add button in the Documents List or Thumbnail View
- Using Quick Create
- From another record within the CRM
Now, we will learn about each method in detail.
Using the + Add button
Follow these steps to create a new Document:
- Log in to the CRM.
- Click the Main Menu.
- Go to Essentials > Documents. The Documents page opens.
- Click +Add.
- Select New Documents from the drop-down. The New Documents window opens.
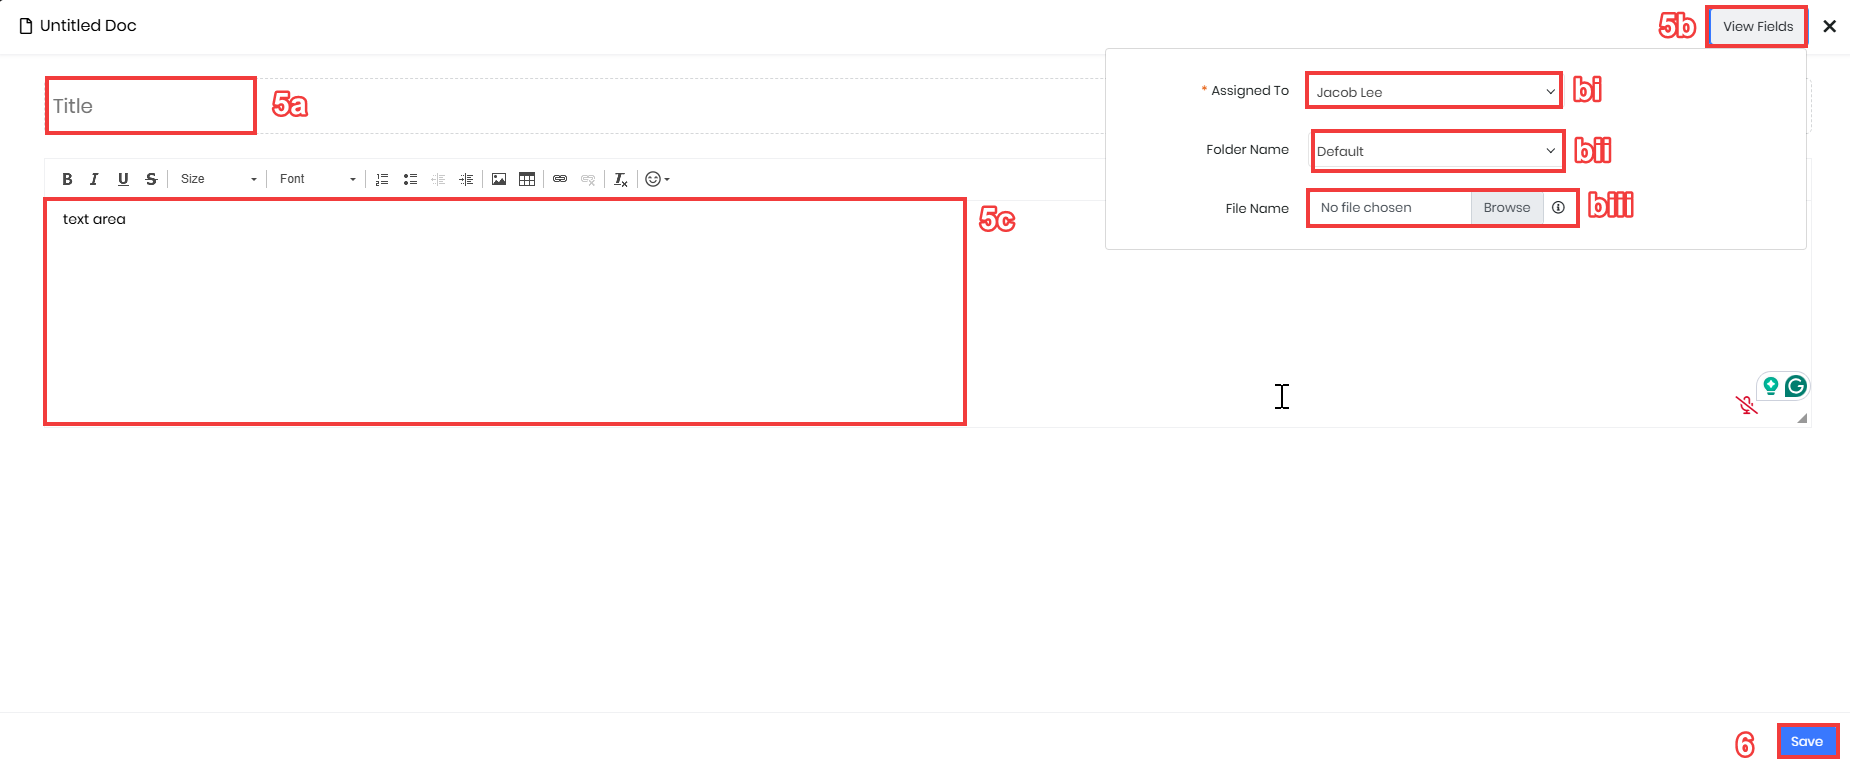
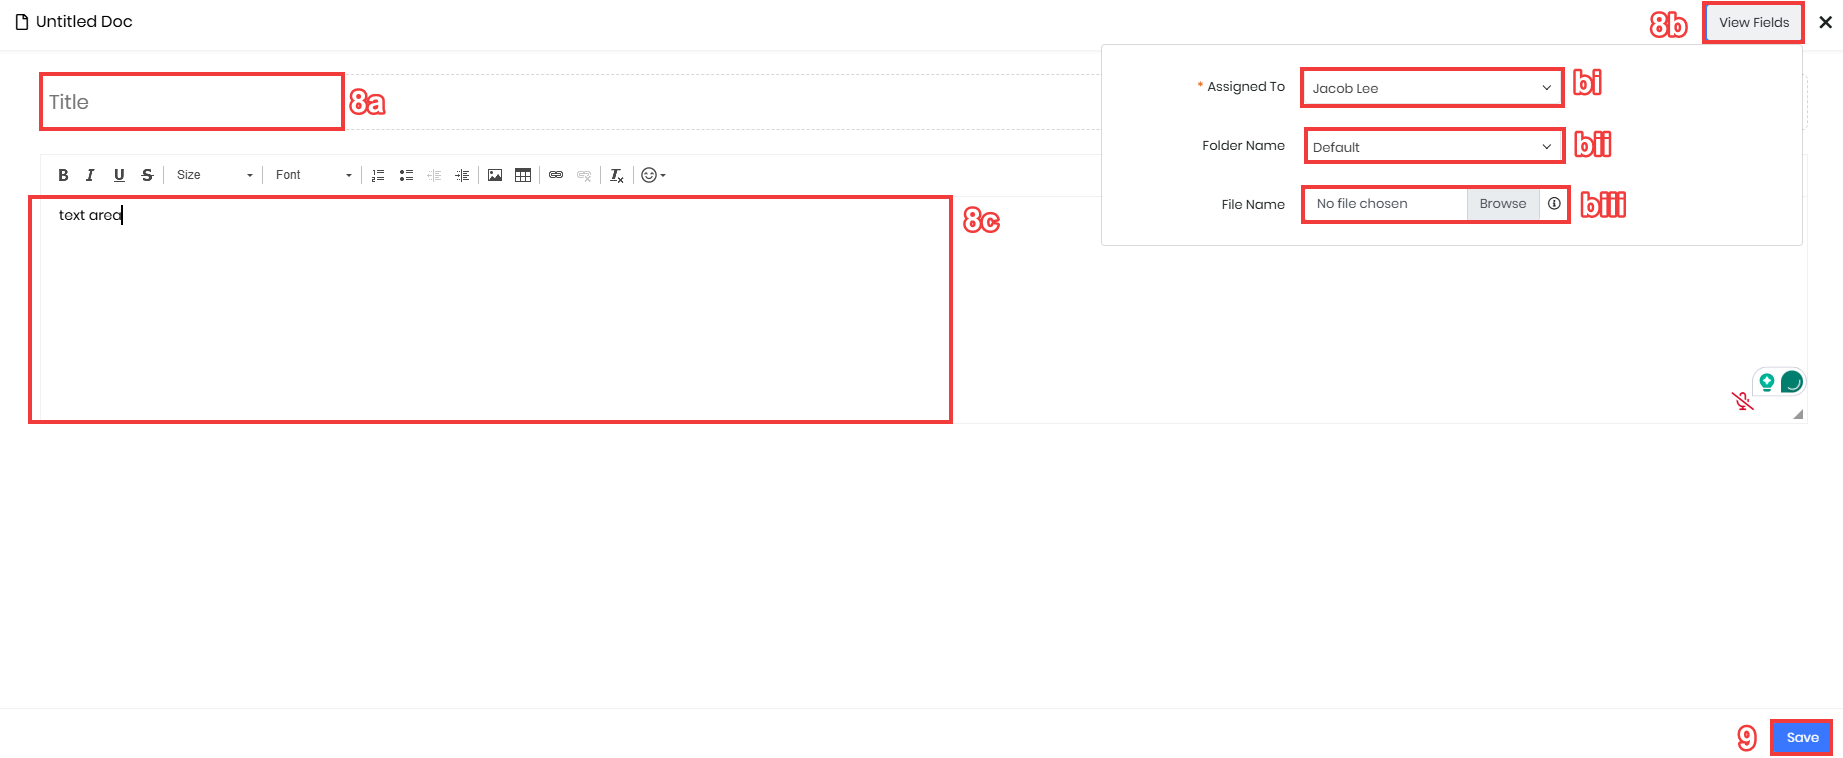
- Enter or select the following information to add a new Document:
- Title: Enter the title name.
- View Fields:
- Assigned To: Select the user or group responsible for this document.
- Folder Name: Choose the folder where this document should be stored from the drop-down list.
- File Name: Click the Browse button to upload the document.
- Text Area: Enter any relevant notes or descriptions related to the document.
- Click Save.
Note: The maximum file size allowed for upload is 50 MB.
Using Quick Create
Follow these steps to add a new document using the quick create:
- Log in to the CRM.
- Click the Quick Create icon located on the top right side of your screen.
- Select Documents. The Create window opens.
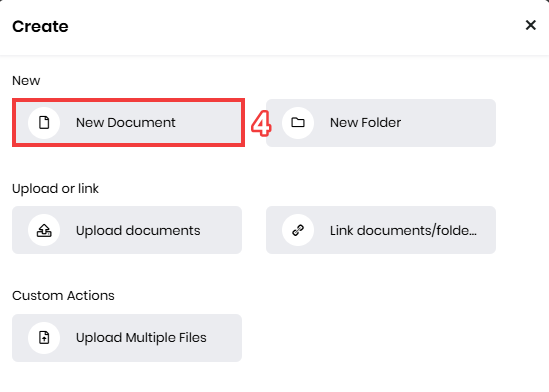
- Select New Document. The New Documents window opens.
- Enter or select the following information to add a new Document:
- Title: Enter the title name.
- View Fields:
- Assigned To: Select the user or group responsible for this document.
- Folder Name: Choose the folder where this document should be stored from the drop-down list.
- File Name: Click the Browse button to upload the document.
- Text Area: Enter any relevant notes or descriptions related to the document.
- Click Save.
Adding a Document from other module records
You can directly attach documents to individual records in modules like Deals, Contacts, Organizations, or Cases.
Follow these steps to add a Document from other module records:
- Log in to the CRM.
- Click the Main Menu.
- Go to Deals (or Contacts, Organizations, Quotes). The List View opens.
- Select a record. The Summary View of the record opens.
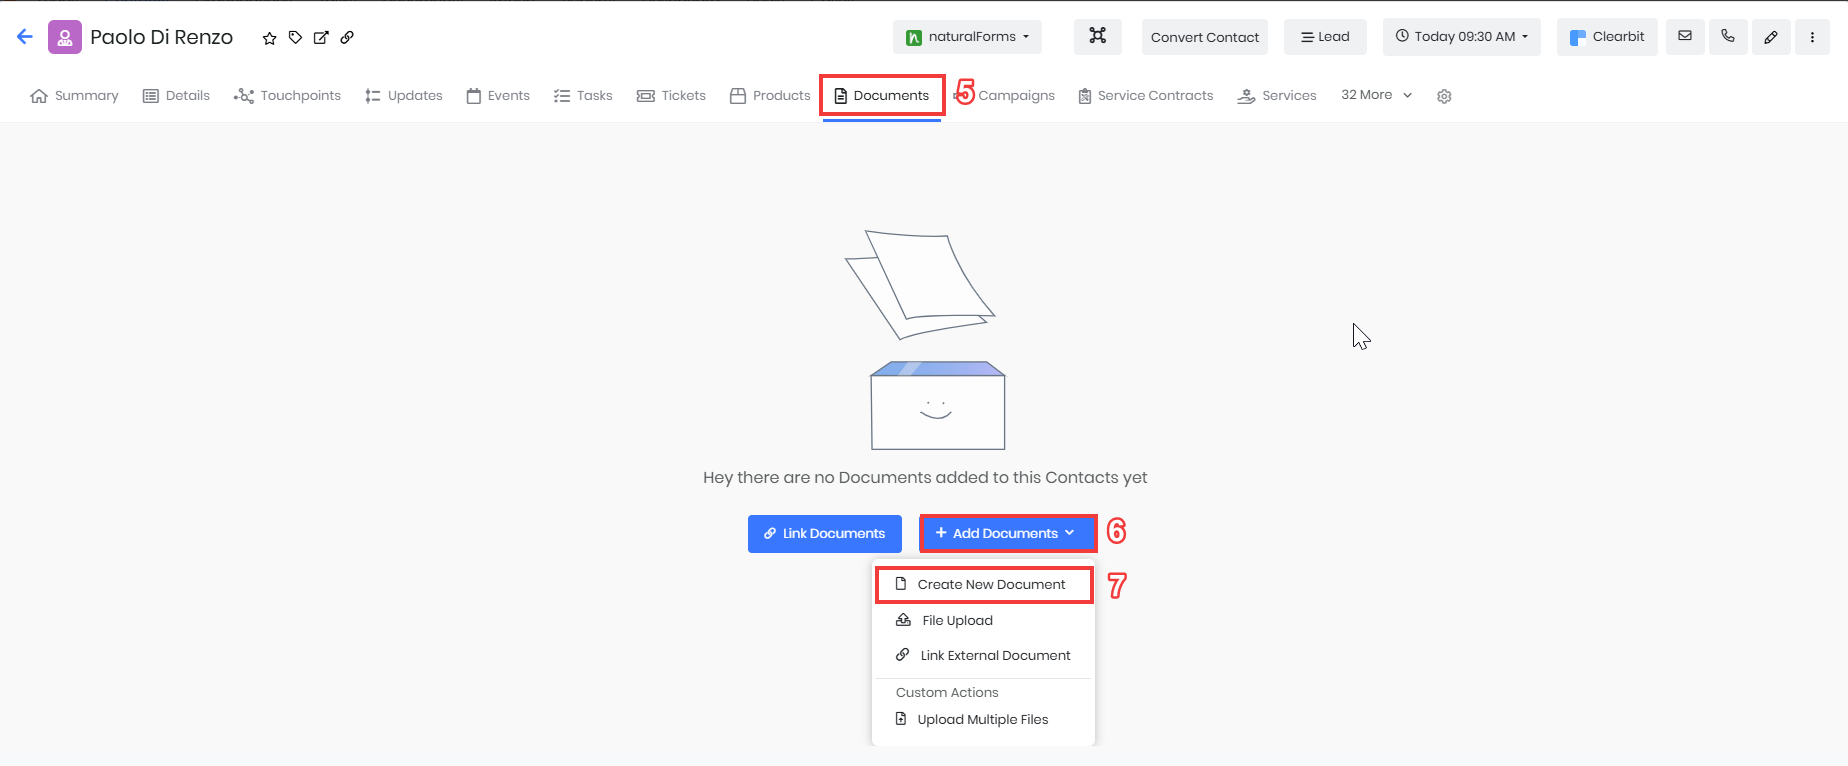
- Click the Documents tab. The Documents List View appears, displaying all previously added Documents for that record.
- Click +Add Documents.
- Click Create New Document. The New Documents window opens.
- Enter or select the following information to add a new Document:
- Title: Enter the title name.
- View Fields:
- Assigned To: Select the user or group responsible for this document.
- Folder Name: Choose the folder where this document should be stored from the drop-down list.
- File Name: Click the Browse button to upload the document.
- Text Area: Enter any relevant notes or descriptions related to the document.
- Click Save.
Once saved, the document will appear in the documents tab of the respective record.
To know more about Quick Create, click here
Uploading a Document
Apart from creating a document, you can also upload a document in Vtiger CRM. You can upload and save the document internally in Vtiger CRM or externally in Google Drive, OneDrive, or Dropbox.
To learn more about up uploading documents to Dropbox, click here.
To learn more about up uploading documents uploading documents to Google Drive, click here.
You can upload a document in the following ways:
- Using the + Add button in the Documents List or Thumbnail View
- Using Quick Create
- From another record within the CRM
Using the + Add button
Follow these steps to upload a document:
- Log in to the CRM.
- Click the Main Menu.
- Go to Essentials > Documents. The Documents page opens.
- Click +Add.
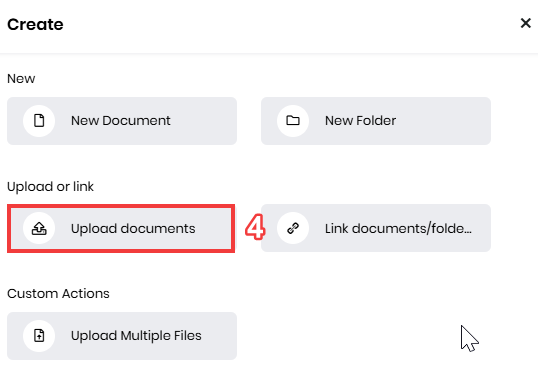
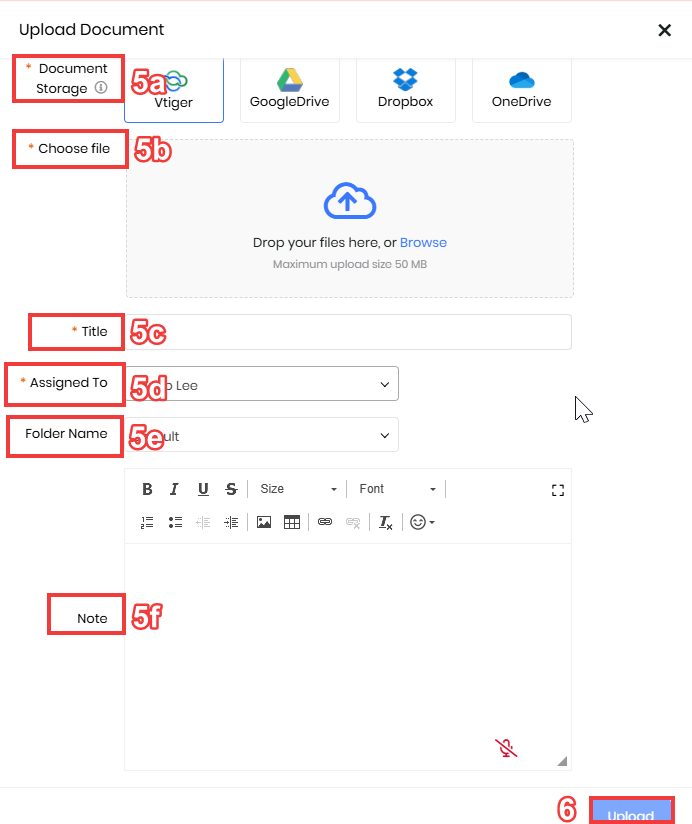
- Click Upload from the drop-down. The Upload Documents window opens.
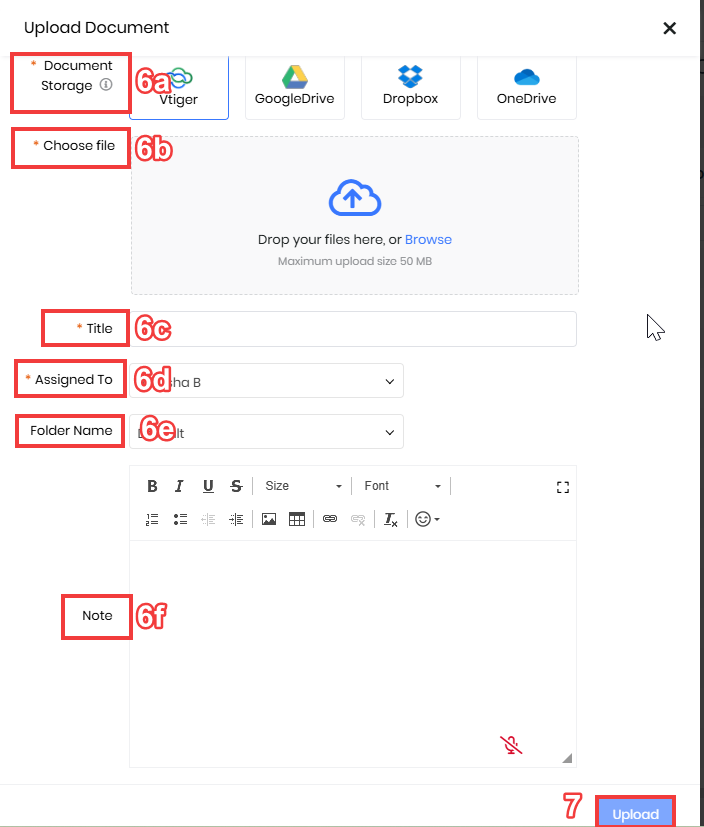
- Enter or select the following information to upload documents:
- Document Storage: Select the destination where the documents have to be uploaded. ( Vtiger, Google Drive, OneDrive, or Dropbox).
- Choose File: Click the Browse button to select and upload a document.
- Title: Provide a title for the document.
- Assigned To: Select the user or group responsible for this document.
- Folder Name: Choose the folder in which the document should be stored from the drop-down list.
- Note: Enter any relevant notes or descriptions related to the document.
- Click Upload.
Note:
- The maximum file size supported for uploads is 50 MB.
- You must be logged in to your respective Google Drive, OneDrive, or Dropbox accounts to upload documents to these external storage services.
Using Quick Create
Follow these steps to upload a document using the quick create:
- Log in to the CRM.
- Click the Quick Create icon located on the top right side of your screen.
- Click Documents. The Create window opens.
- Select Upload Documents. The Upload Documents window opens.
- Enter or select the following information to upload documents:
- Document Storage: Select the destination where the documents have to be uploaded. ( Vtiger, Google Drive, OneDrive, or Dropbox).
- Choose File: Click the Browse button to select and upload a document.
- Title: Provide a title for the document.
- Assigned To: Select the user or group responsible for this document.
- Folder Name: Choose the folder in which the document should be stored from the drop-down list.
- Note: Enter any relevant notes or descriptions related to the document.
- Click Upload.
uploading a Document from other module records
You can directly attach documents to individual records in modules like Deals, Contacts, Organizations, or Cases.
Follow these steps to upload a Document from other module records:
- Log in to the CRM.
- Click the Main Menu.
- Go to Deals (or Contacts, Organizations, Quotes). The List View opens.
- Select a record. The Summary View of the record opens.
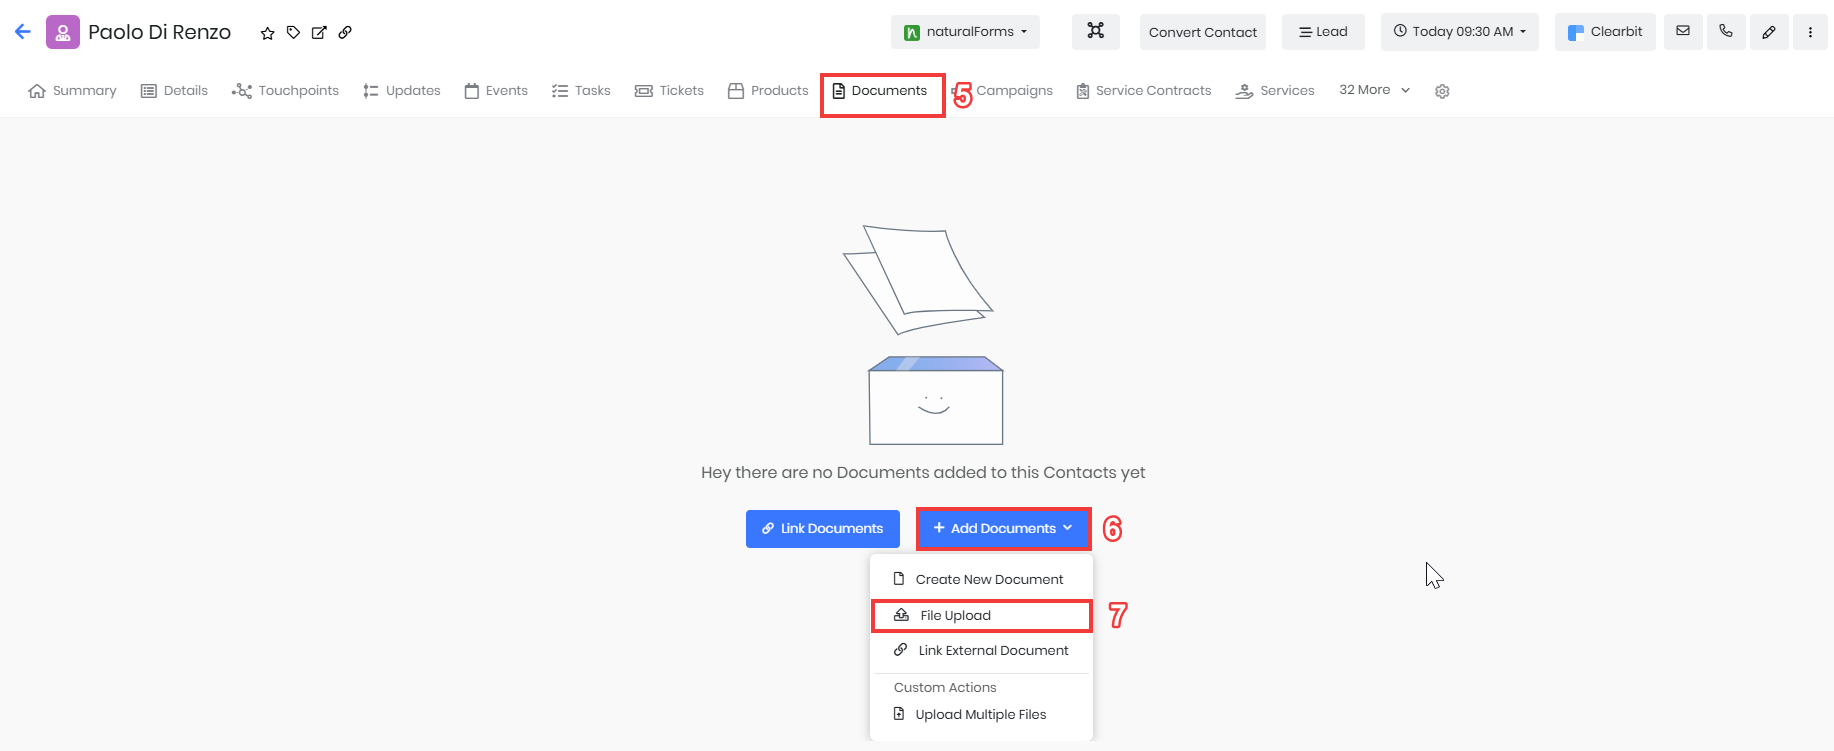
- Click the Documents tab. The Documents List View appears, displaying all previously added Documents for that record.
- Click +Add Documents.
- Select File Upload. The Upload Document window opens.
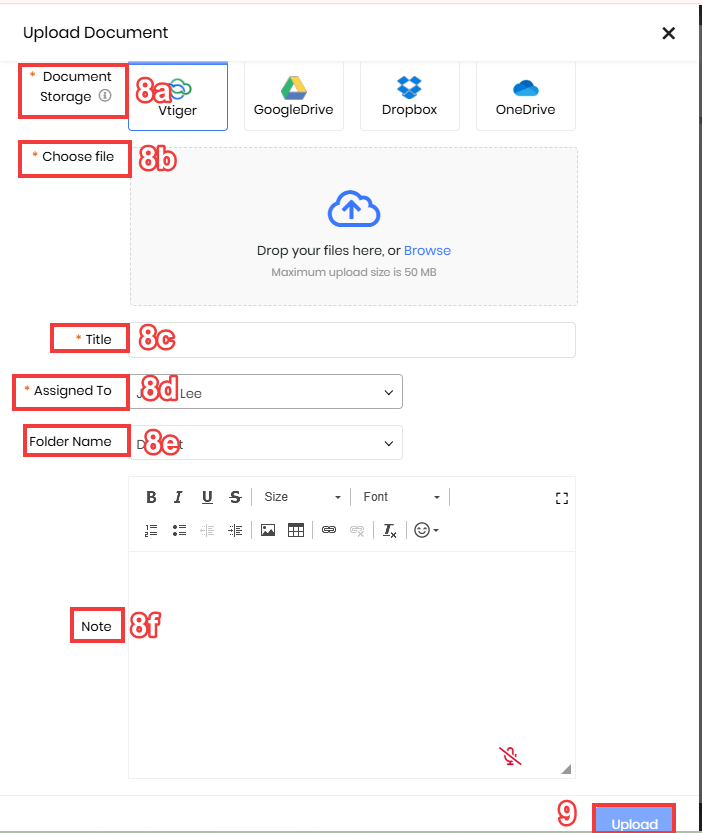
- Enter or select the following information to upload documents:
- Document Storage: Select the destination where the documents have to be uploaded. ( Vtiger, Google Drive, OneDrive, or Dropbox).
- Choose File: Click the Browse button to select and upload a document.
- Title: Provide a title for the document.
- Assigned To: Select the user or group responsible for this document.
- Folder Name: Choose the folder in which the document should be stored from the drop-down list.
- Note: Enter any relevant notes or descriptions related to the document.
- Click Upload.
Linking an External Document
You can link any external folder or a document to Vtiger’s Documents.
You can upload a document in the following ways:
- Using the + Add button in the Documents List or Thumbnail View
- Using Quick Create
- From another record within the CRM
Using the + Add button
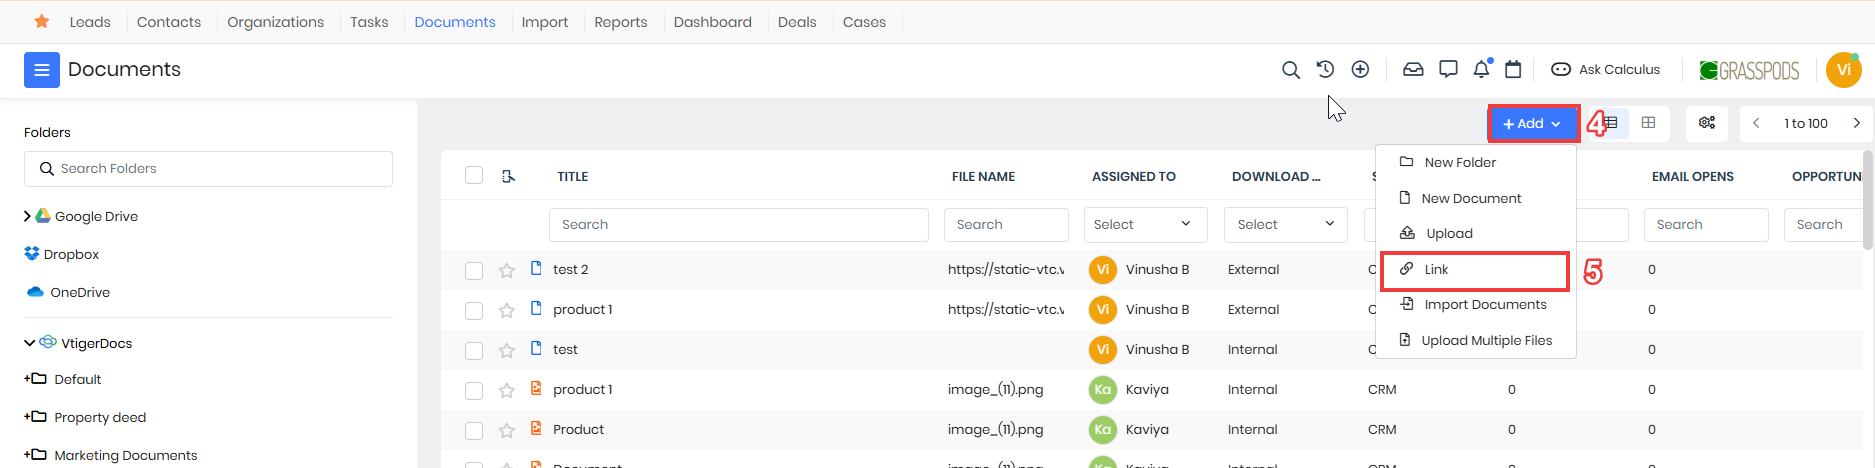
Follow these steps to link a document:
- Log in to the CRM.
- Click the Main Menu.
- Go to Essentials > Documents. The Documents page opens.
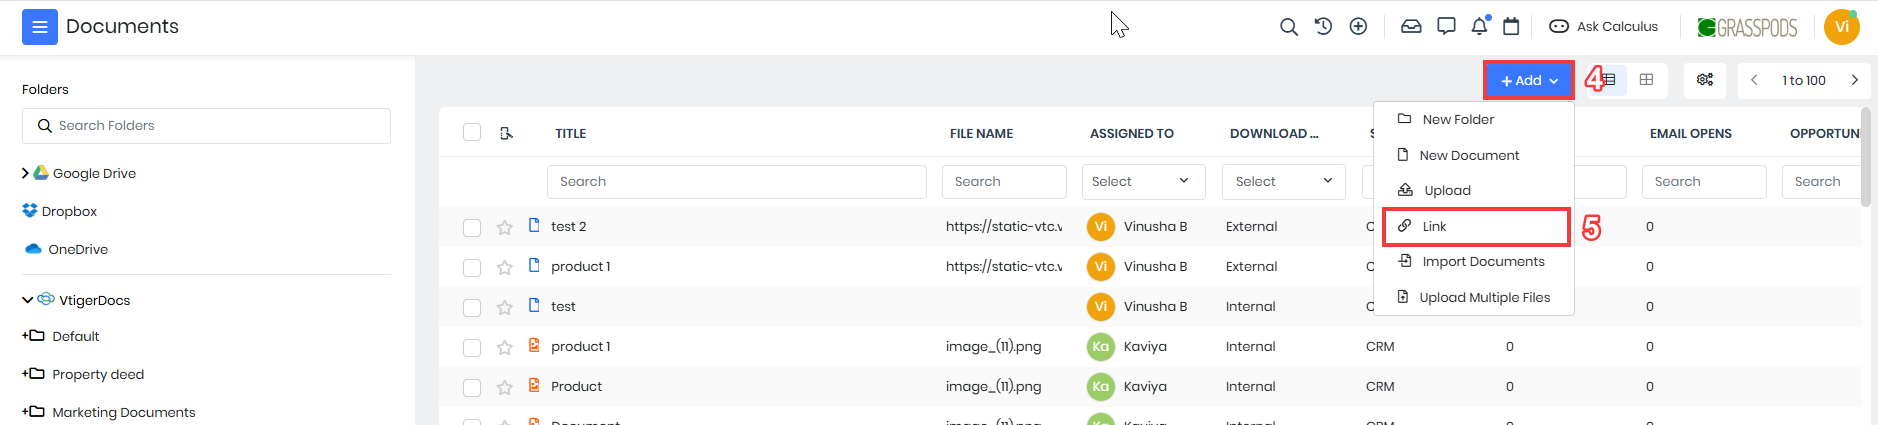
- Click +Add.
- Click the Link from the drop-down. The Upload Documents window opens.
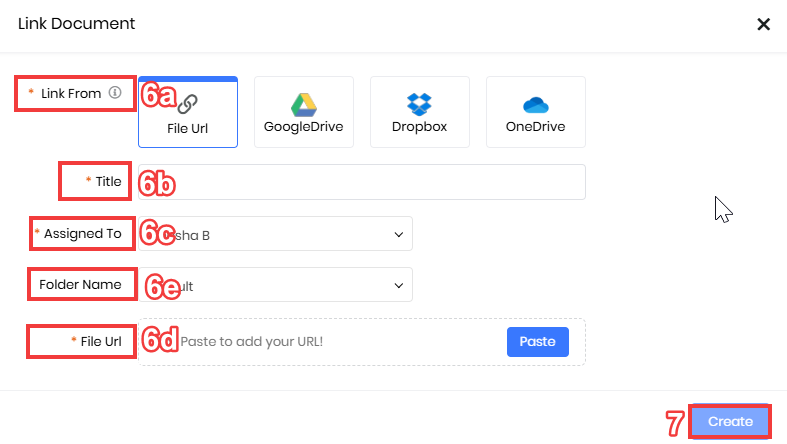
- Enter or select the following information to link a document:
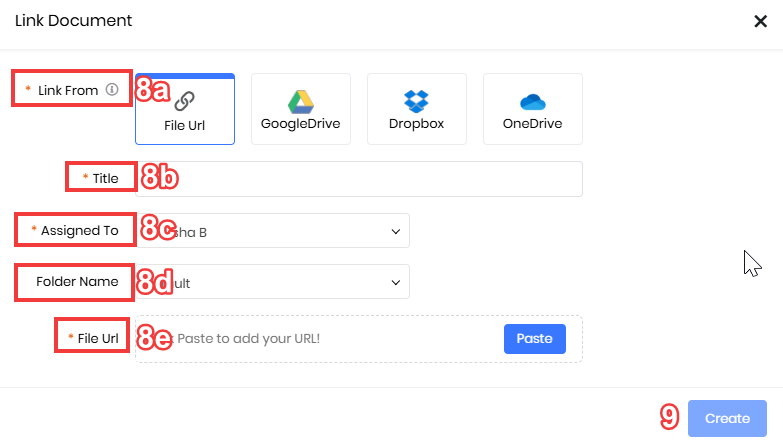
- Link From: Choose the source of the document (e.g., Google Drive, OneDrive, Dropbox, or Vtiger).
- Title: Provide a title for the linked document.
- Assigned To: Select the user or group responsible for this document.
- Folder Name: Choose the folder in which the document should be stored from the drop-down list.
- File Url: Paste the URL or link to the external document.
- Click Create.
Using Quick Create
Follow these steps to link a document using the quick create:
- Log in to the CRM.
- Click the Quick Create icon located on the top right side of your screen.
- Click Documents. The Create window opens.
- Select Link Documents. The Link Documents window opens.
- Enter or select the following information to link a document:
- Link From: Choose the source of the document (e.g., Google Drive, OneDrive, Dropbox, or Vtiger).
- Title: Provide a title for the linked document.
- Assigned To: Select the user or group responsible for this document.
- Folder Name: Choose the folder in which the document should be stored from the drop-down list.
- File Url: Paste the URL or link to the external document.
- Click Create.
Linking a Document from other module records
You can directly link documents to individual records in modules like Deals, Contacts, Organizations, or Cases.
Follow these steps to link a Document from other module records:
- Log in to the CRM.
- Click the Main Menu.
- Go to Deals (or Contacts, Organizations, Quotes). The List View opens.
- Select a record. The Summary View of the record opens.
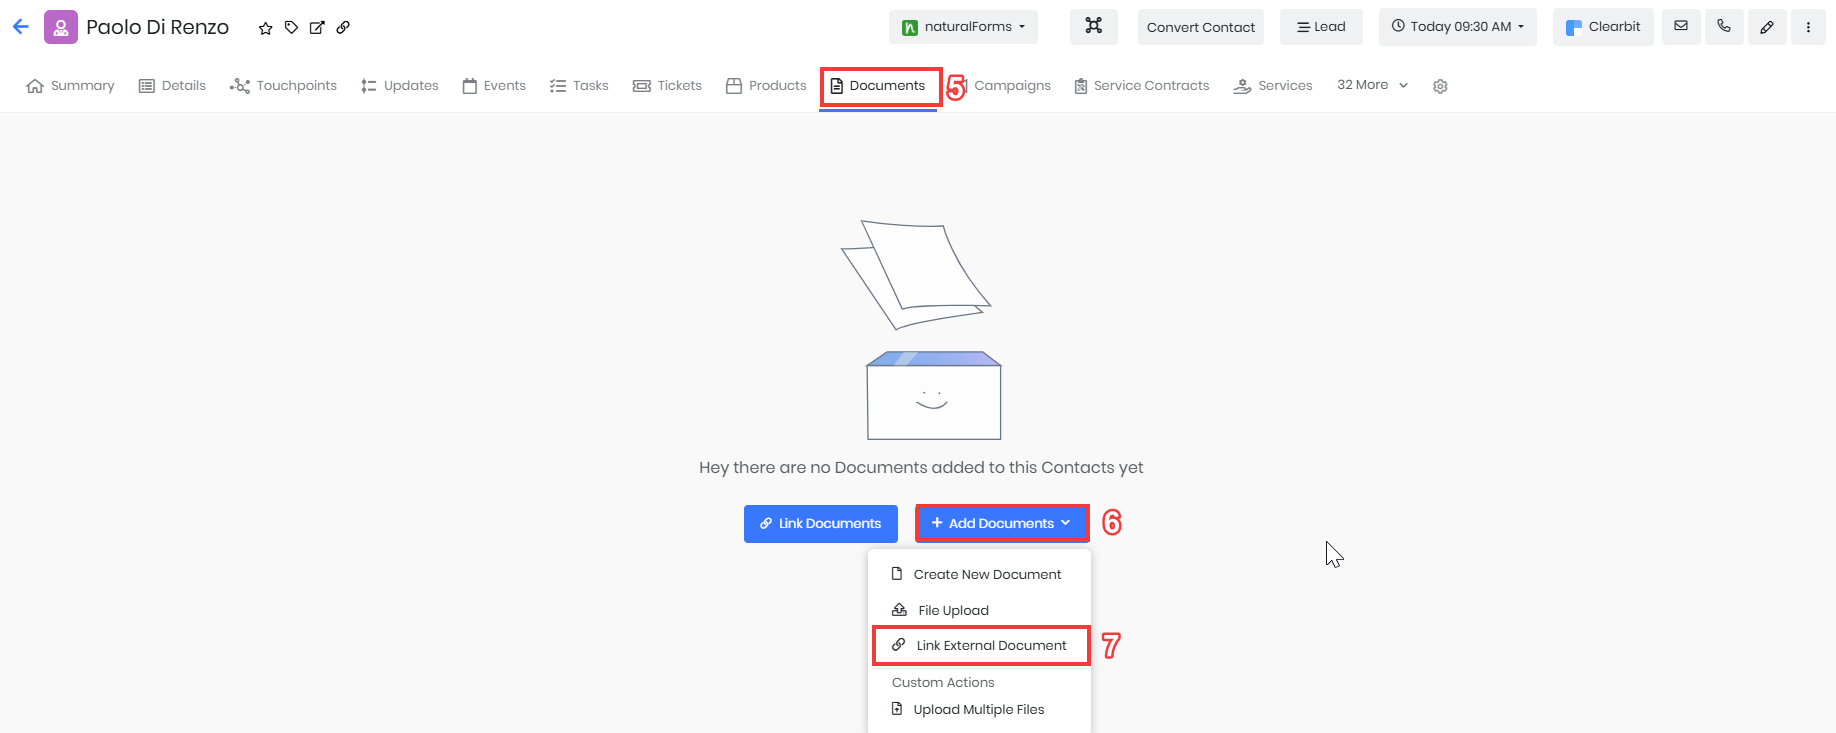
- Click the Documents tab. The Documents List View appears, displaying all previously added Documents for that record.
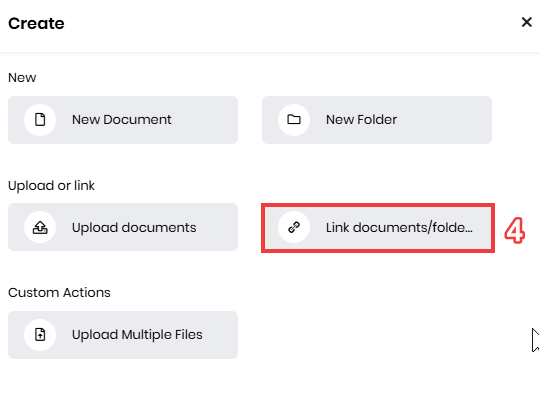
- Click +Add Documents.
- Select Link External Document. The Link Document window opens.
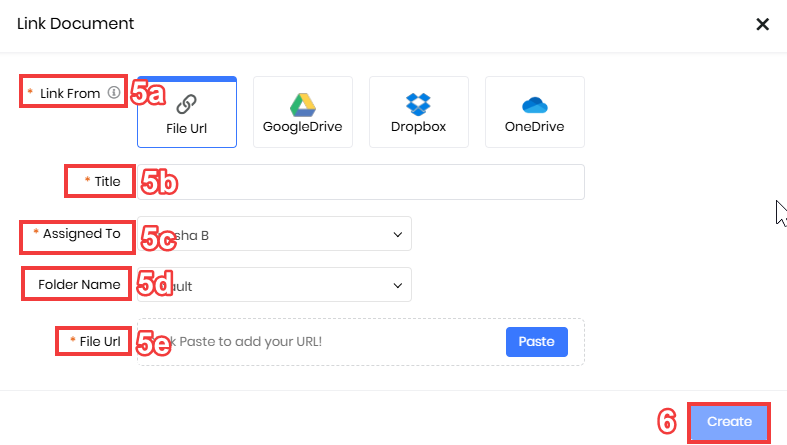
- Enter or select the following information to link a document:
- Link From: Choose the source of the document (e.g., Google Drive, OneDrive, Dropbox, or Vtiger).
- Title: Provide a title for the linked document.
- Assigned To: Select the user or group responsible for this document.
- Folder Name: Choose the folder in which the document should be stored from the drop-down list.
- File Url: Paste the URL or link to the external document.
- Click Create.
Importing Documents
Vtiger CRM allows you to import documents in bulk through the Import option. This is especially useful when you need to bring in multiple files with specific mapping and duplicate handling settings.
To learn more about Import, click here.
Follow these steps to import documents:
- Log in to the CRM.
- Click the Main Menu.
- Go to Essentials > Documents. The Documents page opens.
- Click +Add.
- Select Import Documents. The Import Documents window opens.
- Enter or select the following Section to import the documents.
- Select File
- Field Mapping
- Duplicate Handling
- Click Save.
Uploading Multiple Files
If you need to upload several files at once, Vtiger CRM provides a simple option to upload multiple documents in one go.
Note: You can upload a maximum of six files.
Follow these steps to upload multiple documents:
- Log in to the CRM.
- Click the Main Menu.
- Go to Essentials > Documents. The Documents page opens.
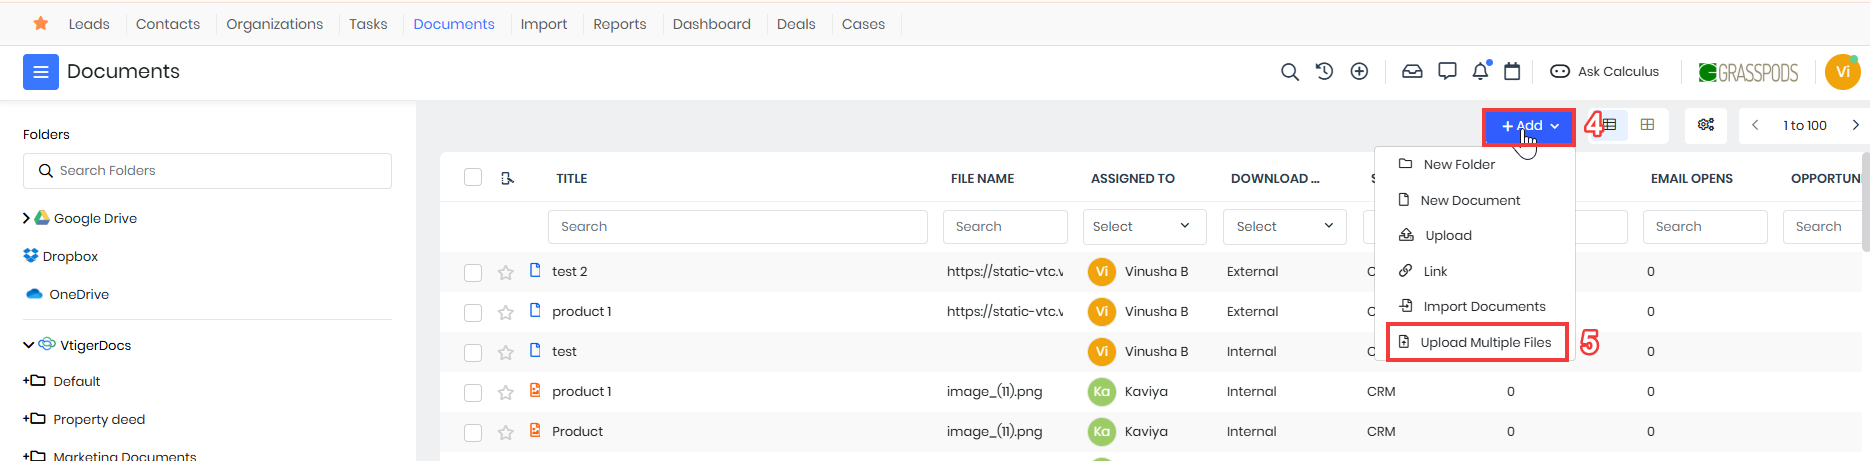
- Click +Add.
- Select Upload Multiple Files. The Upload Multiple Files window opens.
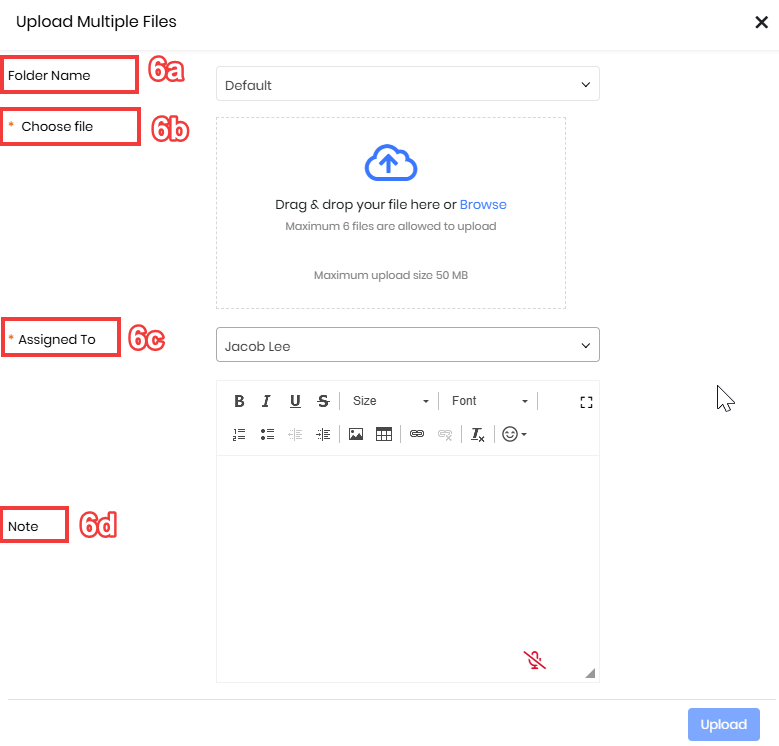
- Enter or select the following information to upload multiple files:
- Folder Name: Select the folder from the drop-down.
- Choose file: Select files from your device.
- Assigned To: Select the user or group responsible for this document.
- Note: Enter any relevant notes or descriptions related to the document.
- Click Upload.
Sharing a Document
Vtiger CRM allows you to share documents with team members or external users effortlessly.
Once a document is added, you can share it with others in the following ways:
You can share a document in the following ways:
- From the Documents module
- From the other module records
Note: To share a document with the customer, you need to first upload it to Vtiger as an internal document in .pdf format.
Sharing Documents from the Documents module
You can share the documents in the following ways:
- List view
- Summary view
List View
Follow these steps to share a document from the List View:
- Log in to the CRM.
- Click the Main Menu.
- Go to Essentials > Documents. The Documents page opens.
- Hover over the record.
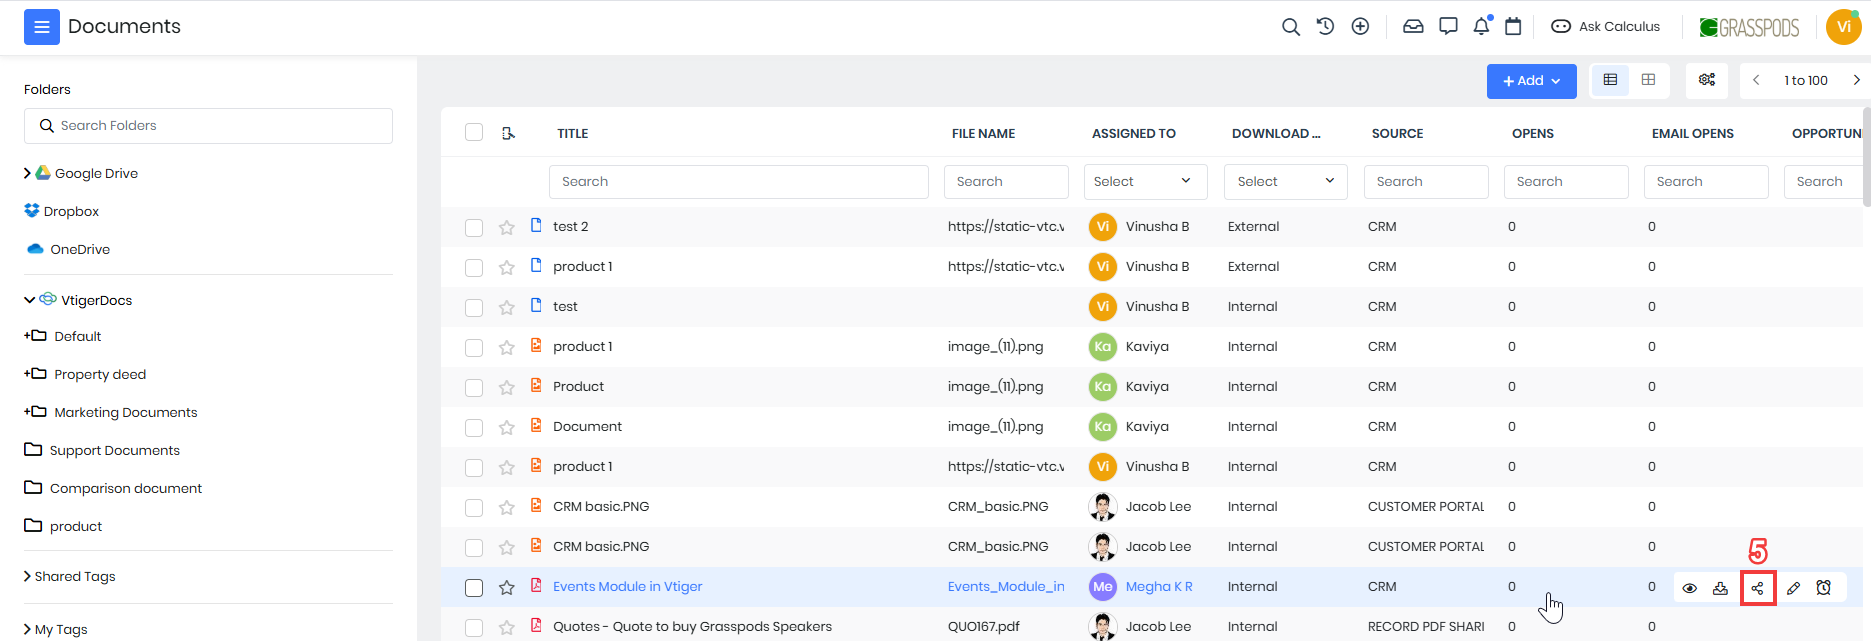
- Click the Share icon. The Document Sharing window opens.
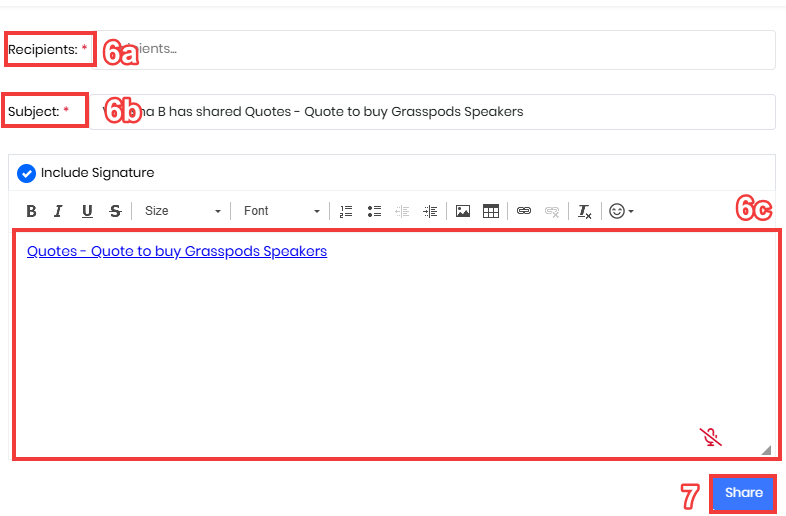
- Enter or select the following information to share the document:
- Recipients: Select the users to share the document with.
- Subject: Enter a subject for the message
- Text Area: Enter any relevant notes or descriptions related to the document.
- Document Link: Click the document link in the text area.
- Text to Display: Edit the display text for the link if needed.
- Preview in Document Viewer: Click to preview the document.
- Click Share.
Summary View
Follow these steps to share a document from the List View:
- Log in to the CRM.
- Click the Main Menu.
- Go to Essentials > Documents. The Documents page opens.
- Click on the document record that you want to share. The Summary View of the record opens.
- Using the Share Icon:
- Click the Share icon. The Document Sharing window opens.
- Enter the mandatory details.
- Click Share.
- Using the More Options:
- Click the More icon.
- Select Share as Link.
- The Document Sharing window opens.
- Enter the mandatory details.
- Click Share.
- Select Share as Attachment.
- The Compose Mail window opens.
- Enter the mandatory details.
- Click Send.
- Using the Document Shared Details:
- Click the Click to Share option.
- The Document Sharing window opens.
- Enter the mandatory details.
- Click Share.
Sharing Documents from the other module records
You can share the document by attaching it in the Email Compose Window. For instance, you can send a document to a contact by attaching it to an email from the Contacts module.
Follow these steps to share the document:
- Log in to the CRM.
- Open the module to which the document should be shared (e.g., Leads, Contacts, or Tickets).
- Open or hover over the specific record.
- Click Email. The Mail Compose window opens.
- Enter the mandatory details.
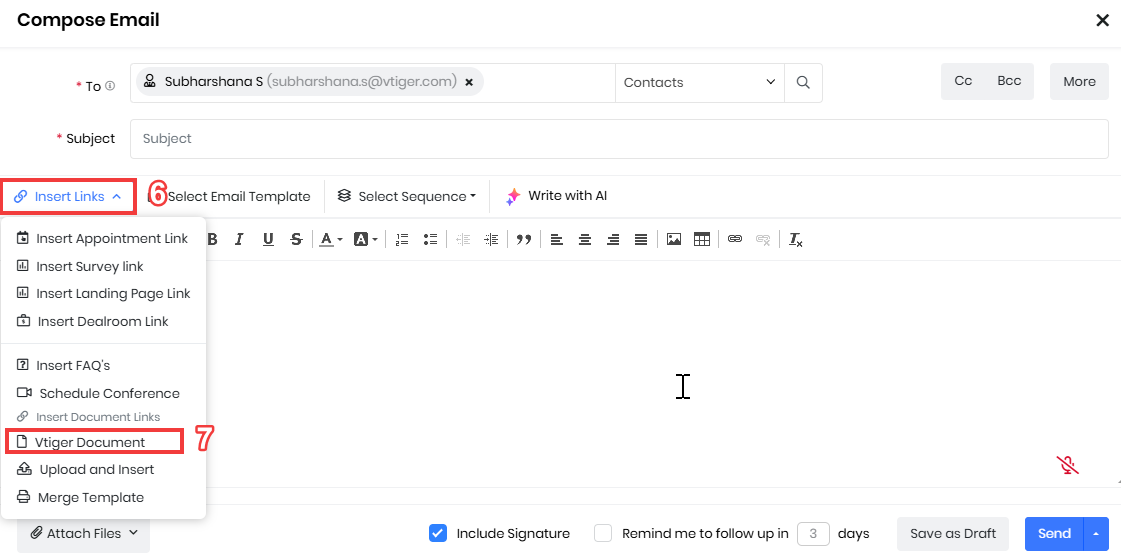
- Click Insert Link.
- Select Vtiger Document. The Document window opens.
- Select the document to insert.
- Click the document link in the text area.
- Text to Display: Edit the display text for the link if needed.
- Preview in Document Viewer: Click to preview the document.
- Click Send.
Editing a Document
Vtiger CRM allows you to edit documents directly from the interface, making it easy to keep information up to date.
You can edit the documents in the following ways:
- List view
- Summary view
List View
Follow these steps to edit a document from the List View:
- Log in to the CRM.
- Click the Main Menu.
- Go to Essentials > Documents. The Documents page opens.
- Hover over the record.

- Click the Edit icon. The Document Sharing window opens.
- Enter or select the following information to share the document:
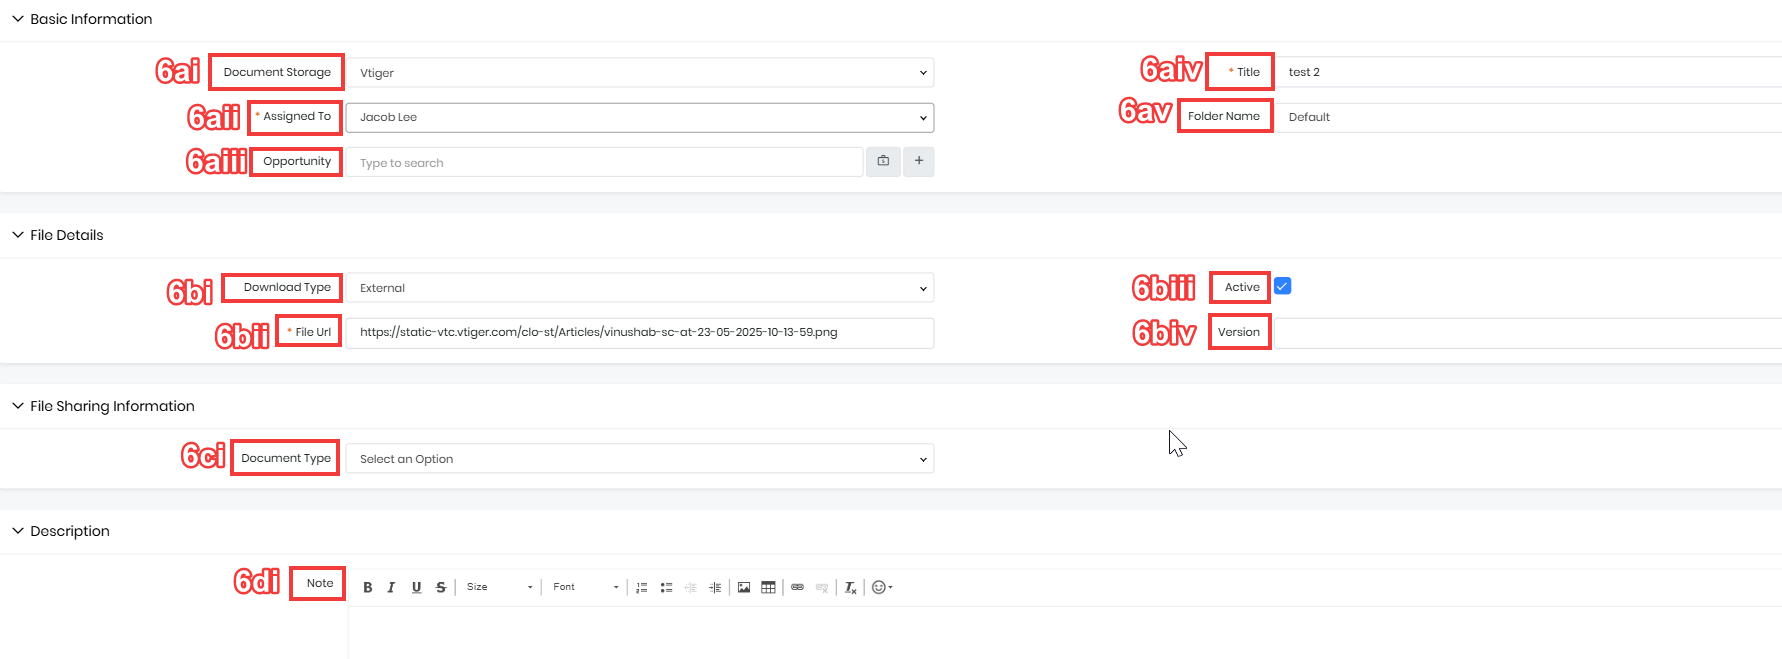
- Basic Information:
- Document Storage: Choose the storage type (e.g., Vtiger, Dropbox, OneDrive, or Google Drive).
- Assigned To: Select the user or group responsible for the document.
- Opportunity: Link the document to a related Opportunity, if needed.
- Title: Enter or update the title of the document.
- Folder Name: Choose the folder where the document should be stored.
- File Details
- Download Type: Choose whether the document is stored internally or externally.
- File Name: Displays the uploaded file name; you may upload a new file if needed.
- Active: Enable or disable the document’s active status.
- Version: Specify the document version number.
- File Sharing Information
- Document Type:
- Public: Documents can be shared, re-shared, and downloaded by any contact.
- Private: Private documents cannot be shared with contacts. They are accessible by Vtiger CRM users only..
- Confidential: Confidential documents can be opened by the recipient with whom the document is shared. It restricts the download and re-share actions.
- Document Type:
- Description
- Note: Add any relevant notes or a summary of the document content.
- Basic Information:
- Click Save.
Summary View
Follow these steps to edit a document from the List View:
- Log in to the CRM.
- Click the Main Menu.
- Go to Essentials > Documents. The Documents page opens.
- Click on the document record that you want to share. The Summary View of the record opens.
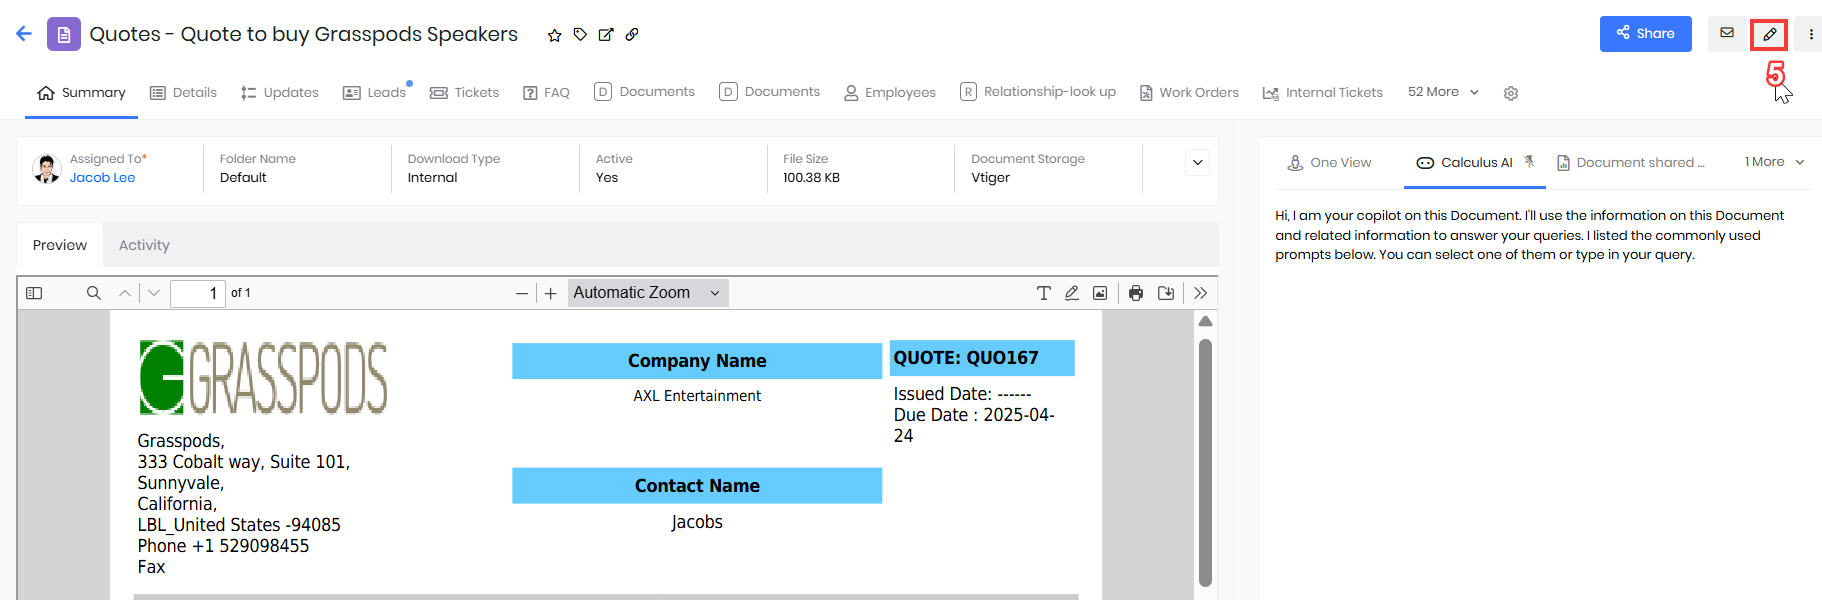
- Click the Edit icon. The Document Sharing window opens.
- Enter or select the following information to share the document:
- Basic Information
- Document Storage: Choose the storage type (e.g., Vtiger, Dropbox, OneDrive, or Google Drive).
- Assigned To: Select the user or group responsible for the document.
- Opportunity: Link the document to a related Opportunity, if needed.
- Title: Enter or update the title of the document.
- Folder Name: Choose the folder where the document should be stored.
- File Details
- Download Type: Choose whether the document is stored internally or externally.
- File Name: Displays the uploaded file name; you may upload a new file if needed.
- Active: Enable or disable the document’s active status.
- Version: Specify the document version number.
- File Sharing Information
- Document Type:
- Public: Documents can be shared, re-shared, and downloaded by any contact.
- Private: Private documents cannot be shared with contacts. They are accessible by Vtiger CRM users only..
- Confidential: Confidential documents can be opened by the recipient with whom the document is shared. It restricts the download and re-share actions.
- Document Type:
- Description
- Note: Add any relevant notes or a summary of the document content.
- Basic Information
- Click Save.
Preview a Document
Vtiger CRM allows you to preview documents without downloading them, making it easy to quickly view.
You can preview the documents in the following ways:
- List view
- Summary view
List View
Follow these steps to preview a document from the List View:
- Log in to the CRM.
- Click the Main Menu.
- Go to Essentials > Documents. The Documents page opens.
- Hover over the record.
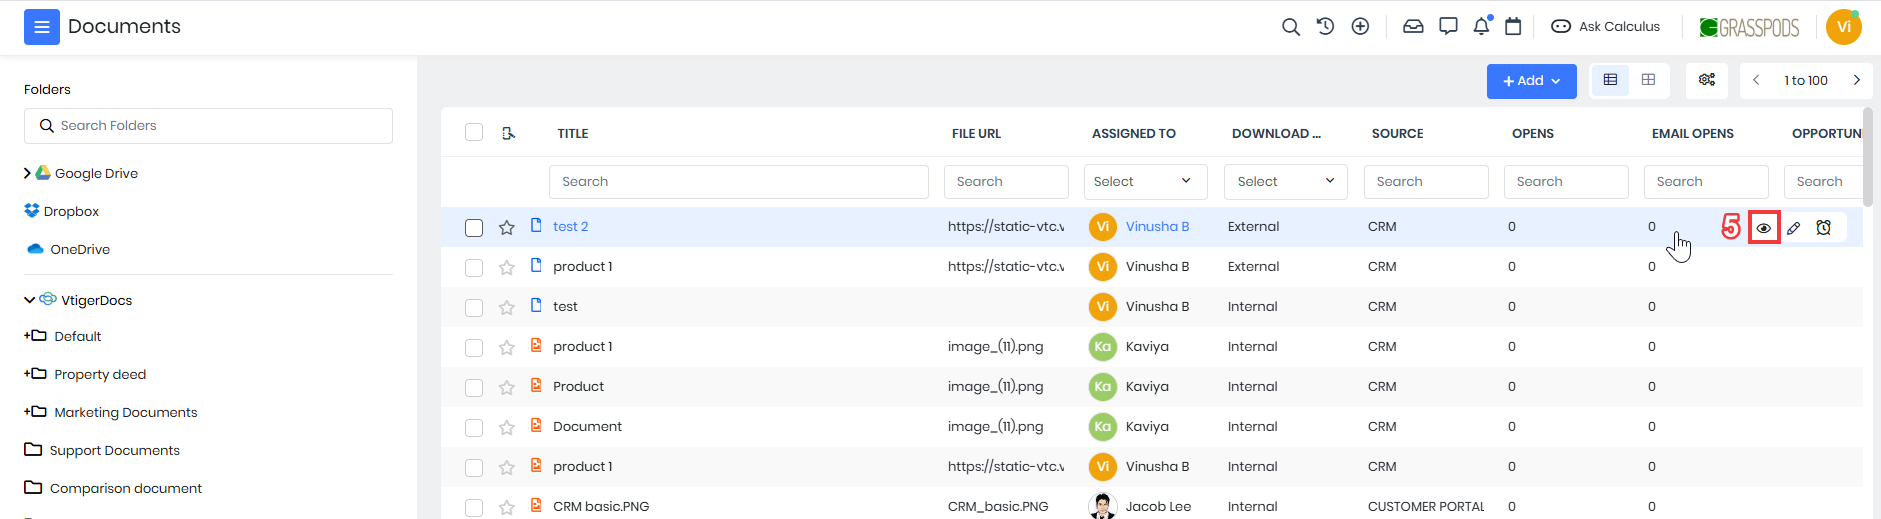
- Click the Preview icon. The preview window opens.
Summary View
Follow these steps to preview a document from the List View:
- Log in to the CRM.
- Click the Main Menu.
- Go to Essentials > Documents. The Documents page opens.
- Click on the document record that you want to preview. The Summary View of the record opens.
- View the Preview section to view the document.
Downloading a Document
You can download any document in Vtiger CRM for any future reference. To download a document, make sure that the document record contains a file.
You can download the documents in the following ways:
- List view
- Summary view
List View
Follow these steps to download a document from the List View:
- Log in to the CRM.
- Click the Main Menu.
- Go to Essentials > Documents. The Documents page opens.
- Hover over the record.
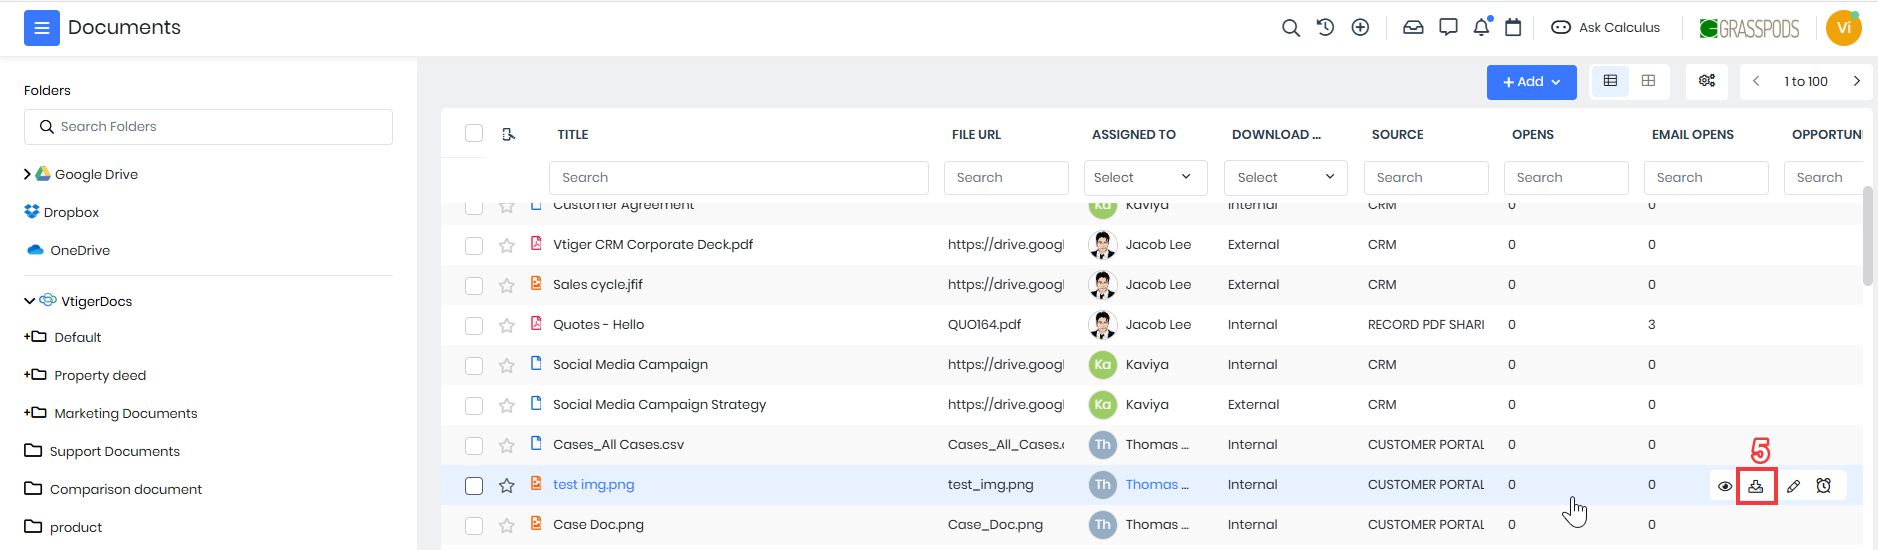
- Click the Download icon.
Summary View
Follow these steps to preview a document from the Summary View:
- Log in to the CRM.
- Click the Main Menu.
- Go to Essentials > Documents. The Documents page opens.
- Click on the document record that you want to download. The Summary View of the record opens.
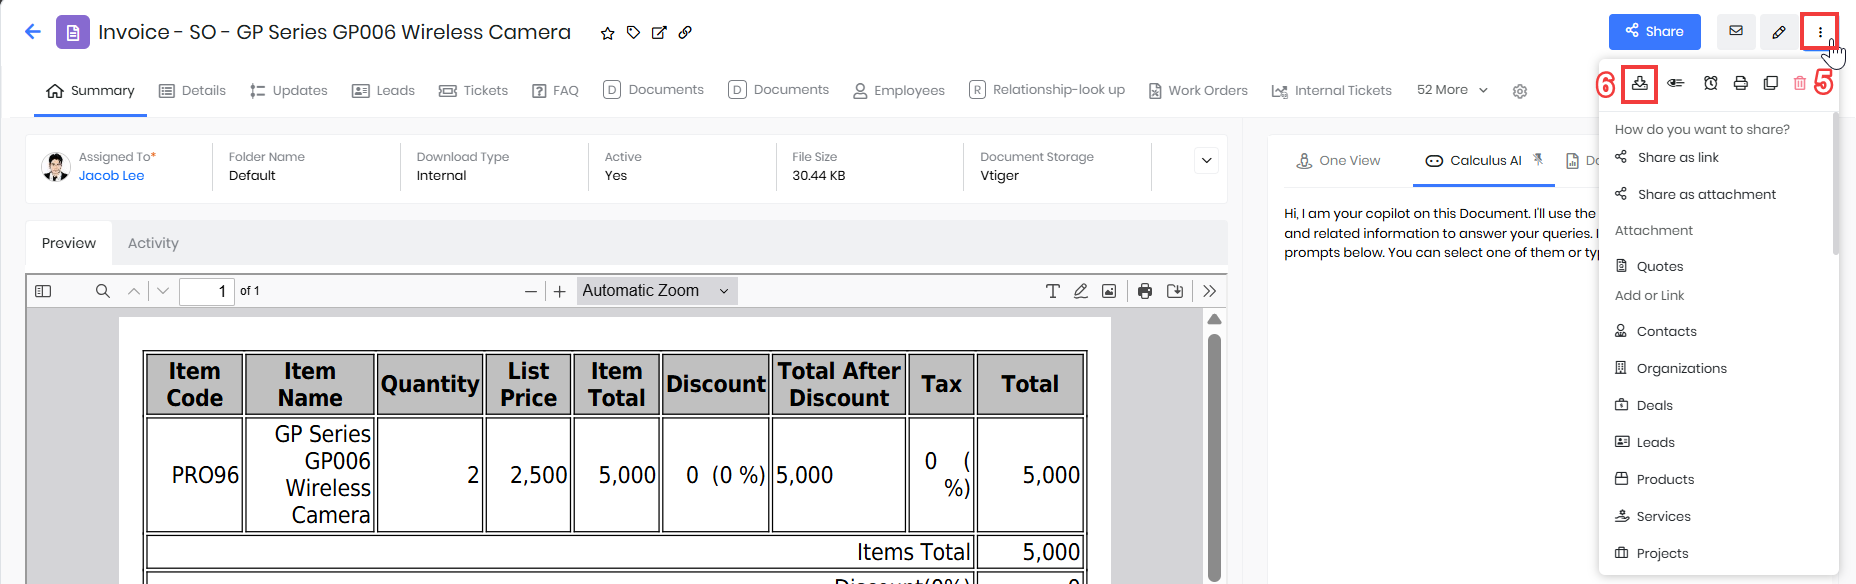
- Click the More icon.
- Select the Download icon.
Tracking Document Downloads
The Documents module in Vtiger CRM keeps a download log for every document you upload and share. Each time someone downloads a document, the CRM records it in the parent record timeline and in the document’s update history, along with the user’s name and the time of download.
This helps you easily see who downloaded a document and when.
You can find this information under the Updates tab or in the Summary View > Activity tab of the document and its related records.
Documents Insights
Vtiger CRM provides you the flexibility to observe and track the recipients’ actions when you share a document with them. You can track the recipients’ activity when you click on the Documents Shared Details widget in the summary of a document record.
You can view the insights in the following ways:
- Summary view
- Details View
Summary View
If you have shared a document with multiple contacts, you can track each recipient's individual activity. Click on the Documents Shared Details widget to view the tracking section, and select the recipient whose actions you want to review.
Follow these steps to view the insights of a document from the Summary View:
- Log in to the CRM.
- Click the Main Menu.
- Go to Essentials > Documents. The Documents page opens.
- Click on the document record for which you want to view the insights. The Summary View of the record opens.
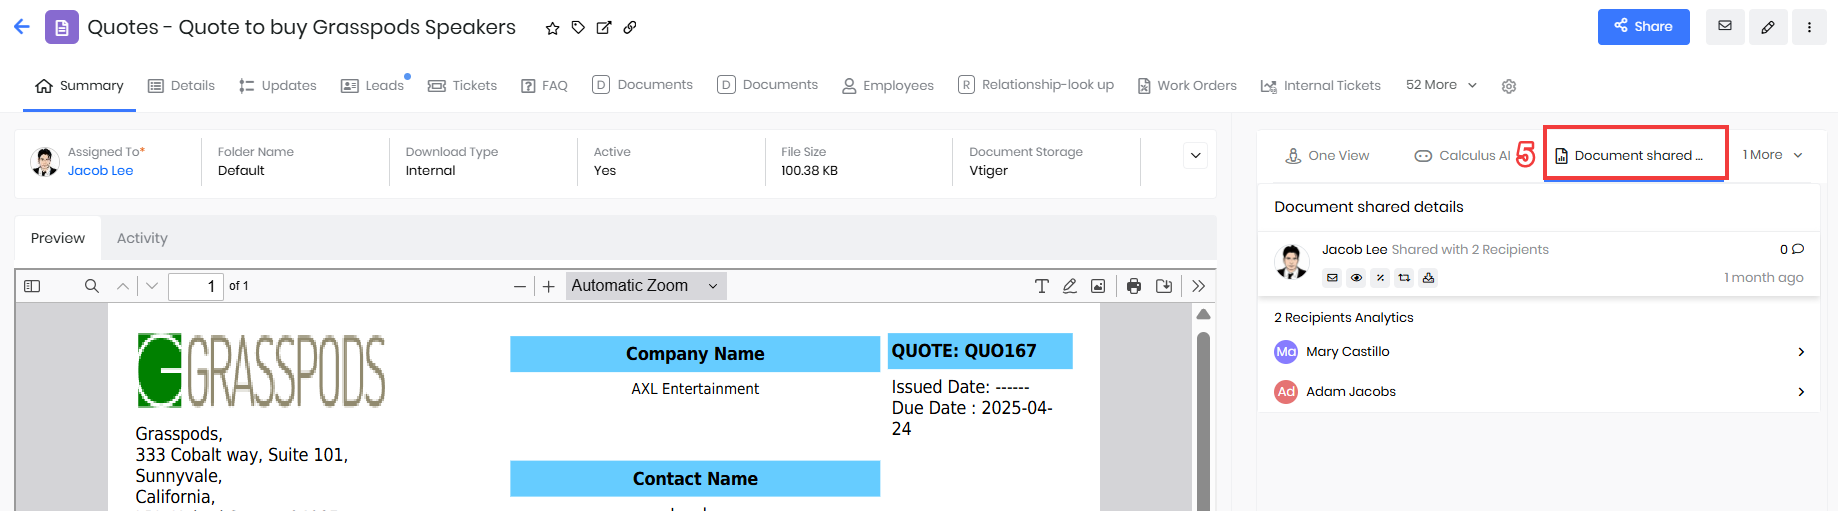
- Click on the Documents Shared Details widget.
- View the following information in the Documents Shared Details widget:
- Views: Total document views.
- Downloads: Total downloads for this document.
- Reshares: Total reshares of this document from the document viewer.
- Avg time spent: Average time a contact has spent on this document.
- Total time spent: Total time spent by all contacts.
- Total Pages Read: The number of pages read.
Details View
Follow these steps to view the insights of a document from the Summary View:
- Log in to the CRM.
- Click the Main Menu.
- Go to Essentials > Documents. The Documents page opens.
- Click on the document record for which you want to view the insights. The Summary View of the record opens.
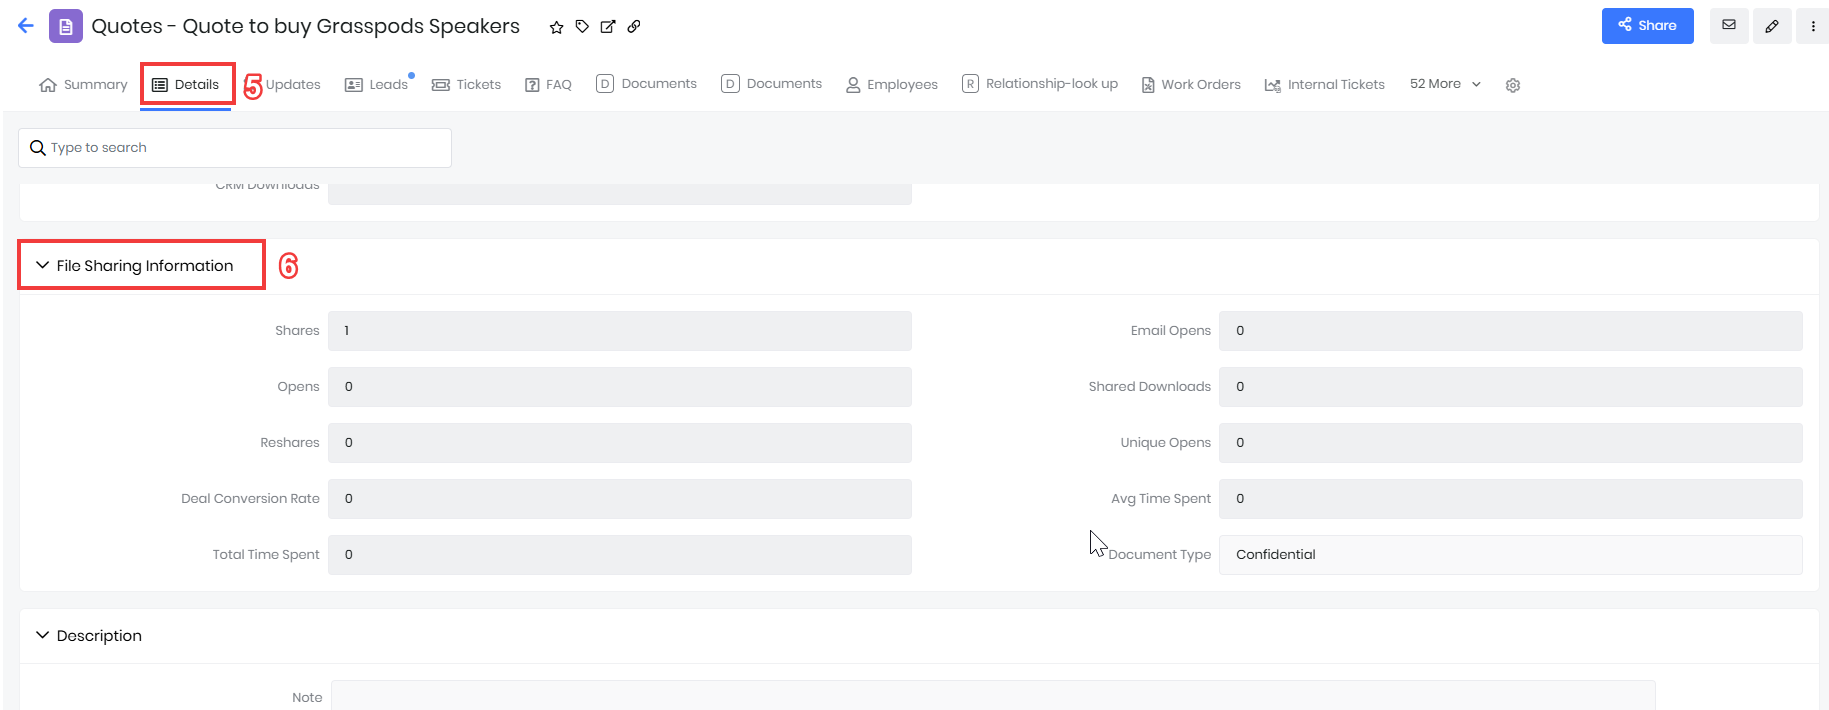
- Click Details View. The Details View opens.
- Go to the File Sharing Information section.
- View the following information in the File Sharing Information section:
- Shares
- Opens
- Reshares
- Deal Conversion Rate
- Total Time Spent
- Email Opens
- Shared Documents
- Unique Opens
- Avg Time Spent
- Document Type
Managing OTP Verification for Documents
You can manage the OTP verification for document by updating the settings in the Configuration Editor. By disabling this allows recipients to access shared documents without requiring a one-time password.
Follow these steps to enable or disable the OTP for accessing the documents:
- Log in to the CRM.
- Click the User Menu.
- Select Settings. The Settings page opens.
- Click Configuration > Configuration Editor. The Configuration Editor page opens.
- Click Edit in the top right corner.
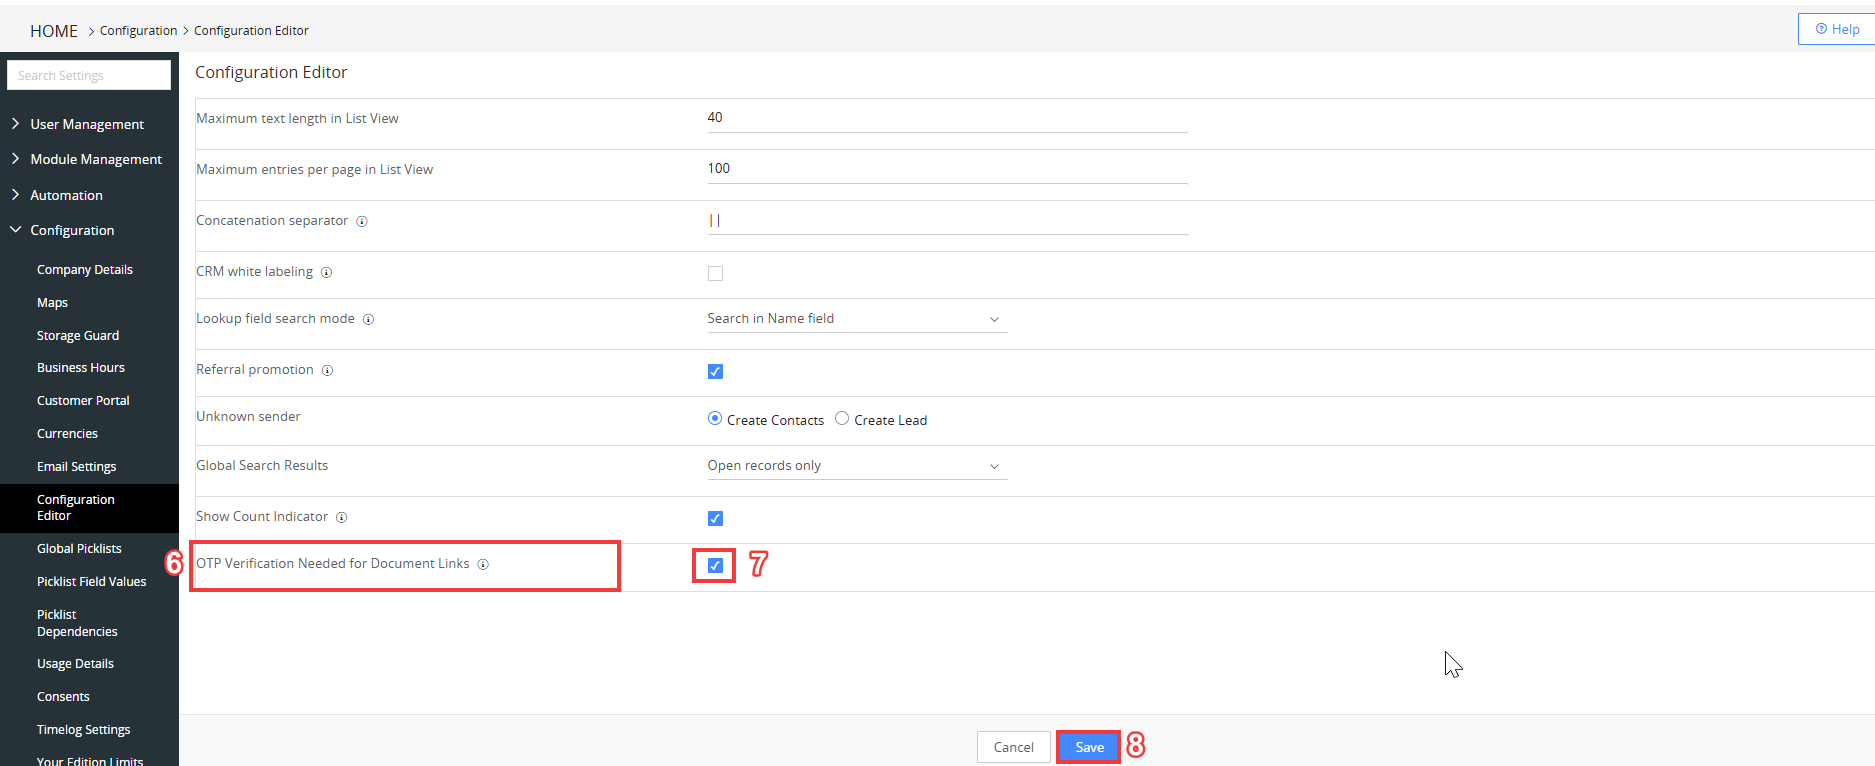
- Go to OTP Verification Needed for Document Link.
- Enable or disable the check box based on your needs.
- Click Save.
Deleting a Document
When a document is no longer needed or is outdated, you can remove it from the Vtiger CRM.
You can delete a document in the following ways:
- List view
- Summary view
List View
Follow these steps to delete a document from the List View:
- Log in to the CRM.
- Click the Main Menu.
- Go to Essentials > Documents. The Documents page opens.
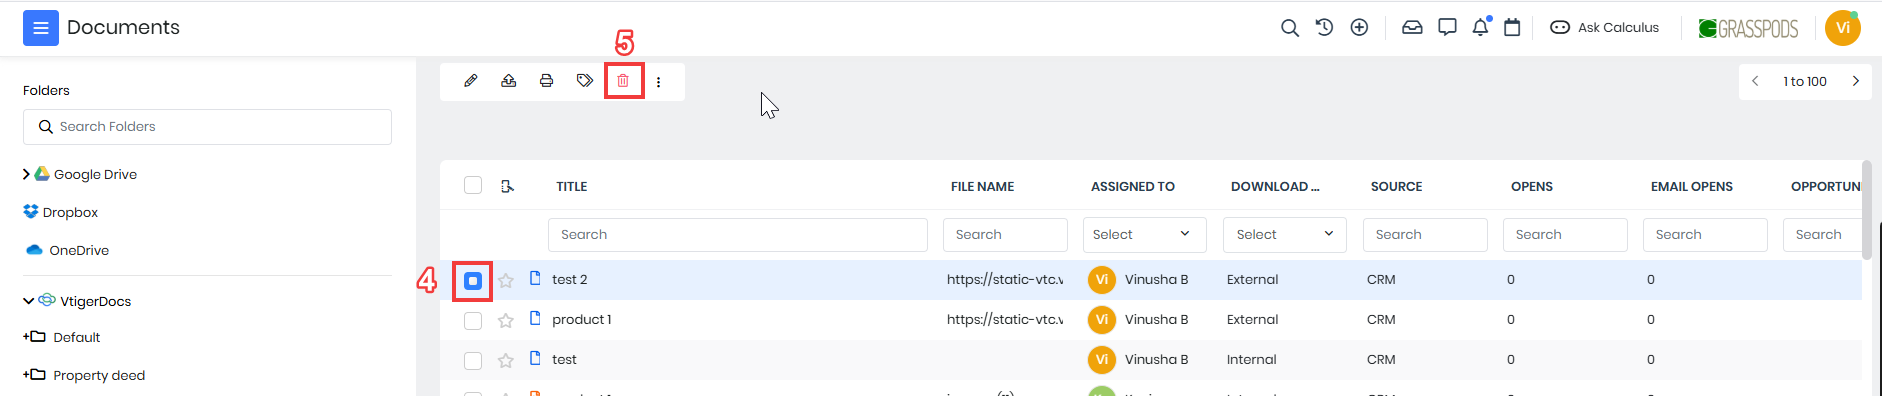
- Select the records by clicking the checkbox on the left side of each record.
- Click the Delete icon.
Summary View
Follow these steps to delete a document from the Summary View:
- Log in to the CRM.
- Click the Main Menu.
- Go to Essentials > Documents. The Documents page opens.
- Click on the document record that you want to download. The Summary View of the record opens.
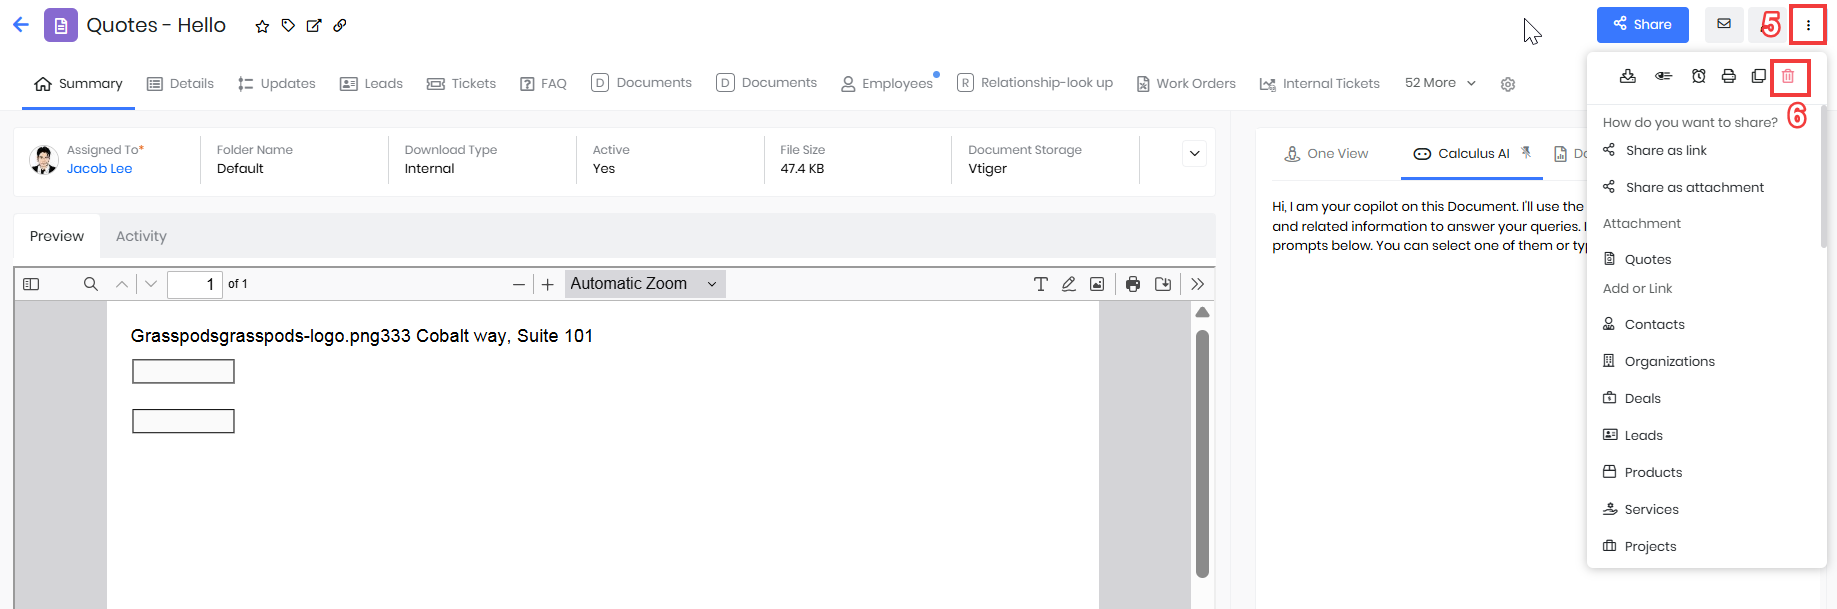
- Click the More icon.
- Select the Delete icon.
Reference
Customer Touchpoints
Uploading Documents to Dropbox
Uploading Documents to Google Drive