Articles in this section
Masking Information in Vtiger CRM
Introduction
CRM systems typically store voluminous customer data, including personal details, contact information, purchase history, and sometimes financial information. This data is valuable and needs to be safeguarded to maintain customer privacy and comply with data protection regulations.
Masking is a technique used to obscure certain parts of data for privacy or security purposes, often applied in user interfaces. Sensitive data fields, on the other hand, are specific data elements within a dataset that require special protection due to their sensitive nature, for example, social security numbers, credit card numbers, medical records, passwords, and biometric data. These sensitive data fields are encrypted in a scattered text or string unreadable to a human and need a decrypting key to convert into human-readable text.
Masking can be applied to sensitive fields as part of a broader data protection strategy. To know more about encrypting sensitive data fields in Vtiger, click here.
In the context of CRM software, masking refers to the process of hiding or obfuscating sensitive customer data such as phone numbers, email addresses, or text fields within a dataset or communication to protect it from unauthorized access. Masking ensures that only authorized individuals can view or access certain information in the CRM.
Masking in Vtiger CRM
Vtiger CRM provides several mechanisms to mask and protect sensitive information. Here are some ways Vtiger CRM can help in masking information:
- Field-Level Security: Vtiger CRM allows administrators to set field-level security permissions. This means that certain fields can be configured to be visible or editable only to authorized users or specific user roles.
- Access Control: Vtiger CRM provides robust access control features that allow administrators to define user roles and permissions. By assigning appropriate roles, administrators can control which users can access specific modules, records, or data fields.
- Data Encryption: Vtiger CRM offers encryption mechanisms to secure data at rest and in transit. Encryption ensures that even if unauthorized individuals access the data, it remains unreadable without the decryption key.
- Masking Data Display: Vtiger CRM provides options to mask or partially hide sensitive information. For example, credit card numbers can be masked to display only the last few digits or phone numbers can be masked to display only certain digits.
Masking Add-on in Vtiger CRM
Personal information about customers, such as their contact details, email addresses, or credit card information, often must be stored within a CRM system.The Masking Add-on allows you to implement field-level masking and protect this sensitive data from unauthorized access. Masking is available at the field level in all modules that support email, phone, and text.
For example, you can use the Add-on to mask the last few digits of a phone number or credit card number. This will ensure that only users with appropriate permissions can view the complete information.
Masking can also be used for role-based access control in the CRM. Different users or user groups in the CRM may have varying access levels to sensitive data. By defining roles and permissions, administrators can ensure that only authorized individuals can view or edit certain types of information.
Role-based masking in Vtiger CRM helps you in:
- Restricting access to sensitive information to authorized
- Preventing data breaches
- Complying with privacy regulations like the General Data Protection Regulation (GDPR).
How does it work
The Masking Add-on is available in the Extension Store. Once installed, you will find it on the Module Layout Settings page. Module-level Masking
Once enabled, you can apply it to email, phone, and text fields.
Role-level Masking
Masking can also be handled at the role level, with the ability to enable or disable it for specific roles.Administrators can enable or disable masking for specific roles in the User Management - Roles Settings page in Vtiger CRM. This means they can control whether sensitive information is masked or visible to users assigned to each role.
For example, consider masking a phone number for a record in the Contacts module.
If you select the Contacts module, you can mask the phone number. To do this, add the Custom Field and select Phone as the Field Type. Then, you must enable the Mask field.
If you are a non-admin, you can go to the Contacts module and add a contact by adding the Phone number and other mandatory fields. When you add the Phone number, you must select the Masking Phone field to mask it.
When fields like phone number, email address, and text are masked, it will be shown as below:
- Phone Fields: +91****803
- Email Fields: l*****[email protected]
- Text Field: ******ing
Note: Only the admin will be able to configure Masking.
Click here to learn about Module Layouts and Fields.
Modules and Features with Masking Support
Masking can be applied to any module with email, phone, or text values that must be concealed.The Masking feature is available in the following modules and features:
- Contacts and Organizations: You can mask the phone numbers in Contacts and email addresses of organizations.
- List View, Related Views, Detailed View, and One View: The masked phone numbers or email addresses will appear in these Views.
- Webservice APIs: Masking can be implemented to conceal sensitive data exchanged between clients and the API.
- Retrieve: Masking sensitive data returned in response to retrieval requests ensures only authorized users can access it.
- Query: Masking to query results helps protect sensitive information included in query responses.
- Sync: Masking data to be synced from one system to another helps prevent unauthorized access or exposure.
- Update: Masking helps protect privacy and security by modifying or updating sensitive information.
- Create: Masking helps conceal sensitive information in newly created records or data objects.
- Revise: Masking helps data fields be revised or updated in existing records or data objects.
- Retrieve_related: Masking helps retrieve data through related record queries to protect privacy and security.
- Query_related: Masking helps conceal sensitive data in query results related to related record queries, preventing unauthorized access or disclosure.
- Get_account_hierarchy: Masking helps retrieve sensitive data through the API in the account hierarchy.
- Get_record_hierarchy: Masking helps retrieve sensitive data through the API in the record hierarchy.
- Email and Print Templates: Merge tags in Email and Print templates must mask sensitive information when the template generates an email or print document. This can be unmasked while sending it to the customer.
- Incoming Mail: Masking incoming mail from the mailroom, Inbox, and Cases ensures senders' identities are masked correctly.
- WhatsApp messages: Masking in WhatsApp messages to Contacts, Leads, and Organizations' related lists, ensures the senders’ identity is masked when sending.
- Sending SMS: Masking ensures that sensitive data is masked adequately before sending the SMS messages.
- Phone Calls: Masking ensures the identification of the fields or information related to outgoing calls that need to be masked, such as caller ID or phone numbers.
- Reports: Masking in Reports, Charts, Pivot Tables, and Scheduled Reports to secure sensitive information like customer names, account numbers, and sales figures.
Feature Availability
Benefits of Masking Information
The following are the benefits of masking information in Vtiger CRM:
- Enhanced Data Security: By masking sensitive information, such as personal identification numbers, credit card details, or social security numbers, you reduce the risk of unauthorized access or data breaches.
- Compliance with Data Protection Regulations: Many industries have strict regulations regarding the handling and storing of sensitive customer data. Masking information in compliance with these regulations helps organizations meet legal requirements such as the General Data Protection Regulation (GDPR) or the Health Insurance Portability and Accountability Act (HIPAA).
- Improved Customer Trust: When customers entrust their personal information to a company, they expect it to be handled securely. Implementing data masking techniques in your CRM system demonstrates a commitment to protecting customer privacy.
- Minimized Insider Threats: Not all data breaches are external. Insider threats can occur, such as unauthorized access or data misuse by employees or contractors.
- Reduces Data Exposure in Testing Environments: CRM systems often have separate testing environments where developers and testers work with real or synthetic data.
- Facilitates Data Analytics and Reporting: Data masking techniques can preserve customer data's statistical and analytical value without compromising privacy.
Masking information in a CRM system contributes to data security, regulatory compliance, customer trust, and responsible data handling practices.
In this article, you will learn about the following:
- Installing Masking add-on from the Extension Store
- Using the Masking feature
- Enabling masking feature
- Setting up maskin for roles
- Setting up making for profiles
- Setting up masking for modules
Key Terminology
Installing Masking Add-on
The Masking Add-on is available as a paid Add-on and can be installed from the Add-ons page.
Follow these steps to install the Maskin add-on from the Extension Store:
- Log in to your CRM account.
- Click the User Menu.
- Click Settings.
- Look for the Extensions.
- Click Add-ons.
- Search for Masking.
- Click Install.
After successful installation, you will see a success message on the screen. You can find the Masking feature under Settings > Module Management > Modules.
Using the Masking Feature
Being an admin user, you can do the following:
- Enable masking feature
- Set up masking for roles
- Set up masking for profiles
- Set up masking for modules
Enabling the Masking Feature
Follow these steps to enable the Masking feature:
- Log in to the CRM.
- Click the User Menu.
- Click Settings.
- Look for Module Manager.
- Click Module.
- Look for Masking.
- Enable the Checkbox beside Masking. You will see a success message.
Setting up Masking for Roles
Follow these steps to set up Masking for a Role:
- Log in to the CRM.
- Click the User Menu.
- Click Settings.
- Look for User Management.
- Click Roles.
- Go to Privileges.
- Enable Assign privileges directly to Role.
- Go to Edit Privileges of this profile section.
- Click the Other Modules drop-down.
- Enable UI Masking.
- Click the UI Masking drop-down.
- Enable Do Not Mask under Tools.
- Click Save.
Similarly, if you want to disable the Masking for a role, enable the checkbox beside Unmask Masked Values under the Other Modules drop-down and click Save.
Setting up Masking for Profiles
Follow these steps to set up masking for a profile:
- Log in to your CRM account.
- Click the User Menu.
- Click Settings.
- Look for User Management.
- Click Profiles.
- Select the required Profile from the list.
- Click the Other Modules drop-down.
- Enable the Checkbox.
Similarly, if you want to disable Masking for a Profile, check the checkbox beside Unmask Masked Values under the Other Modules drop-down and click Save.
Setting up Masking for Modules
Follow these steps to set up masking for specific fields of a module:
- Log in to your CRM account.
- Click the User Menu.
- Click Settings.
- Look for Module Manager.
- Click Module Layouts & Fields. The Module Layouts & Fields window appears.
- Select the required module from the Select Module drop-down.
- Hover over the field you want to mask and click the Edit icon. The edit pop-up appears.
- Enable the Checkbox beside the Masking option.
- Click Save.
Note: If you try to disable the masking for a module, the CRM displays the following warning messages.
- Remove the masking for fields before disabling the masking module.
- Related modules that might be affected.
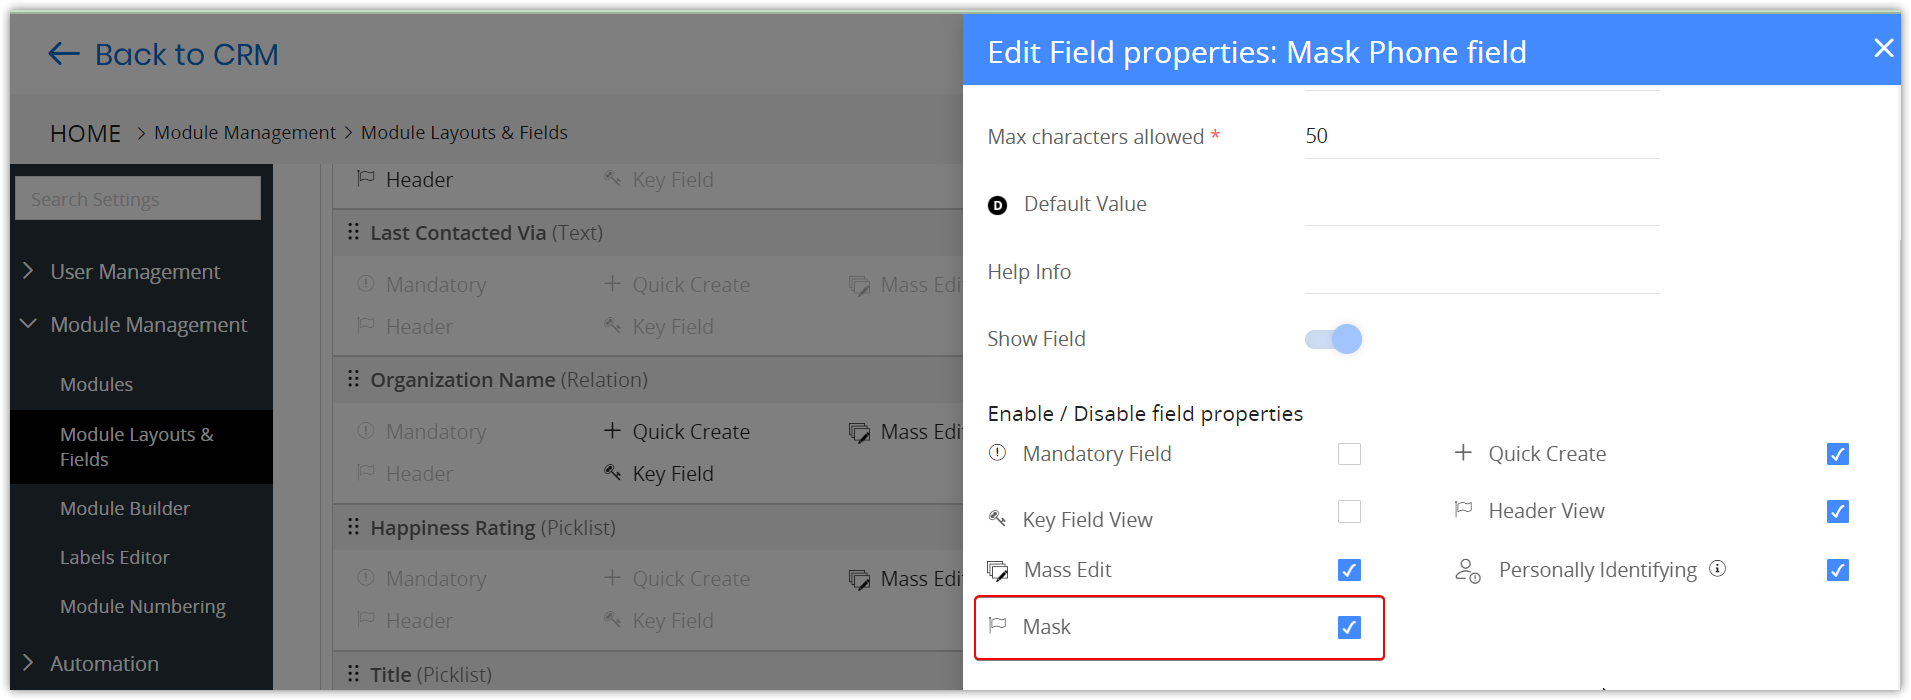
Follow these steps to mask a phone field in a Contact record:
- Log in to the CRM.
- Click the User Profile on the top right of the screen.
- Click Settings.
- Go to Module Management.
- Select Module Layout and Fields. The Module Layouts and Fields page opens.
- Select the Contacts module from the drop-down.
- Click +Create Custom Field. A Create Custom Field window opens.
- Select the Phone Field Type from the drop-down.
- Type the Label Name.
- Type Min Characters allowed.
- Type Max Characters allowed.
- Go to the Enable/Disable field properties section.
- Enable Mask.
- Click Save.
Note: Only the admin can configure the Masking.
Follow these steps to mask an Email field in a Contact record:
- Log in to the CRM.
- Click the User Profile on the top right of the screen.
- Click Settings.
- Go to Module Management.
- Select Module Layout and Fields. The Module Layouts and Fields page opens.
- Select the Contacts module from the drop-down.
- Click +Create Custom Field. A Create Custom Field window opens.
- Select the Email Field Type from the drop-down.
- Type the Label Name.
- Type Min Characters allowed.
- Type Max Characters allowed.
- Go to the Enable/Disable field properties section.
- Enable Mask.
- Click Save.
Masking for Vtiger 360 app
Masking is enabled for Vtiger 360 app. You can mask customer-sensitive information in the app.
For example, the text, phone number, and email fields will be masked in this format 45******45 and m******[email protected] respectively.
Limitations
The following are the limitations of the Masking feature:
- If any email field is masked, it will not display the Masking feature in the following:
- Compose an email
- Inbox email
- Cases.
- The following actions are restricted to avoid leaking masked email addresses.
- Reply
- Reply All
- Forward
- Masking is enabled for only the following field types:
- Phone
- Text
- The Details tab from the Cases module allows you to see the email address in each email thread but does not allow you to see the email address in the CC field.
- Email validation will not be performed when masking is enabled.
- External applications that will not follow the masked settings are:
- Customer Portal
- Partner Portal
- You must restrict searching for masked fields in the following areas:
- List view
- Related List view
- Global Search
- Global Advanced search
- Compose email window in Inbox and other places.
- Invitees in Events records
- Numbers from phone calls are masked and then decoded for the customer.