Articles in this section
Contacts Module in Vtiger CRM
Feature Availability
Vtiger Editions: One Pilot | One Growth | One Professional | One Enterprise | One AI
Introduction
The Contacts module in Vtiger CRM stores and manages information about the people you do business with, including leads, prospects, and customers. A contact can represent an individual or an organization, enabling you to manage both personal and business relationships in one place.
The Contacts module acts as a central repository for contact details, communication history, lifecycle stages, and engagement data. Contacts move through different lifecycle stages, such as lead, prospect, and customer, helping teams track relationship maturity and sales readiness. Contacts can also be linked with other CRM modules like Organizations, Deals, Activities, Emails, and Cases, providing a complete view of all interactions.
Benefits
Benefits of the Contacts module in vtiger CRM are:
- Maintain a centralized repository of all Contact information.
- Track a Contact’s complete lifecycle from lead to customer.
- View all interactions and communication history in one place.
- Identify and focus on qualified and high-priority Contacts.
- Improve collaboration between sales, marketing, and support teams.
- Automate Contact-related activities and follow-ups.
- Ensure data accuracy, consistency, and compliance with privacy regulations.
- Deliver personalized and timely communication based on engagement insights.
In this article, you will learn about:
- Creating a Contact
- Editing a Contact
- Converting a Contact to Lead
- Exporting a Contact
- Deleting a Contact
- Actions in a Contact Record
Key Terminology
|
|
|
|
|
|
|
|
|
|
|
|
|
|
|
|
|
|
|
|
|
Creating a Contact
There are three ways to create a Contact.
- From the Contacts module
- Using Quick Create
- By importing
From the Contact Module
Follow these steps to create a Contact using the Contact module:
- Log in to the CRM.
- Click main Menu.
- Click Essentials > Contacts. The Contacts List View opens.
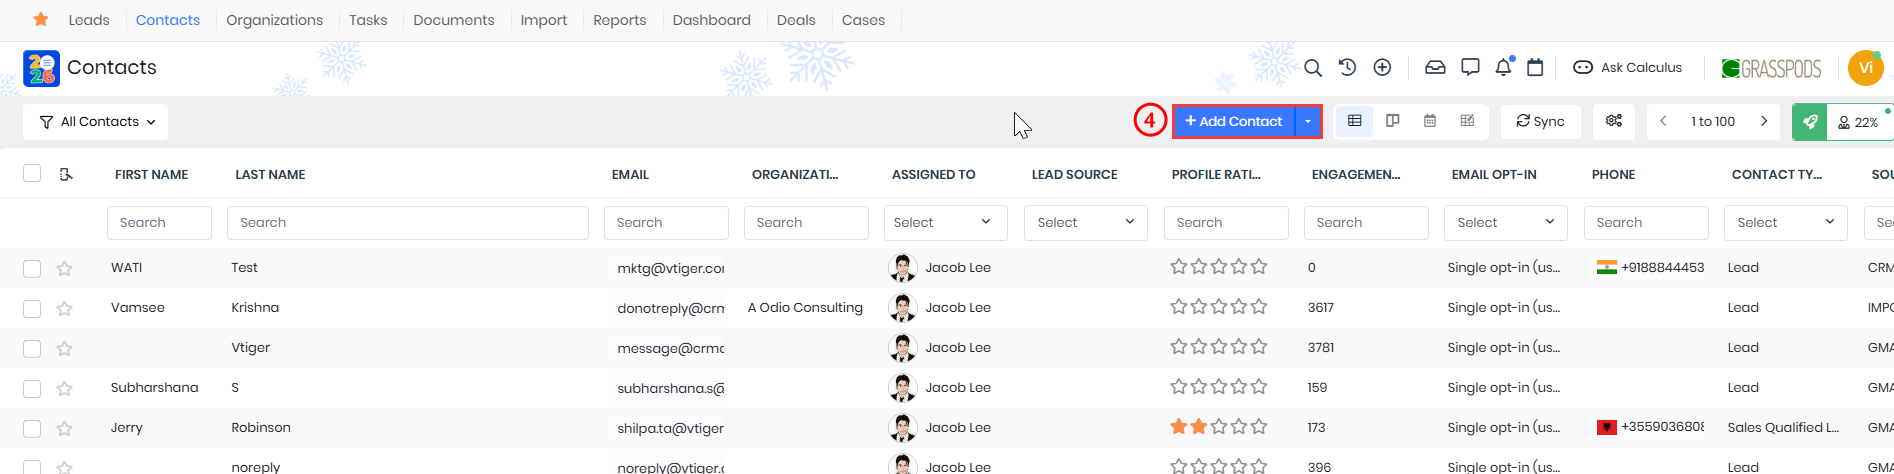
- Click +Add Contact. The Add Contact page opens.
- Enter or select the following information:
- Fill out only the mandatory fields (marked with *) or all the essential fields.
- Click View full form to see all the fields.
- Click Save.
Using Quick Create
Quick Create is a handy option for creating records from anywhere in the CRM. You can identify Quick Create by the + icon on the top bar of your CRM screen.
Follow these steps to create a Contact using Quick Create:
- Log in to the CRM.
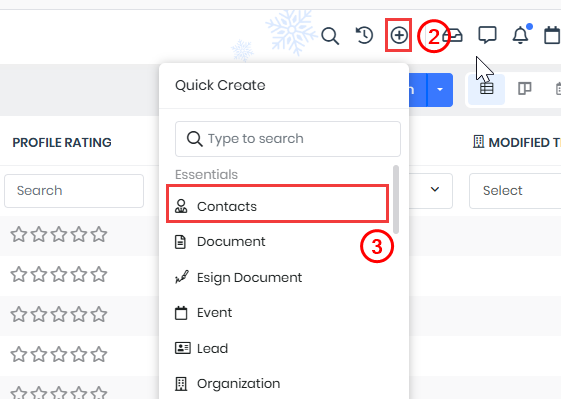
- Click the + icon on the top of your CRM screen.
- Select Contacts under Essentials. The Add Contacts page opens.
- Enter or select the following information:
- Fill out only the mandatory fields (marked with *) or all the essential fields.
- Click View full form to see all the fields.
- Click Save.
By Importing
You can import Contact information from a CSV or ICS file.
To learn more about the importing process, click here.
Follow these steps to import Contact:
- Log in to the CRM.
- Click main Menu.

- Click the Drop-down next to + Add Contact.
- Select Import. The Importing Contacts page opens.
- Enter or select the following information:
- Select a data file.
- Mapping the columns of the data file to the CRM fields.
- Handling duplicate data.
Editing a Contact
There are two ways to edit a Contact.
- From the List View
- From the Summary View
From the List View
Follow these steps to edit a Contact from the List View:
- Log in to the CRM.
- Click main Menu.
- Click Essentials > Contacts. The Contacts List View opens.
- Hover over the Contact record to which you want to edit.

- Click Edit. The Editing Contact page opens.
- Make the required changes in the Summary View of the Contact record.
- Click Save.
From the Summary View
Follow these steps to edit a Contact from the Summary View:
- Log in to the CRM.
- Click main Menu.
- Click Essentials > Contacts. The Contacts List View opens.
- Click to open the Summary View.

- Click Edit. The Editing Contact page opens.
- Make the required changes in the Summary View of the Contact record.
- Click Save.
Converting a Contact
Follow these steps to convert a Contact:
- Log in to the CRM.
- Click main Menu.
- Click Essentials > Contacts. The Contacts List View opens.
- Select and click a Contact record that you want to convert. The Summary View of the record opens.
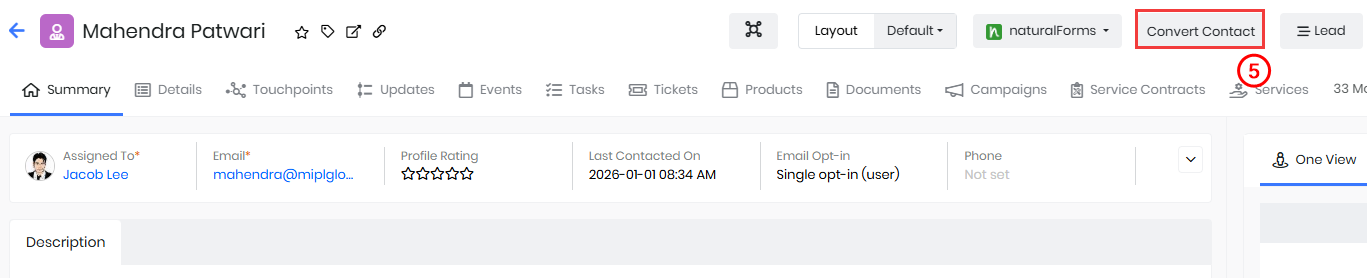
- Click Convert Contact. The Convert Window opens.
- Enter or select the following information:
- Contact Type: Specifies the Contact's category, such as Prospect or Customer.
- Contact Stat: Indicates the engagement level of the contact, such as Hot, Warm, or Cold.
- Assigned To: Determines the CRM user who owns the contact record and is responsible.
- Do you want to create a deal? - Enable the New Deal checkbox if you want to create a Deal simultaneously while converting the Contact.
- Fill in all the Deals information.
- Click Save.
Exporting a Contact
Follow these steps to export a Contact:
- Log in to the CRM.
- Click main Menu.
- Click Essentials > Contacts. The Contacts List View opens.
- Select the records you want to export.
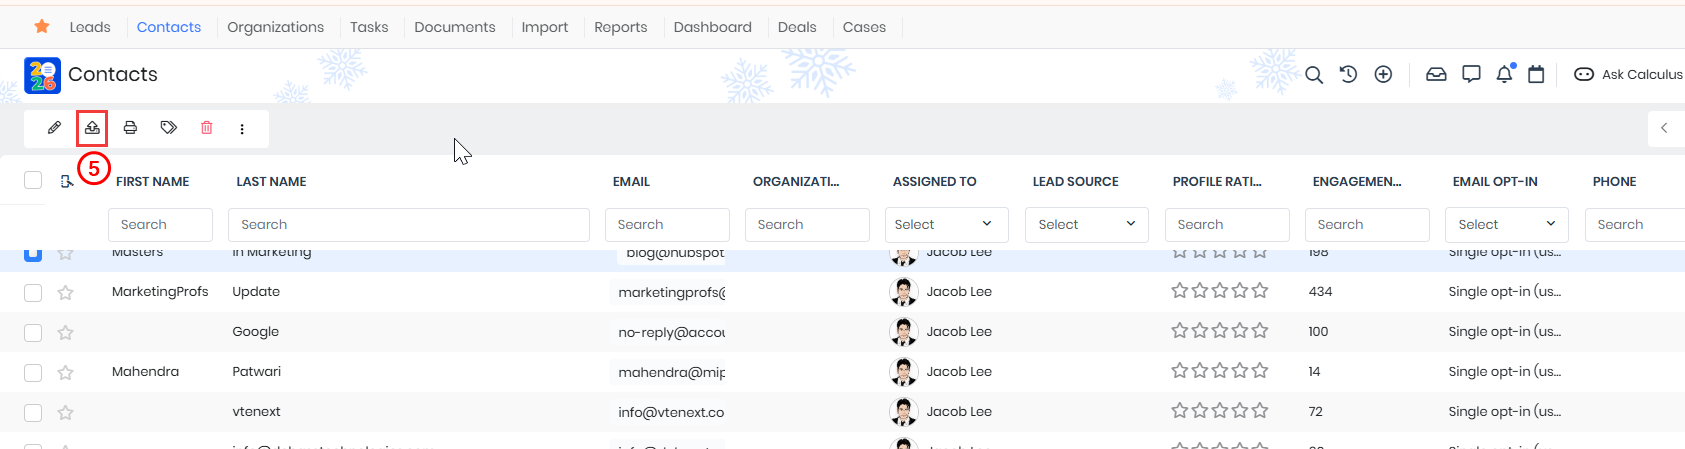
- Click Export. The Export window opens.
- Enter or select the following information:
- Export selected records
- Export records on the current page
- Export all the records
- Click Export.
Deleting a Contact
There are two ways to delete a Contact.
- From the List View
- From the Summary View
From the List View
Follow these steps to delete a Contact from the List View:
- Log in to the CRM.
- Click main Menu.
- Click Essentials > Contacts. The Contacts List View opens.
- Select the Contact record you want to delete.

- Click Delete. The Delete record window opens.
- Click Yes to delete the record.
From the Summary View
Follow these steps to delete a Contact from the List View:
- Log in to the CRM.
- Click main Menu.
- Click Essentials > Contacts. The Contacts List View opens.
- Select the Contact record you want to delete. The Summary view opens.

- Click More.
- Click Delete. The Delete record window opens.
- Click Yes to delete the record.
Actions in a Contact record
You can perform the following actions in a Contact record
- Edit
- Export
- Print / Export PDF
- Tag
- Delete
- More
Follow these steps to perform the above actions:
- Log in to the CRM.
- Click main Menu.
- Click Essentials > Contacts. The Contacts List View opens.
- Select the Contact records.
- Enter or select the following information:
- Edit - Click the Edit the Contact record.
- Export - Click to export the Contact record.
- Print / Export PDF - Click to Print / Export PDF. The Print window opens.
- Tag - Click to add new Tags, select Tags, or add multiple Tags for easy reference.
- Delete - Click to Delete the Contact record.
- More - Click and perform the following actions:
- Comment
- Send Email
- Send OTP
- Calculus AI
- Export to Google Spreadsheet
- Follow
- Unfollow
- Transfer Ownership
- Merge selected records
- Add to Process
- Update in Marketing List
Viewing Contacts
You can view and manage your Contacts using the following options: List View, Summary View, Kanban View, Calendar View, and Grid View. By default, Contacts are displayed in List View. You can switch between these views using the view icons available at the top right of the Contacts page.
List View
The List View displays all your Contacts in a structured list format. You can sort Contacts by name, email, contact status, organization, owner, and other fields by clicking the column headers.
From this view, you can:
- Edit Contact records
- Merge duplicate Contacts
- Apply filters and create Custom Lists
- Perform bulk actions on multiple Contacts
Summary View
The Summary View shows complete information about an individual Contact on a single page.
In this view, you can:
- View and edit Contact details such as phone number, email, organization, and status.
- Track activities, comments, and updates related to the Contact.
- Use Calculus AI to gain insights into the Contact’s engagement.
- Use One View to access all related information in one place.
Kanban View
The Kanban View displays Contacts as cards grouped by Contact Status (for example, Hot, Warm, or Cold). This visual layout helps you easily track and manage Contacts as they move through different stages.
You can drag and drop Contact cards between columns to update their status.
Calendar View
The Calendar View shows Contacts based on Contact created date.
From this view, you can:
- View upcoming and past activities related to Contacts.
- Click an activity to see details like date, time, owner, and status.
- Edit or mark activities as completed directly from the calendar.
Grid View
The Grid View presents Contacts in a compact, tile-based layout, making it easy to quickly browse through multiple Contact records at once.
This view is useful when you want a visual overview of Contacts with key details displayed for each record.