Articles in this section
WhatsApp Integration with IMI Mobile
Feature Availability
Vtiger Editions: One Professional | One Enterprise | One AI
Introduction
IMI Mobile, now part of Cisco's Webex CPaaS Solutions, is a cloud communications platform that enables businesses to engage with customers across multiple channels, including SMS and WhatsApp.
It provides secure and scalable messaging capabilities, helping organizations streamline customer communication and deliver personalized interactions at scale.
WhatsApp Integration with IMI Mobile for Vtiger CRM
WhatsApp Integration with IMI Mobile for Vtiger CRM helps you send and receive WhatsApp messages directly on the CRM screens.
WhatsApp Integration with IMI Mobile is available for the following modules:
- Cases
- Contacts
- Deals
- Internal Tickets
- Invoices
- Leads
- Organizations
- Quotes
- Vendors
Once IMI Mobile is integrated with the Vtiger WhatsApp module, you can carry out WhatsApp conversations via Vtiger CRM or a mobile phone.
In Vtiger CRM, only Admin users can configure WhatsApp Integration with IMI Mobile. Non-Admin users can only use the feature to send and receive messages.
Requirements
To integrate WhatsApp and use it with Vtiger CRM through IMI Mobile:
- You must have a business account with IMI Mobile.
- Your business account with IMI Mobile should be Active.
- You must enable WhatsApp Extension in Vtiger CRM.
Benefits of using WhatsApp Integration with IMI Mobile
The following are the benefits of using the WhatsApp integration with IMI Mobile:
- Manage customer WhatsApp conversations directly from Vtiger CRM.
- Create Leads, Contacts, Cases, or Deals from WhatsApp conversations.
- View complete WhatsApp conversation history within the related CRM record.
- Send approved WhatsApp message templates for notifications and follow-ups.
- Share images, documents, videos, and other supported attachments with customers
- Respond to customer queries instantly from within the CRM.
In this article, you will learn about:
- Prerequisites for installing and using WhatsApp through IMI Mobile
- Installing IMI Mobile
- Configuring WhatsApp with IMI Mobile for Vtiger CRM
- Using IMI Mobile Templates with Vtiger CRM
- Sending WhatsApp messages from Vtiger CRM
Key Terminology
|
|
|
|
|
|
|
|
|
|
|
|
|
|
|
|
|
|
|
|
|
Installing WhatsApp via IMI Mobile
To use WhatsApp Integration with IMI Mobile, you need to first install the IMI Mobile Add-on. The IMI Mobile Add-on is not available by default in the CRM; you will need to install it from the Extension Store.
Follow these steps to install the IMI Mobile Add-on:
- Log in to the CRM
- Click User Menu in the top-right corner of the screen.
- Click Settings. The Settings page opens.
- Click Add-ons. The Add-ons page opens.
- Look for WhatsApp via IMI Mobile.
- Click Install.
A success message appears once the installation is complete.
IMI Mobile must be added to the Service Providers list before you can configure and use it.
Follow these steps to add IMI Mobile as a service provider.
- Log in to the CRM.
- Click the main Menu.
- Click Essentials.
- Look for Conversations.
- Click WhatsApp. The WhatsApp module List View opens.
- Click the Settings icon.
- Click +Add. The Add Configuration pop-up opens.
- Select Provider as IMI Mobile.
IMI Mobile will now appear in the Service Providers list.
Configuring WhatsApp with IMI Mobile for Vtiger CRM
Let us now learn how to configure WhatsApp with IMI Mobile for Vtiger CRM.
Note: Keep both the IMI Mobile and Vtiger CRM screens open as these steps require you to navigate back and forth between the Vtiger CRM screen and the IMI Mobile platform.
Configuring WhatsApp via IMI Mobile with Vtiger requires you to do the following:
- Step 1: Integrating WhatsApp via IMI Mobile in Vtiger
- Step 2: Creating a service account
- Step 3: Creating an app account
- Step 4: Retrieving the key
- Step 5: Configuring integration for Outbound Webhooks
- Step 6: Adding App ID and Key in Vtiger CRM
Step 1: Integrating WhatsApp via IMI Mobile in Vtiger
Follow the steps below to integrate WhatsApp via IMI Mobile:
- Log in to the CRM.
- Click the main Menu.
- Click Essentials.
- Look for Conversations.
- Click WhatsApp.
- Click the Settings icon.
- Click +Add. The Add Configuration window opens.

- Enter or select the following details:
- Provider: Choose the Provider as IMI Mobile.
- Active: Select Active input as Yes.
- Once you choose the Provider as IMI Mobile, the Status Callback and Incoming Callback URLs fields are displayed.
- Copy the Status Callback and Incoming Callback URLs (to Notepad or a document).
With this, navigate to Clickatell.
Step 2: Adding your WhatsApp number in IMI Mobile
On the IMI Mobile screen, you will have to create a Service account and an App account.
Note: Keep your IMI Mobile login credentials before you begin.
Follow the steps below to create a Service account:
- Log in to your IMI Mobile account.
- Click Create New Service.
- Enter a name for your Service account in the Service Name section.
- Click Create.
Once you create a Service account, your account will be displayed on the home screen.

If you already have a Service account, click on it.
Follow the steps below to create an App account:
- Log in to your IMI Mobile account.
- Click Assets.
- Click Apps.

- Click Configure New App.
- Select WhatsApp. The Configure New App - Manage WhatsApp opens.


- Enter or select the following details and have your number verified:
- Name: Enter a name to identify the WhatsApp account.
- Number: Enter the WhatsApp Business phone number to be associated with the account.
- WABA ID: Enter the WhatsApp Business Account (WABA) ID assigned to your business account.
- Certificate: Upload the certificate required to authenticate the WhatsApp Business account.
Note: WABA ID is the Facebook Business ID, and for the Certificate, reach out to [email protected].
Once the App is approved, you can view it by navigating to Assets > Apps.

Step 3: Retrieving App ID
After the App is approved, an App ID is generated and can be used to integrate with Vtiger CRM.
Follow the steps below to copy the App ID;
- Log in to your IMI Mobile account.
- Click Assets.
- Click Apps. The Apps screen displays the App details, including the App ID.
- Copy the App ID.

Step 4: Retrieving Key
Follow these steps to retrieve the key:
- Log in to your IMI Mobile account.
- Click your account. The Services page opens.

- Click API for API integration.
- Under JWT Authentication, choose Service Key.

- Keep the Service Key visible using the Eye icon.
- Copy the Service Key using the Copy icon. The Service Key copied here serves as the Vtiger CRM Key.
- Click Configure Outbound Webhooks.

Step 5: Configuring Integration for Outbound Webhooks
You will have to configure integration for two Outbound Webhooks:
- To Receive WhatsApp Messages Delivery Status (Sent, Delivered, and Read).
- To Receive Incoming WhatsApp Messages.
Configuring Outbound Webhook Integration for Receiving Delivery Status
Follow the steps below to configure outbound webhook integration for receiving delivery status:
- Log in to your IMI Mobile account.
- Click Configure Outbound Webhooks on the Services page.
Or
- Click Assets.
- Click Integrations.

- Click Add Integration.
- Select Outbound Webhook. The Configure New Integration - Outbound Webhook screen opens.


- Enter or select the following details:
- Name: Provide a name to the Outbound Webhook in the name section.
- Entity: Select Entity as your Service Account under Services. Note: While configuring the integration for receiving delivery status, always select Entity under Services.
- Channel: Select the channel as WhatsApp.
- Choose the Notifications you want to receive and check the same. You can check all the notifications.
- Under Endpoint Configuration, paste the Status Callback URL in the URL field.
- Click Save.
Configuring Outbound Webhook Integration for Receiving Incoming Messages.
Follow the steps below to configure the outbound webhook integration for receiving incoming messages:
- Log in to your IMI Mobile account.
- Click Assets.
- Click Integrations.
- Click Add Integration.
- Select Outbound Webhook. The Configure New Integration - Outbound Webhook screen opens.

- Enter or select the following details:
- Name: Provide a name to the Outbound Webhook in the name section.
- Entity: Select Entity as your App account under Apps. Note: While configuring the integration for receiving incoming messages, always select Entity under Apps.
- Channel: Select the channel as WhatsApp.
- Choose the Notifications you want to receive, then check them. You can check all the notifications.
- In the Endpoint Configuration, paste the Incoming Callback URL into the URL field.
- Click Save.
You will now have to navigate back to Vtiger CRM.
Step 6: Adding App ID and Key in Vtiger CRM
Follow these steps to add the App ID and Key (you copied on the IMI Mobile screen):
- Log in to the CRM.
- Click the main Menu.
- Click Essentials.
- Look for Conversations.
- Click WhatsApp.
- Click the Settings icon.
- Click +Add. The Add Configuration window opens.
- Enter or select the following details:
- Provider: Provider is displayed as IMI Mobile.
- Paste the copied App ID in the App ID section.
- Paste the copied Service Key in the Key section.
- Click Save.
IMI Mobile is now available in the Providers list. You can view the IMI Mobile WhatsApp record in the WhatsApp module List View.


Displaying WhatsApp - IMI Mobile Records
You can view all WhatsApp records in the WhatsApp List View
Follow these steps to view the WhatsApp - IMI Mobile records:
- Log in to the CRM.
- Click the main Menu.
- Go to Essentials > Conversations.
- Click WhatsApp. The WhatsApp module List View opens.
- Select IMI Mobile in the Source field to view WhatsApp records with IMI Mobile as the service provider.
- Click on a record to view its details.
The Details View displays all the related WhatsApp information, including the message content, message source, API response, and other relevant details.
Using IMI Mobile WhatsApp Templates with Vtiger CRM
When using IMI Mobile as your WhatsApp service provider in Vtiger CRM, you must use WhatsApp-approved IMI Mobile templates, whether default or customized. Additionally, you must specify the IMI Mobile Template ID to send messages to customers.
Follow these steps to create IMI Mobile WhatsApp templates in Vtiger CRM:

- Log in to your IMI Mobile account.
- Click Tools.
- Click Templates.
- Click Add New Template. The Configure New Template window opens.

- Enter or select the following details:
- Name: In the Name section, provide a name(lowercase) to your WhatsApp Template.
- Channel: Select Channel as WhatsApp.
- Message Body: In the Message Body section, type in your desired WhatsApp Message content, which is the prime step.
- Enter the required Category, Language, Header, Text, and Footer options.
- Select the required Buttons and Locking the Template option.
- Click Save. The Templates window opens.
The IMI Mobile WhatsApp Template created will appear in the WhatsApp Templates List View.

Submit the WhatsApp Template for approval by WhatsApp. Once WhatsApp approves the template, you have successfully created the IMI Mobile WhatsApp Template.
Now, copy the approved IMI Mobile WhatsApp Template Body. Also, copy the Template ID displayed on the Templates screen.
Navigate back to Vtiger CRM.
Follow the steps below to use the IMI Mobile WhatsApp Template in Vtiger CRM:
- Log in to the CRM.
- Click the main Menu.
- Click Marketing.
- Look for Marketing Enablement.
- Click WhatsApp Templates.
- Click +Add Template. The Create WhatsApp Template window opens.

- Enter or select the following details:
- Content: Paste the copied Message Body from IMI Mobile in the Content section. You can always customize the IMI Mobile Template content as per your requirements.
- Template ID: Paste the copied Template ID from IMI Mobile.
- Template Name: Provide a name to the IMI Mobile WhatsApp Template. Note: The IMI Mobile WhatsApp Template names provided here are the Select WhatsApp Template dropdown list on the Contacts module.
- Assigned to: Creator of the Template.
- Module: The only desired modules where you want the specific IMI Mobile WhatsApp Templates to be available.
- Merge Field: The selected fields will be displayed and added to the IMI Mobile WhatsApp Template Content. Note: The field’s data selected here will, by default, appear in the Contacts > Send WhatsApp Message > Message Body section.
- Click Save.
Once created, the IMI Mobile WhatsApp Template appears in the List View of the WhatsApp Template module.
Sending WhatsApp Messages from Vtiger CRM
You can send WhatsApp messages:
- From the desktop version of Vtiger CRM as well as the Vtiger CRM Mobile app.
- Via IMI Mobile for all the modules where the WhatsApp Integration feature is available.
- From Vtiger CRM to customers who are only IMI Mobile WhatsApp Templates.
- Once the user replies, you can accordingly send the personalized replies only within 24 hours of the response.
- From the List view as well as the Summary view in all the modules where the WhatsApp Integration feature is available.
Let us see how.
Sending WhatsApp Messages from List View
Here, for instance, let us consider the Contacts module.
Follow these steps to send WhatsApp messages via IMI Mobile:
- Log in to the CRM.
- Click the main Menu.
- Click Essentials.
- Look for Lead & Contact Management.
- Click Contacts. The Contacts module opens.
- Hover over the desired Contact record to whom you want to send the message.
- Click WhatsApp from the options that are displayed. The Send WhatsApp Message window opens.

- Choose the appropriate Phone Number.
- Select the required WhatsApp Template.
- Attach files if needed. Note: Approved WhatsApp templates saved in the WhatsApp Template module are displayed here.
- Click Send.
You have now sent a WhatsApp message to the selected Contact.
Viewing WhatsApp Messages
You can view WhatsApp messages between Vtiger CRM and customers in the Summary View of the Contact record.

The Activity section displays WhatsApp messages and different delivery statuses such as Delivered, Failed, and Read.
Sending WhatsApp Messages from Summary View
Note: You can send WhatsApp messages via the record Summary View only after the customer responds. You can use this section to reply and continue the WhatsApp conversations.
Follow these steps to continue WhatsApp conversations from the record Summary View:
- Log in to the CRM.
- Click the main Menu.
- Click Essentials.
- Look for Lead & Contact Management.
- Click Contacts. The Contacts module opens.
- Click the Contact record to whom you want to reply
- Click WhatsApp.

You can reply and continue personalized or non-personalized WhatsApp conversations in the input box provided. You can also make voice calls, attach images and videos, and send WhatsApp Templates.

Note: You cannot send personalized messages outside the 24-hour messaging window. If you attempt to do so, the following error message is displayed.
Checking the Message Delivery Status of WhatsApp messages
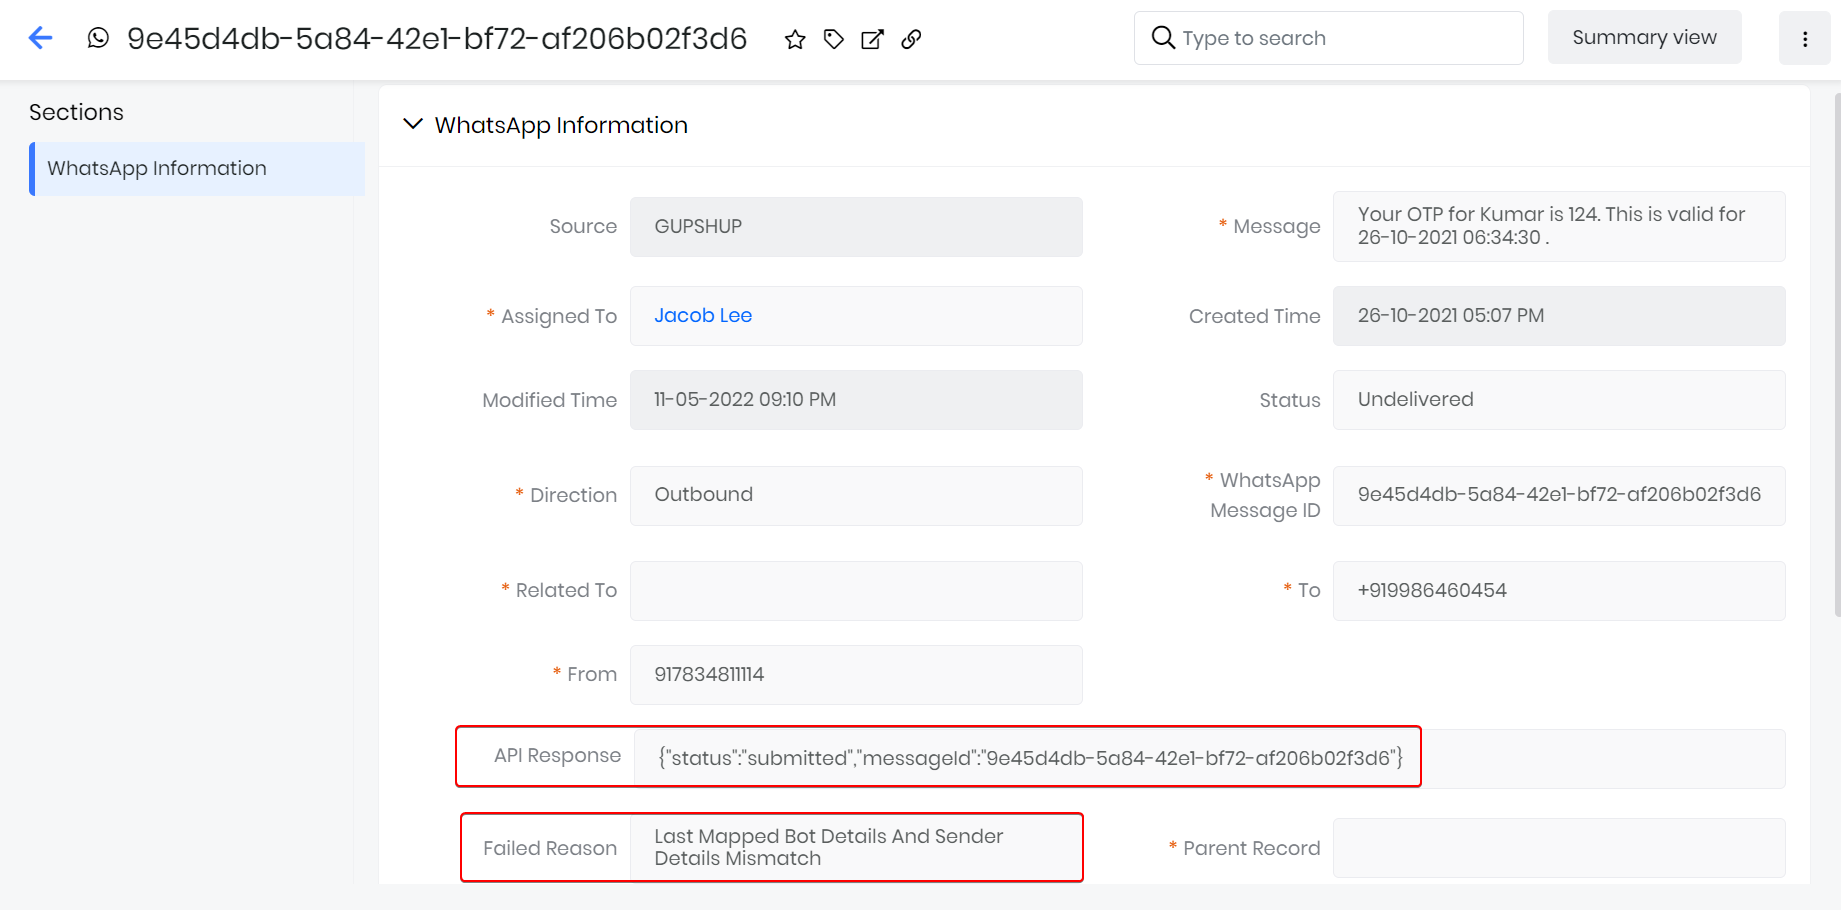
Once you have sent a message on WhatsApp, you can check its status by heading to the Information section. Here, you can view the API Response and Failed Reason. If your message wasn't successfully delivered, the API Response field will display authentication failed. The Failed Reason field will also give you more information on why the message was not sent.
WhatsApp opt-in settings for IMI Mobile
The WhatsApp opt-in is a field available in a few CRM module records under Basic Information > WhatsApp opt-in in the Summary View and Detailed View. It provides WhatsApp opt-in options. WhatsApp opt-in options are WhatsApp messaging options available for sending and receiving WhatsApp messages with IMI Mobile. You can select the following WhatsApp opt-in options for your contacts, leads, organizations, and vendors based on your preferences:
- Single opt-in: It lets you send outgoing messages and receive incoming messages from WhatsApp using IMI Mobile.
- User opted out: It lets you receive incoming messages and does not let you send outgoing messages from WhatsApp using IMI Mobile.
- None: It lets you send outgoing messages and receive incoming messages from WhatsApp using IMI Mobile.
The WhatsApp opt-in options are available for the following modules:
- Contacts
- Leads
- Organization
- Vendors
Follow these steps to select a WhatsApp opt-in option while creating or editing a record for a Contact, Lead, Organization, or Vendor:
Note: For example, we have considered the Contacts module; you can do the same in any of the modules mentioned above.
- Log in to the CRM.
- Click the main Menu.
- Click Essentials.
- Look for Lead & Contact Management.
- Select Contacts.
- Click +Add Contact.
or
- Select a Contact record.
- Go to the Details View of the record.
- Go to Basic Information.
- Look for the WhatsApp opt-in field.
- Select a suitable WhatsApp opt-in option.
You have now successfully selected a WhatsApp opt-in option for a contact in CRM.
Note: The WhatsApp opt-in options are available for all the WhatsApp providers with which Vtiger CRM is integrated.
Disabling WhatsApp Integration With IMI Mobile
Admin users can disable WhatsApp Integration with IMI Mobile in Vtiger CRM by disabling the IMI Mobile extension.
Follow these steps to disable the IMI Mobile feature:
- Log in to the CRM.
- Click the main Menu.
- Click Settings. The Settings page opens.
- Look for Module Management.
- Click Modules.
- Uncheck the WhatsApp by IMI Mobile extension
Once you uncheck the WhatsApp by IMI Mobile extension, a success message is displayed.

Once you disable the IMI Mobile extension, the IMI Mobile option won’t be visible anymore.