CREATE Operation
In this example, we will use the CREATE operation to create a Contact record. Performing REST API operations in API Designer requires you to do the following:
- Step 1: Running the API script within the API Designer interface
- Step 2: Verifying the CRM record reflects the REST API action
Step 1: Running the API script within the API Designer interface
Follow these steps to perform a CREATE operation for a Contact record:
- Log in to the CRM.
- Click the main Menu.
- Go to Platform.
- Select API Designer. The API Designer opens.
- Click on +Add API. A pop-up will appear with two options.
- Select REST API to create a custom API endpoint.
- Enter or select the following information:
- Module: Select the module you want to work with from the drop-down list.
- Name: Enter a name to identify the REST API you are creating.
- Status: Check the status box to activate and make the Rest API available for use.
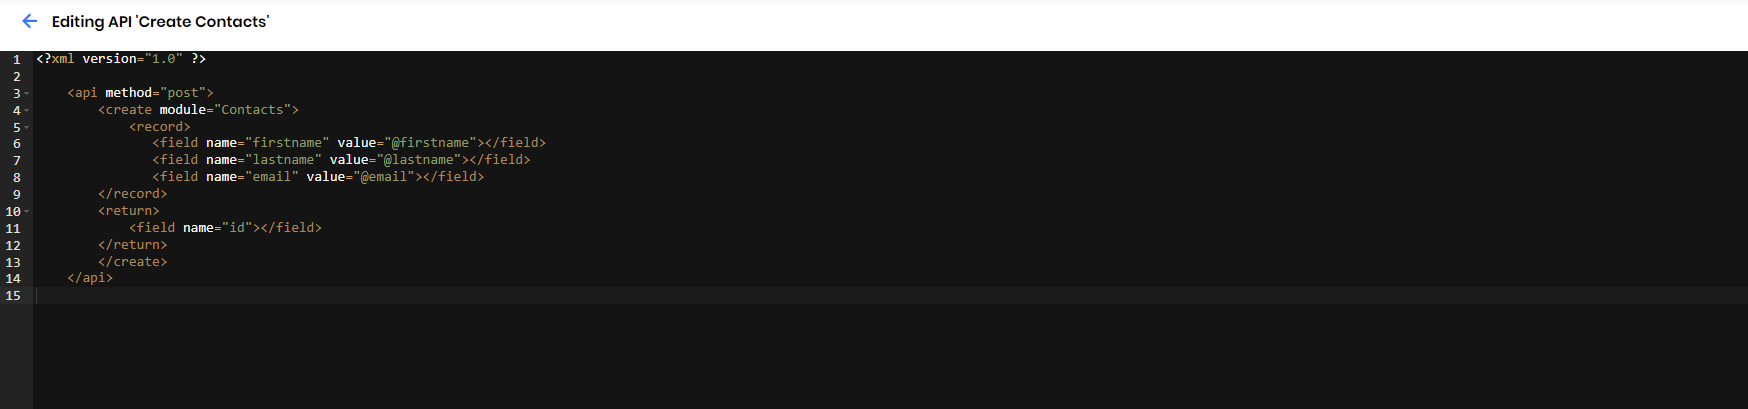
- Click Save. The API Designer interface opens.
- Add all required fields for the chosen module and specify the operation name based on the action you want to perform.
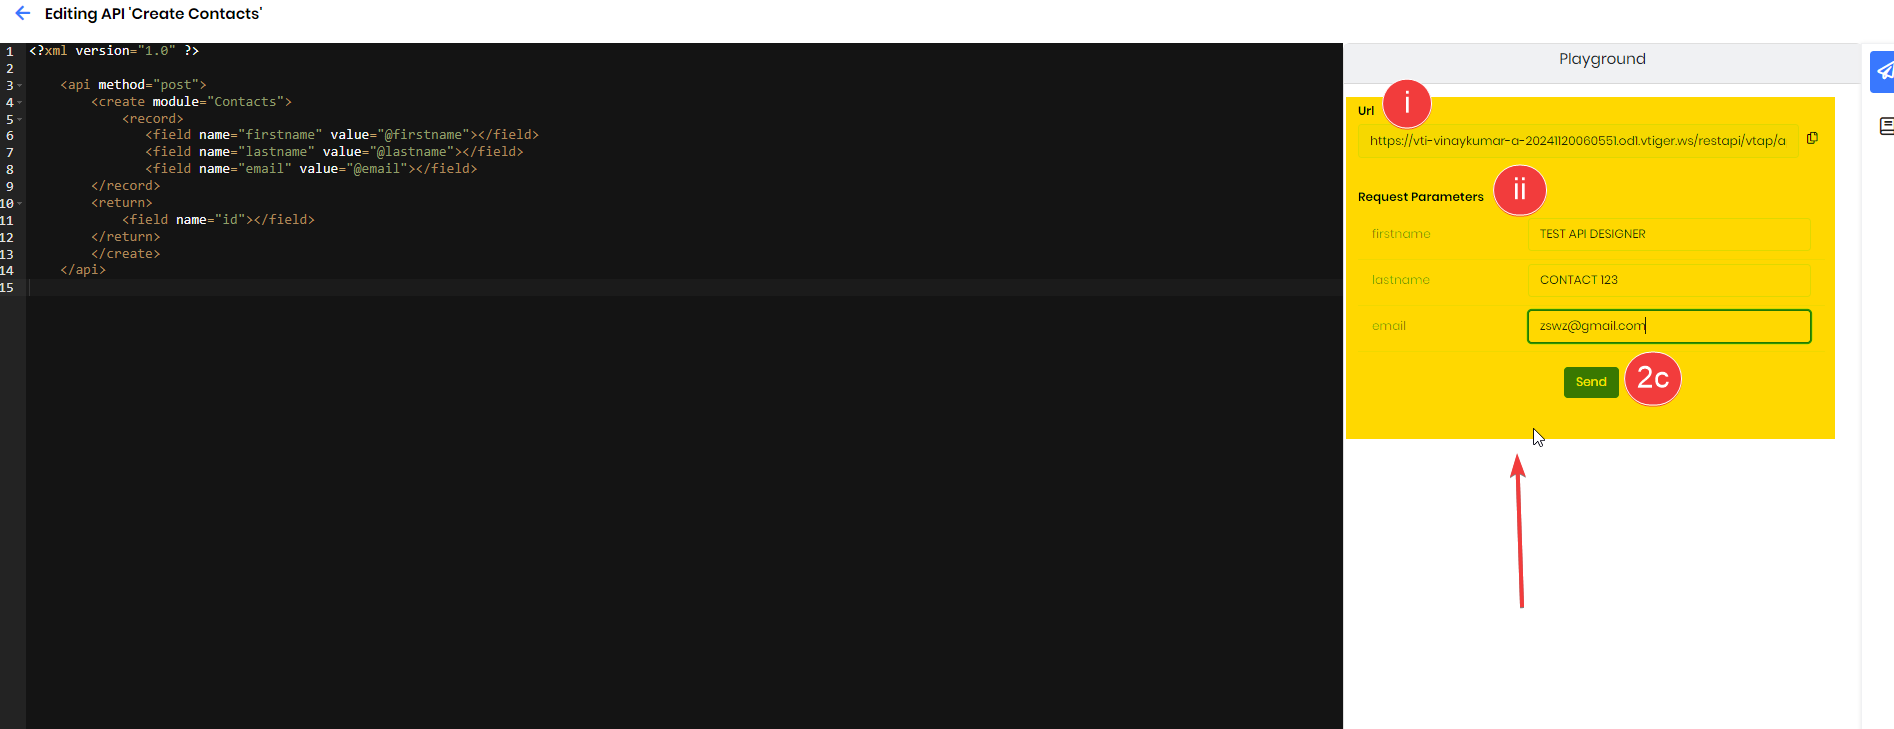
- Click the Playground icon on the right side of the API Designer interface.
- Enter or select the following information:
- URL: The endpoint where the API request is sent.
- Request Parameters
- firstname: The first name of the contact being created.
- lastname: The last name of the contact being created.
- email: The email address of the contact.
- Click Send.
The API Designer will process your request and create a new record with the provided information.
Step 2: Verifying the CRM record reflects the REST API action
Follow these steps to verify the created record:
- Log in to the CRM.
- Click the main Menu.
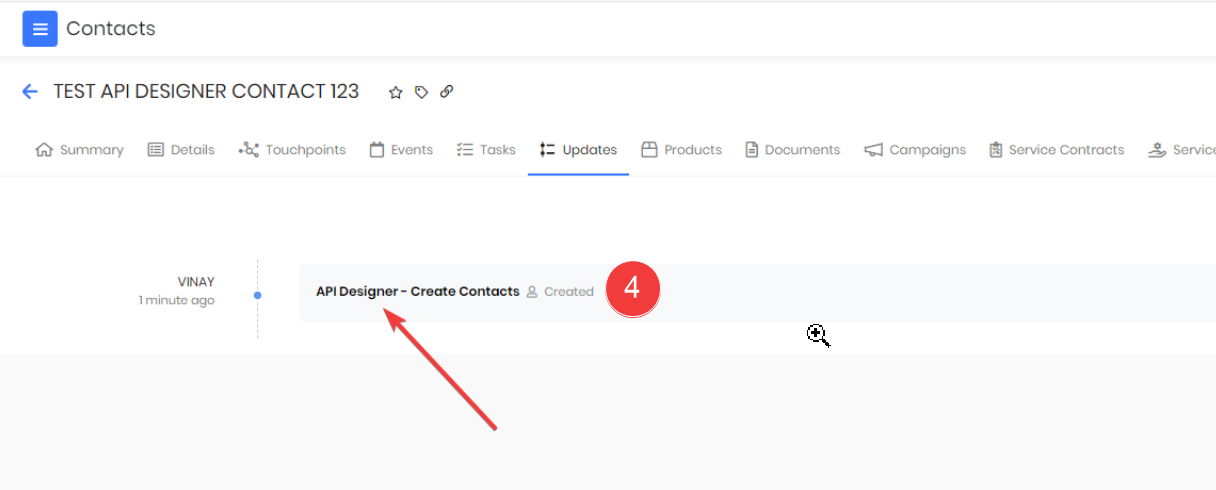
- Click Contacts. The Contacts List View opens.
- Look for the latest contact record created using the CREATE action.
- Go to the Updates tab.
You will see an update saying API Designer - Created, confirming the record was added using the API Designer.UPDATE Operation
In this example, we will use the UPDATE operation to update a Case record. Performing REST API operations in API Designer requires you to do the following:
- Step 1: Running the API script within the API Designer interface
- Step 2: Verifying the CRM record reflects the REST API action
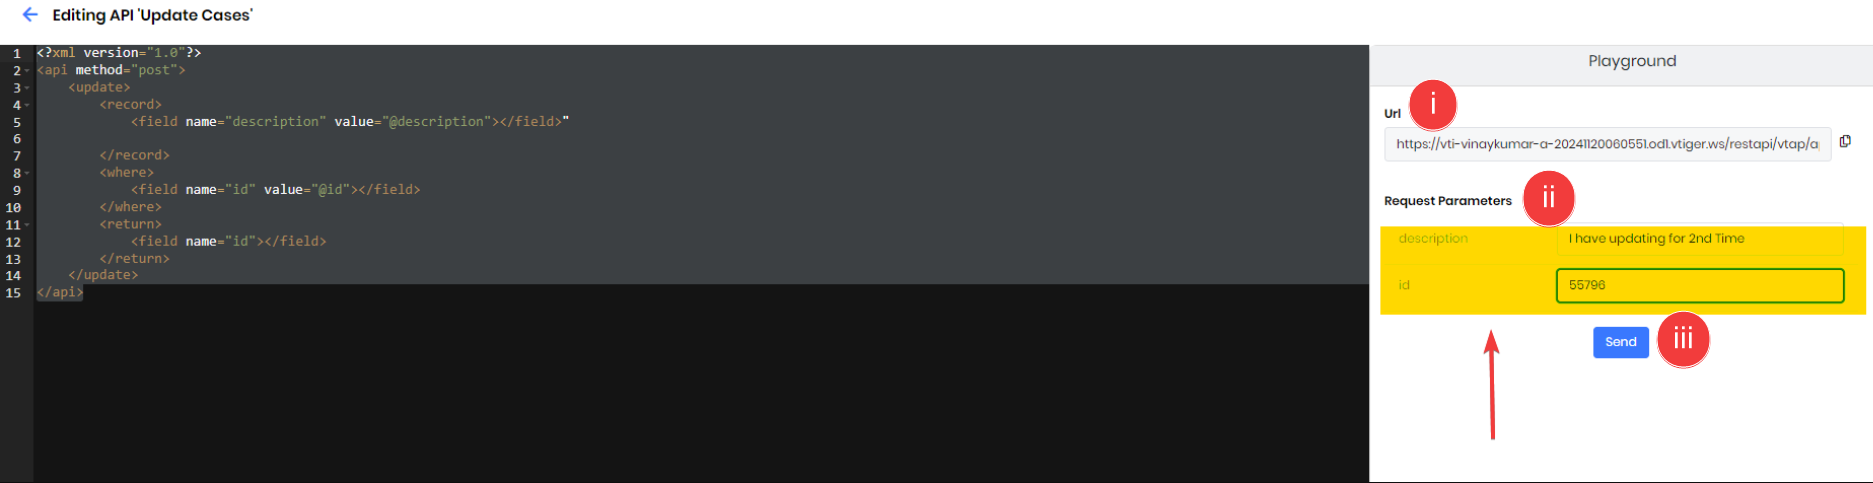
Step 1: Running the API script within the API Designer interface
Follow these steps to perform an UPDATE operation for a Case record:
- Log in to the CRM.
- Click the main Menu.
- Go to the Platform.
- Select API Designer. The API Designer opens.
- Click on +Add API. A pop-up will appear with two options.
- Select REST API to create a custom API endpoint.
- Enter or select the following information:
- Module: Select the module you want to work with from the drop-down list.
- Name: Enter a name to identify the REST API you are creating.
- Status: Check the status box to activate and make the Rest API available for use.
- Click Save. The API Designer interface opens.
- Add all required fields for the chosen module and specify the operation name based on the action you want to perform.
- Click the Playground icon on the right side of the API Designer interface.
- Enter or select the following information:
- URL: The endpoint where the API request is sent.
- Request Parameters
- description: The additional details of the record.
- Id: Unique identifier of the record that needs to be updated.
- Click Send. The API Designer will process your request and update the record with the provided information.
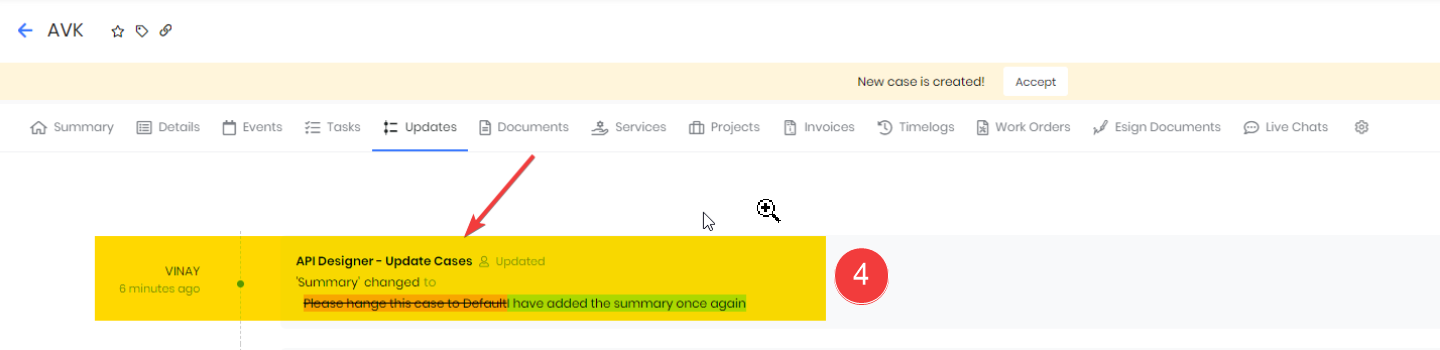
Step 2: Verifying the CRM record reflects the REST API action
Follow these steps to verify the updated record:
- Log in to the CRM.
- Go to Help desk > Cases.
- Look for the latest case record updated using the UPDATE action.
- Go to the Updates tab. You will see an update saying API Designer - Update Cases, confirming that the record was updated using the API Designer.
GET Operation
In this example, we will use the GET operation to retrieve an Organization record.
Follow these steps to perform a GET operation for an Organization record:
- Log in to the CRM account.
- Go to the main Menu.
- Go to the Platform.
- Select API Designer. The API Designer opens.
- Click on +Add API. A pop-up will appear with two options.
- Select REST API to create a custom API endpoint.
- Enter or select the following information:
- Module: Select the module you want to work with from the drop-down list.
- Name: Enter a name to identify the REST API you are creating.
- Status: Check the status box to activate and make the Rest API available for use.
- Click Save. The API Designer interface opens.
- Add all required fields for the chosen module and specify the operation name based on the action you want to perform.
- Click the Playground on the right side of the API Designer interface.
- Enter or select the following information:
- URL: The endpoint where the API request is sent.
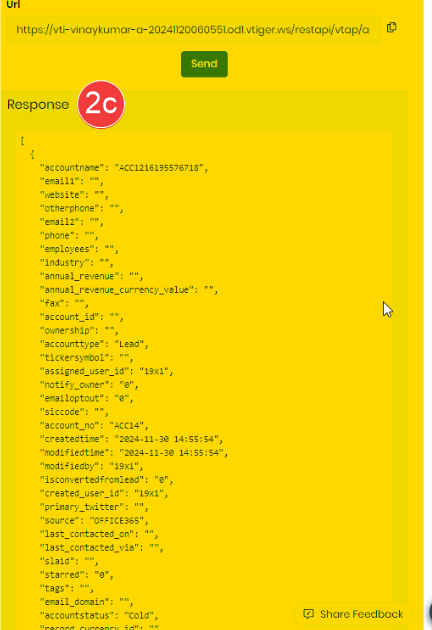
- Click Send.
The API Designer will process the request and return a response containing all organization records along with their respective field values.
UPSERT Operation
A UPSERT operation combines the functionality of both update and create actions. It checks whether a record already exists; if it does, the record is updated; if it doesn’t, a new record is created. This ensures data is inserted or updated in a single operation.
Rules of UPSERT Operation:
- For the update action using the upsert operation, you must include the record ID along with the fields you want to update.
- If a field parameter is provided without a value, the corresponding field in the CRM record will be updated as empty. Only include the fields that need to be updated, unless they are mandatory fields.
- If any mandatory field is missing or has no value, the request will fail, and an error message will be displayed prompting you to update the missing or required field.
- For the create action, make sure to include all mandatory fields along with the selected operation type to complete the upsert process
- If a field parameter is empty, it will be updated as an empty value in the CRM record.
- If any mandatory field is not provided, the request will fail, displaying an error message to update the missing or required field.
In this example, we will use the UPSERT operation for a Contact record. Performing REST API operations in API Designer requires you to do the following:
- Step 1: Running the API script within the API Designer interface
- Step 2: Verifying the CRM record reflects the REST API action
Step 1: Running the API script within the API Designer interface
Follow these steps to perform a UPSERT operation for a Contact record:
- Log in to the CRM.
- Go to the main Menu.
- Go to the Platform.
- Select API Designer. The API Designer opens.
- Click on +Add API. A pop-up will appear with two options.
- Select REST API to create a custom API endpoint.
- Enter or select the following information:
- Module: Select the module you want to work with from the drop-down list.
- Name: Enter a name to identify the REST API you are creating.
- Status: Check the status box to activate and make the Rest API available for use.
- Click Save. The API Designer interface opens.
- Add all required fields for the chosen module and specify the operation name based on the action you want to perform.
- Click Playground on the right side of the API Designer interface.
- Enter or select the following details:
- URL: The endpoint where the API request is sent.
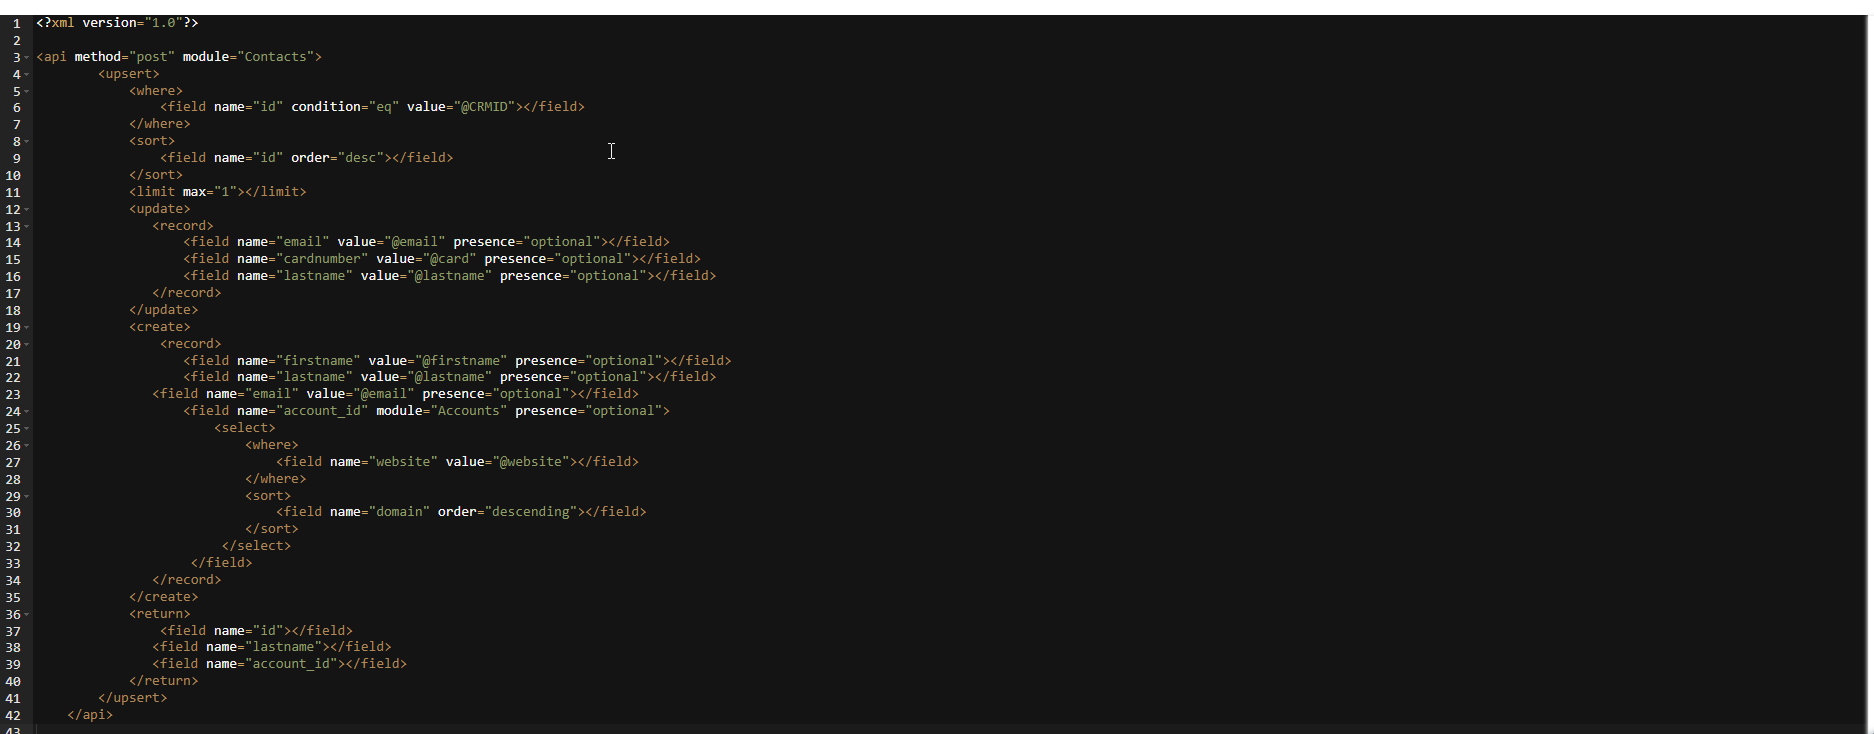
- Enter the following Request Parameters:
- CRMID: Unique identifier of the record.
- email: Email address of the contact record.
- card: Custom or reference field to store card details or related identifier.
- lastname: Last name of the contact record.
- firstname: First name of the contact record.
- website: The contact’s website to store web details.
- Click Send. The API Designer will process your request and update the record with the provided information.
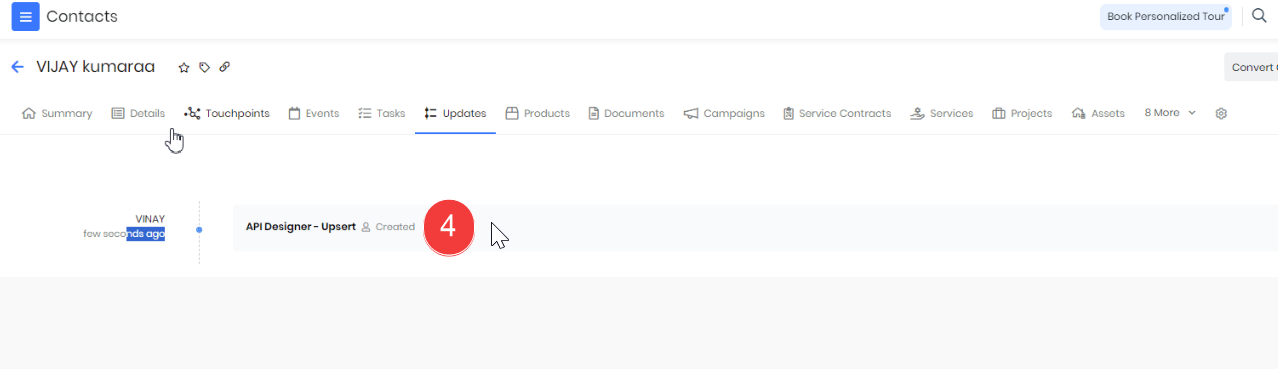
Step 2: Verifying the CRM record reflects the REST API action
Follow these steps to verify the record:
- Log in to the CRM.
- Go to Essentials > Contacts. The Contacts List View opens.
- Hover over the records updated or created using the API action.
- Go to the Updates tab. You will see an update saying API Designer - Upsert, confirming that the record was created using the API Designer.
Note: When sending additional requests, make sure to change the field values. If the same values are used, the system may return a Duplicate records found error.
Using Webhooks in API Designer
You can use the Webhook option to trigger API operations from third-party apps, enabling actions such as CREATE, UPDATE, and GET.
Follow these steps to create a new API using Webhook:
- Log in to the CRM.
- Go to the main Menu.
- Go to the Platform.
- Select API Designer. The API Designer opens.
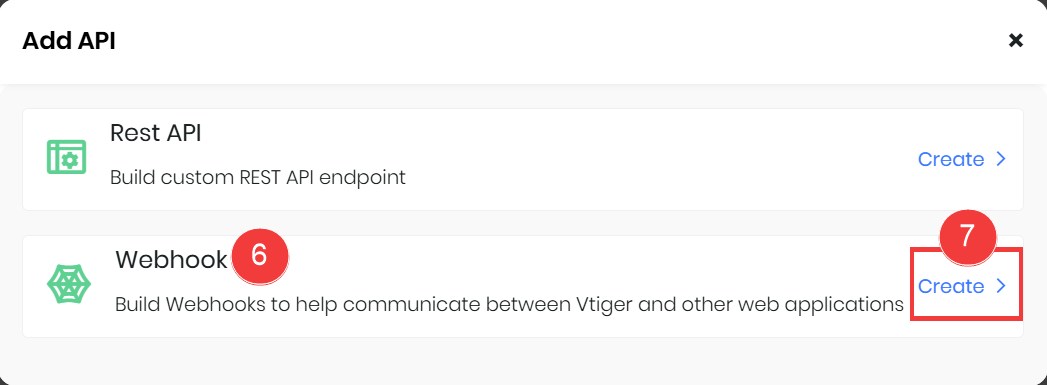
- Click on +Add API. A pop-up will appear with two options.
- Select Webhook to connect Vtiger with other apps.
- Select Create from the Webhook option.
- Enter or select the following information:
- Module: Select the module you want to work with from the drop-down list.
- Name: Enter a name to identify the Webhook you are creating.
- Status: Check the status box to activate and make the Webhook available for use.
- Click Save. The API interface opens.
Let us understand the steps to perform different API actions through Webhooks.
Performing API Operations using Webhooks
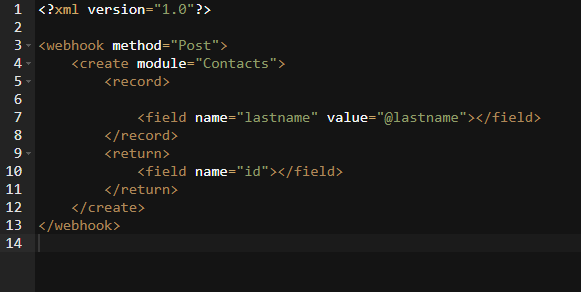
CREATE Operation
Let us walk through the CREATE operation using the Contacts module as our example in the webhook setup via Postman.
Rules while adding the scripts for the CREATE operation via Webhook:
- Replace API with WEBHOOK in the script.
- Add all necessary fields and the operation name in the script.
- Once the script is done, create a Token to continue the process.
Note:
- If a field parameter is left empty with no value provided, the corresponding field in the CRM record will be updated with an empty value.
- If any mandatory field is missing or has no value, the request will fail and display an error message prompting you to provide the required field.
Performing API actions through Webhook requires you to do the following steps:
- Step 1: Generating a Token in the API Designer
- Step 2: Using Postman to test an API from the API Designer
Step 1: Generating a Token in the API Designer
Follow these steps to generate a Token in the API Designer:
- Log in to the CRM.
- Go to the main Menu.
- Go to the Platform.
- Select API Designer. The API Designer opens.
- Click on +Add API. A pop-up will appear with two options.
- Select Webhook to connect Vtiger with other apps.
- Select Create from the Webhook option.
- Enter or select the following information:
- Module: Select the module you want to work with from the drop-down list.
- Name: Enter a name to identify the Webhook you are creating.
- Status: Check the status box to activate and make the Webhook available for use.
- Click Save. The API interface opens.
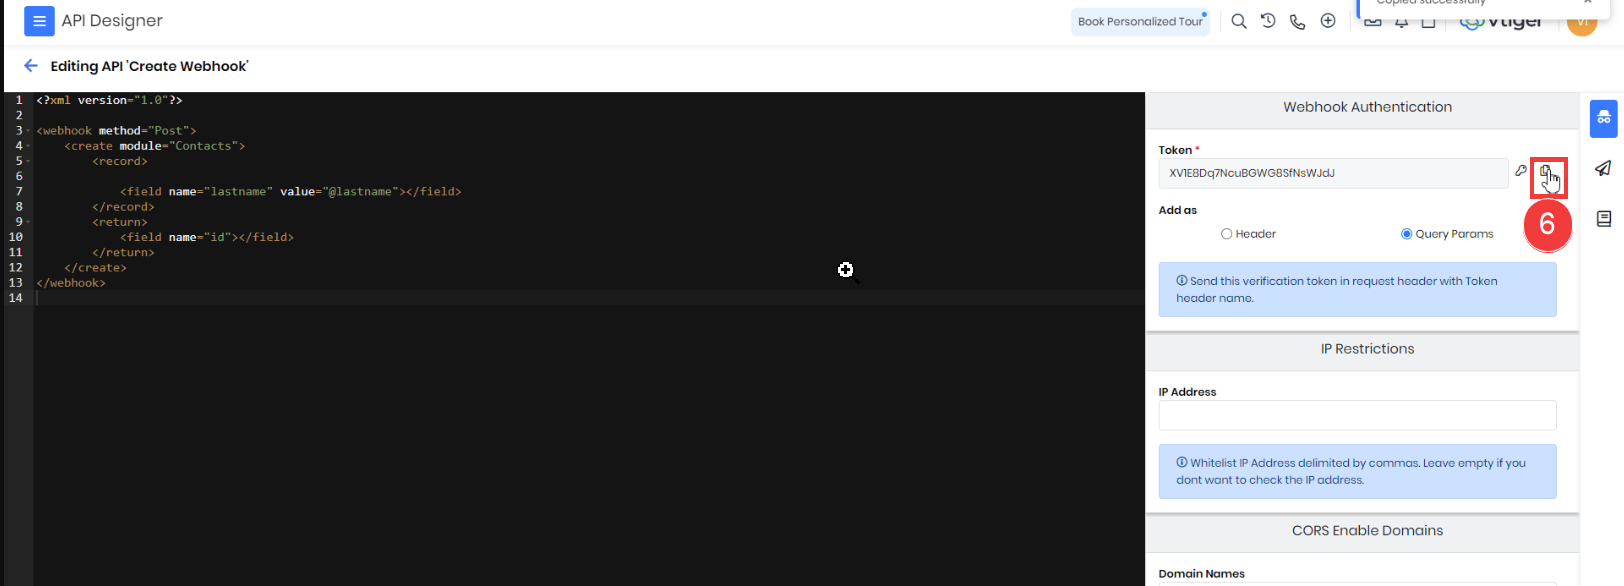
- Add the required fields and specify the operation name for your action in the API interface.
- Click on the Security tab on the right side of the API interface.
- Click on the Generate New Token icon. The token will be generated and automatically filled in the Token box.
- Note: The token will automatically update when the key icon is clicked.
- Select either of the following for Add as:
- Header: For Header type, use the Header tab in Postman to add the key.
- Query Params: For Query Params, use the Params tab in Postman to enter the key.
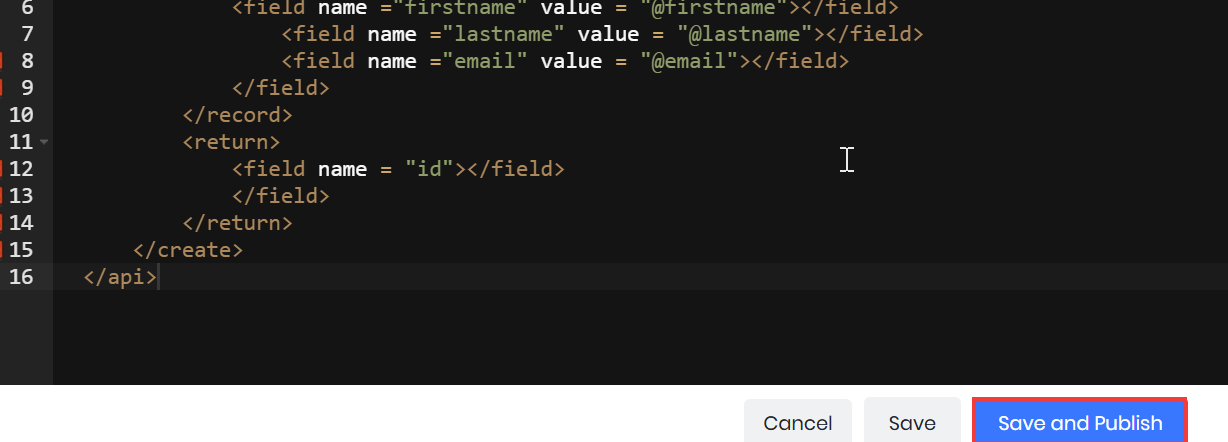
Note: To activate the changes, click Save and Publish before testing the API with the Send option in Postman.
Step 2: Using Postman to test an API from the API Designer in Vtiger CRM
To begin testing the API, ensure your Vtiger instance is properly configured in Postman.
Note: The following steps will be performed in both Postman and Vtiger CRM. Keep both tabs open.
Follow these steps to configure your signed-up Vtiger instance in Postman:
- Download and install the latest Postman version for your CRM instance.
- Log in to your Vtiger instance.
- Click the Settings button.
- Click the Edit button to view your username and access key.
- Copy your Username and Access Key to a notepad.
- Open Postman and click the + icon to create a new request tab.
- Select the HTTP method based on the API operation you want to perform.
- Navigate to the Authorization tab in Postman.
- Select Basic Auth from the dropdown menu.
- Copy your Username from the user profile and paste it into the Username field in Postman.
- Copy your Access Key from the user profile and paste it into the Password field in Postman.
- Paste your Vtiger instance URL into Postman, followed by the appropriate API endpoint for the action you want to perform.
- Click Send to execute the request and view the response.
Once you have configured Postman, you can begin making test requests.
Note: The following steps will be performed in both Postman and Vtiger CRM. Keep both the Postman and the CRM tabs open.
Follow these steps to test your API and create a new record using Postman:
- Open Postman.
- Go to the Authorization tab in Postman.
- Select Basic Auth from the type dropdown.
- Enter the Vtiger CRM username and access key as the credentials.
- Go to API Designer in Vtiger CRM.
- Copy the Token displayed in the API Designer page.
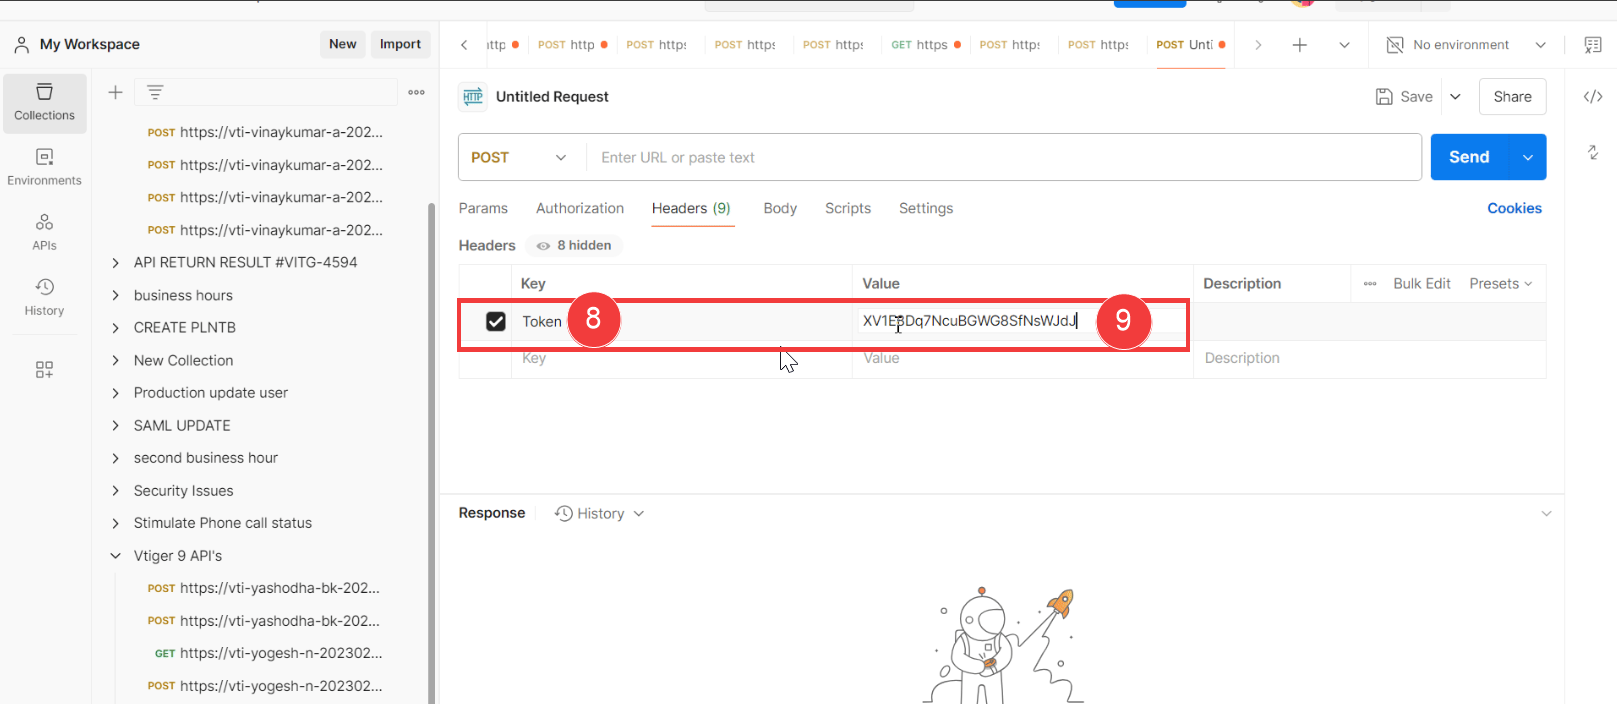
- Go back to Postman.
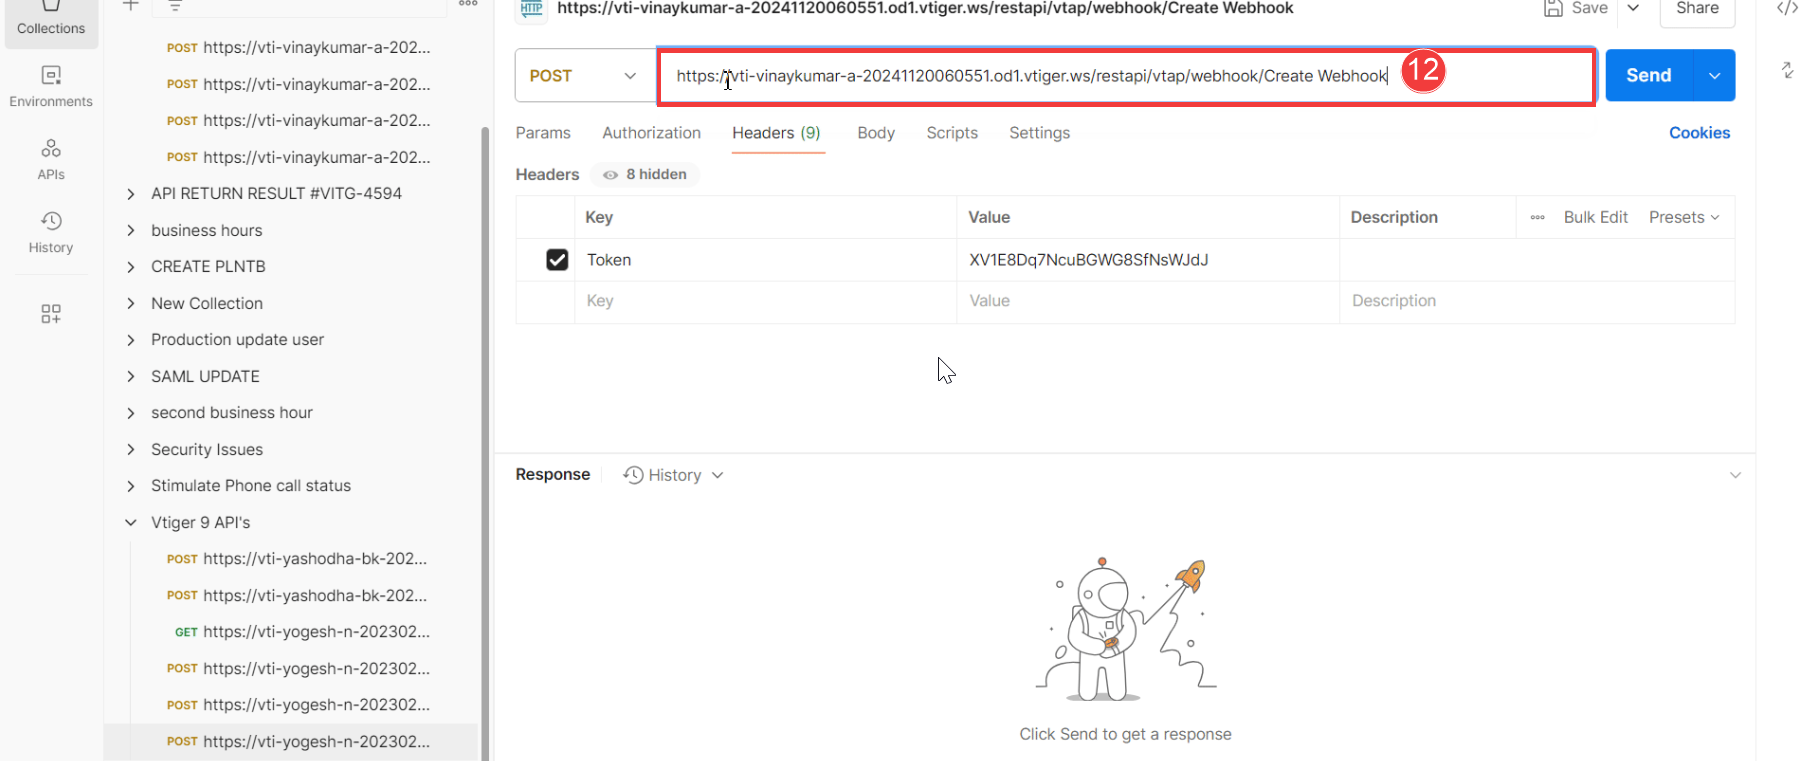
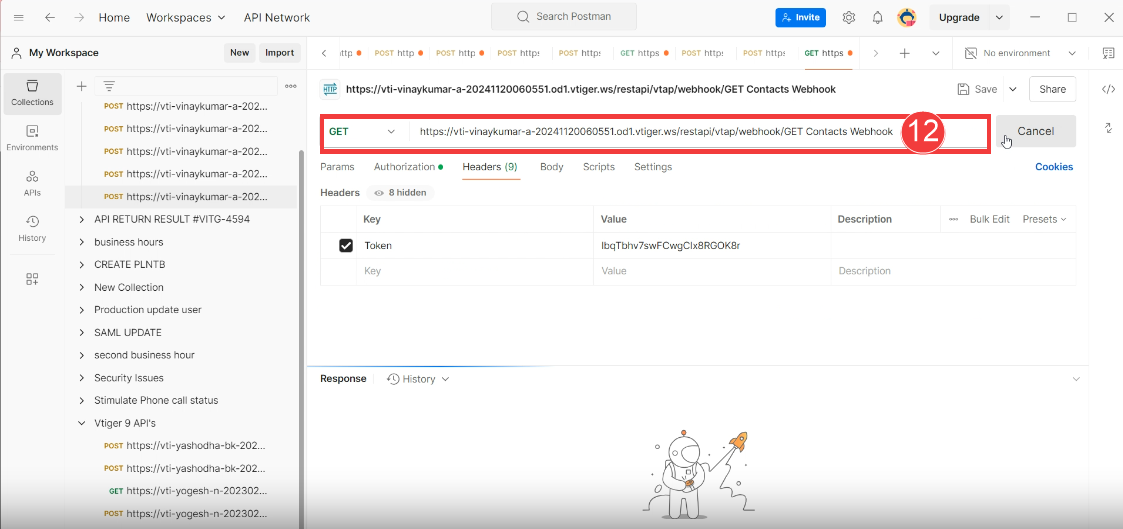
- Select the Headers tab and type Token in the key column.
- Paste the Token you copied earlier into the value column.
- Select POST from the method dropdown located beside the URL field in Postman.
- Copy the endpoint URL from your API Designer (this should be the API endpoint generated).
- Paste the URL into Postman's request URL field.
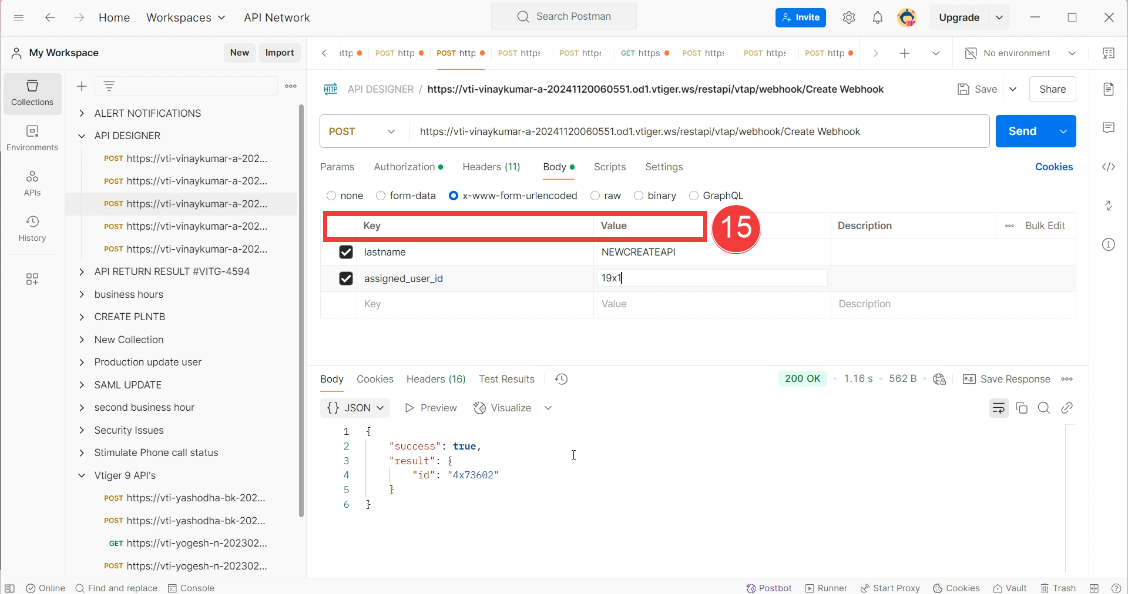
- Go to the Body tab in Postman.
- Choose raw and then select JSON as the format.
- Copy the field structure from your API script into the Key and Value columns in Postman.
- Click the Send button in Postman.
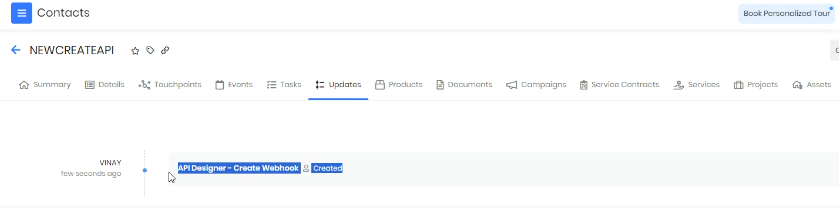
Once the Contact is created, you can check the Contacts module, and API Designer - Create Webhook will appear in the Updates tab.
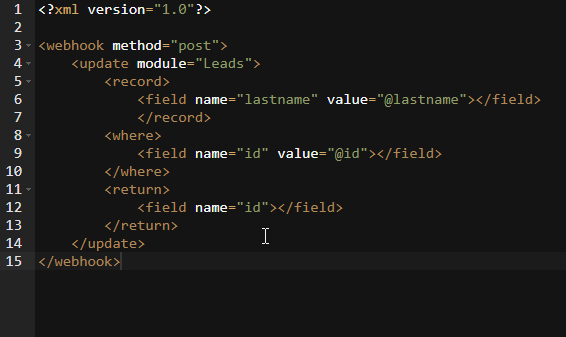
UPDATE Operation
Let us walk through the UPDATE operation using the Leads module as our example in the webhook setup via Postman.
Rules while adding the scripts for the CREATE operation via Webhook:
- Replace API with WEBHOOK in the script.
- Add all necessary fields and the operation name in the script.
- Once the script is done, create a Token to continue the process
Performing API actions through Webhook requires you to do the following steps:
- Step 1: Generating a Token in the API Designer
- Step 2: Using Postman to test an API from the API Designer in Vtiger CRM
Step 1: Generating a Token in the API Designer
Follow these steps to generate a Token in the API Designer:
- Log in to the CRM.
- Go to the main Menu.
- Go to the Platform.
- Select API Designer. The API Designer opens.
- Click on +Add API. A pop-up will appear with two options.
- Select Webhook to connect Vtiger with other apps.
- Select Create from the Webhook option.
- Enter or select the following information:
- Module: Select the module you want to work with from the drop-down list.
- Name: Enter a name to identify the Webhook you are creating.
- Status: Check the status box to activate and make the Webhook available for use.
- Click Save. The API interface opens.
- Add the required fields and specify the operation name for your action in the API interface.
- Click on the Security tab on the right side of the API interface.
- Click on the Generate New Token icon. The token will be generated and automatically filled in the Token box.
- Select either of the following for Add as:
- Header: For Header type, use the Header tab in Postman to add the key.
- Query Params: For Query Params, use the Params tab in Postman to enter the key.
Note: To activate the changes, click Save and Publish before testing the API with the Send option in Postman.
Step 2: Using Postman to test an API from the API Designer in Vtiger CRM
Note: Keep both the Postman and the CRM tabs open.
Follow these steps to test your API and update a record using Postman:
- Open Postman.
- Go to the Authorization tab in Postman.
- Select Basic Auth from the type dropdown.
- Enter the Vtiger CRM username and access key as the credentials.
- Go to API Designer in Vtiger CRM.
- Copy the Token displayed in the API Designer page.
- Go back to Postman.
- Select the Headers tab and type Token in the key column.
- Paste the Token you copied earlier into the value column.
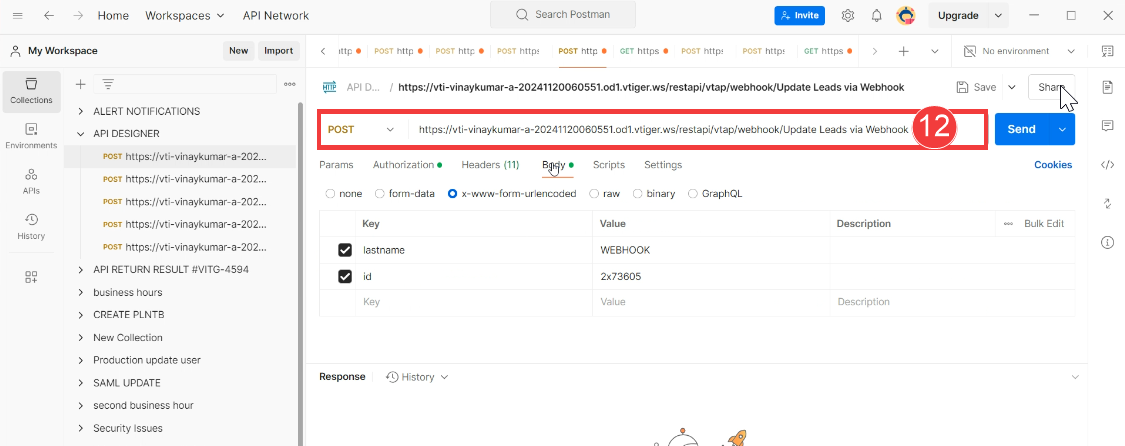
- In Postman, from the dropdown beside the URL bar, select POST as the request method.
- Copy the endpoint URL from your API Designer (this should be the API endpoint generated).
- Paste the URL into Postman's request URL field.
- Go to the Body tab in Postman.
- Choose raw and then select JSON as the format.
- Copy the field structure from your API script.
- Click the Send button in Postman.
You can verify the record was updated via the webhook action by reviewing the details tab of that record.
GET Operation
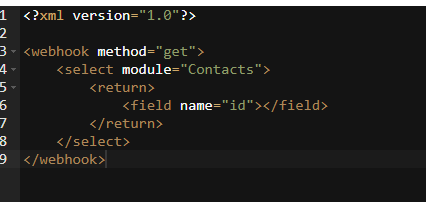
Let’s walk through the GET operation using the Contacts module as our example in the webhook setup via Postman.
Rules while adding the scripts for the GET operation via Webhook:
- Replace API with WEBHOOK in the script.
- Add all necessary fields and the operation name in the script.
- Once the script is done, create a Token to continue the process
Performing API actions through Webhook requires you to do the following steps:
- Step 1: Generating a Token in the API Designer
- Step 2: Using Postman to test an API from the API Designer in Vtiger CRM
Step 1: Generating a Token in the API Designer
Follow these steps to generate a Token in the API Designer:
- Log in to the CRM.
- Go to the main Menu.
- Go to the Platform.
- Select API Designer. The API Designer page opens.
- Click on +Add API. A pop-up will appear with two options.
- Select Webhook to connect Vtiger with other apps.
- Select Create from the Webhook option.
- Enter or select the following information:
- Module: Select the module you want to work with from the drop-down list.
- Name: Enter a name to identify the Webhook you are creating.
- Status: Check the status box to activate and make the Webhook available for use.
- Click Save. The API interface opens.
- Add the required fields and specify the operation name for your action in the API interface.
- Click on the Security tab on the right side of the API interface.
- Click on the Generate New Token icon. The token will be generated and automatically filled in the Token box.
- Select either of the following for Add as:
- Header: For Header type, use the Header tab in Postman to add the key.
- Query Params: For Query Params, use the Params tab in Postman to enter the key.
Note: To activate the changes, click Save and Publish before testing the API with the Send option in Postman.
Step 2: Using Postman to test an API from the API Designer in Vtiger CRM
Note: Keep both the Postman and the CRM tabs open.
Follow these steps to test your API and retrieve information using Postman:
- Open Postman.
- Go to the Authorization tab in Postman.
- Select Basic Auth from the type dropdown.
- Enter the Vtiger CRM username and access key as the credentials.
- Go to API Designer in Vtiger CRM.
- Copy the Token displayed in the API Designer page.
- Go back to Postman.
- Select the Headers tab and type Token in the key column.
- Paste the Token you copied earlier into the value column.
- In Postman, from the dropdown beside the URL bar, select POST as the request method.
- Copy the endpoint URL from your API Designer (this should be the API endpoint generated).
- Paste the URL into Postman's request URL field.
- Go to the Body tab in Postman.
- Choose raw and then select JSON as the format.
- Copy the field structure from your API script.
- Click the Send button in Postman.
The retrieved contact information will be visible after running the GET operation
Reference