Articles in this section
Creating Standard Workflows
Feature Availability and Limits
| One Pilot | One Growth | One Professional | One Enterprise | One AI | |
|
| |||||
|
|
|
|
|
|
|
|
|
|
|
|
|
|
|
| |||||
|
|
|
|
|
|
|
|
|
|
|
|
|
|
Introduction
Standard workflows help you automate simple, repetitive tasks in Vtiger CRM. They follow a single set of rules and perform actions like sending emails or creating tasks, when certain conditions are met. For example, you can set up a workflow to automatically send a welcome email whenever a new contact is added.
Four Components of Standard Workflows
To create a standard workflow, you must specify the following:
- The module on which the workflow is executed.
- The trigger that will cause the workflow to execute.
- Conditions based on which the workflow will execute its actions.
- Actions that the workflow will perform when the conditions are met.
In this article, you will learn about:
- Standard Workflow
- Components of a Standard Workflow
- Setting up Standard Workflow
- Deactivating and Deleting am Standard Workflow
Key Terminology
|
|
|
|
|
|
|
|
|
|
|
|
|
|
|
Creating a Standard Workflow
Follow these steps to create a standard workflow:
- Log in to the CRM.
- Click the User Menu in the top right corner of the screen.
- Click the Settings button. The Settings page opens.
- Look for the Automation section.
- Select Workflows.
- Click the +New Workflow button.
- Select Standard.
- Enter or select the following information:
- Basic information: Enter the workflow name, target module, and status.
- Workflow trigger: Select when the workflow should run.
- Entry criteria: Select the conditions that must be met for the workflow to execute.
- Actions: Select what the workflow will do, such as sending emails, updating fields, or creating tasks.
- Click Save.
Let us look at each components in detail.
Section 1: Basic information
This section provides basic information about a workflow, such as its name, module, etc.
- Workflow Name: Specify the name of the workflow.
- Target Module: Specify the module on which the workflow must execute, such as Deals, Contacts, Products, etc.
- Status: Specify the workflow status as Active or Inactive. The workflow does not execute when the status is set to Inactive
- Description: Provide a brief description of what the workflow is used for, the actions it performs, etc.
Section 2: Workflow trigger
Specify when the workflow must trigger by choosing an option from the following two fields:
- Trigger Workflow On:
- Record creation: Choose this option if you want the workflow to trigger when a record is created in the Target Module (mentioned in the previous section).
- Record updation (includes creation): Choose this option if you want the workflow to trigger when a record is updated or created in the Target Module (mentioned in the previous section).
- Time Interval: Choose this option if you want the workflow to trigger at a frequent time interval.
- Frequency: Specify the frequency at which the workflow must trigger. To learn more about this option, click here.
- Recurrence: This option is shown when you select Record updation in the previous section.
- Only first-time conditions are met: Triggers the workflow if the specified conditions are true. Once executed, the workflow will not trigger on the same record again. However, it will trigger on other records in the selected module.
- Every time conditions met: Triggers the workflow on a record every time the specified conditions are true.
Section 3: Entry criteria
Define the conditions to specify which records the workflow should run on. Vtiger offers two types of conditions:
-
All conditions: It is based on the logical AND operation. Workflow executes when all the conditions are met.
|
|
-
Any condition: It is based on the logical OR operation. Workflow executes when at least one condition is met.
|
|
Note: There is an AND operation between All conditions and Any condition. The conditions mentioned under both All conditions and Any condition are applied in the entry criteria.
For example, to send an email to a contact three weekdays before the deal’s close date, you must set up the condition as follows:In this case, workflows exclude non-working days based on the specified business hours.
Deals module

You create a workflow on the Deals module. You want the workflow to execute its actions when the deal amount is more than 1000. So, the condition that you specify is that the Amount is greater than 1000. You can specify the condition using three fields. In the first field, you must select the field name (Amount). In the second step, select the condition (greater than), and in the third step, enter the amount (1000).
Contacts module

You create a workflow on the Contacts module. The intent is to send an email to contacts two days before their support end date. Select Support End Date in the first field, less than days later in the second, and enter 3 in the last field.
To learn more about conditions, click here.
Section 4: Actions
The Actions part defines what the workflow must execute after getting triggered and meeting the entry criteria. You can set up different types of actions around a Picklist or Assigned To field, which is called the Anchor Field.
Here is a list of actions and what each one does.
|
|
|
| Send Email |
|
| Invoke Custom Function |
|
| Create Task |
|
| Create Event |
|
| Update Fields |
|
| Create Record |
|
| SMS Task |
|
| Mobile Push Notification |
|
| Webhook |
|
Follow these steps to create an standard workflow:
- Log in to the CRM.
- Click the User Menu in the top right corner of the screen.
- Click the Settings button. The Settings page opens.
- Look for the Automation section.
- Select Workflows.
- Click the +New Workflow button.
- Select Standard. The New Standard Workflow page opens.
- Enter or select the following details:
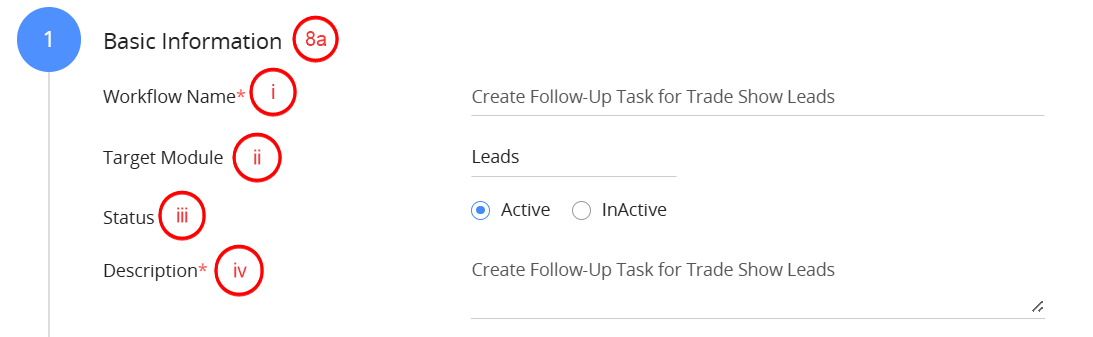
- Basic Information
- Module: Select Leads as the target module.
- Workflow Name: Enter a name like Create Follow-Up Task for Trade Show Leads.
- Status: Set to Active to enable the workflow once saved.
- Description: Enter a brief description of what the workflow is used for.
- Basic Information
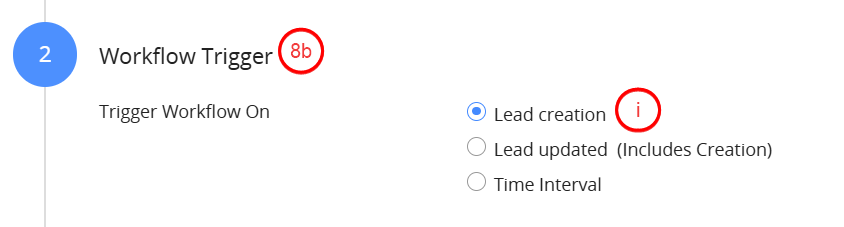
- Workflow Trigger
- Choose Lead creation as the trigger event.
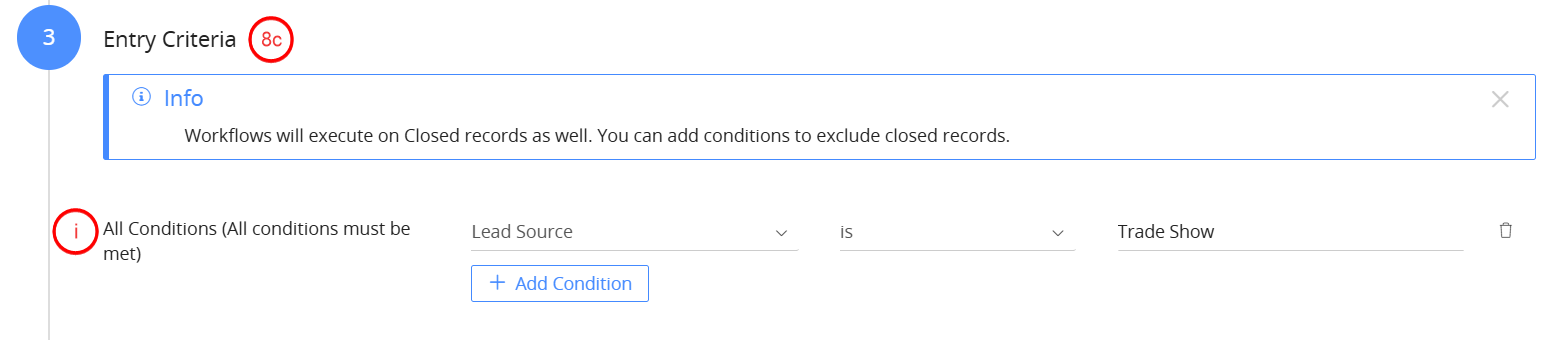
- Entry Criteria
- Define a condition to target only leads from a specific source. This limits the workflow to leads that originate from trade show events.
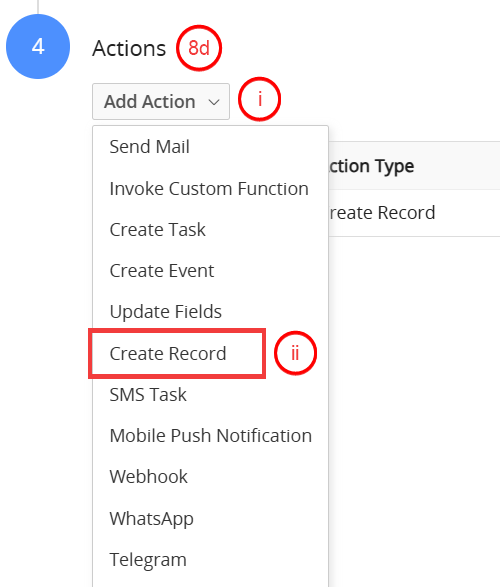
- Actions
- Click Add Action.
- Choose Create Record.
- Set the Action title, choose the module where the new record will be created, and define the field values for the record using Add Record Field.
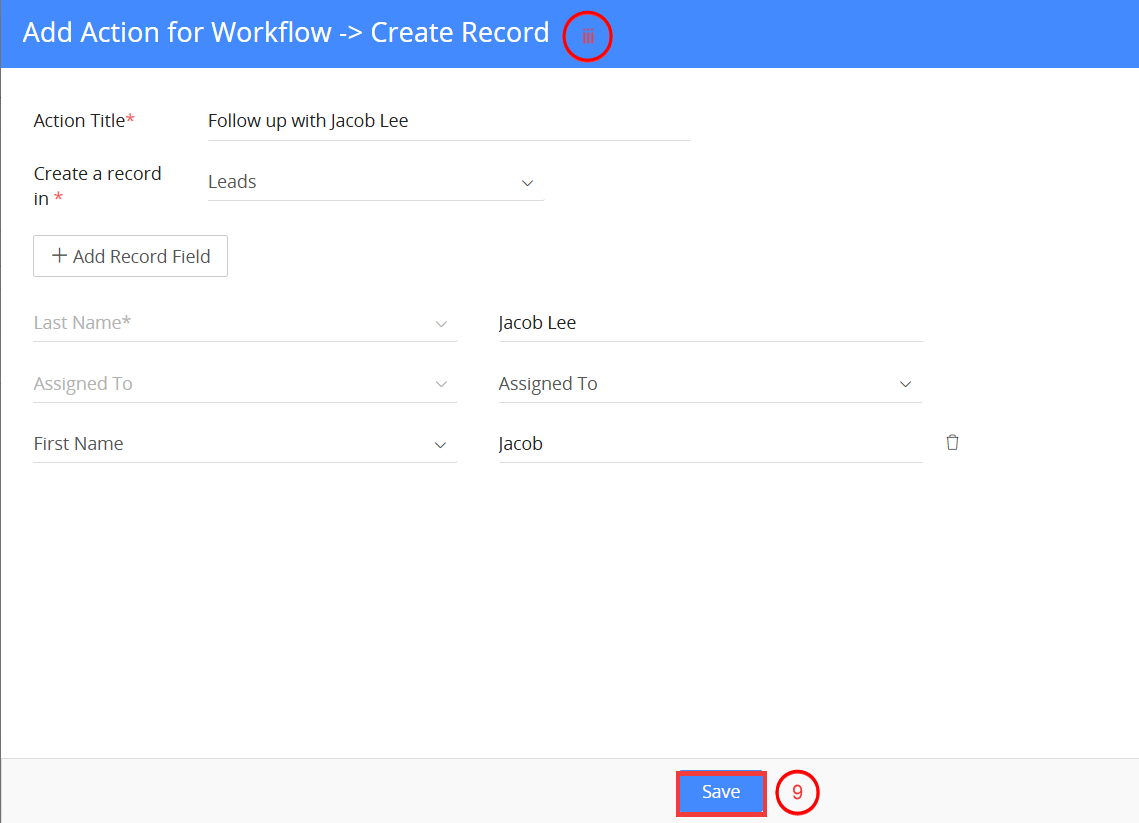
- Click Save to activate the workflow.
Deactivating a Standard Workflow
Follow these steps to deactivate a standard workflow:
- Log in to the CRM.
- Click the User Menu in the top right corner of the screen.
- Click the Settings button. The Settings page opens.
- Look for the Automation section.
- Click Workflows.
- Click the Standard tab on the top left side of the workflow list.
- Select a module from the drop-down at the top to view its related workflows.
- Select a workflow.
- Disable the toggle button on the left side of the workflow to deactivate it.
Deleting a Standard Workflow
Follow these steps to delete a standard workflow:
- Log in to the CRM.
- Click the User Menu in the top right corner of the screen.
- Click the Settings button. The Settings page opens.
- Look for the Automation section.
- Click Workflows.
- Click the Standard tab on the top left side of the workflow list.
- Select a module from the drop-down at the top to view its related workflows.
- Select a workflow.
- Hover over a workflow and click the Delete icon to delete it.