Articles in this section
Autoresponder Emails and Campaigns
Feature Availability
Vtiger Editions: One Professional | One Enterprise | One AI
Introduction
Autoresponder emails are automated messages sent in response to specific actions or events, like form submissions or record updates. They trigger automatically when predefined conditions are met. Here are a few examples of autoresponder emails:
- Welcome Email: Sent automatically when a user signs up for your newsletter or creates an account.
- Order Confirmation: Sent immediately after a customer places an order on your e-commerce site.
- Appointment Confirmation: Sent when a user schedules an appointment or meeting.
- Password Reset Email: Triggered when a user requests to reset their password.
Autoresponder Emails in Vtiger CRM
In Vtiger CRM, you can set up autoresponder emails to send predefined messages automatically. Common triggers include:
- Creation of a Lead or Contact from a webform
- Submission of a support or feedback form
- Changes to a record, such as status updates
These emails can be set up through Workflows or Autoresponder Email Campaigns, allowing you to automate communications efficiently.
Benefits
The benefits of using the autoresponder emails in Vtiger CRM are:
- Sends instant responses to customer actions such as form submissions or record creation.
- Ensures consistent communication with predefined email templates.
- Reduces manual effort by automating repetitive follow-up emails.
- Helps teams respond even outside business hours.
- Minimizes the risk of missed or delayed responses.
- Allows automation through workflows and autoresponder email campaigns.
In this article, you will learn about:
- Autoresponder email campaigns
- Sending autoresponder emails to leads created from webforms
- Prerequisites for sending an autoresponder email campaign
- Creating and stopping an autoresponder email campaign
- Viewing campaign metrics
- Tracking email campaign performance
- Tracking email campaign activity
Key Terminology
|
|
|
|
|
|
|
|
|
|
|
|
|
|
|
|
|
|
|
|
|
|
|
|
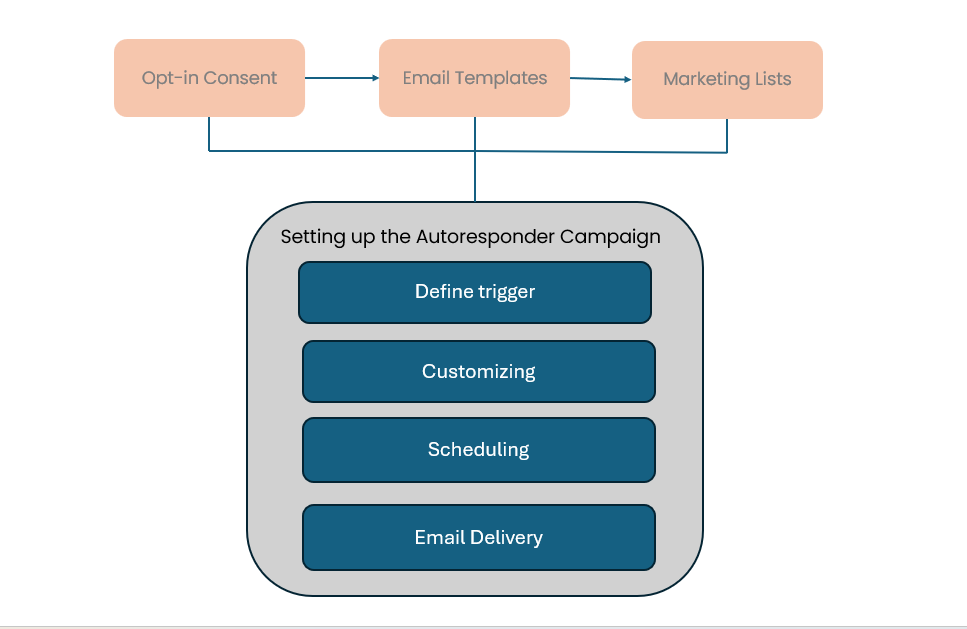
Prerequisites for Setting Up Autoresponder Emails and Campaigns
Ensure the following requirements are met before sending autoresponder emails or starting an autoresponder campaign.
GDPR
General Data Protection Regulation, or GDPR, is a law that requires you to get affirmative and provable consent to send EU citizens marketing emails. You can do this by obtaining their double opt-in.
To learn more about GDPR, click here.
Double opt-in
A double opt-in is confirmation that a subscriber wants to receive your email campaigns. To obtain the subscriber's confirmation, you must:
- Send a request confirmation email.
- In the email subject line, explain that the subscriber must click the link to allow you to send marketing emails.
If the subscriber clicks the link in the email, they are double-opted in, confirming that they have agreed to receive email marketing. This ensures that you can send your marketing emails to them legally.
Email Settings
Before you send an email campaign, you must set the email opt-in required for email delivery. When your contact has opted in, it means you have their consent to send them marketing emails.
Follow these steps to set the required email opt-in:
- Log in to the CRM.
- Go to the User Profile in the top right corner of the screen
- Click Settings. The Settings page opens.
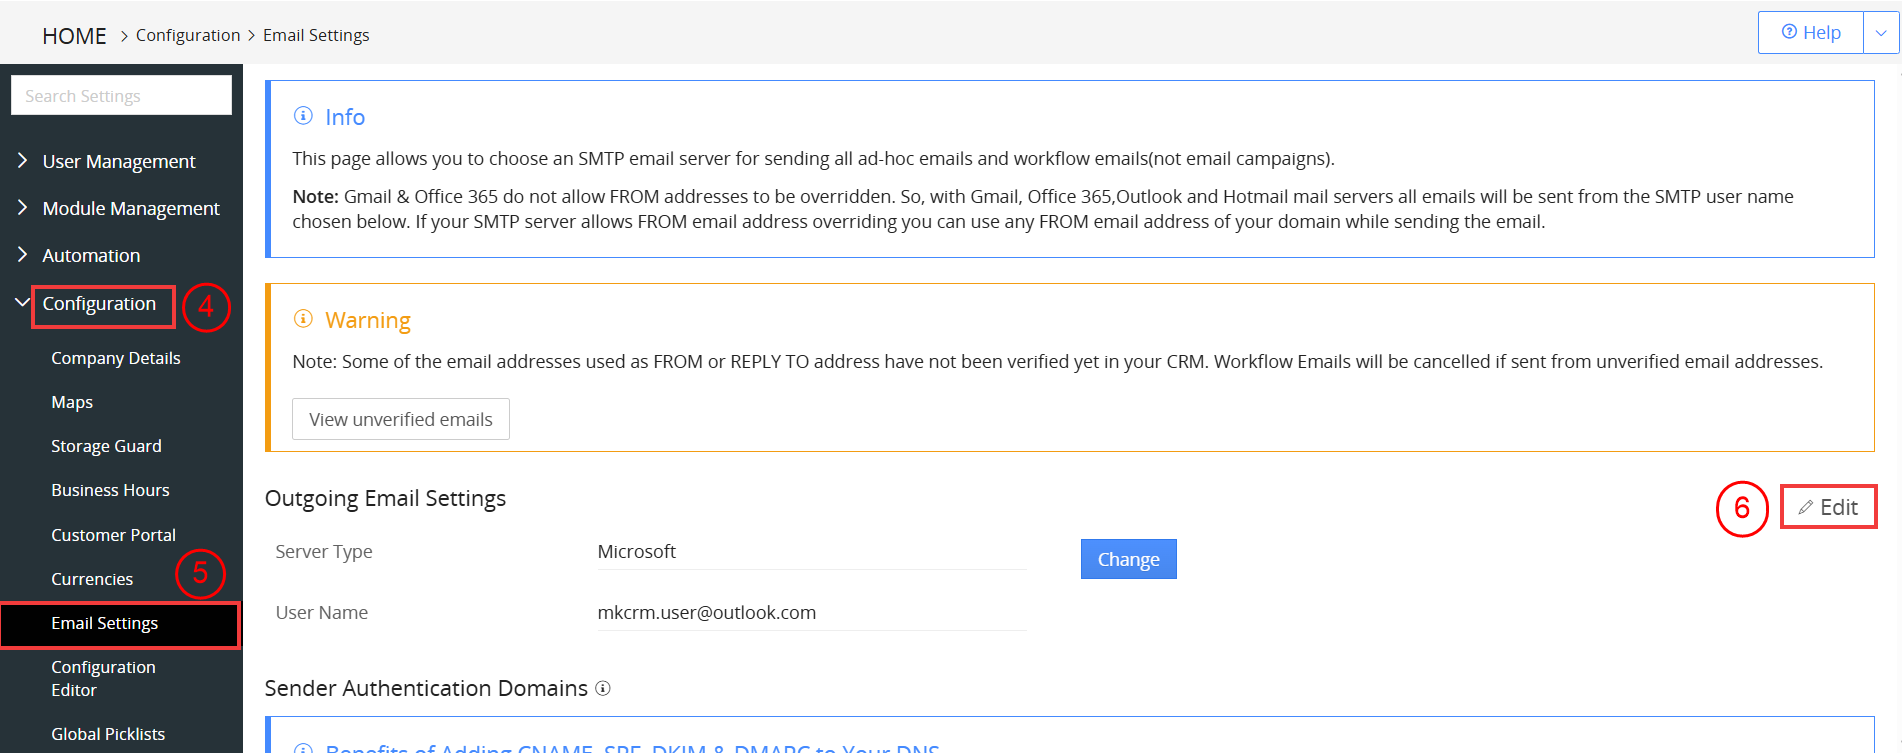
- Look for the Configuration section.
- Select Email Settings. The Email Settings page opens.
- Click Edit.
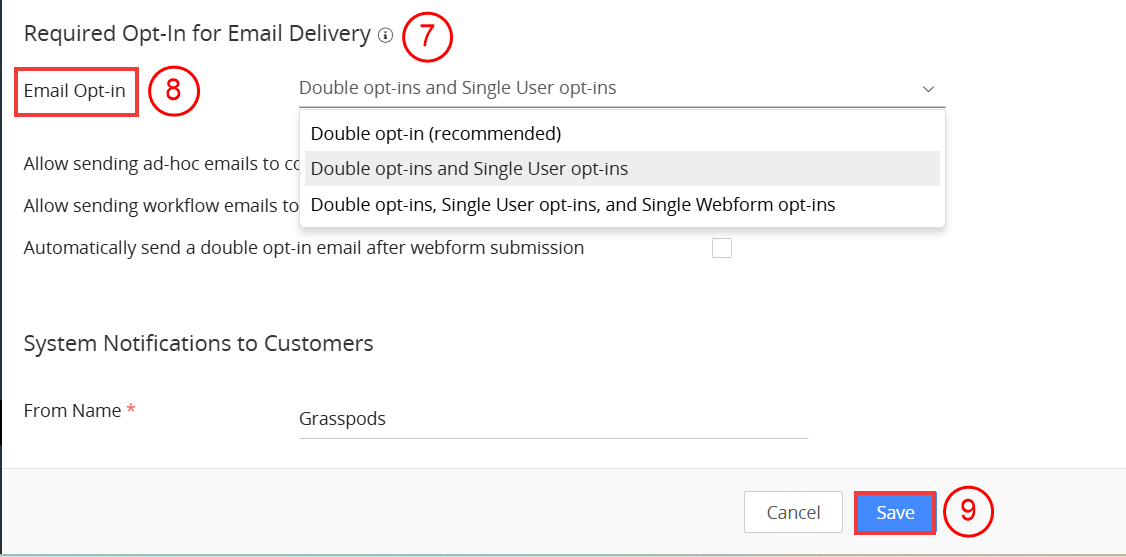
- Scroll down to the Required Opt-in for Email Delivery setting.
- Choose the suitable opt-ins from the Email Opt-ins drop-down.
- Click Save.
Different Types of Opt-in
You can see the Email Opt-in field in a contact record. Here are the different values it can take:
- None: Set automatically when a contact’s primary email is edited or changed.
- Single opt-in (user): Set manually by a user when a contact agrees to receive marketing emails or automatically when a contact is created.
- Single opt-in (webform): Set automatically when contacts submit a web form with the email marketing checkbox selected.
- Double opt-in: Set automatically when a contact clicks the double opt-in email link.
- Opted out (user): Set manually by a user when a contact requests to opt-out of email marketing.
- Opted out (contact): Set automatically when a contact unsubscribes from their email preferences page.
Opt-In Types that Allow Email Campaigns
You cannot send marketing emails to contacts with the Email Opt-in field set to None, Opted out (user), or Opted out (contact).
Vtiger delivers email campaigns only to contacts with the opt-in set to:
- Single opt-in (user)
- Single opt-in (webform)
- Double opt-in
Soft Bounces and Hard Bounces
- Soft bounces occur when emails are dispatched, but the recipient’s mailbox is temporarily down, or the server is full to receive your emails.
- Hard bounces are emails that are permanently undelivered. Typos in the email address or invalid domain names cause hard bounces.
Note:
- When a hard bounce occurs on a contact’s email address, then the Email Opt-in field in the contact record changes to Opted out (contact).
- When a soft bounce occurs on a contact’s email address five times, then the Email Opt-in field in the contact record changes to Opted out (contact).
- When a contact unsubscribes from your emails, the Email Opt-in field in the contact record changes to Opted out (contact).
Ensuring Email Delivery for Opted-out Contacts
To ensure that your ad hoc, workflow, and other emails get delivered to your Contacts who have opted out of marketing emails, you must configure specific settings.
Follow these steps to ensure email delivery:
- Log in to the CRM.
- Go to the User Profile in the top right corner of the screen
- Click Settings. The Settings page opens.
- Look for the Configuration section.
- Select Email Settings. The Email Settings page opens.
- Click Edit.
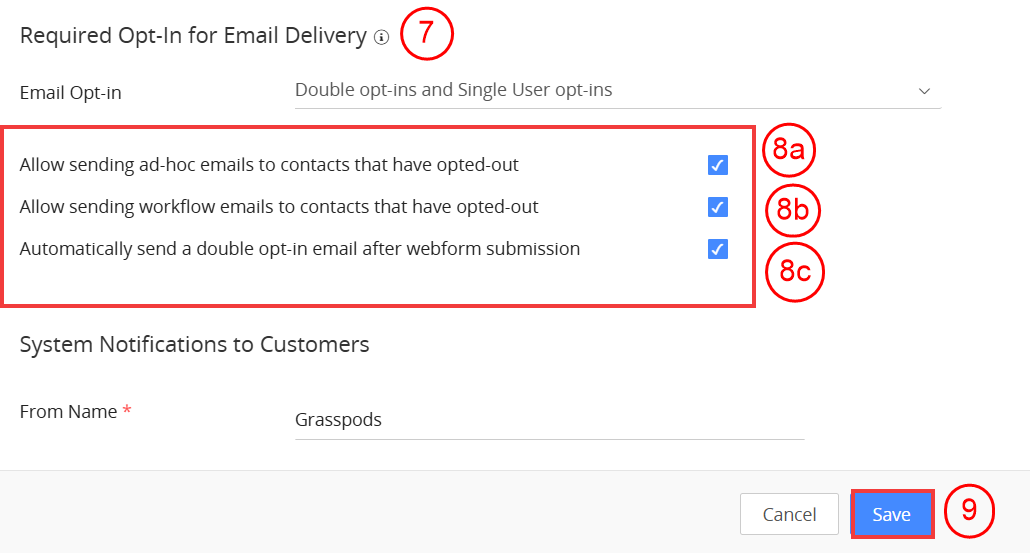
- Go to the Required Opt-in for Email Delivery section.
- Enable the following checkbox:
- Allow sending ad-hoc emails to contacts who have opted out
- Allows sending workflow emails to contacts that have opted out
- Automatically send a double opt-in email after webform submission
- Click Save.
Email Templates
Vtiger offers a built-in template designer that allows you to create reusable email templates from scratch.
The Email Templates module provides various tools to help you design, customize, and personalize your templates, ensuring professional and consistent communication for every campaign.
Note: Vtiger provides default email templates for quick setup.
To learn more about email templates in Vtiger CRM, click here.
Marketing Lists
A marketing list is a selected group of leads, contacts, or organizations targeted by your email campaign. You can either create a new marketing list or select an existing one while setting up your campaign. Properly segmented marketing lists help ensure your messages reach the right audience and improve engagement.
To learn more about creating a marketing list, click here.
Sending Autoresponder Emails to Webform Leads
When a visitor submits a webform on your website, Vtiger CRM captures the details and checks if a record with the same information already exists.
- If no existing record is found, a new Lead record is created.
- If a matching record exists, the system updates it with any missing or new information.
Once the lead record is created or updated, the system can then trigger autoresponder emails based on the predefined workflow or conditions.
Consider this example: When a user fills out a webform on your website, for example, a Contact Us or Request a Demo form, an autoresponder email can be sent automatically.
Example scenario:
A user fills out a Request a Demo webform.
Autoresponder email sent:
“Hi {{First Name}},
Thanks for reaching out! We’ve received your request for a demo. Our team will review your details and get back to you shortly.
To learn more about webforms in Vtiger CRM, click here.
Note: Before you configure the autoresponder email, you need to keep the message ready. You can use an existing email template or create a new template that suits your purpose.
Follow these steps to configure an Autoresponder Email for Webform Leads:
- Log in to the CRM.
- Click the User Menu in the top-right corner of the screen.
- Go to Settings > Automation > Workflows. The Workflows page opens.
- Click +New Workflow.
- Select Standard.
- Enter or select the following information in the Basic Information block:
- Workflow Name: Enter the workflow name as Webform Lead – Thank You Email.
- Target Module: Select Leads as the Target Module.
- Status: Set the status to Active.
- Enter the description as: Automatically sends a thank-you email when a Lead is created through a webform.
- Enter or select the following information in the Workflow Trigger block:
- Under Trigger workflow on, select the Lead Creation radio button.
- Enter or select the following information in the Entry Criteria block:
- Click +Add Condition under All Conditions.
- Add a condition where Source is Website to ensure the workflow runs only for leads generated through webforms.
- Enter or select the following information in the Actions block:
- Click Add Action and choose Send Mail.
- Enter or select the following information:
- Action Title: Enter a title for the action.
- From: Enter the sender’s email address.
- To: Enter the recipient’s email address.
- Subject: Enter the email subject.
- Create or select an Email Template, and enter the required email details (recipient, subject, and content).
- Click Save.
- Click Save to activate the workflow.
Once configured, a thank-you email will be automatically sent whenever a Lead is created via a webform on your website.
To learn more about email templates in Vtiger CRM, click here.
To learn more about Workflows in Vtiger CRM, click here.
Autoresponder Email Campaigns
Autoresponder email campaigns are automated emails that are sent when a contact performs a specific action, such as engaging with an email or submitting a form. These emails are triggered based on defined conditions and are delivered automatically at the scheduled time.
For example, you send a Christmas offer to your customers through an email campaign. When they buy a product from the offer, you send them an autoresponder email with a Thank You note. The autoresponder is triggered automatically when they buy a product from the offer mentioned in the email
Creating an Autoresponder Email Campaign
Note: Before creating the campaign, make sure you have the following ready
- A marketing list to send the campaign to.
- An email template for the campaign content.
- A campaign message to add to the template.
Follow these steps to create an autoresponder email campaign:
- Log in to the CRM.
- Click the main Menu.
- Go to Marketing> Email Campaigns. The Email Campaigns module will open.
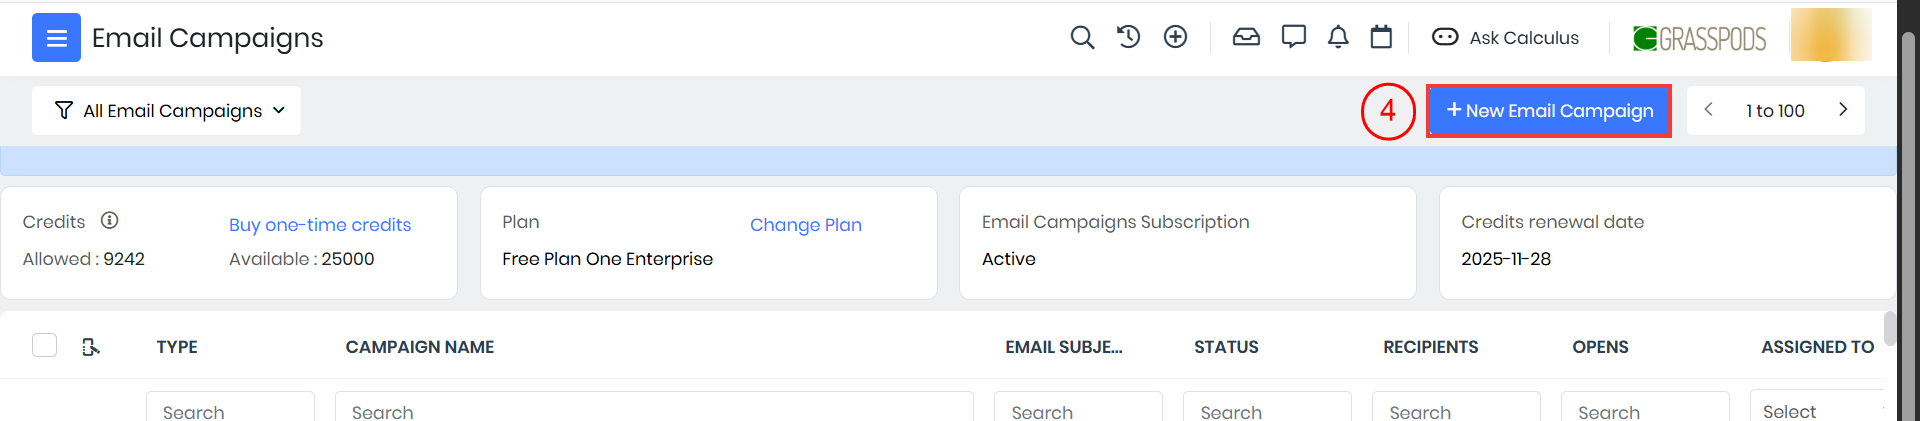
- Click +New Email Campaign.

- Enter the Campaign Name.
- Select Autoresponder.
- Click Next. The email campaign gets created in Draft mode.
- Enter or select the following information:
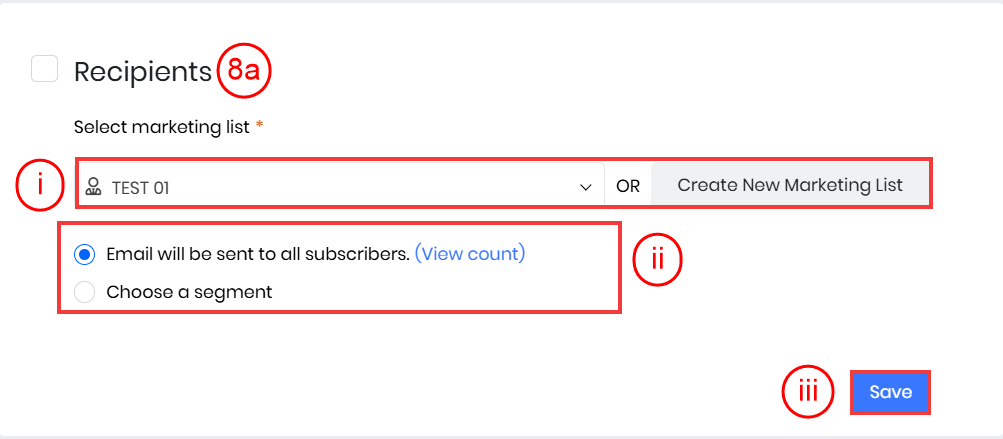
- Recipients
- Select a marketing list from the drop-down or click Create New Marketing List to create a new one.
- Enable Email will be sent to all subscribers to send the email campaign to all subscribers on the marketing list.
- Enable Choose a segment to send the email campaign to a filtered list of subscribers on the marketing list.
- Click Create a segment to filter the list of subscribers by applying specific conditions.
- Click Save.
- Sender Information
- Enter From Name, From Email, and Reply-To email address. Note: You must verify the From Email before sending an email campaign.
- Assign the email campaign to a user under the Assigned To field.
- Enable Real-Time Alerts to receive alerts when the recipients open the email.
- Enable Google Analytics Tracking to allow Google Analytics to track the clicks on links in the email body.
- Click Save.
- Trigger
- Select event to trigger autoresponder: Choose the trigger condition for the response. For example, when a recipient clicks a link in the previous campaign, opens the previous campaign email, etc.
- When to send: Choose how many days, hours, weeks, minutes, etc., after the previous campaign, the auto response must be triggered.
- Select the day(s) on which the campaign has to be sent: Select the days on which the campaign should be sent.
- Click Save.
- Content
- Click Select Template or Design from scratch to choose an email template for your emails.
- Recipients
- Click Start Autoresponder.

- Click Ok to confirm.
Note:
- When an autoresponder has started, you will see the Started sign beside the email campaign name. An autoresponder is sent only on the date and time you select in the Trigger.
- An autoresponder campaign is sent only after its cron job runs. It runs every 15 minutes. Go to Settings > Automation > Scheduler > AutoResponder Campaigns to view the cron job.
Stopping an Autoresponder Email Campaign
Follow these steps to stop an autoresponder email campaign:
- Log in to the CRM.
- Click the main Menu.
- Go to Marketing > Email Campaigns.
- Open the autoresponder that you want to stop.

- Click the Stop Campaign button at the top.
- Click Ok to confirm.
When you stop an autoresponder, its status changes to Stopped.
Viewing Campaign Metrics
You can find the metrics for an email campaign in the campaign record. Follow these steps to see the email campaign metrics:
- Log in to the CRM.
- Click the main Menu.
- Go to Marketing > Email Campaigns. The Email Campaigns module will open.
- Open an email campaign.
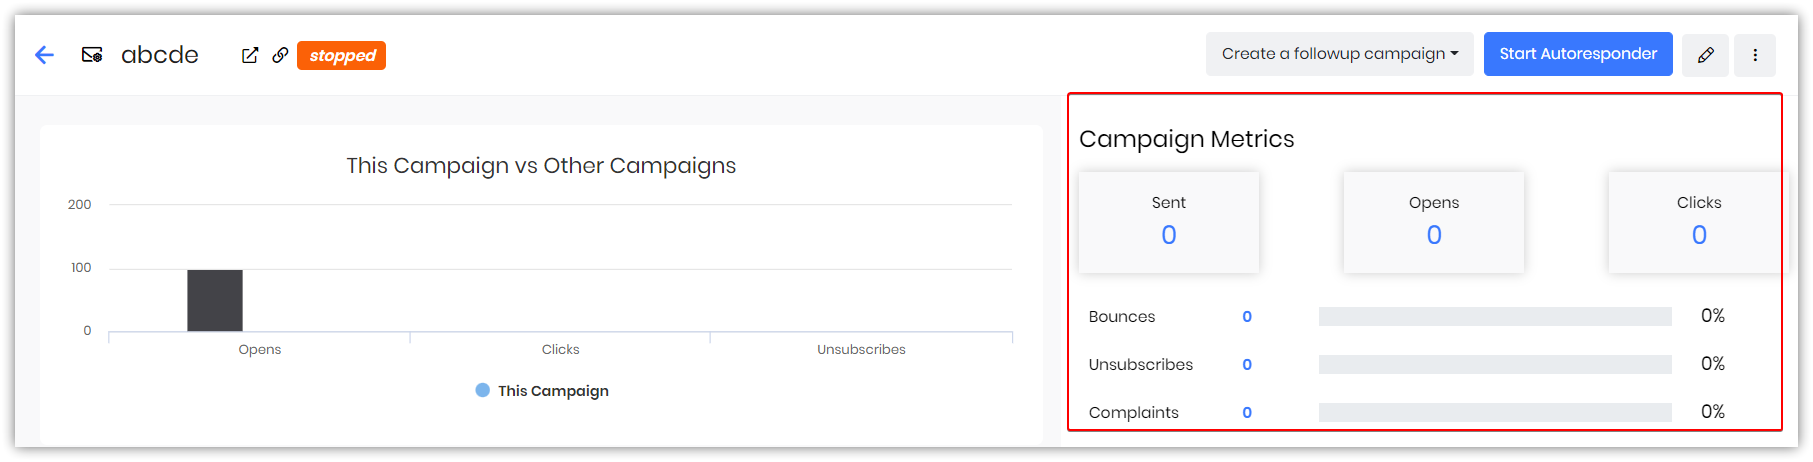
You can see the campaign metrics on the right-hand side. You can view the following details:
- Sent: Number of emails sent through the campaign.
- Opens: Number of unique opens.
- Clicks: Number of click actions (on any link) in the email.
- Bounces: Number of emails that have bounced.
- Unsubscribes: Number of recipients who have unsubscribed from the email campaign.
- Complaints: Number of emails that were reported as spam.
- Unopened: Number of unopened emails.
Note: You can export the metrics – Sent, Opens, and Clicks – individually by hovering on the numbers and clicking the Export icon.
Tracking Email Campaign Performance
You can track detailed performance metrics for both Regular and Auto-responder email campaigns. The system provides clear insights into user interactions, including clicks, opens, bounces, and unsubscribes.
- Clicks: View who clicked on each link and how many times.
- Click the Count under the Clicks column to see detailed recipient and link-level click data.
- Opens: Displays how many recipients opened the email.
- Click the Opens column to see a list of users and the number of times they opened the email.
- Unsubscribes: Shows which users unsubscribed and when.
- Click the Unsubscribed On column for more details.
- Bounces: Shows both hard (permanent) and soft (temporary) bounces.
- Click the Bounces column to view affected email addresses and bounce types
Tracking Email Campaign Activity
When you send out an email campaign and enable email tracking, you can get updates about the recipient’s activities on the emails. These updates are available under the Activity section of a contact’s Summary View.
Follow these steps to track touchpoints for email campaigns:
- Log in to the CRM account.
- Click the main Menu.
- Go to Essentials > Contacts. The Contacts List View opens.
- Select and open the Contact record.

- Click Filters in the Activity section.
- Enable the Email Campaigns checkbox under Customer Touchpoints.
You will see updates, such as when the contact opened your email, clicked a link in your email, etc., in the Activity section.
Note: You can enable email tracking for email campaigns by going to the main Menu > Essentials > Actions.