Articles in this section
Messaging Campaigns in Vtiger CRM
Feature Availability
Vtiger Editions: One Pilot | One Growth | One Professional | One Enterprise | One AI
Introduction
The Messaging Campaign module in Vtiger CRM allows you to create and send targeted WhatsApp and SMS messages to customers. With this module, you can:
- Compose personalized messages and distribute them to selected audiences.
- Automate marketing efforts.
- Track delivery and engagement in real time to evaluate campaign effectiveness.
- Maintain consistent communication with customers.
To use this feature, you must first install the Messaging Campaigns Add-on.
Message Campaign Statuses
Message campaigns progress through various statuses that indicate their current status.
- Draft: The campaign is created (or being created) and saved, but not yet sent.
- Queued: The campaign is in the queue and will be sent shortly.
- Sending: The campaign is currently being sent to recipients.
- Sent: The campaign has been successfully sent to the service provider.
- Completed: The campaign is marked as completed when all messages are either successfully delivered or have failed delivery.
Features
The following are the key features of Messaging Campaigns in Vtiger CRM:
- Message Status Tracking: View the real-time delivery status of all messaging campaigns you have sent.
- Campaign Templates: Choose from predefined templates to quickly create and send your messaging campaigns.
- Message Scheduling: Schedule your campaign for a later date and time to ensure it reaches your audience at the right moment.
- Multiple SMS and WhatsApp Service Providers: Select your preferred SMS or WhatsApp service provider from the available options
- Marketing Lists: Create or select targeted marketing lists consisting of specific Contacts or Groups to ensure your campaign reaches the right audience.
Benefits
The benefits of using messaging campaigns in Vtiger are:
- Send WhatsApp and SMS messages to multiple contacts directly from the CRM without switching platforms.
- Monitor delivery status to see how many messages were delivered, pending, or failed.
- Track message delivery reports based on the user assigned to the campaign for better accountability.
- Schedule messages to be sent at a specific date and time.
- Choose different service providers for WhatsApp and SMS based on requirements.
- Preview message templates before sending to ensure accuracy and consistency.
In this article, you will learn about:
- Installing and accessing Messaging Campaigns
- Prerequisites for sending a Messaging Campaign
- Creating Messaging Campaigns for SMS and WhatsApp channels
- Viewing Message Campaign details
Key Terminology
|
|
|
|
| SMS messages are short text-based communications sent between mobile devices without requiring internet connectivity. |
|
| WhatsApp is an internet-based messaging app used to send texts, media, and make calls securely and in real time. |
|
|
|
|
| A service provider is a third-party service that manages and delivers your SMS, WhatsApp, or other communication messages. |
|
|
|
Installing the Messaging Campaigns Add-on
Follow these steps to install messaging campaigns:
- Log in to the CRM.
- Click the User Menu.
- Go to Settings. The Settings page opens.
- Go to Extensions > Add-ons.
- Look for Messaging Campaigns.
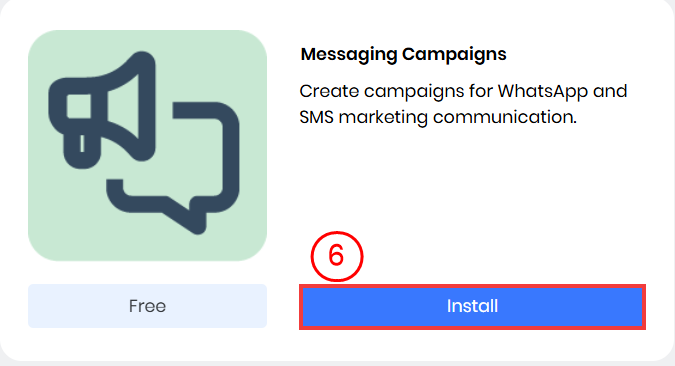
- Click Install.
- Click Yes to confirm the installation. A message appears confirming that the Messaging Campaigns have been successfully added.
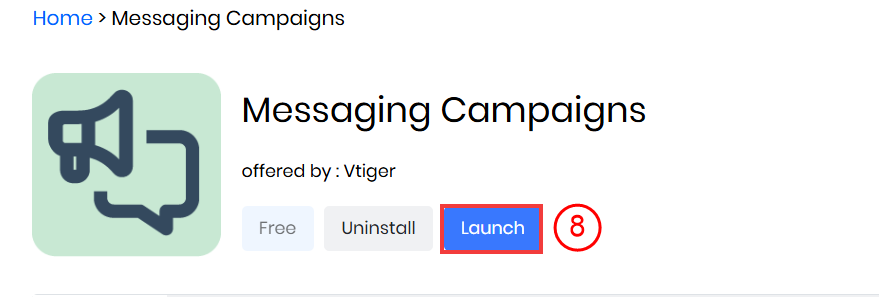
- Click Launch
Once installed, you can find Messaging Campaigns under Marketing > Others.
Accessing the Messaging Campaigns Module
You can access Messaging Campaigns from the Marketing module. Follow these steps to access the Messaging Campaigns:
- Log in to the CRM.
- Click the main Menu.
- Click Marketing.
- Go to Others > Messaging Campaigns.
The messaging campaigns module will open.
Prerequisite for Sending a Message Campaign
The following are the prerequisites for sending a messaging campaign:
- Ensure that SMS and WhatsApp service providers are configured in Vtiger CRM to send campaigns through these channels.
- SMS campaigns can be sent only to a Contact’s Mobile Phone number.
- You must have the contact’s, customer’s, or Lead’s consent before sending SMS messages. Additionally, contacts must be opted in, and the SMS Opt-in field must be set to Single Opt-in (User).
- A marketing list must be created or selected for sending the campaign.
- Ensure message templates are available for use in the campaign.
- Ensure your WhatsApp message template is approved (usually within a few minutes to 24 hours) before scheduling or sending campaigns.
Let us learn how to configure the following before sending a Message Campaign:
- Configure an SMS Service Provider
- Configure a WhatsApp Service Provider
Configuring an SMS Provider
Consider Twilio as an example for setting up an SMS service provider. You can do this only if you are an Admin user.
Note: You will need to navigate between the Vtiger CRM and the Twilio screens. Keep the screens open in separate tabs or windows.
Step 1: Copying the Account SID and Auth Token from Your Twilio Account
Follow these steps to copy the account SID and Auth Token:
- Log in to your Twilio account.
- Go to the Dashboard in your Twilio Console.
- Copy the Account SID and save it in a notepad or document.
- Click Show to reveal the Auth Token, then copy and save it in a notepad.
Step 2: Logging in to Vtiger CRM and Pasting the Account SID and Auth Token
Follow these steps to configure an SMS service provider:
- Log in to the CRM.
- Click User Menu in the top right corner of the screen.
- Click Settings. The Settings page opens.
- Go to Extensions > SMS Provider Configuration.
- Click the +New Configuration button.
- Select Twilio from the Provider drop-down.
- Enter or select the following information:
- Provider: Select Twilio from the drop-down.
- Provider Name: Enter the name of the service provider.
- Active: Click the checkbox beside the required status.
- Default Provider: Select Yes or No to set Twilio as the default provider.
- Account SID: Paste the Twilio Auth SID into the Auth ID field.
- Auth Token: Paste the Twilio Auth Token into the Auth Token field.
- From: Enter the sender’s phone number. The phone number must be in the E.164 format.
- Click Save
Once configured, the service provider will appear in the SMS Provider drop-down.
Configuring a WhatsApp Provider
Consider Twilio as an example for setting up a WhatsApp service provider. You can do this only if you are an Admin user.
Note: You will need to navigate between the Vtiger CRM and the Twilio screens. Keep the screens open in separate tabs or windows.
Step 1: Installing the WhatsApp via Twilio Add-on
Follow these steps to install WhatsApp via Twilio Add-on:
- Log in to the CRM.
- Click User Profile in the top right corner of the screen.
- Click Settings. The Settings page opens.
- Go to Extensions > Add-ons.
- Look for WhatsApp via Twilio.
- Click Install.
- Click Yes to confirm the installation.
- Click Launch.
Step 2: Copying the Account SID and Auth Token from Your Twilio Account
Follow these steps to copy the account SID and Auth Token:
- Log in to your Twilio account.
- Go to the Dashboard in your Twilio Console.
- Copy the Account SID and save it in a notepad or document.
- Click Show to reveal the Auth Token, then copy and save it in a notepad.
Step 3: Logging in to Vtiger CRM and Pasting the Account SID and Auth Token
Follow these steps to configure a WhatsApp service provider:
- Log in to the CRM.
- Click the main Menu.
- Go to Essentials > Conversations.
- Click WhatsApp. The List View displays all available records for WhatsApp messages.
- Click Settings in the top right corner.
- Click + Add.
- Enter or select the following information in the Add Configuration window:
- Provider (Service provider): Select Twilio from the drop-down.
- Active/Inactive: Select Active Provider.
- Account ID: Paste the Twilio Auth SID into the Auth ID field.
- Token: Paste the Twilio Auth Token into the Auth Token field.
- WhatsApp From Number: Paste the From number from the Sandbox Configuration page.
- Click Save
Once configured, the service provider will appear in the WhatsApp Provider drop-down.
Creating a Messaging Campaign Using WhatsApp
Note: If no message campaigns are available in the List View, click +Create Messaging Campaign on the screen that appears after installing the module, or use the +Create Messaging Campaign button in the top-right corner of the screen.
We will see how to send a message campaign using WhatsApp.
Follow these steps to create a message campaign:
- Log in to the CRM.
- Click the main Menu.
- Go to Marketing > Others.
- Select Messaging Campaign. The Messaging Campaign module opens.

- Click +Create Messaging Campaign. A Create Messaging Campaign window opens.
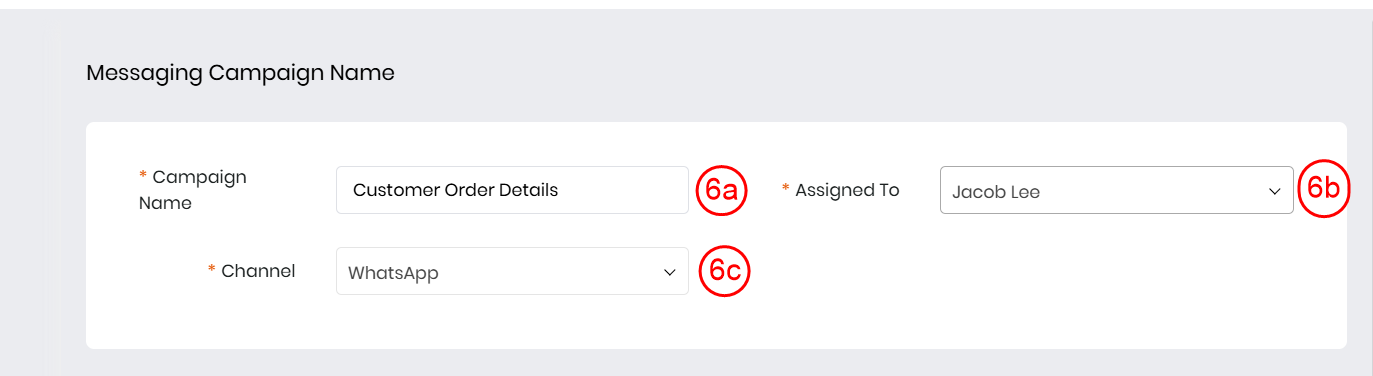
- Enter or select the following information in the Marketing Campaign Name section:
- Campaign Name: Enter a name for the messaging campaign.
- Assigned To: Select the user to whom you want to assign the campaign.
- Channel: Select WhatsApp as the channel to send your message campaign.

- Enter or select the following information in the Marketing List section:
- Select Marketing List: Choose the marketing list to which you want to send the message campaign. Note: You also have the option of creating a Marketing List using the Create Marketing List.

- Enter or select the following information in the Message section:
- WhatsApp Provider: Select the WhatsApp provider to send the message campaign.
- Template: Choose the template to design the message campaign.
- Message: Enter the content of the message for the campaign.
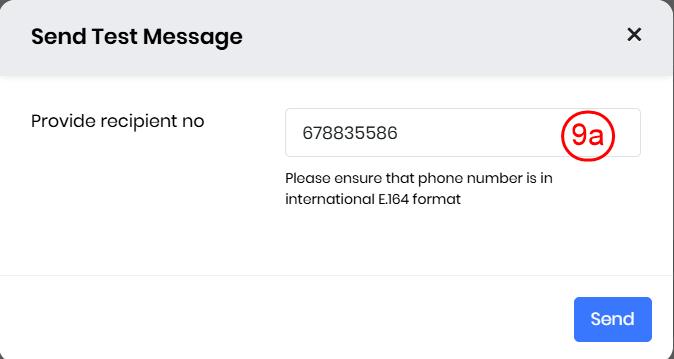
- Click Test to verify if the message campaign is delivered successfully before the final send-out.
- Upon clicking Test, a pop-up appears prompting you to enter the recipient’s number to test the delivery of the message campaign.
- Note: The recipient number is required only when sending a test message campaign.
- Click Send Now to send the message campaign immediately.
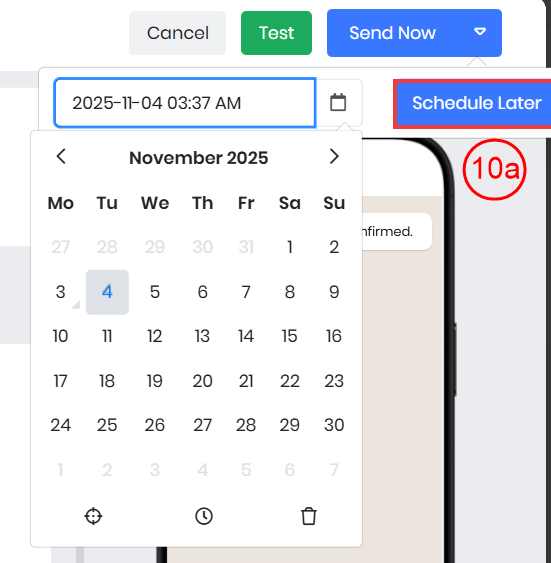
- To schedule the campaign for a later time, click the drop-down menu, select the desired date, and choose Schedule Later.
Once the campaign is sent, you will receive a notification confirming the successful delivery of your WhatsApp message campaign.
Creating an SMS Message Campaign
Follow these steps to create an SMS Message Campaign:
- Log in to the CRM.
- Click the main Menu.
- Go to Marketing > Others.
- Select Messaging Campaign. The Messaging Campaign module opens.
- Click +Create Messaging Campaign. A Create Messaging Campaign window opens.
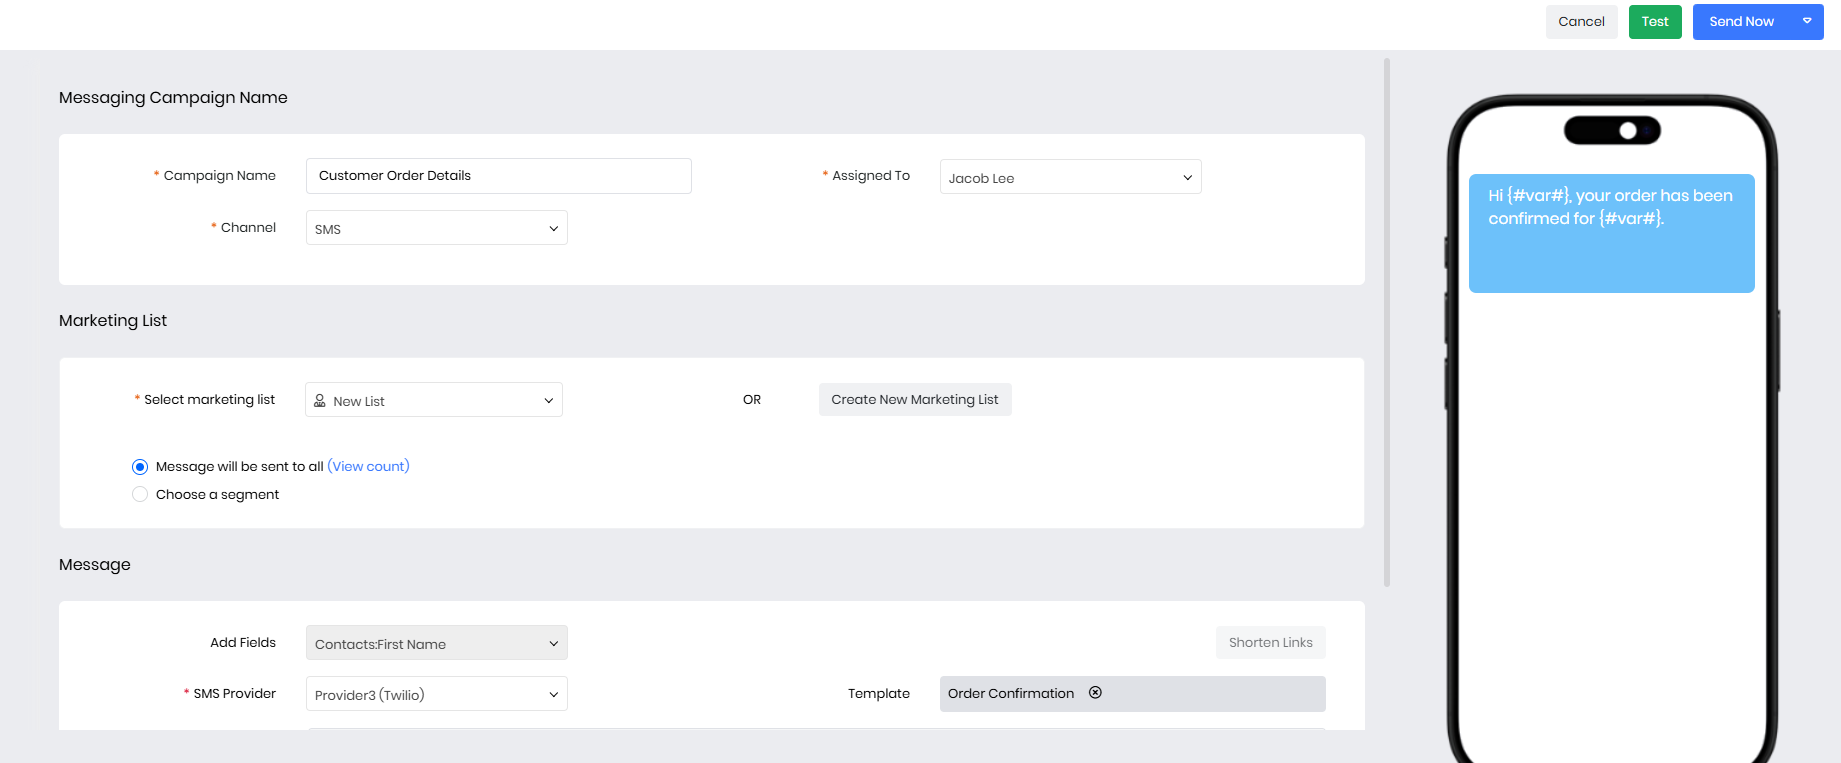
- Enter or select the following information in the Marketing Campaign Name section:
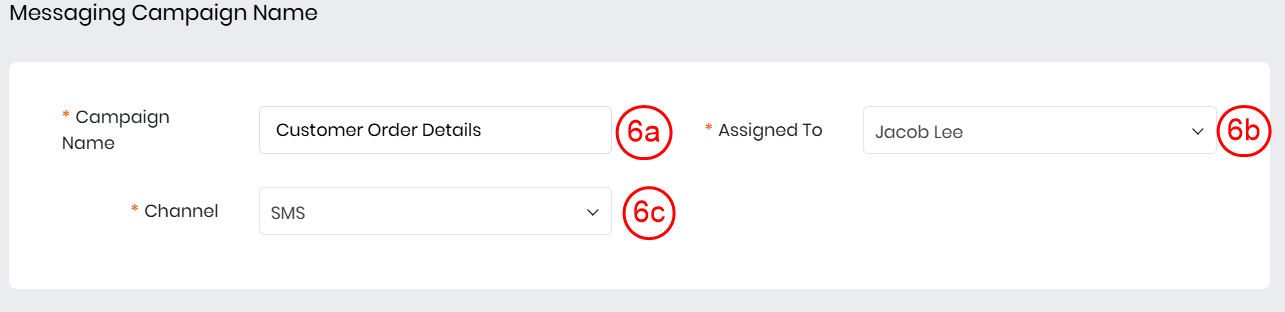
- Campaign Name: Enter a name for the messaging campaign.
- Assigned To: Select the user to whom you want to assign the campaign.
- Channel: Select SMS as the channel to send your message campaign.
- Enter or select the following information in the Marketing List section:
- Select Marketing List: Choose the marketing list to which you want to send the message campaign. Note: You also have the option of creating a Marketing List using the Create Marketing List.
Create Marketing List: Create a new marketing list if your list is not available in the drop-down.

- Enter or select the following information in the Message section:
- Add Fields: Select a merge tag to personalize your SMS message campaign.
- SMS Provider: Select the SMS provider to send the message campaign.
- Template: Choose the template to design the message campaign.
- Message: Enter the content of the message for the campaign.
- Click Test to verify that the message campaign is delivered successfully before the final send-out.
- Upon clicking Test, a pop-up appears prompting you to enter the recipient’s number to test the delivery of the message campaign.
- Note: The recipient number is required only when sending a test message campaign.
- Click Send Now to send the message campaign immediately.
- To schedule the campaign for a later time, click the drop-down menu, select the desired date, and choose Schedule Later.
Once the campaign is sent, you will receive a notification confirming the successful delivery of your SMS message campaign. You can also preview the final campaign in mobile view while creating the message campaign.
Message Campaign Record Details
When you open a specific message campaign from the List View, you will see the following details:
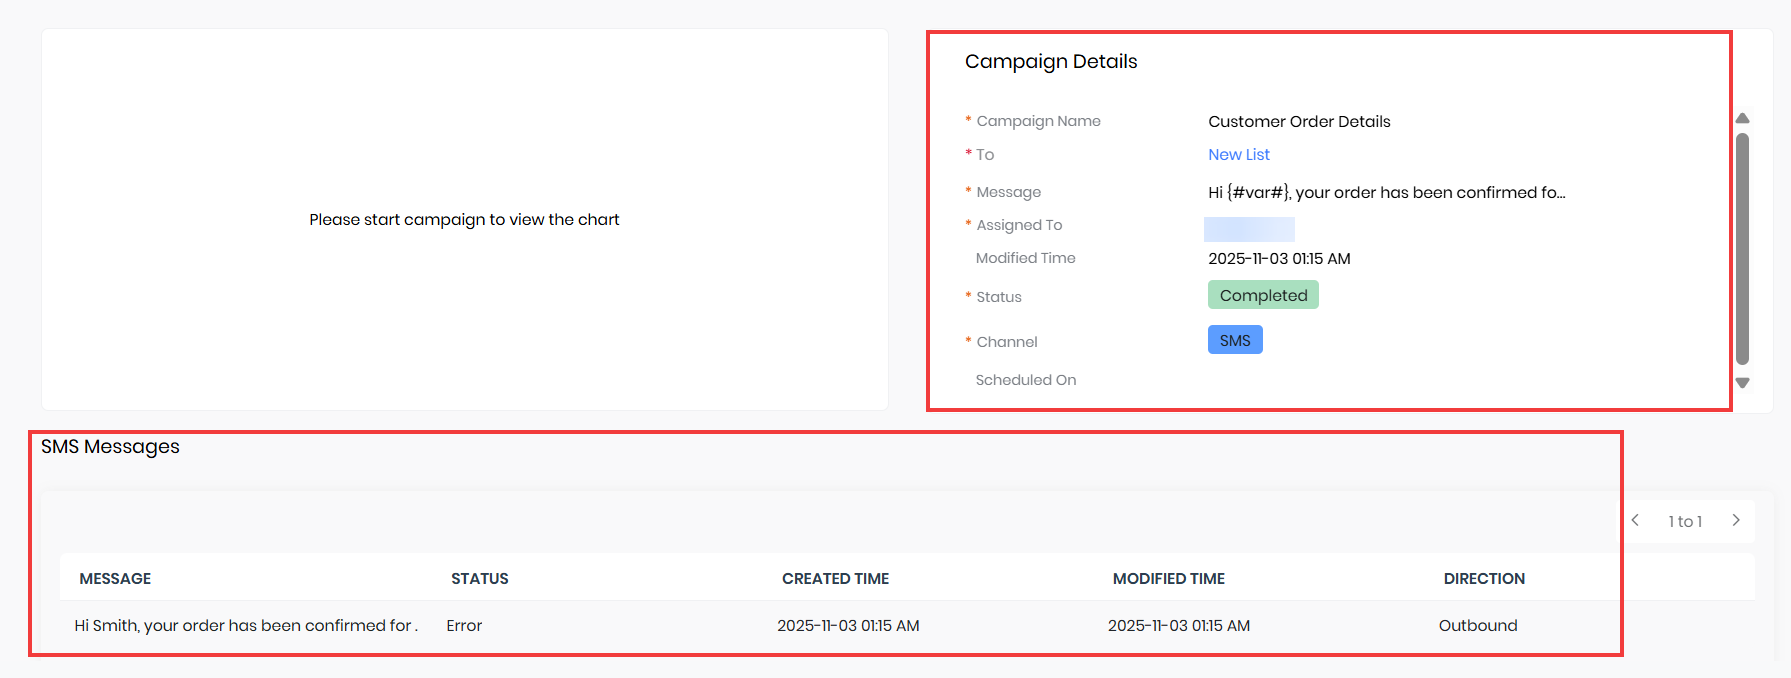
- Campaign Chart: Displays the campaign performance in a pie chart format, showing message distribution and delivery status.
- Campaign Details: Displays key information such as the campaign name, message content, status, and channel used.
- Message Records:
- SMS Campaigns: Shows the records of the SMS messages sent.
- WhatsApp Campaigns: Shows the records of the WhatsApp messages sent.
- The service providers for Contacts and Organizations may differ; however, the campaign will be sent using the respective service provider configured for each.
- Campaigns sent through WhatsApp will appear in the WhatsApp module, while those sent through SMS will appear in the SMS module.
Actions in the Record View
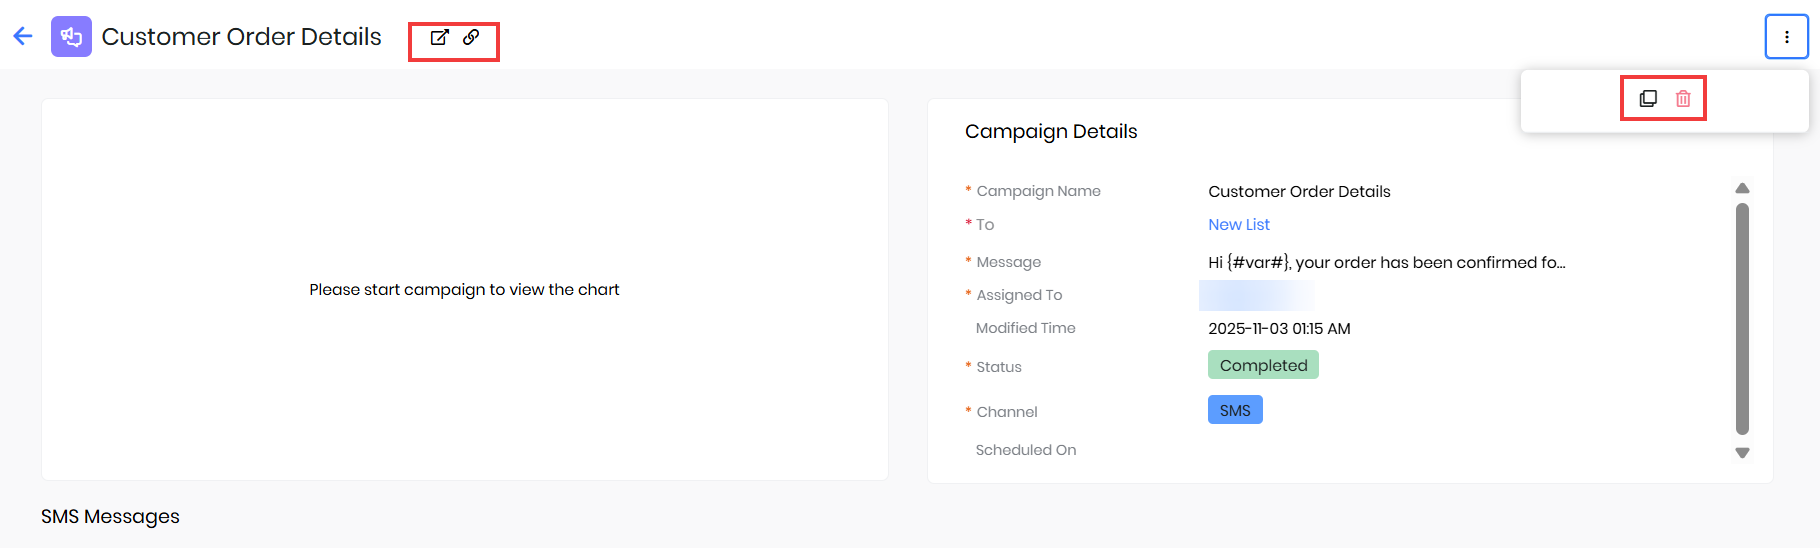
- Open in New Tab: Opens the message campaign record in a separate browser tab for easy access.
- Click to Copy Direct Link: Copy the direct link to the message campaign record so you can share it quickly.
- More: Clicking on More will display the following actions:
- Duplicate: Create a copy of the existing message campaign record for reuse or modification.
- Delete: Permanently removes the message campaign record from the system.
List View in Messaging Campaigns
Once the message campaign is created, it will appear in the List View. The List View lets you easily manage and organize your campaigns.
Columns in List View
The default columns shown in the List View include:
- Campaign Name: Displays the name of the campaign.
- Channel: Shows the channel through which the campaign was sent.
- List: Indicates the marketing list to which the campaign was delivered.
- Segment: Shows the segment with which the campaign is associated.
- Assigned To: Displays the user responsible for the campaign.
- Total: Shows the number of subscribers in the selected list who received the campaign.
- Status: Displays the current status of the messaging campaign.
We will now look at the actions available in the messaging campaigns List View.
List View Actions
The following actions can be performed from the Messaging Campaigns List View.
Deleting a Messaging Campaign
You can delete a message campaign if you no longer need it. Follow these steps to delete a message campaign:
- Log in to the CRM.
- Click the main Menu.
- Go to Marketing > Others > Messaging Campaigns.
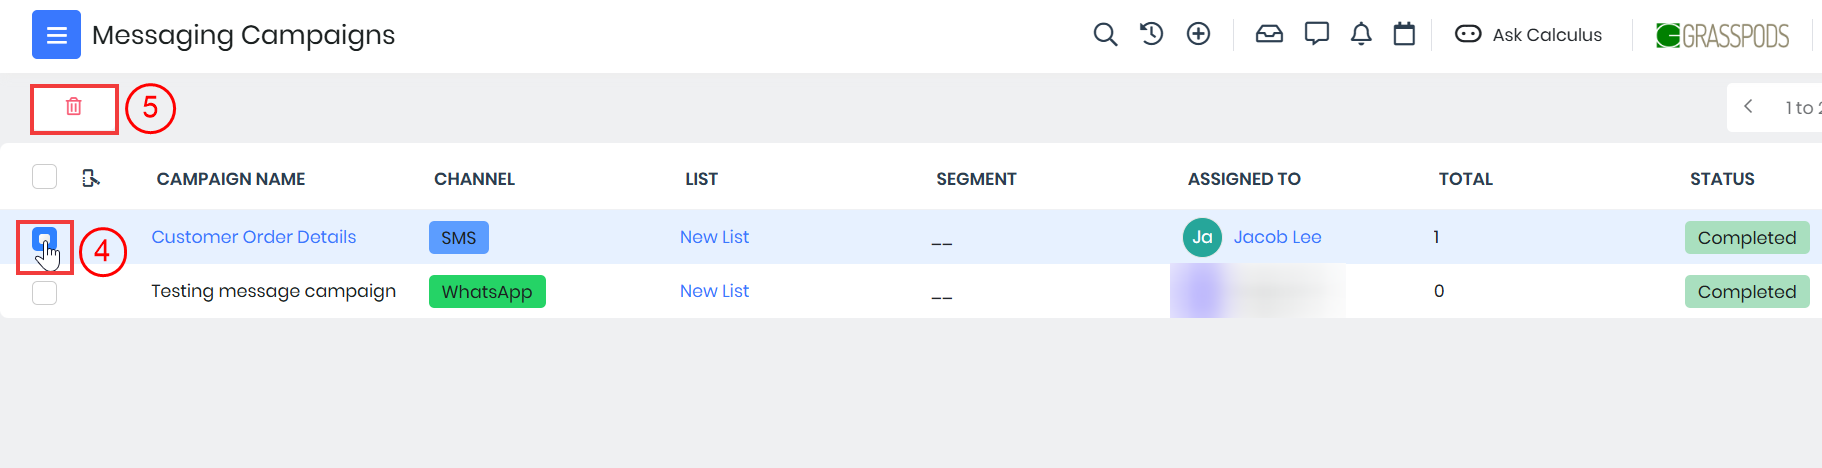
- Select the campaign record you want to delete by clicking the button next to it.
- Click the Delete icon to remove the campaign. A pop-up message will appear asking for confirmation to delete the record.
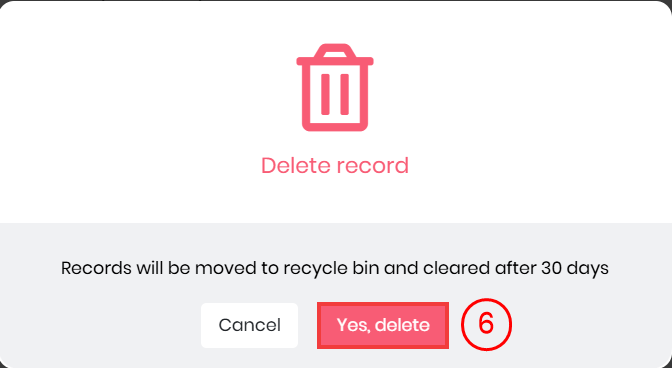
- Click Yes, Delete.
A confirmation message will then appear indicating that the record was successfully deleted.
Sending a Campaign to a Selected List or Tag
You can send the message campaign to a specific group of contacts by selecting a list or tag. Follow these steps to send the campaign to a specific list or tag:
- Log in to the CRM.
- Click the main Menu.
- Go to Marketing > Others > Messaging Campaigns.
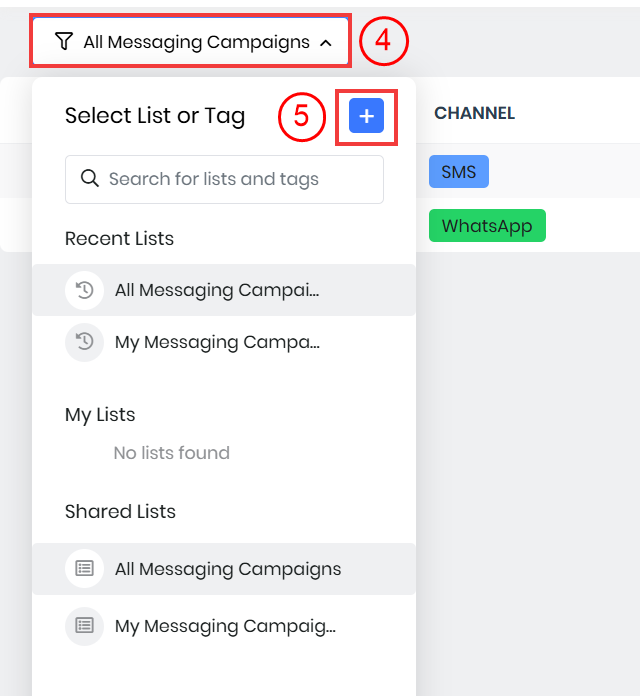
- Click the drop-down menu in the top-left corner of the List View screen.
- Click the + button beside the Search for List bar.
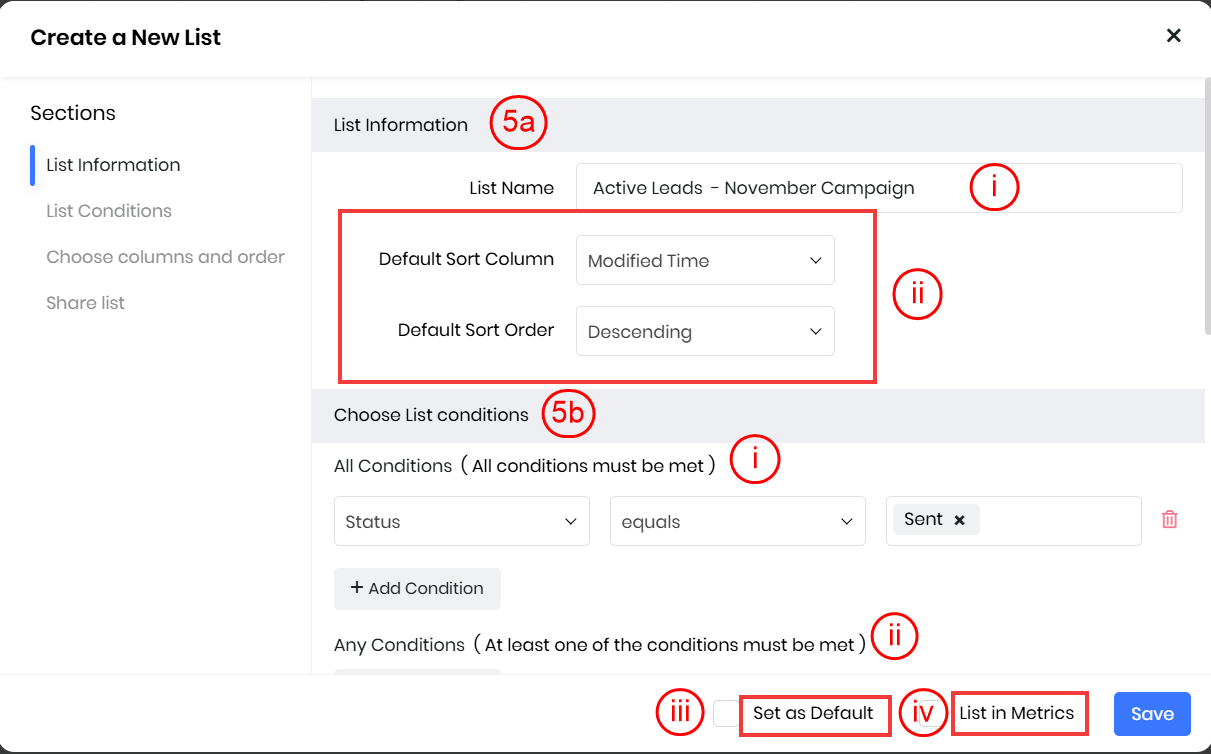
- Enter or select the following for List Information:
- List Name: Enter a name for the list.
- Default Sort Column and Order: Choose how the records should be sorted.
- Set as Default: Enable this option to make the list your default view. (Optional)
- List in Metrics: Enable this option to display the list on the dashboard. (Optional)
- Define List Conditions
- Add conditions by clicking + Add Condition.
- You can specify conditions in the All Conditions or Any Conditions sections.
- Choose a field in the Select Field drop-down, then select the condition type:
- Equals
- Not Equal To
- Starts With
- Ends With
- Contains
- Does Not Contain
- Is Empty
- Is Not Empty
- Enter or select the following for List Information:
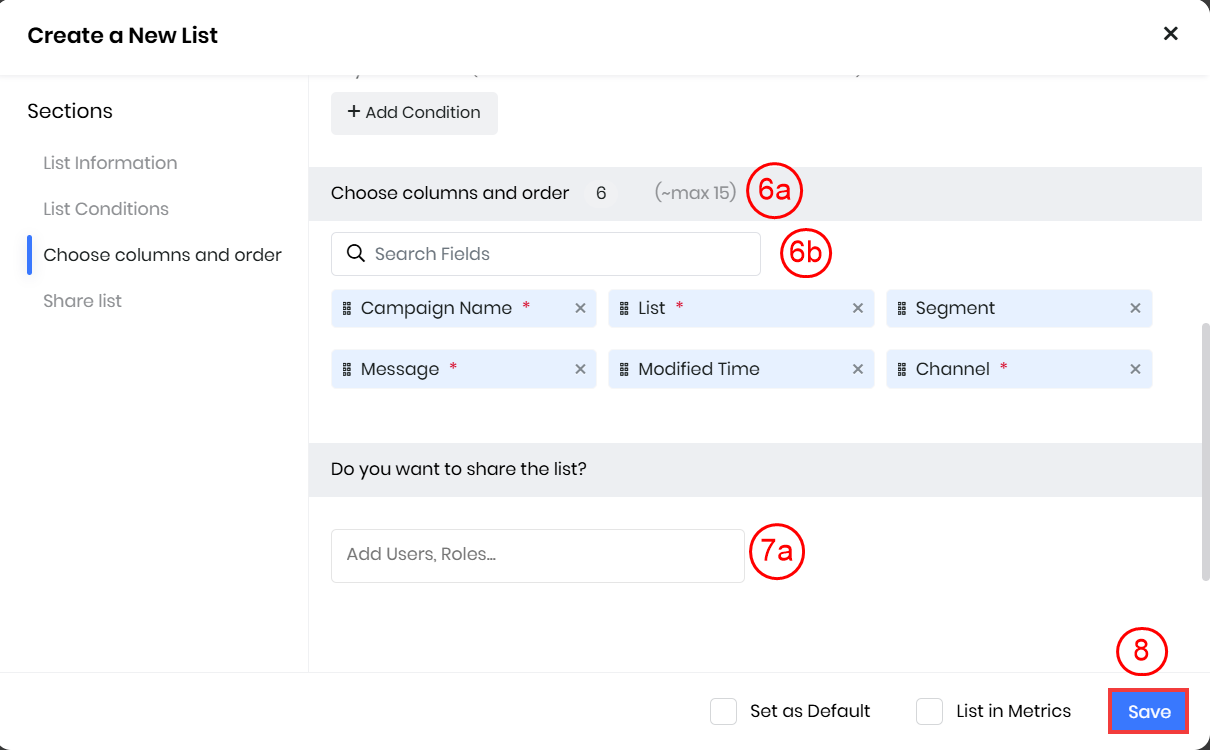
- Enter or select the following information for the Choose Columns and Order section:
- Select columns using the Search Fields bar. The chosen columns will appear under Choose Columns and Order.
Note: You can select up to 15 fields. - Remove a field by clicking the X icon beside it.
- Select columns using the Search Fields bar. The chosen columns will appear under Choose Columns and Order.
- Enter or select the following for Sharing Information:
- Choose the users or roles with whom you want to share the list.
- Click Save.
Note: Add specific users if you only want to share the list with them.
Once the list is created, a confirmation message stating List saved will appear. To learn more about List View, click here.
Reference
- SMS Messages
- WhatsApp Integration Overview
- Creating Marketing Lists for Campaigns
- Email Campaigns for Marketing
- Creating SMS Campaigns
- WhatsApp Integration with Pinnacle
- WhatsApp Integration with Twilio
- WhatsApp Integration with Wablas
- Configuring SMS Gateways in Vtiger
- List View in Vtiger CRM