Articles in this section
Email Sending Guidelines for Google, Yahoo, Microsoft and Apple
Introduction
Do you send a significant volume or bulk emails regularly (5000 emails or more) from Vtiger CRM via Gmail and Yahoo? Then, you need to authenticate your emails with well-established best practices.
To protect user inboxes, both Gmail and Yahoo have introduced a new set of guidelines. Email senders must meet these guidelines by February 2024 for mail to be delivered (as expected) to their subscribers.
For example, Sarina from Nacent sends 2300 emails from her email ID, [email protected], and 2,800 emails per day from her manager’s email ID, [email protected]. The email count for nacent.com is 5,100 emails per day, thus making the domain a bulk email sender.
Email Guidelines for Gmail and Yahoo Users
Vtiger CRM users using Gmail and Yahoo to send bulk emails are required to authenticate their sending domains with SPF and DKIM. This will ensure smooth delivery of emails and prevent rate limitations, message blocks, or spam markings.
Users who do not authenticate their domains won’t be allowed to send any emails from Vtiger CRM.
Note:
- Complete the authentication by February 2024.
- Click the links to know more about the new requirements by Google and Yahoo!
- Click the links to learn more about authenticating emails with SPF and DKIM.
Vtiger recommends performing these checks before:
- Sending email campaigns
- Sending outgoing emails (Adhoc emails)
- Workflow emails
- Cases email
The following are the requirements you must meet to send bulk emails:
- Email Authentication
- Mandate strong authentication for significant email volumes - that is, implement SPF, DKIM, and DMARC for sender authentication.
- Easy Unsubscription
- One-click unsubscribe for email recipients from large senders.
- Process unsubscription requests within two days.
- Prevent Unwanted Emails
- Enforce a spam rate threshold to reduce inbox clutter.
- Maintain a spam-free mailbox for users, as Google has mandated that an email sender’s spam rates should be below 0.3%
- Configure Your DMARC Policy: Set up a DMARC policy on your root domain via your DNS provider. Follow these steps to configure your DMARC policy:
- Publish a DMARC record (the policy can be “p=none”).
- Ensure alignment with their SPF/DKIM domains.
- Implement a DMARC reporting solution (recommended).
To know more about the DMARC, click here.
Benefits
The following are the benefits of implementing SPF, DKIM, and DMARC for sender authentication:
- Enhances email security and prevents spoofing and phishing attacks.
- SPF specifies authorized mail servers, reducing spam and preventing email spoofing.
- DKIM adds digital signatures for email integrity and sender authentication.
- DMARC enforces policies, prevents phishing, and provides reporting for visibility.
- Together, they protect brand reputation, build trust, and ensure email security.
Implementing SPF, DKIM, CNAME, and DMARC for Sender Authentication
To implement SPF, DKIM, and DMARC sender authentication, consider the DNS provider GoDaddy. To learn more about adding SPF, DKIM, and DMARC records for other DNS providers, click here.
To watch a video on how to implement SPF, DKIM, and CNAME sender authentication.
Follow these steps to add a SPF or DKIM record to your domain:
- Log in to the CRM.
- Click the User Menu.
- Click Settings.
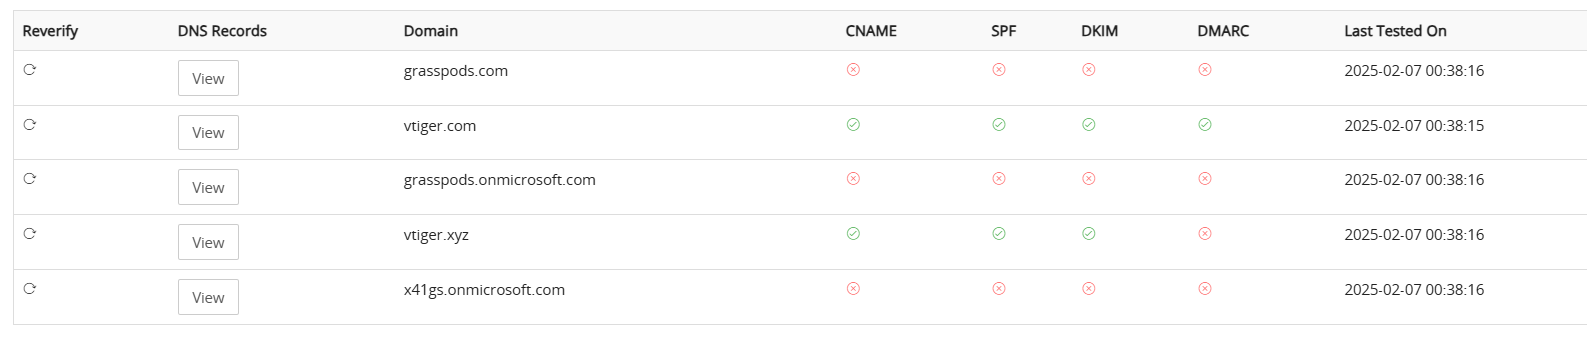
- Click Email Settings under Configuration. You will see a list of sender authentication domains.
- Click View on the required domain. You will see SPF and DKIM record details.
- Copy or note down the HOST Key and TXT Value.
- Now login to your DNS provider.
- Open the Domain Settings.
- Select the required Domain.
- Click Manage DNS.
- Click Add.
- Enter or select the information for the following:
- Type: Select TXT as type.
- Host: Paste or enter the copied HOST key.
- TXT Value: Paste or enter the copied TXT value.
- TTL Value: Select the default value as 1 hour.
- Click Save.
Email Guidelines for Microsoft
Microsoft has aligned with Google and Yahoo to enforce authentication for bulk email senders. Vtiger CRM users who send bulk emails through Microsoft must authenticate their sending domains using SPF and DKIM.
This authentication is essential to:
- Ensure smooth email delivery
- Prevent rate limitations
- Avoid message blocks or spam classification
Email Hygiene Recommendations
Large senders should implement the best practices to ensure their messages are trusted and delivered reliably. The following are some of the best practices to ensure message deliverability:
- Compliant P2 (Primary) Sender Addresses: Ensure the From or Reply‐To address is valid, reflects the true sending domain, and can receive replies.
- Functional Unsubscribe Links: Provide an easy, clearly visible way for recipients to opt out of further messages, particularly for marketing or bulk mail.
- List Hygiene & Bounce Management: Remove invalid addresses regularly to reduce spam complaints, bounces, and wasted messages.
- Transparent Mailing Practices: Use accurate subject lines, avoid deceptive headers, and ensure your recipients have consented to receive your messages.
Outlook reserves the right to take negative action, including filtering or blocking—against non‐compliant senders, especially for critical breaches of authentication or hygiene.
Enforcement Timeline
Starting today, Outlook encourages all senders, and particularly those that send at high volume, to review and update their SPF, DKIM, and DMARC records, in preparation for when the enforcement begins, starting in May.
After May 5th, 2025, Outlook will begin routing messages from high-volume non‐compliant domains to the Junk folder, giving senders an opportunity to address any outstanding issues.
Note: In the future (date to be announced), messages that don’t meet the requirements will be rejected to enhance user protection.
Next Steps
- Prepare Now: Audit your DNS records (SPF, DKIM, DMARC) and verify you meet all the requirements. To view the authentication header, visit this. To learn how to read authentication headers, click here.
- Stay Informed: We’ll provide updates on official rollout schedules and dates for when rejection actions will begin through a blog post.
- Join the Mission: Embracing better authentication and hygiene not only benefits your deliverability but also helps protect the entire email ecosystem.
- For additional resources or support, visit sender support.
Apple Guidelines for Sending Mass Emails
To successfully send bulk emails to iCloud Mail (Apple) users, you must follow all of Apple’s email sending rules. If any of these requirements are not met, your emails may be blocked or rejected by Apple’s mail servers.
Make sure to review and follow each guideline carefully to ensure your bulk emails are delivered smoothly.
- Send only to recipients who explicitly subscribed to your emails (not list purchases, list rentals, or email appends).
- Offer an unsubscribe link, so that recipients can unsubscribe immediately.
- Add ARC headers to forwarded emails.
- Ensure compliance with RFC321 and RFC322.
- Publish reverse DNS with your domain to help identify your IP addresses.
- Use consistent IP addresses and domains for your bulk email, but do segment marketing and transactional email streams.
- Use a consistent From: name and address to clearly identify your brand.
- Make use of Sender Policy Framework (SPF) and DomainKeys Identified Mail (DKIM) to authenticate your emails.
- The sending domain must publish their Domain-based Message Authentication, Reporting, and Conformance (DMARC) policy.
- Track the temporary and permanent SMTP errors from our mail servers and act on them accordingly.
- Have a standard policy for handling bouncing addresses.
- Periodically remove inactive subscribers from your list.
- Don’t reactivate email addresses that are already on your unsubscribe or suppression list.
You can also go to the Messaging, Malware, and Mobile Anti-Abuse Working Group (M³AAWG) website and check their best communication practices.