Articles in this section
Creating Standard Workflows
Feature Availability
Vtiger Editions: One Pilot | One Growth | One Professional | One Enterprise | One AIIntroduction
Repetitive CRM tasks, such as sending notifications, creating follow-up tasks, and updating records, can take time when they are performed manually. Standard workflows in Vtiger CRM help address this challenge by automating these routine tasks based on predefined triggers and conditions.
A standard workflow follows a defined set of rules. When a specified event occurs and the required conditions are met, Vtiger automatically performs the configured actions. For example, you can configure a workflow to automatically create a follow-up task whenever a new lead is created from a trade show.
Components of a Standard Workflow
Before creating a standard workflow, it is important to understand the components that determine when the workflow runs and what actions it performs.
A standard workflow consists of four key components:
- Target Module: The module on which the workflow executes.
- Workflow Trigger: The event that causes the workflow to run.
- Entry Criteria: The conditions that determine which records qualify for the workflow.
- Actions: The operations that Vtiger performs when the trigger occurs and the entry criteria are met.
Benefits of Standard Workflows
The benefits of using Standard Workflows are:
- Reduce manual effort: Automate repetitive activities such as sending emails, creating tasks, and updating records.
- Improve consistency: Ensure that predefined actions are performed whenever the configured conditions are met.
- Save time: Automate routine follow-up activities and notifications.
- Improve response time: Trigger actions when the required conditions are satisfied.
- Support process automation: Connect record events and business conditions with predefined actions.
In this article, you will learn about:
- Accessing Workflow settings
- Creating a Standard Workflow
- Editing a Standard Workflow
- Enabling a Standard Workflow
- Disabling a Standard Workflow
- Deleting a Standard Workflow
Accessing Workflows Settings
Follow these steps to access Workflow settings:
- Log in to the CRM.
- Click the User Menu.
- Select Settings. The Settings page opens.
- Go to the Automation section.
- Click Workflows. The Workflows page opens.
The Workflows page displays the workflows available for your organization. From this page, you can create, edit, enable, disable, or delete workflows as needed.
Creating a Standard Workflow
You can create a standard workflow by defining its basic information, trigger, entry criteria, and actions.
Follow these steps to create a Standard Workflow:
- Log in to the CRM.
- Click the User Menu in the top-right corner.
- Click Settings. The Settings page opens.
- Go to the Automation section.
- Select Workflows. The Workflows page opens.
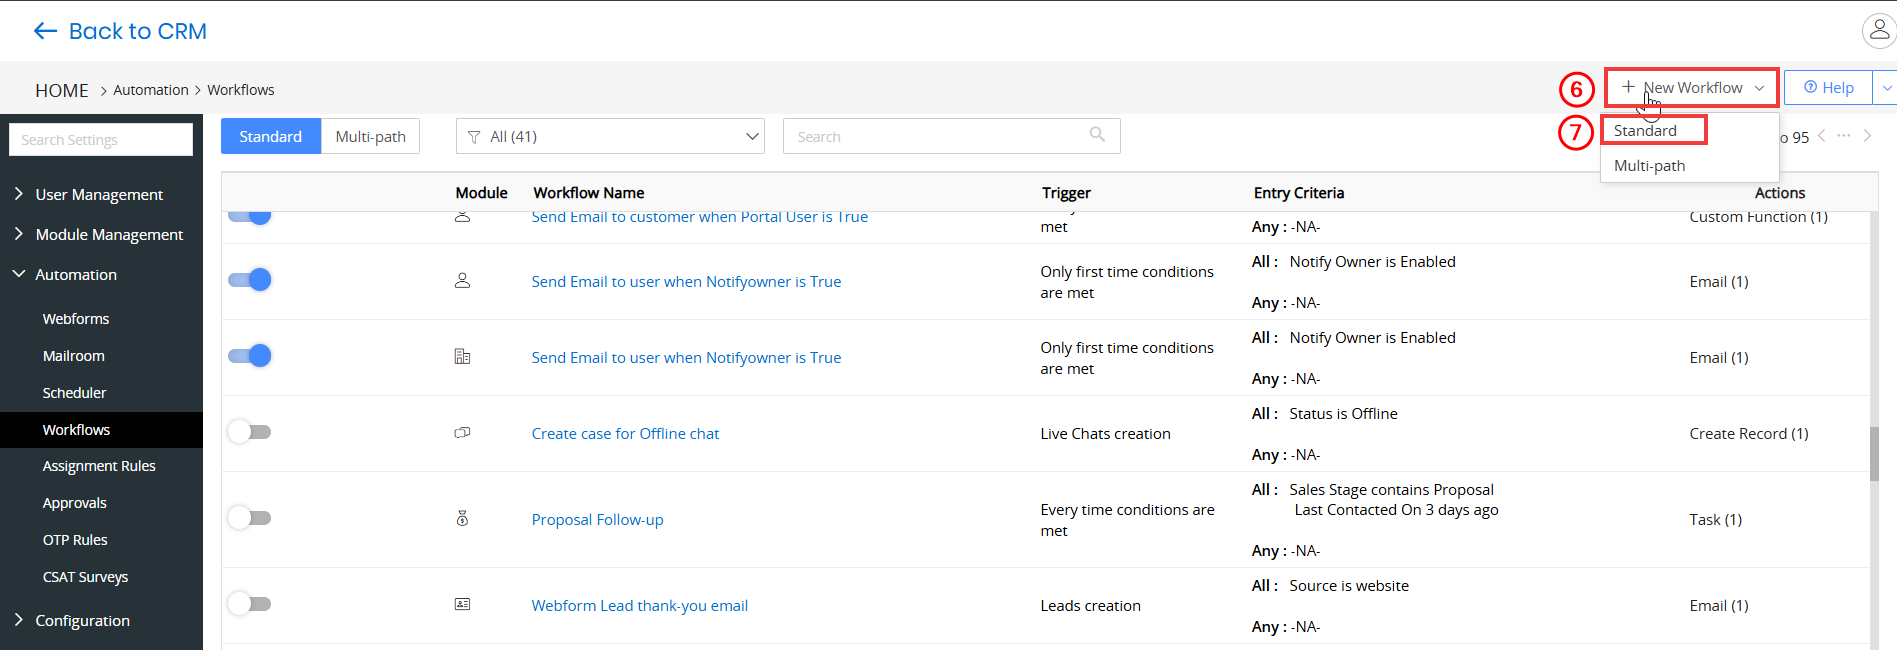
- Click + New Workflow.
- Select Standard. The New Standard Workflow page opens.
- Enter or select the following information:
- Basic Information:
- Workflow Name: Specify the name of the workflow.
- Target Module: Specify the module on which the workflow must execute, such as Deals, Contacts, Products, etc.
- Status: Specify the workflow status as Active or Inactive. The workflow does not execute when the status is set to Inactive
- Description: Provide a brief description of what the workflow is used for, the actions it performs, etc.
- Workflow Trigger:
- Trigger Workflow On:
- Record creation: Choose this option if you want the workflow to trigger when a record is created in the Target Module (mentioned in the previous section).
- Record updation (includes creation): Choose this option if you want the workflow to trigger when a record is updated or created in the Target Module (mentioned in the previous section).
- Only first-time conditions are met: Triggers the workflow if the specified conditions are true. Once executed, the workflow will not trigger on the same record again. However, it will trigger on other records in the selected module.
- Every time conditions met: Triggers the workflow on a record every time the specified conditions are true.
- Time Interval: Choose this option if you want the workflow to trigger at a frequent time interval.
- Entry Criteria
- All Conditions: Select this option when all the specified conditions must be satisfied for the workflow to execute.
- Any Conditions: Select this option when at least one of the specified conditions must be satisfied for the workflow to execute.
- Actions
- Send Mail: Send an email notification to specified recipients.
- Invoke Custom Function: Execute a custom function to perform a specific operation.
- Create Task: Create a task and assign it to the required user or role.
- Create Event: Create an event based on the workflow requirements.
- Update Fields: Automatically update one or more fields in the record.
- Create Record: Create a new record in a supported module.
- SMS Task: Create or send an SMS-based task or notification.
- Mobile Push Notification: Send a push notification to a user's mobile device.
- Webhook: Send workflow data to an external application or service through a webhook.
- WhatsApp: Send a WhatsApp message based on the workflow configuration.
- Telegram: Send a Telegram message based on the workflow configuration.
- Server Script: Execute a server-side script to perform a customized operation.
- Send OTP: Send a one-time password based on the configured workflow action.
- Click Save.
- Trigger Workflow On:
- Basic Information:
The workflow is saved with the configured settings and is available in the Workflows list.
Example: Create a Follow-Up Task for Trade Show Leads
Consider a sales team that collects leads during trade shows and needs to follow up with them promptly. To avoid manually creating follow-up tasks for each lead, you can create a Standard Workflow that automatically creates a high-priority task whenever a new lead is added with Trade Show as the lead source.
Follow these steps to create a workflow:
- Log in to the CRM.
- Click the User Menu in the top-right corner.
- Click Settings. The Settings page opens.
- Go to the Automation section.
- Select Workflows. The Workflows page opens.
- Click + New Workflow.
- Select Standard. The New Standard Workflow page opens.
- Enter or select the following information:
- Basic Information:
- Workflow Name: Enter a name such as Create Follow-Up Task for Trade Show Leads.
- Target Module: Select Leads as the target module.
- Status: Select Active to enable the workflow after it is saved.
- Description: Enter a brief description explaining that the workflow creates a follow-up task for leads generated from trade shows.
- Workflow Trigger:
- Under Trigger Workflow On, select Record creation to trigger the workflow whenever a new lead is created.
- Entry Criteria:
- Select the All condition to identify leads whose source is Trade Show.
- Actions:
- Click Add Action.
- Select Create Record. A Create Record window opens.
- Enter an Action Title.
- Select the module in which the follow-up task should be created.
- Click Add Record Field and specify the required values for the follow-up task, such as its priority and other relevant fields.
- Click Save
- Basic Information:
The Standard Workflow is created and activated. Whenever a new lead is created with its source set to Trade Show, Vtiger automatically creates the configured follow-up task.
Editing a Standard Workflow
You can edit an existing Standard Workflow when you need to change its trigger, conditions, or actions.
Note: You cannot edit the Target Module field.
Follow these steps to edit a Standard Workflow:
- Log in to the CRM.
- Click the User Menu in the top-right corner.
- Click Settings. The Settings page opens.
- Go to the Automation section.
- Select Workflows. The Workflows page opens.
- Click the Standard tab. The Standard workflow page opens.
- Locate the Standard Workflow you want to modify.
- Click and open the Workflow.
- Update the required workflow settings.
- Click Save.
The updated configuration is saved and is used the next time the Standard Workflow executes.
Enabling a Standard Workflow
A workflow must be active for Vtiger to execute its configured actions, so enabling a workflow allows the automation to run when its trigger and conditions are satisfied.
Follow these steps to enable a Workflow:
- Log in to the CRM.
- Click the User Menu in t he top-right corner.
- Click Settings. The Settings page opens.
- Go to the Automation section.
- Select Workflows. The Workflows page opens.
- Click the Standard tab. The Standard workflow page opens.
- Select the workflow you want to enable.
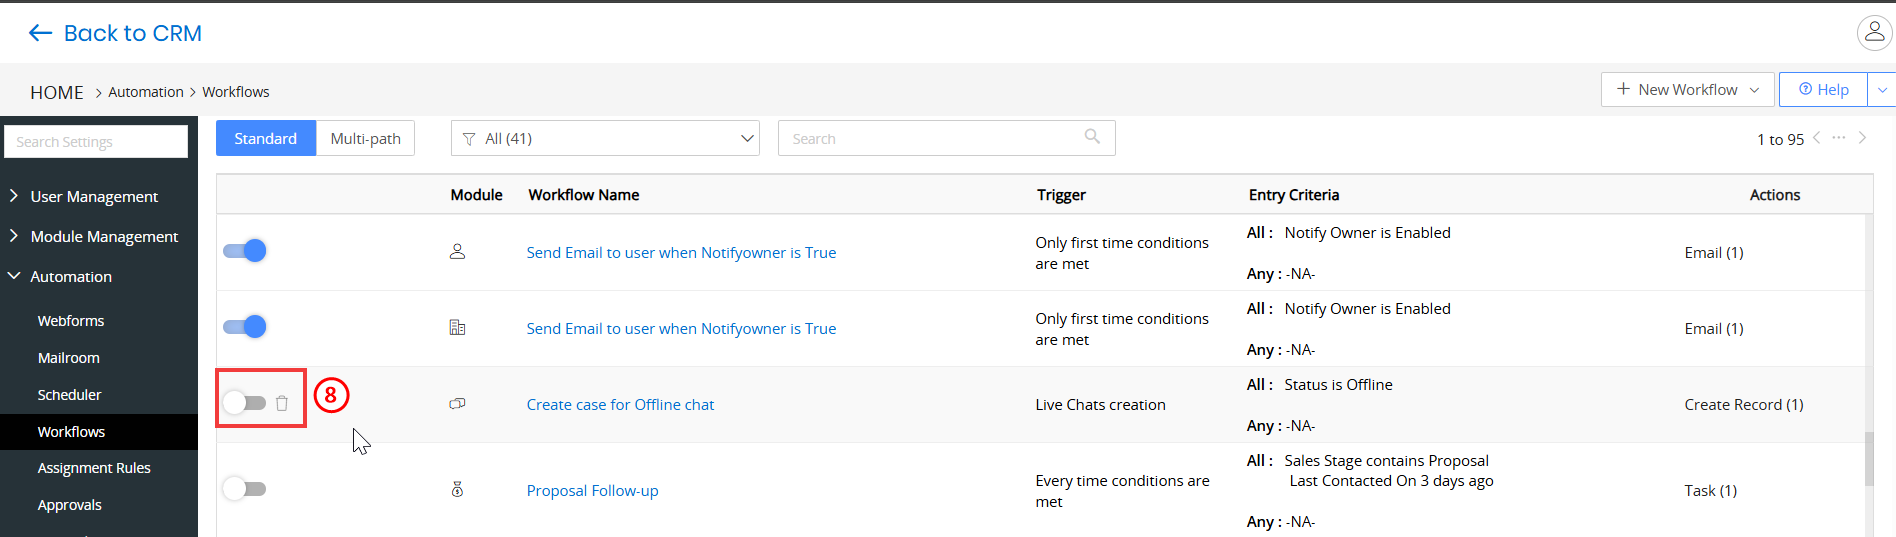
- Click the toggle to enable the Workflow.
Once enabled, the workflow executes when its configured trigger and conditions are satisfied.
Disabling a Standard Workflow
If you no longer want a workflow to execute but may need it later, you can disable it instead of deleting it.
Follow these steps to disable a Workflow:
- Log in to the CRM.
- Click the User Menu in t he top-right corner.
- Click Settings. The Settings page opens.
- Go to the Automation section.
- Select Workflows. The Workflows page opens.
- Click the Standard tab. The Standard workflow page opens.
- Select the workflow you want to enable.
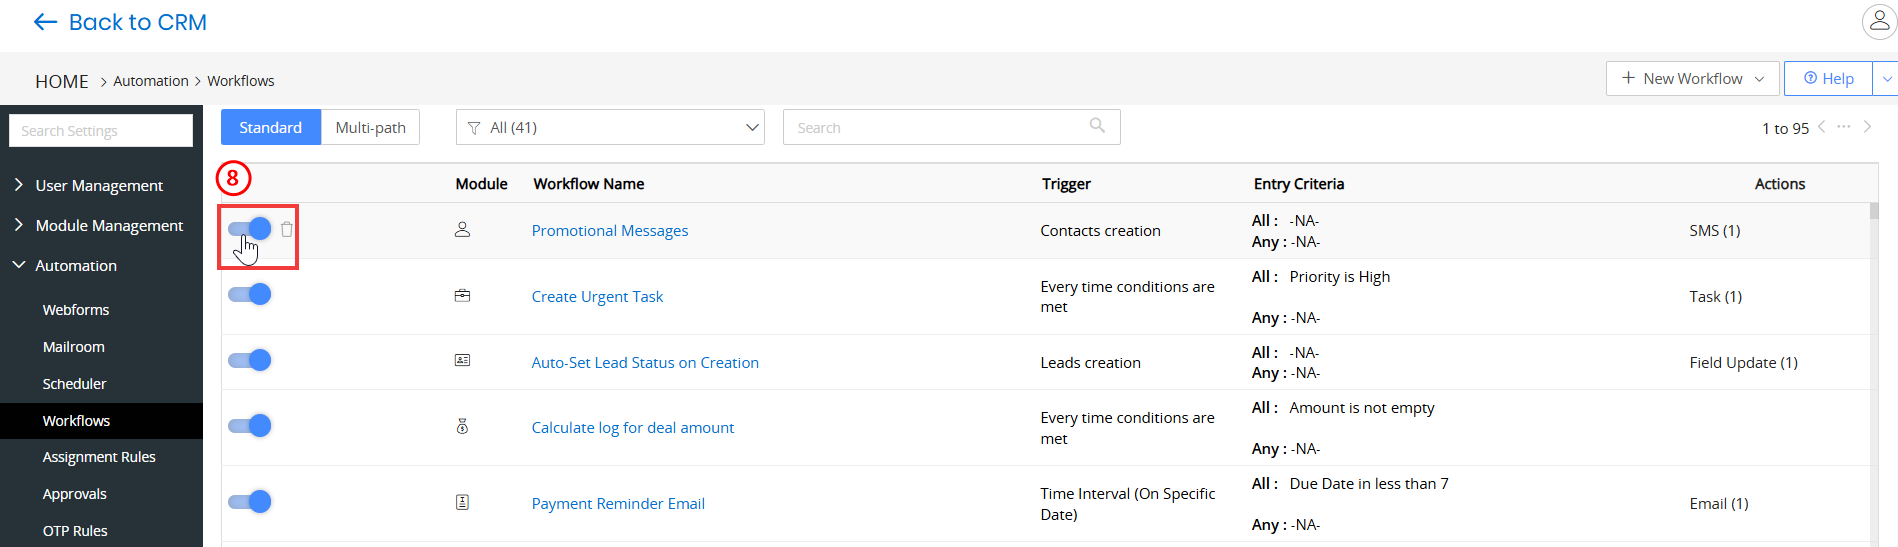
- Click the toggle to disable the workflow.
When disabled, the workflow remains available in Vtiger but does not execute until it is enabled again.
Note: Once disabled, the workflow record moves to the bottom.
Deleting a Standard Workflow
When a workflow is no longer required, you can remove it from the workflow list.
Follow these steps to delete a Workflow:
- Log in to the CRM.
- Click the User Menu in t he top-right corner.
- Click Settings. The Settings page opens.
- Go to the Automation section.
- Select Workflows. The Workflows page opens.
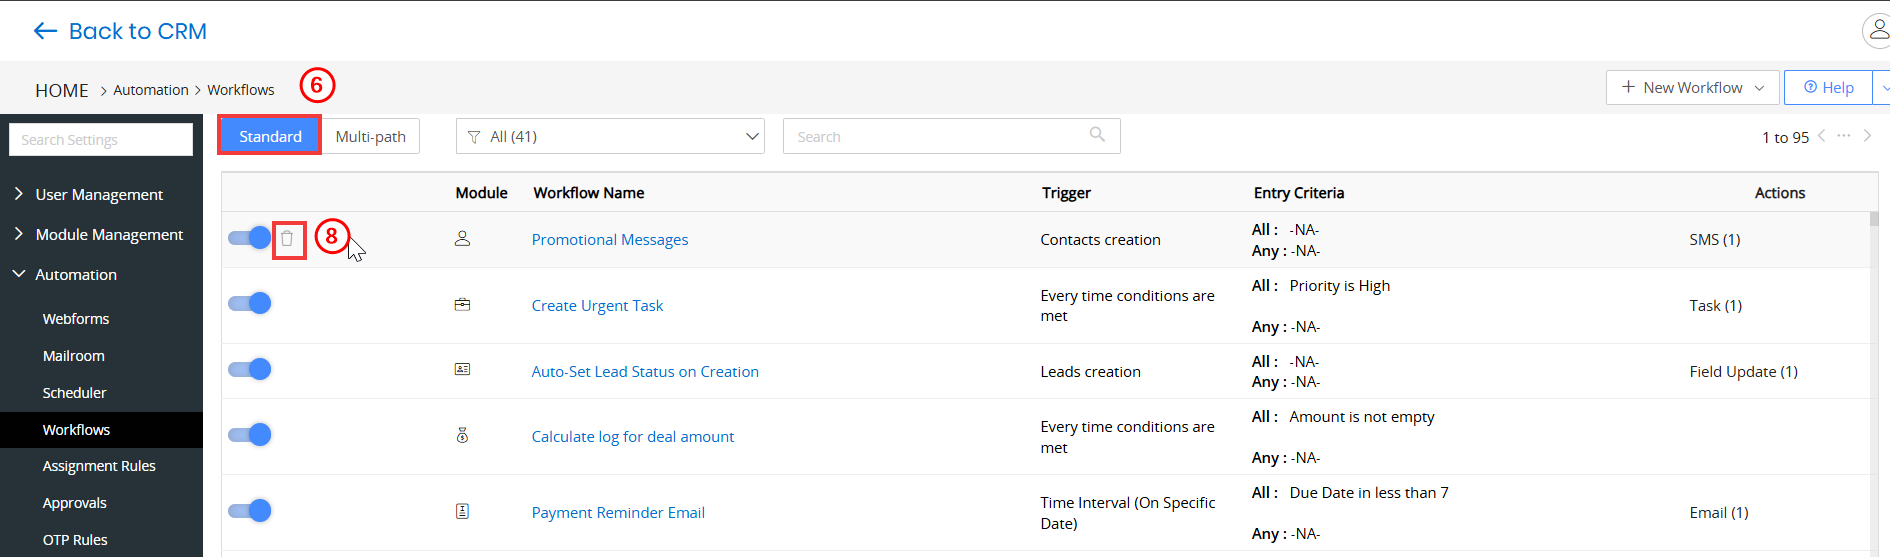
- Click the Standard tab. The Standard workflow page opens.
- Hover over the workflow you want to delete.
- Click Delete. A confirmation window opens.
- Click Yes.
Once deleted, the workflow is no longer available for execution.