Articles in this section
Configuring Business Hours
Feature Availability
Vtiger Editions: One Pilot | One Growth | One Professional | One Enterprise | One AI
Introduction to Business Hours
Business hours are the working hours of a company, team, or individual in a week.
For example, you can define business hours (in hours) for your customer support team. This will help your customers to contact them at the right time and you willalso be available to serve customers, based on their time zones.
You can use the Business Hours feature in Vtiger CRM to set up the available duration of your teams to help give your customers reliable support. You can also view clear metrics on the customer service provided by your team. SLAs, appointments, and workflows in the CRM are dependent on business hours.
Note: Your CRM comes with default business hours already configured. Default business hours are always applied to new users created in the CRM. You cannot delete the default business hours. Instead, you can configure other business hours and mark them as default.
Benefits
The benefits of configuring Business Hours in the CRM are:
- Calculate case response times, Internal Tickets, and SLAs based on the business hours configured for a user. Note: The time elapsed on cases is not calculated during non-business hours to avoid SLA violations.
- Create meetings based on a user’s business hours.
- Configure different workflow actions that will trigger during non-business hours.
Viewing Default Business Hours
Default business hours are configured for new users created in the CRM. You cannot delete the default business hours. Instead, you can configure other business hours and mark them as default.
You can view default business hours from Settings > Configuration > Business Hours.
Configuring Business Hours
Note: You can configure Business Hours in the CRM to automatically stop the clock at the end of the configured working day.
In this section, you will learn how to configure business hours for your company, along with other nuances related to this setting. Once configured, they are mainly useful to your company’s sales and support teams, especially if they work in shifts.
Follow these steps to configure business hours:
- Log in to the CRM.
- Click the User Menu in the top right corner of the screen.
- Click Settings.
- Look for the Configuration section.
- Select Business Hours.
- Click + Add Business Hour.
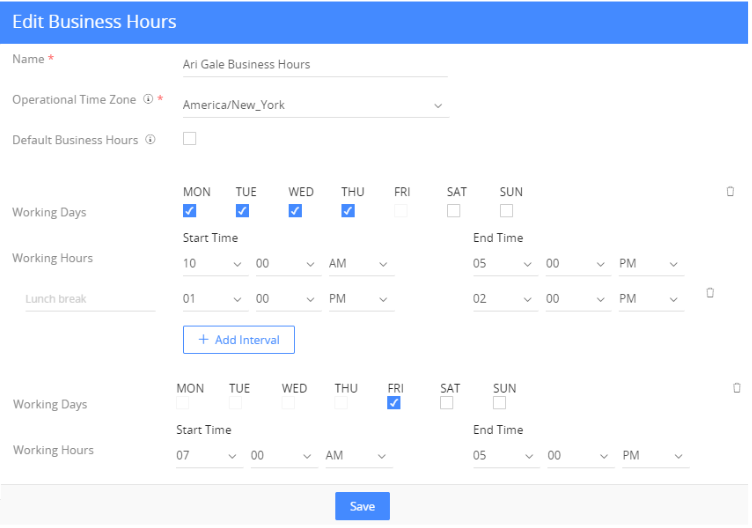
- Enter or select the following information -
- Name: Provide a name to the business hour.
- Operational Time Zone: Select the time zone (where your Users are working or SLAs cater to).
- Default Business Hour: Enable this checkbox if you wish to make the current business hour the default.
- Working Days: Enable the checkbox on the days that your company will be functioning.
- Working Hours: Enter the Start Time and End Time for all the working days you have selected in the previous row.
- Click + Add Interval to schedule breaks, such as coffee or lunch breaks, for your employees.
- Note: To delete an interval, click the Delete icon on the right side of the interval.
- Click + Add Working Day to specify the timings and intervals for the set of working days that were not included previously.
- Note: To delete a working day, click the Delete icon on the right side of the working day.
- Click + Add Holiday to add a list of holidays in the Holidays section.
- Click Save.
Configuring User Business Hours

The default business hours apply to all new users. As CRM users, you can select your business hours yourself or ask the CRM admin to do it for you. The user's business hours are used in the Appointment Pages module.
Follow these steps to set up user business hours:
- Log in to the CRM.
- Click the User Menu in the top right corner of the screen.
- Click Settings.
- Select My Preferences.
- Go to the User business hours block.
- Click the Edit icon beside the business hour name.
- Select the business hour from the drop-down.
The new business hours have now been applied to the CRM user. To learn more about My Preferences, click here.
List View in Business Hours
All the business hours are listed in Settings > Configuration > Business Hours. In this view, you can see the following:
- The name of the business hour,
- The actions that can be performed during the business hours,
- The operational time zone, and
- Whether or not business hours are marked as default.
List View actions
You can perform a few basic actions in the List View, such as:
- Edit - To edit business hours, hover over them and click the Edit icon.
- Delete - To delete business hours, hover over them and click the Delete icon. The record will be deleted permanently.
- Note: You cannot delete a default business hour.
- Search – Use the Search option to quickly find specific business hour records.
To learn more about List View, click here.
Impact of Business Hours on Other Modules
Business hours directly affect Cases, Internal Tickets, SLAs, and Appointment pages. In this section, you can understand the scope of business hours in these modules.
In SLAs
Business hours play a huge role in creating an SLA and configuring target response times for the SLA. Every new case created is associated with the business hours defined in the SLA. For example, when a case is created, an SLA policy and the business hours defined in it are associated with the case. Once the case is assigned to an agent, the SLA clock will start running based on the business hours defined in the SLA.
To learn more about SLA Policies, click here.
In Cases
When you set up business hours, the time elapsed on a case during non-business hours is not calculated while measuring the SLA. For example, if a case is assigned to an agent that is due in 4 hours on a Sunday morning, and the agent is not working on Sundays, then the clock will start ticking only on Monday when the agent’s business hours start. Business hours will also help redirect phone calls to voicemail during non-business hours.
To learn more about Cases in Vtiger CRM, click here.
In Internal Tickets
When an internal ticket is created, an Internal SLA is associated with it. So, the functioning of the SLA clock in this scenario depends on the Business Hour defined in the Internal SLA. Similarly to Cases where you set up business hours, the time elapsed on an Internal ticket during non-business hours is not calculated while measuring the SLA.
To learn more about Internal Tickets, click here.
In Appointment Pages
While scheduling an appointment, available slots are displayed based on the user’s business hours.
To learn more about the Appointment Pages, click here.
In Events and Tasks (Calendar View)
Business hours also influence how working days are displayed in the Calendar view for the Events and Tasks modules. Once you configure the Working Days in Settings > Configuration > Business Hours, you can choose to display only those working days in the Calendar view.
In the Calendar view of the Events or Tasks module:
- Enable the Business Days option to display only the configured working days.
- Non-working days (such as weekends or holidays) will be hidden from the Calendar view.
- When you use the Dates filter, records will be displayed by showing only the selected business days.
This helps users focus on operational days and avoid scheduling meetings or tasks during non-working days.
To learn more about Events, click here.
To learn more about Task, click here.