Articles in this section
Appointment Pages in Vtiger
Feature Availability
Vtiger Editions: One Pilot | One Growth | One Professional | One Enterprise | One AI
Introduction
Scheduling appointments with customers should not require endless email conversations. With Vtiger CRM’s Appointment Pages, you can automate appointment booking, eliminate back-and-forth communication, and keep your calendar organized effortlessly.
Appointment Pages allow you to create and share a booking link with your leads or customers. Once they pick a suitable date and time, Vtiger automatically blocks your calendar and creates an event for the appointment.
Appointment Page Types
In Vtiger CRM, you can create three types of appointment pages – Meet Me, Auto-Assigned, and Group Event.
- Meet Me Page: Meet Me pages are for one-on-one meetings. They let you invite a customer to meet a specific individual. You can schedule a meeting for yourself or another team member using Meet Me pages.
- Auto-Assigned Page: Auto-Assigned pages are assigned to a team/group. When the customer picks a date and time, Vtiger CRM automatically gives the meeting to a team/group member who is available to host the meeting, depending on his or her business hours.
- Group Event Page: Group Event pages allow you to invite multiple customers to attend an event. For example, if you are hosting a webinar or a workshop, you can create an appointment page and send it to your customers.
Benefits of Appointment Pages
The benefits of using Appointment Pages are:
- Reduce no-shows with automated email reminders.
- Save time by setting buffer times between meetings.
- Improve team efficiency with auto-assigned appointments.
- Track booking sources using UTM parameters.
- Offer a hassle-free booking experience to your customers.
In this article, you will learn about:
- Creating a Meet Me Page
- Creating an Auto-Assigned Page
- Creating a Group Event Page
- Sharing an Appointment
- OTP validation for Appointment
- Rescheduling an Appointment
- Cancelling an Appointment
- Actions in the Appointment Page Module
Key Terminology
|
|
|
|
|
|
|
|
|
|
|
|
|
|
|
|
|
|
|
|
|
|
|
|
Creating a Meet Me Page
When you share an appointment page with a customer, and they schedule an appointment using the page, Vtiger CRM creates an event for the appointment. You can view the event from the main Menu > Essentials > Events.
Follow these steps to create a Meet Me page:
- Log in to the CRM.
- Click the main Menu.
- Go to Sales > Sales Enablement.
- Click Appointment Pages. The Appointment Page List View opens.
- Click +New Appointment Page. A Choose the type of appointment page to create window opens.
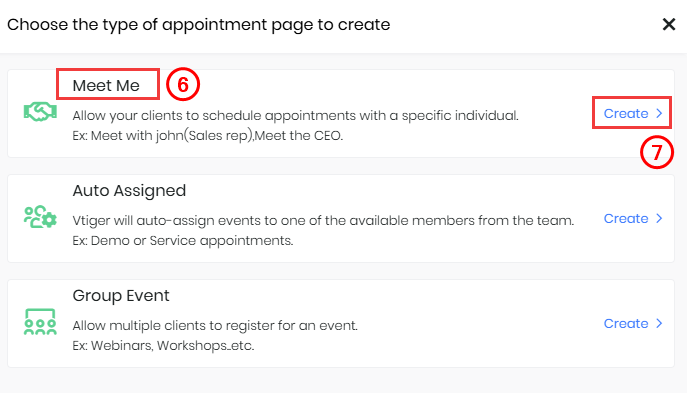
- Select Meet Me.
- Click Create. The Add Meet Me window opens.
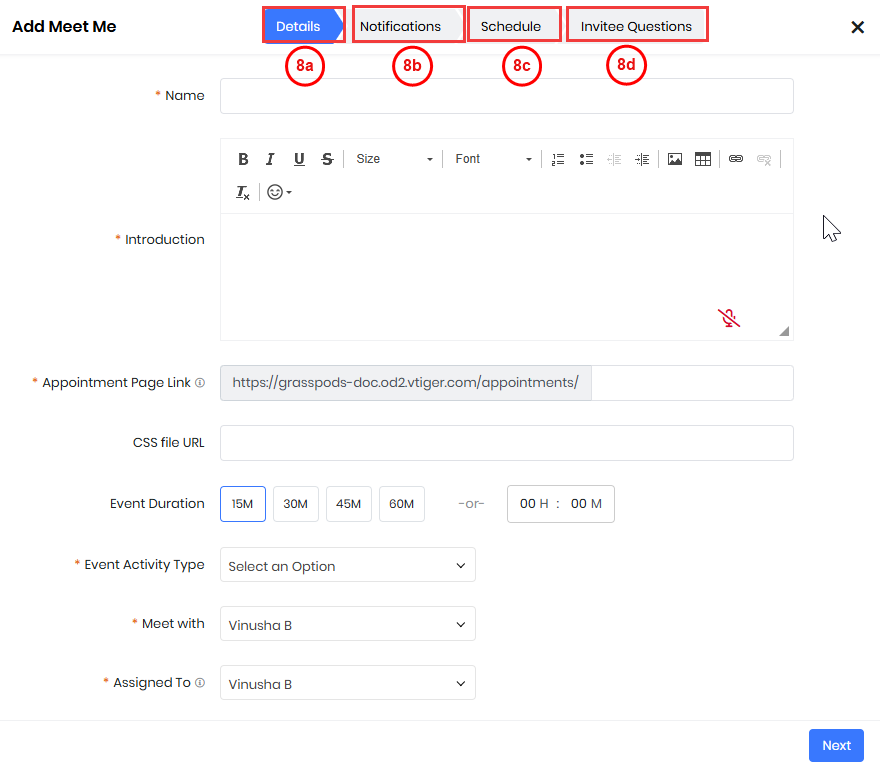
- Enter or select information for the following sections:
- Details - Enter information for Name, Introduction, Duration, Activity Type, etc.
- Note:
- Enable the Status toggle to ensure the appointment page is active and accessible to customers.
- Enable the Track UTM Parameters toggle to add UTM parameters to the appointment page URL and track the bookings for conversions. You can:
- Trace the origin of appointments.
- Measure the campaign effectiveness.
- Optimize strategies for marketing.
- Accurately attribute appointments to specific ads, emails, or links, improving ROI analysis.
- Click Next.
- Note:
- Notifications - Configure notifications for confirmation, cancel, and reminder email templates, enable reminders, and specify the time as needed.
- Click Next.
- Schedule - The maximum date a customer can schedule an appointment and other details.
- How far into the future should customers be able to schedule an appointment? If you say 15 days, the customers will be able to see the slots available for an appointment in the next 15 days.
- Prevent scheduling appointments less than (X hours away) - If you say 1 hour, the customers cannot schedule an appointment one hour before the current time.
- Buffer time before the appointment - Prevents scheduling back-to-back appointments.
- Buffer time after appointment - Prevents scheduling back-to-back appointments.
- Click Next.
- How far into the future should customers be able to schedule an appointment? If you say 15 days, the customers will be able to see the slots available for an appointment in the next 15 days.
- Invitee Questions - Enter questions that the invitee must answer to be a part of the event. You can add and modify your questionnaire by rearranging the question sequence using the drag-and-drop option.
- Click Save.
- Details - Enter information for Name, Introduction, Duration, Activity Type, etc.
Creating an Auto-Assigned Page
If a customer schedules an appointment using the appointment page you share with them, Vtiger CRM creates an event for the appointment. You can view the event by going to Main Menu > Essentials > Events.
Follow these steps to create an Auto-Assigned page:
- Log in to the CRM.
- Click the main Menu.
- Go to Sales > Sales Enablement.
- Click Appointment Pages. The Appointment Page List View opens.
- Click +New Appointment Page. A Choose the type of appointment page to create window opens.
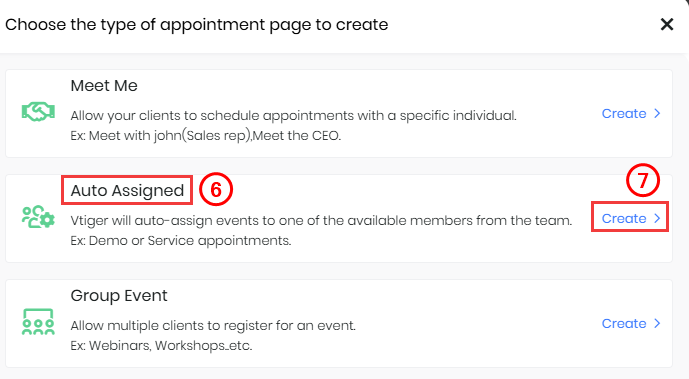
- Select Auto-Assigned.
- Click Create. The Add Auto Assigned window opens.
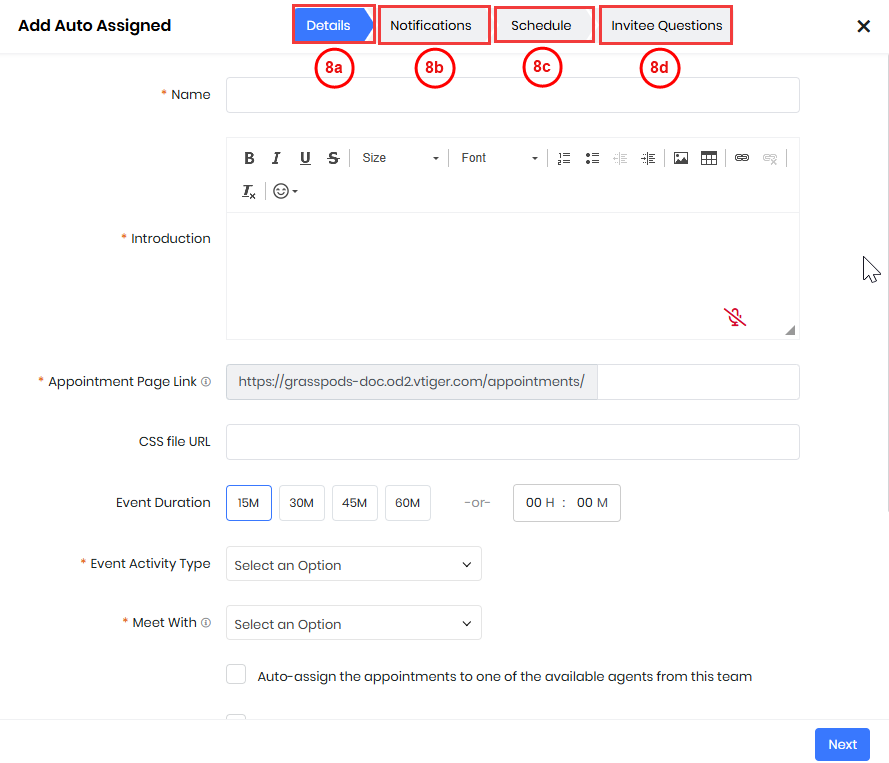
- Enter or select the following information:
- Details - Enter information for Name, Introduction, Duration, Activity Type, etc.
- Enable the Auto-assign the appointments checkbox below the Meet with drop-down.
- Enable the checkmark for Notify auto-assigned members and teams when an appointment is scheduled to send them a notification.
- Note:
- The member and the group must have verified email addresses to receive the notification email. An appointment page is accessible only if you enable the Status toggle button. It means the page is active.
- Enable the Status toggle to ensure the appointment page is active and accessible to customers.
- Enable the Track UTM Parameters toggle to add UTM parameters to the appointment page URL and track the bookings for conversions. You can:
- Trace the origin of appointments.
- Measure the campaign effectiveness.
- Optimize strategies for marketing.
- Accurately attribute appointments to specific ads, emails, or links, improving ROI analysis.
- Click Next
- Notifications - Configure notifications for confirmation, cancel, and reminder email templates, enable reminders, and specify the time as needed.
- Click Next.
- Schedule - The maximum date a customer can schedule an appointment and other details.
- How far into the future should customers be able to schedule an appointment? If you say 15 days, the customers will be able to see the slots available for an appointment in the next 15 days.
- Prevent scheduling appointments less than (X hours away) - If you say 1 hour, the customers cannot schedule an appointment one hour before the current time.
- Buffer time before the appointment - Prevents scheduling back-to-back appointments.
- Buffer time after appointment - Prevents scheduling back-to-back appointments.
- Click Next.
- How far into the future should customers be able to schedule an appointment? If you say 15 days, the customers will be able to see the slots available for an appointment in the next 15 days.
- Invitee Questions - Enter questions that the invitee must answer to be a part of the event. You can add and modify your questionnaire by rearranging the question sequence using the drag-and-drop option.
- Click Save.
- Details - Enter information for Name, Introduction, Duration, Activity Type, etc.
What the customers see

When customers click on the appointment link you provide, they see the above page. Here, they can then select a date, choose a time slot, and complete the form to confirm their appointment with you.
Depending on the time format selected on the Appointment Page, they will see available time slots either within the 12-hour format (with AM/PM indicators) or using the 24-hour format (without AM/PM).
For example, if the 12-hour format is chosen, they will see time slots like 8:00 AM or 2:00 PM, whereas with the 24-hour format, the slots will show as 08:00 or 14:00.
Creating a Group Event Page
When you share a group event page with a customer, and he or she schedules an appointment using the page, Vtiger CRM adds the customer to the invitee list of the group event. You can view the event by going to Main Menu > Essentials > Events.
Follow these steps to create a Group Event page:
- Log in to the CRM.
- Click the main Menu.
- Go to Sales > Sales Enablement.
- Click Appointment Pages. The Appointment Page List View opens.
- Click +New Appointment Page. A Choose the type of appointment page to create window opens.
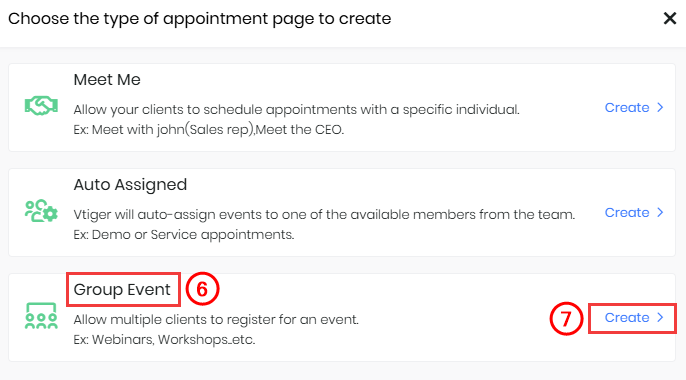
- Select Group Event.
- Click Create. The Add Group Event window opens.

- Enter or select the following information:
- Details - Enter information for Name, Introduction, Duration, Activity Type, etc.
- Note:
- You can create a group event by clicking the + beside the Event field. The newly created group event will be listed here.
- You can select an existing event that is scheduled for the future.
- Click Next.
- Note:
- Notifications - Configure notifications for confirmation, cancel, and reminder email templates, enable reminders, and specify the time as needed.
- Click Next.
- Invitee Questions - Enter the questions the invitees must answer to participate in the event. You can add and modify your questionnaire by rearranging the question sequence using the drag-and-drop option.
- Note:
- Default Questions are not draggable.
- Except for the two Activity types (Onsite meeting and Onsite Service), the address field is draggable.
- Click Save.
- Details - Enter information for Name, Introduction, Duration, Activity Type, etc.
What the customers see
When customers click on the appointment link you provide, they see the above page. Here, they can then select a date, choose a time slot, and complete the form to confirm their appointment with you.
Depending on the time format selected on the Appointment Page, they will see available time slots either within the 12-hour format (with AM/PM indicators) or using the 24-hour format (without AM/PM).
For example, if the 12-hour format is chosen, they will see time slots like 8:00 AM or 2:00 PM, whereas with the 24-hour format, the slots will show as 08:00 or 14:00.
Sharing an Appointment Page
You can send or share an Appointment Page link from:
- The List View and Details View of an Appointment Page record via email.
- The List View and Details View of a Contact record using the Copy Appointment Page icon. This allows you to copy the appointment link and send it to your contacts via email, WhatsApp, in the Comments section, etc.
Sharing an Appointment Page via email
After creating an appointment page, you can share its link via email from the Appointment Page record in the CRM.
Follow these steps to share an appointment page via email:
- Log in to the CRM.
- Click the main Menu.
- Go to Sales > Sales Enablement.
- Click Appointment Pages. The List view opens.
- Select and open an Appointment Page record.
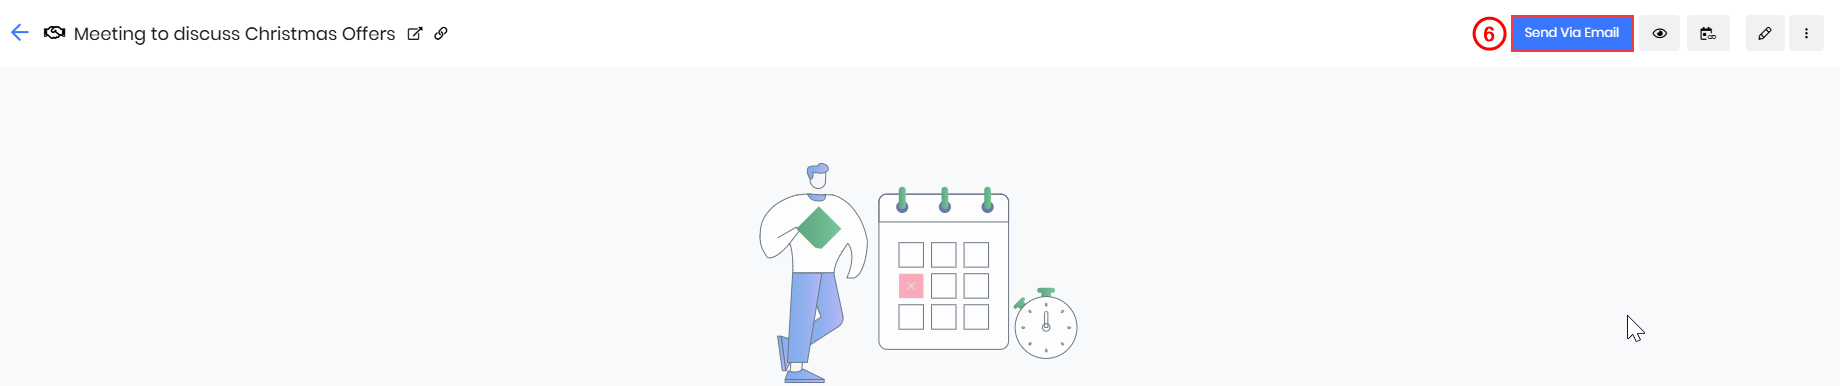
- Click Send Via Email. The Compose Email window opens.
- Enter or select the following information:
- To - Enter the To address.
- Cc & Bcc Fields - You can enter email addresses in these fields if required.
- Click More.
- From - Enter the from address.
- Reply To - Enter the reply to address if you are responding to someone.
- Subject -Enter the email subject
- Textbox - Enter the content of the email. In this section, you can:
- Edit and format your email content with the various options available.
- Insert links to appointments, surveys, landing pages, documents, etc.
- Select an email template instead of typing your email content
- Select a sequence if your email is a part of an email sequence.
- Use the Write with AI option to use Calculus AI to write your email.
- You can also attach files, add your digital signature, and create reminders
- Note - You can also save the email as a draft and send it later.
- Click Send.
OTP Validation for Appointments
- You can add OTP validation while creating an Appointment, scheduling an Event, or a Group Appointment.
- The customer must enter an email ID where the OTP will be sent. They can book an appointment only if they enter a valid OTP.
- In case they do not receive an OTP the first time, you will be able to resend the OTP
Rescheduling an Appointment
If you or your customer cannot attend a confirmed appointment, it can be rescheduled for a future date or time. Rescheduling automatically cancels the previously scheduled appointment.A new event record is created in the CRM for the rescheduled appointment, and confirmation emails are sent to you and your customer. The process of rescheduling is the same for both you and your customer.
Follow these steps to reschedule an appointment:
- Open the confirmation email of the appointment.
- Click the Reschedule option in the email.
- Pick a new date.
- Pick a new time slot.
- Click Reschedule.
Canceling an Appointment
Both you and your customer have the privilege of canceling a scheduled Appointment.When you want to cancel an appointment
You can cancel an Appointment in two ways:- By marking the related event as Canceled
- By using the Cancel option in the confirmation email
Marking the related Event as canceled
When you share an Appointment page with a customer and they schedule an appointment using the page, Vtiger CRM creates an Event for the Appointment. You can cancel an Appointment by marking its related Event as canceled.Follow these steps to cancel an Appointment (Event):
- Log in to the CRM.
- Click the main Menu.
- Go to Essentials.
- Click Events. The Events List View opens.
- Select and open the appointment-related Event.
- Click the status bar on the top-right.
- Select Canceled.
- Click Save.
Canceling through email

When a customer schedules an appointment with you, you will receive a confirmation email. The email contains an option to cancel the appointment. Click Cancel, enter the cancellation reason, and confirm.
Actions in the Appointment Pages Module
List View
You can perform the following actions on an appointment page in the CRM:- Duplicate - Duplicate an appointment page and change its details by selecting Duplicate under the More icon.
- Delete - Delete an appointment page by clicking the Delete icon under the More icon.
- Preview - Get a preview of the appointment page by clicking the Preview icon.
- Send appointment link - Send the appointment page link to customers via email using the Send Appointment Link button.
- View registrations - View customer registrations and the customers’ answers to Invitee Questions under Event Registrations.
Viewing Registered Appointments
- You can check your appointments under Main Menu > Sales > Sales Enablement > Appointment Pages. You can see the registrations for an event under Event Registrations in an appointment record. By clicking on a customer’s registration, you can view the customer’s answers to Invitee Questions.
- When an appointment is scheduled, it reflects on your Vtiger calendar. You can see your appointments at Main Menu > Essentials > Events.
How can your customers set up an Appointment
Picking an Appointment Slot
When your customers click the link to the appointment page, they will see the slots available for a meeting. They can pick a slot and schedule a meeting by filling out a form. Here is how your customers can schedule a Meet Me or Auto-Assigned appointment:

- You send an email to your client so they can pick a slot for an appointment.

- When a customer opens an appointment link, they will see all the dates available for a meeting.

- They can then select a date, choose a time slot, and complete the form to confirm their appointment with you.
- Depending on the time format selected on the Appointment Page, they will see available time slots either within the 12-hour format (with AM/PM indicators) or using the 24-hour format (without AM/PM).
- For example, if the 12-hour format is chosen, they will see time slots like 8:00 AM or 2:00 PM, whereas with the 24-hour format, the slots will show as 08:00 or 14:00.
- Note: Slots that are already booked are not shown in the schedule.

- After they pick a slot, they must fill out a form. Form details may vary for different appointments, depending on the customers, the reason for the appointment, etc.

- When they click Schedule Event, they will see a confirmation message as shown above.
- Note: You now have the option to display the success/confirmation message in your local language when an appointment is scheduled. You can select the language from the Select Language drop-down on the top-right.
Scheduling a group event

When your customers click the link to the group event page that you send them, they will see the Invitee Questions form. They must fill out the form and click Register to book the appointment.
Expired Events

Your customers will see the following message if they try to register for a group appointment that has expired (crossed the due date).
How your customers can cancel an Appointment
There are two ways your customers can cancel an appointment:

From the email: When a customer schedules an appointment with you, they will immediately receive a confirmation email. When they click the cancel registration link in the email, the appointment gets canceled.

From the confirmation page: Your customers can also cancel an appointment from the confirmation page immediately after scheduling the appointment.
API for Appointment Pages
APIs are available for Appointment Pages to fetch available time slots and book appointments. These APIs return real-time availability based on staff schedules and appointment page configuration, allowing you to integrate appointment booking directly into your website or external applications.
You can use these APIs to:
- Display available appointment slots on your website in real time.
- Allow customers to select a slot and book an appointment without leaving your site.
API to Get Available Slots
This API retrieves the list of available time slots for a specific Appointment Page on a selected date, based on staff availability and working hours.
GET restapi/v1/vtiger/default/appointment/availableslots
Request:
- id (Appointment Page Record ID)
- date (YYYY-MM-DD)
- timezone (e.g., "Asia/Kolkata")
| { "id": "42x542", "date": "2025-10-15", "timezone": "Asia/Kolkata" } |
Response:
| { "response": { "returnvalue": { "reponse": true, "data": [ "15:15", "15:30", "15:45", "16:00", "16:15", "16:30", "16:45" ], "time_zone": "Asia/Kolkata" }, "status": "success" } |
API to Book an Appointment
This API allows you to book an appointment for a specific Appointment Page (not just a calendar event).
POST restapi/v1/vtiger/default/appointment/book
Request:
- appointmentId (ID of the Appointment Page)
- startTime
- endTime
- timezone
- customerDetails (name, email, phone, etc.
| { }"appointmentId": "42x542", "startTime": "2025-10-15 10:00:00", "endTime": "2025-10-15 10:30:00", "timezone": "Asia/Kolkata", "customerDetails": {"firstname": "John", "lastname":"Doe", "email": "[email protected]","phone": "+911234567890" } |
Response:
Success status (true/false) with confirmation details.
| { "success": true, "message": "Appointment booked successfully.", "appointmentDetails": { "appointmentId": "42x542", "startTime": "2025-10-15 10:00:00", "endTime": "2025-10-15 10:30:00", "timezone": "Asia/Kolkata", "customerName": "John Doe", } } |