Articles in this section
Vtiger Process Designer
Feature Availablity
Vtiger Editions: One Pilot | One Growth | One Professional | One Enterprise | One AI
Introduction
A business process consists of a series of tasks and decisions that help achieve a specific business goal. Managing these processes manually can take time and may lead to delays or errors.
The Process Designer in Vtiger CRM is a visual automation tool that allows you to design and manage business processes using a flowchart-style interface. It enables you to define triggers, conditions, actions, and wait times that automate tasks within the CRM.
Using Process Designer, you can automate routine activities such as sending emails, creating tasks, updating records, and submitting records for approval. This helps ensure that records follow a structured process without manual intervention.
Process Designer Module in Vtiger CRM
The Process Designer module is where you create and manage automated business processes in Vtiger CRM.
It provides a visual interface where users can build workflows by connecting different components such as triggers, conditions, and actions. Each process can be configured for a specific module, like Leads, Deals, Contacts, or Cases.
From the Process Designer module, users can:
- Create new process flows
- Configure triggers and actions
- Publish or save processes as drafts
- View and manage existing process designs
The module acts as a central place to design and manage automation within the CRM.
Use Case
ABC Technologies, a software company, receives many leads through its website every day. The sales team must quickly respond to these leads by sending emails and scheduling follow-ups. Doing these tasks manually for every lead can take time.
Using Process Designer, ABC Technologies can automate this process.
For example:
- When a new Lead is created, the process is triggered.
- The system automatically assigns the lead to a sales representative.
- A welcome email is sent to the lead.
- A follow-up task is created for the sales representative.
By automating these steps, the sales team can respond faster to leads and ensure that every lead follows the same process.
Benefits of using Process Designer
The benefits of using Process Designer are:
- Allows you to design and automate business processes using a visual flow.
- Helps reduce manual work by automating repetitive tasks.
- Ensures that records follow a consistent and structured workflow.
- Enables you to create multi-step workflows with conditions and actions.
- Reduces human errors by executing predefined actions automatically.
- Improves productivity by allowing teams to focus on more important tasks.
In this article, you will learn about:
- Accessing the Process Designer
- Creating a Process Designe
- The Process Designer and its components
- Different views in the Process Designer records
- The 7 Step Prospecting Sequence
Key Terminology
| Key Terminology | Definition |
| Business process | A business process is a series of tasks or activities methodically structured to achieve a business goal in due course. |
| Flowchart | A flowchart is a diagrammatic representation of a chain of actions or activities designed for a specific process or system using conventional symbols. |
| Workflow | Workflow defines the work pattern for various business stages in a business process. It decides how each stage is executed or automated for a business. |
| Business rules | Business rules are conditions or constraints that are designed to regulate or supervise the behavior of a business according to its organizational standards. |
| Process Designer | The Process Designer is a design tool where you can design process designs for your various business processes and configure business rules. |
Accessing Process Designer
You can access the Process Designer module from the Platform section in Vtiger CRM.
Follow these steps to access Process Designer:
- Log in to the CRM.
- Click the main Menu.
- Click Platform.
- Select Process Designer. The Process Designer.
The Process Designer List View page opens, where you can view and create process designs.
Creating a Process Designer
Follow these steps to create a process design:- Log in to the CRM.
- Click the main Menu.
- Click Platform.
- Look for Designers.
- Select Process Designer. The Process Designer page opens.
- Click +Add Process. The Add Process window opens.
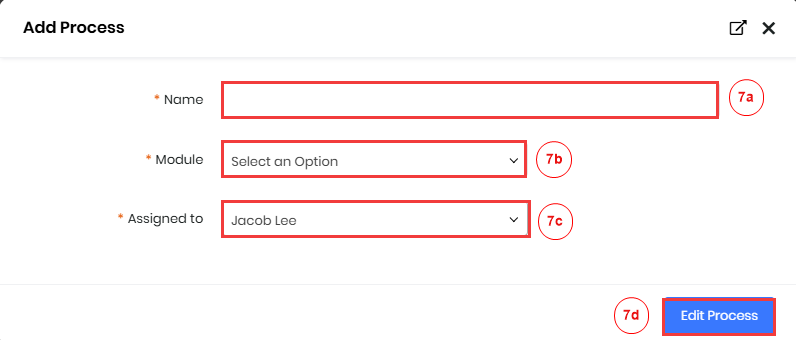
- Enter or select the following information:
- Name: Enter the name of the process.
- Module: Select the module for which the process is designed.
- Status: Select the status as Active or Inactive. While setting up a process, the status is always Active.
- Assigned to: Assign an owner to the process design record.
- Note: Status and Assigned to fields are auto-filled but can be edited.
- Click Edit Process.
You will be directed to the Add Process window, where you can design and publish process designs for your business processes.
Process Designer Components

The Add Process screen is where you create flows for your business processes. It has the following components:
- Left Menu bar
- Trigger and Trigger Properties
- Process Details
- Save options
- Components Menu
Let us now learn about these components.
Left Menu Bar
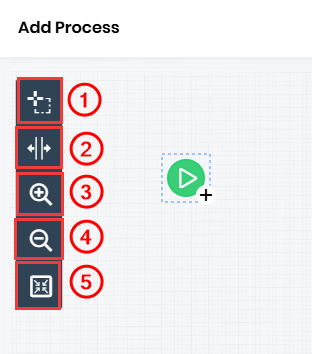
The Left menu bar contains the following tools:
- Lasso Tool - Helps you collectively select multiple components at once and reposition them at your desired location.
- Follow these steps to access the Lasso tool:
- Select the Lasso tool, + mark pops up.
- Hold and select all the components that you want to reposition.
- Drag and drop the selected area to your desired location.
- Follow these steps to access the Lasso tool:
- Add/Remove Space tool - Helps you with spacing adjustments, letting you add or remove spaces in your flowchart.
- Follow these steps to access the Add/Remove Space tool:
- Select the Add/Remove Space tool.
- Place the Add/Remove Space tool where you want to adjust the spacing (remove or add spaces length or breadth-wise).
- Drag and drop the selected area and respace accordingly.
- With this, you have successfully respaced your flowchart components.
- Follow these steps to access the Add/Remove Space tool:
- Zoom In - Clicking Zoom In maximizes the view of a process design.
- Zoom Out - Clicking Zoom Out minimizes the view of a process design.
- Zoom Reset - Clicking Zoom Reset resets the process design to normal view.
Trigger and Trigger Properties

The Trigger component allows you to choose when to trigger a process. You can trigger a process under the following conditions:
- Create - Triggers a process when a record is created.
- Update (Includes Creation) - Triggers a process when a record is updated. Selecting Update allows you to select a Recurrence (when to trigger a process) by setting up All conditions or Any Conditions.
- First-time conditions are met
- This is executed if conditions are satisfied. If no conditions are given, the process proceeds further.
- If the record has undergone the process, it skips the update.
- If the record has not undergone the process, it executes the update.
- Every time conditions are met, but only if the record is not already in process
- This is executed if conditions are satisfied. If no conditions are given, the process proceeds further.
- If the record is running in the process, it skips the update.
- If the record is not running in the process, it executes the update.
- Every time conditions are met
- This is executed if conditions are satisfied. If no conditions are given, the process proceeds further.
- If the record is not running in the process, it executes the update.
- If the record is running in the process, it cancels it and starts a new process.
- First-time conditions are met
- Manual - It allows you to add records to a process manually. It triggers a process when a record is manually added.
- Follow these steps to access the Trigger symbol:
- Click Trigger.
- The Trigger Properties window opens up.
- Select a Trigger On option.
- Select a Recurrence option if chosen, Update (Includes Creation).
- Click Save. The Saved notification is displayed.
- Follow these steps to access the Trigger symbol:
With this, you have successfully set up a Trigger for a process in the Process Designer.
Process Details
Clicking Process Details lets you edit the Name, Module, Status, and Assigned to details for the specific process design record.
Save options
The following Save options are available:
- Save - Clicking Save saves the configurations for a component. If saved successfully, the Saved notification is displayed.
- Save and Publish - Clicking Save and Publish allows you to publish a process design.
- Save as Draft - Clicking Save as Draft lets you save a process design and edit or delete it at a later time.
The Components Menu
The Components Menu lists the prime components of the Process Designer. To access the Process Designer's prime components you have to click the + (plus) mark on a symbol for the Components Menu to appear.
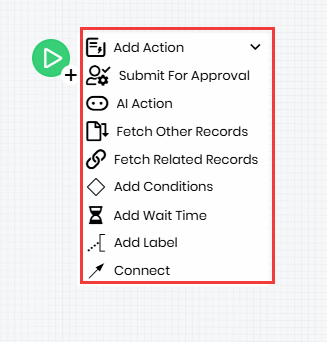
The following components are available in the Components Menu:
Add Action
- Add Action
- Submit for Approval
- AI Action
- Fetch Other Records
- Fetch Related Records
-
Add Conditions
-
Add Wait Time
-
Add Label
-
Connect
Add Action
The Add Action component helps you set up a task or an action for a process. It allows you to select an action from a list of actions and configure its properties as well.
Follow these steps to access Add Action:
- Log in to the CRM.
- Go to the Process Designer.
- Click + mark on a component.
- You will be directed to the Components Menu.
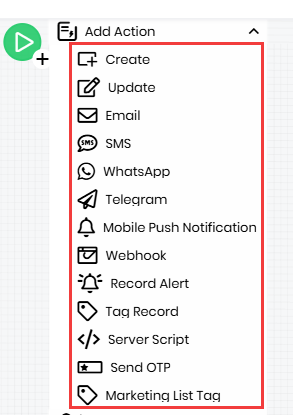
- Click Add Action. The Add Action menu opens and displays the following list of actions:
- Create - Lets you create a record.
- Update - Lets you update a record.
- Email - Lets you:
- Send an email.
- Select the days you want to send the email.
- Add record owner’s dynamic Meet Me Appointment Pages.
- SMS - Lets you send an SMS.
- WhatsApp - Lets you send a WhatsApp message.
- Mobile Push Notification - Lets you send a mobile push notification.
- Webhook - Lets you trigger a Webhook.
- Record Alert - Lets you set an alert or a message for a record. This will be displayed in the record’s Summary View > Next Actions section.
- Tag Record - Lets you tag process records.
- Server Script – Lets you execute a server-side script to perform custom operations.
- Send OTP – Lets you send a One-Time Password (OTP) for verification.
- Marketing List Tag – Lets you tag records to a marketing list for campaign purposes.
- Note: The above actions, once executed for process records, will be displayed in the Process History for their respective process design records as well as the record’s Summary View’s Activity section.
- Click an action to be executed. You will be directed to the specific action window.
- Set up the required settings for the action.
- Click Save. The Saved notification is displayed.
Dynamic Appointment Pages in the Email Action
The Process Designer's Email action lets you very conveniently merge the Meet Me Appointment Page URL of the process record owner in the emails called the Owner Appointment Page URL. This facilitates easy and quick interactions between agents and the customers.
To add the Owner Appointment Page URL to your emails in the Process Designer, you must first add your Meet Me Appointment Page record as the Default. This record, which is added as Default, will be listed as the Owner Appointment Page URL in the emails you send from the Process Designer. This is available under Process Designer > Email Action > Send Mail window > General Fields.
Step 1: Add your Meet Me Appointment page as the Default
Follow these steps to add your Meet Me Appointment page as the Default:
- Log in to CRM.
- Click the main Menu.
- Click Sales.
- Look for Sales Enablement.
- Click Appointment Pages.
- Go to the Meet Me Pages. The List View opens

- Hover your mouse on the Meet Me Appointment Page record that you wish to mark as Default.
- Click the Default icon.
- If the record is successfully added as the Default, the system displays the success message Added.
Note: Only one Meet Me Appointment Page record can be added as the Default.
Step 2: Add the Owner Appointment Page URL to your emails in the Process Designer
Follow these steps to add the Owner Appointment Page URL to your emails in the Process Designer:
- Choose the Email action. You will be directed to the Send Mail window, where you can set up your email configurations.
- Under General Fields, select Owner Appointment Page URL.
With this, the Meet Me Appointment Page URL of the process record owner is successfully added to the email. When your customers click the link, they will be redirected to the Meet Me Appointment Page of the owner, where they can set up a meeting.
Submit For Approval

The Submit For Approval component helps you submit your process records for approval. To select this option, you have to configure the Approval Trigger under Approvals settings:
- Via Process - Under Settings > Approvals > Approval record > Approval Trigger, select Via Process. This lets you submit records for approval via the process design in the Process Designer.
- With this, the Select Approval dropdown in the Submit for Approval window lists the:
- Approvers set up in the approval records (Settings > Approvals > Approval record > Name), configured for the module (Settings > Approvals > Approval record > Module), same as the chosen module for the process design.
Note: The Approvals’ Status for which you configure the Via Process Approval Trigger should be Active (Settings > Approvals > Approval record > Status > Active).
Step 1: Configuring the Approval Trigger
Follow these steps to configure the Approval Trigger Via Process:
- Log in to the CRM.
- Click the User Menu.
- Click the Settings tab.
- Look for Automation.
- Select Approvals.
- Create an approval or select the required approval.
- Go to Approval Trigger.
- Select Via Process.
You have now configured the Approval Trigger Via Process for approvals submitted via processes in the Process Designer.
Note: Approvers won't be listed in the Process Designer's Select Approvers picklist if you select the following in Settings > Approvals > Approval records:
- Approver Trigger - On Save
- Status - Inactive
Step 2: Submitting a Record for Approval
Follow these steps to submit a record for approval:
- Log in to the CRM.
- Go to the Process Designer.
- Click + mark on a component. You will be directed to the Components Menu.
- Click Submit For Approval. You will be directed to the Submit For Approval window.
- Select Approval lists the approvers set up for the module-specific approvals Via Process. Select an approver.
- Click Save.
Once you submit a process record for approval, it can either be approved or rejected. Submit For Approval helps you set up different processes for approval statuses, Approved and Rejected.
Step 3: Setting up the process for the If Approved action
Follow these steps to set up a process for the if Approved action:
- Click + mark on Submit For Approval. You will be directed to the Components Menu.
- Click Approved.
- Click + mark on Approved. You will be directed to the Components Menu, where you can set up the further process.
Step 4: Setting up the process for the If Rejected action
Follow these steps to set up a process if Rejected:
-
Click + mark on Submit For Approval. You will be directed to the Components Menu.
-
Click Rejected.
-
Click + mark on Rejected. You will be directed to the Components Menu, where you can set up the further process.
You have now successfully set up a process when a record is rejected.
AI Action
The AI Action component allows you to use AI capabilities within a process. It executes AI-based tasks using prompts that are already configured for the specific module in the Generative AI Designer.Follow these steps to access AI Action:
-
Log in to the CRM.
- Go to the Process Designer.
- Click the + mark on a component. You will be directed to the Components Menu.
- Click AI Action.
- Configure the AI settings based on your requirements.
- Click Save. The Saved notification is displayed.
Once configured, the AI action will execute automatically when the process reaches this step.
Fetch Other Records
The Fetch Other Records component allows you to retrieve records from another module during a process. This helps you use data from different modules while executing a process.For example, when a Deal is created, you can fetch related Contact or Organization details and use them in further actions like sending emails or updating records.
Follow these steps to access Fetch Other Records:
-
Log in to the CRM.
- Go to the Process Designer.
- Click the + mark on a component. You will be directed to the Components Menu.
- Click Fetch Other Records.
- Select the required module from which records must be fetched.
- Configure the required conditions or filters to identify the records.
- Click Save.
The fetched records can then be used in the subsequent steps of the process.
Fetch Related Records
The Fetch Related Records component allows you to retrieve records that are related to the current process record. This helps you perform actions using associated records.For example, if the process is triggered from a Deal, you can fetch related Contacts, Activities, or Quotes linked to that Deal and perform further actions on them.
Follow these steps to access Fetch Related Records:
-
Log in to the CRM.
- Go to the Process Designer.
- Click the + mark on a component. You will be directed to the Components Menu.
- Click Fetch Related Records.
- Select the related module from which records must be fetched.
- Configure the required conditions if necessary.
- Click Save.
The process will retrieve the related records and allow you to use them in the following steps of the workflow.
Add Condition
The Add Condition component helps you set up a condition or criteria for a process.
Follow these steps to access Add Condition:
- Click + mark on a component. You will be directed to the Components Menu.
- Click Add Conditions. You will be directed to the Conditions window, where you can set the necessary conditions for a process, such as:
- All conditions must be met, or,
- At least one of the conditions must be met
-
Under All Conditions or Any Conditions (both if required), click + Add Condition to set the necessary conditions.
-
Click Save Conditions. The Saved notification is displayed.
Add Conditions also helps you set up a different process if the condition is False.
Follow these steps to set up a Condition as False:
-
Click + mark on Add Conditions. You will be directed to the Components Menu.
-
Click False.
-
Click + mark on the False symbol. You will be directed to the Components Menu, where you can set up the further process.
You have now set up a False condition.
Adding Conditions to Previous Actions
The Process Designer allows you to add conditions not just for the Main Record but for all the previous actions that you have set up for a process. Clicking any condition will list all the previous actions in the Conditions window. You can select the required previous action and set conditions for it. This will evaluate the set conditions for the previous actions and execute them accordingly. The Process Designer allows you to add conditions for the following actions:
- Create
- SMS
Follow these steps to add conditions for previous actions:
- Select any condition. For instance, consider the above screenshot; we have selected Condition 1. You will be directed to the Conditions window.
- Click + mark to list all previous actions - WhatsApp, SMS, and Email.
- Select the required previous action - On WhatsApp. You will be directed to set up WhatsApp’s conditions.
- Select the necessary conditions.
- Click Save Conditions.
Note: If the same Action exists multiple times for a process, its previous actions will be listed number-wise. For instance, if there are 2 Email Actions for a process, clicking the + mark lists them as Email 1 and Email 2 as per their occurrences.
Immediate and Listener Types for Conditions
Once you set up conditions for various actions in a process. The Process Designer provides the following Types for conditions:
-
Immediate - Lets a condition immediately proceed to the next action in a process.
-
Listener - Lets a condition wait for the set wait time for the conditions to meet, and then proceeds to the next action in a process.
Let us learn each of these condition types with examples.
Immediate
If you select type Immediate for a condition, the condition immediately proceeds to the next task in the process if the conditions are met and stops if not. The Immediate option is selected by default for conditions.
Process:
-
Action 1 - Create Task 1
-
Condition 1 - Task 1’s Stage should be set to Interested
-
Type - Immediate
-
-
If True Condition (Condition 1 is met) then,
-
Action 2 - Update Task 1’s Description as Task to be Executed.
-
If False Condition (Condition 1 is not met) then,
-
Action 3 - Send an Email to the Manager
- Once Task 1 is created and Task 1’s Stage is not set to Interested, then immediately Action 3 for the False Condition is executed, where an email is sent to the Manager.
Listener
If you select type Listener for a condition, the condition listens (waits) until the time period (listen time) that you have set up for the conditions to meet. And then proceeds to the next task in the process.
Process:
-
Action 1 - Create Task 1
-
Condition 1 - Task 1’s Stage should be set to Interested
-
Type - Listener
-
Listen Time (Until) - 1 Day
-
-
If True Condition (Condition 1 is met) then,
-
Action 2 - Update Task 1’s Description as Task to be Executed.
-
If False Condition (Condition 1 is not met) then,
-
Action 3 - Send an Email to the Manager
When the above process is executed using the Listener option for Condition 1, the following occurs:
- Once Task 1 is created and Task 1’s Stage is not set to Interested. Then Condition 1 listens until the set listening time i.e., one day.
- If Condition 1 is met anytime during one day, Action 1 for the True Condition is executed. Where in Task 1’s Description is updated as the Task to be Executed.
Follow these steps to set up Type Listener for a condition:
-
Select Listener.
-
In the Until field:
-
Enter a listening time.
-
Select a unit of time.
-
-
Click Save Conditions.
Note: Immediate and Listener options are available for conditions on previous actions as well.
Listener’s Parallel Executions
Vtiger CRM Process Designer’s Listener listens to and executes multiple conditions for an action in parallel. It simultaneously listens to and processes the following multiple process design scenarios at the same time:
-
Multiple Conditions for the same Action
-
Multiple Wait Times for the Same Action
-
Multiple True or False blocks for the same Condition
-
Multiple Approved or Rejected blocks for the same Submit for Approval action.
Note: As the listener executes actions in parallel, all actions for multiple conditions, wait times, true or false blocks, and approved or rejected blocks will have the same start time, although end times may differ.
Multiple Conditions for the same Action
For instance, let us consider multiple Conditions for the same action to understand the listener's parallel executions. For instance, consider the process below:
- Trigger - Every time a Deal is created
- Action - Create an Event.
- Condition 1 (Satisfied after 3 Hours)
- Type - Listener
- Until - 6 Hours
- If Condition 1 is satisfied, execute:
- Action 1 - Update Contact
- Condition 2 (Satisfied after 1 Hour)
- Type - Listener
- Until - 4 Hours
- If Condition 2 is satisfied, execute:
- Action 2 - Send an Email to the Manager
- If Condition 3 (Satisfied after 2 Hours)
- Type - Listener
- Until - 2 Hours
- If Condition 3 is satisfied, execute:
- Action 3 - Send an SMS to the customer
After creating an Event from a Deal and after Conditions 1, 2, and 3 are satisfied, the following actions are executed simultaneously:
- Updating Contact
- Sending an email to the Manager
- Sending an SMS to the customer
- Sending an email to the Manager
- Start time - 08:00
- End time - 09:00
- Sending an SMS to the customer
- Start time - 08:00
- End time - 10:00
- Updating Contact
- Start time - 08:00
- End time - 11:00
Adding Wait Time
The Wait Time component helps you set up a wait time until you move to the next action in a process. It allows you to time in minutes, hours, and days.
Follow these steps to access Wait Time:
-
Click + mark on a component. You will be directed to the Components Menu.
-
Click Wait Time. You will be directed to the Wait Time window.
-
Enter the time (an integer value) in the Wait For field.
-
Select a unit of time.
-
Click Save. The Saved notification is displayed.
Adding a Label
The Add Label option helps you label a component.
Follow these steps to add a label to a component:
-
Click + mark on a component. You will be directed to the Components Menu.
-
Click Add Label. You will be directed to the label box.
-
Type a label in the label box.
-
You can drag and drop the label wherever required.
-
Double-clicking the label will allow you to edit it.
Connecting a Symbol
The Connect option lets you connect one symbol to another.
Follow these steps to access the Connect tool:
-
Click + mark on a component. You will be directed to the Components Menu.
-
Click Connect.
-
Drag and drop Connect from one symbol to the other to have them connected.
Deleting a Component
The Delete option lets you delete a component.
Follow these steps to delete a component:
-
Click + mark on a component. You will be directed to the Components Menu.
-
Click Delete.
-
The chosen component will be deleted.
Note:
- The Delete option is not provided for the Trigger component, as you cannot delete the Trigger in the Process Designer.
- Vtiger CRM Process Designer provides the below keyboard shortcuts for the following actions:
- Undo: Ctrl+Z
- Redo: Ctrl+Y
- Zoom In: Ctrl++
- Zoom Out: Ctrl+-
- Delete: You can delete a component by clicking a component and hitting the Delete button
Creating a Process Flow
Let us now learn how to create a process flow for a business process with a precise illustration. For instance, we have considered the following scenario for a business process:
Note: We recommend creating a business flowchart for a business process (in a Notepad or a document) before creating the process flow on the Process Designer.

Details:
Name of the Business Process: Deal Process
Module Chosen: Deals
Number of Workflows: 1
Deal Process Workflow:
- If Deal Amount > 1M,
- Is True then, (Criteria)
-
Update the next action (Action)
-
Wait for an hour (Wait Time)
-
Check if the Sales Stage is still new (Criteria)
-
Send an email to the Manager (Action)
-
- Is False, then,
-
Send an SMS notification to the Team lead (Action)
-
- Is True then, (Criteria)
Use Case: Create a process flow for the Deal process
Let us learn how to create a process flow for the Deal process on the Process Designer.

Follow these steps to create a process flow for the Deal Process on the Process Designer:
Step 1: Setting up a process design
Follow these steps to set up the Deal Process:
-
Log in to the CRM.
-
Click the main Menu.
-
Click Platform.
-
Look for Designers.
-
Select Process Designer.
-
Click +Add Process. The Add Process window opens
-
Enter or select the following information -
-
Name: Enter Deal Process.
-
Module: Select Deals.
-
Status: Select Active.
-
Assigned to: Select the user or group to whom the process is assigned.
-
Click Edit Process. The Add Process window opens.
-
Step 2: Configuring the start of a process
Follow these steps to start the Deal Process in the Add Process window -
- Click + mark on Trigger. The Trigger Properties window opens up.
- Select Update (Includes Creation).
- Under Recurrence select, Every time record is saved.
- Click Save. The Saved notification is displayed.
- Add the label Deal is Updated /Created.
Step 3: Configuring a Condition (True)
Follow these steps to configure a True Condition for Deal Process:
-
Click + mark on Trigger. You will be directed to the Components Menu.
-
Click Add Conditions. You will be directed to the Conditions window.
-
Under All Conditions, click + Add Condition.
-
In the Select Field dropdown, select Amount.
-
In the Select Condition dropdown, select greater than.
-
In the Set Amount value window, enter 1000000. (You can also select a Field or Expression by clicking the Raw Text dropdown).
-
Click Ok.
-
Click Save Conditions. The Saved notification is displayed.
-
Add the label Amount > 1M.
Step 4: Configuring an Action (Update)
Follow these steps to configure the Update action for the Deal process:
- Click + mark on Add Conditions. You will be directed to the Components Menu.
- Click Add Action. You will be directed to a list of actions.
- Select Update. You will be directed to the Update Fields window.
- In the Add Field dropdown, select Next Step.
- In the Next Step field, enter Follow-up call in the Set Next Step value window.
- You can also select a Field or Expression by clicking the Raw Text dropdown.
- Click Ok.
- Click Save Task. The Saved notification is displayed.
- Add the label Update Next Step.
Step 5: Configuring Wait Time
Follow these steps to configure a wait time for the Deal process:
- Click + mark on Add Action. You will be directed to the Components Menu.
- Click Wait Time. You will be directed to the Wait Time window.
- Enter 1 in the Wait for field.
- Select a unit of time: Hours.
- Click Save. The Saved notification is displayed.
- Add the label After 1 Hour.
Step 6: Configuring a Condition (False)
Follow these steps to configure a False Condition for Deal Process:
- Click + mark on Wait Time. You will be directed to the Components Menu.
- Click Add Conditions. You will be directed to the Conditions window.
- Under All Conditions, click + Add Condition.
- In the Select Field dropdown, select Sales Stage.
- In the Select Condition dropdown, select is.
- In the (third field) Set Sales Stage value window, select New from the dropdown.
- You can also select a Field or Expression by clicking the Raw Text dropdown.
- Click Ok.
- Click Save Conditions. The Saved notification is displayed.
- Add the label Deal is still New.
Step 7: Configuring an Action (Email)
Follow these steps to configure the Email action for the Deal process -
- Click + mark on the Add Conditions. You will be directed to the Components Menu.
- Click Add Action. You will be directed to a list of actions.
- Select Email. You will be directed to the Send Mail window.
- Select or add the information below in the Send Mail window:
- In the From field dropdown, select the email address of the sender.
- In the Reply To field dropdown, select the email address to whom you want to reply.
- In the mandatory To field dropdown, select the email address of the receiver.
- In the mandatory Subject field, enter the email subject.
- In the Add Record Field dropdown, select a record you want to add to the email. Note: You can add multiple record fields by selecting one field at a time.
- In the General Fields dropdown, select a field you want to add to the email. Note: You can add multiple general fields by selecting one field at a time.
- In the Email Template field dropdown, select an email template you want to add to the email.
- In the Select day(s) on which the email has to be sent, select the days you want to send the email. Once you select the days, it waits for the specific days you have selected and then sends the email. For instance, if the process is being executed on Thursday, and you have selected Monday, the Email Action waits until Monday in the week after that.
- Checkbox Add Merge Template and choose the merged template to be added as a link or an attachment.
- Checkbox Insert Related Matching Documents and set suitable conditions for it.
- Uncheck Include Signature if you do not want to include the same in the email.
- With Insert Links, you can add the following to your email:
- Insert appointment links
- Insert Survey links
- Attach Vtiger Documents
- Upload and Insert files
- Insert the Payment link in the send email window. The payment link can be accessed in the email Activity section of the email record and in the recipient’s email. To learn more about configuring payment gateways in Vtiger, click here.
- Type the email content.
- Click Save Task. The Saved notification is displayed.
- Add the Label Escalate to Manager.
- Note: You can configure the Timezone field to show date and time information based on the Contact’s time zone rather than the assigned user’s time zone.
Step 8: Publishing or Saving a Process Design
Once you have created a process design, follow these steps to:
-
Publish a Process Design
-
Click Save and Publish.
-
Once you publish a process design, you will not be able to edit or delete it. You can only Preview (view) and Clone (duplicate) it.
-
-
Save a Process Design
-
Click Save as Draft.
-
Once you save a process design as a draft, it will be saved in the Process Designer module, which you can edit or delete at a later time.
-
You have now created a process flow for Deal Process on the Process Designer.
Process Design Versions
Once you have created a process design in the Process Designer, clicking Save as Publish or Save as Draft will save the design as a different version in the Summary View of the record.
- Once you Clone (duplicate) a process design version, a new version will be created in the record.
- Activating process design versions
- Once you choose the Save as Draft option, you can publish the process design version by activating (enabling) it.
- Once a process design version is Active, you will not be able to edit or delete it. You can only Preview and Clone it.
- Activating a process design version is the same as publishing it. Hence, the Process Designer allows only one Active or published process design version for a process design record.
- Deactivating process design versions: A process design version is saved in the Inactive status when you deactivate (disable) it.
Note:
- You cannot link flows in the Process Designer to multiple loops (infinite loops). The CRM displays an error message - Infinite loop detected in flow. Unable to save, if you try to link multiple loops and save the process.
- In the Process Designer, if you publish or activate a process design with a few mandatory steps, fields, and connections invalid or empty, you will be directed to the following error message Failed to Publish
Time-based Triggers in Process Designer
When selecting DateTime or Time fields in Process Designer, the following conditions are available to trigger your workflows:
-
Less Than: Triggers before the specified time (e.g., 8:00 AM triggers from 12:00 AM to 7:59 AM).
-
Less Than or Equal To: Triggers up to and including the specified time (e.g., 8:00 AM triggers from 12:00 AM to 8:00 AM).
-
Greater Than: Triggers after the specified time (e.g., 9:00 AM triggers from 9:01 AM to 11:59 PM).
-
Greater Than or Equal To: Triggers at or after the specified time (e.g., 9:00 AM triggers from 9:00 AM to 11:59 PM).
These conditions apply to both Create and Update actions.
Process Designer - List View
The Process Designer List View conveniently lets you change the status of the process design. Enabling or disabling the process design record will activate or deactivate the process design for the respective module. Only process design records with an active process design version can be enabled from the List View.
Follow these steps to go to the Process Designer List View:
- Log in to the CRM.
- Click the User Menu.
- Click Platform.
- Look for Designers.
- Select Process Designer. The Process Design List View opens.
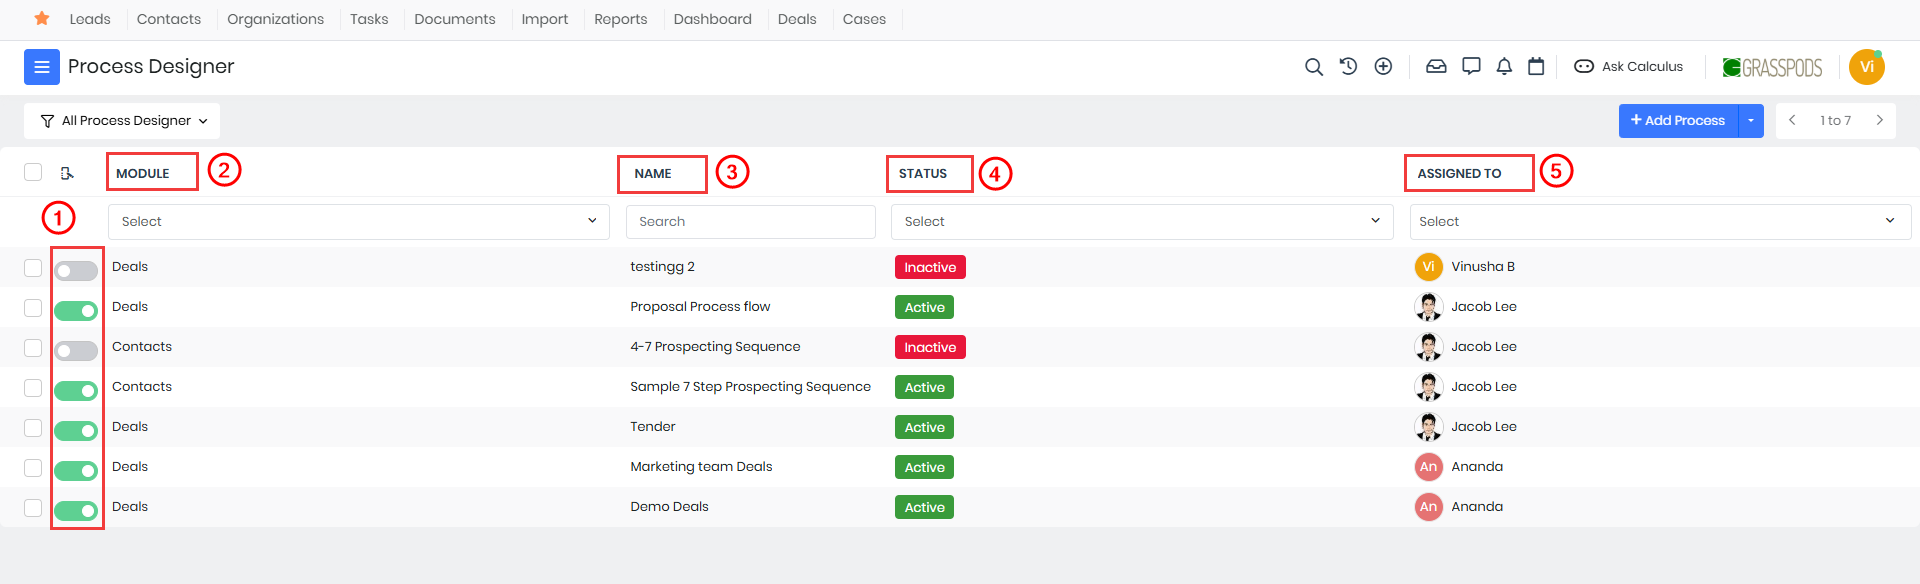
The Process Designer List View lists the following information for the process design records:
- Status Enabler - Lets you enable or disable a process design.
- Module- The name of the module the process design is configured for.
- Name - The name of the process design.
- Status - Displays the Active or Inactive status of the process design.
- Assigned to - The owner of the process design.
Note:
- The Process Designer List View columns can be customized using the Manage Columns option.
- In the List View, if you enable a process design record with no active process design version, the system displays the following error message Process will not work without an active version. Please enable it from the Summary View.
Process Designer List View Actions
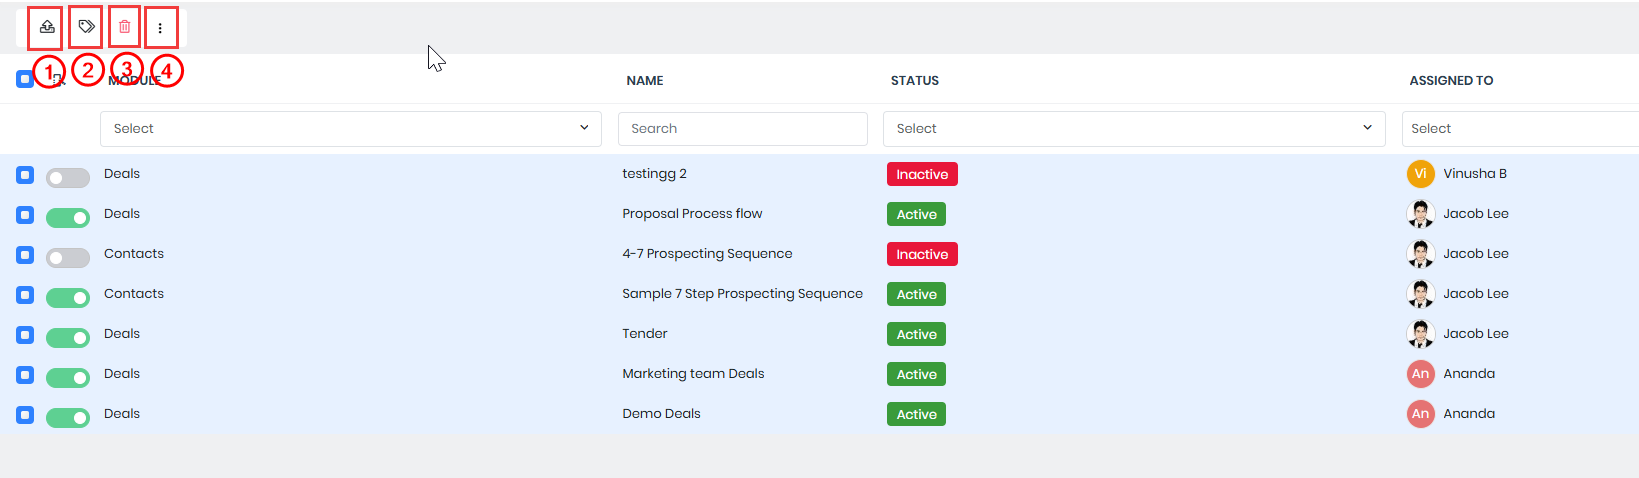
The following actions can be performed in the Process Designer List View:
- Export - Clicking the Export icon lets you export the process design record.
- Tag - Clicking the Tag icon lets you tag the process design record.
- Delete - Clicking the Export icon lets you delete the process design record.
- More - Clicking the More icon, the Comment tab pops up. Clicking it lets you comment on the process design record.
Import-Export Actions in the Process Designer
The Process Designer lets you:- Import process designs records from an XML file.
- Export process design records to an XML file.
Importing Process Design Records
Let us learn how to import process design records into the Process Designer.
Note: Process design records with the same name cannot be imported. If imported, the system displays the following error message: Duplicate exists. Please choose another name.
Follow these steps to import a process design into the Process Designer:
-
Go to the Process Designer. You will be directed to the List View.
-
Click the down arrow on the +Add Process button.
-
Click Import Processes. The Import Processes window opens.
-
Click Choose file to choose the XML file to be imported. The Import Result window which displays the following:
-
Total Processes - The total number of process designs imported.
-
Imported Processes - The number of process designs imported.
-
Failed Processes - The process designs that failed to import.
-
Process design data - Name, status, and details of the process design imported.
-
-
Click Ok. The XML process design file is successfully imported into the Process Designer as a process design record in the List View.
-
Click the imported process design record. You will be directed to the Summary View.
-
Click Preview to view the imported process design. Its actions and set actions’ conditions.
You have now imported a process design into the Process Designer.
Note: In Vtiger CRM, the Import module does not facilitate the Process Designer imports.
Exporting Process Design Record
Let us learn how to export process design records in the Process Designer.
Note: Only Active process design records can be exported.
Follow these steps to export a process design:
- Go to the Process Designer. The List View opens.
- Select the process design record that you wish to export. The Actions bar pops up.
- Click the Export icon. This will take you to the Export window.
- Select one of the following export options:
- Export selected records - This option exports the selected process design records to an XML file.
- Export records on the current page - This option exports process design records available on the existing page to an XML file.
- Click the Export button. The process design is successfully exported to an XML file
Note:
- You can export only:
- Active process design records with a published process design version.
- A maximum of 10 process design records. If more records are selected the first 10 records will be exported.
- Exported process design records configured for custom fields when imported into an instance with different custom fields malfunction.
You have now exported a process design record.
List View Actions - Add to a Process
The Add to Process option is available in the List View of the Process Designer-related modules under More actions. With this, you can add the respective module’s multiple records to a manually triggered process in the Process Designer.
Note: The Add to Process option is available in the List View for all the modules supported by the Process Designer.
Follow these steps to add a module’s records to a manual process in the Process Designer:
- Go to a Process Designer-related module. You will be directed to the List View.
- Select a record you want to add to a manual process by clicking the checkbox. The Actions bar pops up.
- Click More (three dots) icon.
- Click the Add To Process option. This takes you to the Add To Process window. It lists only the Manually created processes in the Process Designer.
- Select the process to which you want to add the record.
- The Success message is displayed if the record is successfully added to the process.
Note: Adding records to a process limit is 150.
Process Designer - Summary View
Follow these steps to go to the Process Designer Summary View:
- Log in to the CRM.
- Click the main Menu.
- Click Platform.
- Look for Designers.
- Select Process Designer. The List View opens.
- Click on a process design record. The record Summary View opens.
The Summary View of the Process Designer displays the following tabs:
- Versions - Clicking the Versions tab displays the Versions section.
- Records - Clicking the Records tab displays the Records section.
The Versions tab displays the following information:
- Status Enabler - Lets you enable or disable a process design.
- Version - the version number of the process design.
- Status - Displays the Active or Inactive status of the process design.
- Published On - The date and time the process design was published.
The Records tab section displays the following information:
- Version - The version number of the process design.
- Name - The name of the record.
- Status - Displays the following process design record statuses:
- Completed - When the process is completely executed for the record.
- In Progress - When multiple records are selected and are waiting for the process design to process the execution.
- Cancelled - When you manually terminate a process.
- Last Action Title - Displays only the last action processed for the record.
- Started On - The date and time the process began.
- Last Touched On - The date and time the last time the record entered into the process.
- Ended On - The date and time the process stopped
Summary View - Viewing Process History
Process History is the complete history of a process flow executed by the Process Designer. The Process History window details every activity and action type performed by the Process designer for the record, as well as the related process. Along with the time and date, it also displays the status of the process in the end.
Follow these steps to view the Process History for a process design record:
- Go to the Summary View of a process design record.
- Click Records.
- Click the required process record. The Process History window opens.
Note: You can also view the Process History for process design versions in the Activity section of the related records.
Summary View Actions - Add To Process
The Add to Process button is available in the Summary View of a Process Design record. With this, you can add the process design’s specified module record to its process. This option is available for records only if the Process Design version is Active or if it is a manually created process (Trigger Properties > Trigger On > Manual).
Follow these steps to add a process design’s specified module record to its process:
- Go to the Summary View of a process design record.
- Click Records.
- Click the Add To Process button. This takes you to the Add To Process window. It lists records from the specified module.
- Select the record you want to add to the process.
- Note: Adding records to a process limit is 150.
- If the record is successfully added to the process, the Success message is displayed.
Note: If multiple process design records are added, the first record will be added to the process and the rest will be added to the queue. These records will be added once the process design is executed again.
Summary View Actions - Terminating a running process record
You can terminate a running process record from the Summary View of a Process Designer record.
Follow these steps to terminate a running process record from the Summary View:
- Go to the Summary View of a process design record.
- Click Records.
- Go to the required process record.
- Hover your mouse on the record. You see the Stop icon (red button).
- Click the Stop icon. This takes you to the Stop Process window.
- Enter a reason for ending the process.
- Click Proceed. The process record’s Status is displayed as Cancelled.
Note: In the Activity section of the process record, the message, Removed this record from process_name process is displayed.
Summary View Actions - For Process Design Versions
In the Process Designer Summary View, you can hover the mouse over the Saved and Published or Active process design version to display the following options:
- Preview - Clicking the Preview icon, you can view a process design version.
- Clone - Clicking the Clone icon lets you duplicate a process design version.
- Status Enabler - Lets you enable (activate) or disable (deactivate) a process design version.
- A Save as Draft process design version, the following options are provided:
- Preview - Clicking the Preview icon, you can view a process design version.
- Clone - Clicking the Clone icon lets you duplicate a process design version.
- Delete - Clicking the Delete icon lets you delete a process design version.
- Edit - Clicking the Edit icon directs you to the Editing Process window, where you can edit a process design version.
- Status Enabler - Lets you enable (activate) or disable (deactivate) or Inactive a saved as draft process design version
Summary View Actions - For Process Design records
In the Process Designer Summary View you can perform the following for the process design records:
- Change Status
- Delete
Change the status of a Process Design record:
Follow these steps to change the status of a process design record:
- Click the Status button on the top right corner of the screen.
- This will take you to the Change Status popup.
- Select Active or Inactive status.
- Note: The Status button in the Summary View by default changes to Active or Inactive when the process design version is activated or deactivated (enabled or disabled).
Delete a process design record:
Follow these steps to delete a process design record:
- Click the More icon on the top right corner of the screen.
- Click the Delete icon.
- This will take you to the ‘Delete record?’ popup.
- Click Yes, delete
Summary View Actions - Fetching related records
This will help you configure advanced automation flows on other records that might not be directly related to the process record.
Consider these Use Cases:
- You can cancel all related tasks when a Sales Order is canceled.
- You can send emails to all Contacts related to a Deal when the Deal is changed to Requirements Gathering.
- You can send emails to all affected Contacts when an incident is created.
Summary View Actions - Triggering Actions on Closed Records
You can now configure the Process Designer to take actions on records that are already closed.
Example Use Cases:
- If a Deal linked to an Organization is in the Closed Won stage and was closed within the last 18 months, you can set the organization's status to Existing.
- If the last Closed Deal is older than 18 months, you can automatically update the organization's status to "Lapsed".
This helps keep your records up to date based on deal history, even after a deal is closed.
Summary View Actions - View Running Processes in CRM Modules
Running Process is a process that is running on a record. For instance, assume that you have designed a process for the Contacts module in the Process Designer.
From the beginning of the process to the end, you can track the status of the process in the Contacts > Summary View > Running Processes section. You can also view its process history and terminate it.
Follow these steps to access the running process for a record in CRM modules:
- Login into your CRM account.
- Go to any module.
- Select a record. This will take you to its Summary View.
- Click the Running Processes tab. It lists running processes for the record if available.
Note: If no running processes for the record are available, the following message is displayed, No Running processes
Running Processes section displays the following information:
- Count - Beside the Running Process tab, the count of running processes for the record is displayed.
- Add to Process button - It lets you manually add records to processes in the Process Designer.
- Name - Name of the record.
- Started On - The date and time the process began.
- Last Touched On - The date and time the record was last entered into the process.
- Ended On - The date and time the process stopped.
- Process History window - Displays the running process history.
- Stop button (on hover) - To stop the running process if required.
Running Process for a Process Designer record
You can view active (running) processes in the related module’s Summary Views. You can view the following details for an active process:
- View running processes along with their count
- Manually add records to a process
- View the Process History for records of running processes
- Stop a process running in the Process Designer
Note: For running processes, every action type, along with its title field, being processed by the Process Designer is updated in the Summary View of their records in the Activity section. Displaying the process names and action types.
Summary View Actions - Manually add records to a Process
You can manually add records to a process from its module’s Summary View.
Follow these steps to manually add records to a process:
- Go to a record’s respective module.
- Select the record whose process history you want to view. This will take you to its Summary View.
- Click the Running Processes tab.
- Click the Add To Process button. This takes you to the Add To Process window. It lists only the manually created (Trigger Properties>Trigger On>Manual) processes in the Process Designer.
- Select the process to which you want to add the record.
- The Success message is displayed if the record is successfully added.
Summary View Actions - Viewing Process History for Records for Running Processes
You can view the process history for records for running processes from the process-related records’ Summary View.
Follow these steps to view the process history for a record for a running process from the record’s Summary View:
- Go to the record’s respective module.
- Select the record whose process history you want to view. This will take you to its Summary View.
- Click the Running Processes tab. It lists running processes for the record.
- Click the required process. It will take you to the Process History window, where you can view the record’s process history.
Note: Once a running process is executed, the displayed process under Running Processes in the Summary View of the related record is, by default, removed.
Summary View Actions - Stop a process from the record’s Summary View
You can terminate processes running in the Process Designer from the process-related records’ Summary View.
Follow these steps to terminate a process from the record’s Summary View:
- Go to the record’s respective module.
- Select the required record. This will take you to its Summary View.
- Click the Running Processes tab. It lists running processes for the record.
- Hover your mouse on the record whose process you want to stop. You see the Stop icon (red button)
- Click the Stop icon. This takes you to the Stop Process window.
- Enter a reason for ending the process.
- Click Proceed. The respective process is removed and not displayed anymore under Running Processes for the record.
- In the Activity section of the record, the message Removed this record from process_name process is displayed.
Note: The stopped process is displayed as Cancelled along with the specified reason in its Process History window
7 Step Prospecting Sequence
The 7 Step Prospecting Sequence is a Vtiger CRM's sample process design available by default to all users in their Vtiger CRM Process Designer. It helps you understand and learn the various aspects and scopes of Vtiger CRM Process Designer. You can preview, clone, edit, and delete it.
Follow these steps to access the 7 Step Prospecting Sequence:
- Log in to the CRM.
- Click the main Menu.
- Click Platform.
- Look for Designers.
- Select Process Designer. The Process Designer page opens
- You will find the 7 Step Prospecting Sequence process design in the List View.
- Click 7 Step Prospecting Sequence. You will be directed to its Summary View.
- Hover your mouse under Under Versions > Version 1
- Click Preview. You can view the 7 Step Prospecting Sequence (Version 1) process design.
You have now successfully accessed Vtiger CRM’s sample process design the 7 Step Prospecting Sequence.
Scheduling a Process in the Process Designer
You can schedule processes in the Process Designer (similar to workflows) with a trigger called Time Interval. You can set up the trigger at different time intervals - Daily, Weekly, and Monthly. The available trigger options are:
-
Frequency - Daily, Weekly, Monthly
-
At time - when the process has to run
-
On these days - day of the week or day of the month, depending on the frequency
You can set the number of actions to 10 per process.