Articles in this section
WhatsApp Integration Overview
Feature Availability
Vtiger Editions: One Pilot | One Growth | One Professional | One Enterprise | One AI
Introduction
Integration is bringing together smaller components into a single system that functions as one. In an IT context, integration refers to the result of a process that aims to stitch together different, often disparate, subsystems so that the data contained in each becomes part of a more extensive, more comprehensive system that, ideally, quickly and easily shares data when needed.
WhatsApp is probably the most used means of communication across the planet. In India, WhatsApp is widely used for business also. Your customers also use WhatsApp for communication. WhatsApp CRM integration can be an extremely effective means of communication, especially by using Templates and automated transactional WhatsApp messages.
This article provides information about WhatsApp and the WhatsApp Integrations under Vtiger CRM.
WhatsApp Module Availability
In Vtiger CRM, the WhatsApp feature:
- Is available by default for the below modules:
- Cases
- Contacts
- Deals
- Internal Tickets
- Invoice
- Leads
- Organizations
- PhoneCalls
- Quotes
- Services
- Vendors
- Can be availed for any module including the custom module by creating a relationship with the Contact module. To learn how to create a relationship with the Contact module click here.
- For example, if you want to avail the WhatsApp feature for the Products module, you will have to create a One to One or One to Many or Many to One relationship with the Contact module for it.
Service Providers for Integrating WhatsApp
WhatsApp business messaging is a feature by its owner, Meta (formerly Facebook). The service is enabled through intermediate gateways. Here are the service providers you can integrate WhatsApp with Vtiger CRM:
Requirements:
To integrate WhatsApp with Vtiger CRM and send messages:
- You will need a Facebook Business Manager Account.
- If you already have a Facebook Business Manager account, look for your Business Manager ID in the Business Settings > Business Info section.
- You need to create one if you do not have a Facebook Business Manager ID.
- WhatsApp uses approved Business Manager accounts to identify your business and associate your phone numbers with it.
- Additional fees apply for sending messages via WhatsApp Business API. Please check the website of the service provider for the pricing.
Benefits of WhatsApp Integration
By connecting systems and providing a central pipeline through which both old and new systems can communicate, integration allows you to save costs, keep using your existing infrastructure, and add functionality piecemeal, using separate applications and services.
Following are the benefits of integrating WhatsApp Integration:
- Collect customer feedback
- Automate keyword-based actions
- Follow-Ups
- Assign labels for seamless communications
- Order Tracking
- Initiate conversations
- Create workflow-based drip-marketing campaigns
- Send Time-Based Messages
- Improve Customer Support
- Send team Notifications
In this article, you will learn about,
- Configuring and Setting Up WhatsApp
- Installing WhatsApp
- Navigation
- Using WhatsApp through Vtiger CRM
- Views in the WhatsApp module
- WhatsApp opt-in/opt-out settings
Configuring and Setting Up WhatsApp
Before configuring, you need to first set up the service provider with WhatsApp. You need to have a service provider and a WhatsApp account.
For example, after you have bought and set up your Twilio account (service provider), you need to configure WhatsApp on the Twilio Console. To send and receive messages WhatsApp messages from the registered Twilio number, you also need a Vtiger instance URL in Twilio. Let us see how.
Follow these steps to configure WhatsApp from your Twilio console:
- Go to the Twilio homepage.
- Click Programmable SMS.
- Click on WhatsApp.
- Click on the Senders option. WhatsApp: 1234XYZ Configuration window opens.
- Add the Vtiger instance URL in Twilio. This helps you to send and receive messages from Vtiger CRM.
- Enter or select the following information:
- CONFIGURE WITH: Select Webhooks
- WHEN A MESSAGE COMES IN: Enter the URL
- STATUS CALLBACK URL: Enter the URL
- FALLBACK URL: Enter the URL
- Click Save.
Installing WhatsApp
A WhatsApp CRM tool eliminates repetitive tasks from your to-do list. By automating workflows- assigning incoming conversations to specific users and labeling conversations - your team has more time to focus on what is important to customers.
If you are not able to see the WhatsApp icon on your CRM, it is because WhatsApp is not available by default. You can install it yourself with just a few clicks.
Follow these steps to install WhatsApp:
- Log in to the CRM.
- Click on the Main Menu in the top left corner of the screen.
- Click on Settings.
- Select Extensions > Add-on. The Add-ons page opens.
- Type WhatsApp in the search bar.
- Press Enter on your keyboard. The WhatsApp Add-on is displayed.
- Click Install.
Navigating to WhatsApp
Follow these steps to go to the WhatsApp module
- Log in to the CRM.
- Click Main Menu.
- Go to Essentials.
- Select Conversations > WhatsApp. The WhatsApp List view Opens.
- Select any record from the List View.
Adding or removing WhatsApp Columns
You have the flexibility to customize your List View by adding and removing columns in the WhatsApp List View.
Follow these steps to add or remove columns:
- Click the Menu icon.
- Select and open any module.
- Click the Manage Columns icon on the left side of column names.
- A Configure Columns window appears.
- Remove the columns by clicking the X button on the field name in the Selected Fields section.
- Add the columns of your choice by selecting the columns from the Available Fields section by clicking Search Fields.
- Click the Update List button to view the changes in your List View.
Actions in the WhatsApp record
Once you select a record from the List View, you will be able to see the summary view of that particular record.
Here are the actions that can be performed on the WhatsApp record.
- Follow: You can follow a record by clicking on the star icon.
- Tags: You can add tags to that record by clicking the ‘+Add’ icon.
- Open in New tab: You can open the record in a new tab by clicking this icon.
- Copy Link: You can click on this icon to copy the link.
- More: Click on the icon to see the attached documents.
Actions on Documents
When you click on the More icon, you will find documents.
Here are the actions that can be performed on documents
- Click on the More Icon. Select Documents.
- A What do you want to do window will appear.
- Click on Select Documents.
- A document window will open where you can find a list of documents.
- Click on a record.
- That record will appear on the main page of that particular record.
- When you hover on that record, you will see the following options that can be performed on that record.
- Preview
- Share
- Download
- Edit
- Unlink
- Link Document: You can link documents with one another.
- Add Document: You can create a new document or upload a file.
- Record List: Displays a list of documents.
Using WhatsApp Through Vtiger CRM
WhatsApp Templates
WhatsApp message templates are standard, reusable messages that companies can use to contact their customers. They are semi-automated conversation starters where most of the message is pre-written and you have to add a few details for that personal touch.
WhatsApp template messages are pre-written, pre-approved messages that are sent by businesses to opted-in customers via WhatsApp API. Some of the examples might include confirmations, delivery updates, and support-related automatic replies.Creating and setting up standard message templates in Vtiger CRM is a two-step process.
- First, create a standard message template on your service provider's website and get it approved by WhatsApp.
- Secondly, create templates in Vtiger CRM using the approved message texts.
Let us see an example of creating WhatsApp Message templates with the Twilio service provider.
Step 1: Setting up a standard message on the Twilio Console.
Follow these steps to add standard message templates on the Twilio console and get them approved from WhatsApp:
- Log in to the Twilio website using your Twilio credentials.
- Click on Messaging.
- Click on Senders.
- Click on the WhatsApp Templates.
- Go to the WhatsApp Message Templates section on the right-hand side.
- Click New Message Template.
- A Submit a New Message Template section will appear. Update the details here.
- Type the required message in the General Information and Message Template section so that WhatsApp approves it.
- Click Submit Message Template.
- The WhatsApp Message Templates section displays approved templates.
- The Message Template Status column will display the template approved and rejected by WhatsApp.
- Copy the approved message you created and paste it into the WhatsApp template record in the CRM.
Step 2: Creating a WhatsApp template in the CRM (for the approved message).
Note: Copy the approved message from the Twilio console and keep it ready.
Follow these steps to create standard message templates:
- Log in to the CRM.
- Go to the Main menu.
- Go to Tools.
- Click on the WhatsApp Templates option.
- Click on the + Add Template button.
- Enter the following details in the Create WhatsApp Template window -
- Message Textbox on the left:
- We can create our template for all the modules.
- The standard message displays certain numbers in brackets. Replace these numbers with actual merge tags in the template.
- Message Textbox on the left:
b. The fields on the right side of the window:
i. Template Name - Enter the name of the template.
ii. Assigned To - Select the employee to whom the template is assigned.
iii. Module - The module to the template is attached. For example, you can create templates for Invoices or Deals and so on.
iv. Merge Fields - You can select and add standard merge fields. from this section. For example, you can choose salutation, phone numbers, primary email addresses, etc., and they will appear in the message textbox.
- The message textbox on the left displays standard messages along with numbers in brackets. Replace these numbers with merge fields.
- Click Save.
The new template will appear in the WhatsApp Templates List View.
Remember, WhatsApp needs to approve all standard message templates you create before you can use them.
Note:
- WhatsApp templates are available for all modules.
- By default, WhatsApp templates were available for the Contacts module only. You can now make them available by enabling the Any module option in WhatsApp templates. Selecting this option will let you send a message (direct or automated) from any module in the CRM.
- Limitation:
- Approved templates with variables cannot be used by any other module other than Contacts.
- Approved templates without variables can be synchronized with any module in the CRM.
From Where in CRM can you send WhatsApp messages?
Sending a WhatsApp Message
From the List View (of different modules) .
Follow these steps to send a WhatsApp message from the List View of your CRM.
- Go to the ListView of a module.
- Hover on the record you want to send a WhatsApp message to.
- Click on the WhatsApp icon that is visible on the extreme right of the screen. The Send WhatsApp Message window opens.

- Enter or select the following in the Send WhatsApp Message window:
- Phone Number - Select a phone number to send the WhatsApp message.
- Note - The number has to be a mobile number registered with the respective service provider installed to receive and send messages.
- Select WhatsApp Template - Select a WhatsApp template from the drop-down to send messages.
- You can select this option only if you have a template that has been approved by WhatsApp. Templates need to be approved by WhatsApp before you can use them to send messages.
- Message - Type your message in this textbox. Don’t forget the following.
- Make your message fun - You can include emojis in your message by clicking the emoji icon in the top right corner of the textbox.
- Don't forget to add documents - You can upload documents with your message by clicking the Attach Files link. You can attach only one document of size 16MB.
- Phone Number - Select a phone number to send the WhatsApp message.
- Click Send.
From the Summary View of a record
Follow these steps to send a WhatsApp message from the Summary View of your CRM.
- Log in to the CRM.
- Go to a module from where you want to send a message.
- Click on a record to go to its Summary View.
- Click on the More option.
- Under the Reach Out Now option.
- Click on the WhatsApp option.
- Enter or select the following in the Send WhatsApp Message window:
- Phone Number - Select a p
- Select WhatsApp Template - Select a message template if you want to send a standard message. This is optional.
- Message window - Type your message in the textbox.
- Make your message fun: You can include emojis in your message by clicking the emoji icon in the top right corner of the textbox.
- Don't forget a document: You can upload documents along with your message by clicking the Attach Files link. The maximum size of a document is limited to 16 MB.
- Click Send.
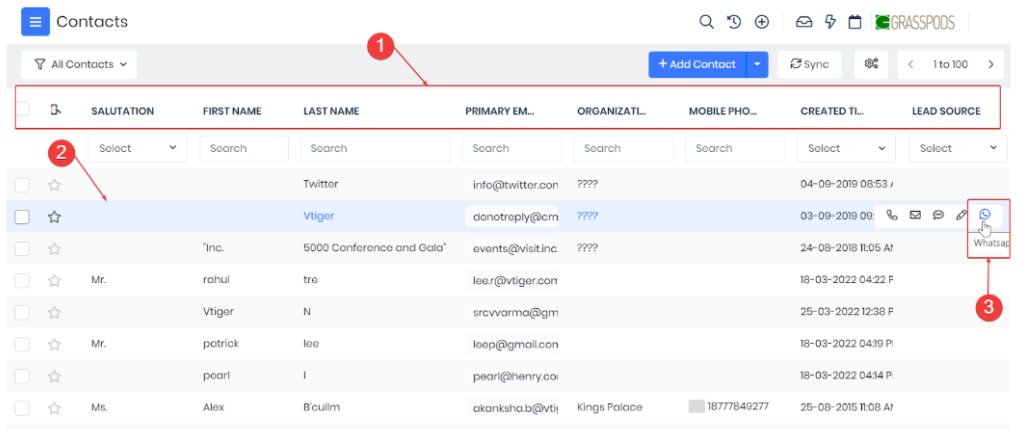
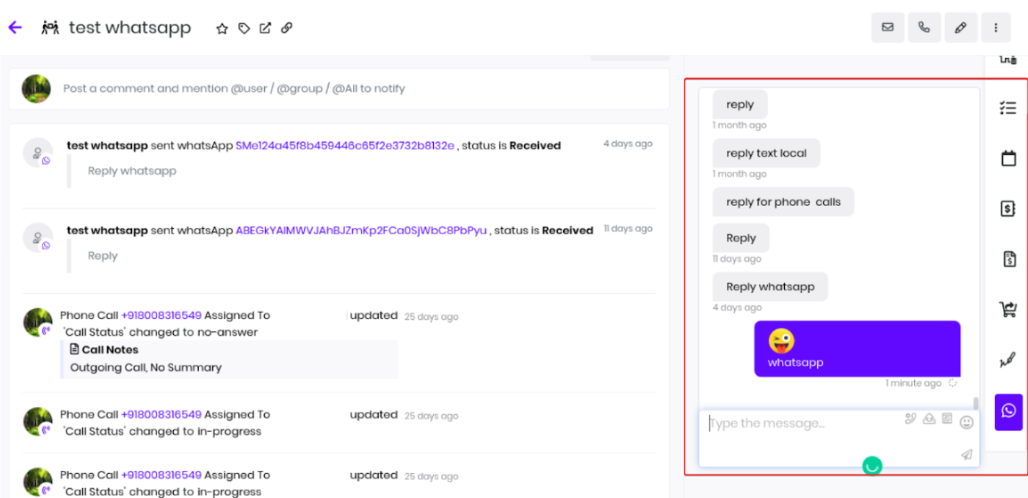
Sending WhatsApp messages (From the WhatsApp Widget View CRM modules)
You can also send WhatsApp messages from the widgets view.
When you select a record from the List View, you will find icons(widgets) on the right-hand side. You can find the WhatsApp icon. When you click on the icon, a message text box will appear on the left-hand side of the icon. You can now start sending messages to that contact.
Outgoing messages are marked in blue and Incoming messages are marked in grey.
Checking the Message Delivery Status of WhatsApp messages
Once you have sent a message on WhatsApp, you can check its status by heading to the Information section.
Here, you can view the API Response and Failed Reason. If your message wasn't successfully delivered, the API Response field will display authentication failed. The Failed Reason field will also give you more information on why the message was not sent.
Saving Customer Whatsapp Responses
You can now save customer interactions from their responses to your WhatsApp messages directly in the CRM. For example;
- If your WhatsApp message is a feedback query, the customer's response will be automatically recorded in the CRM. This ensures that feedback data is centralized and easily accessible.
- When your message pertains to a task, case, or ticket, and you request specific details from the customer, their replies will now be automatically linked to the corresponding record in the CRM.
This functionality is enabled by a new custom field, Reply Message, introduced in the WhatsApp module.
- When a customer replies to your WhatsApp message, the API checks for a Reply Context ID in the incoming message.
- If the Reply Context ID matches the Message ID of your original WhatsApp message, the Reply Message field is updated automatically.
Receiving WhatsApp Messages in Vtiger CRM
You can view incoming WhatsApp messages directly within Vtiger CRM through alerts and notifications. When a new message is received, a notification appears in the CRM.
Clicking the notification takes you to the related Contact’s chat view or the Live Chat window, where you can read the message and respond immediately.
Views in the WhatsApp module
The following are the WhatsApp views:
- List
- Summary
- Detailed
List View of WhatsApp module
The List View of the WhatsApp module displays the list of all WhatsApp messages that have been sent and received. From the ListView, you can:
- Check sent and received messages.
- Check the status of messages.
- Open individual messages to view details.
The Activity section of individual records displays the details for each record.
Status of WhatsApp Messages
WhatsApp messages are visible in the following statuses in the List View:
- Sent
- Received
- Delivered
- Read
- Queued
- Undelivered
Summary View of the WhatsApp module
When you click on a record from the List view, you can see the Summary View of that record. Here, when you click on the More option in the right corner, a drop-down menu will appear. You can select WhatsApp under the Reach Out Now section.
Will this message be available in a contact record and if it is, where is it available?
When you click on a record, you will be able to see the Summary view of that particular record.
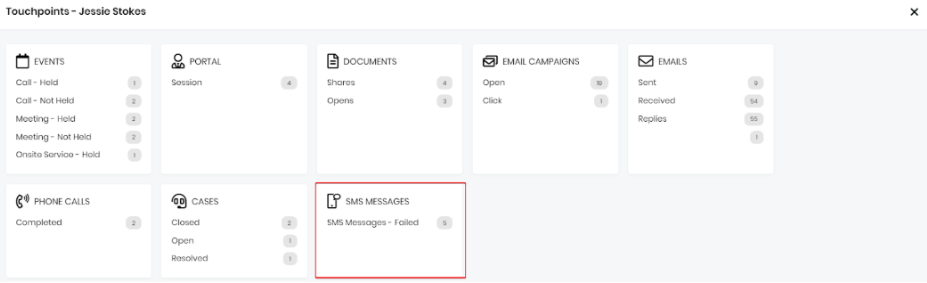
When you select the TouchPoints tab next to Filters, you will find the following information regarding that record:
- Events
- Portal
- Documents
- Email Campaigns
- Emails
- Cases
- Phone Calls
- SMS Messages
When you select the SMS messages tab, you can find dispatched and failed, messages against the count of each category.
WhatsApp opt-in settings
Opt-in/Opt-out
WhatsApp opt-in is the agreement of your lead or client to receive messages and notifications from your business via WhatsApp.
An opt-in cannot happen via WhatsApp. That is, users must provide you with their number via another 3rd-party channel your business uses (website, app, email, SMS, etc.). You must obtain an opt-in before you engage with customers via the messaging app. It’s your responsibility to store your opt-ins and ensure that users are only receiving what they signed up for.
Opting out of information sharing does not appear to be conceivable, but rather WhatsApp is putting forth a partial opt-out — particularly for Facebook promotion and product-related purposes.
The WhatsApp opt-in is a field available in a few CRM module records under Basic Information > WhatsApp opt-in in the Summary View and Detailed View. It provides WhatsApp opt-in options. WhatsApp opt-in options are WhatsApp messaging options available for sending and receiving WhatsApp messages. You can select the following WhatsApp opt-in options for your contacts, leads, organizations, and vendors based on your preferences:
- Single opt-in: It lets you send outgoing messages and receive incoming messages from WhatsApp.
- User opted out: It lets you receive incoming messages and does not let you send outgoing messages from WhatsApp.
- None: It lets you send outgoing messages and receive incoming messages from WhatsApp.
The WhatsApp opt-in options are available for the following modules:
- Contacts
- Leads
- Organization
- Vendors
Follow these steps to select a WhatsApp opt-in option while creating or editing a record for a contact, lead, organization or vendor:
Note: For instance, we have considered the Contacts module, you can go to any module mentioned above.
- Log into your CRM account.
- Click the User Menu.
- Click Essentials.
- Look for Lead & Contact Management.
- Select Contacts.
- Click +Add Contact.
or
- Select a Contact record.
- Go to the Summary View or Detailed View of the record.
- Go to Basic Information.
- Look for the WhatsApp opt-in field. Select a suitable WhatsApp opt-in option.
You have now successfully selected a WhatsApp opt-in option for contact in CRM.
Note:
- The WhatsApp opt-in options are available for all the WhatsApp providers Vtiger CRM is integrated with.
- The Timezone field can be configured to show date and time information based on the Contact’s time zone rather than the assigned user’s time zone.
Why is Opt-in/Opt-out important?
Opt-in compliance serves as a solid foundation for improving email campaign performance and ensuring compliance with global privacy laws. We become better senders when we learn how the underlying infrastructure works and how we are affected by its rules.
Besides the fact that an Opt-out button is a must, the option serves your business well. It shows your contacts you value your interaction with them – Giving them the option to opt out of your newsletters and emails whenever they choose, avoiding the invasion of space. With this empathetic-like gesture, your readers can feel comforted.Viewing WhatsApp Records
Once you send or receive a WhatsApp message you can view it from the:
- WhatsApp module, or
- Related module
Viewing WhatsApp Records from the WhatsApp module
Follow these steps to view WhatsApp records from the WhatsApp module:
- Log in to your CRM account.
- Click the Main Menu.
- Click Essentials.
- Look for Conversations.
- Click WhatsApp. You can view all WhatsApp records in the List View.
- In the Source field, type the name of the WhatsApp provider.
- Hit Search or Enter.
- WhatsApp records for the specified WhatsApp provider are displayed.
- Click on a record to view its details.
Viewing WhatsApp Records from a module
You can view WhatsApp conversations from the module where you have initiated them.
Follow these steps to view WhatsApp records from a module:
- Log in to your CRM account.
- Go to the module from where you have initiated the WhatsApp conversation.
- Click the customer record. The Summary View opens.
- Under Activities, you can view the WhatsApp conversation with delivery statuses Delivered, Failed, and Read.
Or
- Log in to your CRM account.
- Go to the module from where you have initiated the WhatsApp conversation.
- Click the customer record. The Summary View opens.
- In the Widget View, click WhatsApp.
- You can view the WhatsApp conversation.