Articles in this section
WhatsApp Integration with Wablas
Feature Availability
Vtiger Editions: One Professional | One Enterprise | One AI
Introduction
Wablas is an API gateway interface that offers WhatsApp API services for businesses. It provides the Wablas Inbox, which enables you to use a single WhatsApp number for multi-device and agent interactions, allowing you to communicate with clients simultaneously. This sends timely messages, notifications, schedulers, reminders, and tracking facilities.
Wablas provides various features for easy customer interaction, such as WhatsApp rotator, auto-responder, multi-agents, closing greetings, live chats, auto-reply, etc.
WhatsApp Integration with Wablas for Vtiger CRM
WhatsApp Integration with Wablas for Vtiger CRM helps you send and receive WhatsApp messages directly from the CRM screens. Once Wablas is integrated with the Vtiger WhatsApp module, you can conduct WhatsApp conversations directly within Vtiger CRM or via your mobile phone.
To integrate Wablas and use it with WhatsApp in Vtiger CRM, you must:
- Have an active subscribed business account with Wablas.
- Enable the Wablas add-on in Vtiger CRM.
In Vtiger CRM:
- Only Admin users can configure WhatsApp Integration with Wablas.
- Non-Admin users can use the feature to send and receive messages.
To learn more about the WhatsApp feature in Vtiger CRM, click here.
Note: To activate Wablas for WhatsApp on your phone, log in to your Wablas account, then navigate to Device > your device > Scan QR Code.
Benefits
The benefits of integrating WhatsApp and Wablas with Vtiger are:
- Helps you reduce incoming calls and e-mail volumes by efficiently assisting over chat platforms.
- Enhances customer relationships by allowing personalized messages that build trust and affinity.
- Helps you to simultaneously serve and engage with a wide range of customers.
- Reduces development dependencies, making it easier to set up APIs and messaging campaigns.
- Installing Wablas
- Integrating WhatsApp with Wablas
- Sending WhatsApp Messages from the CRM using Wablas
- Viewing WhatsApp Records for Wablas
Key Terminology
|
|
|
|
|
|
|
|
|
|
|
|
|
|
|
|
|
|
|
|
|
|
|
|
Installing the Wablas Add-on
To use the WhatsApp integration with Wablas, you must first install the Wablas Add-on. Follow these steps to install the Wablas add-on:
- Log in to the CRM.
- Click the main Menu.
- Go to Settings > Extensions.
- Click Add-ons. The Add-ons page opens.
- Browse Wablas.
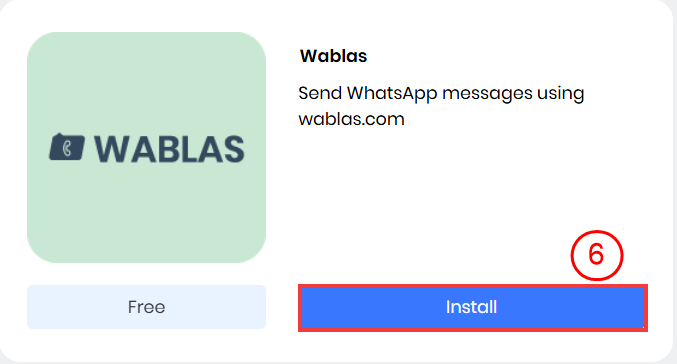
- Click Install.
- Click Yes to confirm the installation.
Once you have successfully installed the Wablas add-on, it will be added as a WhatsApp service provider to Vtiger CRM.
Integrating WhatsApp with Wablas
This section explains how to integrate WhatsApp with Wablas in Vtiger CRM. You can set up the Wablas integration through the following steps:
- Step 1: Retrieving the API Key
- Step 2: Wablas Configuration in Vtiger CRM
- Step 3: Adding Status and Incoming Callback URLs to Wabla
Note:
- This process involves to-and-fro navigation between Vtiger CRM and Wablas screens.
- Keep your Wablas login credentials before you begin.
Step 1: Retrieving the API Key
Follow these steps to retrieve the API Key:
- Log in to your Wablas account.
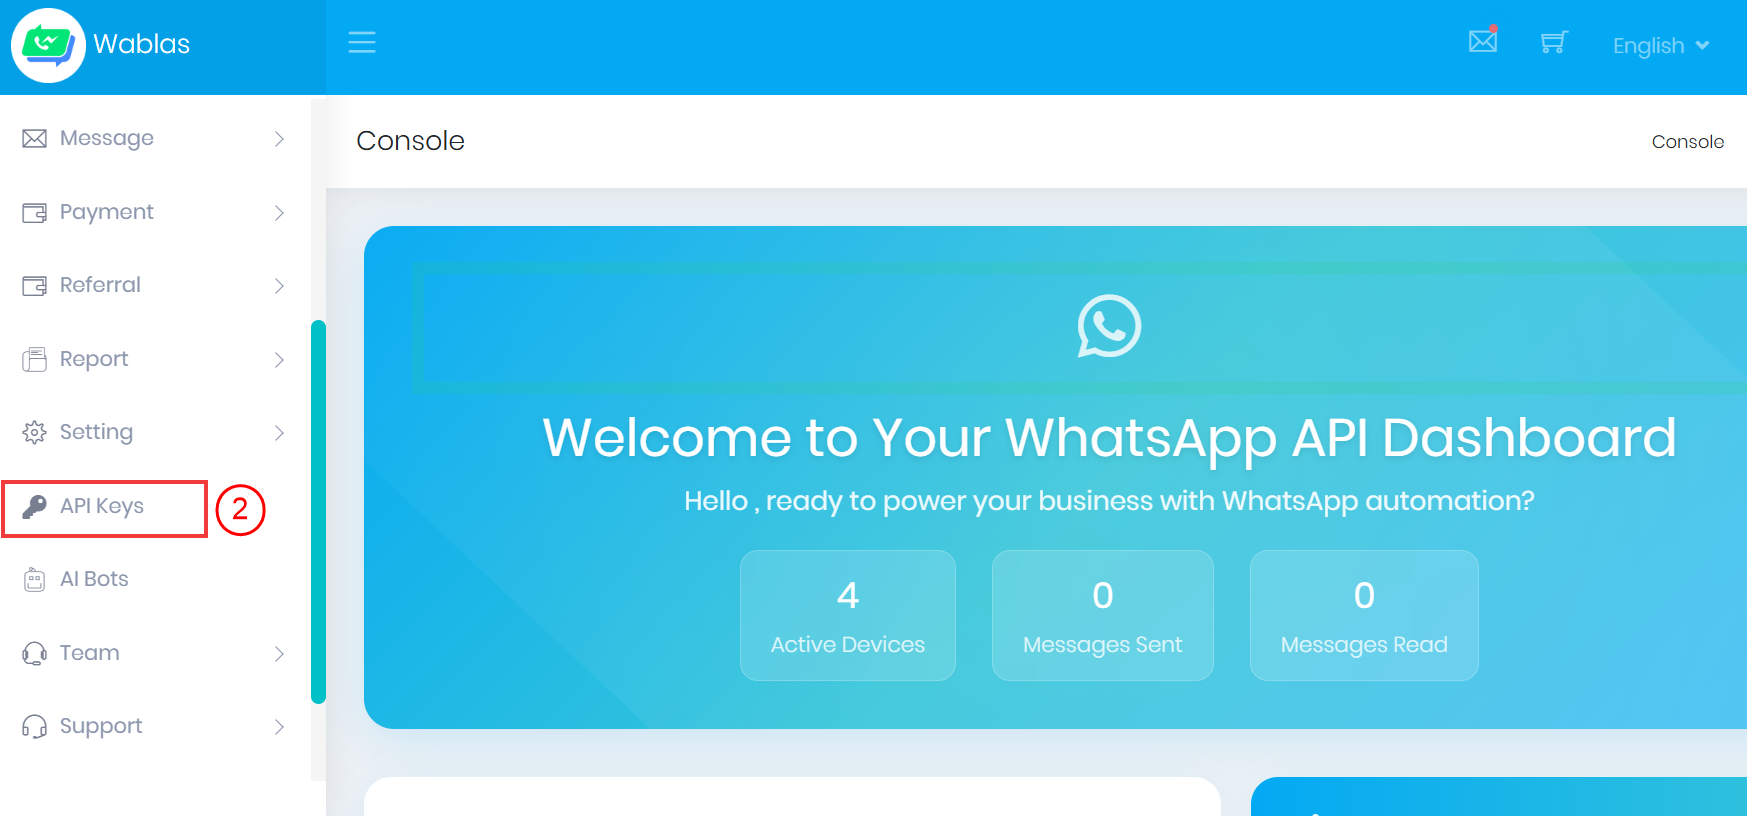
- Select API Keys from the left-hand menu.
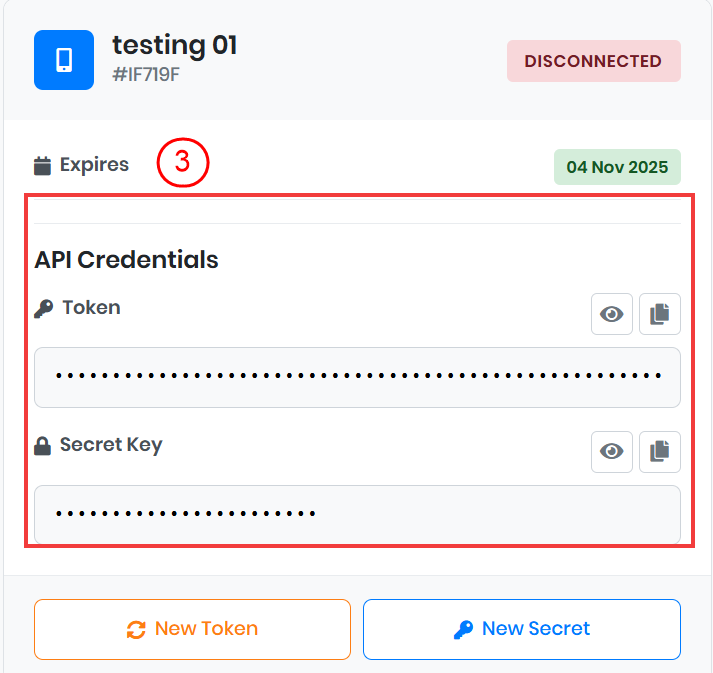
- Copy the Token and Secret Key listed under API Credentials for your device to a notepad or document.
You have now successfully retrieved the API Key.
Note: Do not close the Wablas screen.Step 2: Configuring Wablas in Vtiger CRM
Follow these steps to configure Wablas with Vtiger:
- Log in to the CRM.
- Click the main Menu.
- Go to Essentials > Conversations.
- Click WhatsApp.

- Click Settings on the right side of the screen.
- Select Provider Configuration.

- Click +Add. The Add Configuration window opens.
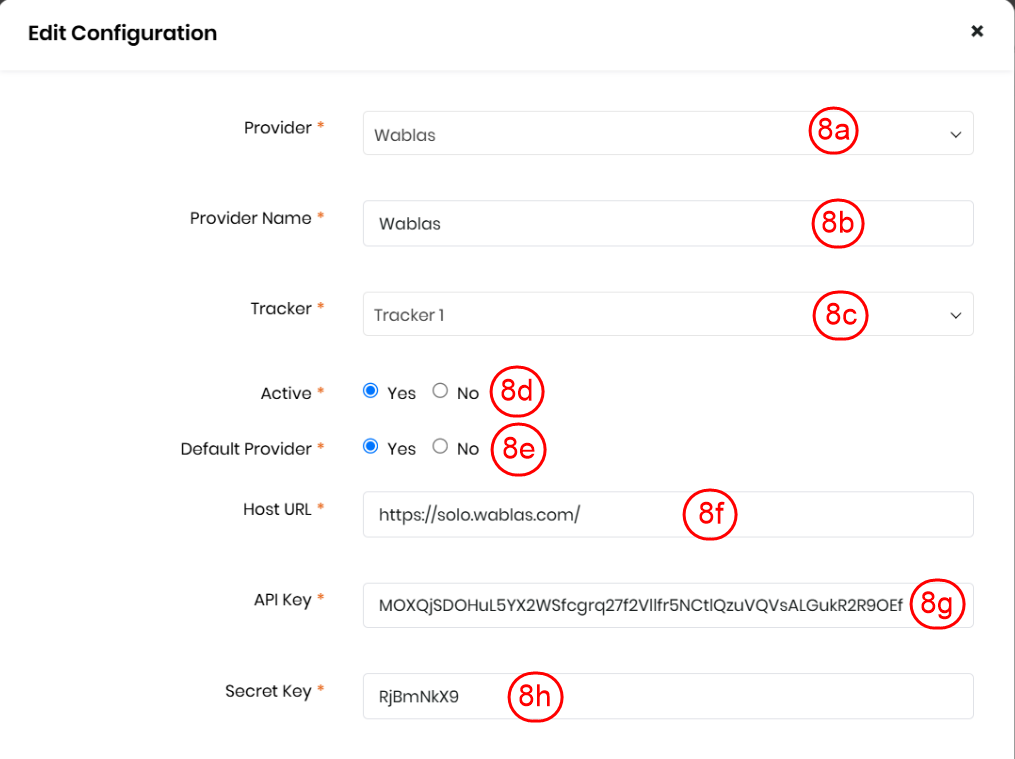
- Enter or select the following information:
- Provider: Select Wablas from the list.
- Provider Name: Enter a name to identify this provider.
- Tracker: Add a tracker name if needed to monitor message activity.
- Active: Select Yes to activate the Wablas provider.
- Default Provider: Select Yes if you want Wablas to be set as the default provider.
- Host URL: Enter the Wablas host URL.
- API Key: Paste the copied API Key from your Wablas account.
- Secret Key: Paste the copied secret key from your Wablas account.
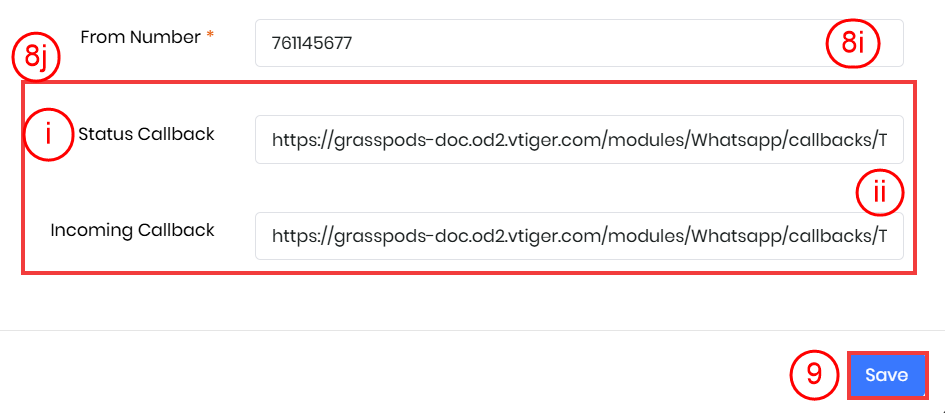
- From Number: Enter the WhatsApp number registered with Wablas.
- Copy the following URLs to a Notepad or a document:
- Status Callback
- Incoming Callback
- Click Save.
You have now successfully configured Wablas with Vtiger.
Step 3: Adding Status and Incoming Callback URLs to Wablas
Follow these steps to add Status and Incoming Callback URLs to Wablas:
- Log in to your Wablas account.
- Click Device from the Menu on the left panel. The List Device window displays the devices that are linked to your Wablas account.
- Select your device account.
- Under Action, click the three dots.
- Click Setting.
- Enter the URLs for the following fields:
- URL Webhook: Paste the Incoming Callback URL copied from Vtiger.
- Tracking URL: Paste the Status Callback URL copied from Vtiger.
- Click Save.
If you have successfully integrated Wablas and WhatsApp with Vtiger CRM, Wablas will be listed as a service provider in the CRM.
Sending a WhatsApp message from the CRM using Wablas
You can send WhatsApp messages via Wablas in the following ways:
- From both the desktop version of Vtiger CRM and the Vtiger CRM mobile app.
- From all modules where the WhatsApp Integration feature is available.
- From the List View and Summary View within those modules.
Note: To learn more about the WhatsApp Integration feature in Vtiger CRM, click here.
Sending WhatsApp Messages from List View
Here, for instance, we will consider the Contacts module. Follow these steps to send WhatsApp messages from List View:
- Log in to the CRM.
- Click the main Menu.
- Go to Essentials > Contacts. The Contacts Module opens.
- Hover over a Contact record.

- Click WhatsApp. The Send WhatsApp Message window opens.
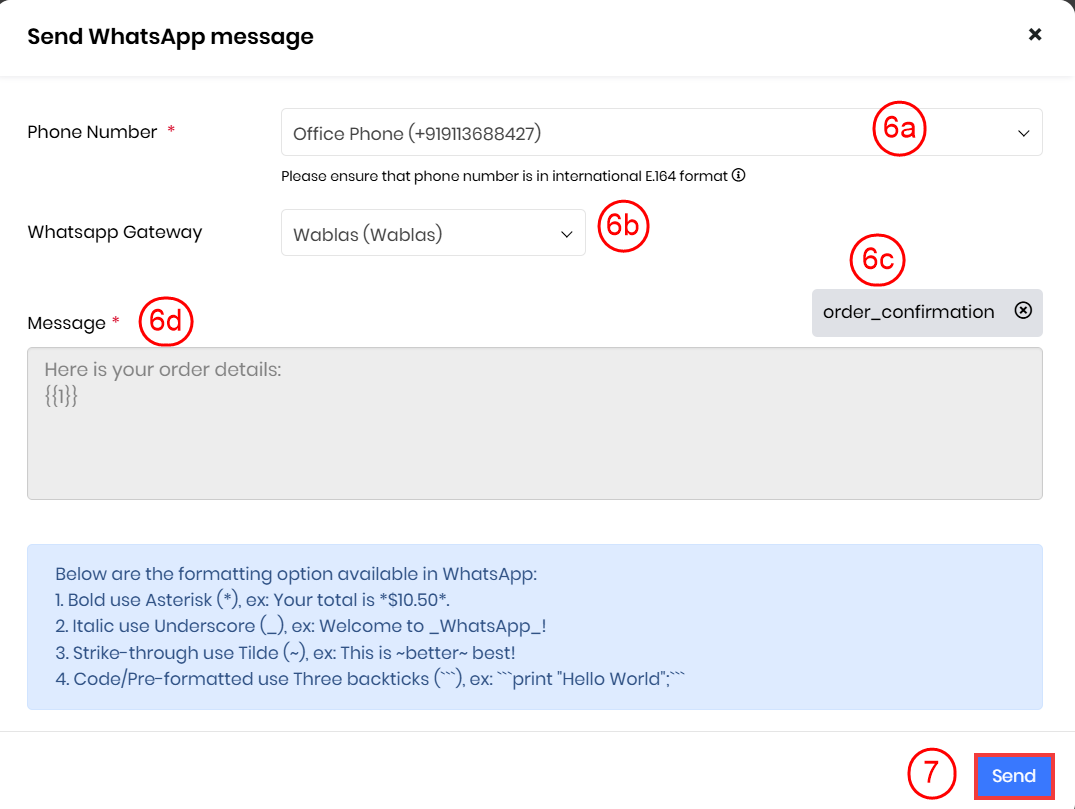
- Enter or select the following information:
- Phone Number: Select the recipient’s phone number.
- WhatsApp Gateway: Choose the gateway through which the message will be sent.
- Select WhatsApp Template: Choose a predefined WhatsApp template.
- Message: Enter the WhatsApp message to be sent to the customer.
- Attach Files: Select this option to attach files if needed. Note: The WhatsApp templates saved in the WhatsApp Template module will appear here. To learn more about the WhatsApp Template module, click here.
- Click Send.
You have successfully sent a WhatsApp message from the List View and will receive a confirmation message once it is sent successfully.
Note: The image, audio, and video files sent via WhatsApp Messages using Wablas should not exceed 2 MB.
Sending WhatsApp Messages from Summary View
Follow these steps to send WhatsApp messages from the Summary view.
- Log in to the CRM.
- Click the main Menu.
- Go to Essentials > Contacts.
- Click the Contact record to which you want to send a WhatsApp message.

- In the Summary View, click the More option.
- Select WhatsApp. The Send WhatsApp Message window will open.

- Enter or select the following information:
- Phone Number: Select the recipient’s phone number.
- WhatsApp Gateway: Choose the gateway through which the message will be sent.
- Select WhatsApp Template: Choose a predefined WhatsApp template.
- Message: Enter the WhatsApp message to be sent to the customer.
- Attach Files: Select this option to attach files if needed. Note: The WhatsApp templates saved in the WhatsApp Template module will appear here. To learn more about the WhatsApp Template module, click here.
- Click Send.
You have successfully sent a WhatsApp message from the Summary View and will receive a confirmation message once it is sent successfully.
Viewing WhatsApp records for Wablas
Once you send or receive a WhatsApp message via Wablas, you can view it from the:
- WhatsApp module, or
- Related module
Viewing WhatsApp Records from the WhatsApp Module
Follow these steps to view WhatsApp records from the WhatsApp module:
- Log in to the CRM
- Click the main Menu.
- Go to Essentials > Conversations.
- Click WhatsApp. You can view all WhatsApp records in the List View.
- In the Source field, type the name of the WhatsApp provider.
- Hit Search or Enter.
WhatsApp records for the specified WhatsApp provider will be displayed.
Viewing WhatsApp Records from Other Modules
You can view WhatsApp conversations from the module where you have initiated them. Here, for instance, we will consider the Contacts module.
Follow these steps to view WhatsApp records from a module:
- Log in to the CRM.
- Click the main Menu.
- Go to Essentials > Contacts.
- Click on a Contact record. The Summary View of the record opens.
- In the Activity section, you can view the WhatsApp conversation with delivery statuses Delivered, Failed, and Read.
Or
- Log in to the CRM.
- Click the main Menu.
- Go to Essentials > Contacts.
- Click on a Contact record. The Summary View of the record opens.
- In the Widget View, click WhatsApp.
You can view the WhatsApp conversation.