Articles in this section
WhatsApp Integration with Twilio
Feature Availability
Vtiger Editions: One Professional | One Enterprise | One AI
Introduction
Twilio is a customer engagement platform used by thousands of businesses and more than ten million developers worldwide to build unique, personalized experiences for their customers.
It is known for democratizing voice, text, chat, video, and email channels through APIs. Twilio makes it easy for organizations to build meaningful customer interactions on the channels they prefer.
WhatsApp - Twilio with Vtiger CRM
WhatsApp and Twilio integration on Vtiger CRM is available for the following modules:
- Cases
- Leads
- Organizations
- Contacts
- Deals
- Internal Tickets
- Invoices
- Quotes
- Vendors
To integrate WhatsApp with Twilio and use it with Vtiger CRM:
- You need to have a Facebook Business Manager account.
- You must have a Business Manager ID.
Integrating WhatsApp and Twilio with Vtiger CRM
You must have a Twilio as well as a business manager account with a WhatsApp account to integrate WhatsApp with Vtiger CRM. And then, you need to connect the two.
To integrate and use WhatsApp and Twilio with Vtiger CRM, you need to:
- Step 1: Enable your WhatsApp account with Twilio
- Step 2: Configuring WhatsApp on Twilio
- Step 3: Installing WhatsApp
- Step 4: Configuring WhatsApp in Vtiger CRM
Step 1: Enable your WhatsApp account with Twilio
Follow these steps to connect WhatsApp with Twilio:
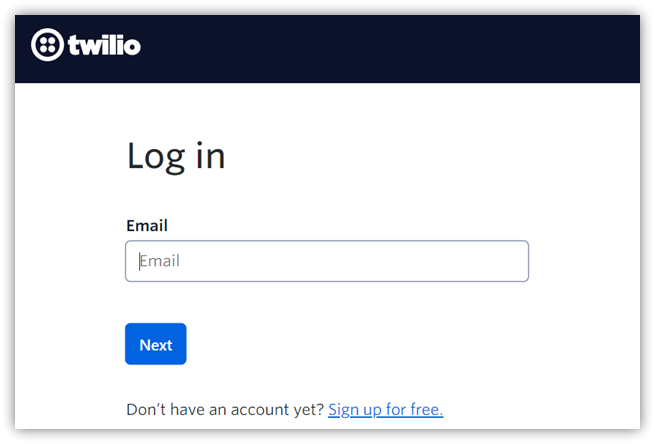
- Log into your Twilio account. If you do not have a Twilio account, create it from here.
- Enable your WhatsApp account on Twilio. Learn about the details here.
- Submit your Twilio number(s) to WhatsApp for approval.
- All customers who wish to create their profiles require approval from WhatsApp.
- Twilio numbers that you submit also need approval from WhatsApp and the approval process may take a little time.
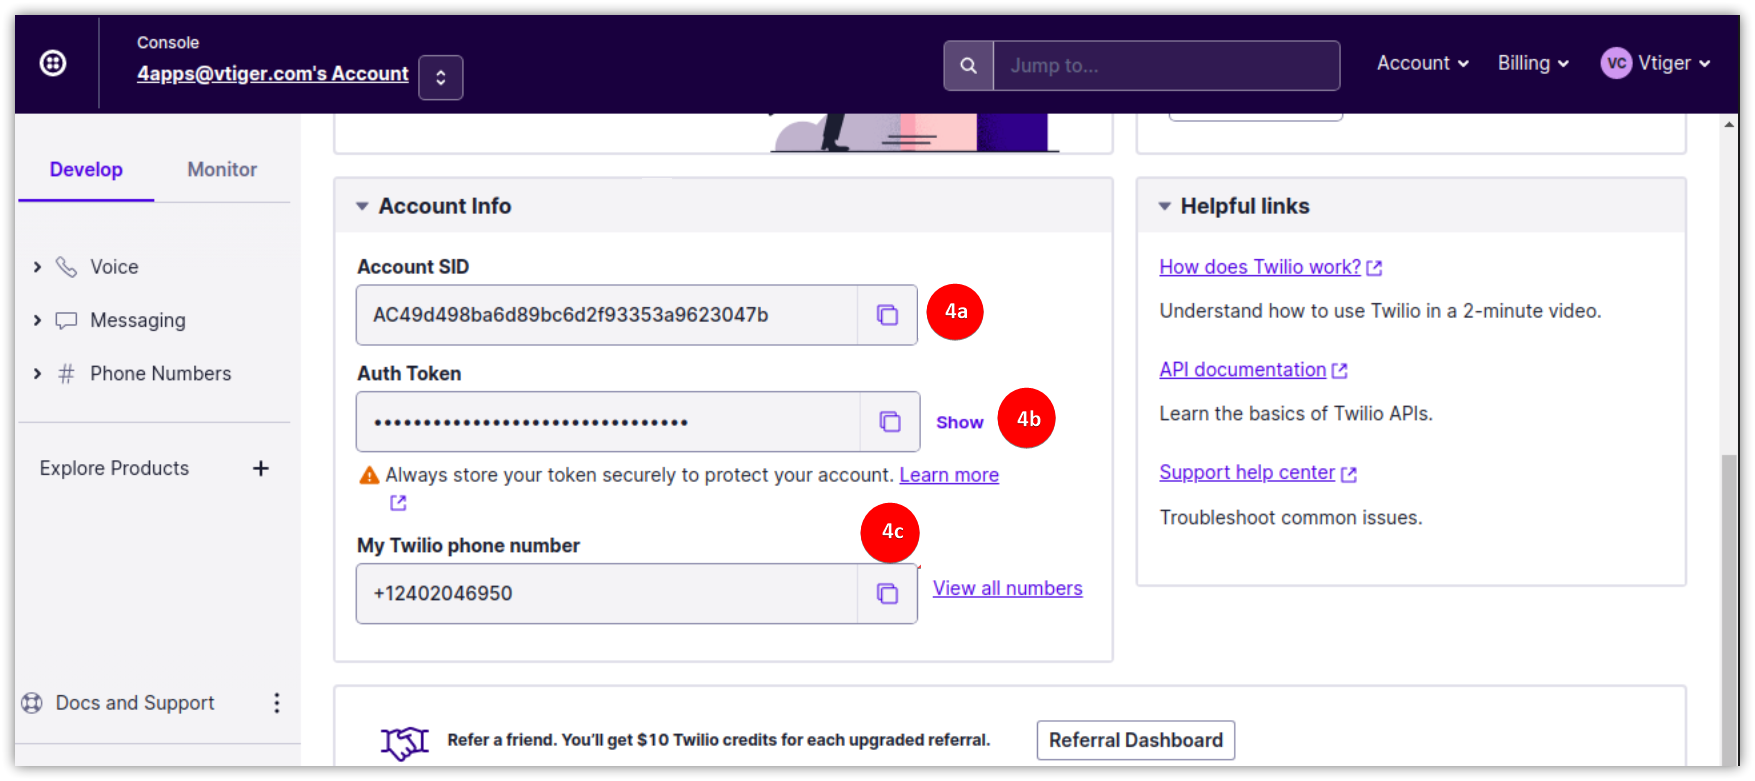
- To enable the integration in Vtiger, you will need the following information from Twilio:
- Account SID
- Token
- WhatsApp From Number
- Copy the above information to a notepad.
Step 2: Configuring WhatsApp on Twilio
After you have bought and set up your Twilio account, you need to configure WhatsApp on the Twilio Console. To send and receive WhatsApp messages from the registered Twilio number, you also need a Vtiger instance URL in Twilio. Let us see how.Follow these steps to configure WhatsApp from your Twilio console:
- Go to the Twilio homepage.
- Log in using your User ID and Password.
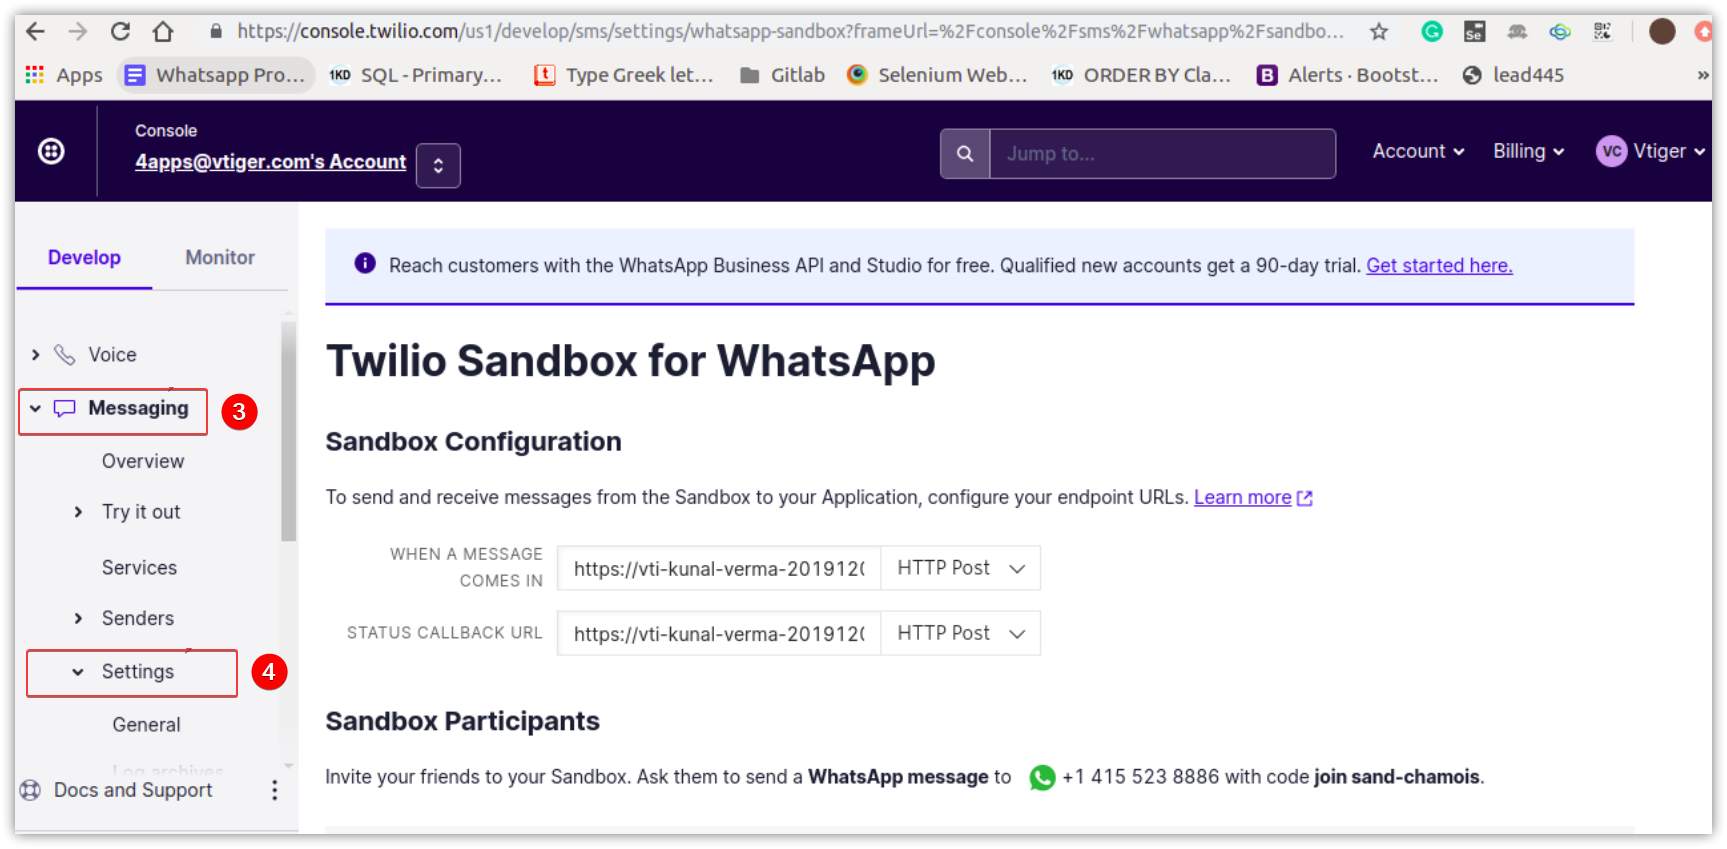
- Click Messaging.
- Click Settings.
- Click WhatsApp sandbox settings.
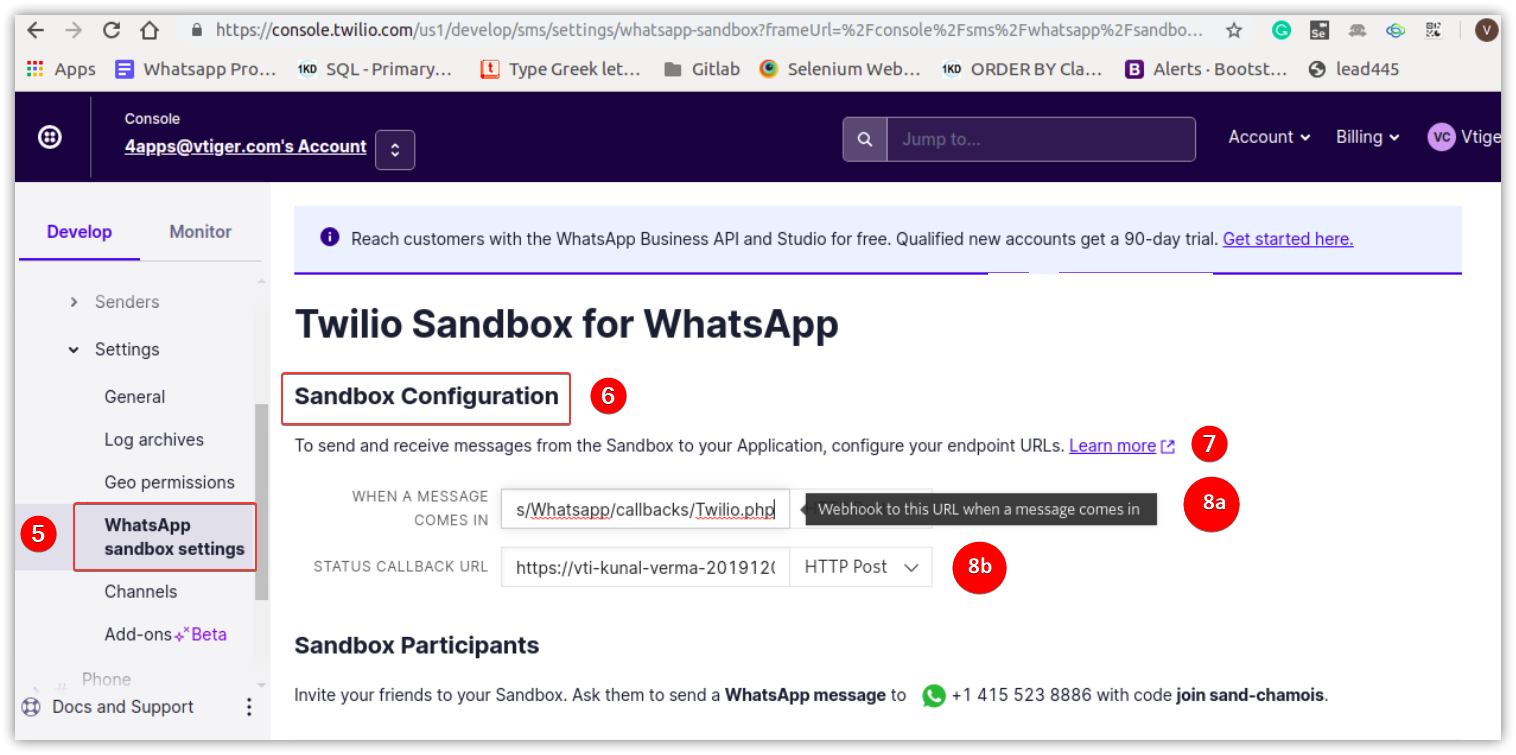
- Select Sandbox Configuration.
- Add the Vtiger instance URL in Twilio. This helps you to send and receive messages from Vtiger CRM.
- Enter the following details:
- WHEN A MESSAGE COMES IN - Enter the URL.
- STATUS CALLBACK URL - Enter the URL.
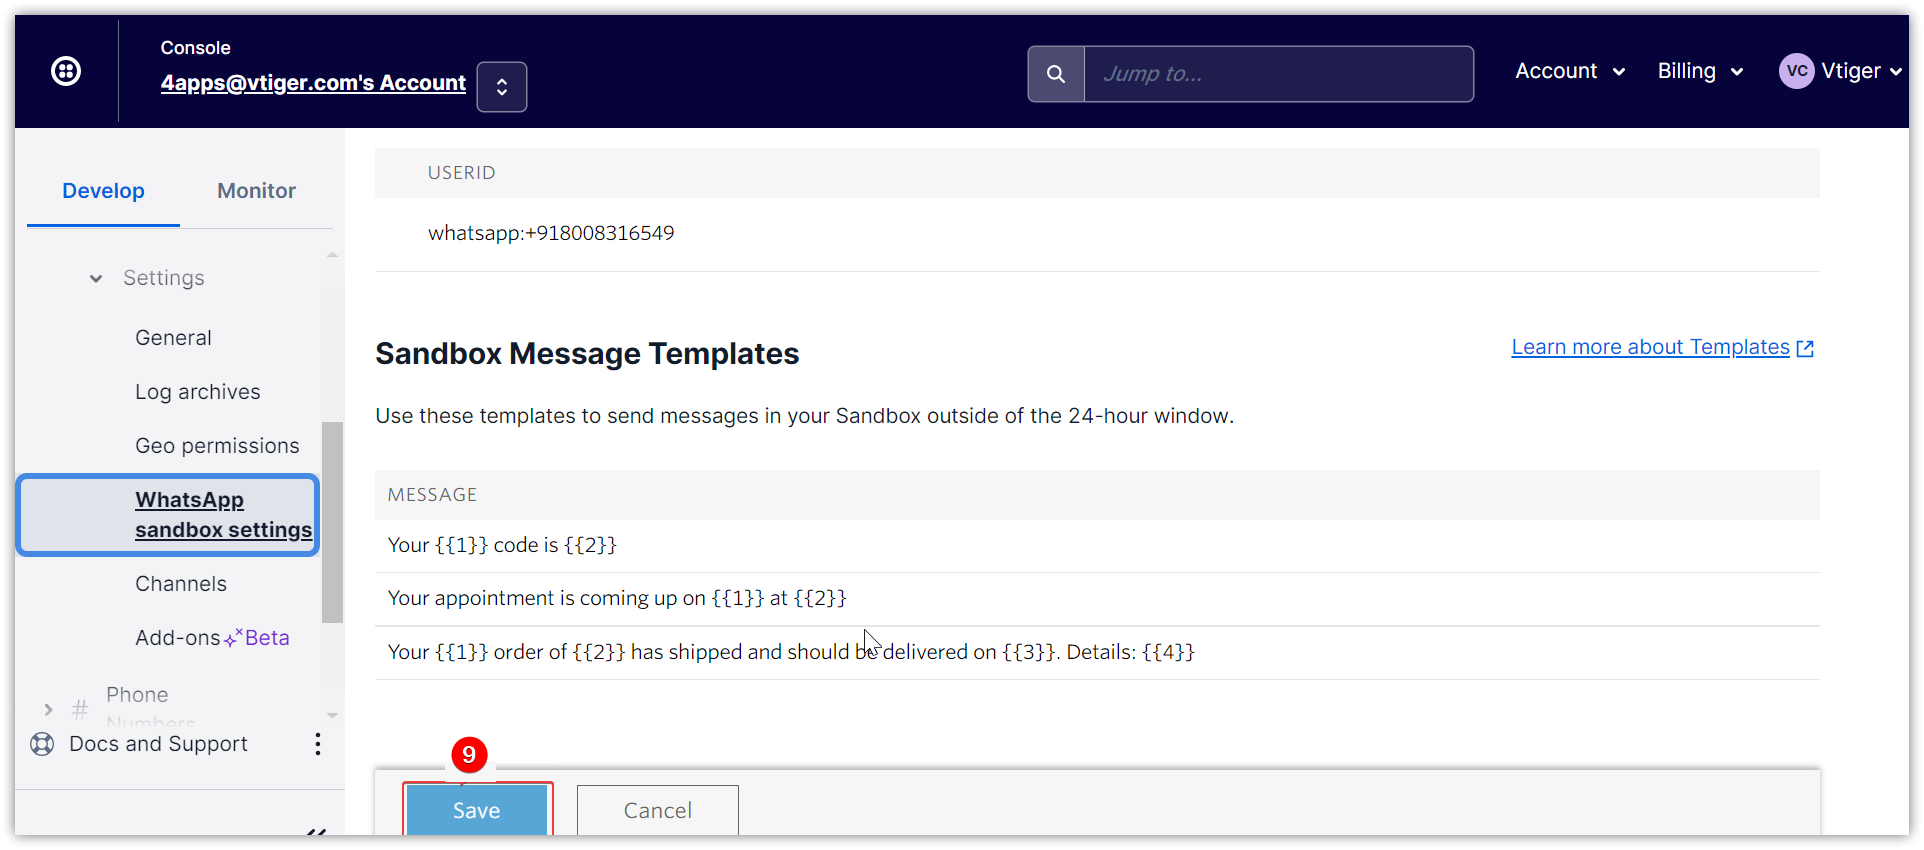
- Click Save.
Step 3: Installing WhatsApp
You have added the Vtiger instance on Twilio. Next, let us connect all three in Vtiger CRM. Start by installing WhatsApp from the Add-on.
Note: You need to install WhatsApp since it is unavailable by default.
Follow these steps to install WhatsApp:
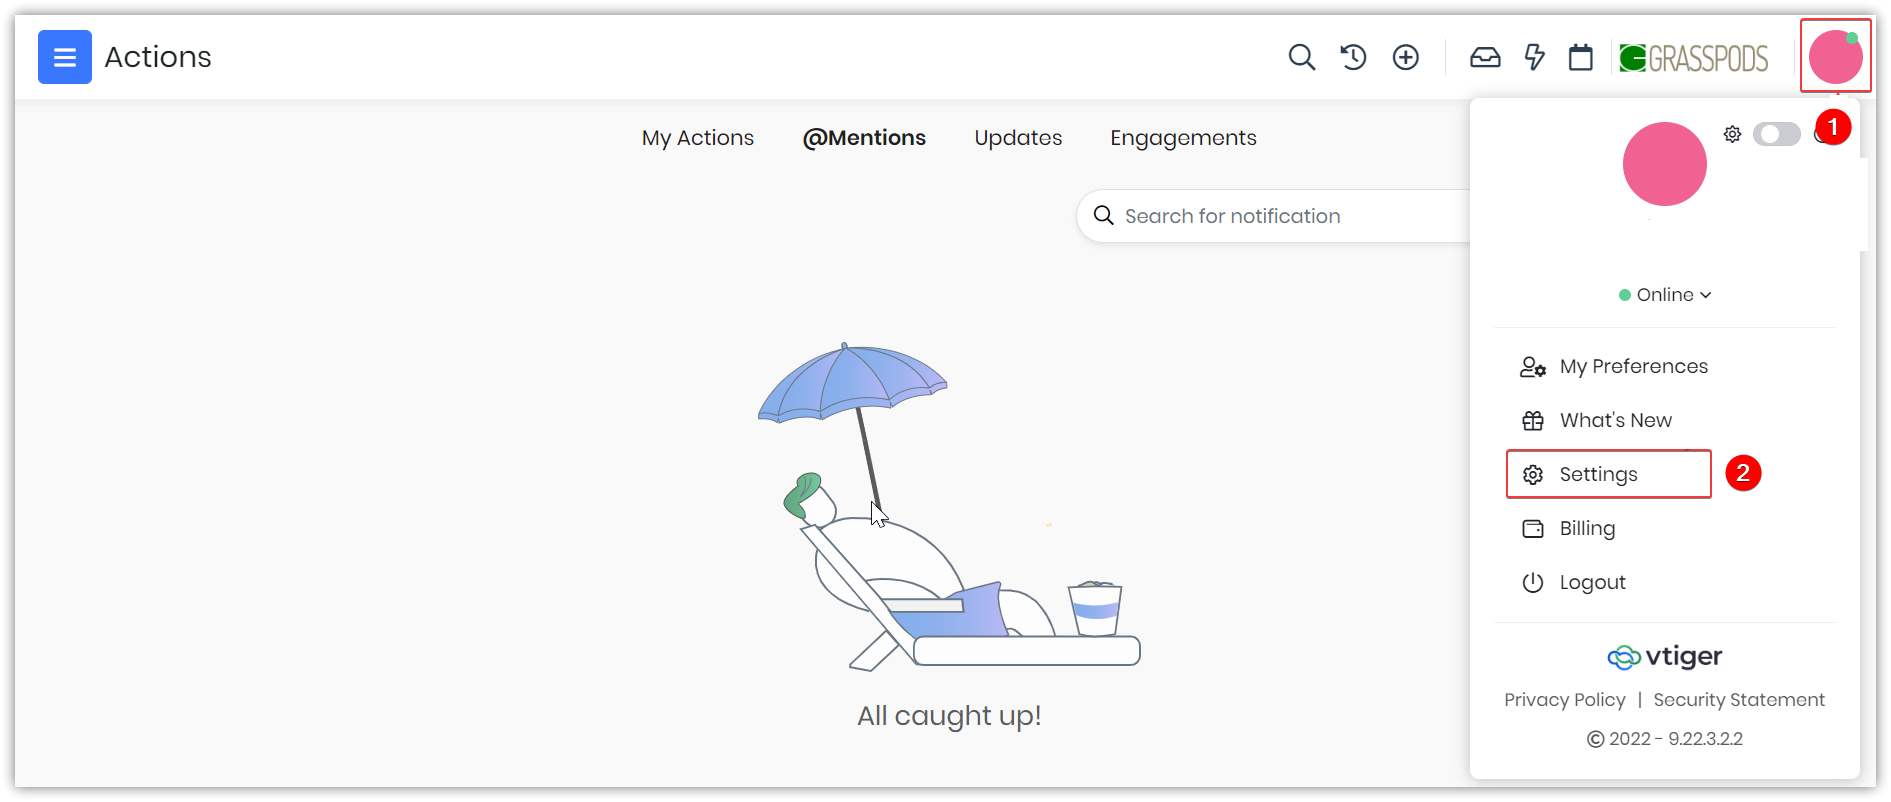
- Click User Profile on the top right corner of the screen.
- Click Settings.
- Go to the Extensions Store.
- Click Add-ons.
- Click WhatsApp.
The WhatsApp icon is visible in:
- The List View of every record in these modules - Contacts, Vendor, Deals, Invoices, Quotes, Cases, Internal Tickets, Leads, and Organization.
- The Summary View under More (⋮) > WhatsApp.
Step 4: Configuring WhatsApp in Vtiger CRM
Once you have installed WhatsApp, you need to configure the details and add Twilio as a service provider for WhatsApp in the CRM.
Follow the steps below to configure the details:
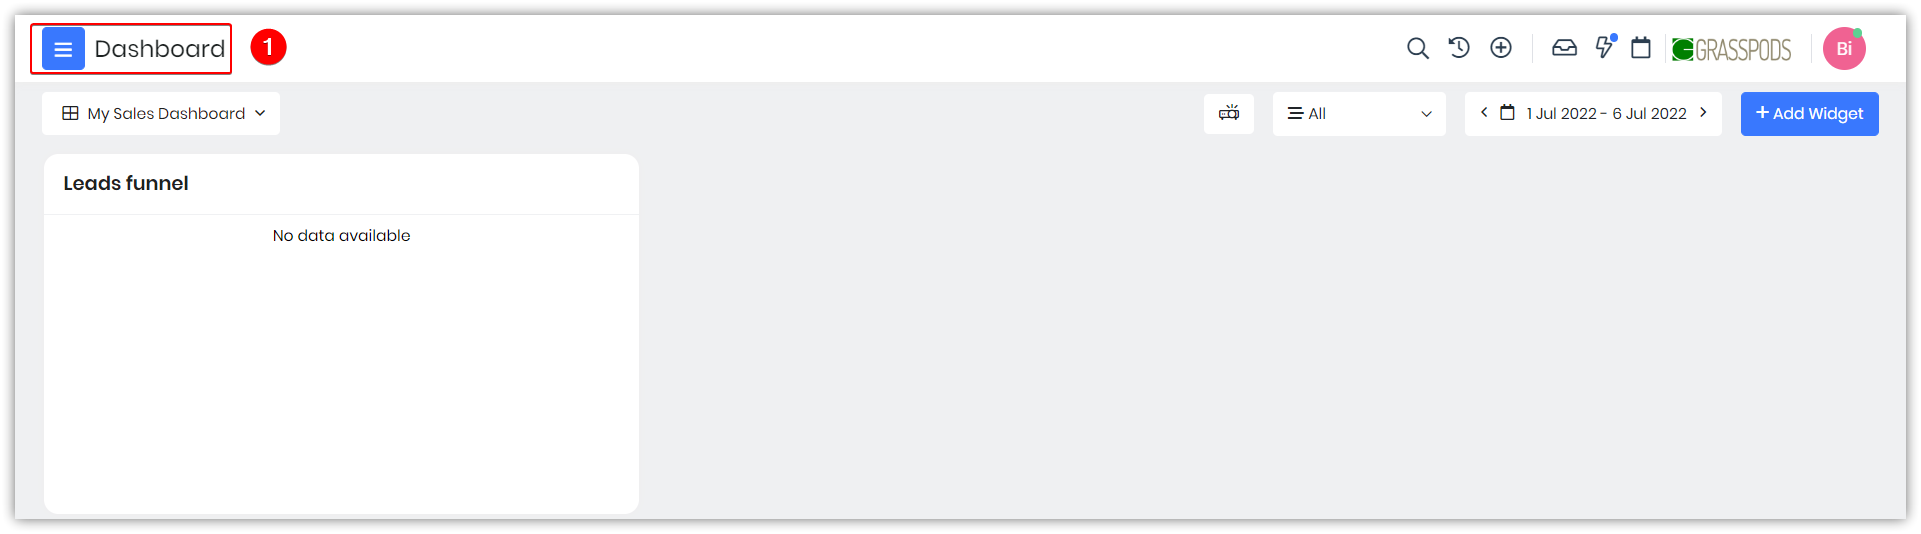
- Go to the Main menu.
- Click Essentials.
- Click Conversations.
- Click WhatsApp. The List View displays all available records for WhatsApp messages.

- Click Settings in the top right corner.

- Click + Add.
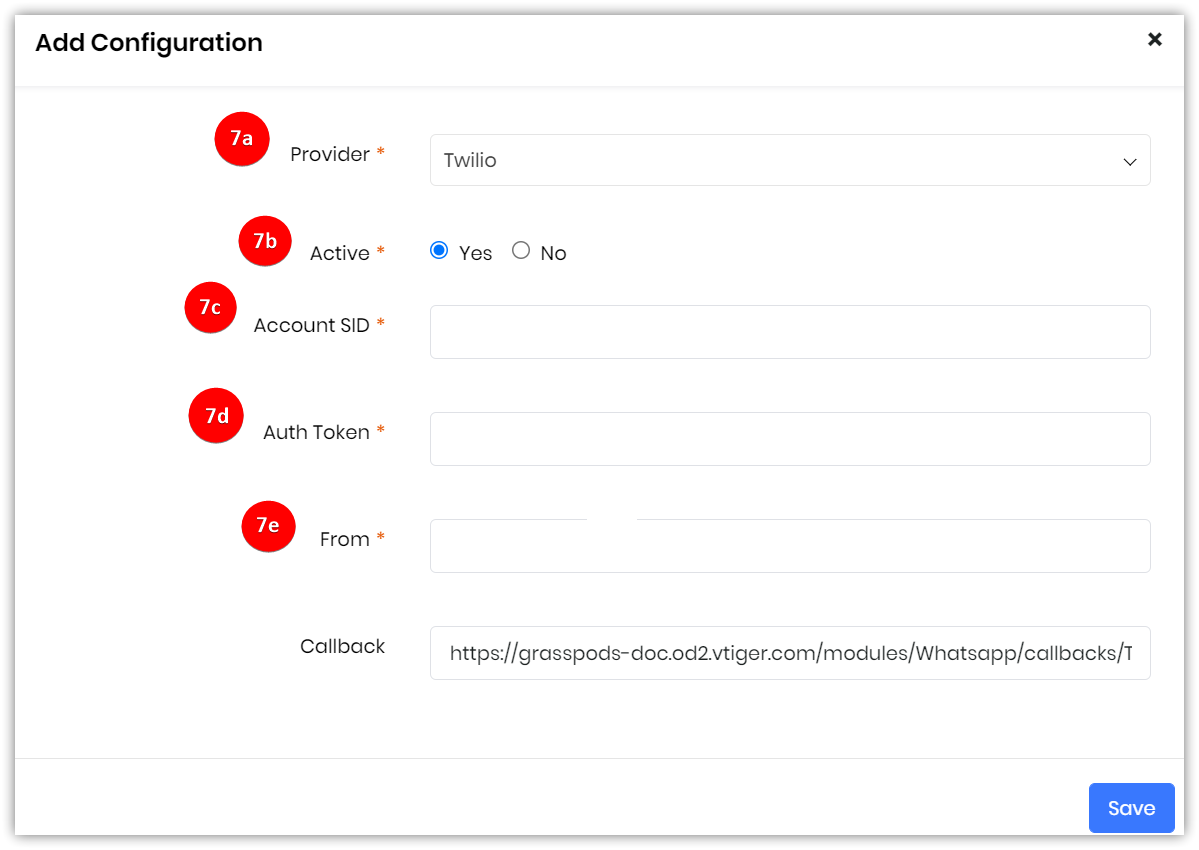
- Enter information for the following in the Add Config window:
- Provider (Service provider) - Select Twilio from the drop-down.
- Active/Inactive the Provider - Select Active Provider.
- Account ID - You will find it under the Twilio console after signup
- Token - You will find it under the Twilio console after signup
- WhatsApp from Number - You can find From number on the Sandbox Configuration page.
Using WhatsApp
Now that you have signed up for WhatsApp with your Twilio number, let us see what messages you can send your customers.Currently, you can:
- Type and send individual text messages. (Only after receiving the messages from the customer.)
- Send textual and image content. You need to get approval from WhatsApp before using media templates.
- Use standard message templates, approved by WhatsApp to communicate with your customers. In some cases, you can create standard message templates. You can use these templates for different customers and avoid typing individual messages.
- Once the customer replies to the sent message within 24hrs, you can reply with messages of your own.
- Do you have a new product line you want to talk about? Send a teaser using a WhatsApp message to your customers.
- Want to send a quotation to a customer? Send them a notification and attach the quote as a PDF along with a message.
- Is it that time of the year again? Send Season's Greetings and New Year Wishes to all your customers.
Creating and Setting up Message Templates
Tired of typing and sending standard messages like season's greetings over and over again? You can avoid this hassle by creating standard message templates for your WhatsApp messages.For example, your company has developed a new product line of paints that reflect changing seasons, and you want to share it with your customers. What if your customer list is enormous, and they want to see the catalog? Well, not to worry, you can use Vtiger CRM's WhatsApp Integration module to send your message.
Just create a standard message that will include a salutation, add the message, and attach the relevant catalog along with your message. Voila, you will send your contacts the new catalog in a jiffy.
Creating and setting up standard message templates is a two-step process.
- First, create a standard message template on your Twilio console and get it approved by WhatsApp to use from your CRM.
- Secondly, use standard approved templates when to have to send the message within 24 hrs.
Follow these steps to add standard message templates on the Twilio console and get them approved from WhatsApp:
- Log in to the Twilio website using your Twilio credentials.
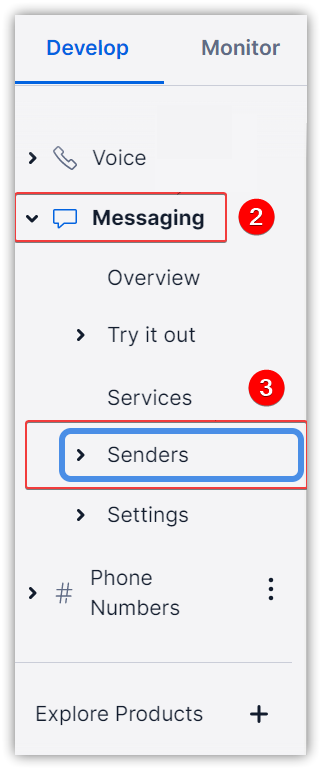
- Click Messaging.
- Click Senders.
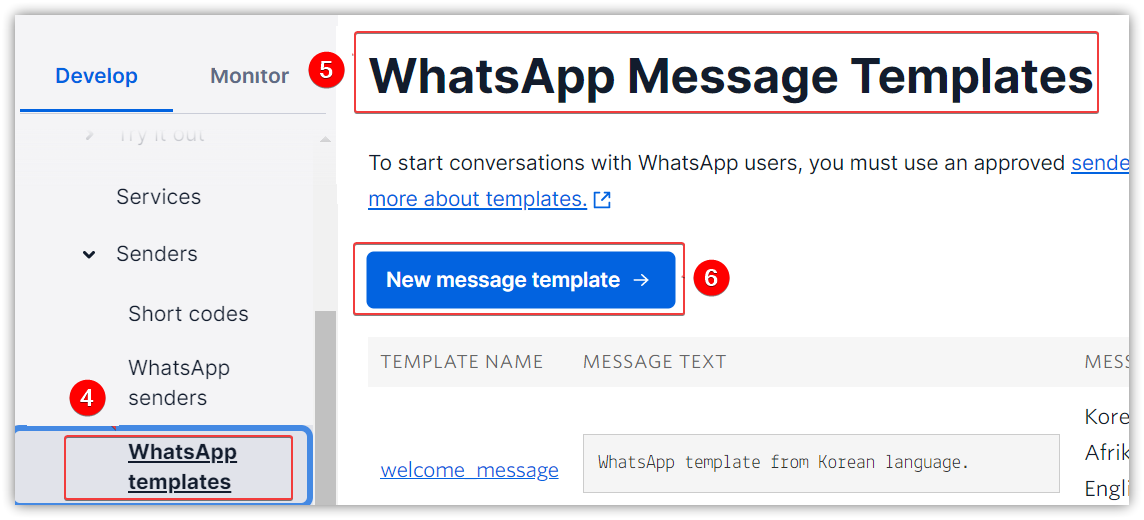
- Click WhatsApp Templates.
- Go to the WhatsApp Message Templates section on the right-hand side.
- Click New Message Template.
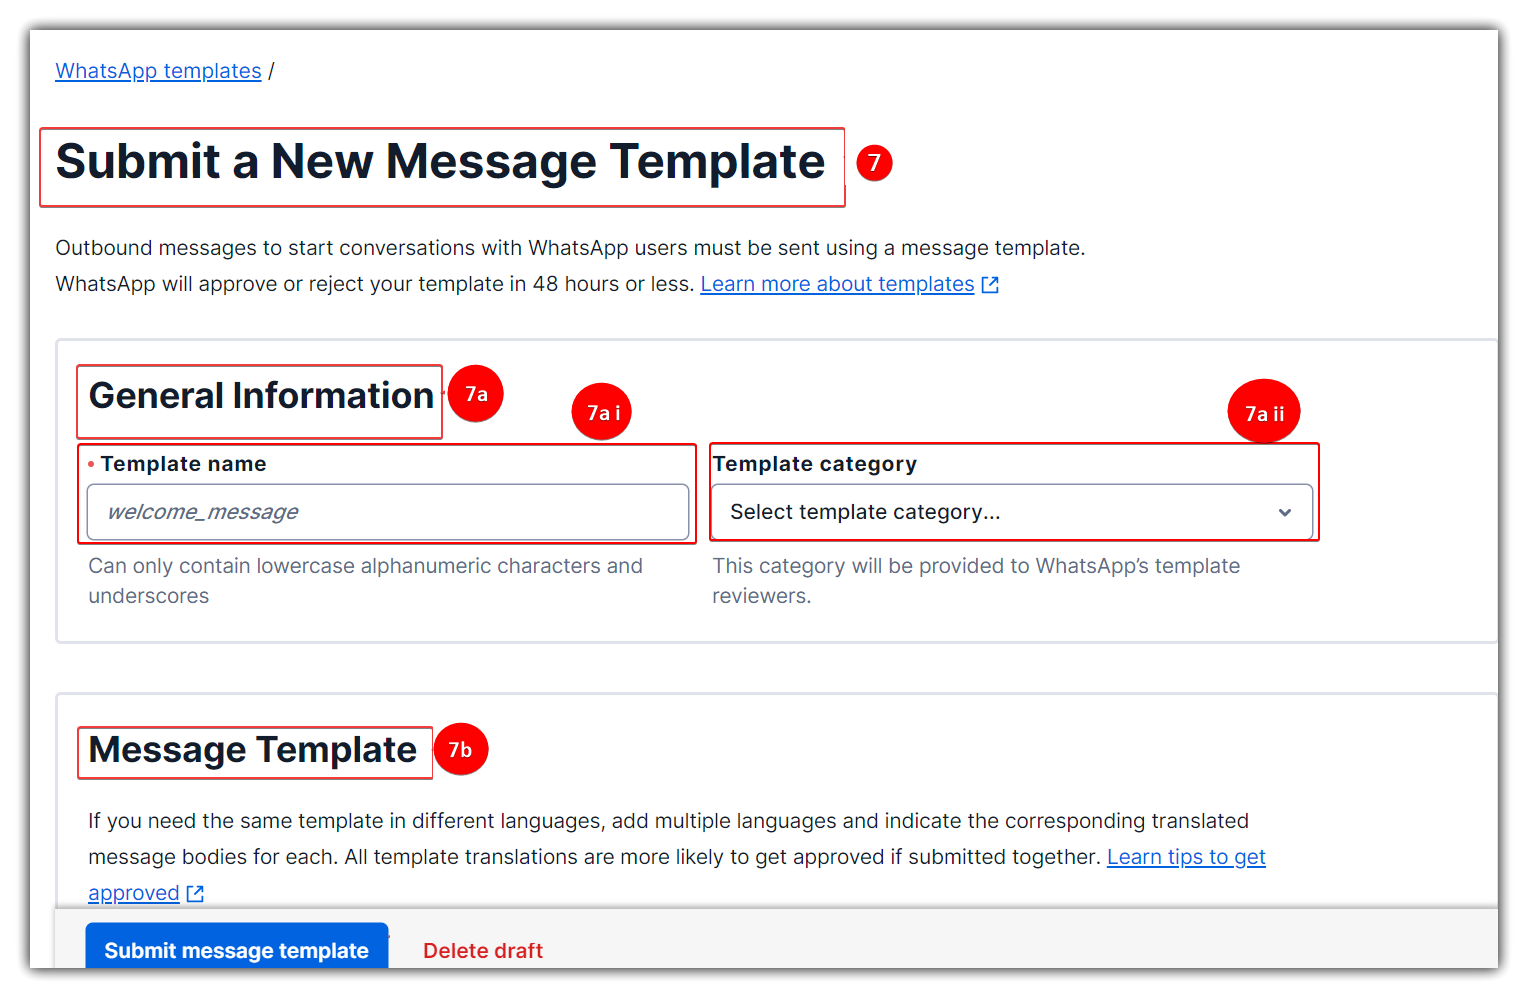
- A Submit a New Message Template section will appear. Add the following details:
- General Information Section:
- Template Name: Enter the name of the template.
- Template Category: Choose the template category from the drop-down.
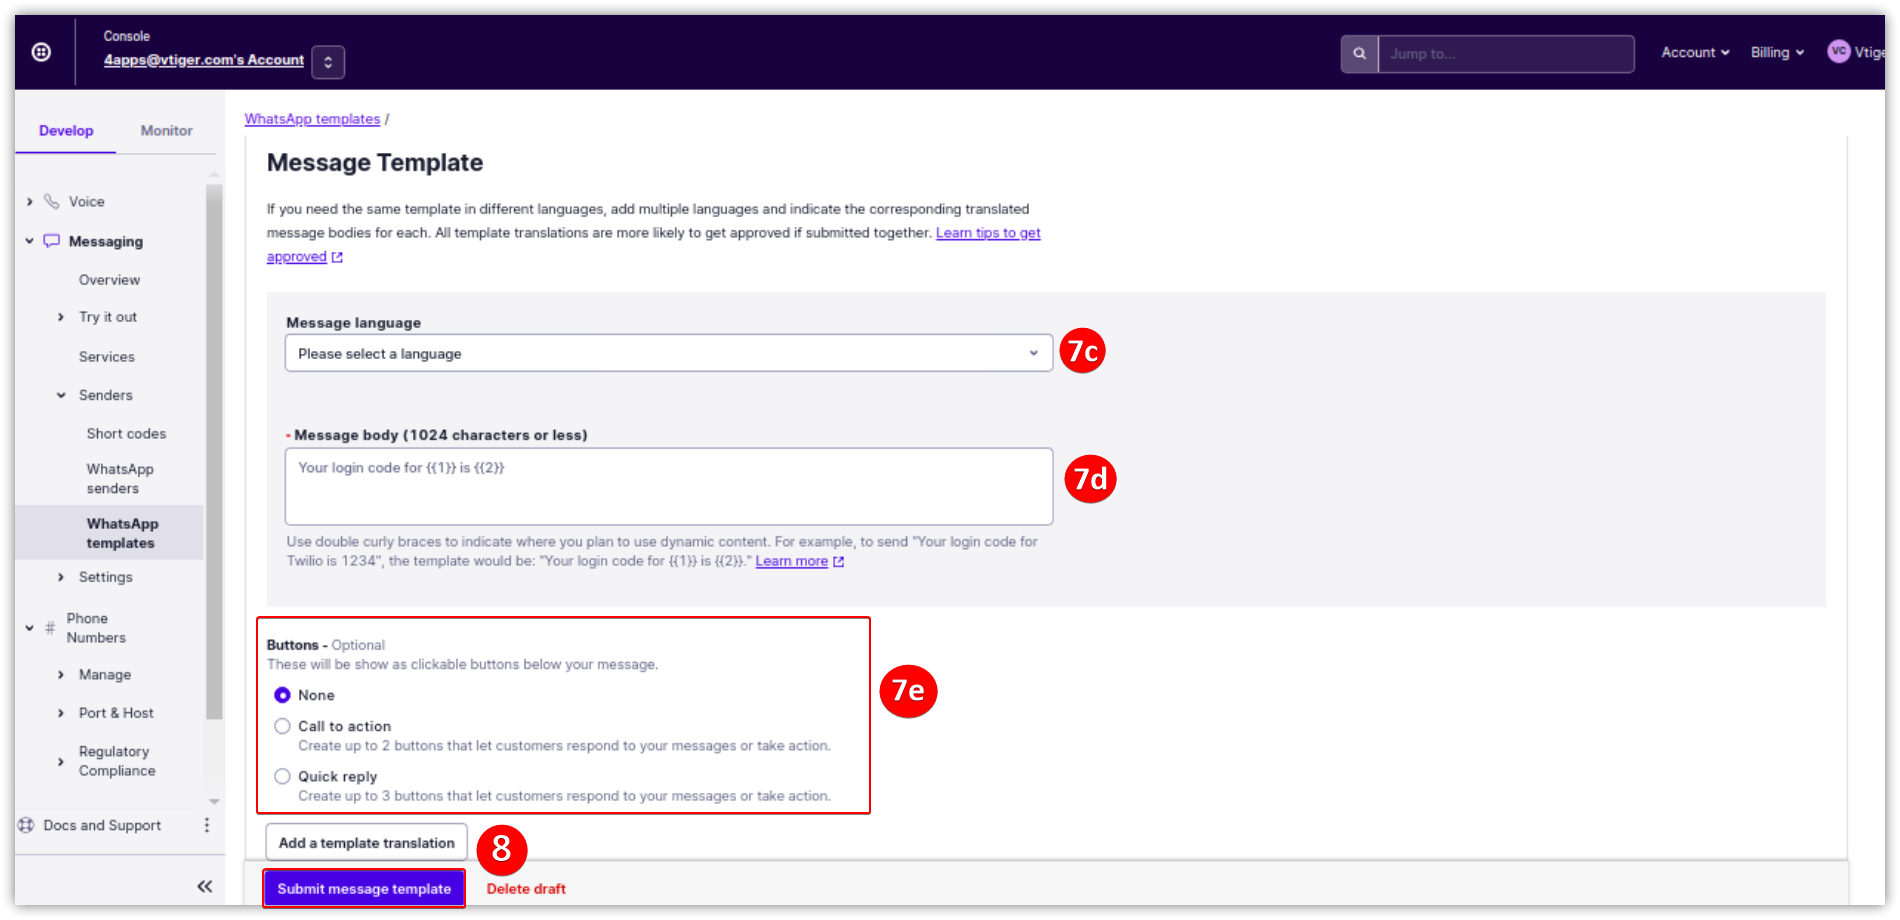
- Message Template:
- Choose the message language from the drop-down.
- Type the message in the message body section.
- Choose the buttons you wish to have below your message, like Call to Action and Quick to Reply.
- General Information Section:

- The WhatsApp Message Templates section displays approved templates.
- Template Name:
- Message Text:
- The Message Template Status column will display WhatsApp approved and rejected template.
- Copy the approved message you created and paste it into the WhatsApp template record in the CRM.
Step 2: Creating a WhatsApp template in the CRM (for the approved message).
Note: Copy the approved message from the Twilio console and keep it ready.Follow these steps to create standard message templates:
- Go to the Main menu.
- Go to Tools.
- Click WhatsApp Templates.
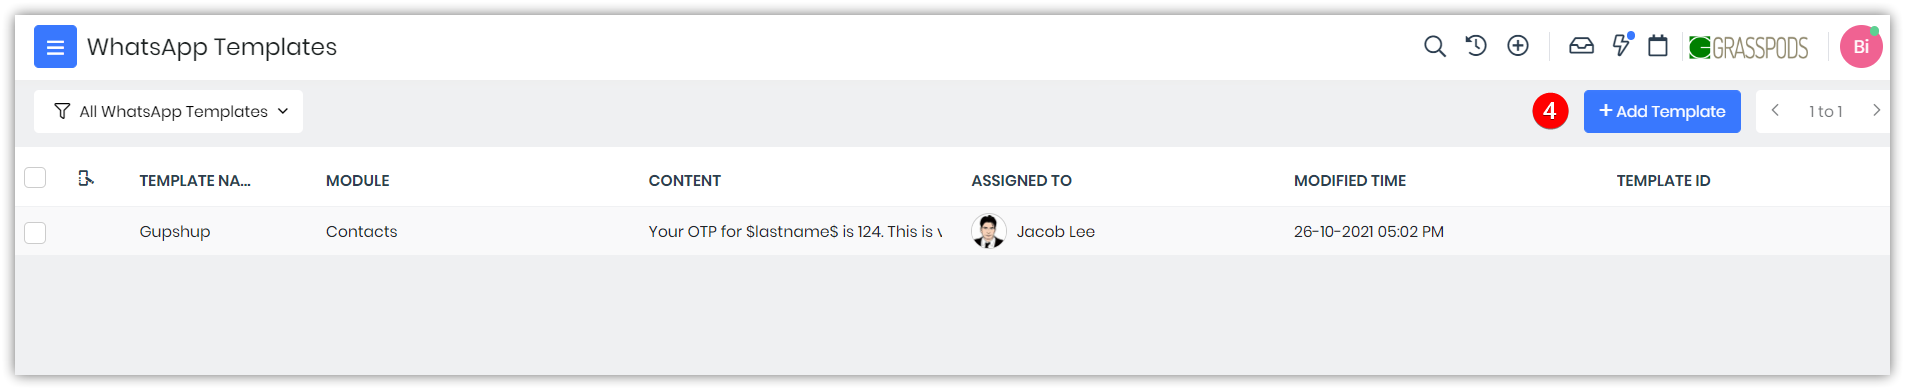
- Click + Add Template.
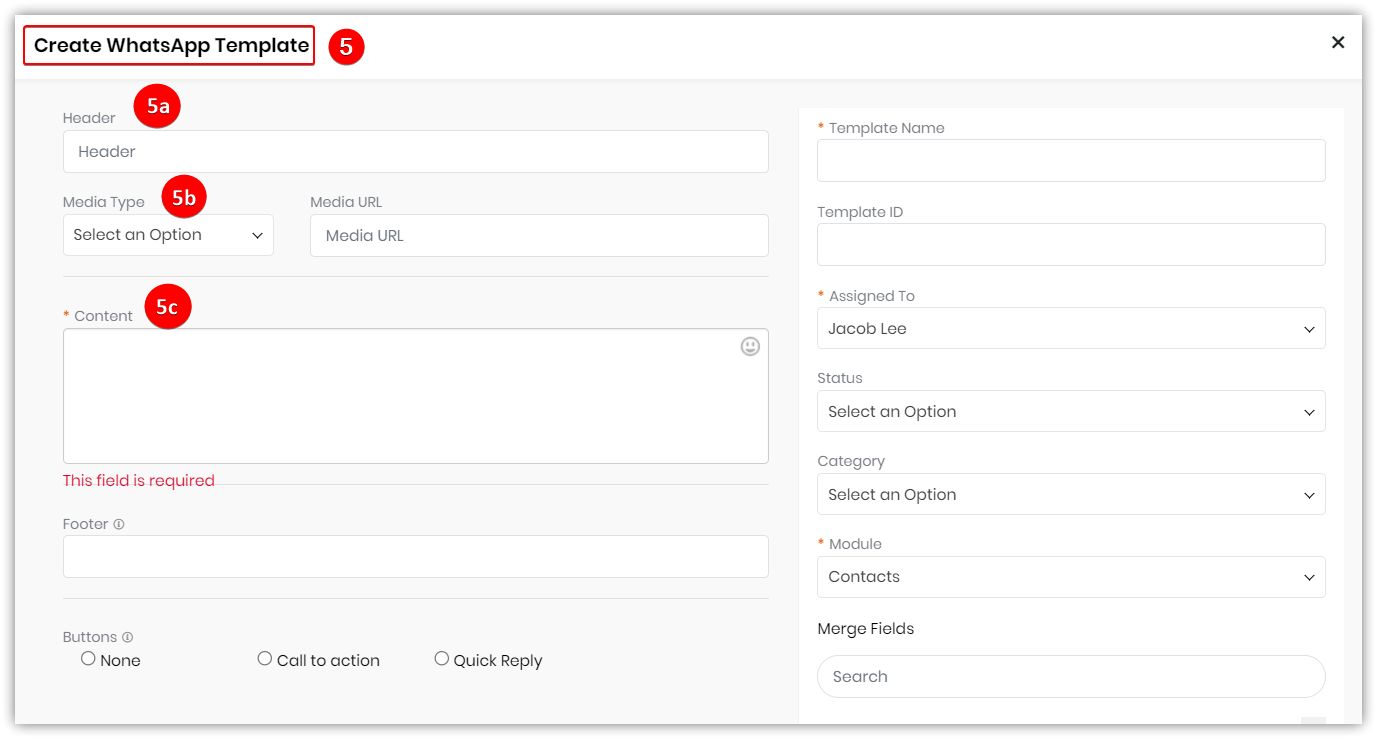
- Enter the following details in the Create WhatsApp Template window -
- Header: Enter the header
- Select the Media Type option and enter the Media URL
- Content: Add your message in this textbox. The message textbox on the left displays standard messages along with numbers in brackets. Replace these numbers with merge fields.
- Footer:
- Select the required Buttons
- Template Name - Enter the name of the template.
- Assigned To - Select the employee to whom the template is assigned.
- Module - The module to the template is attached. For example, you can create templates for Invoices or for Deals, and so on.
- Merge Fields - Select and add standard merge fields. For example, you can choose salutation, phone numbers, primary email addresses, etc., and they will appear in the message textbox
Note:
- You can create our own template for all the modules.
- Remember, WhatsApp needs to approve all standard message templates you create before you can use them.
Messaging with WhatsApp
Now that you have installed WhatsApp, and created standard templates, let us see how you can send and receive messages using the CRM.
The WhatsApp icon appears on the screen in:
- The List View of every record in these modules - Contacts, Organization, Leads, Vendor, Deals, Invoices, Quotes, Cases, and Internal Tickets
- The Summary View under More (⋮) > Reach out now > WhatsApp
You can send WhatsApp messages from:
- The List View (of different modules)
- The Summary View
- Related WhatsApp Tab in the Summary View
You can support related module fields in the WhatsApp template. The Related field is visible only when the selected module has at least one relationship field.
For example, If you select the Contact module, the Account Name, and Relation fields like Website, Phone, Employees, Revenue, and other fields will be available
For the Deals module, you can select the Contact or Organization module field.
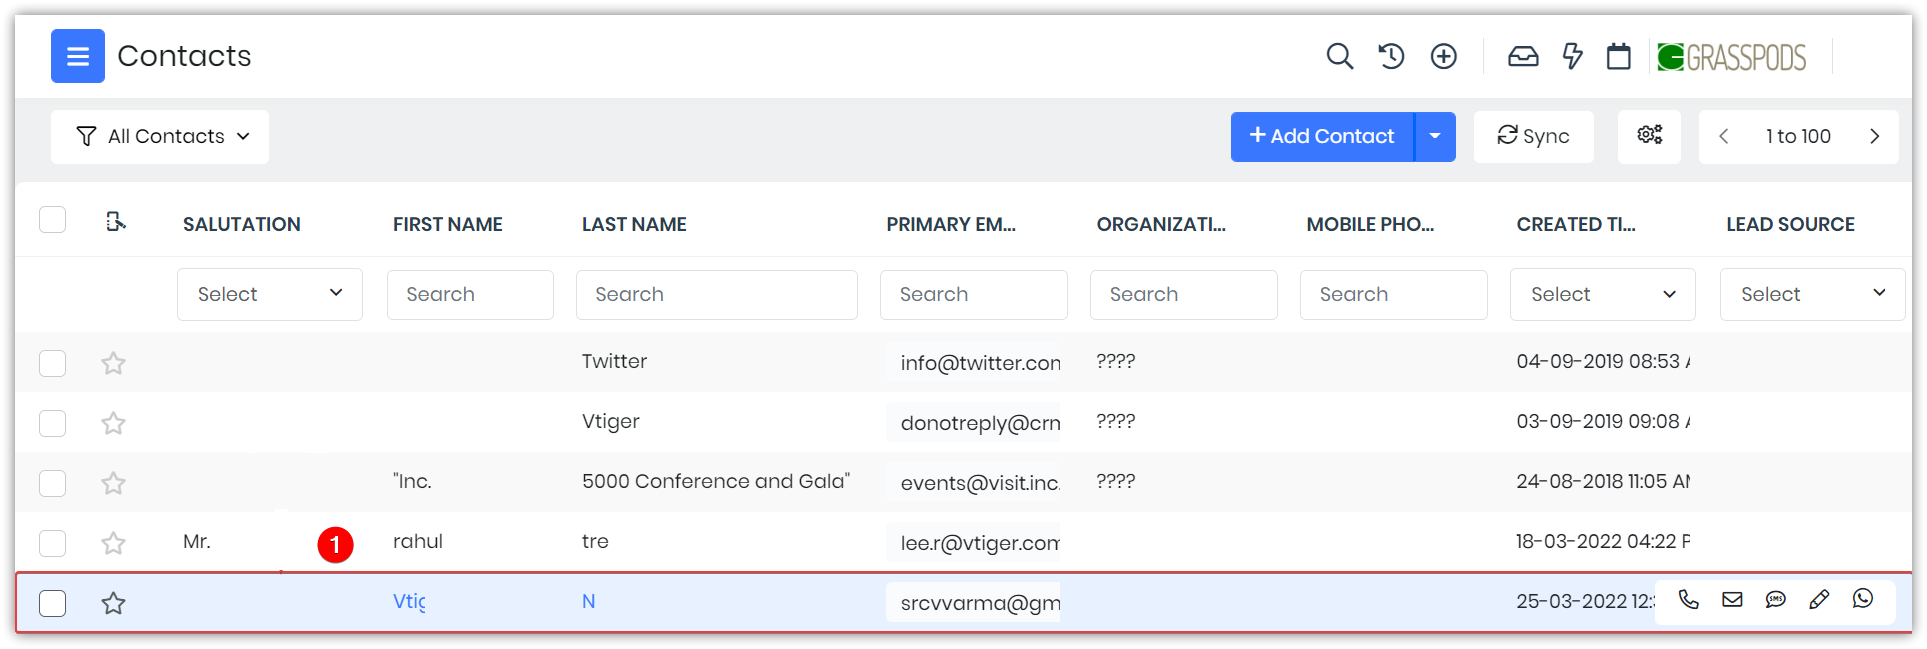
Sending a WhatsApp Message from the List View (of different modules)
Follow these steps to send a WhatsApp message from your CRM.
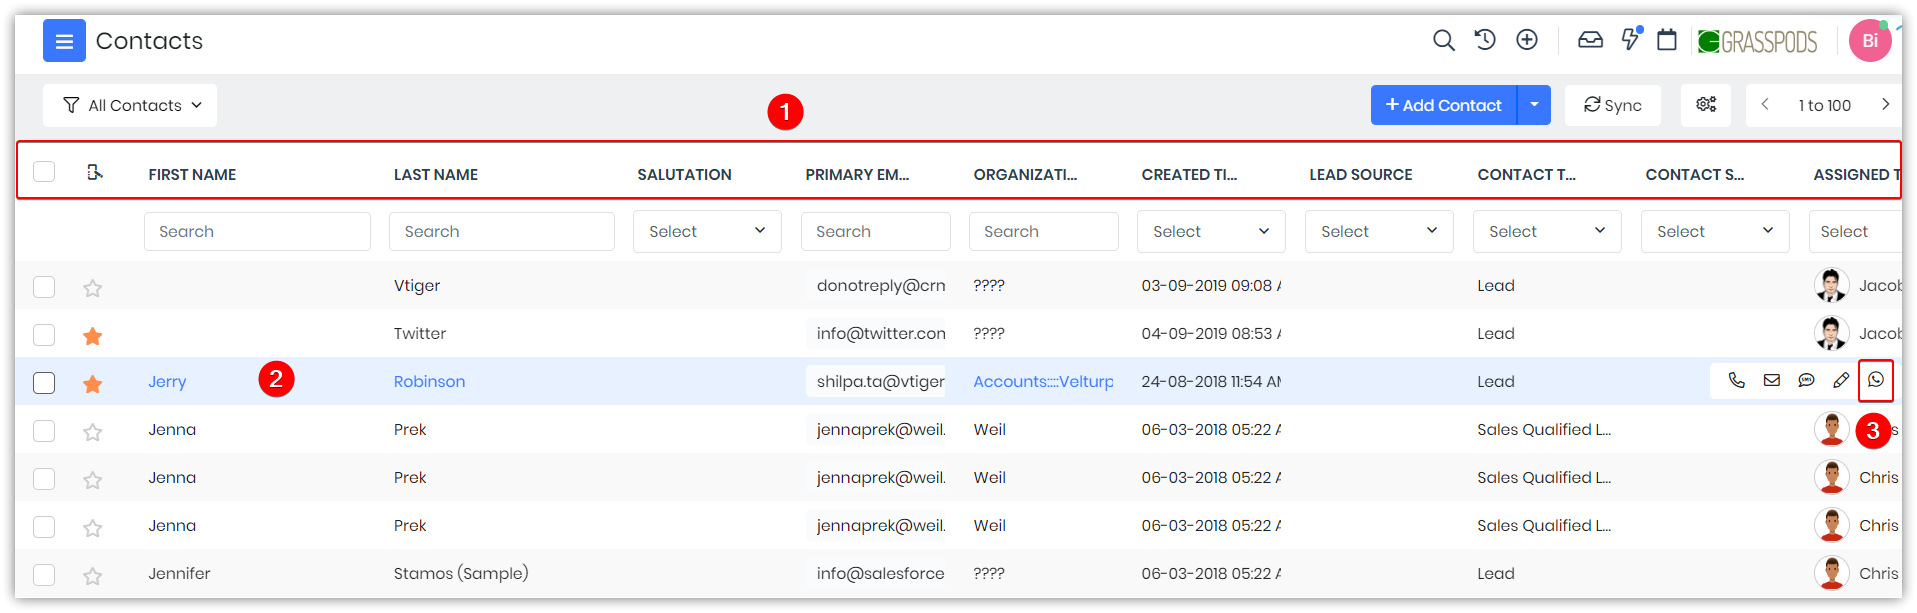
- Go to the List View of a module.
- Hover on the record you want to send a WhatsApp message to.
- Click on the WhatsApp icon that is visible on the extreme right of the screen.
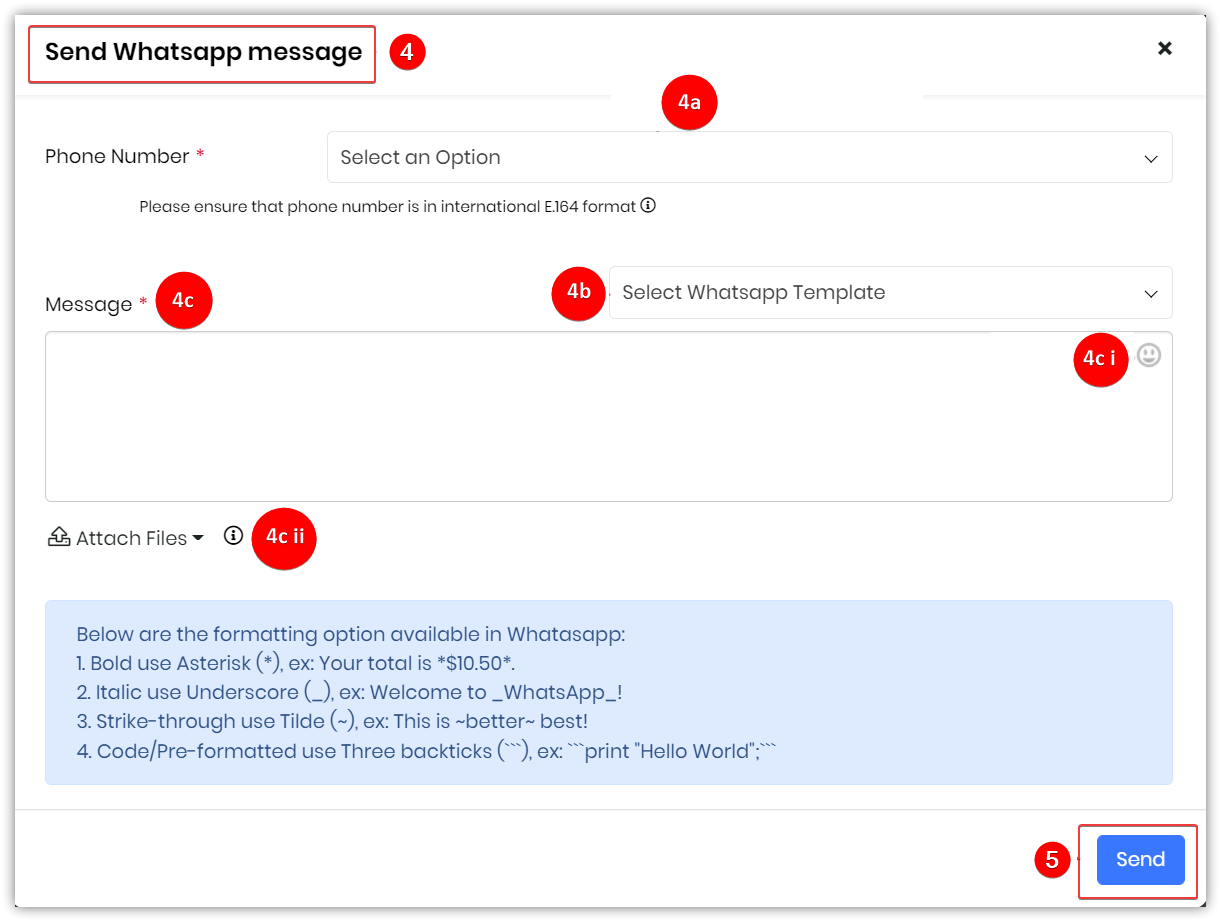
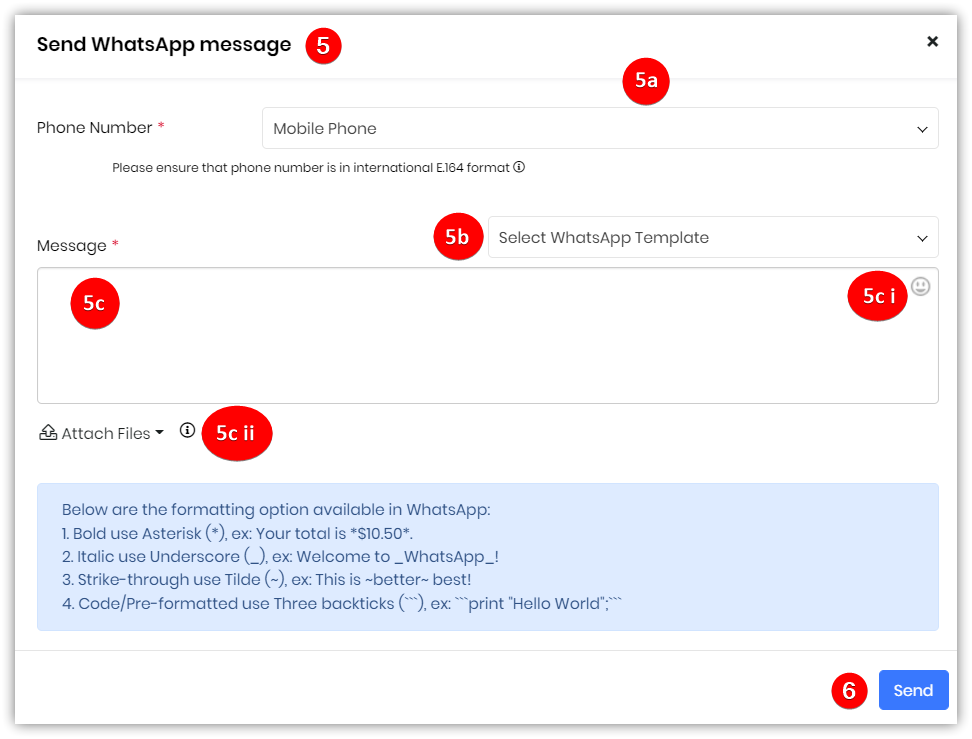
- Enter or select the following in the Send WhatsApp Message window:
- Select WhatsApp Template - Select WhatsApp templates to send messages.
- Phone Number - Select a phone number to send the WhatsApp message
- Note - The number must be a mobile number registered with the service provider installed to receive and send messages.
- Message window - Type your message in this textbox. Don’t forget the following.
- Emoji - Make your message fun. Include emojis in your message by clicking the Emoji icon on the top right corner of the textbox.
- Attach files - Upload documents with your message by clicking the Attach Files link. You can attach only one document of size 16MB.
- Click Send.
Sending A WhatsApp Message From the Summary View of a record
- Click on a record to go to its Summary View.
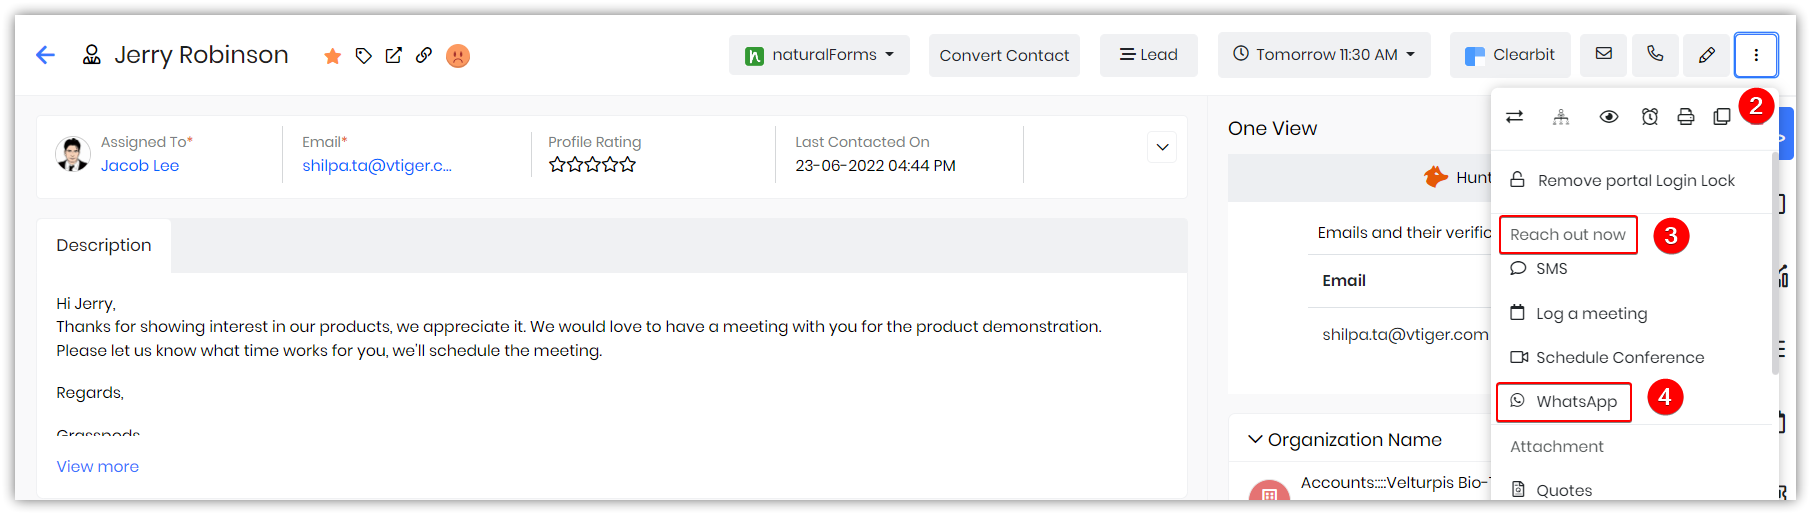
- Click More.
- Under the Reach out now option.
- Click WhatsApp.
- Enter or select the following in the Send WhatsApp Message window:
- Phone Number - Select a phone number to send the WhatsApp message Note: The number has to be a mobile number installed with WhatsApp to receive and send messages.
- Select WhatsApp Template - Select a message template if you want to send a standard message. This is optional.
- Message window - Type your message in the textbox.
ii. Don't forget a document: You can upload documents along with your message by clicking the Attach Files link. You can attach only one document of a maximum size of 16 MB.
Sending a WhatsApp Message from the Related WhatsApp Tab in the Summary View
Follow these steps to send a WhatsApp message from your CRM.- Click on a record to go to its Summary View.
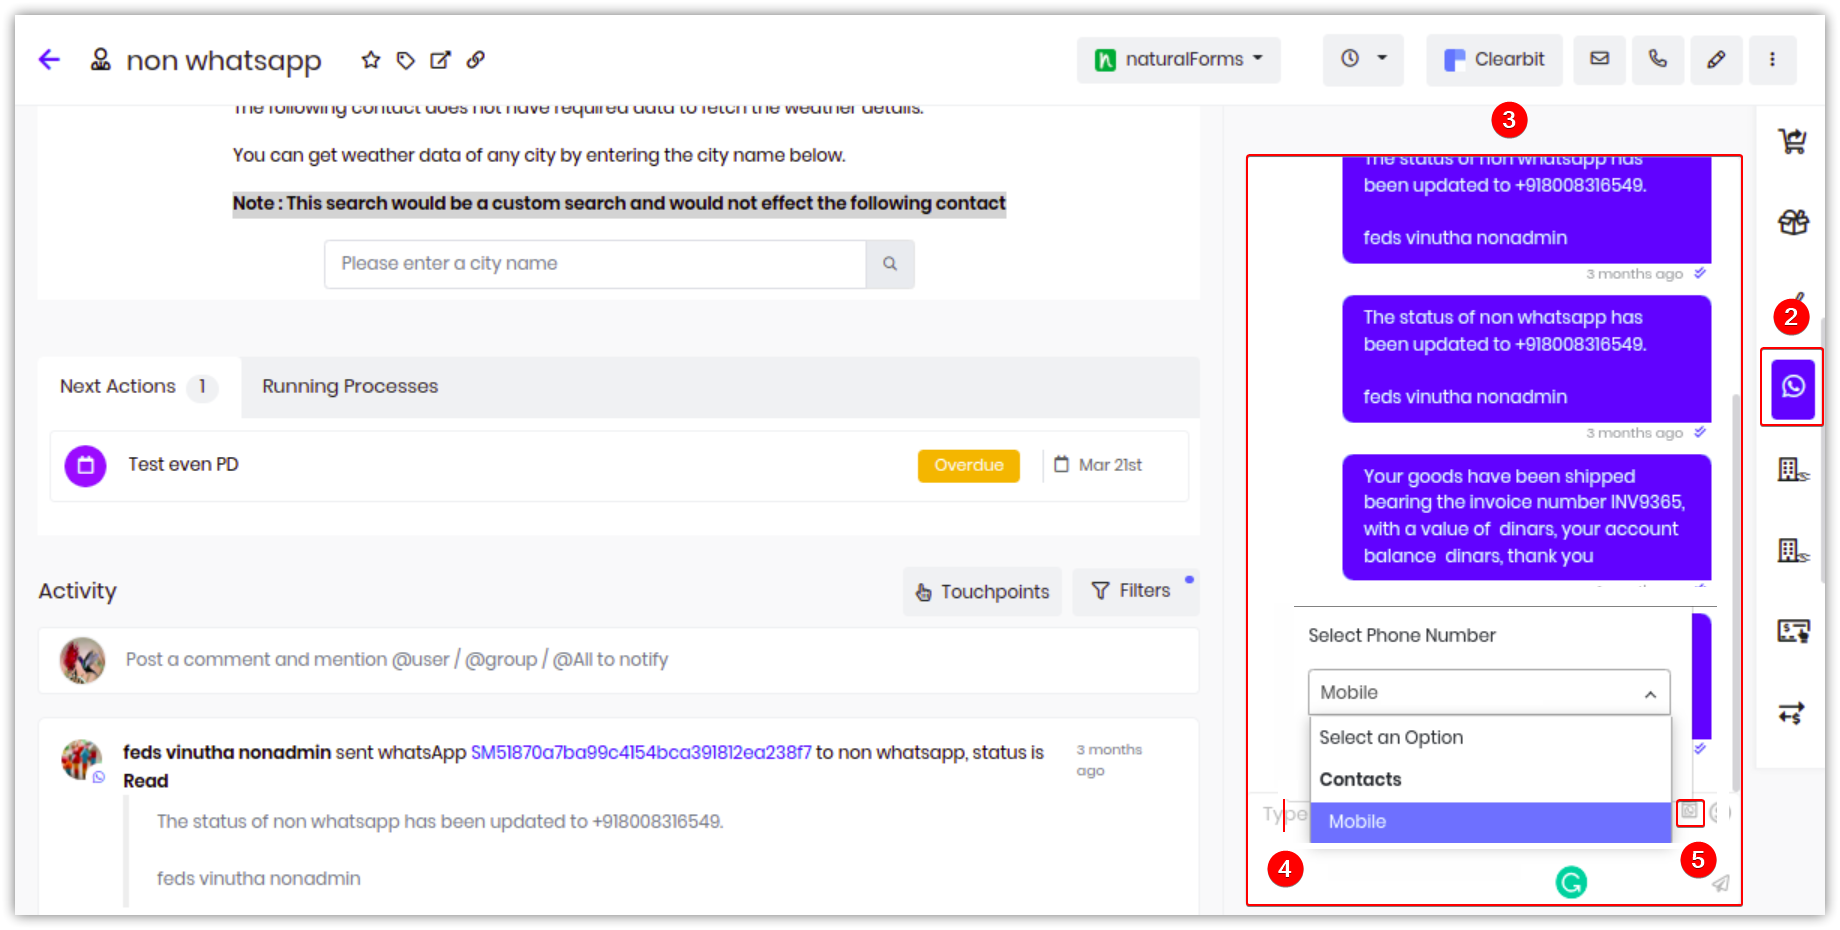
- Select the WhatsApp icon on the Related Tab.
- The Chat/Message conversation box appears.
- You can Type a message in the message section.
- You can use the message templates by clicking on the icon as shown in the screenshot.
Checking the Message Delivery Status of WhatsApp messages
Once you have sent a message on Whatsapp, you can check its status by heading to the Information section. Here, you can view the API Response and Failed Reason. If your message wasn't successfully delivered, the API Response field will display authentication failed. he Failed Reason field will give you more information on why the message was not sent.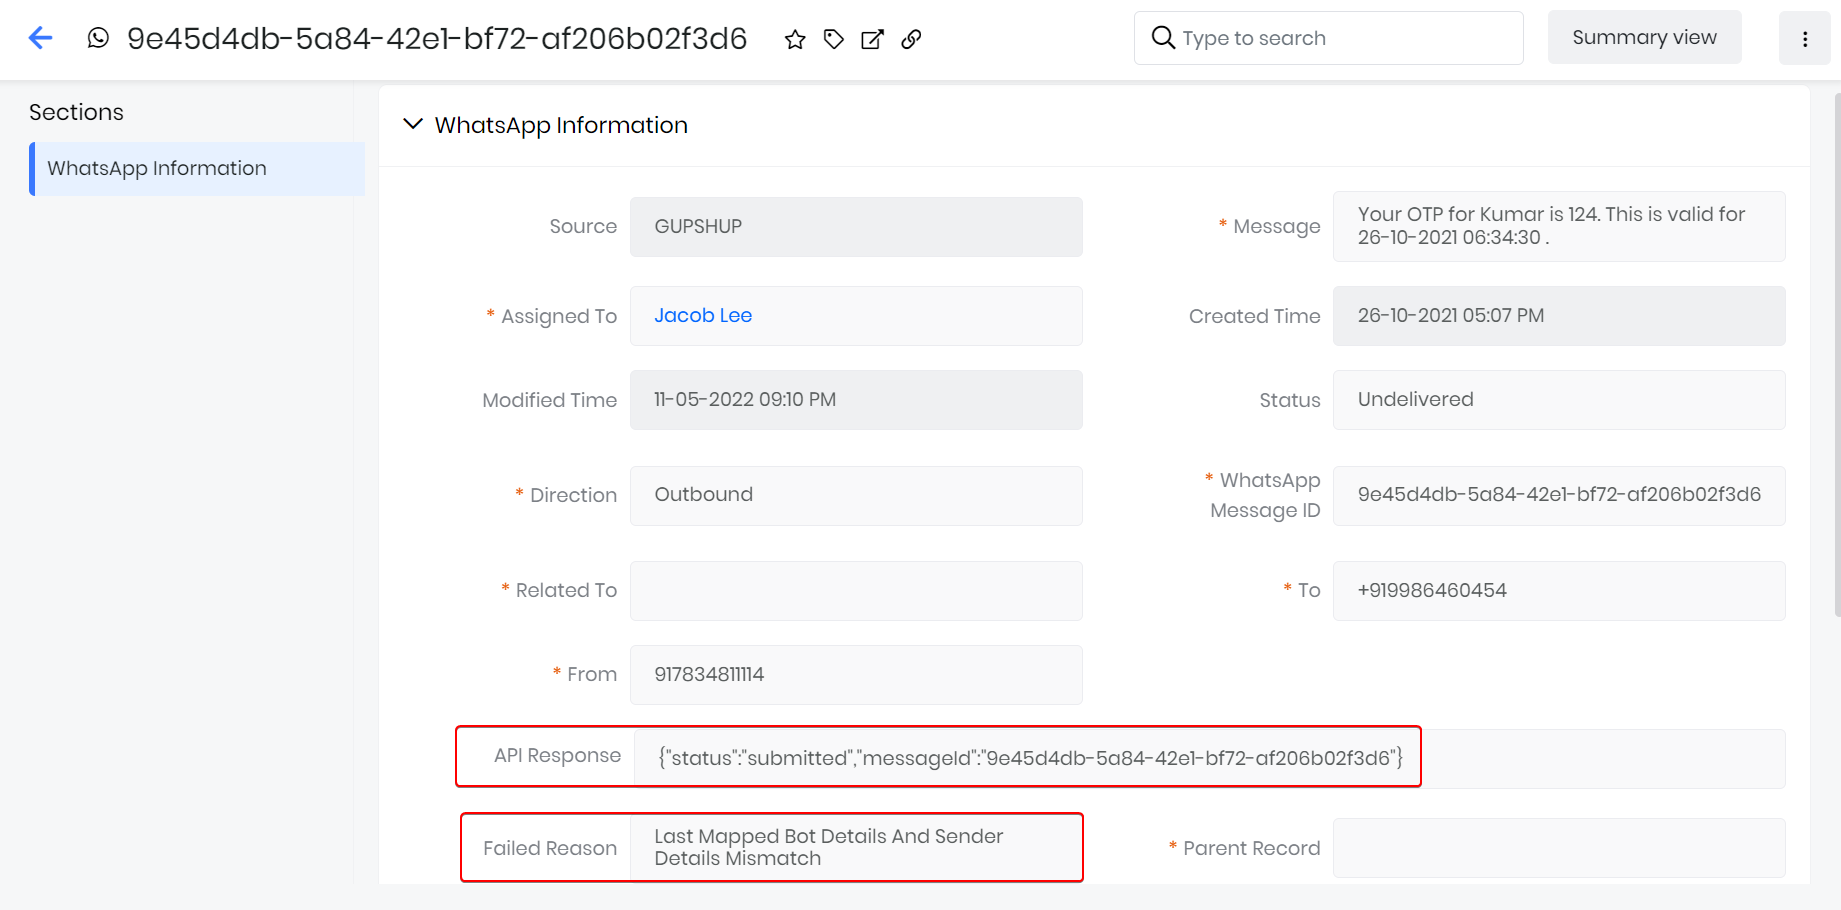
Sending a Print Template with your Message
Consider the following case: Have you ever booked a ticket on a travel or ticketing portal? On booking a ticket, you will have received a confirmation message on your WhatsApp number along with a PDF form of a ticket.Similarly, you can send a document, perhaps an invoice to your customer, with your WhatsApp message.
- To do so, select the Print Template option while sending a WhatsApp message.
- On selecting this option, the CRM generates a PDF document in the Print Template.
- To learn more about Print Templates, click here.
Message Formatting Options
Apart from sending plain text messages, you can also format the content in your WhatsApp messages. Below are the text formatting options available on WhatsApp:- For Bold: Use Asterisk (*). For example, your total is *$10.50* > $10.50
- For Italics: Use Underscore (_). For example, Welcome to _WhatsApp_! > Welcome to WhatsApp!
- For Strike-through: Use Tilde (~). For example, This is ~better~ the best! > This is better than the best!
- For Code or Pre-formatted text: Use three backticks (\`\`\`). For example, \`\`\`print "Hello World";\`\`\` > Hello World.
WhatsApp Module List View
The List View of the WhatsApp module displays the list of all WhatsApp messages that have been sent and received. From the ListView, you can:
- Check sent and received messages.
- Check the status of messages.
- Open individual messages to view details.
The Activity section of individual records displays the details for each record.
WhatsApp Messages Status
WhatsApp messages is visible in the following statuses in the List View:- Sent
- Received
- Sent
- Delivered
- Read
- Queued
- Undelivered
WhatsApp Messages from Workflows
You can now create workflows in the CRM for certain WhatsApp messages. For example, you have sent your maintenance team to service ACs for your customers. The maintenance crew alerts you once a service is completed. You can create a standard template and set up a workflow to send the invoice to customers once a service is completed.
Follow these steps to set up a workflow for a WhatsApp message:
- Go to Settings > Automation > Workflows > (Standard or Multipath) Actions .
- Click Add Action drop-down and select WhatsApp.
To know more about Workflows, click here.
WhatsApp Messages for Approvals
You can also create WhatsApp messages and send approval notifications required for certain processes in the CRM. Approval notifications tell the receiver whether a request submitted was approved or rejected.
For example, if one of your salespersons submitted a Quote with a considerable discount for approval, as a Manager, you can send a WhatsApp message saying the discount was rejected.
To know more about Approvals, click here.
Limitations
- You can type a message to a customer if he has sent you a WhatsApp message in the last 24 hours.
- You can send approved WhatsApp messages outside of 24 hours.
- You cannot send a media file greater than 16MB.
- Currently, you can send only one media file at a time.
- Supported media formats are:
- Images - JPG, JPEG, PNG
- Audio - MP3, OGG, AMR
- Documents - PDF
- Video - MP4 (with H.264 video codec and AAC audio)