Articles in this section
WhatsApp Integration with Ampala
Feature Availability
Vtiger Editions: One Professional | One Enterprise | One AI
Introduction
Ampala is a highly secured messaging platform offering two-way communication and interactive messaging solutions for enterprises. Ampala offers Whatsapp API, Social Media, SEO, website design, and other digital marketing solutions.WhatsApp Integration with Vtiger CRM Via Ampala
Integrating WhatsApp with Vtiger CRM via Ampala lets you send and receive WhatsApp messages to and from your customers directly from the CRM.
WhatsApp Integration with Ampala is available for the following modules:
- Cases
- Contacts
- Deals
- Internal Tickets
- Invoices
- Leads
- Organizations
- Quotes
- Vendors
|
|
How does the integration work
To integrate Ampala with Vtiger CRM, you must first install it from the Vtiger Add-on. Once installed, you must retrieve the API key and License number from Ampala and configure it with Vtiger CRM. Likewise, the Status and Incoming Callback URL has to be copied from Vtiger CRM and pasted in Ampala.
Once it is configured, you must create WhatsApp Templates in Ampala and get them approved by WhatsApp.These approved WhatsApp Templates can then be synced with Vtiger CRM for use.
Note: Only the approved WhatsApp templates can be used for messaging.
To integrate WhatsApp and use it with Vtiger CRM through Ampala:
- You must have a business account with Ampala.
- Your business account with Ampala should be Active.
- You must install the Ampala WhatsApp Add-on in Vtiger CRM.
- Templates
Benefits of Using WhatsApp Integration with Ampala
- Helps you reduce incoming calls and e-mail volumes by efficiently assisting over chat platforms.
- Enhances customer relationships by allowing personalized messages that build trust and affinity.
- Helps you to serve and engage with a wide range of customers simultaneously.
- Reduces development dependencies, making way for easy-to-setup API’s and messaging campaigns.
In this article, you will learn about:
- Installing Ampala
- Configuring WhatsApp with Ampala for Vtiger CRM
- Sending WhatsApp messages from Vtiger CRM
- Using Ampala Templates with Vtiger CRM
Installing Ampala
To use WhatsApp Integration with Ampala, you need to first install the Ampala Add-on from the Add-ons page since the Ampala Add-on is not available by default in the CRM.
Follow these steps to install the Ampala Add-on:
- Log into your CRM account.
- Click the User Profile on the top right.
- Click Settings.
- Go to Extensions.
- Click Add-ons.
- Look for Ampala.
- Click Install. Are you sure you want to install this Add-on? message appears.
- Click Yes.
A success message will be displayed. You have now installed the Ampala Add-on. You need to add Ampala as the service provider for WhatsApp.
Once you have installed the Ampala Add-on, you will find it in the WhatsApp module under the configuration provider drop-down.Configuring WhatsApp and Ampala with Vtiger CRM
Let us now learn how to configure WhatsApp with Ampala for Vtiger CRM.
This process involves to-and-fro navigation between Vtiger CRM, Ampala, and WhatsApp screens.
Note: Open your Vtiger CRM, Ampala, and WhatsApp screens in different browser tabs or windows.
It involves the following steps:
- Step 1: Integrating WhatsApp with Ampala in Vtiger CRM
- Step 2: Retrieving API Key and License number from Ampala
Step 1: Integrating WhatsApp with Ampala in Vtiger CRM
Follow the below steps to integrate WhatsApp with Ampala:
- Log in to your CRM account.
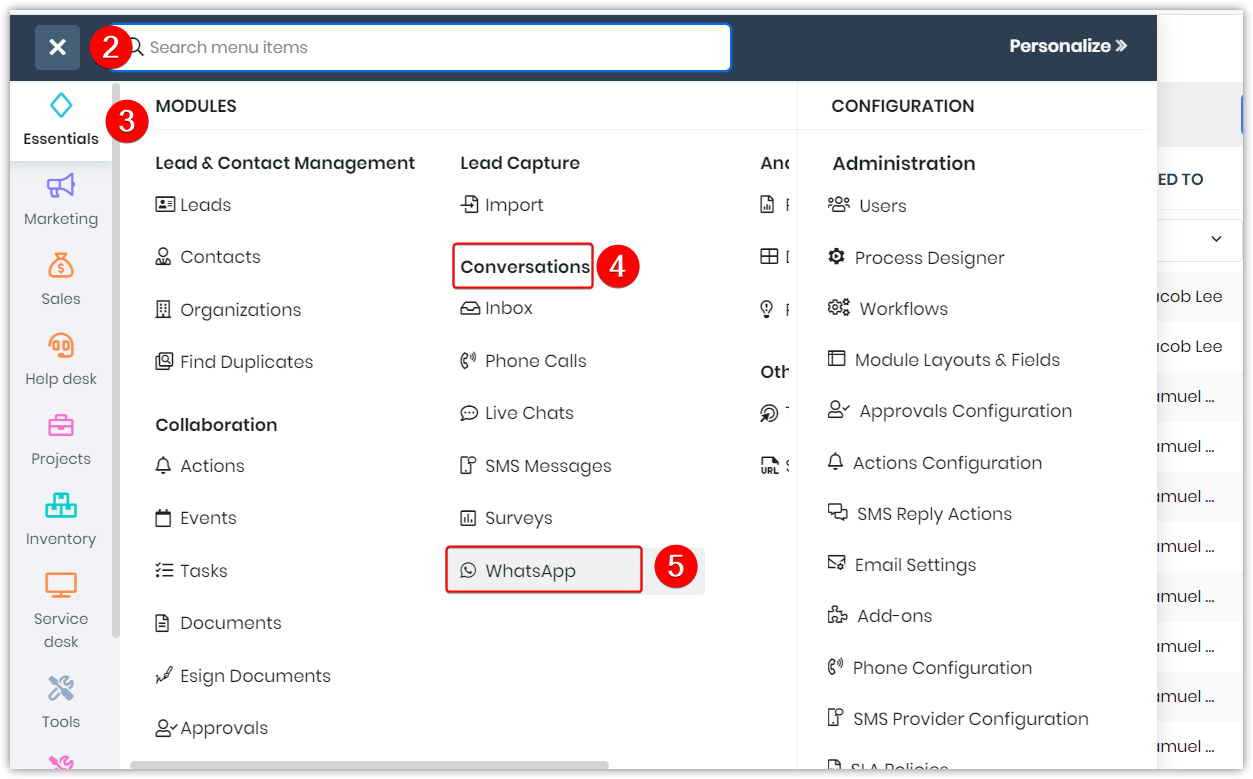
- Click the User Menu.
- Click Essentials.
- Look for Conversations.
- Click WhatsApp.
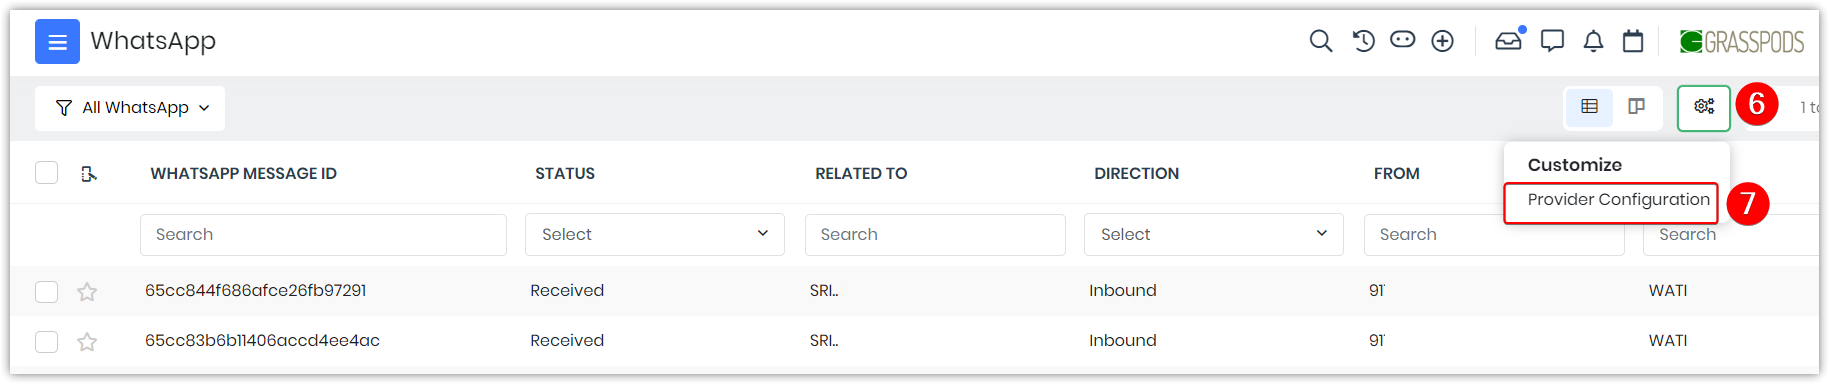
- Click the Settings icon.
- Select Provide Configuration.
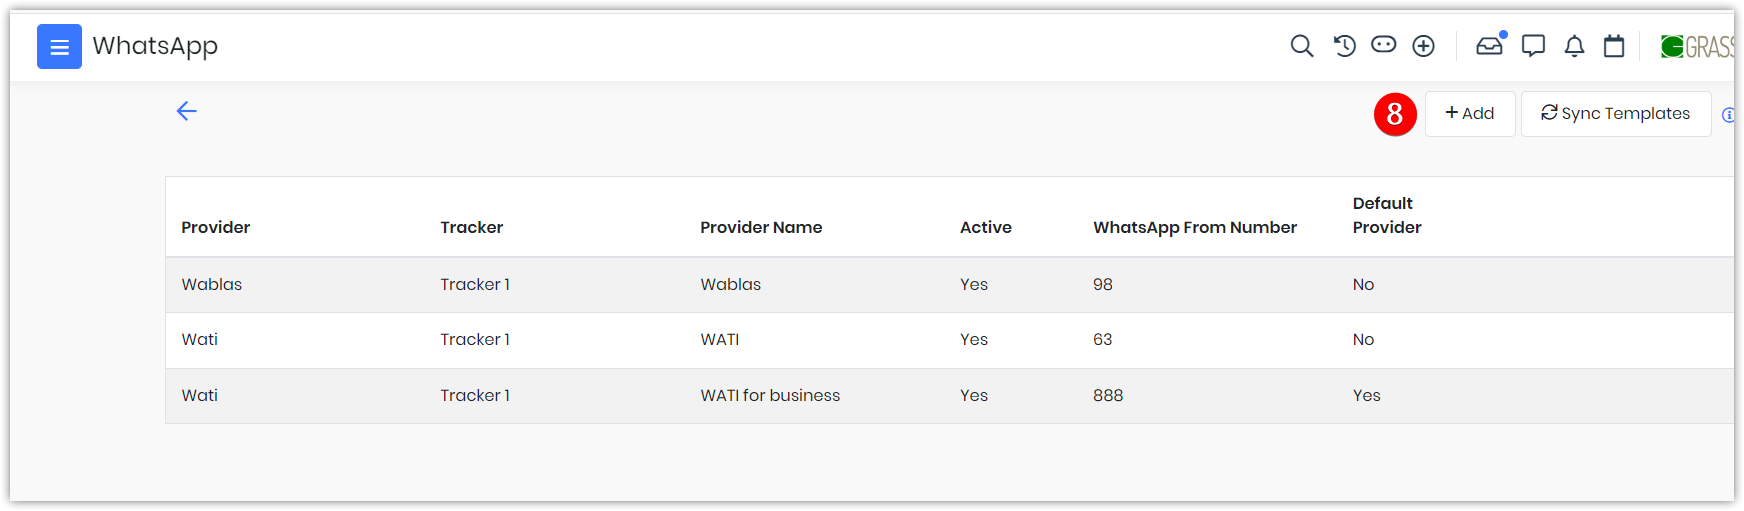
- Click +Add. The Add Configuration screen opens.
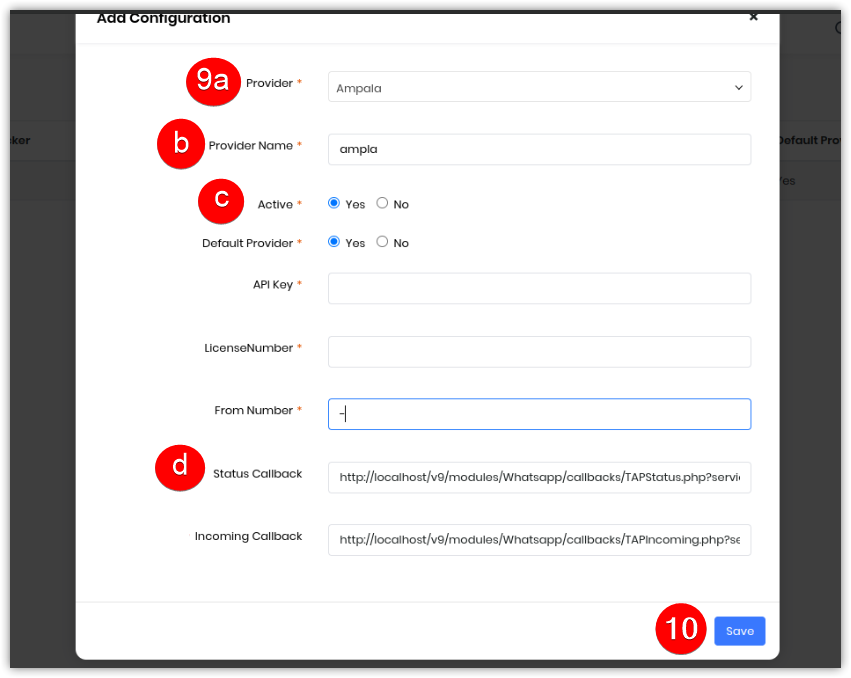
- Enter or select the following information:
- Provider: Choose the Provider as Ampala.
- Provider Name: Type the Provider Name.
- Active: Select Active input as Yes.
- Status Callback: Copy the Status Callback URLs (to a Notepad or a document).
- Click Save.
Step 2: Retrieving API Key, License Number from Ampala
On the Ampala screen, you can retrieve the API Key and License Number.
Note: Keep your Ampala login credentials with you before you begin.
Follow these steps to retrieve the API Key and License number:
- Log in to your Ampala account. (https://login.ampala.in)
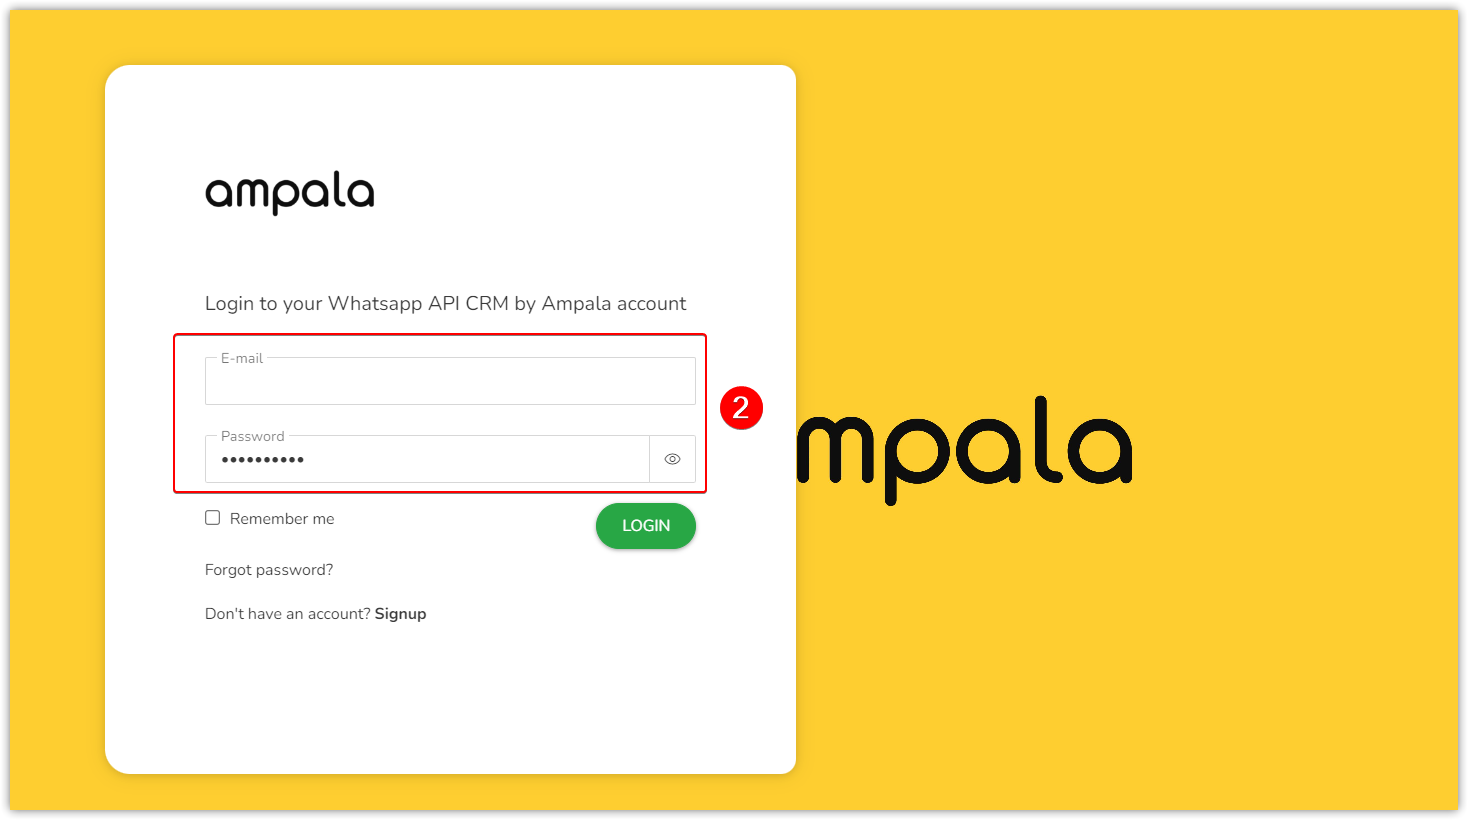
- Enter your Username and Password. The Dashboard opens.
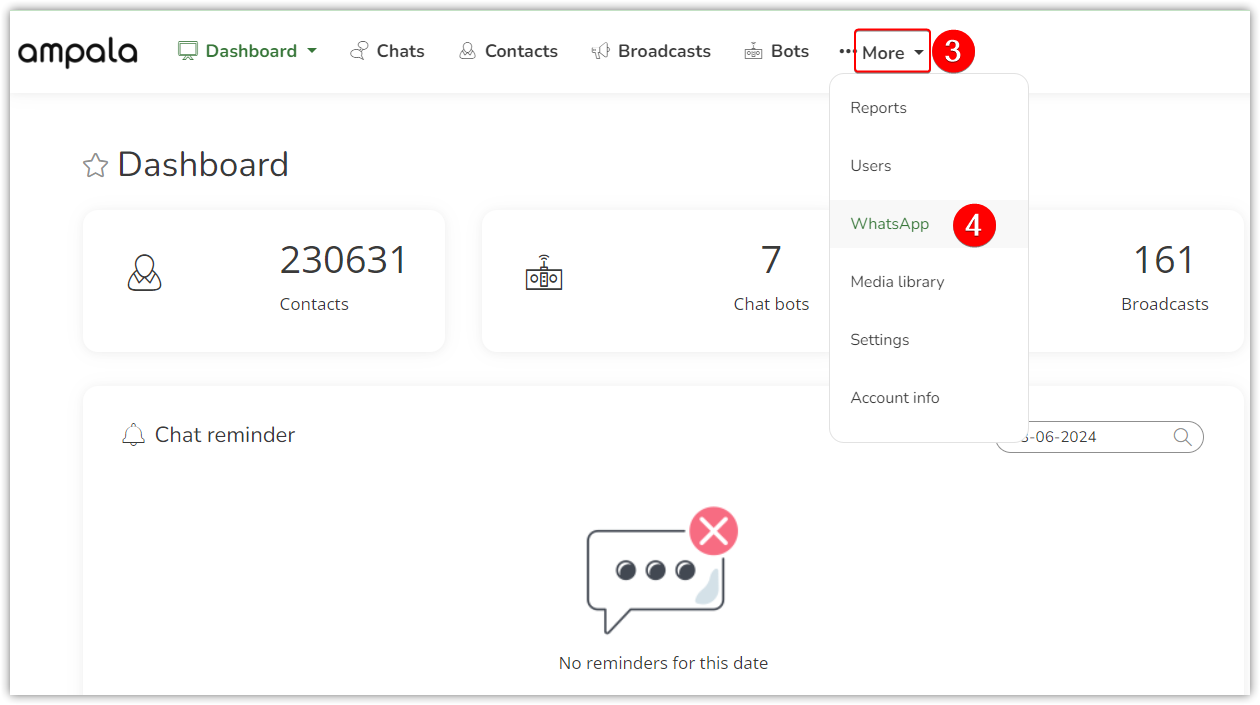
- Click More.
- Click WhatsApp. An API setup page opens.
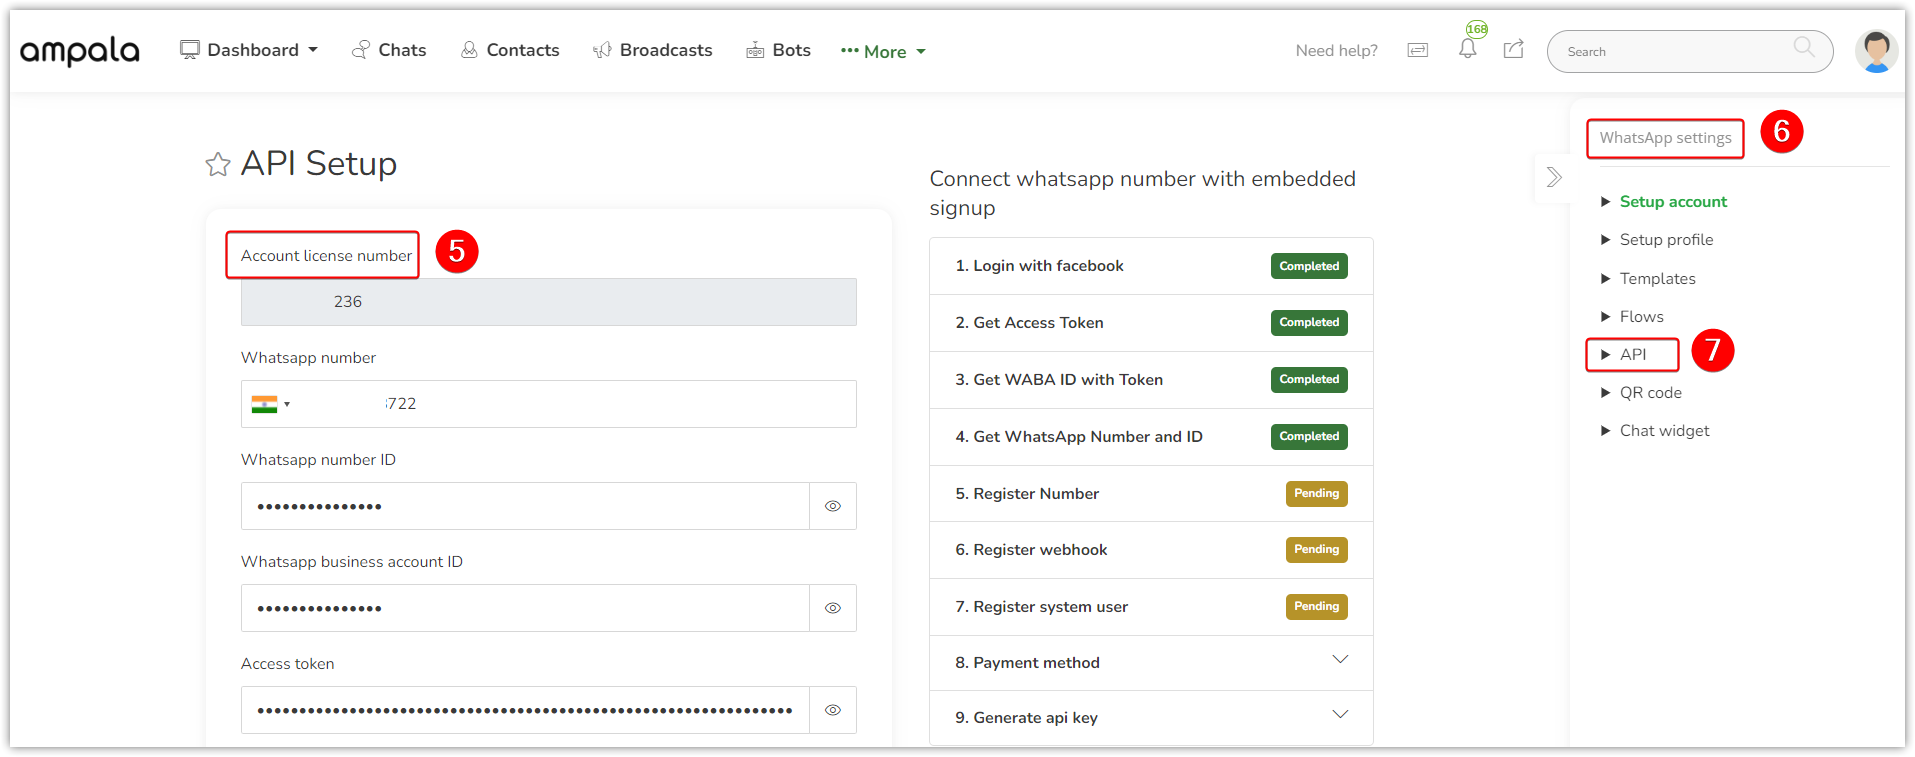
- Copy the Account license number and paste it into a Notepad.
- Go to WhatsApp Settings on the right side of the screen.
- Go to API. The API Documentation window opens.
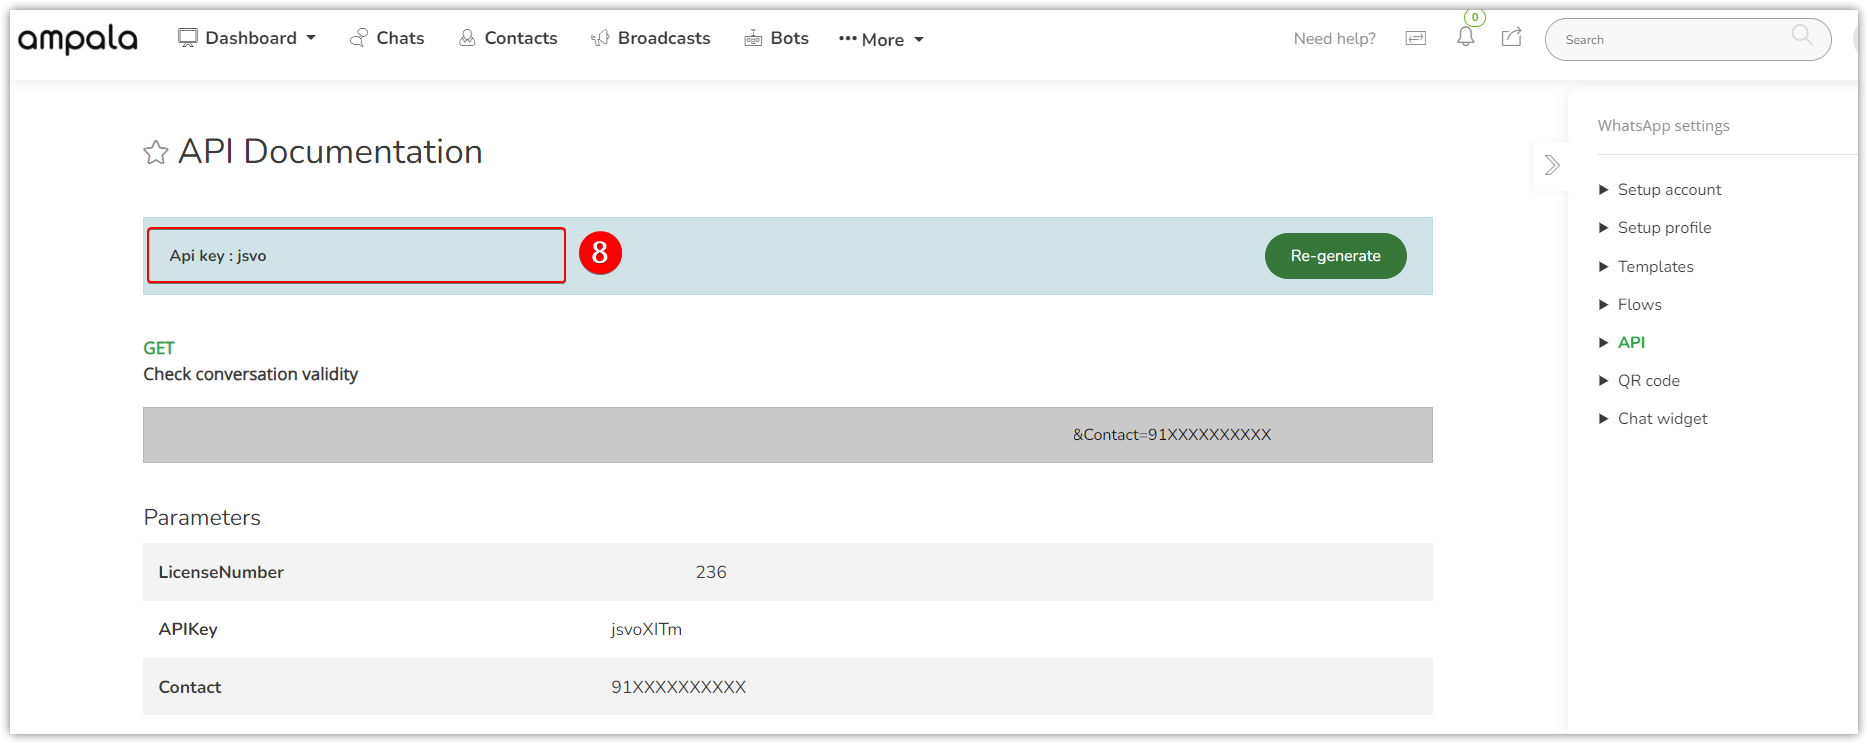
- Copy the API key and paste it to a notepad.
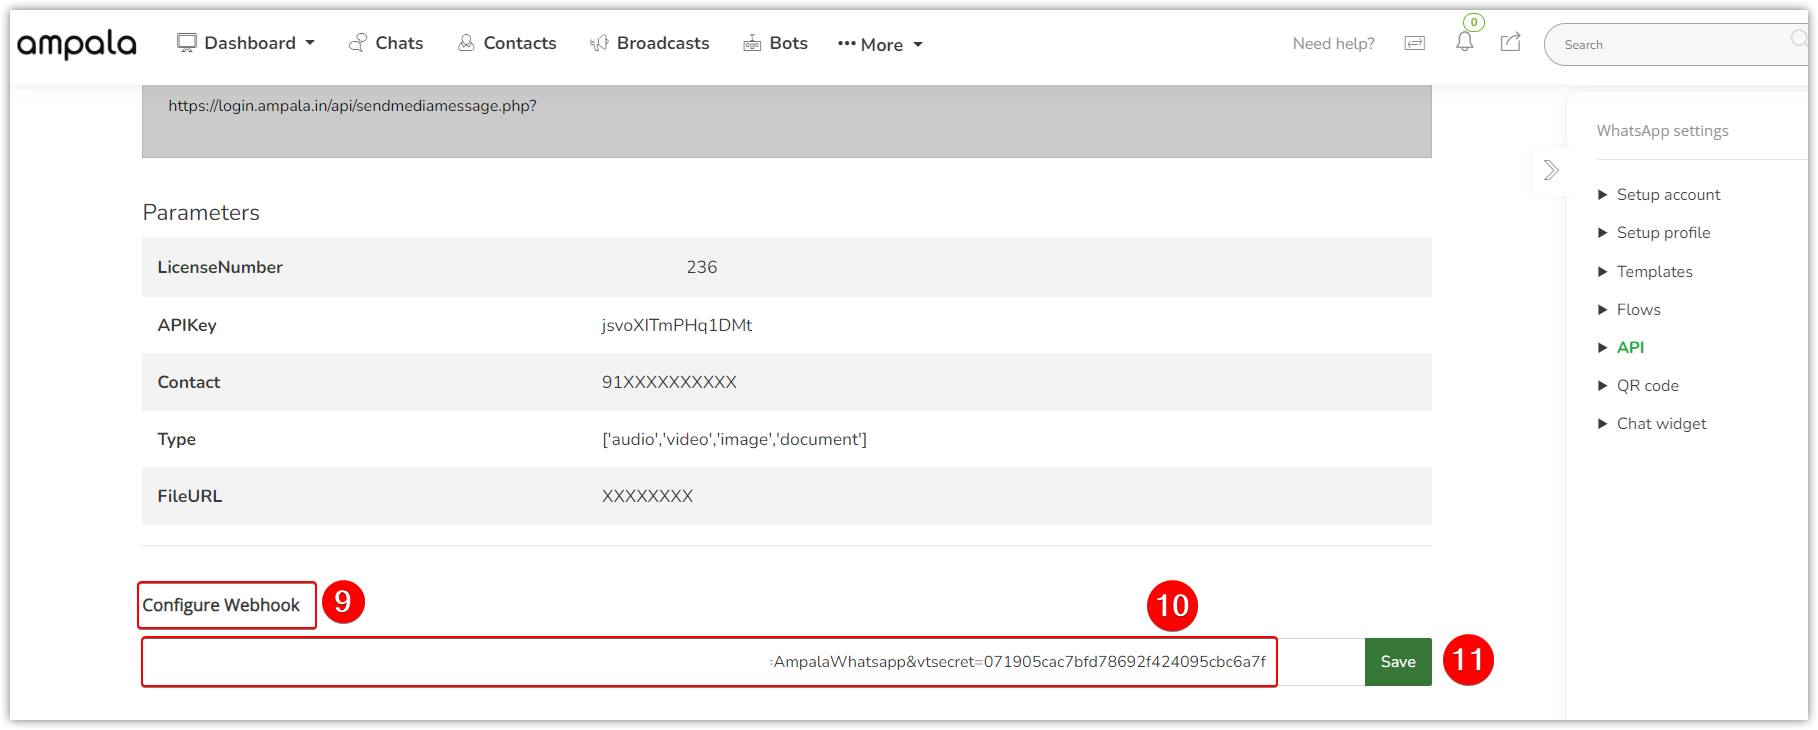
- Go to the Configure Webhook section.
- Paste the Status Callback URL from Step 1.
- Click Save.
Navigate back to Vtiger CRM for the next step
Follow the below steps after the 8th step in Step 1.
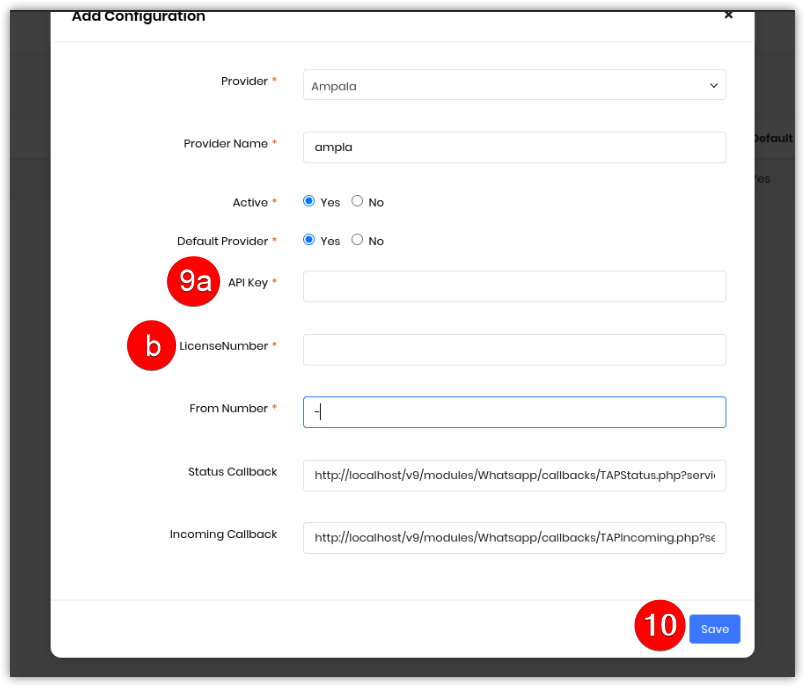
- Enter or select the following information:
- API Key: Paste the API key retrieved from Ampala
- License Number: Paste the License Number retrieved from Ampla
- Click Save.
Once configured, you will find it in the WhatsApp List view.
Sending WhatsApp Messages from Vtiger CRM
You can send WhatsApp messages from:
- All the modules where the WhatsApp Integration feature is available.
- Cases
- Contacts
- Deals
- Internal Tickets
- Invoices
- Leads
- Organizations
- Quotes
- Vendors
- From the List View as well as the Summary View of records.
Let us see how.
Sending WhatsApp messages from the List View
Here, for instance, let us consider the Contacts module.
Follow these steps to send WhatsApp messages via Ampala:
- Log in to your CRM account.
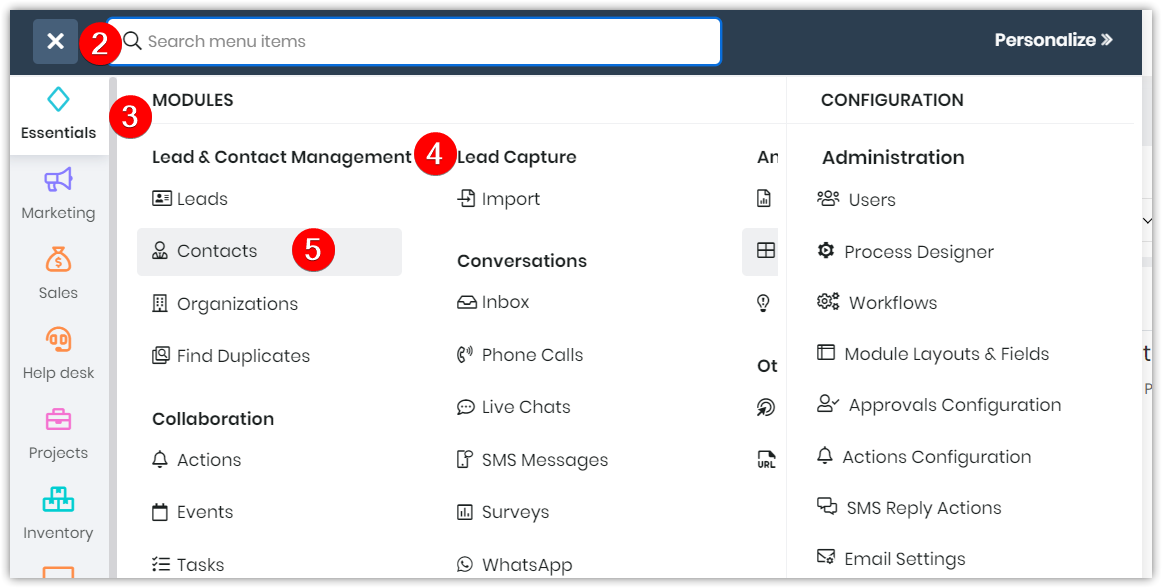
- Click the Main Menu.
- Click Essentials.
- Look for Lead & Contact Management.
- Click Contacts.

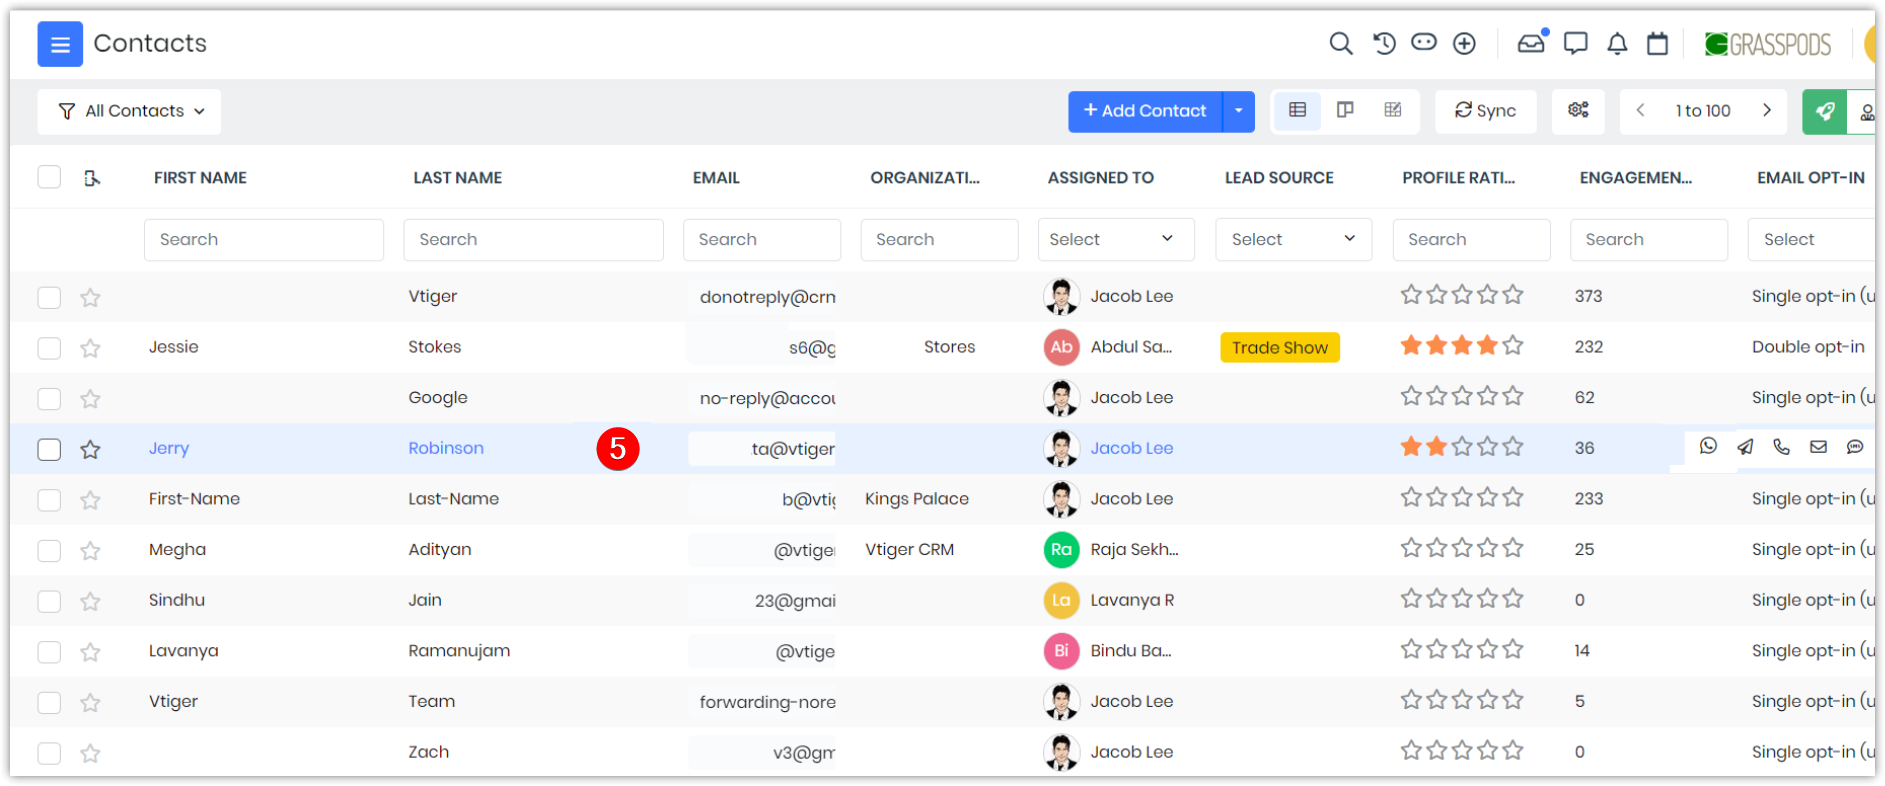
- Hover the mouse on a Contact record to whom you want to send the message to.
- Click WhatsApp from the options that are displayed. The Send WhatsApp Message window pops up.
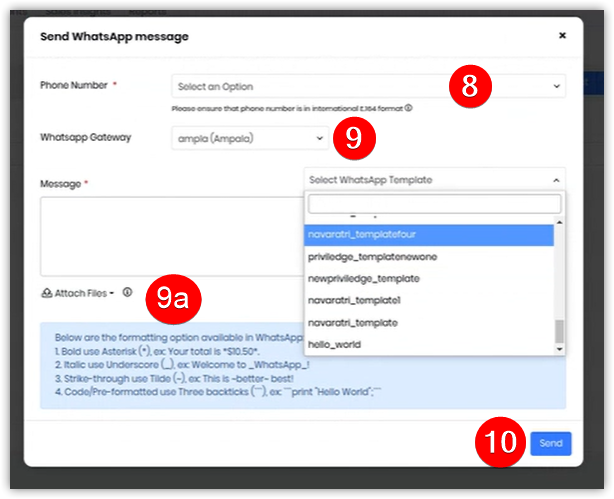
- Choose the appropriate Phone Number.
- Select the required WhatsApp Template
- Attach files if needed
Note: Approved WhatsApp templates saved in Marketing > Marketing Enablement > WhatsApp Template module are displayed here. To learn about WhatsApp Templates, click here.
- Click Send.
You have now sent a WhatsApp message to the selected customer.
Sending WhatsApp messages from a record Summary View
You can send WhatsApp messages via record Summary View only after the customer responds. You can use this section to reply and continue the WhatsApp conversations.
Follow these steps to continue WhatsApp conversations from the record Summary View.
- Log in to your CRM account.
- Click the Main Menu.
- Click Essentials.
- Click Contacts. The Contacts' module List View opens.
- Click the record of the contact to whom you want to reply.

- Click More.
- Click WhatsApp. The WhatsApp window opens.
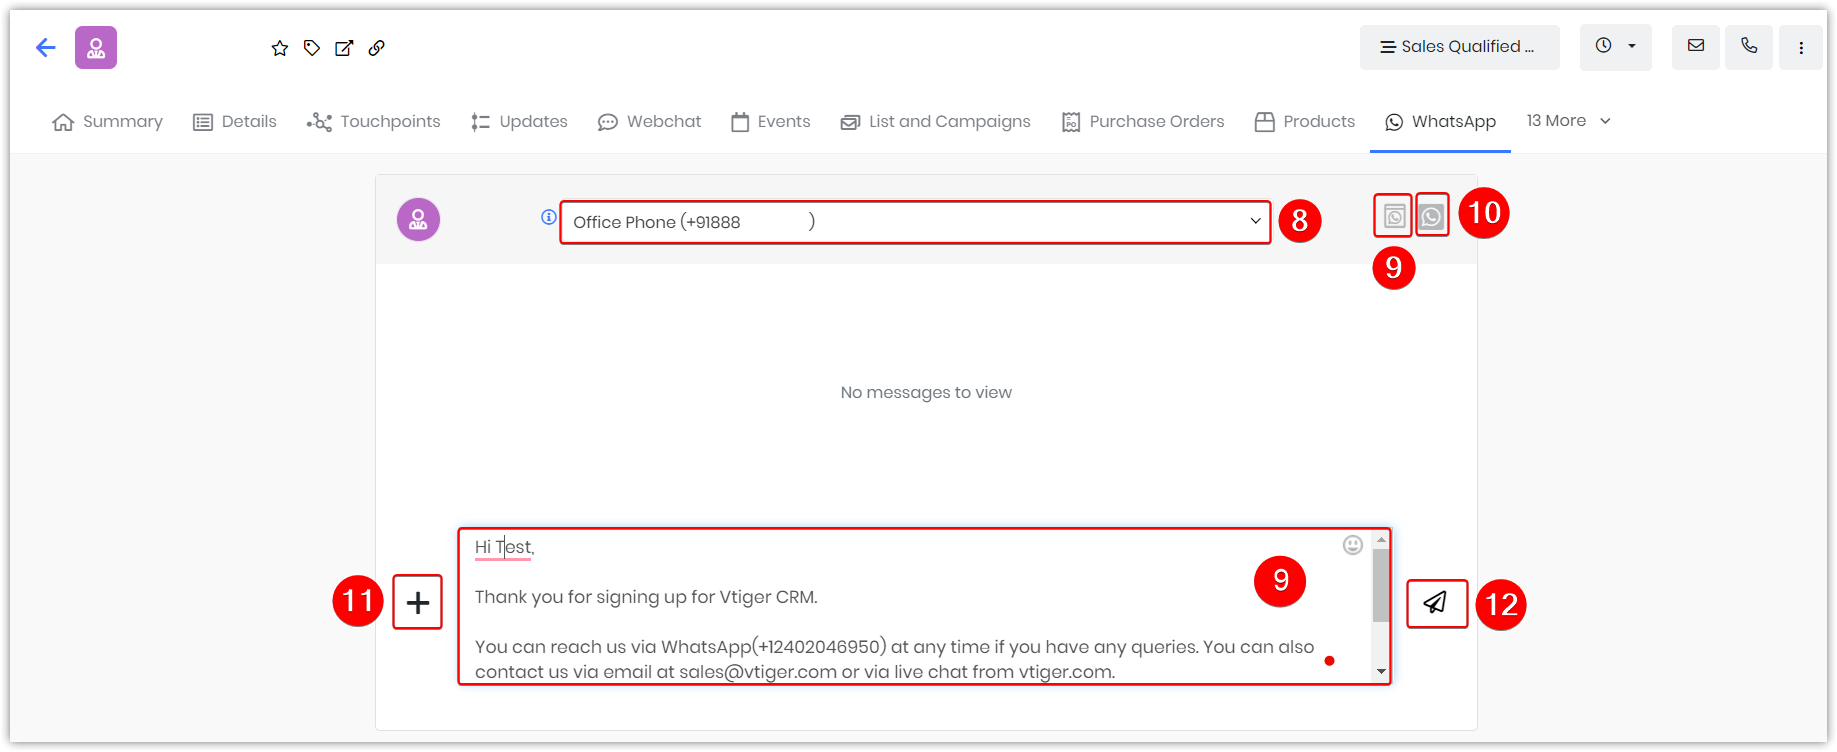
- Select the number from the drop-down.
- Select the WhatsApp Template from the drop-down. The template message gets auto-filled in the Text field.
- Select the WhatsApp Gateway from the drop-down.
- Click + sign on the left of the text box to Attach Files. A window opens for you to select the files.
- Select the file.
- Click Open. Your file will be attached to the message.
- Click Send.
Displaying WhatsApp - Ampala Records
You can view records in the List View and details of each record in its Summary and Details Views.
Displaying WhatsApp - Ampala Records List View
You can view all WhatsApp records in the WhatsApp module List View.
- Log in to the CRM.
- Go to Essentials.
- Go to Conversations.
- Click WhatsApp. The WhatsApp module opens.
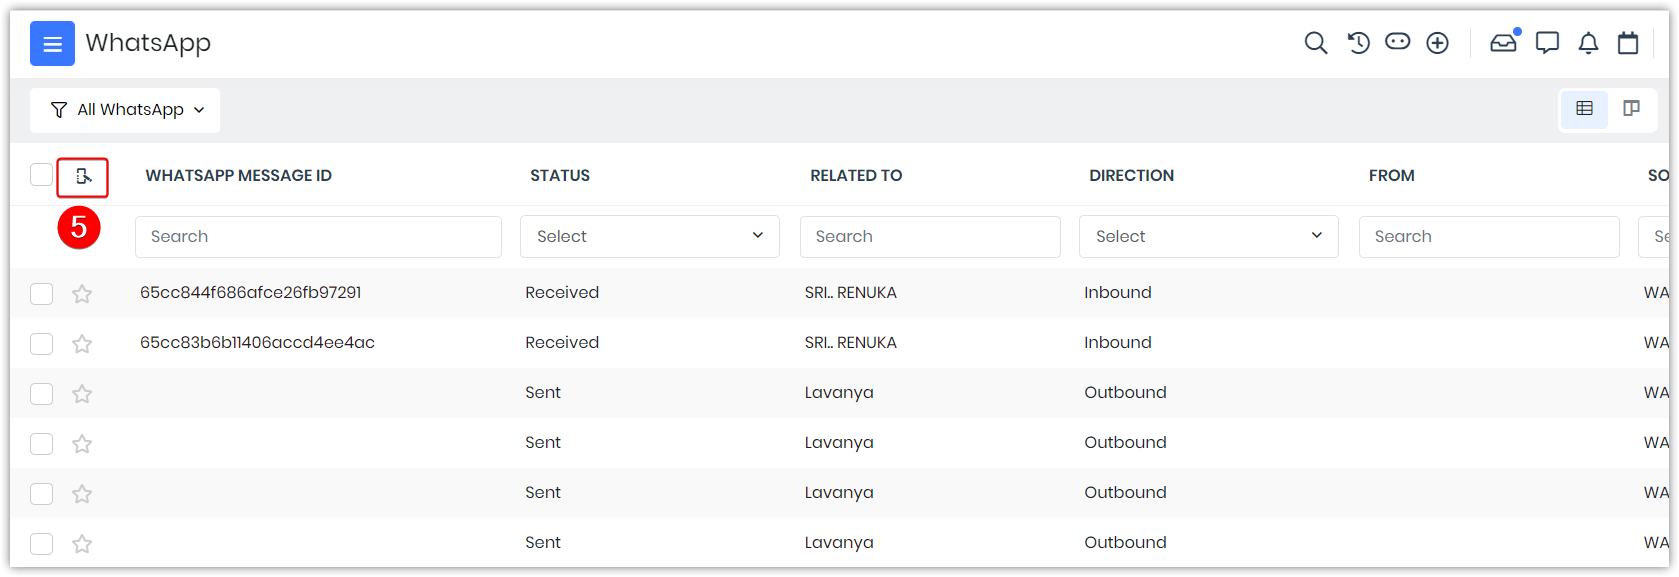
- Click the Manage Columns icon. A Configure Columns - All windows open.
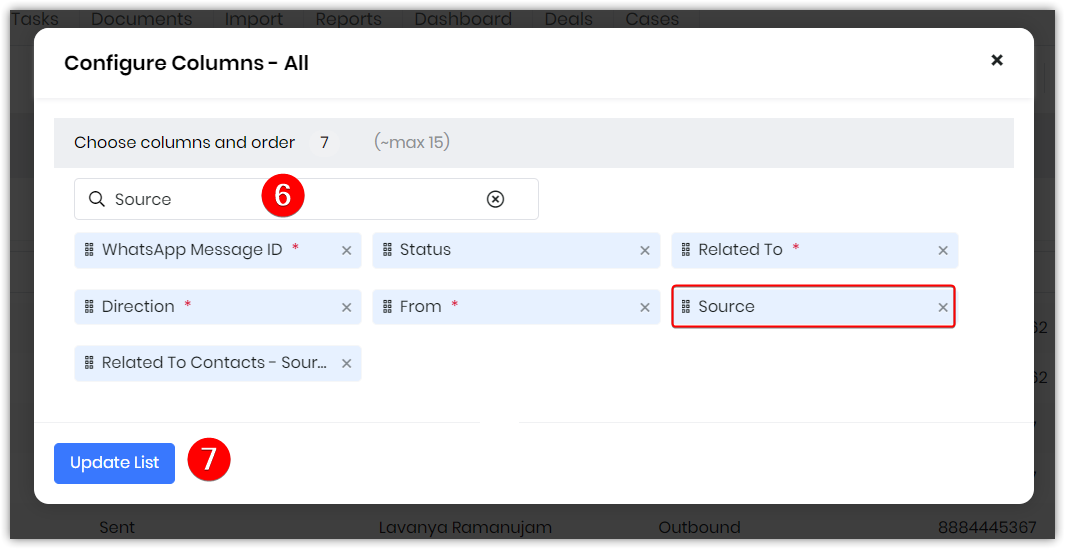
- Type Source in the Search Fields.
- Click Update List.

- Select Ampala in the Source field to view WhatsApp records with Ampala as the service provider. The screen displays all records related to Ampala.
Displaying WhatsApp - Ampala Records Summary View
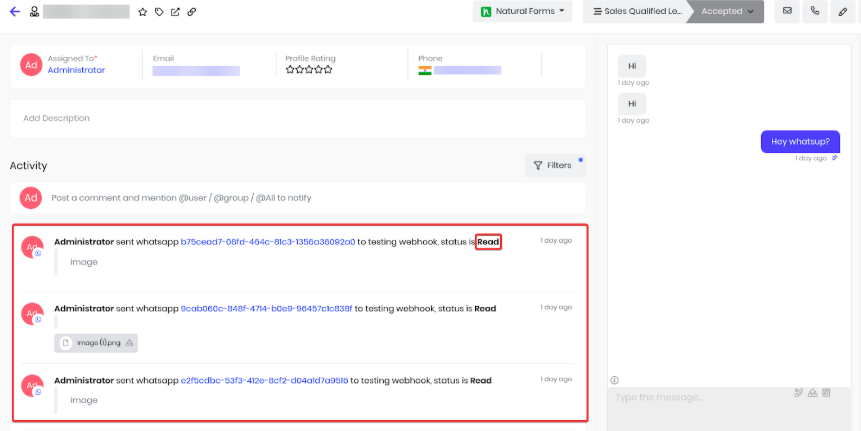
In the Summary View of the contact record, you can view WhatsApp messages between Vtiger CRM and customers.
The Summary View of an Ampala WhatsApp record looks like the image shown above displaying messages sent and received.
The Activity section displays WhatsApp messages and delivery statuses such as Delivered, Failed, and Read.
Displaying WhatsApp - Ampala Records Details View
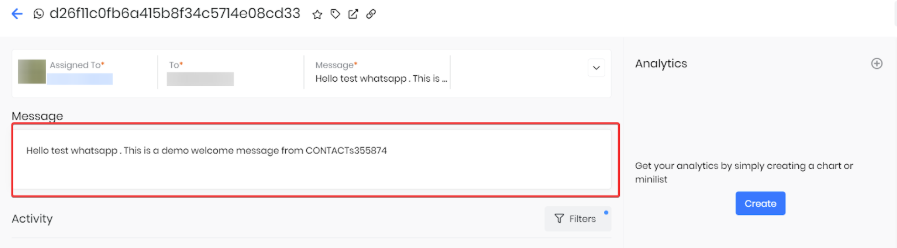
You can see the message in the Details View. You can also view any conversations in the Activity section.
Using Ampala - WhatsApp Templates with Vtiger CRM
When you use Ampala as your WhatsApp service provider, you can send messages only with Ampala WhatsApp Templates. These templates have to be approved by WhatsApp.
Creating WhatsApp Templates in Ampala
Follow the below steps to create Ampala WhatsApp Templates on Vtiger CRM:
- Log in to your Ampala account. The Dashboard page appears.
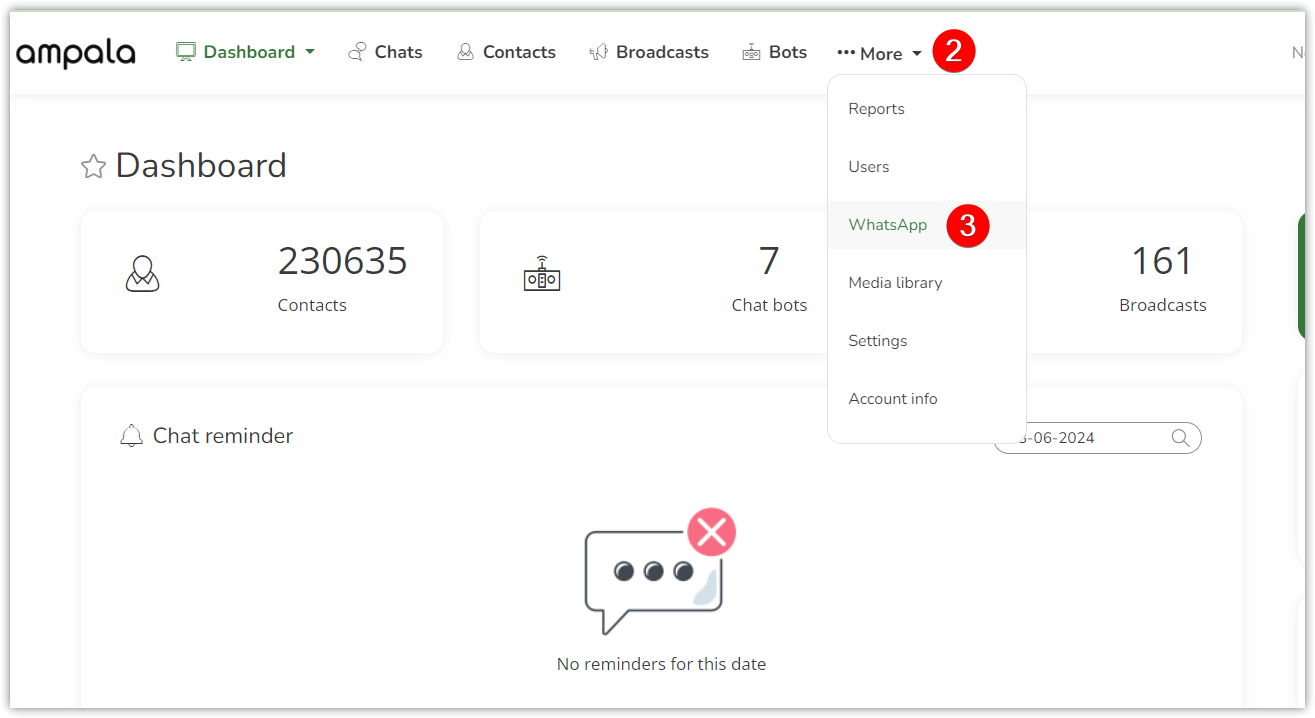
- Click More.
- Click WhatsApp.
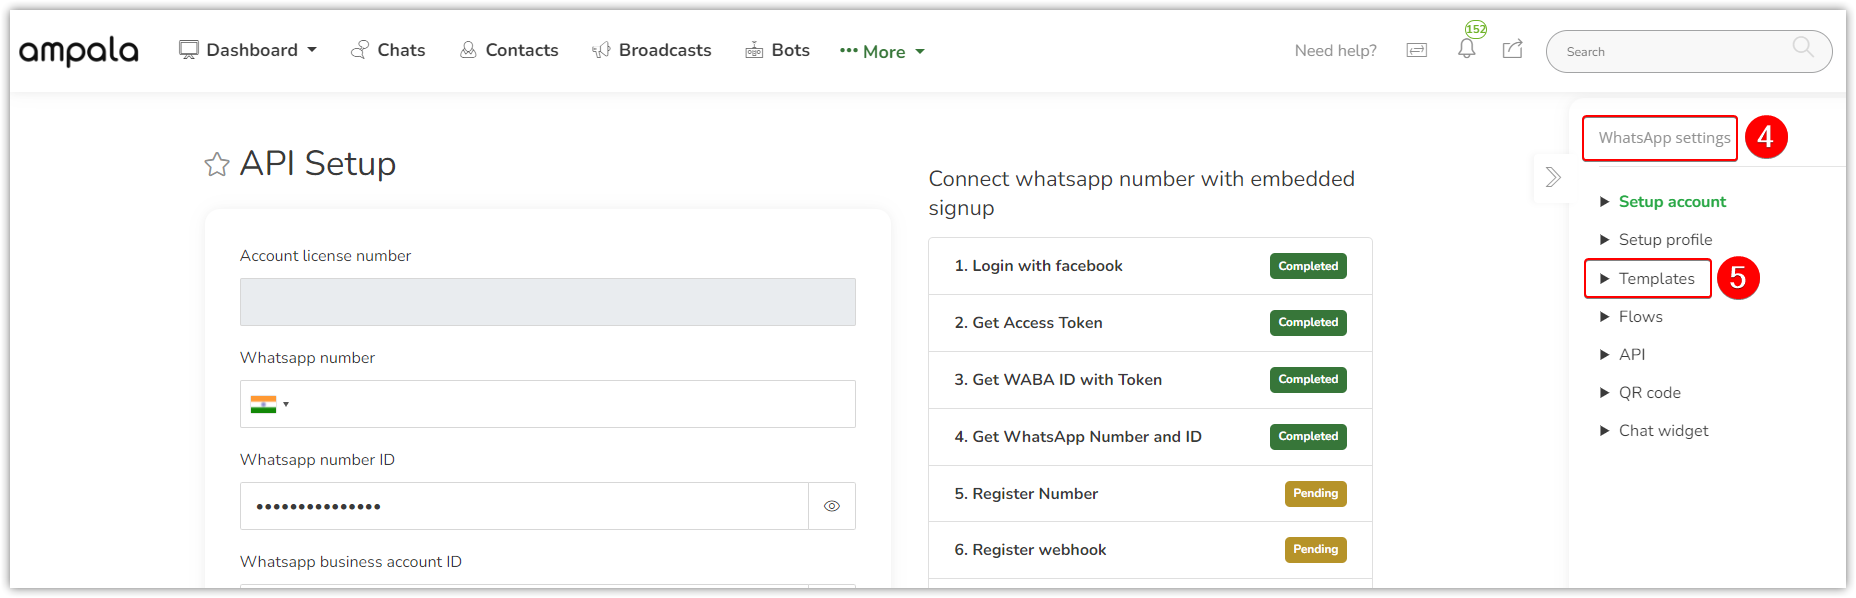
- Go to WhatsApp Settings on the right side.
- Click Templates.
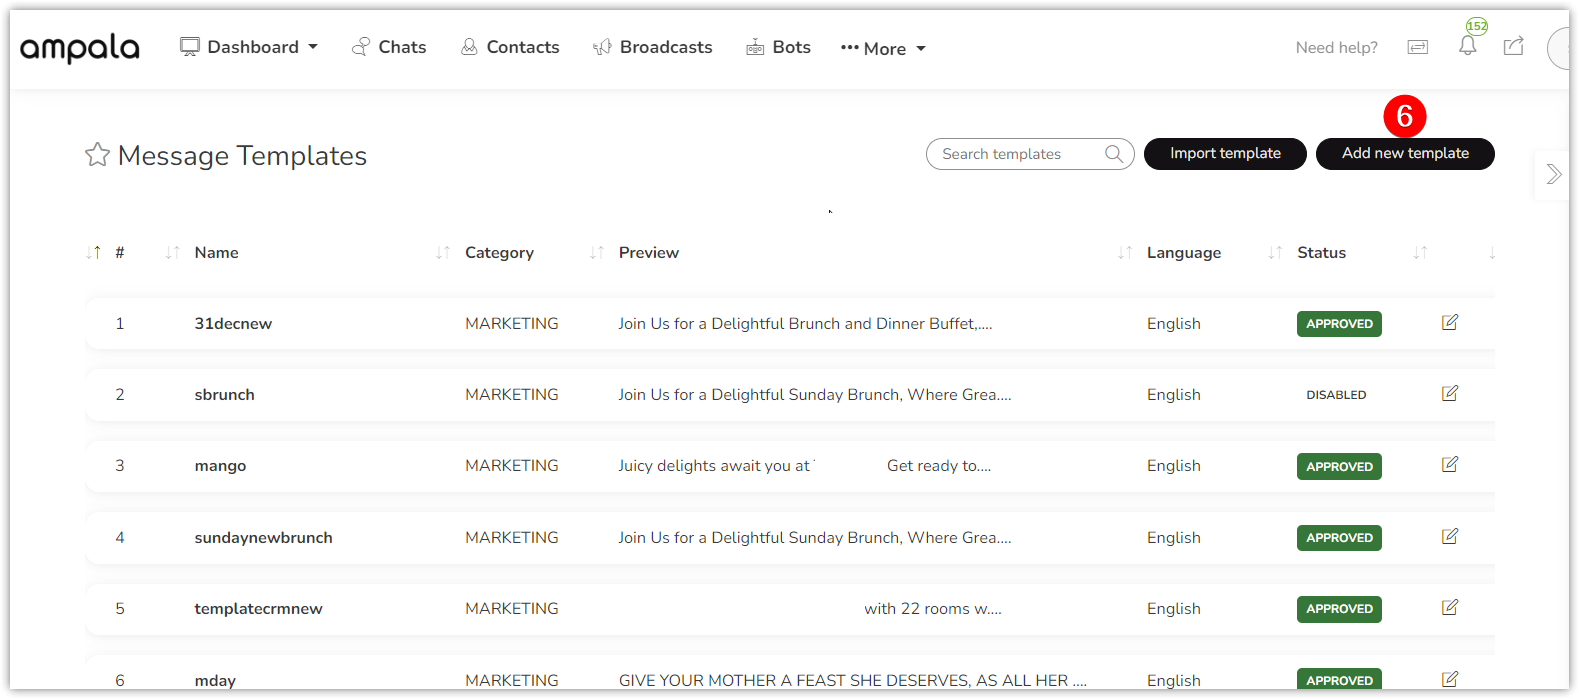
- Click on the Add new template. The Create WhatsApp Template page opens.
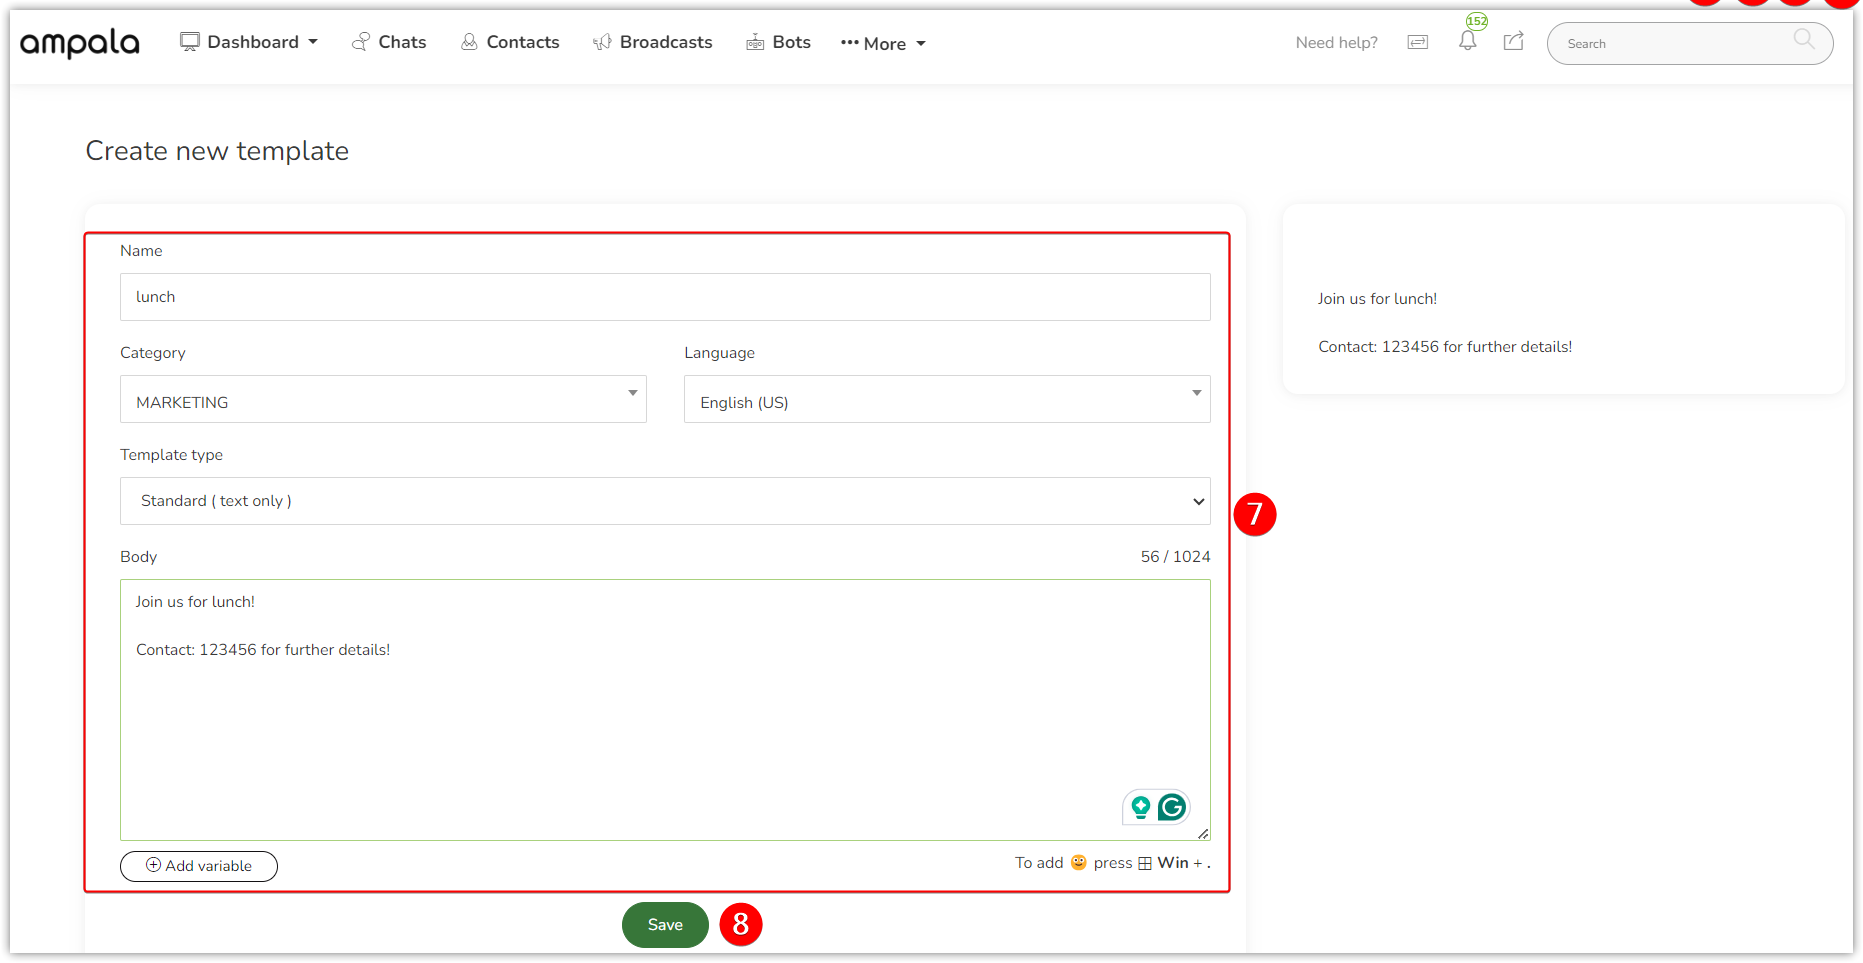
- Enter all the required information in the Message Template section.
- Click Save.
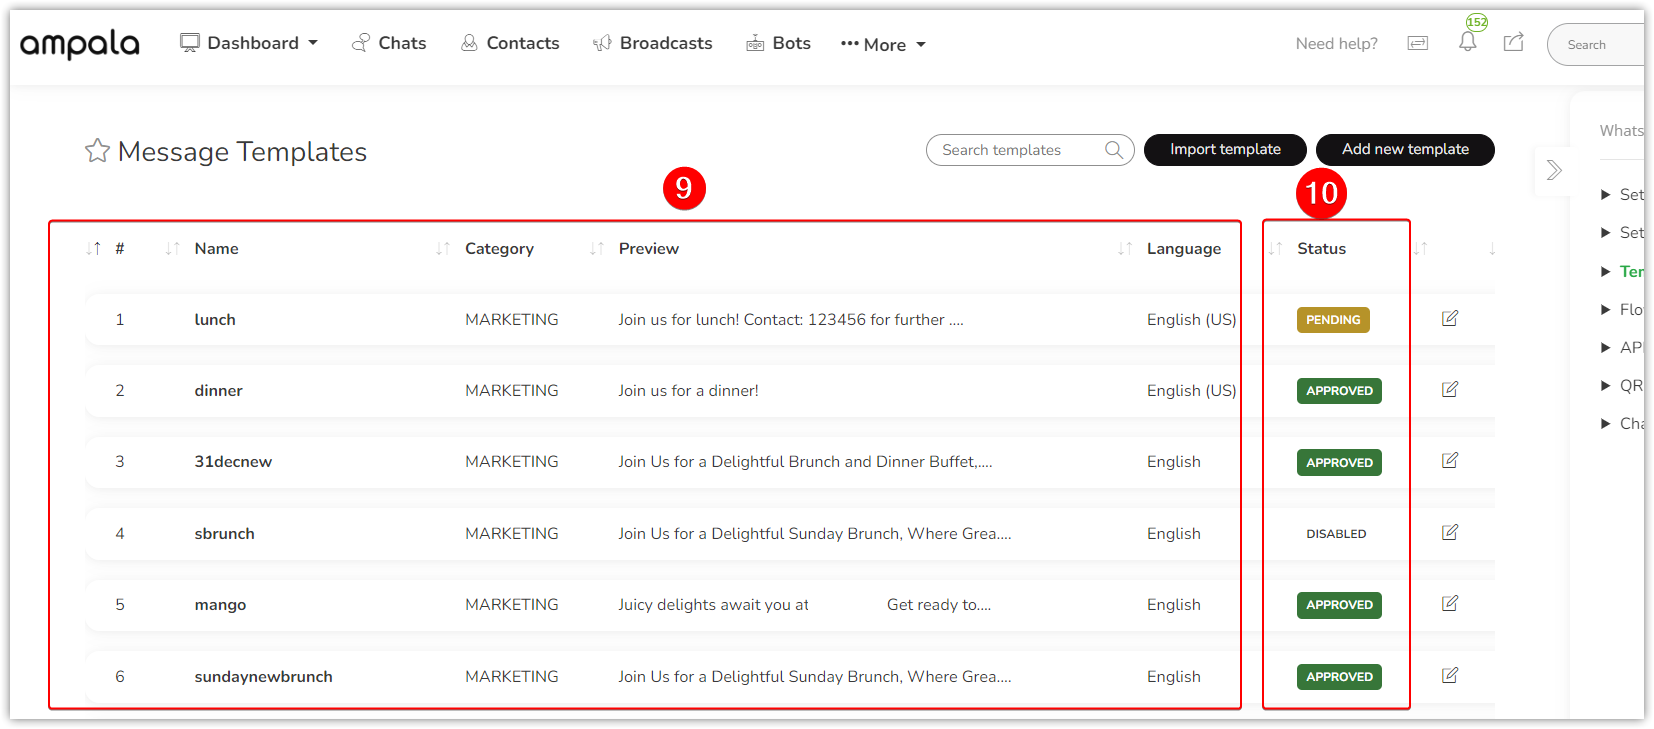
- The Message Templates List View displays approved and pending templates.
- The Status column will display WhatsApp's approved and rejected templates.
Note:
- The Ampala WhatsApp Template names provided here are the Select WhatsApp Template dropdown list on the Contacts module.
- The field’s data selected here will by default appear in the Contacts module> Send WhatsApp Message> Message Body section.
You have now successfully created the Ampala WhatsApp Template on the Ampala platform.
Syncing Ampala-WhatsApp Templates in Vtiger CRM
Follow the below steps to sync Ampala Templates in Vtiger:
- Login to the CRM.
- Click the Main Menu.
- Go to Essentials.
- Go to Conversations.
- Click WhatsApp. The WhatsApp module opens.
- Click Settings.
- Click Provider Configuration.
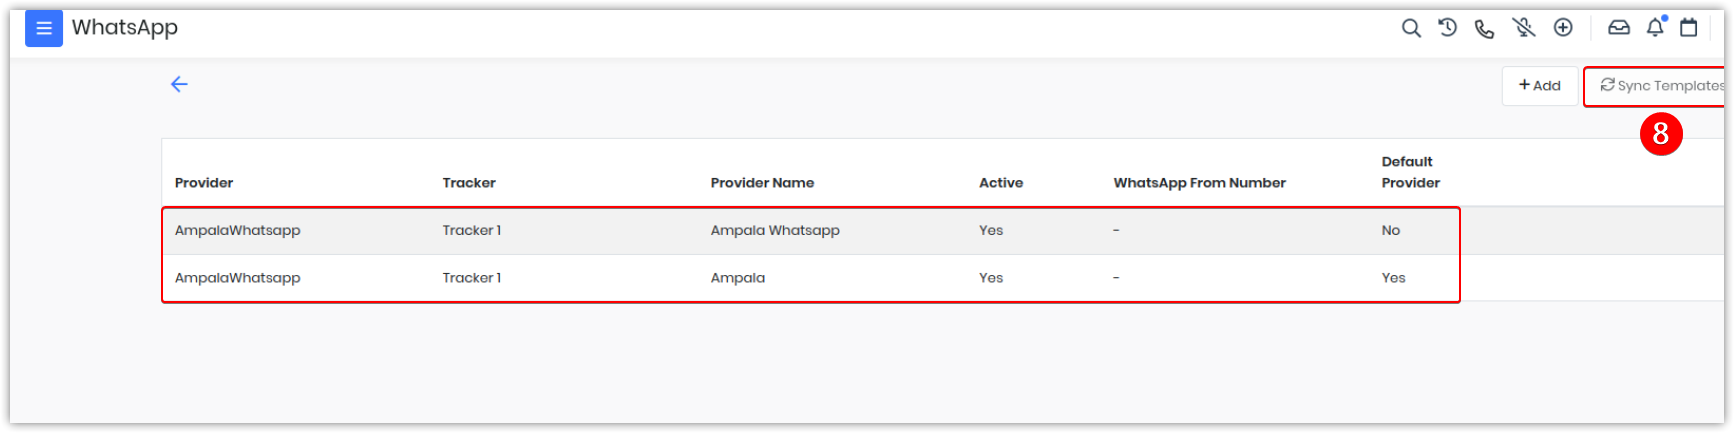
- Click Sync Templates.
Once you sync, you can see the Ampala WhatsApp approved templates in the List View.