Articles in this section
Using Vtiger CRM in Microsoft Outlook
Email Feature User Guide
Vtiger Cloud CRM Software & Hardware Requirements
Scheduling a Conference in Vtiger CRM
Creating Standard Workflows
Benefits of Markdown-based Rich Text Editor over HTML-based RTE
Signature Field in Vtiger CRM
OTP Rules & Validation in Vtiger CRM
Comments in Vtiger
Vtiger Connections
Vtiger's Connections feature helps users view past and present connections between contacts & other entities.
B
Bindu Rekha Babu
25 Jun, 2025 - Updated
7 months ago
Feature Availability
Vtiger Editions: One Professional | One Enterprise | One AIIntroduction
The Connections feature provides users with a comprehensive view of the relationships and associations between contacts and organizations. It enables you to view past and present connections between contacts.It enables you to discover past and present connections between contacts, such as familial ties (e.g., mother of, husband of), professional relationships (e.g., reported to, worked with), and affiliations with organizations (e.g., worked at, served on the board of, consulted at).
The Connections feature supports four key modules: Leads, Contacts, Organizations, and Vendors.
You can access the Connections feature as an Add-on from the Extension Store. This Add-on enables you to:
- Add New Connections: Create links between records to establish relationships within your CRM.
- Edit Existing Connections: Update or modify details of previously established connections.
- Unlink Connections: Remove associations between records when they are no longer relevant.
Key Features
The Connections feature enables users to define and manage relationships between records across different modules.The following connection types are used to build relationships between records:
- Connection Type: Admins can add a new Connection Type between any two modules by providing the primary and secondary connection labels and connection-specific properties. For example, Start Date.
- Example: Contact A ‘is the son of’ Contact B
- Primary Connection - ‘is son of’
- Secondary Connection - ‘is the father of
- Example: Contact A ‘worked at’ Org 1
- Primary Connection - ‘worked at’
- Secondary Connection - ‘employed
- Start Date
- End Date
- Status - Inactive (if the end date is in the past)
- Example: Contact A ‘is the son of’ Contact B
- Default Connections: The predefined default connections are used to simplify common use cases, such as linking contacts to organizations or defining relationships between contacts.
- The following are default connections:
- Contact to Contact - Connection Type values
- is parent of / is child of
- is spouse of / is spouse of
- reported to / manager of (at Organization Name)
- knows/knows
- Contact to Organization - Connection Type values
- previously worked at
- is working at
- is a board member of
- is a consultant at
- Contact to Contact - Connection Type values
- The following are default connections:
Benefits of using Vtiger Connections
The following are the benefits of the Connections feature:- Define and manage customized relationships for flexible business needs.
- Use connections to identify key influencers, decision-makers, and collaborative networks.
- Add custom fields to adapt the feature to their unique business needs.
- View connections directly within relevant modules, speeding up research and decision-making.
- Keep track of organizational roles, professional hierarchies, and collaborative efforts for smoother interactions.
- Installing the Connections Add-on
- Creating Connections
- Viewing existing Connections for a record
- Troubleshooting common Connection issues
Key Terminology
| Configuration settings that allow administrators to customize the structure and appearance of modules. | |
Installing Connections Add-on
You can install the Connections Add-on to view all your connections in one place.Follow these steps to install the Connections Add-on:
- Log in to your CRM account.
- Click Settings. The Settings page opens.
- Go to the Extensions Store.
- Select Add-ons. The Add-on page opens.
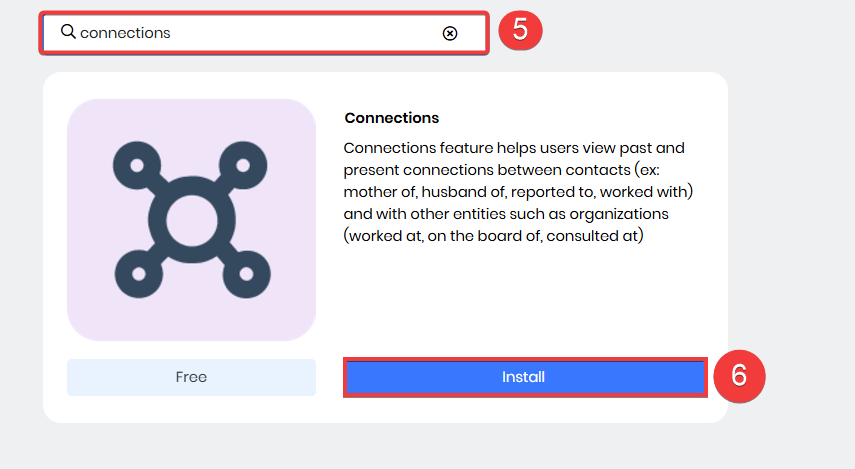
- Use the Search bar to look up Connections. The Connections Add-on appears.
- Click Install.
Creating Connections
Once the Connections Add-On is installed, it automatically sets up a one-to-many relationship by default with the following modules: Contacts, Leads, Organizations, and Vendors.The Connections module also includes customizable module layouts, allowing users to tailor the feature to their needs.
With the customizable module layouts, you can:
- Customize module layouts to align with specific workflows and relationship management requirements.
- Add or remove fields and sections to display only relevant information.
- Create different layouts for different user roles.
- Link the connections feature with other modules, such as Deals, Contacts, or Projects, to enhance inter-module collaboration.
- Update and modify module layouts as per your changing requirements.
Setting up Connections
Admin users can configure connections on the module layouts and fields page by accessing the Settings section.Follow these steps to set up the Connections:
- Log in to the CRM.
- Go to Essentials.
- Go to Lead & Contact Management > Contacts. The Contacts List View opens.
- Click the Settings icon from the Contacts module.
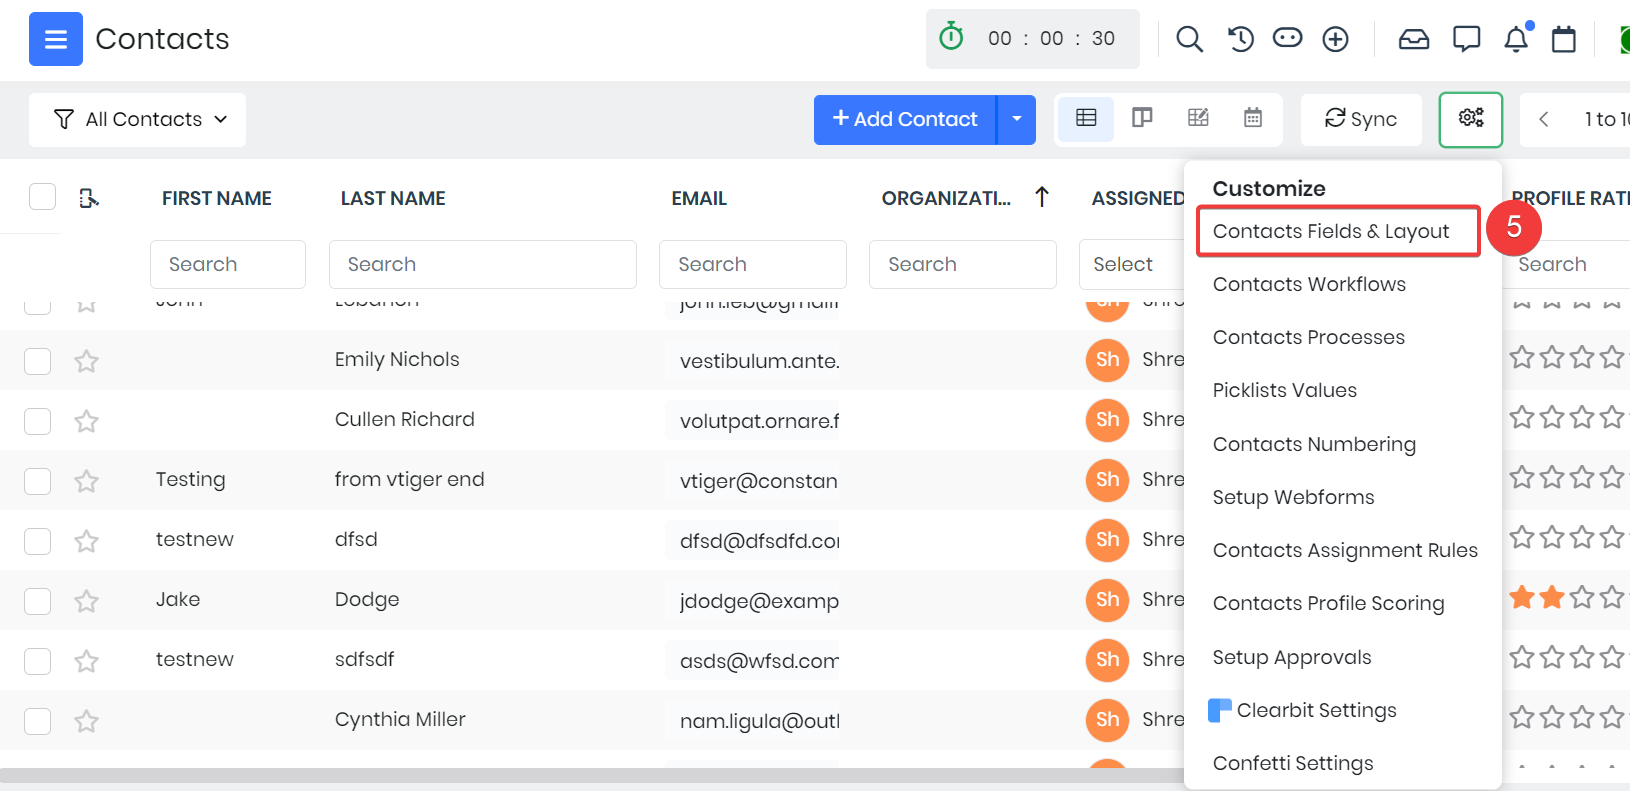
- Select Customize > Contacts Fields & Layout. The Module Layouts & Fields page opens.
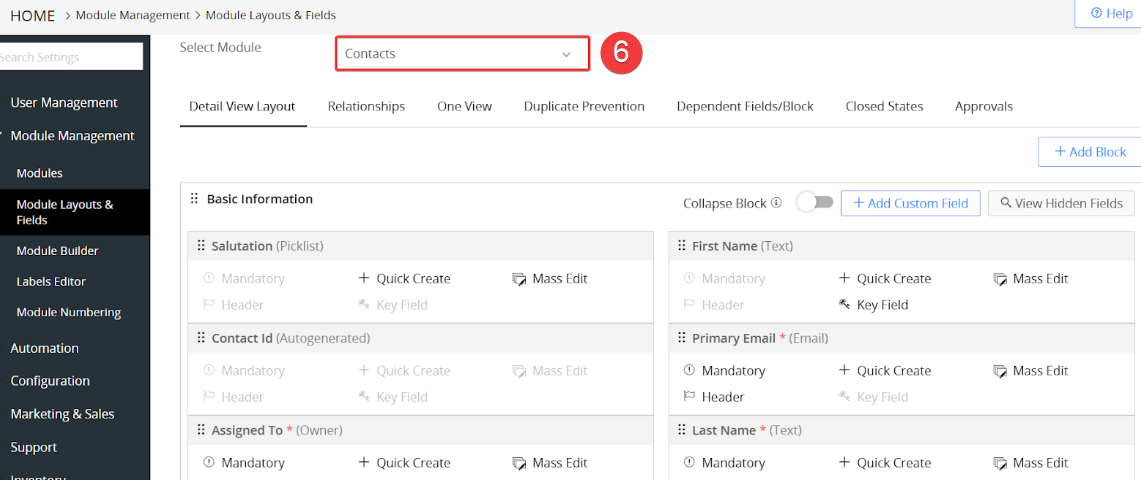
- Select Contacts from the Module list.

- Go to the Connections icon.
- Click + New Connection. The Connections tab opens.
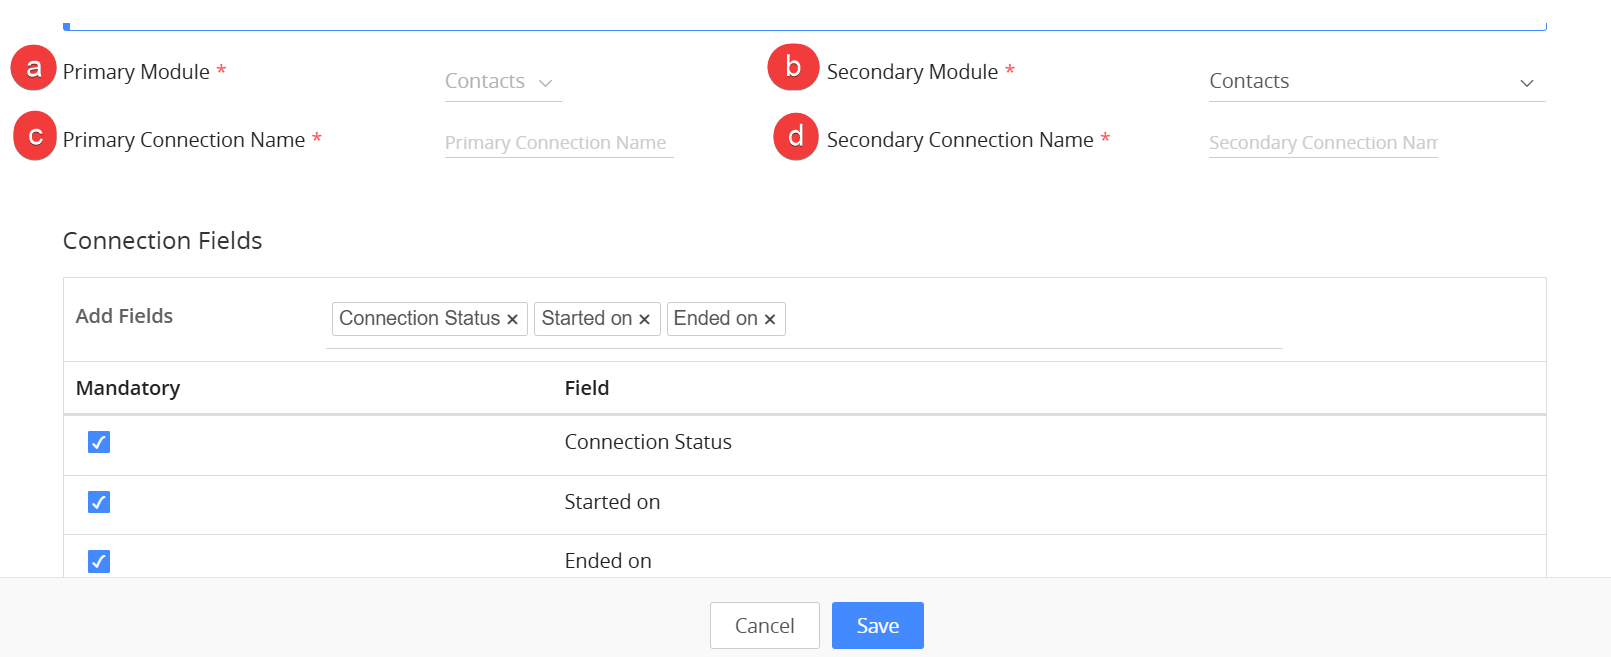
- Enter the following information:
- Primary Module: Select the module from which relationships to other records are created.
- Secondary Module: Select the module linked to the primary module to establish relationships between records.
- Primary Connection Name: Enter the name of the main record in the primary module that is linked to other records. The Primary Connection name is unique in nature and is part of the same primary module.
- Secondary Connection Name: Enter the name of the record linked to the primary record in the secondary module.
- For example: Contact A is the son of Contact B.
- Primary Connection: is son of.
- Secondary Connection: is father of.

- Select the following default Connection fields: Connection status, Start date, End date, and check them as Mandatory.
- Click Save.
Adding Connections
Users can add connections to a specific record by accessing the relevant module and choosing the required record. This allows you to connect the record with other related modules.Follow these steps to add Connections to a Contact record:
- Log in to your CRM account.
- Go to Essentials.
- Go to Lead & Contact Management > Contacts. The Contacts List View opens.
- Select the contact record where you want to add the Connections.
- Go to the Connections tab from the Summary View of the respective record.

- Click + Add Connection. The Add Connection page opens.
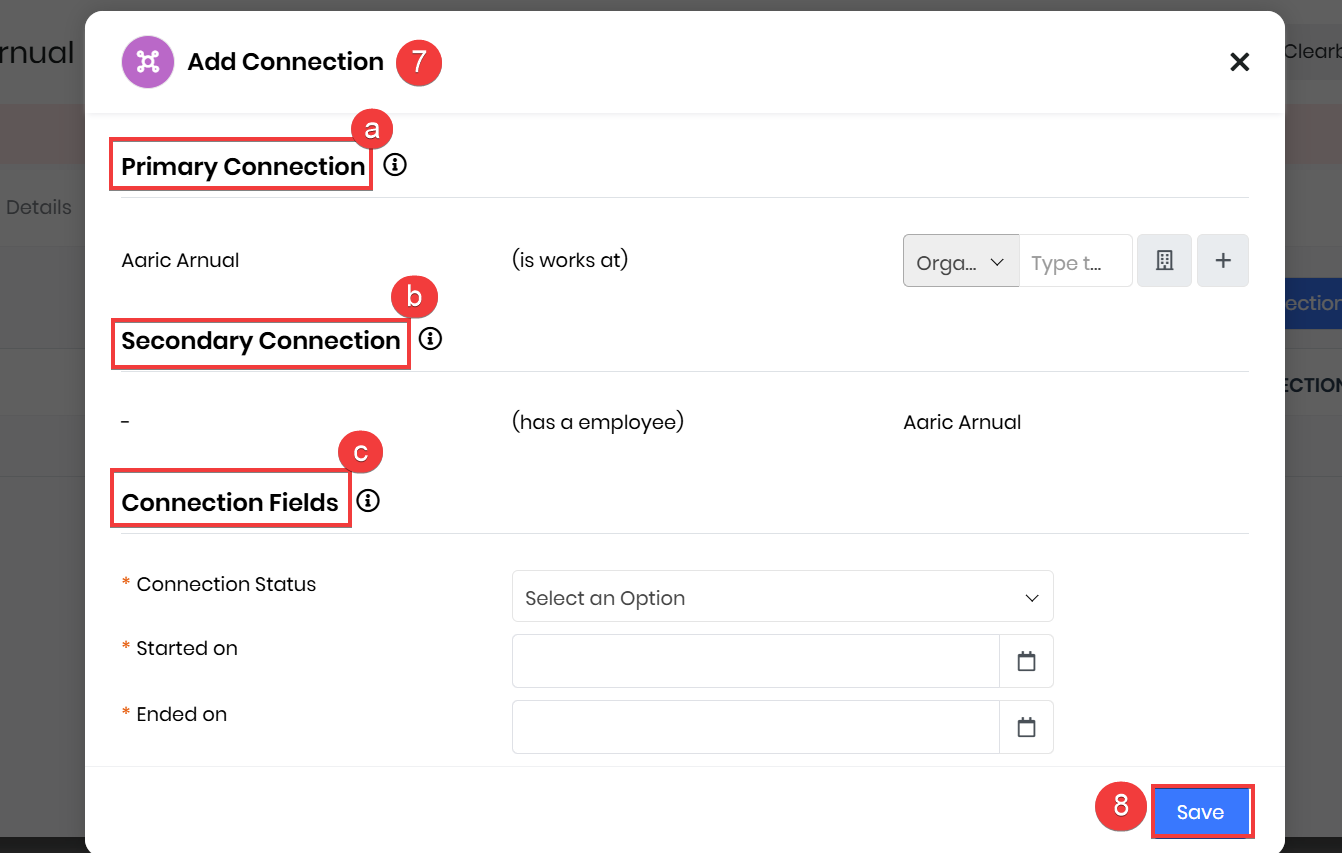
- Enter the following information:
- Primary Connection: Enter the organization details that are linked to the primary record. Follow these steps to add a Primary Connection:
- Enter the organization name and select add “” as a new organization. The Add Organization page opens.
- Enter the following information:
- Organization Name: Enter the organization's name to add as a new organization.
- Assigned To: Enter the name of the user to whom the organization is assigned.
- Click Save. The Organization name will now be visible in the Primary Connection field.
- Secondary Connection: The secondary connection will display the record linked to the Primary Connection.
- Connection Fields: Select the following to display the connection status for a contact:
- Connection Status: Select the connection status as active, inactive, pending, or completed as per the contact status.
- Start Date: Select the start date when the connection between two records began.
- End Date: Select the end date when the connection between two records ends.
- Primary Connection: Enter the organization details that are linked to the primary record. Follow these steps to add a Primary Connection:
- Click Save.

The Connection details will now be displayed for the respective record. In addition, the Connections tab will display the existing connections for a given record.
Note:
- You can perform the above steps to add connections for the Leads, Organizations, and Vendor modules.
- Users with the required permissions can add, update, or remove connections.
Editing Connection Record
You can edit the connection record to update or modify details for a selected contact.
Follow these steps to edit a Connection record:
Follow these steps to edit a Connection record:
- Log in to the CRM.
- Go to Essentials.
- Go to Lead & Contact Management > Contacts. The Contacts List View opens.
- Select a Contact record for which you want to edit the Connection record.
- Go to the Connections tab from the Summary View of the respective record.

- Select the Edit icon by hovering over the Connection record.
- Edit the necessary details.
- Click Save.
Unlinking Connection Record
You can unlink a connection record to remove the association between related entities.Follow these steps to unlink a connection record for a selected contact:
- Log in to the CRM.
- Go to Essentials.
- Go to Lead & Contact Management > Contacts. The Contacts List View opens.
- Select a Contact record for which you want to unlink the Connection record.
- Go to the Connections tab from the Summary View of the respective record.

- Select the Unlink icon by hovering over the Connection record.
- Click Ok for the prompt that will be displayed.
View Existing Connections for a Record
You can view your connections in the Summary View of the respective records. We have considered a Contact record here as an example.Follow these steps to view your Connections:
- Log in to your CRM account.
- Go to Essentials.
- Select Lead and Contact Management > Contacts. The Contacts List View opens.
- Select the record for which you want to view the connections.
- Go to the Connections tab. The connections for the respective record will be displayed.

- Click the Show Connections icon to view the connection diagram. The connection diagram for the specific Connection record will be displayed.
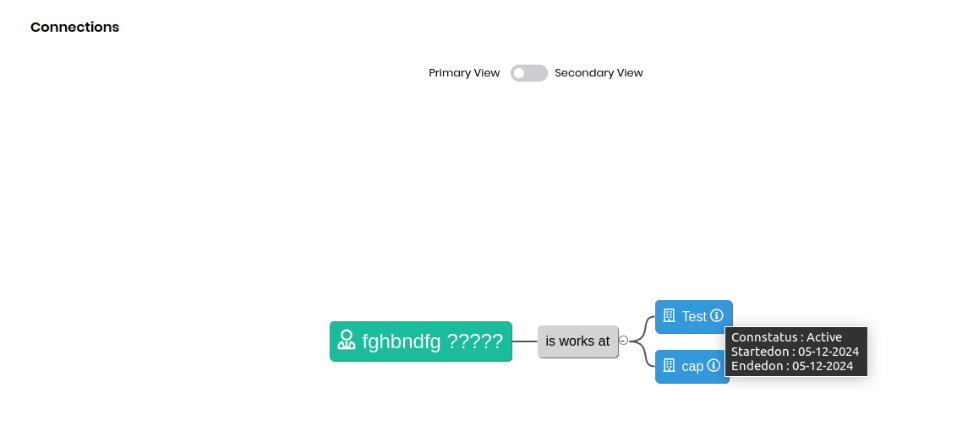
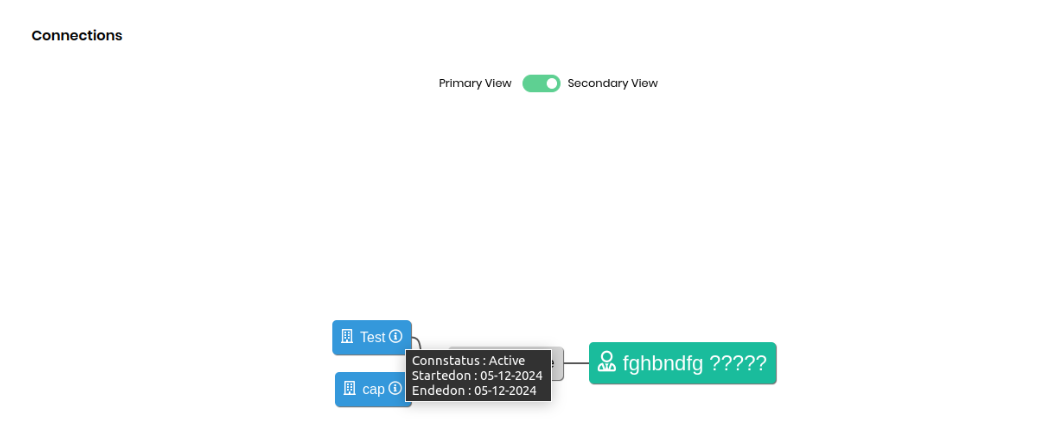
- Use the toggle to view primary and secondary connections for this record.
Troubleshooting Tips
Here are some common issues users encounter while using Connections:- Connection Not Saving Properly: Users are unable to save a connection between records.
- Ensure all mandatory fields are filled with valid data.
- Clear browser cache and cookies.
- Refresh the page or log out and log back into the CRM.
- Unable to View Connections: Connections are not visible in the record details or related modules.
- Check user roles and permissions in the settings.
- Go to module layouts and ensure the connections field is visible.
- Verify sharing settings for connected modules.
- Duplicate Connections: Multiple duplicate connections are created for the same records.
- Enable and configure duplicate detection rules.
- Train users to check for existing connections before creating new ones.
- Use reports to identify and clean up duplicates.
- Data Integrity Problems: Data discrepancies between connected records or modules.
- Run a data integrity check to identify inconsistencies.
- Synchronize connected modules manually if automated sync fails.
- Use version control or audit logs to trace and resolve conflicts.