Articles in this section
Vtiger Release Notes December 2025
Vtiger Release Notes November 2025
Vtiger Release Notes October 2025
Vtiger Release Notes September 2025
Vtiger Release Notes August 2025
Vtiger Release Notes July2025
Vtiger Release Notes May 2025
Vtiger Release Notes April 2025
Vtiger Release Notes March 2025
Vtiger Release Notes February 2025
Vtiger Release Notes January 2025
Vtiger Release Notes June 2025
A list of features and enhancements released in June 2025.
B
Bindu Rekha Babu
7 Jul, 2025 - Updated
8 months ago
Release Notes 2
Enhancements
Contacts and Leads Modules
- PI tagging for the First Name field will be enabled when you install the Privacy Guard.
- This means that you can mark the First Name field as a Personally-Identifying (PI) field in the Contacts and Leads modules by enabling the Personally-Identifying check box.
- This will also enable you to erase the data after a designated period ensuring the privacy of the contact.
Partner Portal
- The Detail View for a record is now available in the Partner portal.
- You can now move between the Summary View and the Detail View using the tabs available on a record’s Detail View.
- When you open a record in the Partner Portal, the selected default view will be displayed.
Plivo
- You now have multiple Plivo gateways to handle your phone calls.
- You can make outbound calls with different Plivo numbers if you have configured different SIP IDs. Whenever you click to call, the call will be placed via the extension you have added in My Preferences.
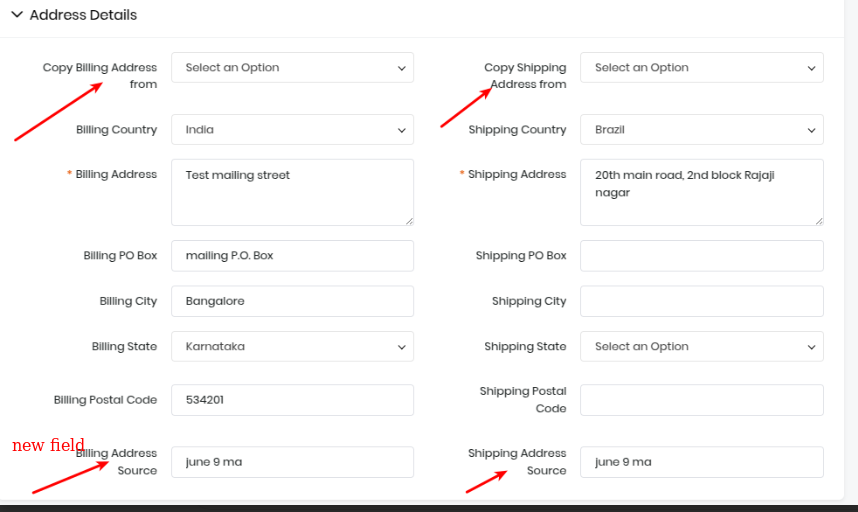
Quotes & Invoices - Print Template
- You now have two fields, Copy Billing Address from & Copy Shipping Address in the Quotes and Invoices modules (Ref 1). These will let you copy addresses from the related fields.
- You can copy and display the name of the selected address in the Shipping Address section of the Print Template when you have:
- Added multiple addresses
- Selected one in the Quote as the shipping address
- Use Case:
- When multiple addresses are associated with an organization, and you select one of them in the Quote > Shipping Address > Copy Shipping Address From option, the Print Template should reflect the selected address.
Workflows
- You will now be able to choose to make Comments either public or private in Workflows. This is available in the Send Email Action in a Workflow from the Add Record Field option.
- You can now add either private comments (from 1 to 5) or public comments in Send Email Workflow actions.
Release Notes 1
Enhancements
Dashboard(s)
- You now have multiple date filter options on all your Dashboards. They are:
- Previous FY
- Next FY
- Previous Week
- Current Week
- Next Week
- Current FY
- The Date field filters are available in the List View. You can apply these date filters to Dashboards such as Sales Insights, Chat Insights, etc.
- How does it work?
- Here is an example: Applying the Previous year filter on the sales insights dashboard
- Open the sales insights dashboard
- Select the date filter option
- Apply previous year filter
- Verify that the data displayed corresponds to the previous year
- Here is an example: Applying the Previous year filter on the sales insights dashboard
Events
- You can now:
- Add those who are not Contacts in the CRM to your event invites (as participants) by adding them as Contacts.
- Send event invites to those who are not Contacts in the CRM (as participants) by using their email ID to add them as Contacts.
- How does it work?
- Add a Contact while creating an Event: Assume you are sending an invite to someone who is not your Contact. As you type the first three letters of their name, the Add Contact window appears. This window automatically populates Last Name with the first three letters you typed and you can save them as a Contact.
- Add a Contact while adding an email: You can add only those email IDs that are already registered for a Contact in the system. With the enhancement, when you add an email ID of someone who is not in the system:
- The system checks if this email ID is already available.
- The Add Contact window appears if the Contact is not in the system, and allows you to add a Contact. The email field will be automatically populated with the email ID you typed.
- You can add minimum details and revisit the Contact record to update the rest.
Field Sales App (FSA)
- You (sales agents) now have the Cancel option for each outlet you check in on a route.
- After you start a Route, you will see the Cancel option for a particular event.
- If you click on Cancel, a pop-up displays the Cancellation Reason. You can select the reason for cancellation and submit.
- On cancellation, the Event record displays the status as Canceled, and the cancellation Reason data will show in the Event record.
- After cancelling an event, you also get an option to reopen and check in to the Event.
- Partial store visits on a route: If a sales rep visits 4 stores out of 10 assigned and cancels the other 6, the route status changes to Partially Completed.
- You can disable the Cancel option in Settings > Picklist Field values.
- You can disable the Reopen an Event option (after it is cancelled) from Settings > User profile.
- If a user does not click Cancel on individual Events and directly ends the route:
- If the representative is unable to visit all the stores on the route (that is, not a single store was checked in), the event records will be marked as Cancelled.
- If the rep checks in at least one store, then the Route status is updated to Partially Completed.
Layout Designer
- You can duplicate records in the Layout Designer using the Duplicate button..
- This will help save time and reduce effort, as you will only need to make a few changes rather than create the same content from scratch.
REST APIs for Picklist Values
- You can use APIs to perform the following actions: add, edit, and delete, to update Picklist field values.
- These APIs are add_picklist, remove_picklist, and edit_picklist.
- add_picklist
- elementType: modulename
- Element : {"fieldname": "lead_status", "values":["value1",value2,"value"]}
- delete_picklist
- elementType: modulename
- Element : {"fieldname": "lead_status", "delete_values" :["value1","value2","value3"],"replace_with":"value4"}
- edit_picklist
- elementType: modulename
- Element : {"fieldname": "lead_status",
- "Current_value":"current_name","new_value":"new_name"}
- Limitations
- These actions are restricted for Global Picklists.
- Non-admin users cannot use these APIs to update Picklist values.
- You cannot use APIs to add, edit, and remove picklist values for disabled modules.
Role-based Picklist Values
- You now have the option to convert a non-role-based picklist value into a role-based picklist value using the Role checkbox.
- You can enable the Role checkbox for the existing picklist value types by clicking the Edit icon and enabling it.
- Note:
- The Role checkbox is disabled by default.
- Once a field is set to role-based, it cannot be changed back.
- Note:
- The changes you make in the Layouts and Fields pages will be reflected in the Picklist configuration page.
Xero
- You can now sync quotes between Vtiger and Xero in both directions.
- This will help you eliminate manual data entry, automate quote conversion, and improve coordination between sales and finance teams. For this sync to work, you need to:
- Map Vtiger Quote fields with corresponding Xero Quote fields.
- Ensure quote status, line items, taxes, and discounts are properly synced.
- When a quote is created or updated in Vtiger, it is automatically synced with Xero.
- If a quote is created or modified in Xero, changes will reflect in Vtiger.
- If a quote is converted into an Invoice in Xero, it will be updated accordingly in Vtiger.