Articles in this section
Phone Calls Module Overview
Feature Availability
Vtiger Editions: One Pilot | One Growth | One Professional | One Enterprise | One AI
Feature Video
Vtiger Telephony Integration - Vtiger Phone Calls Module
Introduction to Phone Calls
The Vtiger Phone Calls module lets you connect with your contacts by dialing right from the CRM screens. Vtiger CRM integrates with multiple service providers to provide a seamless connection with customers worldwide. You can place domestic and international calls directly from the CRM to connect with your customers.
How does Vtiger CRM’s Phone Calls feature work?
With the Phone Calls module installed, you can:
- Place calls directly from your desktop or laptop
- Integrate services such as Live Chat, email, call logging, purchase history, feedback surveying, support tickets, and many more
- Use different telephony gateways, that is, connect to other hosted telephony services such as Plivo, Twilio, ViciDial, Knowlarity, and Asterisk ver. 1.4 and 1.6 (without Vtiger Connector) and Asterisk ver. 1.8 - 11 (with Vtiger Connector)
Benefits
The benefits of using the Phone Calls module are:- Reduced investments - Integrated telephony (web-based) comes at a cheaper cost in hardware and handling, as calls are routed through your internet.
- Reduced resources - It is vastly beneficial, especially if you are a small business with few employees and do not want to invest more in communication.
- Increased coordination - You can control and coordinate your communication with a single platform.
- Increased Flexibility - Call from anywhere and anytime. You or your employees can work from the office or home, or when they are on the road.
- Increased number of calls - More lines of communication can be handled.
- Increased productivity - You will have a single platform, your computer, to track customer data and communicate with them.
Installing Phone Calls
To use the Phone Calls module, you must first install it from Settings > Extensions > Add-ons. You can access Extensions or install an Add-on only if you are an Admin user.
Follow these steps to install Phone Calls:
- Log in to CRM.
- Click the Main Menu.
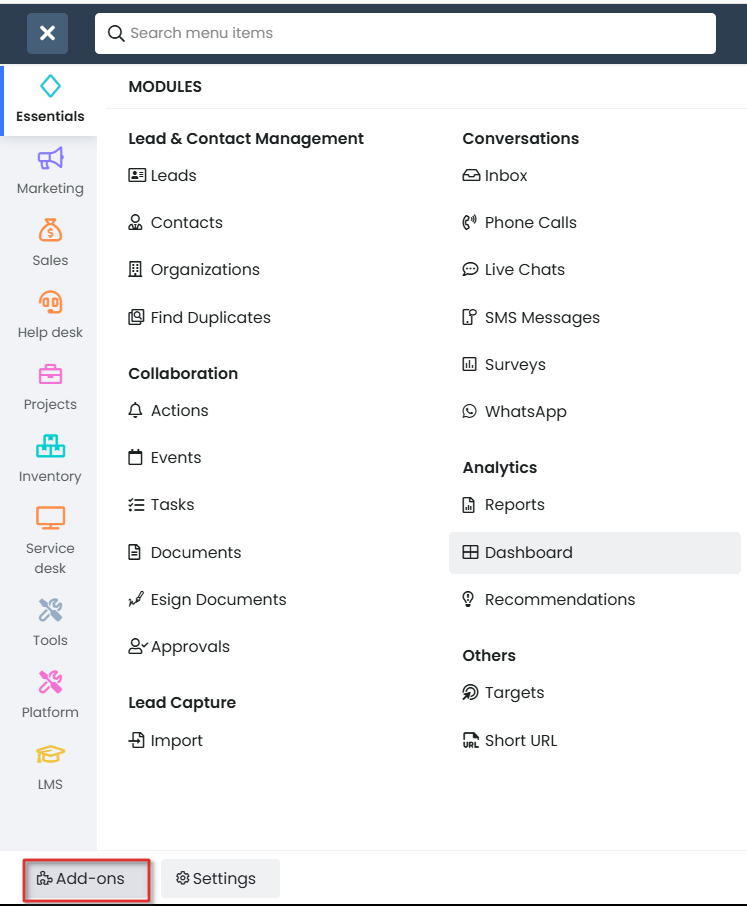
- Click Add-Ons.
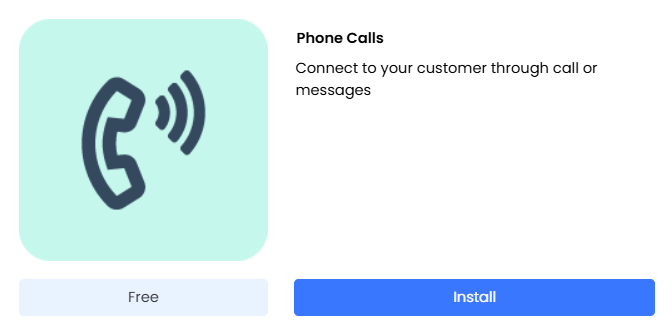
- Search for Phone Calls using the search bar.
- Click Install.
After you install the module, you can see it under Main Menu > Essentials > Conversations.
Phone Calls Integrations
To use the Phone Calls module, you need to integrate it with different service providers. You can integrate the following Telephony Gateway service providers with Vtiger CRM:
Once the Phone Calls module is installed and integrated with any one of the service providers above, the CRM users can directly call their contacts from different modules in the CRM.
For example, hovering over a contact record displays the phone call icon. A user has to simply click the Call icon to call the customer.
Navigating to the Phone Calls Module
Follow the steps below to go to the phone calls module:
- Log in to the CRM.
- Click the Main Menu in the top left corner of the screen.
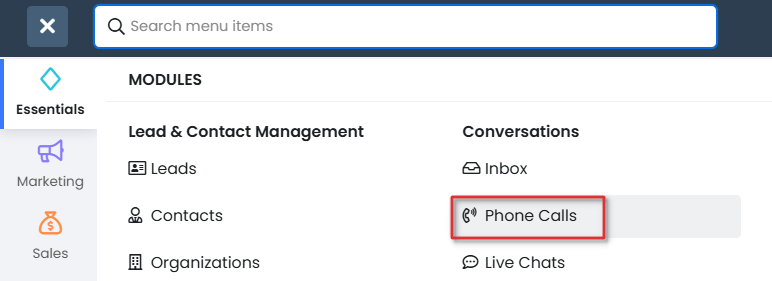
- Hover over the Essential option.
- Select Conversations > Phone Calls. The phone call module appears.
Phone Calls Module Interface
The Phone call module displays the list of available conversations with the following details:
- Call Status - You can see the following call statuses in the CRM.
- Ringing: For inbound calls, before the call is routed to an agent.
- In-progress: For inbound calls, after an agent picks up the call. For outbound calls, when an agent initiates a call.
- Completed: For inbound and outbound calls, after a call is completed
- Voicemail: For inbound calls, if a call goes to voicemail.
- Busy: For outbound calls, if the customer line is busy.
- Hang-up: For inbound calls, if a customer hangs up the call before it is routed to an agent.
- No-answer: For an outbound call, when the call is not answered and there is no voicemail support.
- Agents will get a pop-up window with call details when they place an outbound call, just like the pop-up that appears for incoming calls.
- Recording link - Displays the link redirecting to the recorded conversation between the customer and the agent.
- Customer number - Displays the number of customers used to connect to the customer.
- Handled by - Displays the Agent's name who is taking or dealing with the previous conversation with the customer.
- Customer name - Displays the name of the customer.
- Source UUID - Displays the UUID of the customer. UUID is a 128-bit value used for unique identification.
- Duration - Displays the last call duration with the customer.
- Call start time - Displays the time the customer picks up the call if it is an outbound call, and the agent if it is an inbound call.
- Source - Displays the source of the initiated call, for example, a call placed from the CRM.
- Details for each call can be seen when you open the call record, such as -
- Links to the voice recording
- Call notes
- Call transfer details
- Call directions, etc.
You can create a list of all your phone calls, such as missed calls, completed calls, etc., from the List View.
To learn how to create a list, click here.
Actions in the Phone Calls module
There are different actions available in the Phone Calls module:
Filtering Phone Calls with Lists or Tags
You can filter phone calls by creating Lists and Tags. Lists allow you to use filters to categorize and display data based on your preferences. A Tag is a label attached to identify the data based on a particular aspect.
You can save these Lists and Tags and display information with just a click. By default, the All Phone Calls list is displayed.
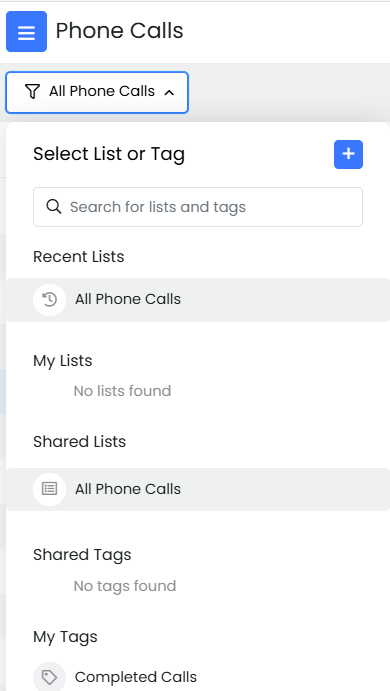
Follow the steps below to filter Phone Call records:
- Click on the Filter button.
- Select the required List or Tag to display information.
- Create a List or Tag of your own using the + Create icon. Click here to learn more about Lists and how to create a List.
Managing columns
You can display data in any order you require by rearranging the columns.
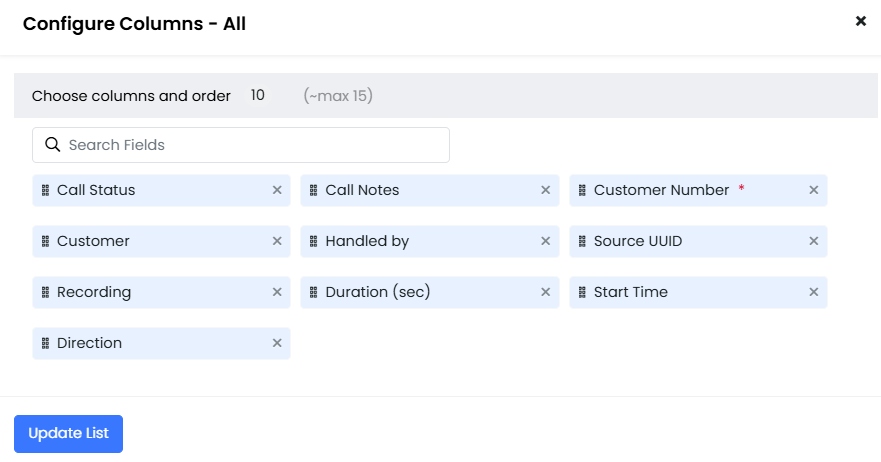
Follow the steps below to address the columns:
- Click the Manage Column icon. The Configure Columns - All windows open.
- Arrange the columns as preferred by moving them in the required order.
- Click Update List.
Actions on Phone Calls record
You can find the following actions in the Phone Calls module to handle a Phone Calls record.
- Edit
- Export
- Tag
- Delete
- More
Edit
You can edit the Phone Call record details, such as updating deals and adding call notes.
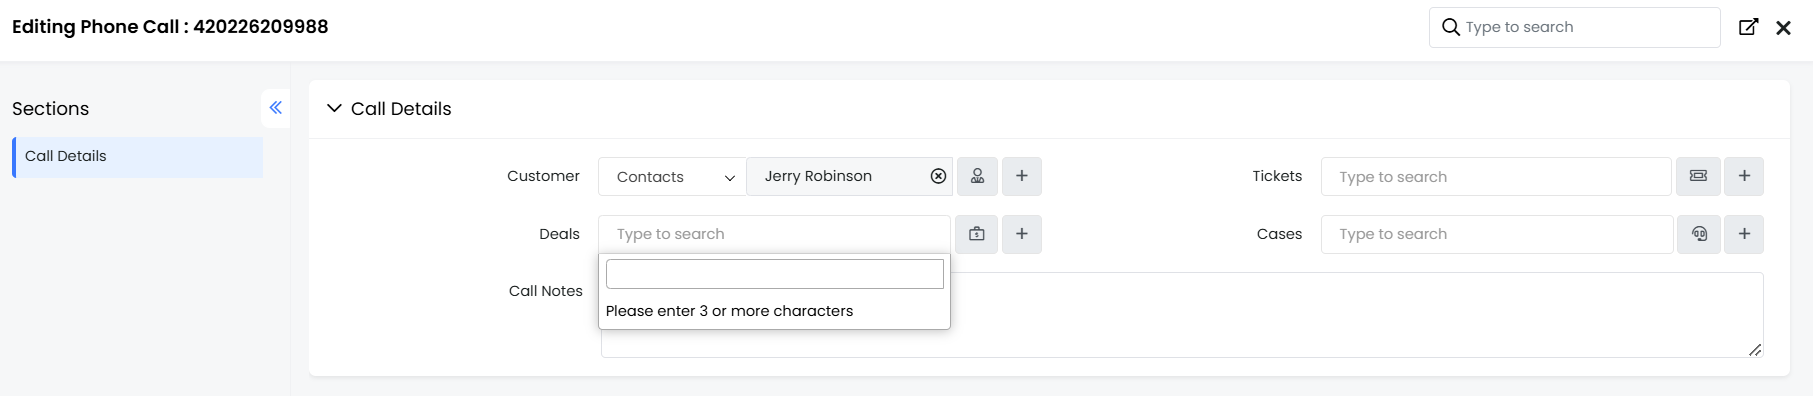
Follow the steps below to edit a phone call record:
- Click the checkbox available on the left side to select the phone call record.
- Click on the Edit icon. The Editing phone call window appears.
- In the Editing Phone Call window, you can edit or add the following details:
- Customer: The contact you spoke with.
- Tickets: Any tickets the customer might have raised.
- Deals: Record if any deal is agreed to.
- Note: You can use the + icon to add a contact, deal, and more.
- Click Save.
Export
You can export Phone Calls contact records into Excel or CSV. format. The exported contact records can be transferred or turned into a hard copy.
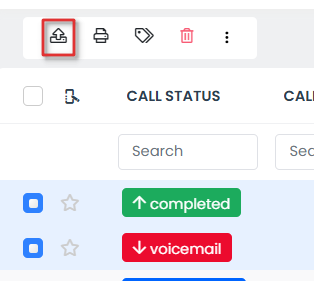
Follow the steps below to export a Phone Calls conversation:
- Click on the checkbox available on the left side of the phone call record.
- Click the Export icon.
- Select from the export options available.
- Click Export.
You can print copies of the Phone Calls records using Print Templates.

Follow the steps below to export a Phone Calls conversation:
- Click the checkbox available on the left side of the Phone Calls conversation.
- Click the Print icon.
- Select the template from the drop-down. Click here to learn more about Print Templates.
- Click print.
Tag
You can add different tags to the Phone Call records, which makes it easier to sort and categorize them.

Follow the steps below to add a tag to a phone call conversation:
- Click the Checkbox available on the left side of the phone call conversation.
- Click the Tag icon.
- Select the type of Tag from the drop-down.
- Click Add tag.
Delete
You can delete Phone Call records. The deleted records are pushed into the recycle bin and can be imported back within 30 days.
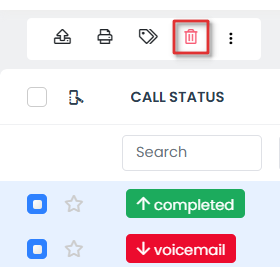
Follow the steps below to delete a phone call conversation:
- Click the Checkbox available on the left side of the phone call conversation.
- Click the Red Bin icon.
- Click delete.
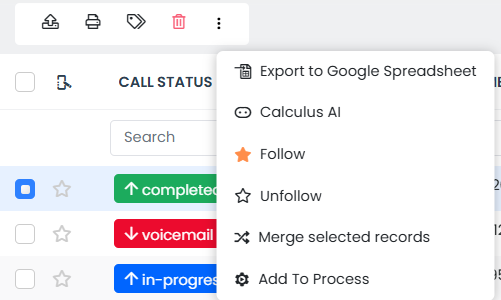
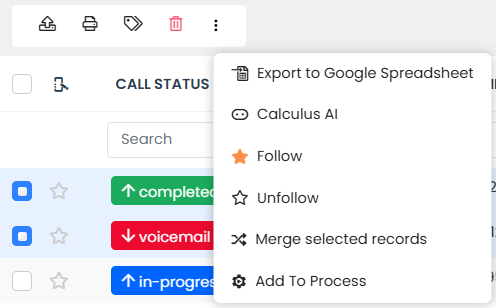
More
Under the More option, you can:
- Export the phone call to Google.
- Follow and unfollow a phone call.
- Merge a phone call with another.
Follow the steps below to open more options:
- Click the Checkbox available on the left side of the phone call conversation.
- Click the More icon.
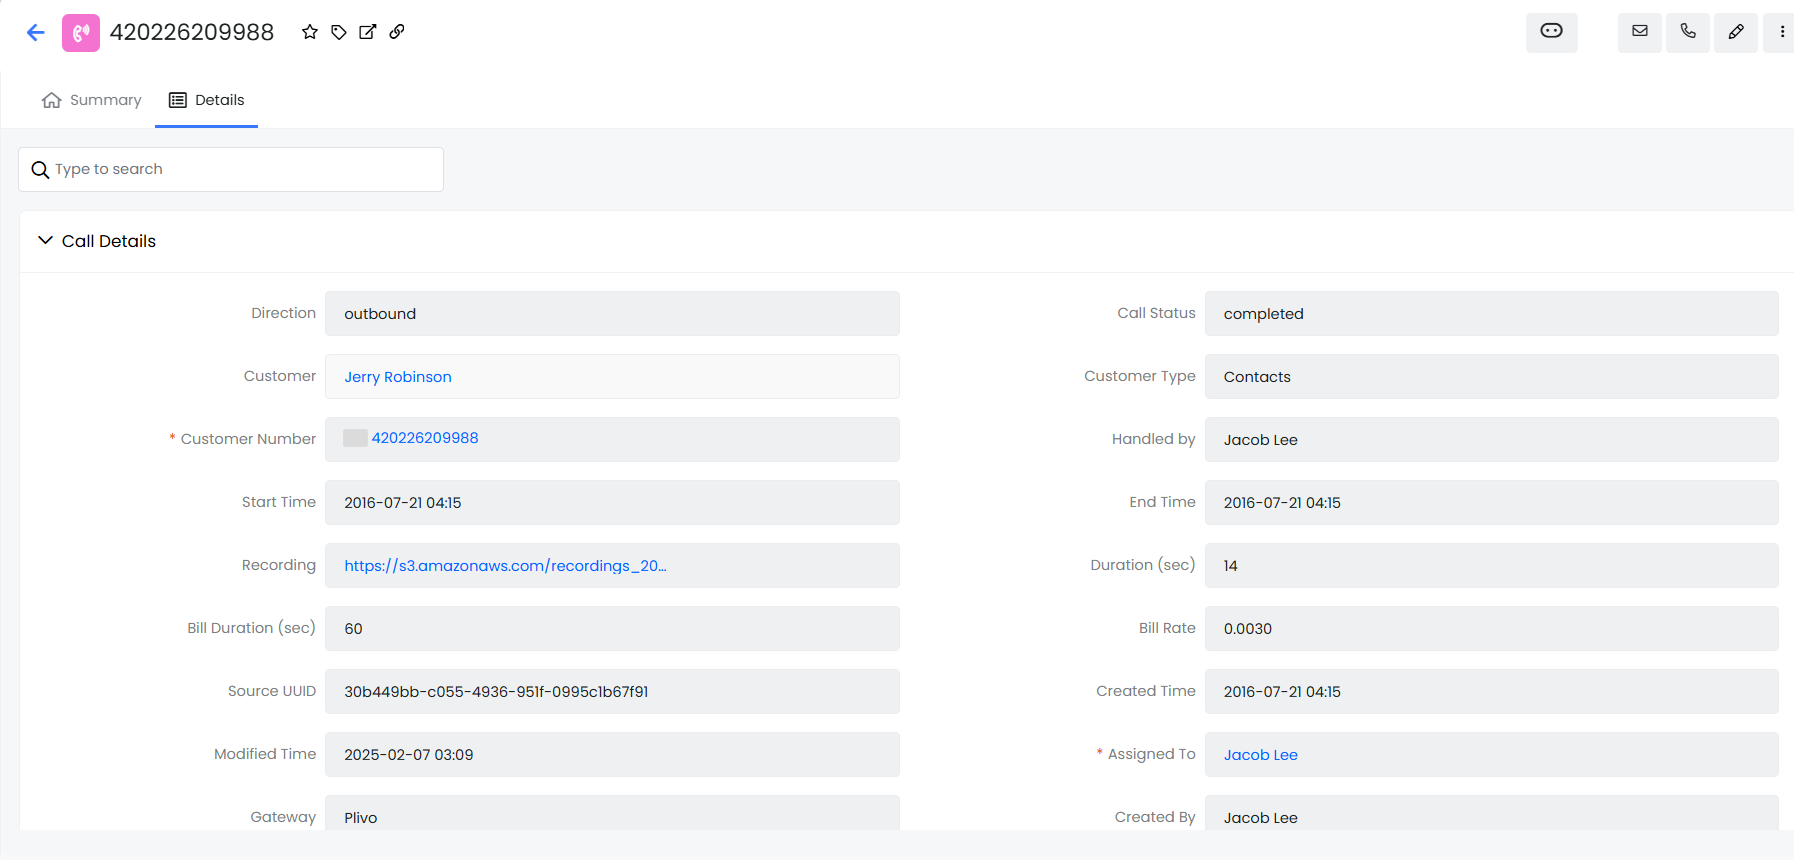
Phone Calls Record
Click on any phone call to open the related phone call record.
The phone calls record displays the following information:
- Contact Number - Displays the number the customer used to connect with the customer.
- Assigned to - Displays the name of the agent who is assigned to the phone call.
- Activities - Displays any comments, mentions, or actions put up by the agent related to the phone call.
- One view - Displays customer details, deals, tickets, and cases related to the phone call.
- Details view - Displays the detailed information associated with the phone call.
Actions under a Phone Calls record
There are different actions available in the phone call record:
Follow the steps below to send an email to the customer:
- Click on the email icon in the top right corner of the screen.
- Fill in all the mandatory fields* and attach the related files.
- Click on send. The email is delivered to the customer based on the Best time to contact.
Edit
Follow the steps below to edit a phone call conversation:

- Click on the pencil icon. The edit phone call window appears.
- You can edit the available fields and add call notes.
- Click Save.
More
Under the More option, you can:
- View followers of the phone call by clicking on the eye icon.
- Print the phone call record by clicking on the print icon
- Delete the phone call record using the Red Bin icon.
- Electronically sign the attached documentation related to the phone call by clicking on Esign Documents.
Phone Calls Features
The Phone Calls module provides the following features during a Phone Call:
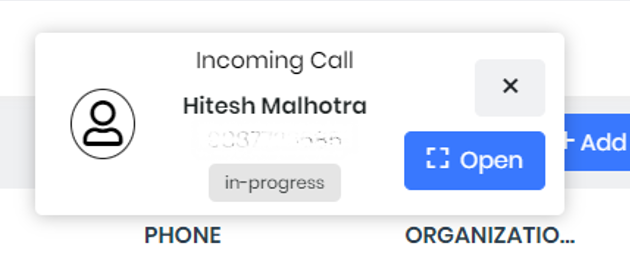
Incoming Call Pop-up
Vtiger CRM users are notified about incoming calls in the form of pop-up messages.

So how does this feature work? Incoming calls are matched with the lead, contact, or organization records in the CRM by matching caller numbers with numbers in the CRM.
- If a matching number exists, the lead, contact, or organization's name is displayed in the pop-up.
- If a matching number does not exist, you are prompted to enter the caller's email ID in the pop-up to create a new contact record.
- These records get updated in the Phone Calls module.
And if you have multiple users manning your phone calls, say a customer care team, then the incoming call pop-up is shown to all the users configured with the extension number in their preferences. When a user answers a call, the pop-up disappears for other users.
So, how is this incoming call pop-up helpful to you? Well, from the pop-up, you can:
- Search or create a contact if there is no matching contact for an incoming call.
- Create a deal or a case from the incoming call pop-up.
- Transfer calls to other agents or reps.
- Add call notes.
- Minimize the incoming call pop-up if you do not want to take up the call.
- View the drop-down list of users who are currently online. This ensures calls are transferred only to users who are not on another call and are available to take new ones.
Also, you can view recent call logs in related touchpoints of the contact’s record. Through Phone Configuration, you can assign incoming missed calls to a user or a group. The Assigned to field in the Phonecalls module allows you to assign incoming missed calls to the right user or group.
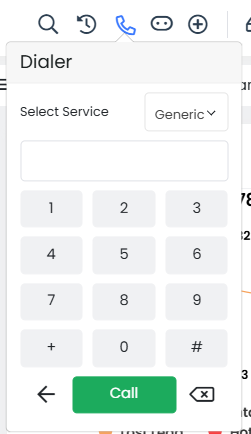
Click-to-Call for Outgoing Calls
This feature is available for all outgoing calls. You can directly call your contacts from the contact or organization record by adding their phone numbers to the record.
Follow these steps to place a call from a record:
- Log in to the CRM.
- Click the main Menu.
- Go to Essentials.
- Select Contacts.
- Hover on any required contact in the List View and click on the Phone icon on the available options.

- Choose a Gateway (if multiple are configured and active).
The call is connected automatically. The outgoing call pop-up has a dialer icon that can be used for IVR messages.
| Note: You can also call your contacts from the following screens -
|
Call Notes
You can add notes while on a call or after the call to follow up with customers. These notes are available in the phone call records. You can also access these notes for reference whenever you call the customer again.
Customer Sentiments
After a call is completed, you can rate the customer’s experience of talking with you using one of the five sentiments: Very Negative, Negative, Neutral, Positive, and Very Positive. Recording sentiments helps you improve customer experiences in the future.
To learn more about customer sentiments, click here.
Call Recording
You can automatically record all incoming calls to ensure you don't miss out on the important points you discussed with your contact. You can listen to these calls later to make notes or to review what you have discussed.
Transfer Calls
Do you have a team of sales reps or customer reps handling calls in your business? Then the Transfer Call feature is perfect for you. If some of your sales reps or customer reps are busy, they can transfer the call to other agents from the incoming call pop-up with just a click. This facility is available for Plivo and Twilio users. For example, if Chris is busy on a call with a customer and receives another call, they can immediately transfer the second call to James, another sales representative.
Follow these steps to transfer a call:
- Log in to CRM.
- Receive the call from the incoming call pop-up.
- Click the Transfer icon shown on the top right of the pop-up.
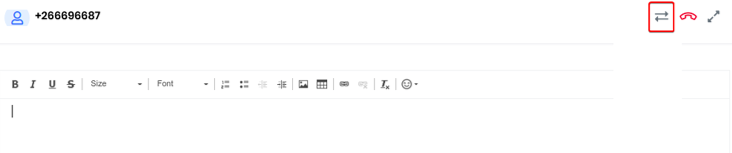
- Select the agent to whom you want to transfer the call.
- Add transfer call notes if any
- Click Transfer call.
| Note: You can get voicemails and voicemail transcriptions in Plivo and Twilio gateways. |
Configuring the Phone Call Pop-up
Would you like to capture details of your phone record directly from the Phone call Pop-up window? You can decide the fields and modules you can add to the Phone call Pop-up window from Settings > Phone Popup Configuration. You can configure the fields and related modules that must be displayed on the Pop-up. You can also make specific fields mandatory to be filled in. So, instead of going to the Phone calls module and editing the phone call records to update information after you finish a call, you can add details right in the phone call pop-up. Doesn’t that make your work easy?
Note: Only Admins can add details for unknown numbers. As an Admin, you can:
- Create a Contact or Link a Contact
- Create a Lead or Link a Lead
- Create an Organization or Link an Organization
- Create a Vendor or Link a Vendor
- Create an Employee or Link an Employee
Linking a Phone Call
To a Case Record
- If you call a customer from a Case record, the phone call is automatically linked to the Case.
- How does it work - The Cases field in the Phone Call module automatically gets updated with the Case details. This information is available in the Details view of the record.
- This is available for Twilio, Plivo, and Exotel gateways.
To a Deal Record
- If you call a customer from a Deal record, the phone call is automatically linked to the Deal.
- How does it work - The Deals field in the Phone Call module automatically gets updated with the Deal details. This information is available in the Details view of the record.
- This is available for Twilio, Plivo, and Exotel gateways.
Duplicate Prevention for the Office and Mobile Phone Fields
As an admin, you can enable duplicate prevention for the Office Phone and Mobile Fields of the essential modules, such as Contacts, Leads, and Organizations. You can prevent duplicate fields for phone call records with the following steps:
- Select the number of trailing digits to check for duplicates.
- The system checks for duplicates based on the following.
- All unique fields match.
- At least one unique field matches.
- When importing phone numbers and using the Find duplicates option, the system checks only the selected digits for duplicates.
Note:
|