Articles in this section
List View in Vtiger CRM
Feature Availability
Vtiger Editions: One Pilot | One Growth | One Professional | One Enterprise | One AI
Introduction
A List View in Vtiger CRM is a customizable display of records for a specific module. It lets you see multiple records simultaneously, filter them based on different criteria, and choose which information to display. Think of it as a flexible spreadsheet where you can tailor the view to suit your needs. Vtiger comes with pre-built List Views, but you can also create your own to focus on specific data sets.
You can perform a lot of quick actions in the List View, like:
- Use different conditions to filter a set of records in a module.
- Perform actions like edit, delete, duplicate, etc.
Benefits of List View in Vtiger CRM
The benefits of the List View in Vtiger CRM are:
- Quick overview of all records in a module.
- Efficient filtering of records using various conditions.
- Make personalized lists based on your requirements.
- Easier identification and organization of specific data sets.
- Perform actions like edit, delete, or duplicate on multiple records simultaneously.
In this article, you will learn about:
- Accessing List View
- Creating List
- Managing Lists
- List Management options
- Customizing List View Columns
- List View Actions
- Navigation and Record Preview
- Mini List View
Key Terminology
|
|
|
|
|
|
|
|
|
|
|
|
Accessing List View
- Log in to the CRM.
- Click the main Menu in the top right corner.
- Select a module under any tab.
- The List View for that module will be displayed, showing all records present.
Note: List View is the default view for every module.
Creating Lists
Using the List option, you can create lists to sort and store the records displayed in your List View and save them for future reference. This feature enables you to create different lists for multiple purposes. Let us begin by learning how to create lists manually.
For you to understand the process, we will create a list in the Contact module. You can follow the steps below to create lists in other modules.
Here are the steps to create a list from a module:
- Log in to the CRM.
- Go to the main Menu.
- Click the Essentials.
- Go to the Lead & Contact Management.
- Click Contact. The Contacts module opens.
- Click the drop-down present on the left corner of the List View screen.
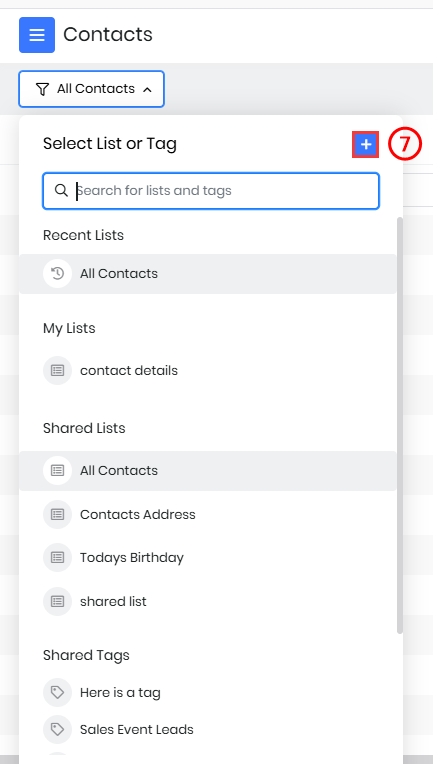
- Click the + button. The New List page opens.
- Enter or select the following List information:
- List Name: Enter the name of the list.
- Default Sort Column and Sort Order: Choose the required column and select Ascending or Descending order by which your list will be sorted.
- Set as Default: Enable this checkbox to make this list the default view. This will help you and other users to view only the most important records.
- List in Metrics: Enable this checkbox to make this list visible in the dashboard metrics.
- Choose List Conditions:
- To create the list, you need to specify a set of conditions. To do this, click + Add Condition.
- Add conditions in the All Conditions field, Any Conditions field, or both, based on which the list will be sorted.
- Use the All Conditions option when you want the list to display results that meet all the specified conditions. If one condition fails, the record is excluded from the list.
- Use the Any Conditions option when you want the list to display results that meet at least one of the specified conditions. If one condition is met, the record is included, even if others are not.
- Select the field on which to apply the condition from the Select Field dropdown.
- After selecting the field, choose the appropriate conditions from the List Conditions dropdown. Below are the list of conditions that you can choose from based on your requirements.
- Equals
- Not equal to
- Starts with
- End with
- Contains
- Does not contain
- Is empty
- Is not empty
- Choose Columns and Order:
- Click on the Search Fields search bar to choose columns. These selected columns will appear under Choose columns and order. Select at least one mandatory field. Mandatory fields are marked with an asterisk (*) next to their name. The default column in manage columns cannot be removed.
- However, you can:
- Add new fields
- Remove existing fields (except the default)
- Rearrange field order
- However, you can:
- Click on the Search Fields search bar to choose columns. These selected columns will appear under Choose columns and order. Select at least one mandatory field. Mandatory fields are marked with an asterisk (*) next to their name. The default column in manage columns cannot be removed.
Note:
- You can choose a maximum of 15 fields. You can remove, add, or rearrange fields based on your requirements.
- You can choose a maximum of 15 fields. You can sort the fields by clicking the X if you choose to remove that field.
- Provide a Share list: Select the users or roles with whom you want to share the list.
- Set as Default: Enable this checkbox if you want this list to be the default view. This will help you and other users to view only the most important records.
- List in Metrics: Enable this checkbox if you want this list to be visible on the dashboard metrics.
- Click Save.
A confirmation message stating that the List saved will appear after adding the list.
Managing Lists
You can track and organize the lists that you create in Vtiger CRM. This helps you find and use your lists easily. To further organize your work, List View provides three default list categories. Below are the steps to view the three list categories.
- Log in to the CRM.
- Go to the main Menu.
- Click the Essentials.
- Go to the Lead & Contact Management.
- Click Contact. The Contacts module opens.
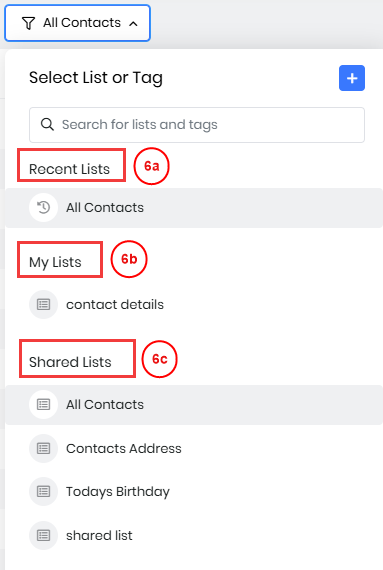
- Click the drop-down menu in the left corner of the List View screen to view the three types of Lists that are available by default.
- Recent Lists: Shows the lists that you have used recently.
- My Lists: You created these lists with different conditions, and you own them.
- Shared Lists: These are the Target records created by other users and shared with you.
For example, if User A creates a list and shares it with User B:
- When User B logs in, the shared list will appear under the Shared Lists section.
- When User A logs in, the same list will appear under their My Lists section.
Note:
- Only the list owner can edit shared lists, while users with whom the list is shared can view and duplicate the list but not make changes to the original.
- The top five frequently used lists will appear under My Lists and Shared Lists.
List Management options
You can easily control and customize your lists. The List View offers several management options. Using these options, you can modify, share, or even delete lists based on your needs. To perform the actions below, click the More icon beside the list name in the Lists drop-down menu. Below are the steps to access list management options.
- Log in to the CRM.
- Go to the main Menu.
- Click the Essentials.
- Go to the Lead & Contact Management.
- Click Contact. The Contacts module opens.
- Click the drop-down present in the left corner of the List View screen.
- Click More in any list to get the following options.
- Edit: Modify the conditions and details of an existing list according to your needs.
- Duplicate: Create a copy of the list with the same settings, allowing you to work with the same data sets.
- Share: Share the list with other users or groups within your organization.
- Delete: Remove the list from the system when it's no longer needed.
- Set as Default: Enable the checkbox to make a list of your default view for quick access.
Search Bar in Lists
The Search Bar in the List View is a unique feature that helps you quickly find and filter records within your CRM. It uses keywords to search your data, making managing large records easier. Here's how it works.
- Log in to the CRM.
- Go to the main Menu.
- Click the Essentials.
- Go to the Lead & Contact Management.
- Click Contact. The Contacts module opens.
- Click the drop-down present in the left corner of the List View screen.

- When you search a list name in the Search Bar, exact matches will appear if the name exists in the database.
- The search function provides auto-suggested results based on the keywords you have entered, helping you find similar or related contacts.
- Note:
- You can have more than one filter to sort and find your choice of records.
- If you search multiple times in the same field, sorting happens based on the OR condition, but if you search in different fields, sorting happens based on the AND condition.
- You can search in the Search Bar, which is present under the column name. This helps you find the desired records quickly.
- Note:
- If your list contains more than five values, the Select All option allows you to select all values, including those below the Show More option.
- If you add the + sign, phone number fields are given priority in the filter options, followed by the rest.
- If you add the @ character, the email field will be displayed first in the filter options, followed by the rest.
- Search the following sections in the Assigned to search bar:
- Users
- Groups
- Suspended Users
- Deleted Users
- Click Clear to clear all the filters and start a new search
Note:
- Switching between lists, adding new lists, and editing the current list will clear search filters.
- The search option is not displayed for user fields (such as the Assigned To field) unless the combined count of users and groups exceeds 10.
Customizing List View Columns
Customizing your List View columns helps you organize your data how you want, making it easier to find and manage the most important information. Adding, removing, rearranging, sorting, and resizing columns allows you to create a view that fits your needs and helps you more efficiently.
Follow these steps to customize the list view columns:
- Log in to the CRM.
- Go to the main Menu.
- Click the Essentials.
- Go to the Lead & Contact Management.
- Click Contact. The Contacts module opens.
- Click the Manage Columns icon on the left side of column names. A Configure Columns window opens.
- Remove the Columns by clicking the X button on the field name in the Selected fields section.
- Add the columns of your choice by selecting the columns from the Available Fields section.
- You can rearrange the columns by dragging and dropping. For example, drag the Last Name field to the place of the First Name field and the First Name field to the place of the Last Name field.
- Click the Update List button to view the changes in your List View.
- You can sort columns in the List View by clicking the arrows present near the column names. This will sort the records in ascending or descending order.
- You can resize the columns by dragging the vertical bar beside each column name.
Note: You can see the vertical bar and Arrows when you hover over the column name.
List View Actions
You can perform various actions on an individual record or on all the records. For you to understand the process, we will edit a list in the Contact module. You can follow the steps below to edit lists in other modules.
- Log in to the CRM.
- Go to the main Menu.
- Click the Essentials.
- Go to the Lead & Contact Management.
- Click Contact. The Contacts module opens.
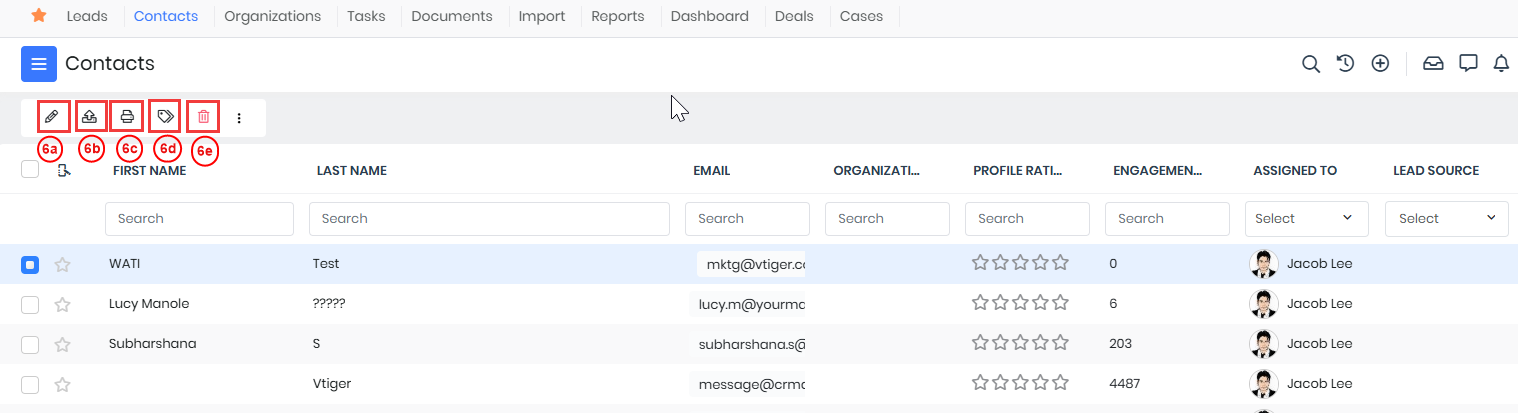
- Click on the Checkbox, and the actions below will be displayed.
- Edit - You can edit a record.
- Export - You can export a record in either of the following ways.
- Export selected records
- Export records on the current page
- Export all the records
- Print/Export PDF - Print a record into a hard copy.
- Tags - You can assign tags to records to categorize them.
- Delete - You can delete a record.
- More - You can perform more module-specific actions like
- Comment
- Export to Google Spreadsheets
- Follow
- Unfollow
- Transfer Ownership
- Email Recipient Preferences
- Add To Process
Note:
- You can now enable or disable the Mass Edit option for individual users based on user roles and profiles. If you disable the mass edit option for a profile, the user related to that profile will not see the mass edit button when they select multiple records. By default, this option is enabled for all profiles. Only admins can perform this action.
- A maximum of 25000 records can be downloaded from List View.
- You will have a module-specific action called Change Owner in the Leads Module. You can change the task's owner by clicking the person icon.
- You can perform the following quick actions when you hover over a record.
- Follow: You can follow a record to receive notifications about all the updates on the record. Click the Star icon. The Follow feature is available in all the modules.
- Communication toolbar: Available in Deals, Quotes, Contacts, and Organizations modules
- Telegram: You can reach the contact via Telegram
- WhatsApp: You can reach the contact via WhatsApp
- Call: You can call a contact
- Email: You can send an email to the registered email address of a contact.
- SMS: You can send an SMS to the contact’s number.
- Edit: You can Edit the record.
- Other icons: other icons available in the Event module
- Create Reminder: You can create a reminder for the contact. For example, an alert for an upcoming meeting
- Edit: You can edit contact information.
Navigation and Record Preview
Switching between pages in the list view in Vtiger CRM is very simple. You can jump to the desired page by just entering the page number.
- For example, assume you have 100 pages of records, with only 50 records displayed per page. If you want to jump directly to the 40th page, type 40, and you will land safely on the 40th page. You will be redirected to the page number you have entered
Note: Clicking on a record in the List View loads its Summary View as a preview. To know more about Summary View, click he
Mini List View
- The Mini List View now has the Sort and Search option similar to the List View.
- Like the List View, it will allow you to search for data on the Dashboard and sort the list according to your requirements.
- The Search will be shown when there are more than five records.
Reference
Summary ViewDetails View