Articles in this section
Managing your Tasks
Feature Availability
Vtiger Editions: One Pilot | One Growth | One Professional | One Enterprise | One AI
Introduction
Managing Tasks and staying organized is crucial for ensuring business processes run smoothly and important details don’t fall through the cracks. Vtiger CRM’s Tasks feature offers an efficient solution by allowing you to create, track, and set reminders for your activities. Tasks, unlike Events that block time on your calendar, function as checklist items with specific due dates, helping you stay on top of your to-dos.
To further streamline your Workflow, Vtiger CRM enables automation through workflows, which can automatically create Tasks based on specific triggers. For instance, when a sales rep converts a Lead to a Contact, a Workflow can generate a Task like Send Welcome Meeting Invite to Contact. This automation reduces manual effort, ensures consistency, and enhances productivity.
To learn more about Workflow Action for creating a Task, click here.
Benefits of Tasks in Vtiger CRM
The following are the benefits of the Tasks in Vtiger CRM:
- Automated Reminders: Keeps users on track by sending timely reminders before Task deadlines, helping to prevent missed follow-ups or overdue activities.
- Clear Task Management and Tracking: Allows users to create, monitor, and update Tasks with options for Dependencies, Subtasks, and Status Updates, making Task progress easy to follow.
- Integrated Time Tracking: Tracks time spent on Tasks via time logs, enabling users to monitor productivity, bill clients accurately, and review time allocations.
- Automated Task Creation with Workflows: Automates routine Tasks through Workflows, creating Tasks based on triggers to save time and ensure consistency in Task Management.
In this article, you will learn about:
- Viewing Tasks
- Creating a Task
- Creating a Subtask
- Task Sequencing
- Setting Up Task Reminders
- Time Tracking in Tasks
- Mass Editing Tasks
- Merging Tasks
Key Terminology
|
|
|
|
|
|
|
|
|
|
|
|
|
|
|
|
|
|
|
|
|
Viewing Tasks
You can access all your Tasks by navigating to Main Menu > Essentials > Tasks. The system offers four viewing options: List View, Kanban View, Calendar View, and Summary View. By default, Tasks are displayed in List View.
You can use the Before and After Picklist values in the Date field of the Tasks module to filter records based on specific time periods. For example, selecting Before 31/12/2024 will exclude records added after this date, while selecting After 31/12/2024 will display only records added after this date.
You can easily switch between the List, Kanban, and Calendar Views using the icons at the top right, next to the +Add Event button
List View
The List View displays all your Tasks in a simple list format. You can sort Tasks by date, name, and other criteria by clicking the column headers. From this view, you can mark Tasks as Completed, Merge, Edit, or even Create your Custom List of Tasks.
To learn more about the List View, click here.
Kanban View
In Kanban View, Tasks are displayed as individual cards organized into columns based on their status. In this view, you can Filter Tasks, hide empty columns, and perform other actions.
To learn more about the Kanban View, click here.
Calendar View
The Calendar View provides a clear snapshot of your daily schedule, showing Tasks based on their assigned time. The arrows at the top allow you to navigate through past and future Tasks, and the Week and Month tabs switch between a weekly and monthly view.
To learn more about the Calendar View, click here.
Summary View
The Summary View provides a comprehensive snapshot of an individual Task, allowing you to see all key details on a single page. This includes important information such as due date, priority, status, and assigned user. You can take quick actions like editing Task details or marking them as completed.
The Activity section displays updates and comments related to the Task. You can use Calculus AI to gain deeper insights, and the filter option helps refine the displayed data, such as internal comments and updates. The One View consolidates all relevant Task information into a single, easily accessible place for efficient management.
To learn more about the Summary View, click here.
Grid Edit
Grid Edit, or Inline Editing, provides a tabular view for quick record updates. It allows users to edit multiple records simultaneously and save changes in one click. Users can customize columns, sort data, and filter records efficiently. Additional actions like adding records, exporting data, and bulk operations enhance productivity.
Note: Grid Edit is a paid add-on that must be installed from the Add-on.
To learn more about the Grid Edit, click here.
Creating a Task
You can create a Task in the following ways:
- Using the + Add Task button in the Events List, Kanban, or Calendar Views
- Using Quick Create
- From another record within the CRM
Now, we will learn about each method in detail.
Creating a Task using the Add Task button
To create a Task, you can use the Add Task button on List, Kanban, or Calendar Views in the Tasks module. The example below shows how to create a Task from the List View. The steps will remain the same in the Kanban and Calendar Views.
Follow these steps to create a Task:
- Log in to your CRM account.
- Click the Main Menu.
- Go to Essentials > Tasks. The Tasks page opens.
- Click +Add Task. The Add Task popup window opens.
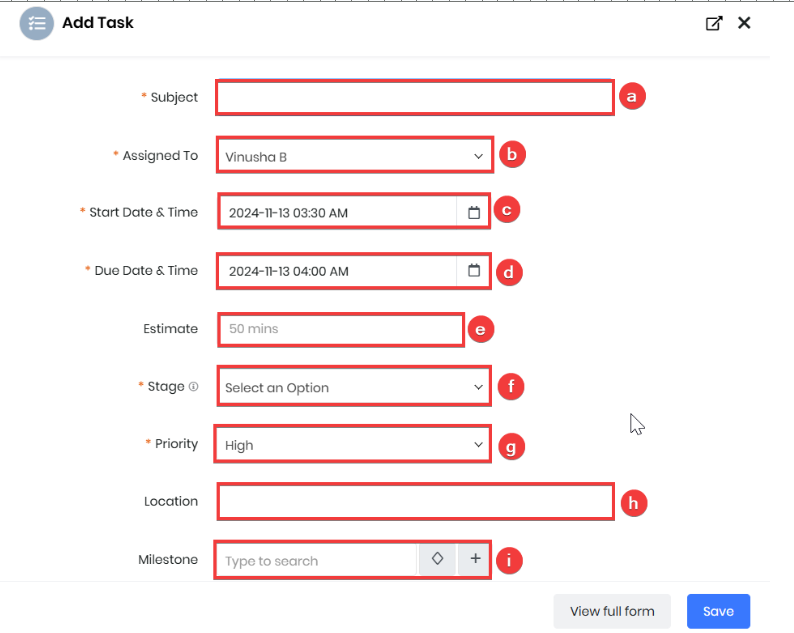
- Enter or select the following details to create a new Task:
- Subject - Add the Task title to the Subject textbox.
- Assigned To - Select the name of the person to whom you want to assign the Task.
- Start Date and Time - Select the start date and time by clicking the Calendar icon.
- Due Date and Time - Select the due date and time by clicking the Calendar icon.
- Estimate - Add your estimated time for completing the Task.
- Stage - Select the Task's current status from the drop-down (e.g., Pending, In Progress, etc.).
- Priority - Select the Task's priority from the drop-down (High, Medium, Low, or Urgent).
- Location - Add the location name if required.
- Milestone -Enter the project's milestone name in the search bar or select it by clicking the project milestone icon. You can also add a new project milestone by clicking the + icon next to the milestone icon.
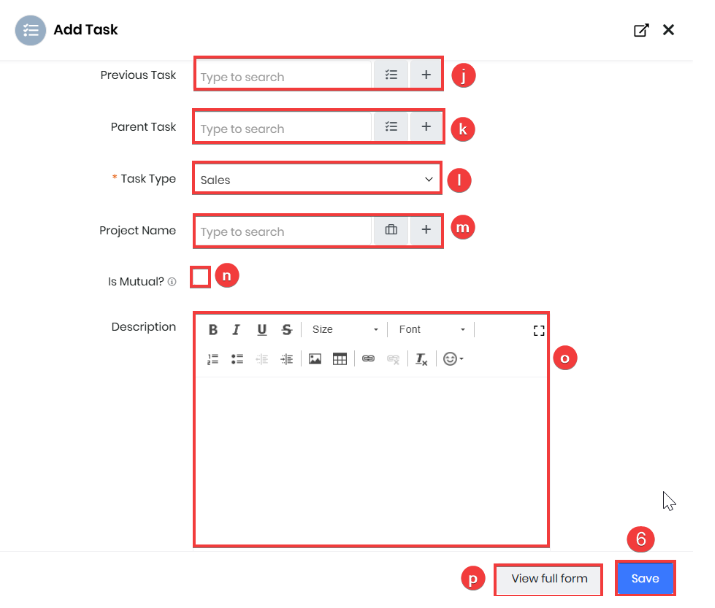
- Previous Task - Add your previous Task by entering its name, or search by clicking the icon next to the search bar.
- Parent Task - Add the parent Task by entering its name or search by clicking the icon next to the search bar.
- Task Type - Select the type of Task from the drop-down menu.
- Project Name - Enter the project name or search by clicking the icon next to the search bar. You can also create a new project by clicking the + icon.
- Is Mutual - Enable to make the Task visible to contacts in the Deal Room.
- Description -Add the description of the Task.
- View full form - Click to enter or select details for the following sections:
- Task Details
- Description Details
- Service Details
- SLA Information
- Click Save.
Creating a Task Using Quick Create
Quick Create allows you to create a Task by entering only the essential details. This feature can be accessed from any screen in the CRM, saving you significant time.
Follow these steps to create a Task using Quick Create:
- Log in to your CRM account.
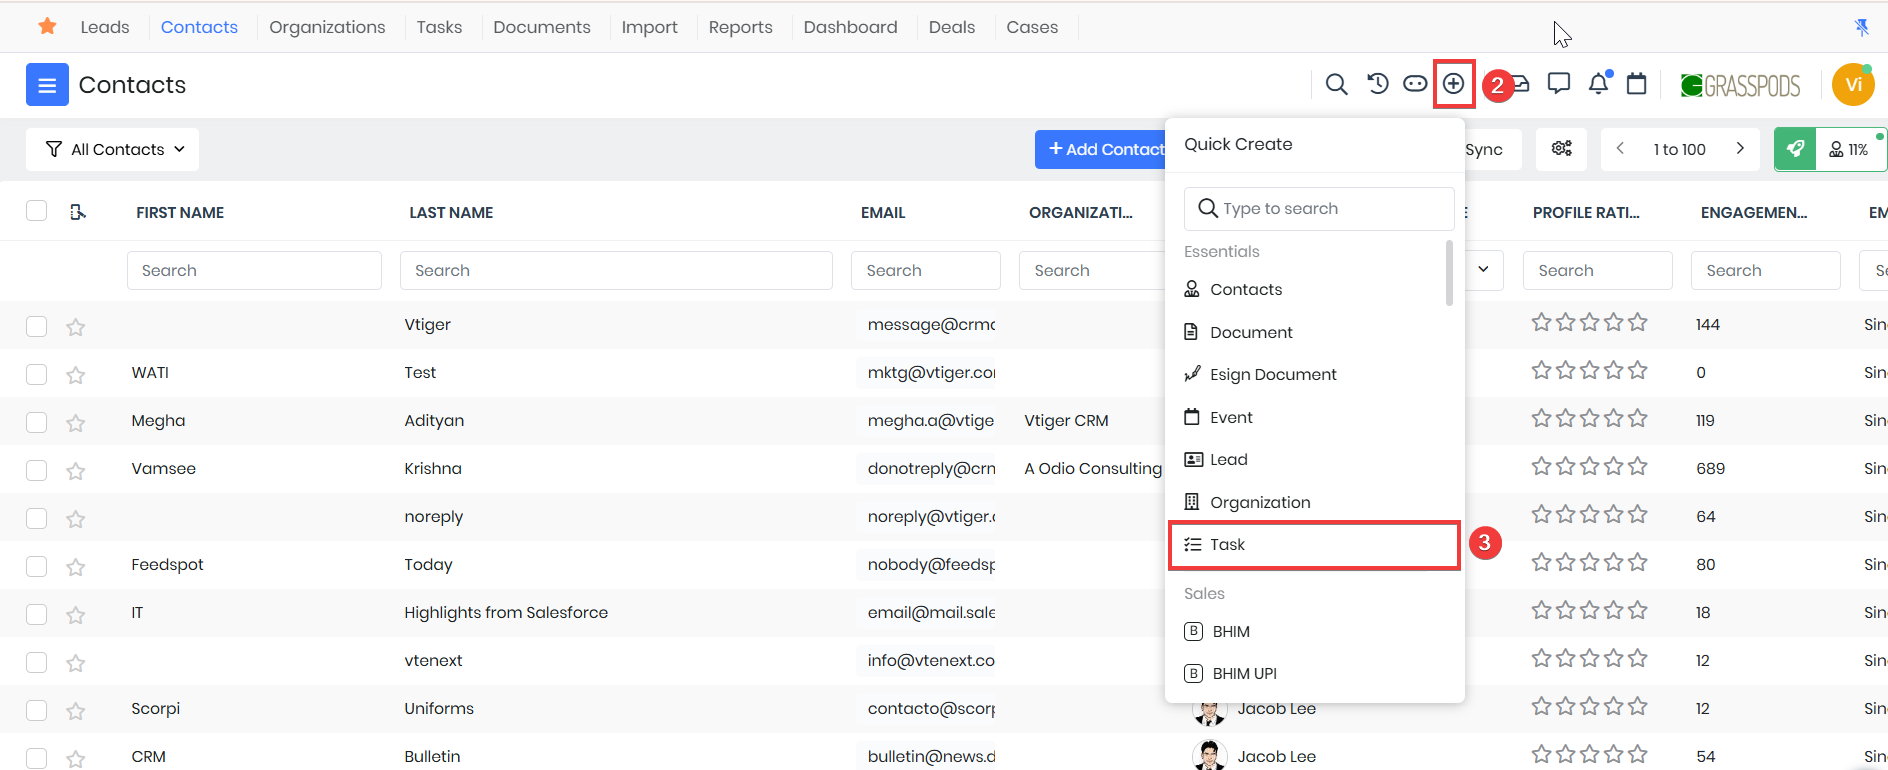
- Click the Quick Create icon located on the top right side of your screen.
- Select Tasks. The Tasks page opens.
- Enter the mandatory details.
- Click View Full Form to enter or select details for the following sections:
- Task Details
- Description Details
- Service Details
- SLA Information.
- Click Save.
To learn more about Quick Create, click here.
Creating a Task from other module records
You can create an Event from a Deal, Contact, Organization, or Quotes record.
Follow these steps to create a Task from other module records:
- Log in to your CRM account.
- Click the Main Menu.
- Go to Deals (or Contacts, Organizations, Quotes). The List View opens.
- Select a record. The Summary View of the record opens.
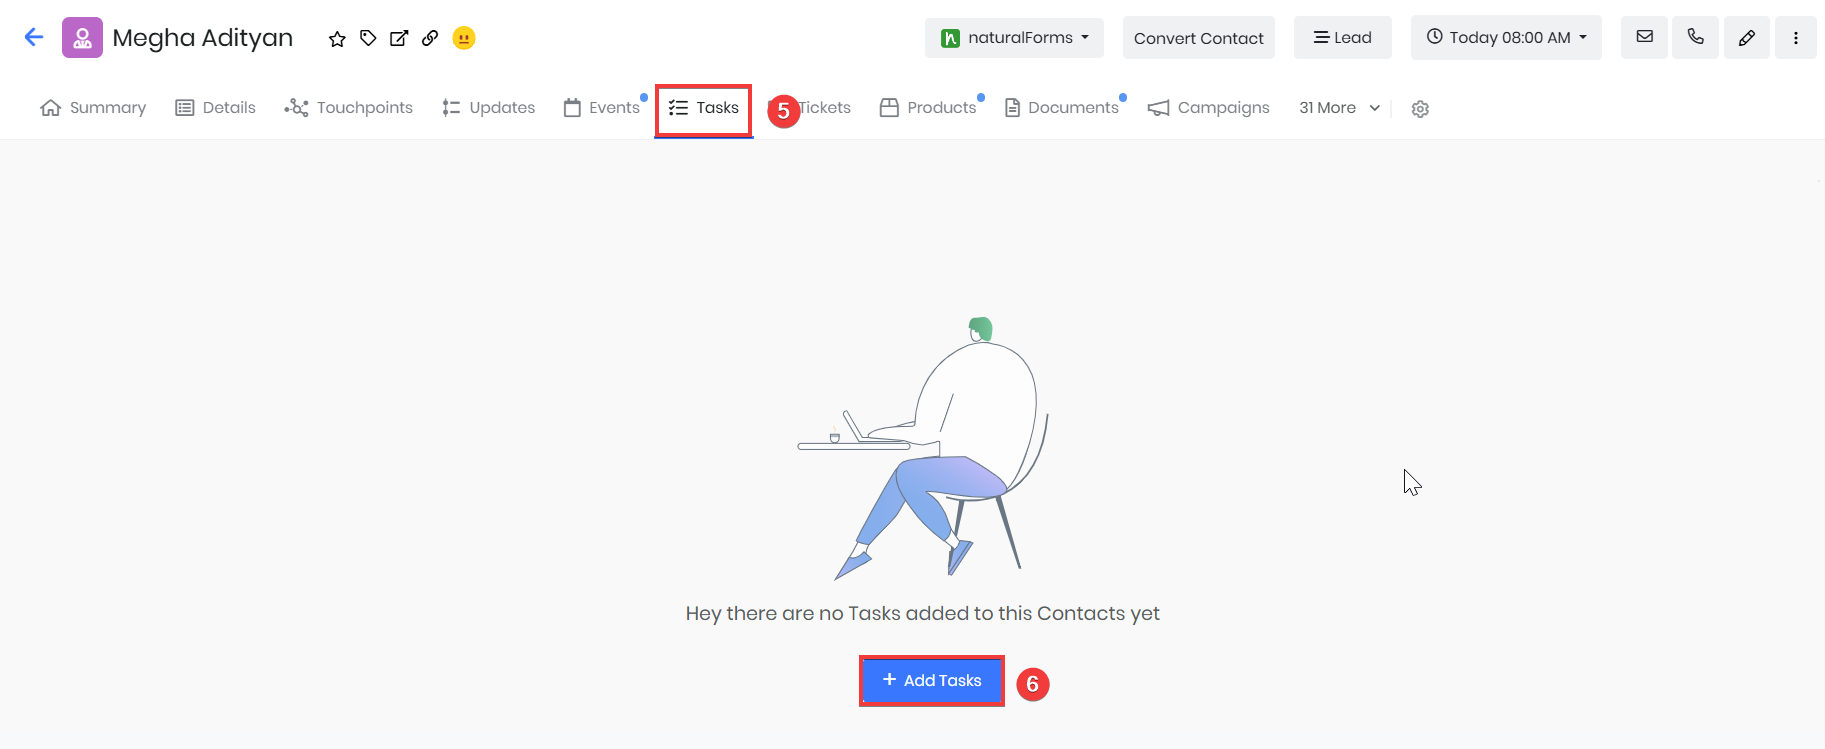
- Click the Tasks tab. The Tasks List View appears, displaying all previously added Tasks for that record.
- Click the +Add Tasks button.
- Enter the mandatory details.
- Click View Full Form to enter or select details for the following sections:
- Task Details
- Description Details
- Service Details
- SLA Information.
- Click Save.
Creating a Subtask
A Subtask is a child Task. You cannot mark a Task as completed before completing its Subtasks. Also, you cannot update the Due Date of a Task before completing its Subtasks.
Follow these steps to create a Subtask:
- Log in to your CRM account.
- Click the Main Menu.
- Go to Essentials > Tasks. The Tasks page opens.
- Select a record. The Summary View of the record opens.
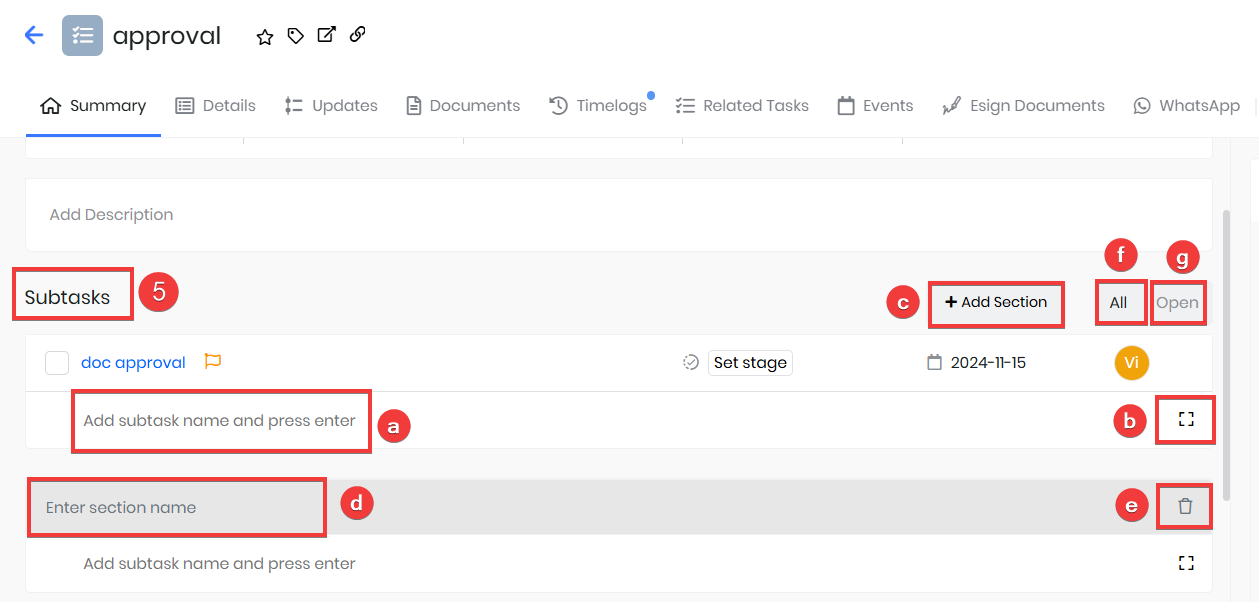
- Enter or select the following sections to add a Subtask:
- Add Subtask name - Enter the Task name in the space provided and click enter.
- Quick Create - Opens an Add Task page, fill the mandatory fields and save the Task as a new Subtask.
- Add Section - Click to create a new section.
- Enter section name - Enter a title for the section and add the Tasks related to it, or create a new Task within that section.
- Delete - Click to remove the added section.
- All - All the Tasks will be visible under this section like completed, pending, progress, etc.
- Open - In Progress, and Pending Tasks will be visible.
Task Sequencing
Task sequencing in CRM organizes Tasks with one-way dependencies, helping teams manage workflows more effectively. You can create dependencies between Tasks or set up parent Tasks with Subtasks to ensure Tasks are completed in the correct order.
Adding Previous Tasks
When one Task depends on the completion of another, it is set up as a successor to a previous Task.
For example, if you have a Write Blog Post Task, you might set it as a successor to Complete Topic Research. This means Write Blog Post can only be completed once Complete Topic Research is marked as completed.
Follow these steps to add a previous Task to a Task:
- Log in to your CRM account.
- Click the Main Menu.
- Go to Essentials > Tasks. The Tasks page opens.
- Select a record. The Summary View of the record opens.
- Click Edit. The edit page opens.
- Go to the Previous Task section.
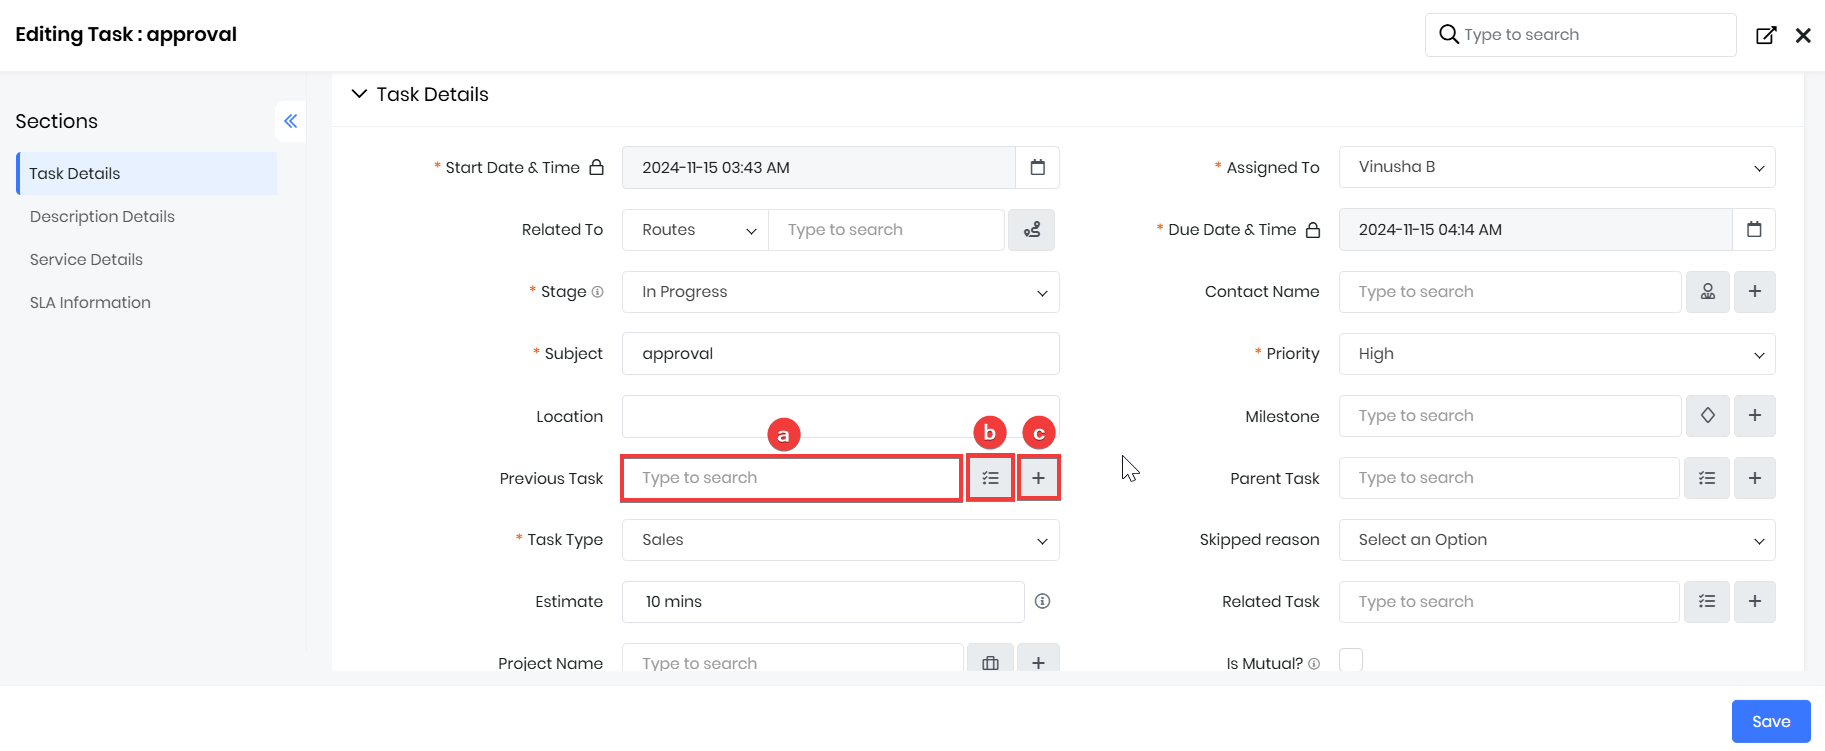
- Enter or select the following sections to add a Previous Task:
- Type to Search - Enter a Task name to view relevant suggestions.
- Create - Open a page to create a new Task, fill in all required fields, and save.
- Select - Click to display a list of Tasks and choose one.
- Click Save.
- If a successor Task’s end time is earlier than the previous Task’s, adjust the previous Task’s start time to align with the successor’s start time. Once a previous Task is marked complete, all successor Tasks will update their start dates to match the completed Task’s due date.
- Reopening a successor Task doesn’t affect its start date. However, if a new previous Task is assigned, the successor’s start date should be updated to align with the new Task’s due date.
Adding Parent Tasks
A Parent Task can have many Subtasks under it. You can close a parent Task only after closing all its Subtasks.
For example, if you have a Website Launch Parent Task, you could break it into Subtasks like Design Approval, Content Upload, and Functionality Testing. The Parent Task can only be completed once each of these Subtasks is completed.
Follow these steps to add a Parent Task to a Task:
- Log in to your CRM account.
- Click the Main Menu.
- Go to Essentials > Tasks. The Tasks page opens.
- Select a record. The Summary View of the record opens.
- Click Edit. The edit page opens.
- Go to the Parent Task section.
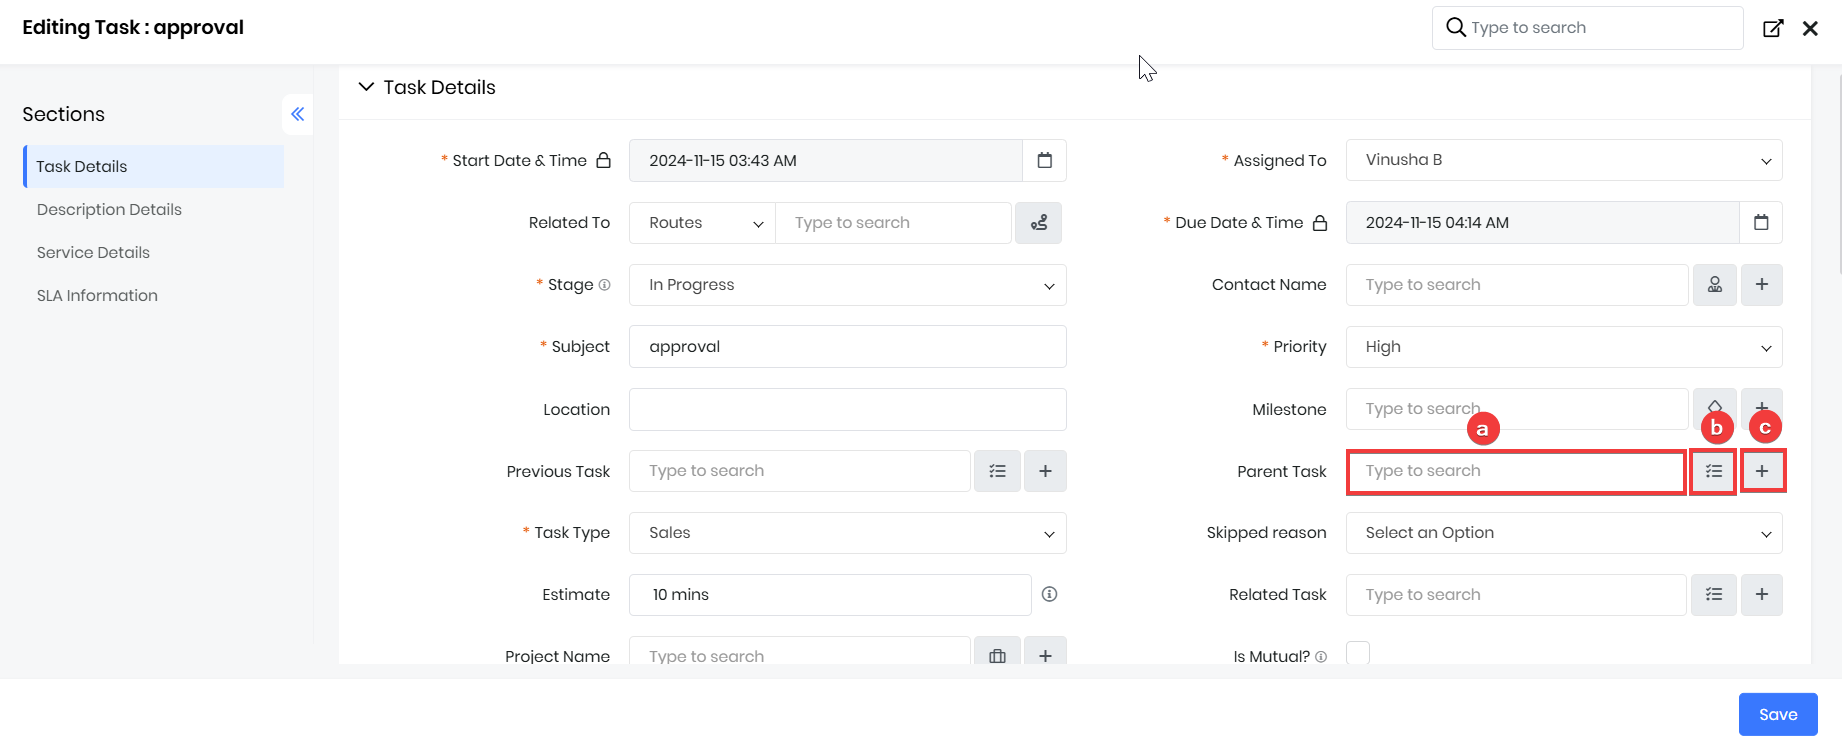
- Enter or select the following sections to add a Parent Task:
- Type to search - Enter a Task name to view relevant suggestions.
- Create - A page opens to create a new Task. Fill in all required fields and save.
- Select -Clicking displays a list of Tasks from which a Task can be selected.
- Click Save.
Note:
- A Parent Task's start and end times are automatically set to the start time of the earliest Subtask and the end time of the latest Subtask.
- Subtasks operate independently and can each have their own previous Tasks.
Setting Up Task Reminders
Vtiger CRM sends an email reminder when a Task is about to begin. To set up this reminder, you need to specify the number of days, hours, or minutes before the Task's Start Date & Time that you want to receive the notification.
Follow these steps to set up a Task reminder:
- Log in to your CRM account.
- Click the Main Menu.
- Go to Essentials > Tasks. The Tasks page opens.
- Create a new Task or open a Task. The Summary View of the record opens.
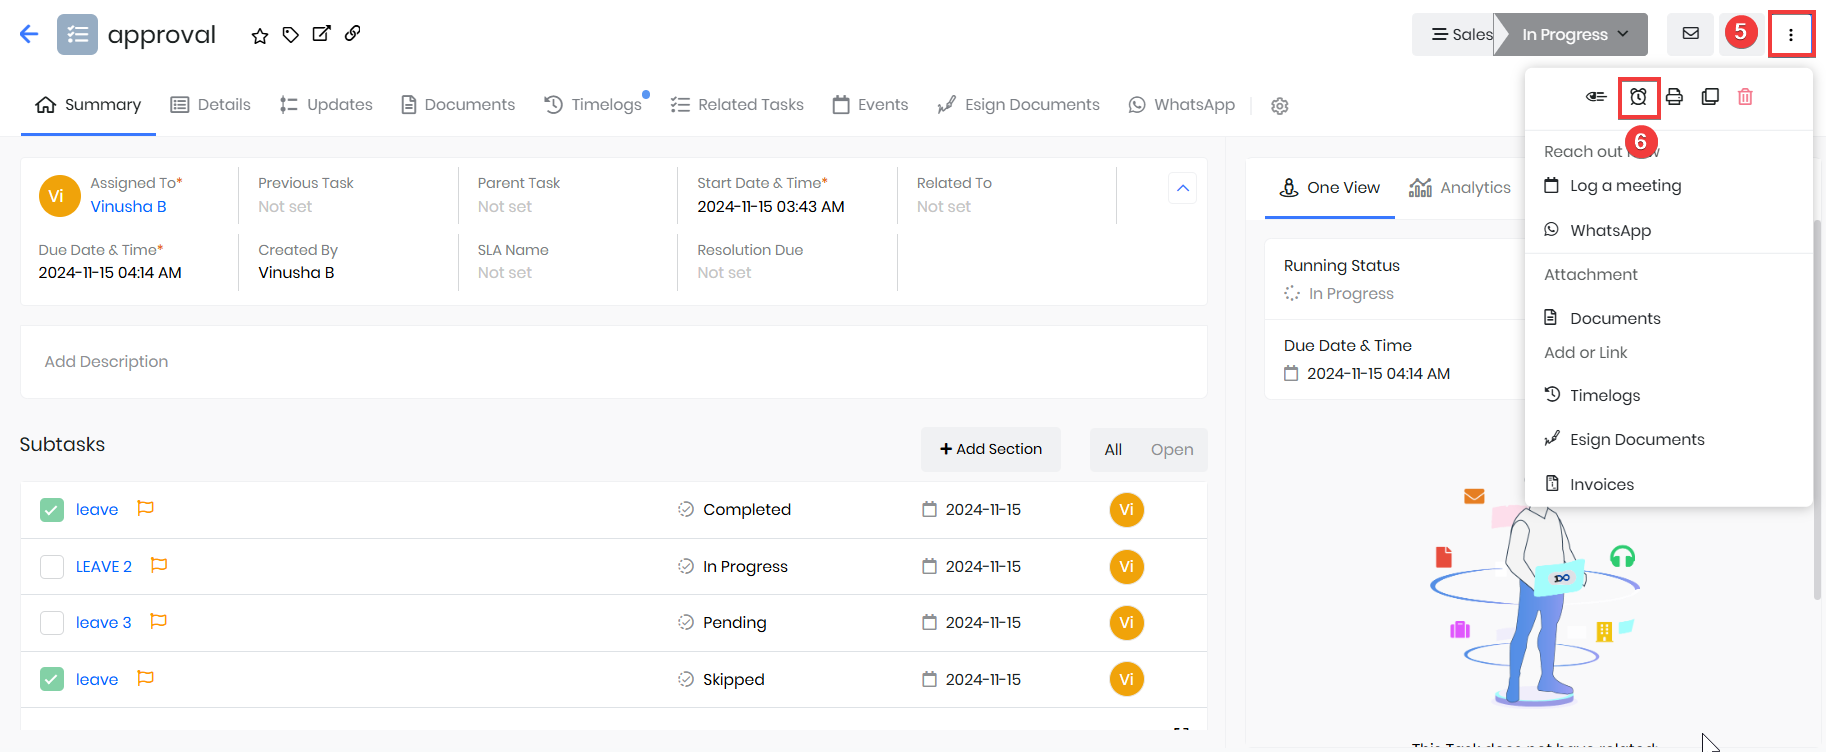
- Click the More icon on the top right corner of a Task.
- Click the Create Reminder icon. The Create Reminder page opens.
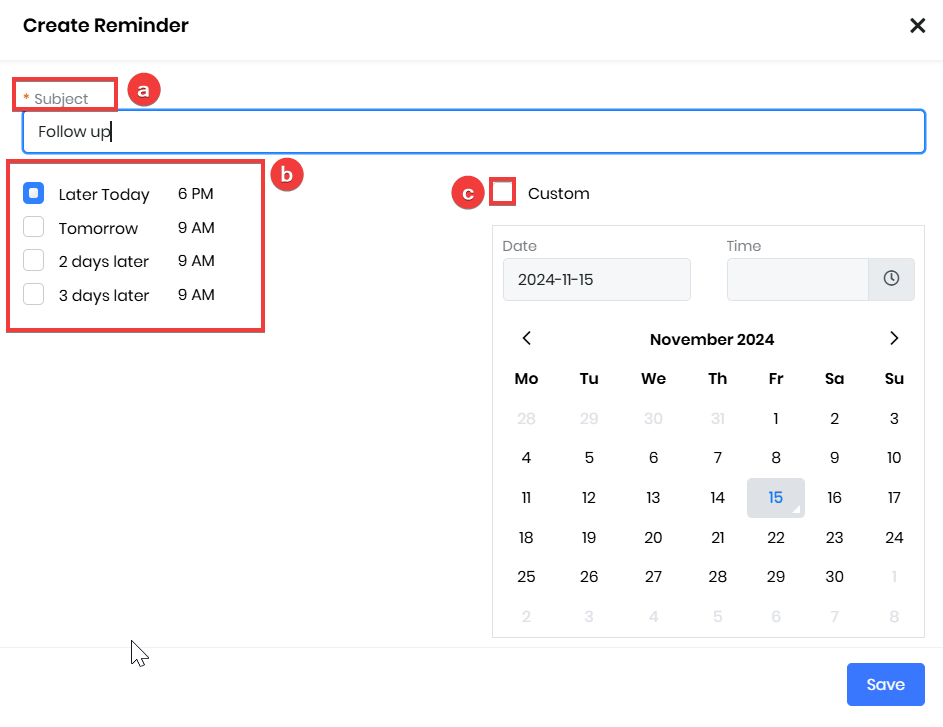
- Enter or select the following sections to add a Reminder:
- Enter the reminder name under Subject.
- Choose the default added reminder date and time.
- Click the Custom checkbox to enter your choice of time.
- Click Save.
Time Tracking in Tasks
Time tracking in Vtiger enables you to log and monitor the time spent on each Task. By creating timelogs, you can accurately track time for Tasks, especially for those that are billable. All timelogs associated with a Task are displayed under the Timelogs tab.
Creating a Timelog for a Task
Follow these steps to create a timelog for a Task:
- Log in to your CRM account.
- Click the Main Menu.
- Go to Essentials > Tasks. The Tasks page opens.
- Create a new Task or open a Task. The Summary View of the record opens.
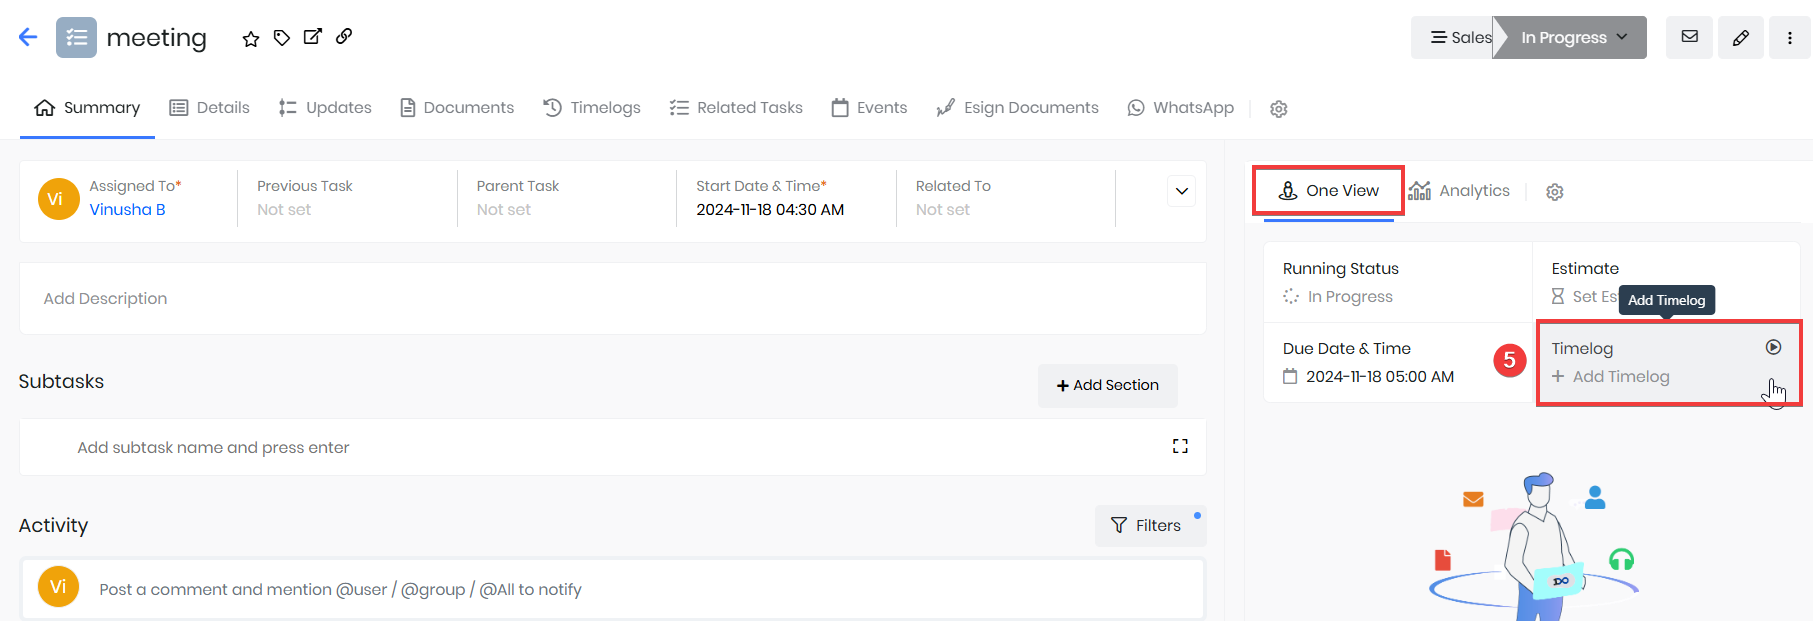
- Click the Start Timer icon in the Timelog block under One View.
You can see the timer running on the top of your CRM screen. Vtiger creates a timelog for the Task in the Working state. You can view it under the Timelogs tab on the Task record.
Using timelogs
Follow these simple steps to create, pause, and stop a timelog for a Task:
- Pause or Stop the Timer: You can pause or stop the timer in two ways:
- By clicking the timer at the top of your screen.
- By clicking the Clock icon under the Task’s One View tab.
- Resume the Timer: You can resume the paused timer in two ways:
- By clicking the timer at the top of your screen.
- By clicking the Clock icon under the Task’s One View tab.
- Add a Timelog Manually: If you forget to start the timer but know the approximate time spent:
- Go to the One View tab or Timelogs tab of the Task.
- Click the + icon to manually create a timelog.
These options can be used when you forget to start the timer but know the approximate time spent on the Task.
Note:
- Only one timer can run at a time. If you start a new timer, all other running timers will automatically pause.
- The One View tab shows the total time spent on a Task. It is calculated by summing up the durations of all timelogs in Paused and Completed states.
Mass Editing Tasks
Mass edit is an action available in the List View of Tasks. You can select multiple Tasks and edit them at once with Mass Edit.
Follow these steps to perform Mass Edits on Tasks:
- Log in to your CRM account.
- Click the Main Menu.
- Go to Essentials > Tasks. The Tasks Page opens.
- Select two or more Tasks in the List View.
- Click the Edit icon from the toolbar shown on the left. The Edit page opens.
- Select a field from the Available Fields drop-down. You can select multiple fields to edit their values.
- Select the value.
- Click Save.
The new field value gets updated in all the Tasks selected.
Merging Tasks
When you have two or more duplicate Tasks or Tasks with similar information, you can merge them into one. While merging Tasks, you must choose a single Task Name, Due Date, and other field values. You can pick field values from one of the records being merged.
Follow these steps to Merge Tasks:
- Log in to your CRM account.
- Click the Main Menu.
- Go to Essentials > Tasks. The tasks Page opens.
- Select two or more Tasks in the List View.
- Click the More icon from the toolbar shown on the left. A list of options is displayed.
- Click the Merge selected record option. A popup with List Record Merge opens.
- Select the fields from the selected record that should be present for the merged Task. Choose the Event Name, Start Time, Due Date, etc., for the merged Task.
- Click Merge.