Articles in this section
Live Chats in Vtiger CRM
Feature Availability
Vtiger Editions: One Growth | One Professional | One Enterprise | One AI
Introduction
Live chats refer to real-time, text-based communication channels that allow individuals or businesses to engage in interactive conversations with website visitors or customers. These chats typically occur on a website or through a dedicated messaging platform. Live chats enable instant communication, efficiently addressing inquiries, offering support, and engaging with website visitors or customers in real-time.
Live Chats in Vtiger CRM
Vtiger's Live Chats feature enables you to engage in real-time conversations with website visitors directly within the CRM platform. Using Live Chat, you can connect directly with website visitors or customers who send direct messages from social media platforms, such as Facebook and Twitter.
Live Chats are primarily used by:
- Sales Agents: To connect with potential leads, respond to inquiries instantly, and improve conversion rates
- Support Agents: To assist customers quickly, resolve issues in real time, and enhance customer satisfaction.
Apart from customer conversations, you can also do the following from the Live Chat window:
- Contact and lead capture: Generate leads or create contacts when someone is interested in the product and visits your website.
- Display CRM records: Access CRM records related to the customer you are chatting with.
- Chat tracking and assignment: Track the chats handled by your team and assign them by creating cases if required.
- Knowledge Base: Use the Knowledge Base to send help articles and FAQs to customers to help them find CRM solutions
- Reporting and analytics: Generate reports and analyze team performance with chat insights.
The Live Chats module screen, known as the Live Chats Console, offers a centralized interface for managing, tracking, and engaging in live chat conversations with website visitors or customers. To use Live Chats, you will need to install the Vtiger Live Chat Add-on from the Vtiger Extension store.
Use Cases - Live Chat in Today's Industries
Here are some common use cases illustrating how different industries can utilize the Live Chats feature to enhance their customer interactions and business operations:
- E-commerce: Live chat is frequently employed by e-commerce businesses to assist customers with product inquiries, order support, and pre-purchase questions.
- Customer Support: Across various industries, live chats serve as a primary channel for customer support.
- Travel and Hospitality: The travel and hospitality industry utilizes live chats to engage with customers during the booking process, address travel-related queries, offer guidance on hotel accommodations, share local recommendations, and manage reservation modifications or cancellations.
- Financial Services: Banks, insurance companies, and other financial service providers use live chats to provide personalized support for customers' account-related inquiries, help with online banking transactions, guide them through the loan application process, and address concerns regarding policies or claims.
- Education: Live chats are utilized in the education sector to assist students and parents with admissions information, course enrollment, tuition inquiries, technical support for online learning platforms, and general academic guidance.
- Real Estate: Real estate agencies employ live chats to interact with potential buyers or tenants, answer property-related questions, schedule property viewings, provide information about listings, and offer assistance throughout the home-buying or renting process.
- Healthcare: Used to provide online consultations, answer non-emergency medical inquiries, assist with appointment scheduling, guide patients through insurance processes, and support telemedicine platforms.
- Software and Technology: Companies in the software and technology sectors use live chats to provide technical support, address software-related queries, assist with product installations or troubleshooting, and guide customers through software updates or feature usage.
- Online Gaming: Live chats are used by online gaming platforms to enable real-time communication between players, provide support for technical issues, offer gaming tips, and facilitate community engagement.
- Sales and Lead Generation: Chat agents can engage website visitors, qualify leads, provide product information, offer personalized promotions, and guide customers through sales.
Benefits of Using Live Chats in Vtiger CRM
The benefits of using the Live Chats feature are:
- Facilitate immediate and direct communication between website visitors, customers, and business representatives.
- A cost-effective alternative to traditional customer support channels, such as phone calls or emails.
- Offer multitasking capabilities, allowing support agents to handle multiple chats simultaneously.
- Provide features to log and save chat conversations, allowing businesses to reference previous chats for future interactions or to review customer queries.
- Directly channel messages from social platforms like Instagram and Twitter into the CRM.
In this article, you will learn about:
- Installing Live Chats
- Activating Live Chat Widget
- Navigating Live Chats
- Using an AI Agent for Live Chats
- Social Media Integration in Live Chats
- Tracking Live Chats
- Viewing Live Chat Records
- Chat Insights
Key Terminology
|
|
|
|
|
|
|
|
|
|
|
|
|
|
|
|
|
|
|
|
|
Installing Live Chats
To use Live Chats, you will need to install the Vtiger Live Chat add-on from the Vtiger Extension store. The Live Chats module screen, called Live Chats Console, provides a centralized interface for managing, tracking, and engaging in live chat conversations with website visitors or customers.
Before you can start using the Live Chats feature, you must install the Vtiger Live Chat Add-on from the Vtiger Extension Store.
Follow these steps to install Vtiger Live Chats from the Extension Store:
- Log in to the CRM.
- Click the User Menu.
- Click Settings. The Settings page opens.
- Look for Extensions.
- Click Add-Ons.
- Search for Vtiger Live Chats.
- Click Install.
After successful installation, you will see a success message in the top right corner of the screen.
Activating the Live Chat Widget
Before you start using Live Chat in Vtiger CRM, you must activate and configure the Live Chat Widget.
Follow these steps to configure the Live Chat Widget:
Step 1: Create a Tracker
- Log in to the CRM.
- Click the User Menu in the top right corner.
- Go to Settings. The Settings page opens.
- Under Websense, select Trackers.

- Click +Create Tracker on the top right of the screen.
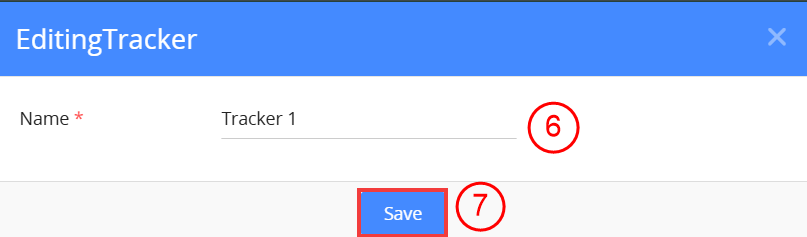
- Enter a name for the tracker.
- Click Save.
The tracker has been created and added to the list, along with its code.
Step 2: Customize Your Widget
- Log in to the CRM.
- Click the User Menu icon on the top right corner of the screen.
- Click Settings. The Settings page opens.
- Under the Websense block, click Widgets.

- From the Select Tracker drop-down, choose the tracker linked to your website.
- From the Select Widget drop-down, select the widget you want to customize.
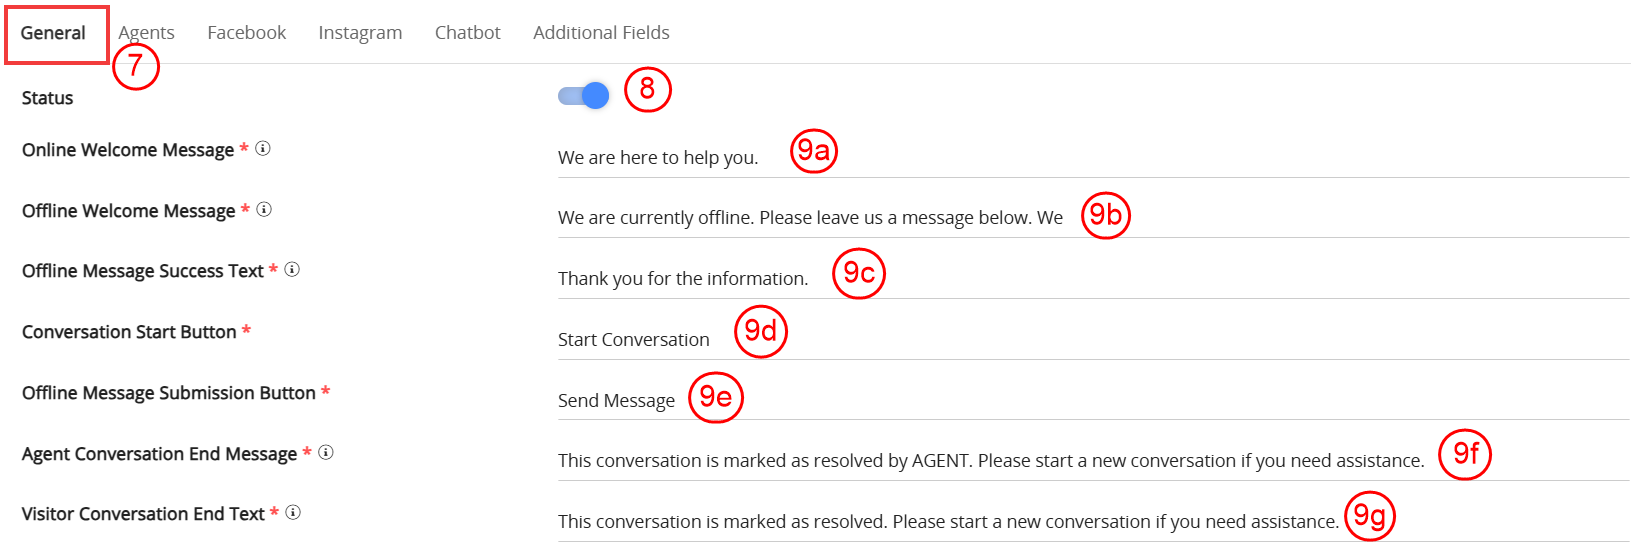
- Go to the General tab.
- Enable the Status to activate the widget.
- You can customize the following fields with your preferred text:
- Status
- Online Welcome Message
- Offline Welcome Message
- Offline Message Success Text
- Conversation Start Button
- Offline Message Submission Button
- Agent Conversation End Message
- Visitor Conversation End Text
- New Conversation Section Label
- New Conversation Placeholder Text
- Reply Placeholder Text
- Registration Form Header
- Message Form Header
- Rating
- Rating Message
- Feedback Message
- Feedback Success Notification
- Feedback Error Notification
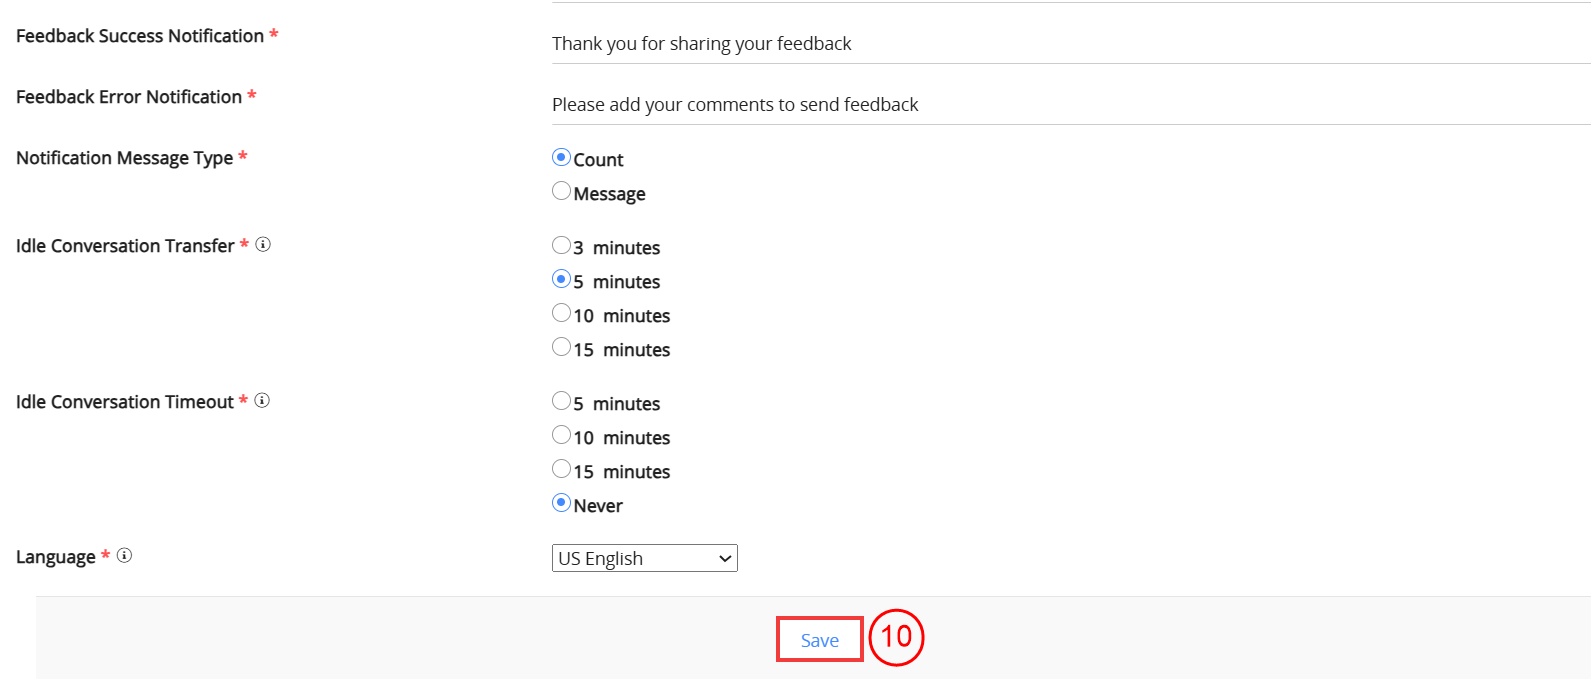
- Click Save.
Step 3: Adding Agents
Follow the steps below to add an Agent:
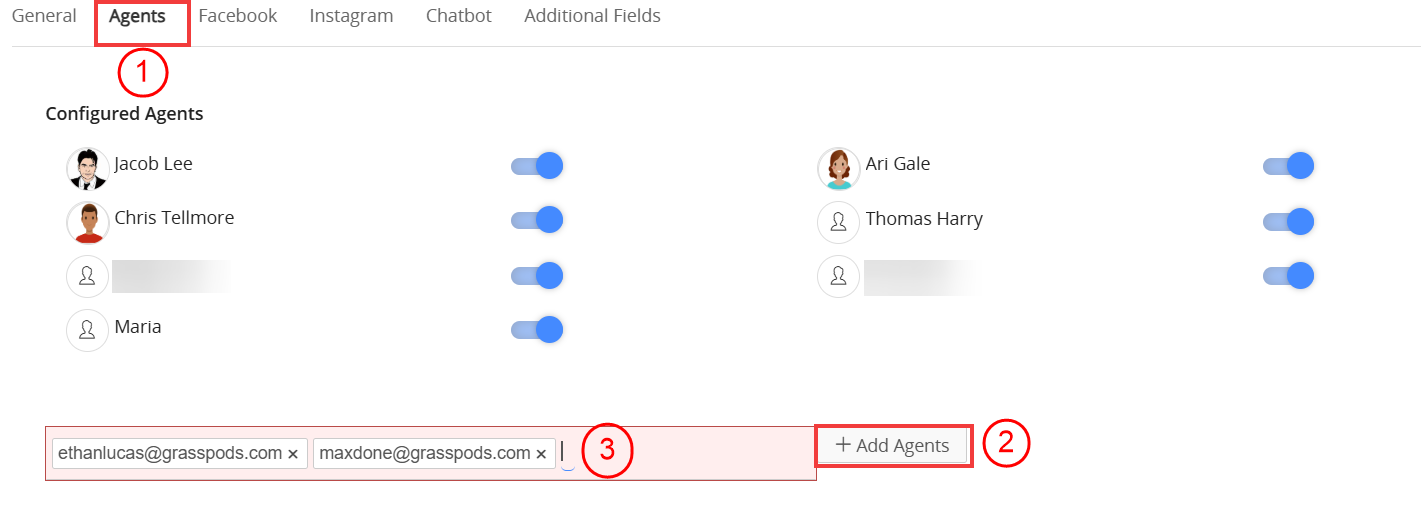
- Go to the Agents tab.
- Click +Add Agents.
- Type the names of the CRM users you want to add as Live Chat Agents. These users will handle customer queries and interactions through the chat widget.
Note: You can enable or disable an agent by clicking the toggle button next to the agent name.
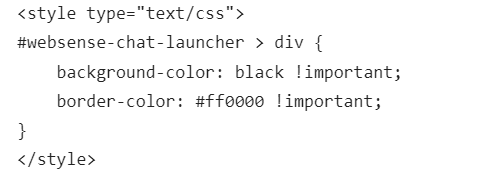
Customizing the Live Chats Feature
You can customize the look and feel of the Chat widget on your website using custom styles on your website. For example, the following snippet changes the default chat launcher color to black with a red border.
Accessing Live Chats
Follow these steps to access the Live Chats:
- Log in to the CRM account:
- Click the main Menu.
- Go to Conversations.
- Click Live Chats. A Live Chat console appears.
You can see and respond to incoming chats on the Live Chats window. Also, you can use actions such as filters, templates, and AI to respond better to the customer. You can access Live Chats records in a List View by clicking View Transcripts.
Navigating Live Chats
The Live Chats module in Vtiger CRM provides a centralized interface for managing, tracking, and engaging in live chat conversations with website visitors or customers. It offers essential features and functionalities to streamline communication, provide real-time support, and maintain a comprehensive record of chat interactions within the CRM system.
Let's divide the Live Chat screen into three sections as follows:
Section One
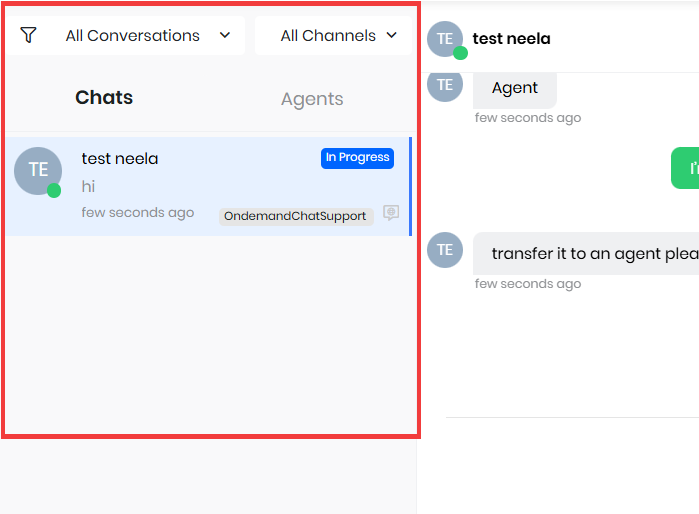
The actions available in the left section are:
- Conversation Filters: You can filter conversations such as All, My, New, and Open Conversations.
- Channel Filters: You can filter incoming chat channels like All, Facebook, Instagram, and more.
- Chats tab: Displays a list of new incoming chats. Once you select a chat, the chat status changes to Open. Ongoing Chats will display the status as In Progress in the Chat conversation window.
- Agents tab: Displays a list of online agents.
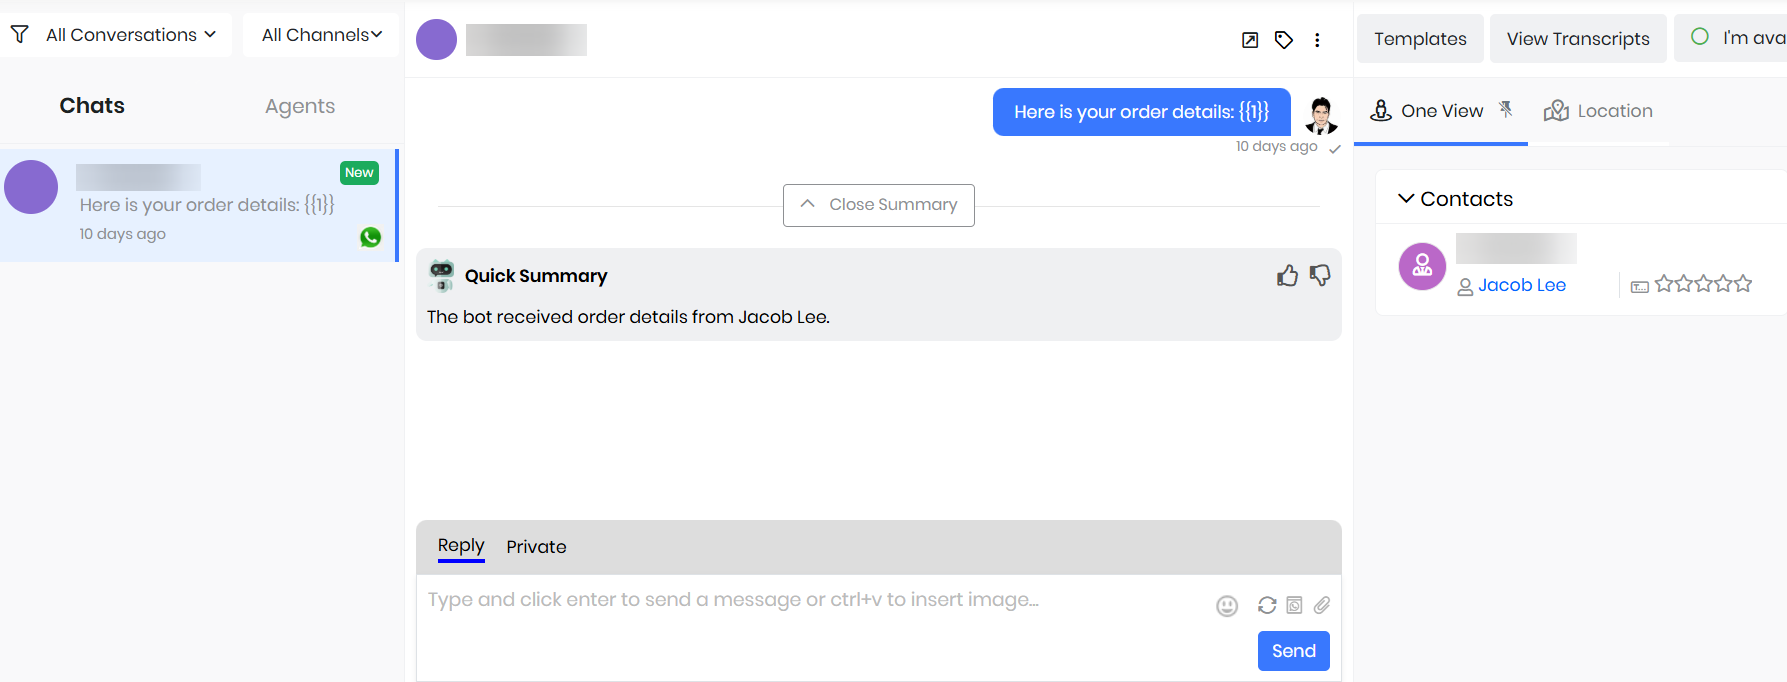
Section Two
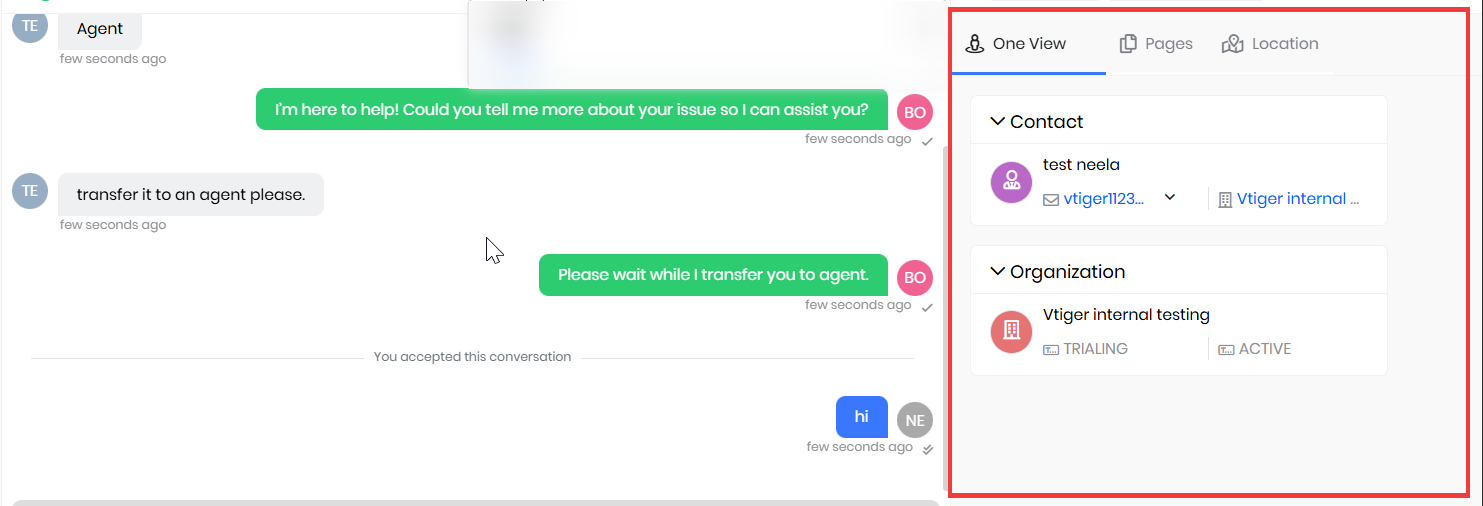
You can see the live chat conversation in the center section. The actions available in the center section are:
- Open icon: Opens the chat transcript in a new tab.
- Tags: Allows you to add a tag to the chat.
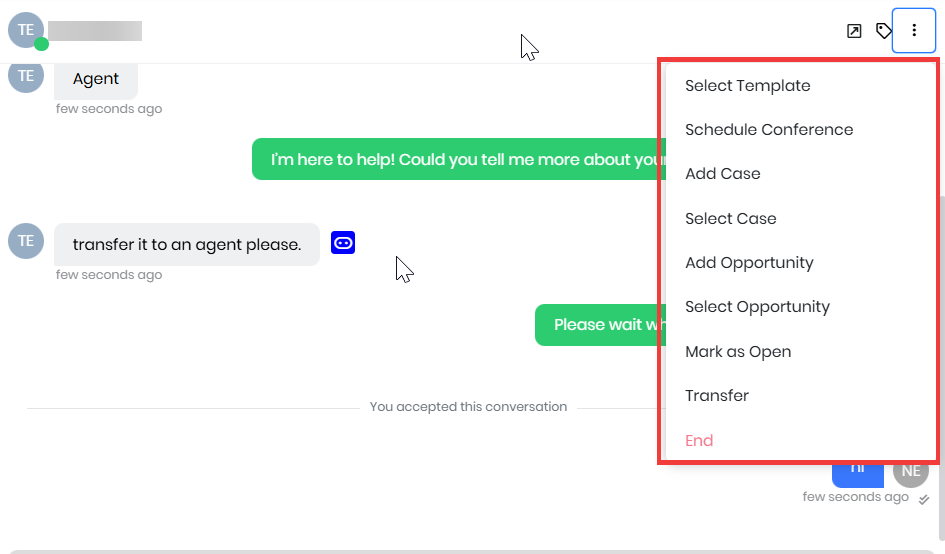
- More: Give you a list of options like transferring a chat, scheduling a conference, adding a case, and more.
- Templates: You can select from the list of response templates available.
- Schedule Conference: You can set up a meeting from here.
- Add Case: You can create a case from the chat.
- Select Case: Link the chat to an existing case.
- Add Opportunity: Create a new opportunity from the chat.
- Select Opportunity: Link the chat to an existing opportunity.
- Mark as Open: Make the chat available for any agent.
- Transfer: Choose an agent to hand over the chat.
- End: Close the chat.
- Reply tab: You can enter the required response in the field provided.
- Rephrase: Click to rephrase the entered response with the help of AI.
- Attachment: Click to add an attachment.
- Send: Click to send the entered response.
- Private tab: You can send a private response in the live chat to keep the data confidential.
Section Three
The actions available in the right section are:
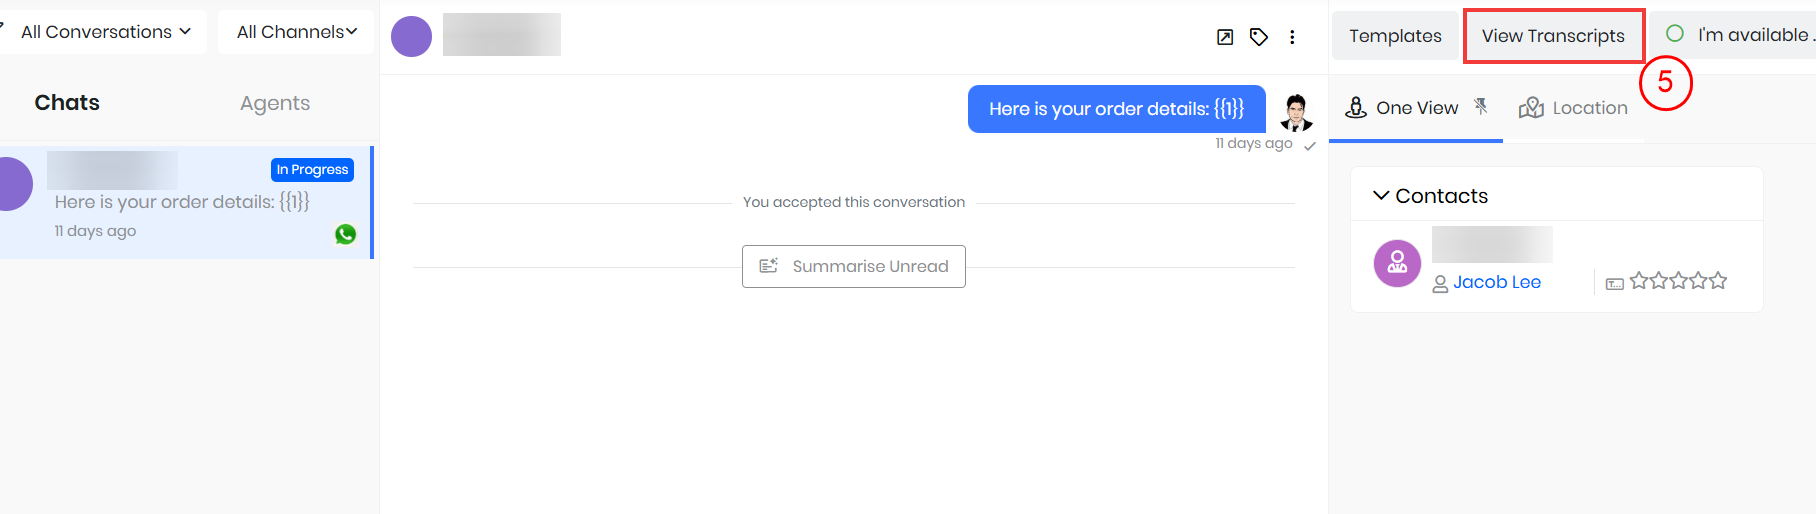
- Templates: You can select from the list of response templates available.
- View Transcripts: You can view the list of older live chats.
- Agent Status: Displays a list of statuses. Select one from the list that best describes your status.
- Related tab: Displays One View by default. One View displays all the details related to the customer in one place.
- Other Related tabs: Hover over the related tab to view documents and locations related to the customer
Note: You can send or receive up to 10 PDF attachments from WhatsApp, Facebook, or Live Chat as a Visitor in a chat conversation window.
Using Live Chats
After you have installed Live Chats, your customers can reach out to you from the Chat window on your website.
Follow these steps to use the Live Chats:
- Log in to the CRM.
- Click the main Menu.
- Go to Essentials > Conversations.
- Click Live Chats. The Live Chats window appears.
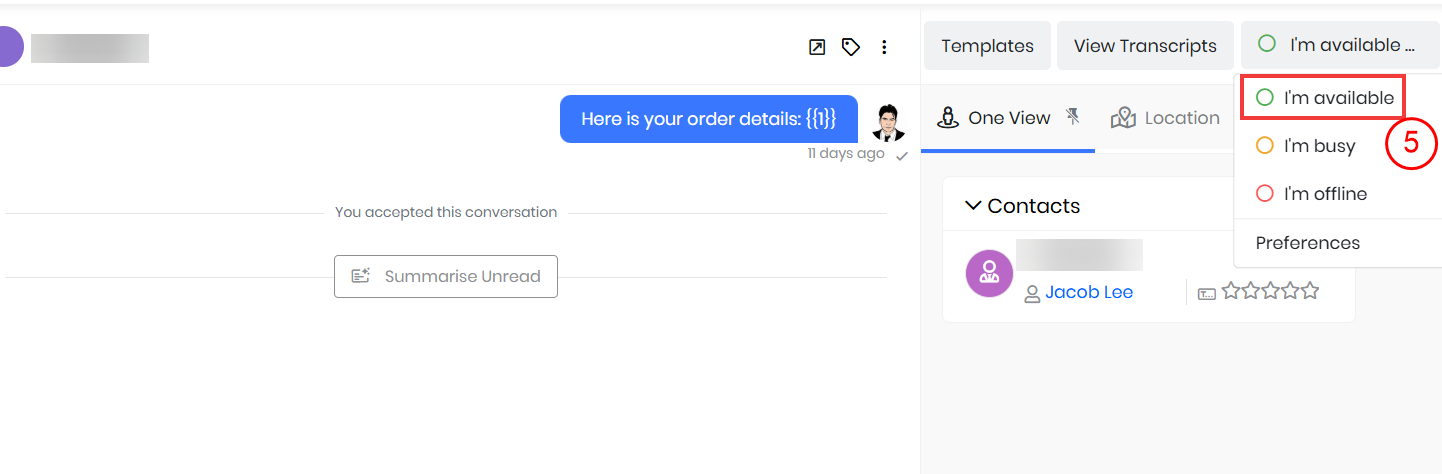
- Select I’m Available to start receiving chats.
- Click the required chat from the list.
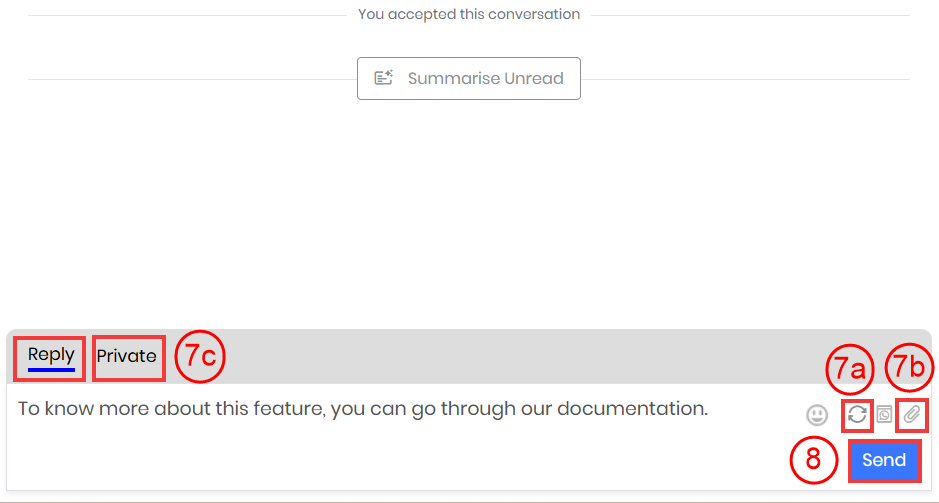
- Enter the appropriate response in the Reply tab.
- Click Rephrase to rephrase the response.
- Click Attachment to attach files.
- Use the Private tab to send confidential responses.
- Click Send.
Note: If no agent is online or available to respond to a live chat, it is considered an offline chat, and a case is created containing the chat transcript.
Tracking Live Chats
To track Live Chats, you will need to configure the Websense tracker on the CRM Settings page. Trackers in Vtiger are system-generated codes that enable you to install the Live Chat widget on your website.
Follow these steps to configure the Websense tracker and track Live Chats:
- Log in to the CRM.
- Click the User Menu.
- Click Settings.
- Look for Websense.
- Click Trackers.

- Click Activate Trackers. You will see a success message at the top of the
- Hover over the tracker and click Copy this.
- Paste the copied code into your website or web application. You can now start tracking your Live Chats.
To learn more about configuring a tracker, click here.
Note
- Only one tracker is available under the Websense tracker by default. If you need more than one tracker, you must install Booster packs for Websense Tracker from the Vtiger Extension Store.
- The Answer Bot section in the Websense Widget Settings page appears only if Calculus AI is installed.
Using an AI Agent for Live Chats
An AI Agent is a smart assistant that automates tasks by understanding customer messages, answering common questions, and helping sales or support teams. You can use AI Agents in Live Chat to handle customer questions automatically. With Chatflows, you can send questions straight to the AI, so customers get fast and consistent answers.
For instance, if a customer wants to check the status of their case, the AI Agent can instantly provide an update using information from your CRM.
- When a customer initiates a new issue through Live Chat, the AI Agent automatically creates a case in the CRM using the details shared during the conversation.
- If a customer asks a question, the AI Agent delivers relevant answers by pulling from your knowledge base or a set of predefined responses, ensuring accurate support at any time.
- Whenever a record is created via Live Chat by an AI Agent, it is automatically associated with the corresponding visitor record, maintaining complete context for future interactions.
Integrating Social Media Platforms with Live Chats
You can integrate Live Chats with social media platforms like Instagram, Twitter, and Facebook.
Twitter Direct Messaging (DM) Integration
You can integrate your Twitter account with the Live Chat feature for direct messaging. To use and respond to Twitter direct messages from the Live Chats window, you must:
- Have a Twitter business account.
- Integrate your Twitter account in the Vtiger Social module.
- Enable the Twitter account in the Websense Widget in the CRM.
- Log in to the CRM.
- Click Settings.
- Search for Widgets.
- Go to the Twitter tab.
- Enable the Twitter Messenger toggle. The Twitter accounts configured in the Social module will be displayed.
- Enable the Status toggle of the Twitter account.
- Click Save.
Agents can now use Twitter DM from the Channels drop-down in the Live Chats Conversation window, allowing customers to message them directly from their Twitter accounts. Once the Twitter account is successfully integrated, the Twitter DM icon will appear in the Live Chat console.
To learn more about Twitter DM integration with Vtiger CRM, click here.
Instagram DM Integration
Vtiger CRM lets you integrate your Instagram account with the Live Chats Add-on for direct messaging. To use and respond to Instagram direct messaging in the Live Chat window, you must:
- Have a Facebook business page.
- Have an Instagram Professional account.
- Integrate your Instagram account in the Vtiger Social module.
- Enable the Instagram user in the Websense Widget in the CRM.
Follow these steps to integrate Instagram in Vtiger CRM:
- Log in to the CRM.
- Click User Profile.
- Select Settings. The Settings page opens.
- Go to Websense.
- Click Widgets. The Widgets page opens.
- Enter or select the following information:
- Select Tracker 1 from the Select Tracker drop-down.
- Select the Instagram tab.
- Click SignIn. A Facebook login page opens.
- Enter your Facebook login credentials to sign in.
- Click SignIn.
- Enable the toggle Enable Instagram Messenger. Instagram accounts with Page Status will be displayed.
- Enable the toggle for the account you wish to use.
- Click Save.
Once you have successfully integrated the Instagram account, the Instagram DM icon will be visible in the conversation window in the Live Chat console. To learn more about Instagram DM integration with Vtiger CRM, click here.
Facebook DM Integration
Vtiger CRM lets you integrate your Facebook account with the Live Chats Add-on for direct messaging. To use and respond to Facebook direct messaging in the Live Chat window, you must:
- Have a Facebook business page.
- Have a Facebook Professional account.
- Integrate your Facebook account in the Vtiger Social module.
- Enable the Facebook user to use the Websense widget in the CRM.
Follow these steps to integrate Facebook in Vtiger CRM:
- Log in to the CRM.
- Click User Profile.
- Select Settings. The Settings page opens.
- Click Websense Tracker.
- Hover over the required tracker, and click Configure Widgets.
- Select the tracker in charge of the widget on your website from the Select Tracker drop-down.
- Select Chat from the Select Widget drop-down.
- Click the Facebook tab.
- Select Click here.
- Click Connect. The Facebook authorization page appears.
- Click Continue as Username.
- Select your Facebook Page.
- Click Next.
- Provide the required permissions.
- Click Done.
- Click OK.
- Come back to the Facebook tab.
- Enable the Facebook Messenger toggle.
- Enable the Facebook Page toggle.
- Click Save.
Once you have successfully integrated the Facebook account, the Facebook DM icon will be visible in the conversation window in the Live Chat console. To learn more about Facebook DM integration with Vtiger CRM, click here.
Viewing Live Chat Records
You can find chat records in the Live chat module. Follow these steps to access Live Chat records:
- Log in to the CRM.
- Go to the main Menu.
- Go to Essentials > Conversations.
- Click Live Chat. The Live Chat console opens.
- Click View Transcripts.
You can access all live chat records from the List View.
Live Chat Record Summary View
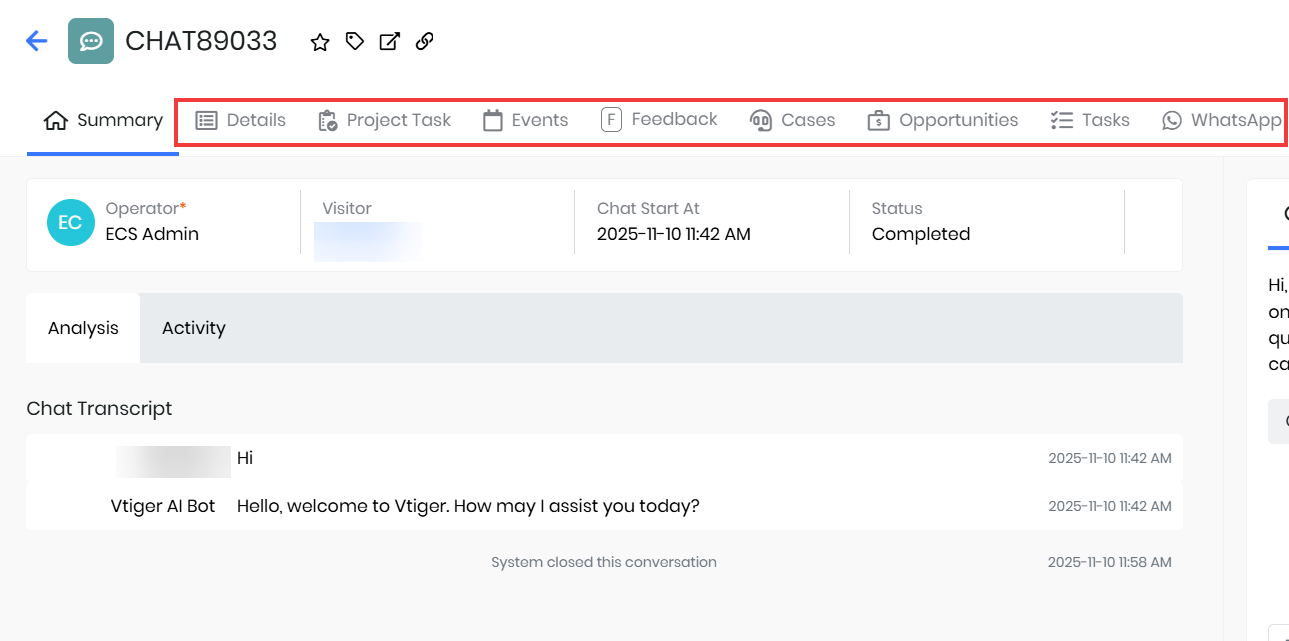
The Summary View displays the entire chat conversation. The following can be viewed in a live chat record:
- Details: Shows the details of the web chat.
- Events: Displays any meetings related to the live chat.
- Cases: Displays the cases linked to the chat.
- Tasks: Displays the tasks linked to the chat.
- Opportunities: Displays the deals linked with the chat.
- Project Tasks: Displays the project tasks linked with the chat.
- WhatsApp: Displays messages sent through the WhatsApp channel.
Possible Actions on a Live Chat Record
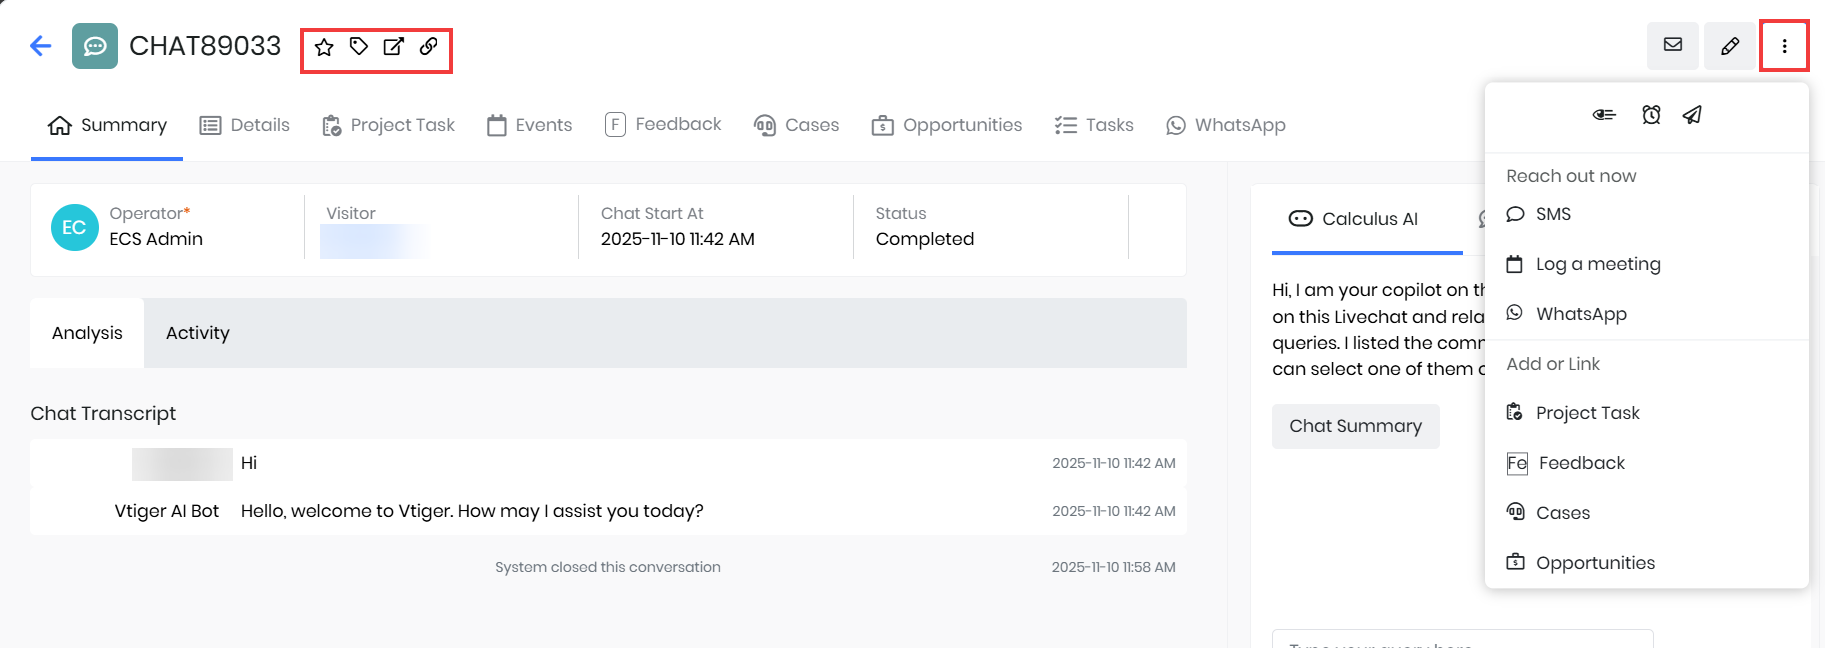
The following actions can be performed from the Summary View of a live chat record:
- Email: Send an email related to the chat record.
- Edit: Edit the chat record details.
- More:
- Send Transcript: Send the chat transcript via email.
- Create Reminder: Create a reminder for follow-up actions.
- Tags: Add relevant tags to the chat record.
- Reach Out Now: Connect with the customer via SMS, WhatsApp, or schedule an event.
- Add or Link: Add or link related records such as project tasks, feedback, cases, or opportunities.
- Open in New Tab: Open the chat record in a new browser tab.
- Click to Copy Direct Link: Click the link icon to copy the direct URL of the chat record.
Generating Chat Insights
Live Chats has a feature called Chat Insights that enables you to track the performance of your agents. You can help them improve their response and grammatical skills and create reports. This will help you retain your current clients.
Chat Rating and Metrics
If you open the Summary View of any chat record, you will find an Analysis widget on the right open at all times. This widget shows a summary of the conversation. You can find the following in this widget:
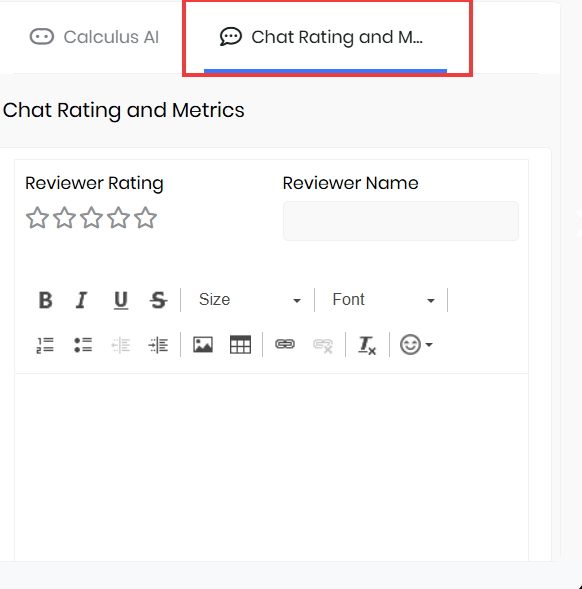
- Client Rating and Feedback: The client will be prompted in the website widget to provide a rating and feedback. That information will be stored here.
- Note: Based on the rating given by the client, an emoticon will appear beside the chat number in the Summary View, which indicates the health of the conversation.
- Reviewer Rating and Notes: A reviewer can also rate the conversation and write some notes to the agent after going through the chat transcript and the chat metrics. This will be very helpful to the agent to avoid certain errors in the future.
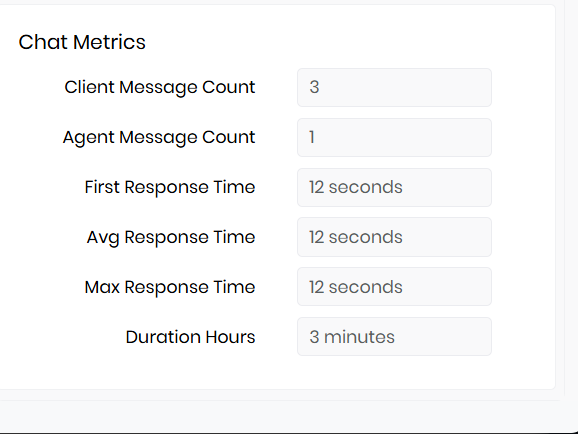
- Chat Metrics: These metrics are automatically calculated by the system, which summarizes the entire conversation. It displays the details listed below:
- Client Message Count: Displays the number of words sent by the client.
- Agent Message Count: Displays the number of words the agent sends.
- First Response Time: Displays the time duration the agent takes to provide the first response to the client’s query.
- Avg Response Time: Displays the average time the agent takes to respond to the client.
- Max Response Time: Displays the maximum time the agent takes to respond to the client.
- Duration: Displays the overall duration of the chat from start time to end time.
The Chat Insights module provides a detailed view of your live chat performance through various analytical reports and charts. It helps track key metrics that reflect both agent efficiency and customer engagement levels.
The module includes the following metrics and charts:
- Agent performance charts: Visualize how each agent performs based on chat volume, response times, and customer interactions.
- Volume by time of day: Shows peak and low activity periods to help manage staffing effectively.
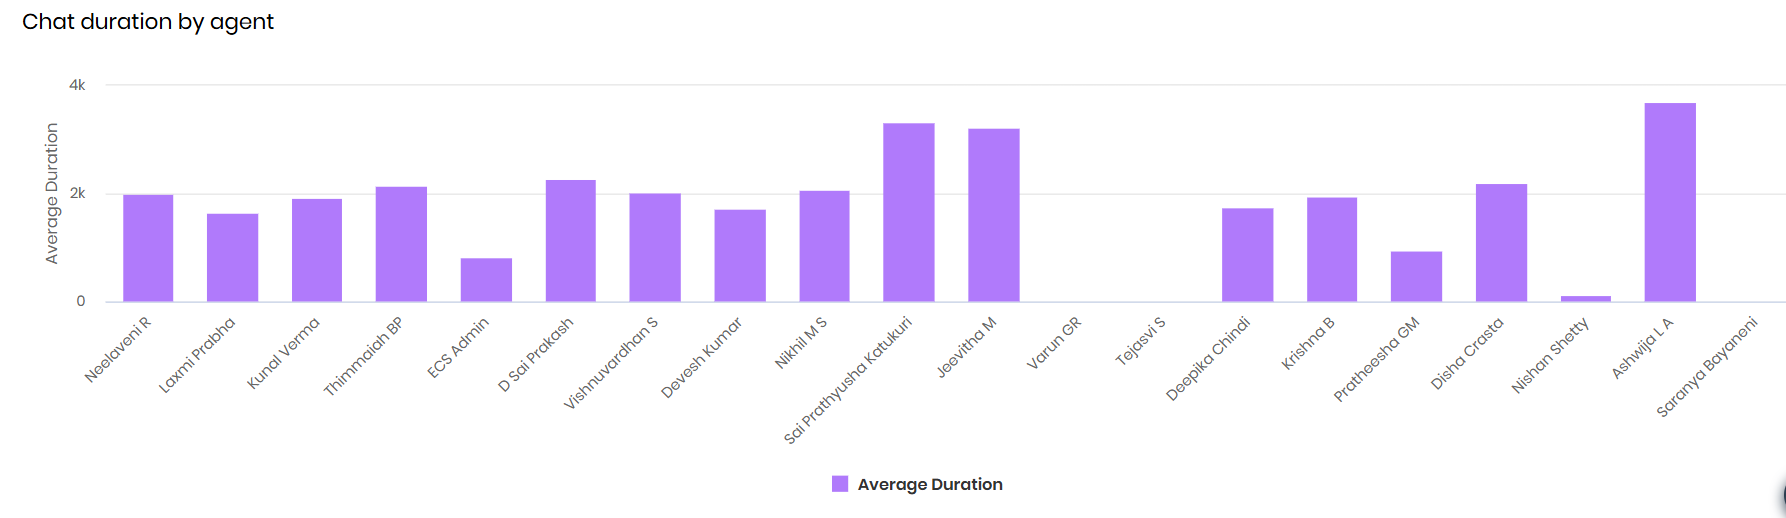
- Average response times by agent: Measures how quickly agents respond to customer messages.
- Caseload by time of day: Displays the number of chats handled during different hours, along with other related charts.
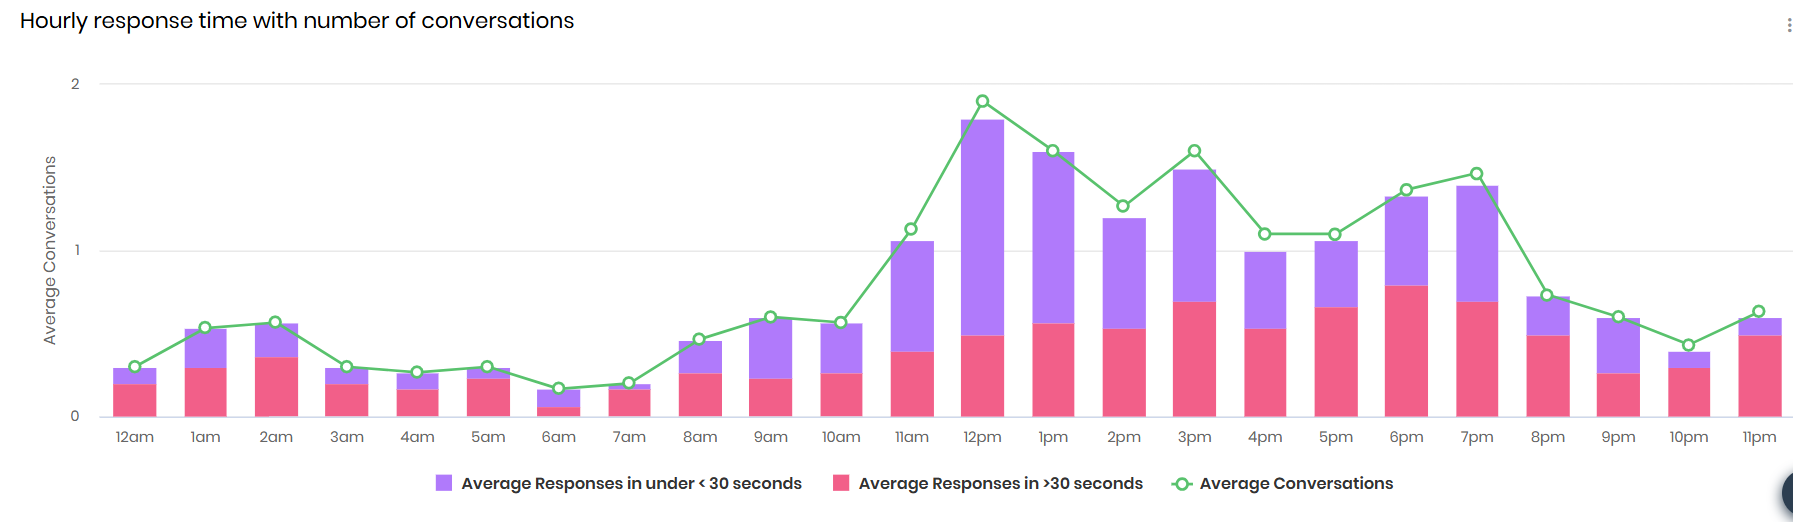
- First and average response times, client and agent message counts: Provide insights into the speed and balance of communication in each conversation.
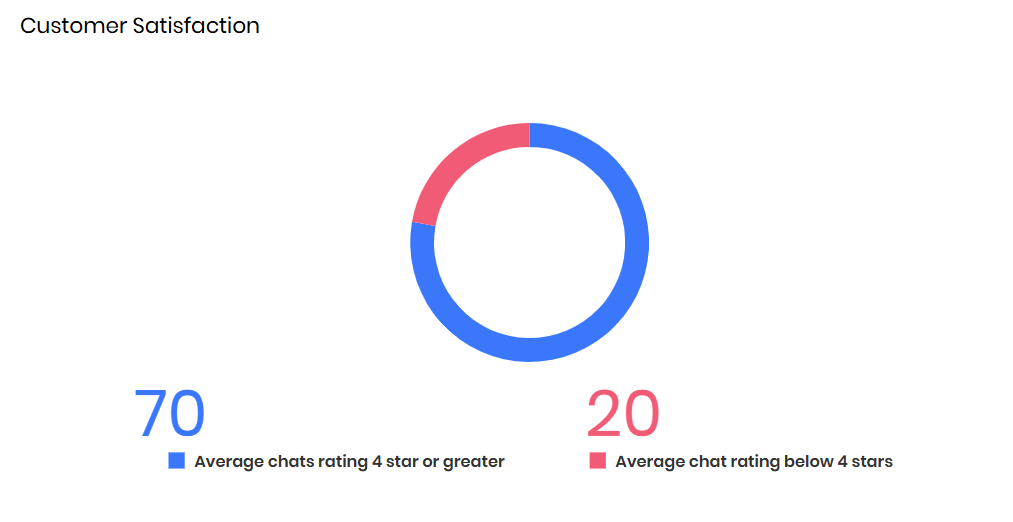
- Customer Satisfaction: Displays a chart representing chat ratings.
- Customer Feedback: Lists the feedback shared by customers based on their chat experience.
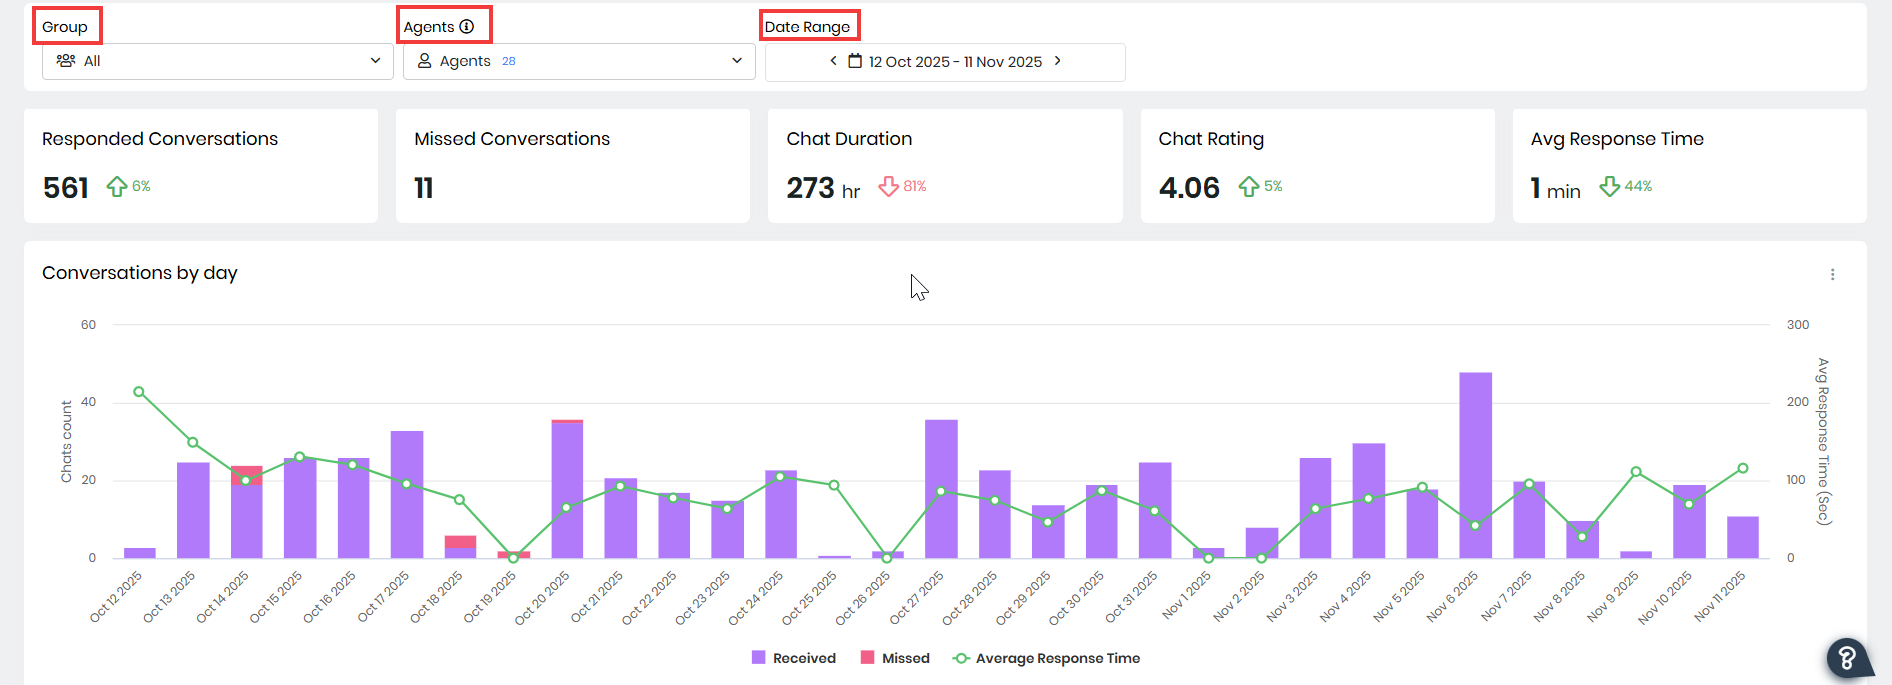
All counts and metrics are automatically calculated and summarized by the system. You can further refine the displayed data using the following filter options:
- Group: Select the team to which the agent belongs.
- Agent: Choose a specific agent whose chat performance you want to review.
- Date Range: Define the time period for which you want to view chat data.
This allows you to analyze performance trends, identify areas for improvement, and optimize your team’s overall chat management efficiency.
Reviewing Live Chat Performance
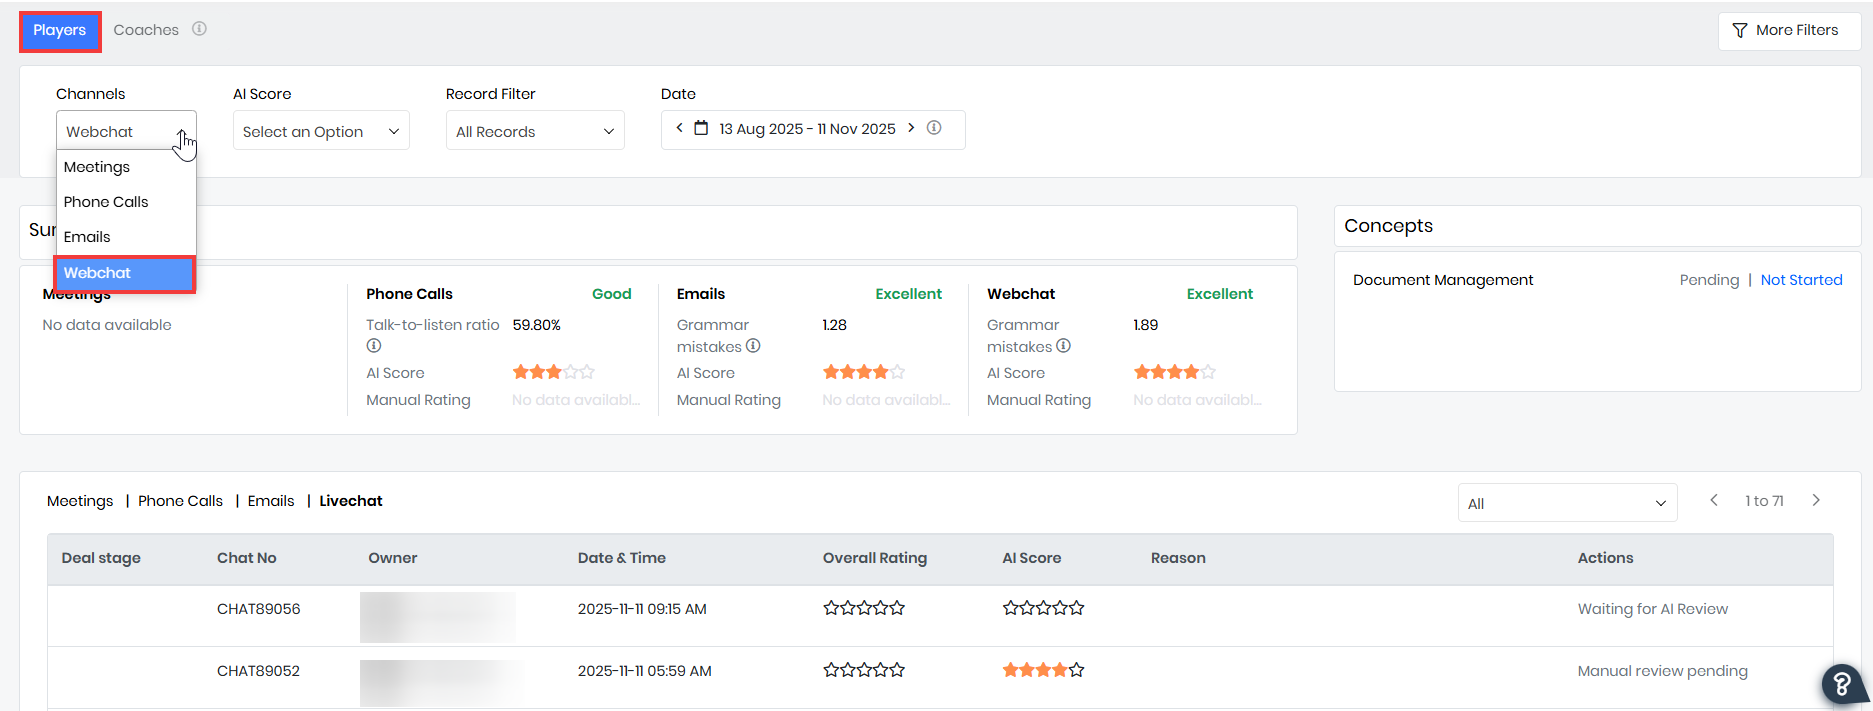
Metrics you generate will be available in the Coaching module. In the Coaching module, the Player Dashboard helps agents enhance their performance by providing insights into their Live Chat interactions. It allows agents to:
- Track their client interactions through the Live Chat channel, with filtering options available.
- View AI-generated performance ratings and personalized improvement suggestions.
- Review key actions and topics discussed during chat interactions.
- Identify areas for improvement based on chat performance analysis.