Articles in this section
Layout Designer
Feature Availability
Vtiger Editions: One Pilot | One Growth | One Professional | One Enterprise | One AI
Introduction
Layout Designer in Vtiger CRM is a powerful customization tool that allows you to control how information is displayed in each module. Whether it is Contacts, Leads, Deals, or Tickets, every module contains fields and sections that store your business data.
With Layout Designer, you can:
- Choose which fields to display
- Rearrange the order of fields
- Group fields into meaningful sections (blocks)
- Add related lists and widgets
- Create a layout that matches your team’s workflow
Instead of adjusting your business process to fit a fixed system, you can tailor the CRM layout to suit your requirements.
A well-designed layout improves efficiency by ensuring users see only the most relevant information. For example, a sales team may want Deal Value, Stage, and Expected Close Date at the top of a record, while a support team may prioritize Ticket Status, Priority, and Assigned To.
Use Case
A sales manager wants to streamline the Deals module so the team can capture key information quickly during client calls.
Using Layout Designer, the manager:
- Removes unused fields such as Fax and Secondary Email.
- Reorders fields so Deal Value and Expected Close Date appear at the top.
- Groups related fields into blocks such as Client Details, Deal Information, and Follow-up Tasks.
- Adds a widget to display related activities within the same view.
This customization reduces clutter, improves data entry speed, minimizes errors, and increases overall productivity.
Benefits of Using Layout Designer
The benefits of using the Layout Designer are:
- Improved productivity – Spend less time searching for the right information.
- Custom fit for your business – Layouts can be tailored for different teams or processes.
- Less clutter – Hide unused or irrelevant fields for a cleaner interface.
- Better data accuracy – Highlight important fields so they’re always filled in correctly.
- Flexibility – Quickly update layouts as your business needs change.
In this article, you will learn about:
- Installing Layout Designer
- Adding a Layout Designer
- Viewing a Layout Designer
- Editing a Layout Designer
- Editing a Layout Designer Details
- Duplicating a Layout Designer
- Deleting a Layout Designer
- Uninstalling Layout Designer
Key Terminology
|
|
|
|
|
|
|
|
|
|
|
|
|
|
|
|
|
|
|
|
|
|
|
|
|
|
|
Installing Layout Designer
To use the Layout Designer, you must install the Layout Designer Add-on.
Follow these steps to install Layout Designer:
- Log in to the CRM.
- Click the User Profile on the right side of the screen.
- Click Settings. The Settings page opens.
- Go to Extensions.
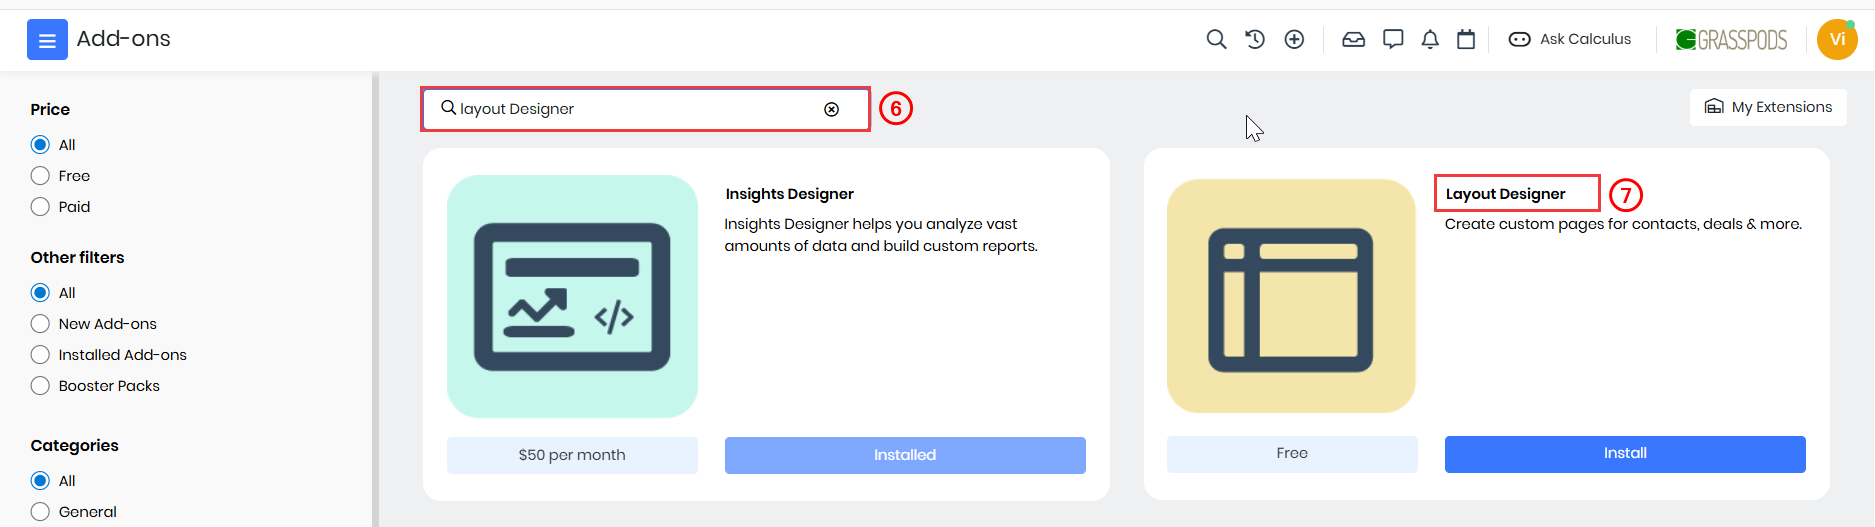
- Click Add-ons.
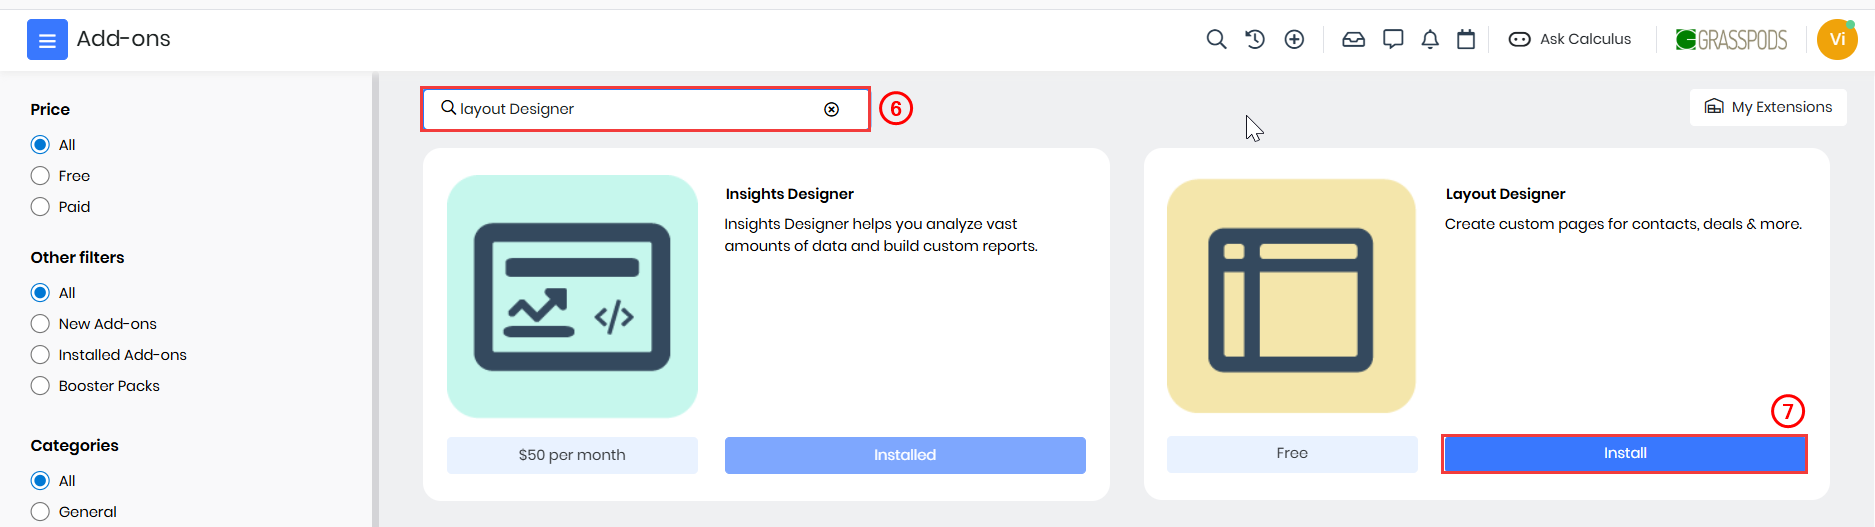
- Type Layout Designer in the search bar.
- Click Install. The Are you sure you want to install this Add-on? message appears.
- Click Yes.
A success message will be displayed. Once installed, the Layout Designer will appear under the Platform.
Adding a Layout Designer
After installation, you can start creating your own layouts to match your team’s needs. Adding a layout allows you to define exactly which fields and sections appear and in what order.
Follow these steps to add a Layout Designer:
- Log in to the CRM.
- Click the main Menu.
- Click Platform > Layout Designer. The Layout Designer List View opens.
- Click + Layout Designer. The Add Layout Designer page opens.
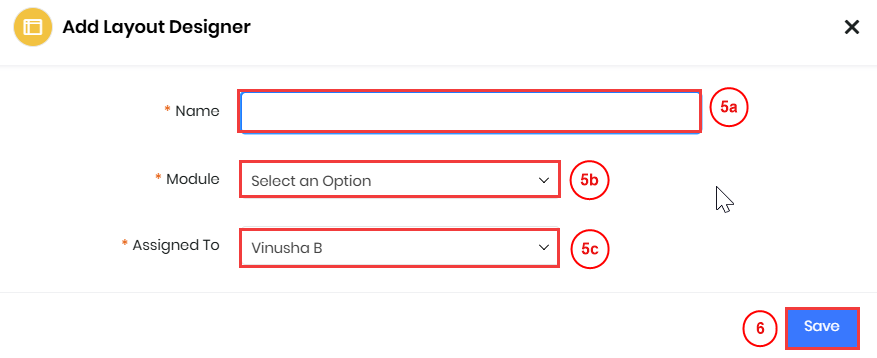
- Enter or select the following information in the Add Layout Designer page:
- Name: Enter a name for the Layout Designer.
- Module: Select the required module from the drop-down.
- Assigned To: Select the User or group from the drop-down.
- Click Save. The Layout Designer editor opens.
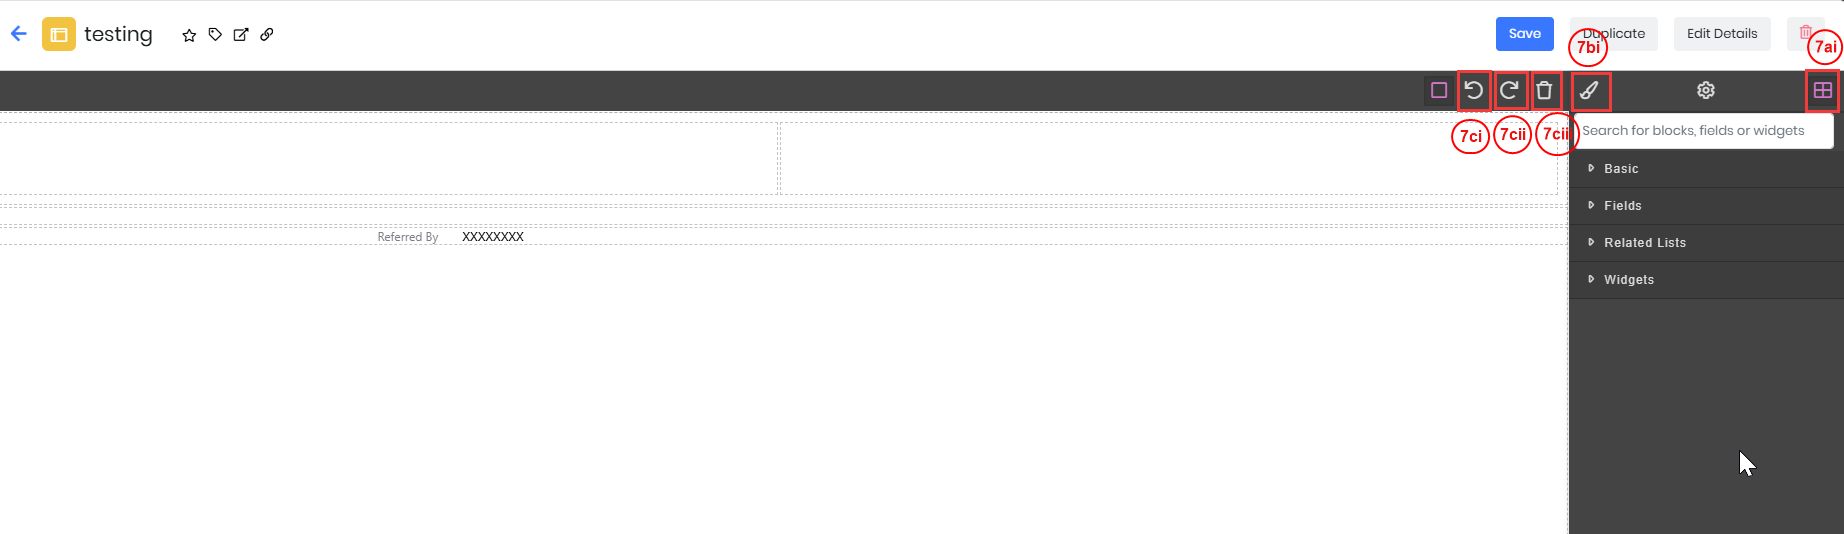
- Enter or select the following information in the Layout Designer editor page:
- Design the Layout
- Open Blocks: Click to access layout components.
- Basic: Standard layout elements such as section headers, text blocks, or placeholders. Used to structure the layout and group related information.
- Fields: CRM fields (standard or custom) from the selected module. Example: Name, Email, Phone, or any custom field.
- Related Lists: Displays records related to the module you are designing. Example: In a Contact layout, you can show related Deals, Tickets, or Activities.
- Widgets: Functional components that enhance the layout. Example: Charts, Dashboards, or Map widgets.
- Open Blocks: Click to access layout components.
- Style the Layout
- Style Manager: Select a block you added and click to configure options such as Display options, Dimensions, Font sizes, Widget width, Background color, and Border setup.
- If you add a Map widget, click Settings to configure and perform actions within the map.
- Manage Blocks
- Undo: Revert recent changes.
- Redo: Reapply recent changes.
- Delete: Remove blocks you added.
- On a specific block:
- Delete: Remove that block.
- Duplicate: Create a copy of that block.
- Design the Layout
- Click Save.
Viewing a Layout Designer
Once you have created a Layout Designer for a module, you can view it directly in the module’s record view. This allows you to see how the customized layout looks and functions for users.
For example, let us say you have created a layout design named Leads New View for the Leads module.
Follow these steps to view the new layout design:
- Log in to the CRM.
- Click the main Menu.
- Go to Essentials.
- Select Leads & Contact Management > Leads. The Leads module opens.
- Open the Lead record where you want to view the layout design.
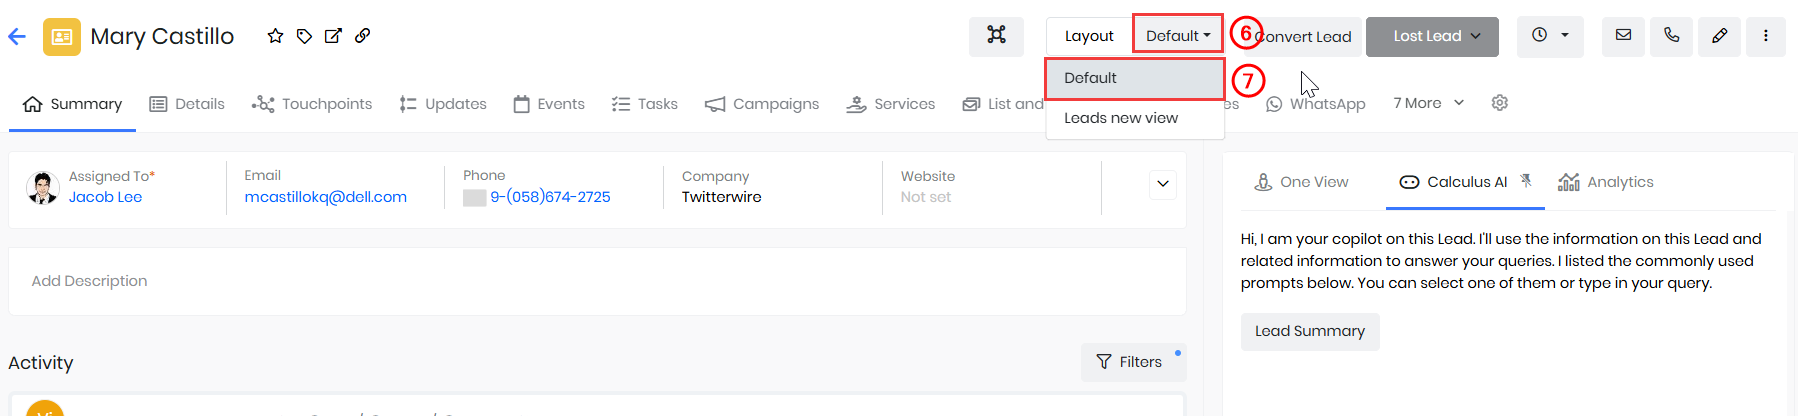
- Click the drop-down menu next to Layout.
- Select Leads New View from the drop-down.
The record’s layout will now switch from the default view to the selected Leads New View design.
Note: Once the layout is changed, all records in the module will be displayed using the selected layout instead of the default view, until you manually switch it back.Editing a Layout Designer
You can update an existing layout to improve its design, allowing you to modify fields, blocks, widgets, and other elements.
Follow these steps to edit an existing layout:
- Log in to the CRM.
- Click the main Menu.
- Go to Platform.
- Click Layout Designer. The Layout Designer List View opens.
- Click the Layout Designer record that you want to edit.
- Make the required changes in the Layout Design editor window.

- Click Save.
Editing a Layout Designer Details
You can update the details of an existing layout Design record.
Follow these steps to edit an existing layout Design record det:
- Log in to the CRM.
- Click the main Menu.
- Go to Platform.
- Click Layout Designer. The Layout Designer List View opens
- Click the Layout Designer record that you want to edit.
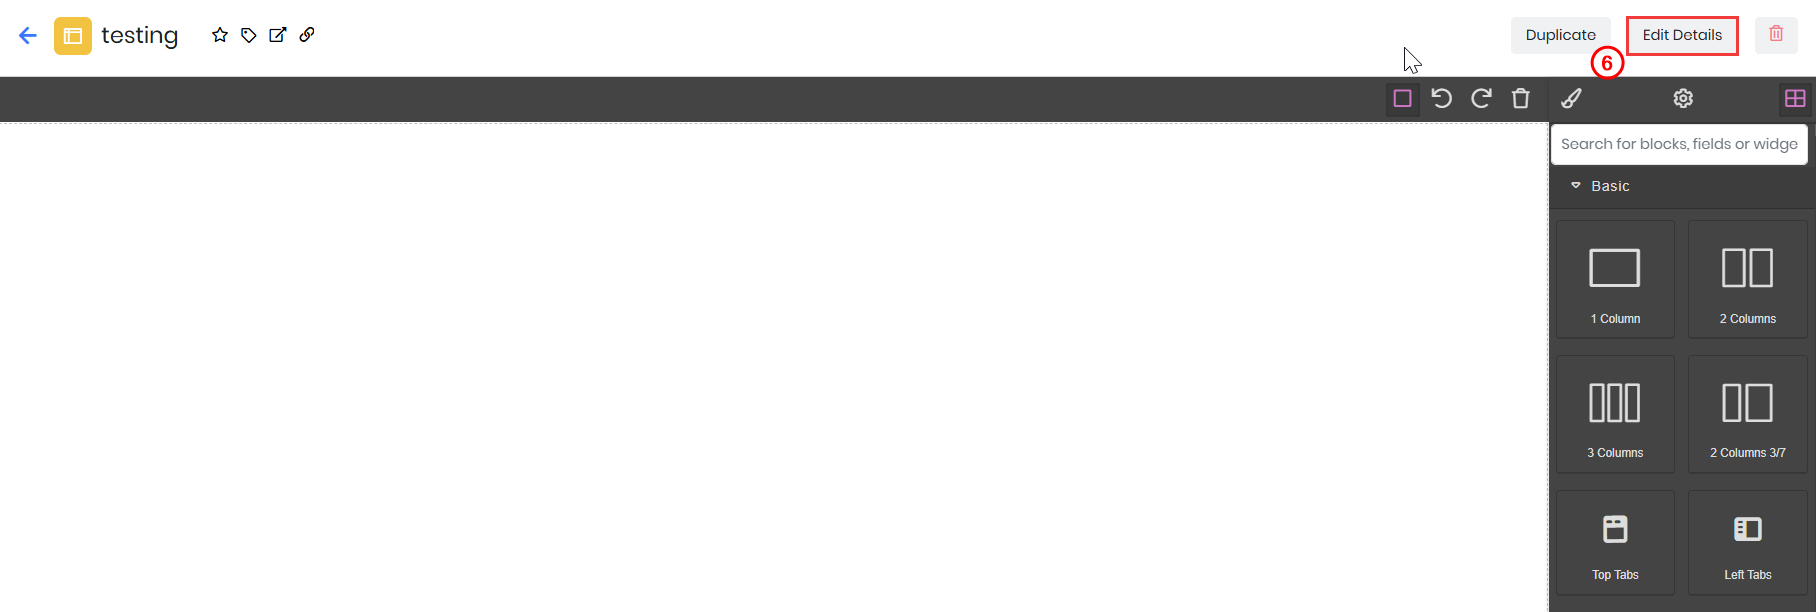
- Click Edit Details. The Edit Layout Designer window opens.
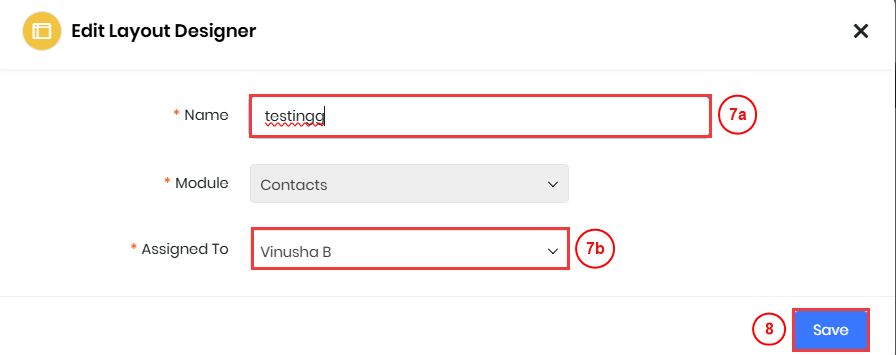
- Enter or select the following information in the Edit Layout Designer window:
- Name: Enter a name for the Layout Designer.
- Assigned To: Select the User or group from the drop-down.
- Click Save.
Duplicating a Layout Designer
If you want to create a new layout that is similar to an existing one, you can duplicate it instead of building it from scratch.
Follow these steps to duplicate the Layout Designer:
- Log in to the CRM.
- Click the main Menu.
- Click Layout Designer. The Layout Designer List View opens.
- Click the Layout Designer record that you want to duplicate.
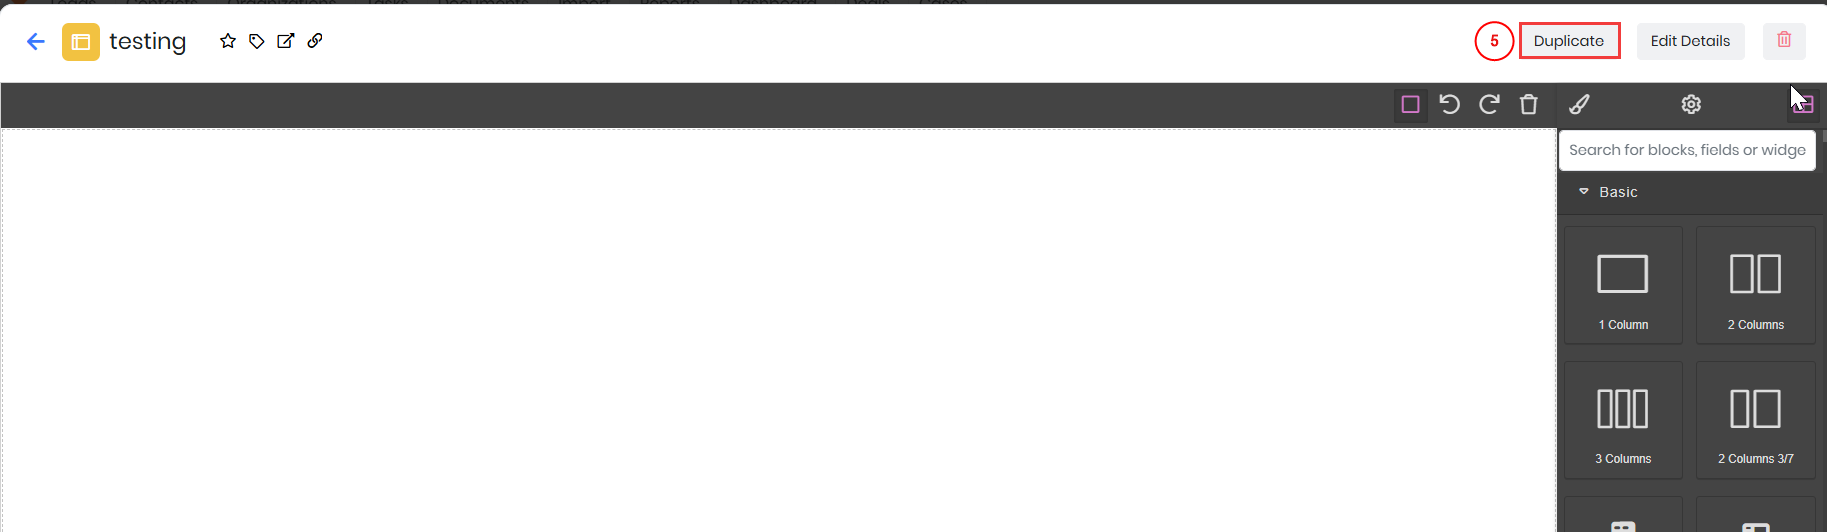
- Click Duplicate. A Duplicating Layout Designer window opens.
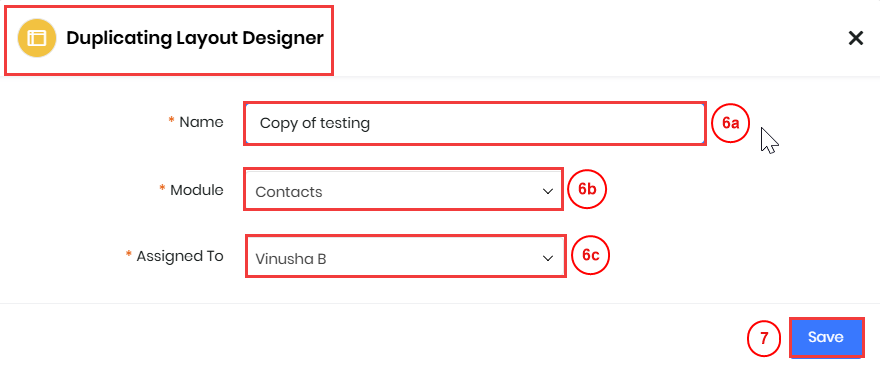
- Enter or select the following information in the Duplicating Layout Designer window:
- Name: Enter a name for the Layout Designer.
- Module: Select the required module from the drop-down.
- Assigned To: Select the User or group from the drop-down.
- Click Save.
Deleting a Layout Designer
If a layout is no longer required, you can delete it from the CRM. Once deleted, the layout will no longer appear as an option in record views, and users can only select the default or other available layouts. The deleted Layout Designer record will be moved to the Recycle Bin, where it can be restored within 30 days. After 30 days, it will be permanently deleted from the CRM.
Follow these steps to delete a Layout Designer:
- Log in to the CRM.
- Click the main Menu.
- Click Layout Designer. The Layout Designer List View opens.

- From List View:
- Hover over the Layout Designer record that you want to remove.
- Click Delete. A Delete record confirmation window opens.
- Click Yes.
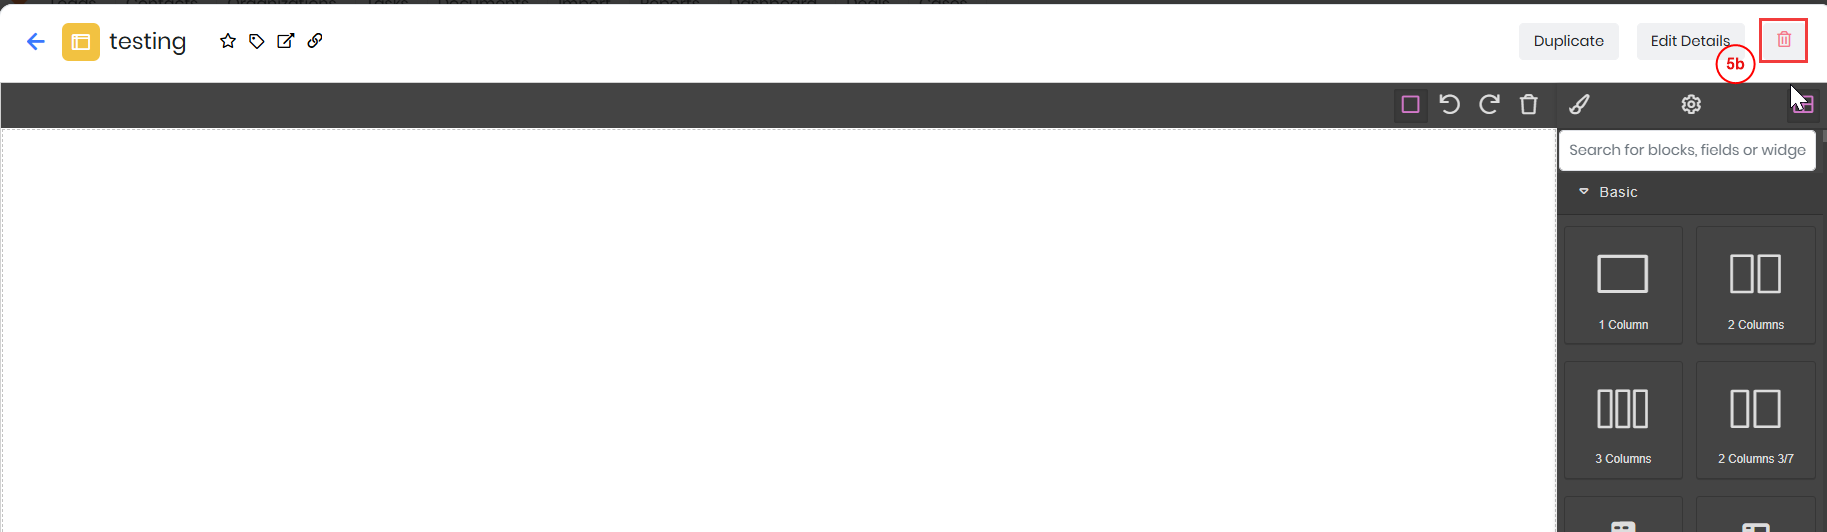
- From Summary View:
- Click the Layout Designer record that you want to remove.
- Click Delete. A Delete record confirmation window opens.
- Click Yes.
Once deleted, the layout will no longer be available for selection in any module, and users will revert to the default or other available layouts.
Uninstalling Layout Designer
If you no longer wish to use Layout Designer in Vtiger CRM, you can uninstall the Layout Designer Add-on.
Follow these steps to uninstall Layout Designer:
- Log in to the CRM.
- Click the User Profile on the right side of the screen.
- Click Settings. The Settings page opens.
- Go to Extensions.
- Click Add-ons. The Add-ons page opens.
- Type Layout Designer in the search bar.
- Click Layout Designer Add-on.
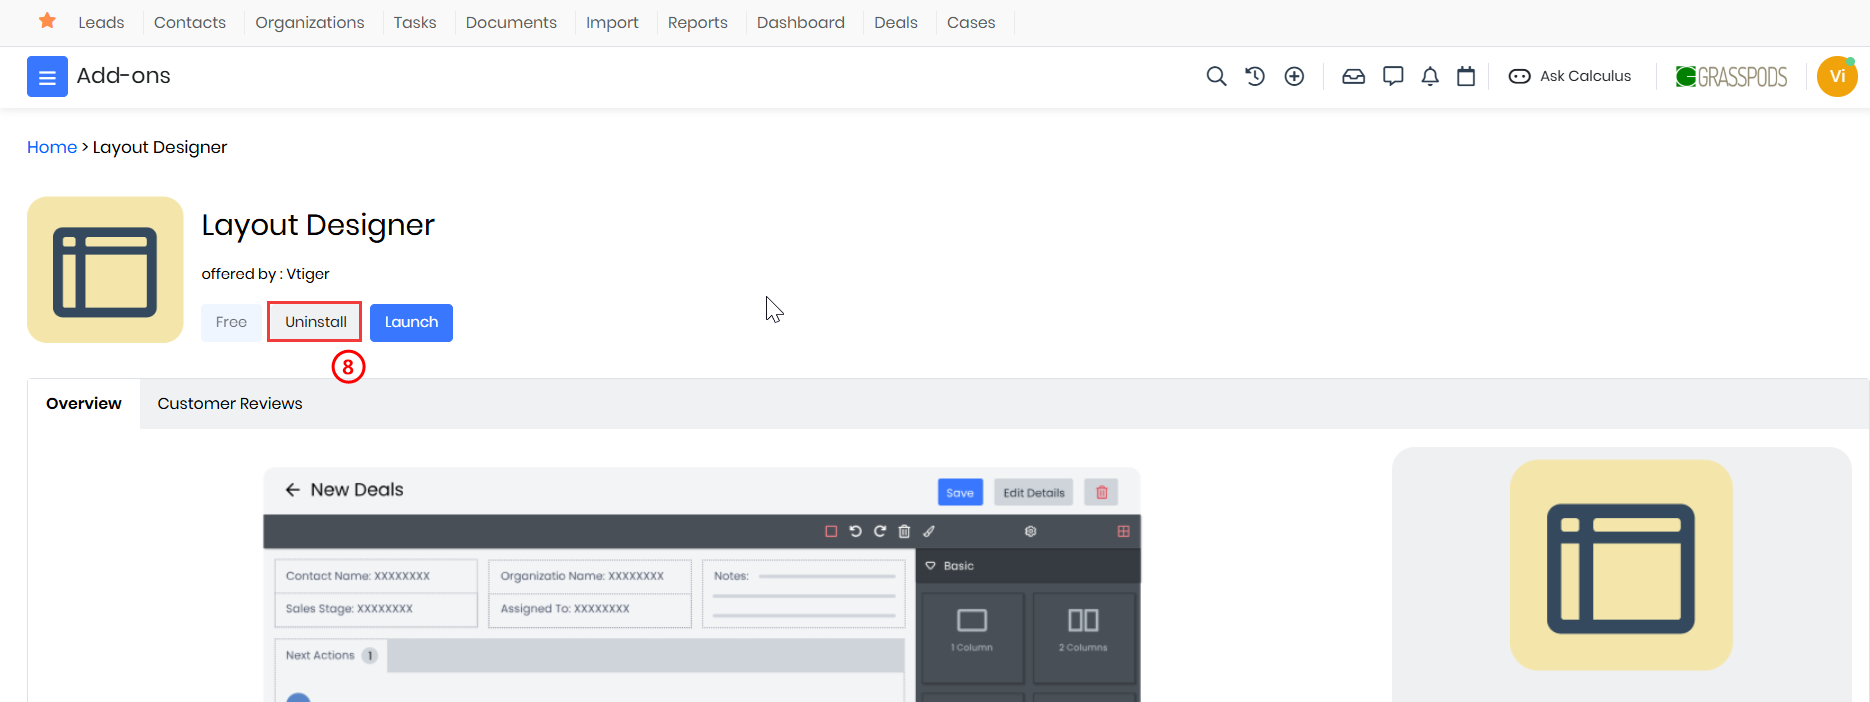
- Click Uninstall. The Are you sure you want to uninstall this Add-on? message appears.
- Click Yes.