Articles in this section
Managing Payments
Feature Availability
Vtiger Editions: One Professional | One EnterpriseIntroduction to Payments
The Payments module helps you record, process, and track customer and vendor payments. It enables you to accept online payments via secure gateways, ensuring faster, safer transactions.
Key Features
The key features of the Payments module are:
- Accepting online payments using secure payment gateways.
- Recording manual payments for tracking purposes.
- Linking payments with Invoices, Purchase Orders, Bills, and Credit Notes.
- Tracking incoming, outgoing, and refunded payments.
Benefits
The benefits of using the Payments module are:
- Improving payment visibility across inventory modules.
- Reducing manual payment tracking efforts.
- Ensuring accurate payment status updates.
- Supporting secure and reliable payment processing.
In this article, you will learn about:
- Payments in Vtiger
- Installing Payments
- Configuring Payment Gateways
- Creating and managing Payments
Key Terminology
|
|
|
|
|
|
|
|
|
|
|
|
Installing Payments
The Payments module is not available by default, and you need to install it from the Add-ons.
Follow these steps to install the Payments module:
- Log in to the CRM.
- Go to the main Menu.
- Select Settings.
- Click Add-ons.
- Look up Payments in the Search field.
- Click Install.
- Click OK for a successful installation.
Once installed, the Payments module will be available under Inventory > Order Fulfillment in the CRM.
Configuring Payment Gateways
Vtiger CRM offers three secure gateway merchants, which you can use to make payments.
- Authorize. net
- PayPal
- Stripe
After you install the payments module, you must configure these gateways to ensure a smooth payment process for your customers.
Configuring Authorize.net in Vtiger CRM:
Step 1: Configuring Authorize.net in Vtiger CRM
Follow these steps to configure your Authorize.net as a Payment Gateway:
- Log in to the CRM.
- Go to the main Menu.
- Click Settings.
- Click Payments and Subscriptions under Inventory.

- Click Payment Gateway Configuration.
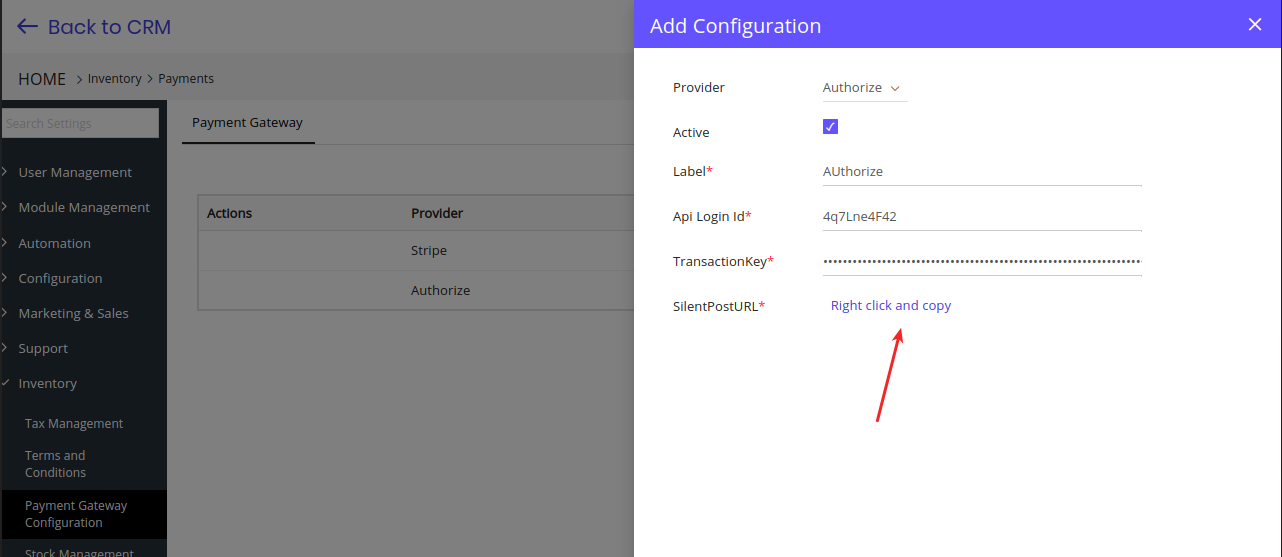
- Click +Add Gateway. The Add Configuration window opens.
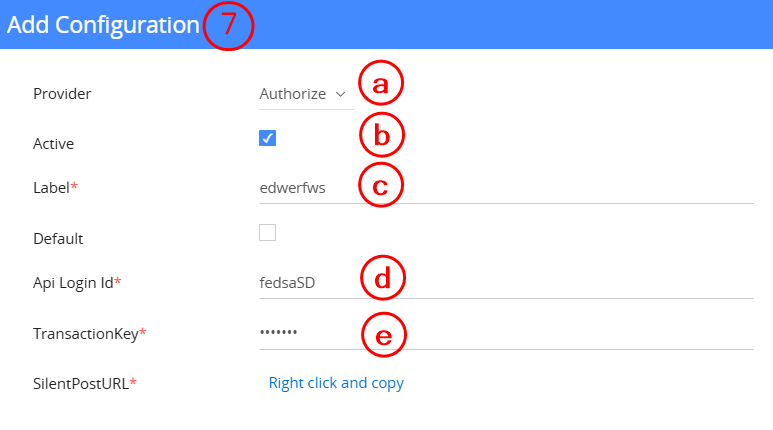
- Enter or select the following information:
- Provider: Select Authorize.
- Active: To enable or disable your merchant account.
- Label: Enter the desired username.
- API Login ID: Provide the API Login ID provided by your online payment gateway.
- TransactionKey: Provide the Transaction Key provided by your online payment gateway.
- SilentPostURL: Use the right-click to copy the link address. Paste the key into a notepad.
- Click Save.
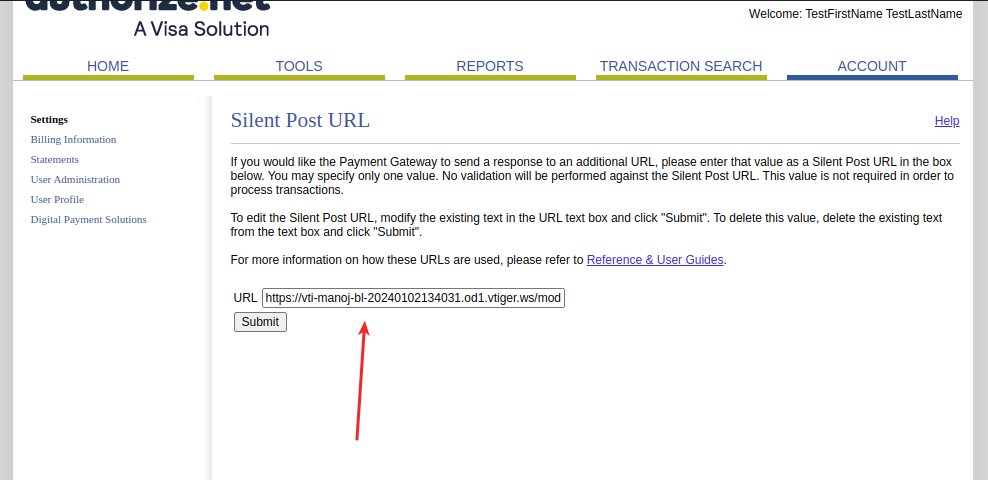
Now log in to your Authorize.net account.
- Click Account.
- Click the Silent Post URL field.
- Paste the Silent Post URL into the field.
- Click Save.
To learn more about the features and benefits of Authorize.net, click here.
Configuring PayPal
The PayPal Digital Goods Checkout payment method helps you to accept payments through a secure PayPal gateway. To achieve this, you’ll need a PayPal Business Account to accept online payments.
Follow a few simple steps to configure your PayPal account
- Log in to the CRM.
- Go to the main Menu.
- Click Settings.
- Click Payments and Subscriptions under Inventory.
- Click the Payment Gateway Configuration tab.
- Click +Add Gateway. The Add Configuration window opens.
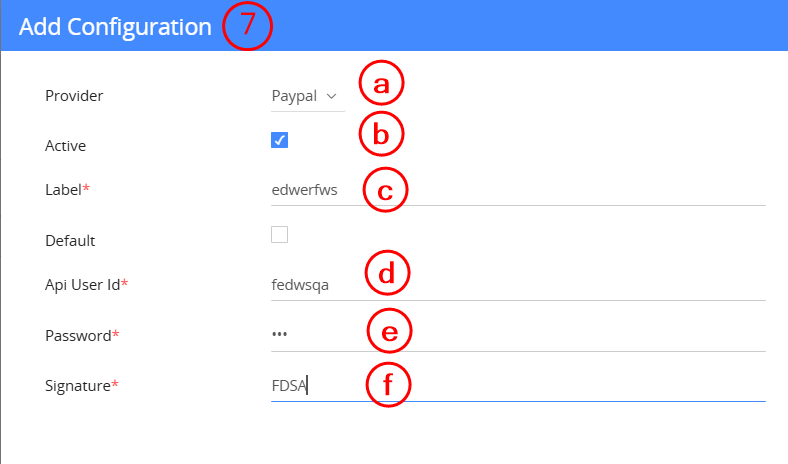
- Enter or select the following information:
- Provider: Select PayPal.
- Active: To enable or disable your merchant account.
- Label: Enter your desired username.
- Api User ID: Enter the API Login ID provided by your PayPal Payment Gateway.
- Password: Enter the Password provided by your PayPal Payment Gateway.
- Signature: Paste the API Signature from PayPal.
- Click Save.
Note:
Business Accounts in PayPal
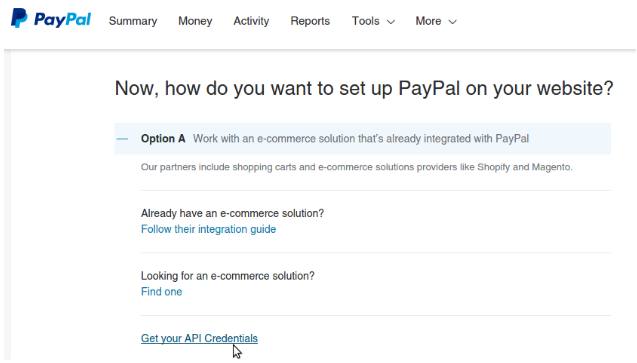
In this section, you will learn how to create a business account on PayPal. If you already have one, you will learn where to find the API User ID, Password, and Signature.

- Sign up for free on the PayPal website.
- Provide all the mandatory details and create a Business Account.
- After signing up, log in to your PayPal account.
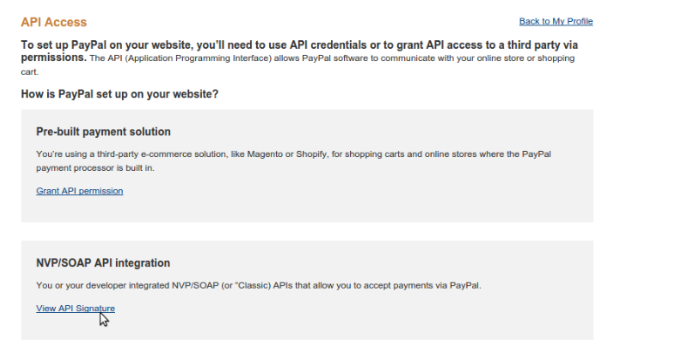
- Click Tools > Business Setup > Option A.
- Select Get your API Credentials.
-
Click View API Signature.
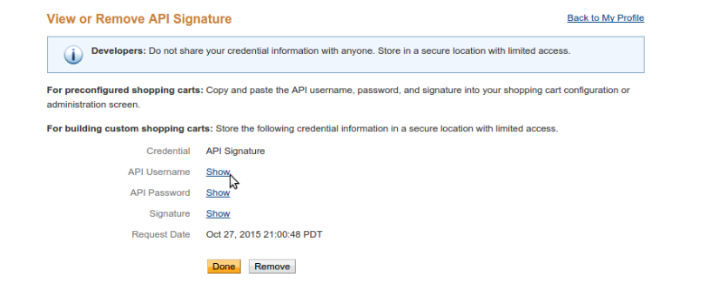
-
Click Show to view the API Username, API Password, and Signature.
-
Copy the values from the API Username, API Password, and Signature and paste them in the Add Configuration Screen.
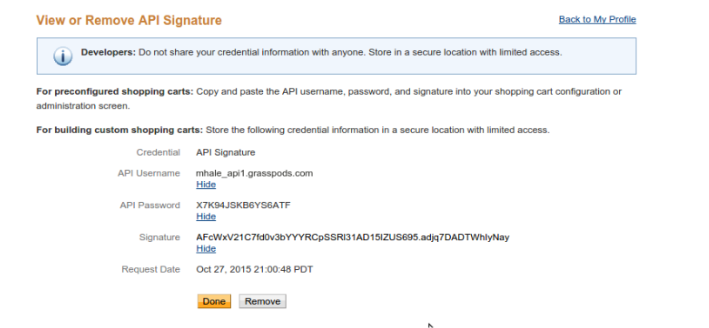
- Click Done and log out of your account.
Currencies supported by PayPal
Here is a list of currencies supported by PayPal:
|
|
|
|
|
|
|
|
|
|
|
|
|
|
|
|
|
|
|
|
|
|
|
|
|
|
|
|
|
|
|
|
|
|
|
|
|
|
|
|
|
|
|
|
|
|
|
|
|
|
|
|
|
|
|
|
|
|
|
|
|
|
|
|
|
|
|
|
|
|
|
|
To know more about PayPal currencies, click here.
Errors in processing PayPal payments
- The total amount of all payments exceeds the maximum allowed. Why does it mean, and what should be done?
- It means you have used up the PayPal Pre-approved amount of $2000 (which you approved when you subscribed to Vtiger), and Vtiger cannot process further payments.
- To add an amount of $2000 to your PayPal account:
- Go to the billing section
- Click on Replace payment method
- Enter PayPal details
- Add an amount of $2000
- Note: To avoid this situation, please add your Credit Card Details so that you do not need to enter the payment details every month
- Card Setup Errors
- If an Error message contains Declined or Do Not Honor, please contact your bank to approve the transaction. Vtiger transactions originate from the US with the name Vtiger CRM On Demand. Banks block international transactions due to suspected fraud. A call to your bank will take care of this.
- Most other errors are due to a change in your card number, your card expiring, or your credit card being canceled.
Configuring Stripe
Follow these steps to configure your Stripe merchant account:
- Log in to the CRM.
- Go to the main Menu.
- Click Settings.
- Click Payments and Subscriptions under Inventory.
- Click Payment Gateway Configuration.
- Click +Add Gateway. The Add Configuration window opens.
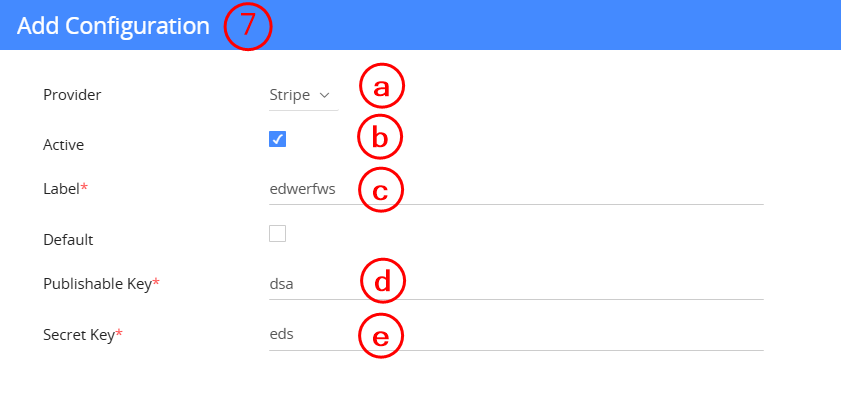
- Enter or select the following information:
- Provider: Select Stripe.
- Active: To enable or disable your merchant account.
- Label: Enter desired username.
- Publishable Key: Enter the key provided in the Stripe account.
- Secret Key: Enter the secret key available in the Stripe account.
- Click Save.
To know more about the features and benefits of Stripe, click here.
Creating a Payment Record
You can create a payment record from the following screens:
- Using Quick Create (+ icon) from all screens in the CRM
- Using + Add Payment from the Payments module
- From related modules like Invoices
You can create a payment record for these scenarios:
- Payment from the customer - Payment records will be linked to invoices.
- Payment to vendor - The payment record is linked to bills.
- Refund to customer - The payment record is linked to credit notes.
From Quick Create
You can create a Payment record by clicking the + icon (Quick Create) on all CRM screens.Follow these steps to create a payment using Quick Create:
- Log in to the CRM.
- Click the + icon displayed on the top right side of your screen.
- Click Show all to view all the modules you can create records in using Quick Create.
- Select Payments from Order fulfillment.
- Enter all the mandatory details.
- Related Invoice: Select the invoice to pay.
- Amount: Enter the payment amount.
- Status: Select the payment status.
- Assigned To: Select the user the payment is assigned to.
- Click Save.
- You can also click Save and Continue to save the record.
- Note: Clicking Cancel discards all the information you entered.
To know more about Quick Create, click here.
From the Payments List View
You can create a Payment record from Inventory > Order Fulfillment > Payments module > +Add Payment button. You can find it in the top right corner of the Payments module List View.
Follow the steps below to create a payment:
- Log in to the CRM.
- Click the main Menu.
- Go to Inventory.
- Select Payments.
- Click +Add Payment.
- Note: By default, all payment records are associated with invoices. To change the module, click the arrow next to the button.
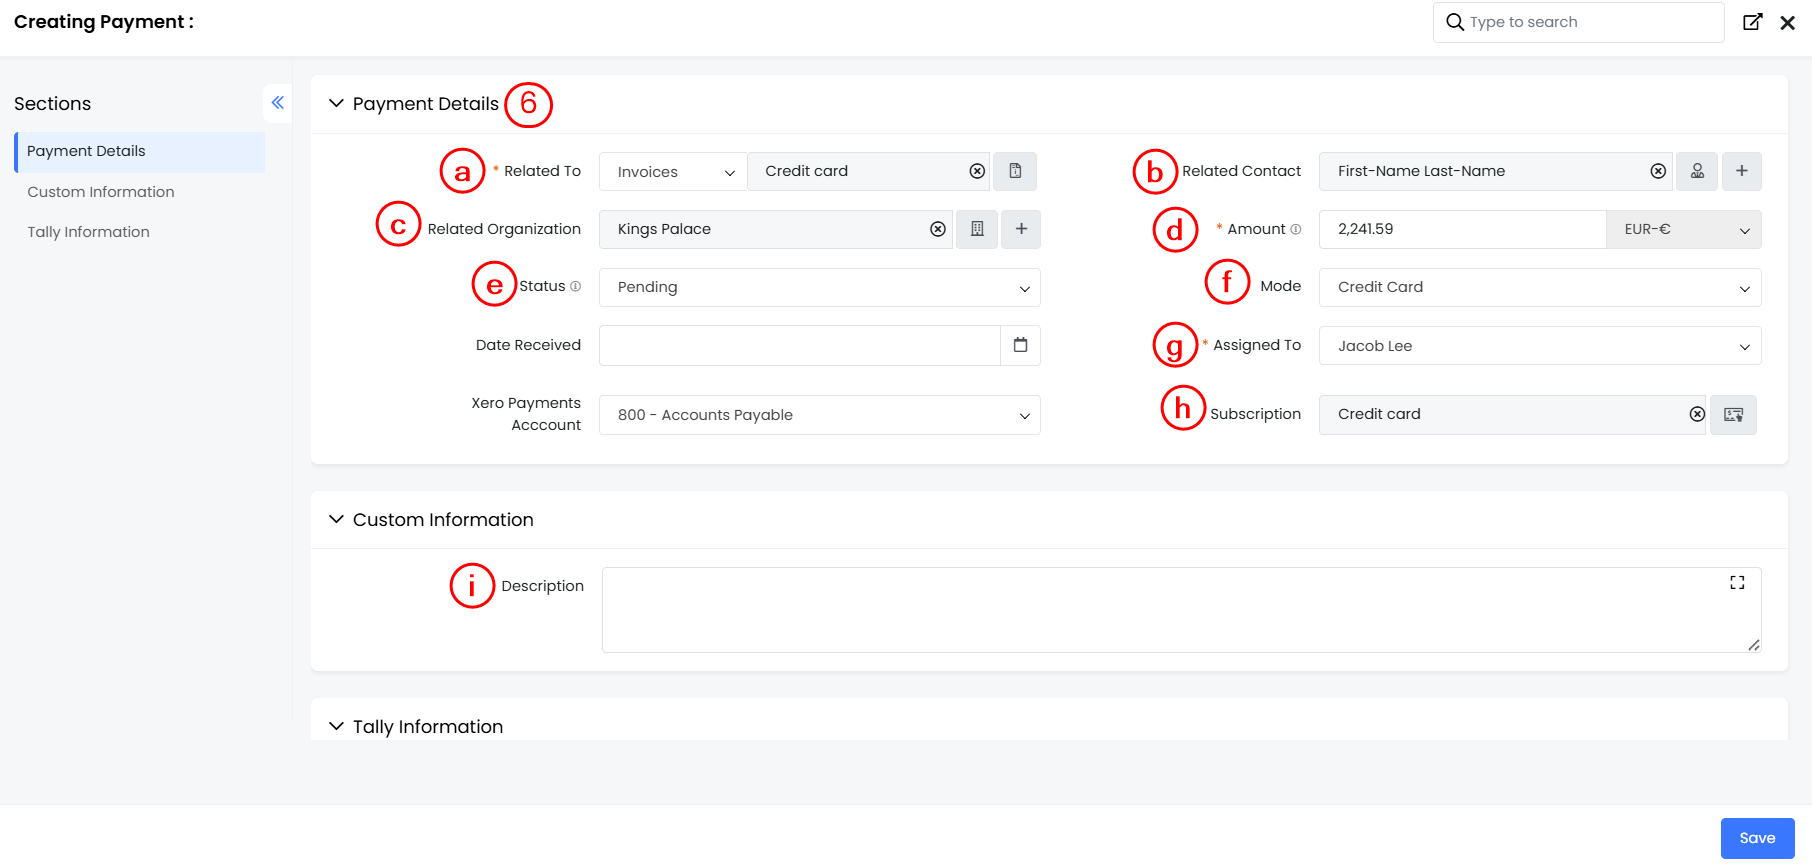
- Fill in all the necessary details.
- Related Invoice: Select the invoice to pay.
- Related Contact: Enter the contact name.
- Related Organization: Enter the organization name.
- Amount: Enter the payment amount.
- Status: Select the payment status.
- Mode: Select the mode of payment.
- Assigned To: Select the user the payment is assigned to.
- Subscription: Select the subscription record.
- Description: Enter the payment description
- Click Save.
Selecting Payment Gateways in Automated Emails
You can configure multiple payment gateways when automating emails (creating email workflows).
- When you click the Insert payment link option, you will be able to select the payment gateway from the list of payment gateways configured in the Payments module. This will add the selected payment gateway to the email body.
- When the workflow is triggered, an email will be sent with the selected payment gateway link.
- Log in to the CRM.
- Go to the main Menu.
- Click Settings.
- Click Workflows under Automation.
- Click Add Workflow.
- Enter the Workflow details.
- Select the Send Email action.
- Enter the email body.
- Click Insert Links.
- Insert payment link.
- Select the payment gateway.
- Click Save to save the email action.
- Click Save to save the workflow.
Relationship between Payments and Invoices
Vtiger CRM provides a default many-to-many relationship between Payments and Invoices. The following functionalities are restricted for the Payments module:
- Duplicate Management from Layout Editor.
- Duplicate Check step in the Import operation.
- Merge and Find Duplicates options from the List View.
Note: To automatically update the invoice and payment status, the customer needs to copy the silent URL from Vtiger CRM and paste it into the authorized accounts settings page. Once this is done, the payment and invoice will get automatically updated once they have made the payment.
Create a payment record for multiple invoices
You can relate many invoices to a payment record. Follow these steps to create a payment for multiple invoices:
- Log in to the CRM.
- Go to the main Menu.
- Select Payments under the Inventory app.
- Click the arrow next to +Add Payment.
- Select a Payment for Customer from the drop-down.
- Enter the total amount to be received.
- Keep the Related To invoice field empty and fill in the other details.
- Click Save.
To link Invoices, change the Payment Status to Received.
Consider the following example. You need to receive $100,000 from the XYZ company via multiple invoices.
- Create a payment record for XYZ company totaling $100,000.
- Change Payment Status to Received.
- Go to the Invoices tab and click on the Select Invoice button.
- Note: To see the Select Invoice button, enable Allow record linking for closed records from the Layout Editor.
- You can see the related Invoices whose currency matches the Payment currency.
- Select the desired invoices.
- Enter the amount to credit.
- Example,
- Invoice 1: Total = $ 75,000, Applied amount = $ 50,000.
- Invoice 2: Total = $ 25,000, Applied amount = $ 25,000.
- Click Apply Payment.
The amount applied is deducted from Available Credits, and the invoice balances are calculated accordingly.
- In the example above, Available credits: 100000 - 75000 = 25000; total applied amount: 75000.
- The Invoice 1 balance becomes 25000.
You can see the Invoice Status and the Applied Amount in the related Invoices tab. Unlinking an Invoice calculates the balance and updates the Invoice record. You can also create a Detail Report on the Applied Amount.
Note: Ensure that the Payment currency and Invoice currency are the same.
Limitation
You cannot edit a Payment linked to an Invoice.Tracking Payments
With Vtiger CRM, you can never lose track of your payments. You will have a record of all payments you owe your suppliers, or that your customers owe you. Below are the ways you can track your payments.
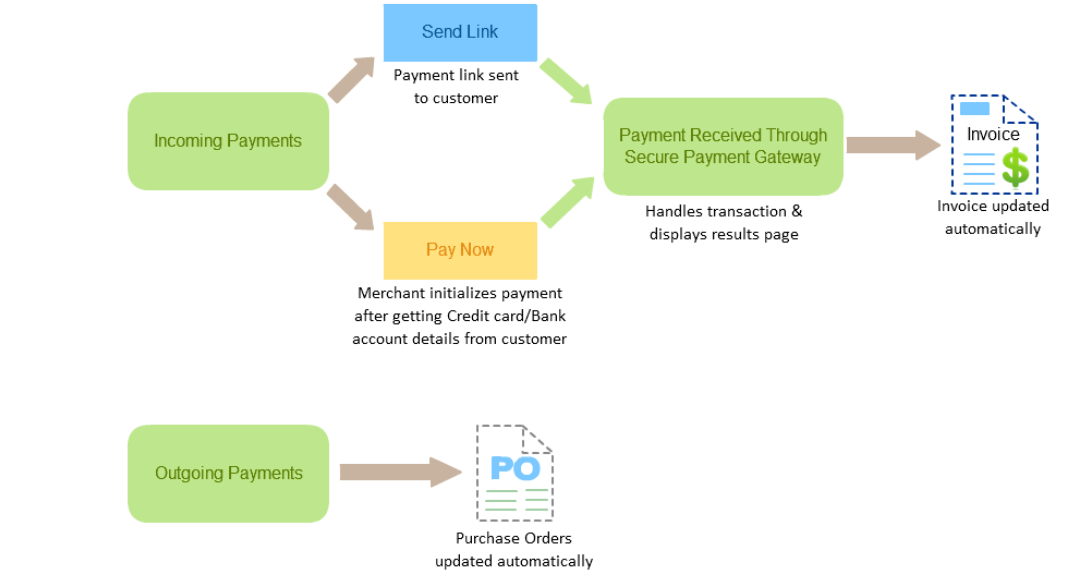
Tracking incoming payments
Vtiger CRM supports two methods for accepting payments from your customers. You can either initiate the payment after obtaining the customer's banking information or send the customer the payment link directly. However, in both cases, payments are processed securely through popular online payment gateways such as Authorize. net.
Payment initiated by the merchant
If you are the merchant, you can initiate the payment provided you have the customer's credit card or bank account details.
Follow these steps to initialize the payment:
- Log in to the CRM.
- Click the main Menu.
- Go to the Inventory tab.
- Select the Payments module. The List View opens.
- Open any pending payment record.
- Select Pay Now.
- Select the gateway you want to use to process the payment.
- Enter the customer’s credit card details. You will be redirected to the gateway where the payment will be completed.
- Status: Updates to Received (Invoice)
- Date received: Updates about the payment received date and the current date
Payment initiated by the customer
You can send your customers a payment link so they can pay.
Follow these steps to initiate the payment by the customer:
- Log in to the CRM.
- Go to the main Menu.
- Select Payments under the Inventory app.
- Open any pending payment record.
- Click More.
- Select the Send Link option.
- Select the gateway you want to use to process the payment. A compose email window will open with the payment link embedded.
- Enter the recipient’s details.
- Click Send.
When your customers click on the payment link, they will be sent to the secure online payment gateway. Here, they can provide their credit card or bank account details and successfully complete the payment process.
As a result, the following fields in your payment record in Vtiger CRM will be updated automatically:
- Status: Updates to Received (Invoice)
- Date received: Updates about the payment received date and the current date
Tracking outgoing payments
When goods are procured from your suppliers, you can easily create a Purchase Order record and link it to the payment record. By doing this, you can track the amounts paid or owed to your suppliers. Once the payment is complete, you can update the payment record, which will automatically update the purchase order as well.
Follow these steps to track outgoing payments:
- Log in to the CRM.
- Go to the main Menu.
- Select Payments under the Inventory app.
- Click +Add Payment.
- Click the arrow in the Related To field.
- Select Purchase Orders from the dropdown.
- Select a PO record from the list of all available records either by typing the PO name or by clicking the PO icon.
- Fill in the other mandatory details.
- Click Save to create the payment record.
- Click Save and Continue to enter other details.
This newly created payment record will be linked to the PO.
Tracking payments in other modules
From Invoices
These particular fields get updated in an invoice record whenever a payment has been successfully completed:
- Received: This field gets automatically updated to the amount that has been paid.
- Grand Total: The amount you received from the payment process is deducted from the grand total field.
- Balance: The remaining amount that the customer owes you is displayed in this field.
Follow these steps to track payments from the invoice record:
- Log in to the CRM.
- Go to the main Menu.
- Go to the Inventory tab.
- Select the Invoices module. The List View opens.
- Open the Invoice record of your choice. The Summary View opens.
- Click the Payments widget to see the list of all payments made and create new ones.
- Click the Details tab.
- Check the Received and Balance fields to see the payment status.
- You can link multiple payment records to a single invoice record.
- You cannot edit a payment linked to an invoice.
From Purchase Orders
A purchase order can have multiple payment records attached to it. These particular fields get updated in the PO record whenever a payment has been successfully completed:
- Paid: When the payment status is set to Paid, this field is automatically updated to the amount paid.
- Grand Total: The amount you paid during the payment process is deducted from the grand total field.
- Balance: The remaining amount that you owe the supplier is displayed in this field.
Follow these steps to track payments from the PO record:
- Log in to the CRM.
- Go to the main Menu.
- Go to the Inventory tab.
- Select the Purchase Orders module.
- Open the purchase order of your choice.
- Click the Payments widget in the summary view to see the list of all payments made and create new ones.
- Check the Paid and Balance fields to see the payment status.
From Bills
You can create multiple payments to settle a bill record. These fields are updated in the bill record whenever a payment is successfully completed.
- Paid: When the payment status is set to Paid, this field is automatically updated to the amount paid.
- Grand Total: The amount you paid during the payment process is deducted from the grand total field.
- Balance: The remaining amount that you owe the supplier is displayed in this field.
Follow these steps to track payments from the bill record:
- Log in to the CRM.
- Click the main Menu.
- Go to the Inventory tab.
- Select the Bills module.
- Open the bill of your choice.
- Click the Payments widget in the summary view to see the list of all payments made and create new ones.
- Check the Paid and Balance fields to see the payment status.
From Credit Notes
You can create multiple refunds on a credit note; thus, creating multiple payments on a single credit note is accepted. These particular fields get updated in a credit note whenever a payment has been successfully completed:
- Refund: When the payment status is set to Refunded, this field is automatically updated to the amount refunded.
- Available Credits: The amount that you have paid through the payment process is deducted from the credit amount field, and the remaining credits to be claimed are displayed here.
Follow these steps to track payments from a credit note:
- Log in to the CRM.
- Click the main Menu.
- Go to the Inventory tab.
- Select the Credit Notes module.
- Open the credit note of your choice.
- Click the Payments widget in the summary view to see the list of all payments made, and also create new ones.
- Check the Refund and Available Credits fields to know the status of the payment.
Viewing Payment Records
List View
List View sorts and lists all payments by last modified by default.Columns in List View
The columns that are visible by default in the List View are :- Payment No - Displays the payment record number.
- Related To - Displays the module to which the payment record is related.
- Amount - Displays the total amount of the payment record.
- Status - Displays the payment record's status.
- Mode - Displays the payment method used.
- Modified Time - Displays the time at which the payment record was modified.
List actions
You can perform quick actions, such as Delete, Export, and Follow, on payment records in the List View.To learn more about List View actions in Vtiger CRM, click here.
Summary View
Summary View is the view that appears when you click a particular record from the List View. The Summary View displays all the key information for the record. The Summary View can be divided into four sections. Each section has a particular functionality.- Summary View actions
- Follow: You can follow a payment record to receive updates on all activities performed on it.
- Tags: You can add tag names to a record to easily identify it.
- Print: You can print payment details or save them as a PDF file for future reference.
- Duplicate: You can duplicate the current record to create a new one with all the details.
- Delete: You can delete a record.
- Activity
- This section lists all the activities performed on that particular record. You can click Filters to display additional information in this section.
- More
- When you click on the More icon on the top right-hand corner of the Summary View, you will see the following:
- Add or Create - You can add or create other modules related to the payment record.
- Send Link - You can send the link from your payment record to the customer.
- Pay Now - You can enter the credit card or bank details manually and make the payment.
- Widgets
- Analytics - You can view all payment metrics in charts, mini-lists, and other formats. You can also create new ones here.
- Sales Ops - You can view the Invoices, Bills, Purchase Orders (PO), and Credit Notes related to the payment record.
Grid View
Grid View is a table-like layout that shows data in rows and columns, similar to a spreadsheet. It lets you view and edit multiple records at once on the same page. You can edit specific field details in a record, just like editing a cell in a spreadsheet. The view resembles the List View but also allows additional actions, such as editing, rearranging columns, and bulk updates.
Actions Possible on a Payment Record
You can perform the following actions on the payment:
- Exporting a Payment record
- Printing a Payment record
- Changing the template of a Payment record
Exporting a Payment Record
Follow these steps to export a payment record- Log in to the CRM.
- Click the main Menu.
- Go to the Inventory tab.
- Select the Payments module. The List View opens.
- Select the records and click Export.
- Select any one of the following options:
- Export Selected Records - This option exports only the selected records.
- Export data on the current page - This option exports the records on the current page.
- Export all data - This option exports all data across all pages of the payments module.
Printing a Payment Record
Follow these steps to print a payment:
- Log in to the CRM.
- Click the main Menu.
- Go to the Inventory tab.
- Select the Payments module.
- Open any payment record.
- Click More.
- Click Print to print the payment record.
- You can perform any of the following options:
- Edit & Export - You can edit and export the payments to your local system.
- Email with PDF - You can email the payment record as a PDF to the contact.
- Print - You can print the payments and keep a hard copy.
- Save as PDF - You can save the payments as a PDF on your local system.
Changing the Template of a Payment Record
Follow these steps to change the template of a payment:
- Log in to the CRM.
- Go to the main Menu.
- Go to the Inventory tab.
- Select the Payments module.
- Open any payment record.
- Click More.
- Click Print to print the payment record.
- Select any template from the list of available templates.
- You can perform any of the following actions to view the applied template on the payment record.
- Edit & Export - You can edit and export payments to your local system.
- Email with PDF - You can email the payment record as a PDF to the contact.
- Print - You can print the payments and keep a hard copy.
- Save as PDF - You can save the payments as a PDF on your local system.
References
- Purchase Order
- Invoices
- Credit Notes
- Bills
- Vendors
- Tax management
- Price books
- Print templates