Articles in this section
Creating and Managing Work Orders
Feature Availability
Introduction to Work Orders
The work to be performed on a customer asset or a service to be completed as per the customer’s request. The Work Orders module in Vtiger CRM helps you efficiently manage service jobs assigned to field technicians or service teams. A work order encompasses all the necessary details to fulfill a service request, including customer information, job description, required parts, assigned technician, location, and scheduled date.
With Work Orders, your service teams can track job progress in real-time, ensure timely completion, and deliver excellent customer experiences. Whether it’s equipment repair, routine maintenance, or installation service, this module keeps every task organized, scheduled, and completed efficiently.
Key Features
- Work Order Creation and Scheduling – Create new work orders manually or from Cases, Sales Orders, or Assets. Schedule them based on customer availability or technician workload.
- Technician Assignment – Assign technicians or service teams to each work order and track their progress.
- Job Status Tracking – Monitor each stage of the work order lifecycle—from creation to completion—with defined status updates.
- Parts and Service Details – Add information about required parts, tools, and estimated labor hours.
- Integration with Calendar – View and manage scheduled jobs directly from the Calendar for better resource planning.
- Mobile App Access – Enable technicians to view, update, and close work orders on the go through the Vtiger Mobile App.
- Linked Records – Link related entities such as Customers, Assets, Invoices, or Cases to maintain a complete service context.
- Custom Templates and Notifications – Automate notifications and use templates for consistent communication with customers and teams.
Benefits
The benefits of the Work Orders module are:
- Streamlined Field Operations – Simplify the management of multiple service jobs with centralized tracking and scheduling.
- Improved Technician Productivity – Assign jobs efficiently and ensure technicians have complete job details before visiting the site.
- Faster Service Resolution – Reduce response times by automating scheduling, updates, and customer communication.
- Enhanced Customer Satisfaction – Keep customers informed about service progress and ensure timely completion.
- Accurate Service Reporting – Gain insights into completed jobs, turnaround times, and technician performance through reports and dashboards.
- Seamless Integration with Other Modules – Connect Work Orders with Cases, Assets, and Invoices to create a unified service workflow.
Key Terminology
|
|
|
|
|
|
|
|
|
|
|
|
|
|
|
|
|
|
|
|
|
|
|
|
|
|
|
|
|
|
|
|
|
- Work Orders
- The relationship of Work Orders with other modules
- How to configure and use Work Orders
- Limitations
Use Case
Preventive maintenance services
Maintenance services are scheduled periodically to prevent product failure. Schedules are planned based on time or usage, and resource planning is conducted according to a maintenance schedule. Preventive maintenance services are typically associated with a service contract, where the terms of service and rates are mutually agreed upon.
Examples include water purifier maintenance, Appliance service, Lawn services, Car services, Hardware services, Server maintenance services, and Software services, among others.
Note: A service can be either remote or on-site. Remote maintenance services are typically associated with software services.
To learn more about creating a planned maintenance Work Order, click here.
On-demand product services
On-demand support services include breakdown maintenance to resolve product issues, as well as custom services provided by the service provider.
Examples include laptop repair, air conditioning (A/C) repair, and installation services, among others.

To learn more about creating an on-demand service request, click here.
Note: Work Orders are not appropriate for jobs or projects that have multiple tasks. In such cases, you should use the Projects, Project Milestones, or the Tasks module in Vtiger CRM.
Work Orders in Real Time
Consider the following scenario:
David is a Service Manager at ABC Electronics, a company that provides repair and maintenance services for home appliances. One of their customers, SmartHome Solutions, reports that an LED television purchased from them is not turning on.
Steps:
- Create a Work Order for the customer, describing the issue (“LED TV not powering on”), and set the Scheduled Date for the next day.
- Assign an experienced technician to handle the repair. Example, Alex.
- The work order automatically appears in Alex’s Calendar and Mobile App, along with the customer address and issue details.
- The technician visits the customer and executes the job
- He also adds Completion Notes mentioning the replaced part and successful testing.
- Close the Work Order: After Alex updates the job, David reviews the details and closes the work order.
- The system automatically links the service record to the Asset (LED TV) and updates the product’s maintenance history.
Result:
The customer’s television is repaired quickly, Alex’s job completion is recorded in real-time, and ABC Electronics maintains a complete service log for future reference.
Relationship with Other Modules
With Cases
A work order is usually created from a case or a service contract. You can associate a work order with either off-site or on-site service, depending on the industry or service type.
For example, the Operations team provides IT services remotely, whereas a field service agent conducts on-site repair services.
To know more about Cases, click here.
With Timelogs
Agents can log time on the assigned work order using a timer with a start and stop function. A Work Order captures the necessary details for an agent to complete a job. When a Work Order is linked to time logs, it is easy to monitor the time spent by the agent to finish the job.
With Service Appointments
Jobs that need to be performed at the customer site can be scheduled using the Service Appointments feature.
Agents can track their daily agenda through Service Appointments and use navigation buttons to reach the customer's location. Check-in and Check-out actions on the appointment record help in monitoring the time spent on the job. On completion of work, the agent signs off and generates the invoice from the Work Order.
To learn more about Service Appointments, click here.
Note: Creating a service appointment involves creating an event associated with a work order.
With Service Contracts
Service contracts can create Work Orders. A service contract is a support agreement between the service provider and the customer. It will contain the warranty period, SLA, and other details. The created work order will inherit all these details. The agent must create a time log for the time he spends on work orders linked to a service contract.
With Assets
If a Work Order is created from a service contract, the Asset linked to the service contract is linked to the Work Order by default. All the details present in the Asset and the Service Contract get linked to the Work Order. Assets are nothing but the products owned by the customer.
To know more about Assets, click here.
With Invoices
A Work Order can be created from an invoice. It simply means that the work to be done in that work order is charged. After an agent completes his work, it will be invoiced and billed to the customer.
To know more about Invoices, click here.
Important Fields in Work Orders
|
|
|
|
|
|
|
|
|
|
|
|
|
|
|
|
|
|
Note:
- Completed, Canceled, and On hold are closed states. If they are reopened, the Work Order status will be updated to 'New'.
- If a Work Order is created from a case, then fields such as Contact Name and Organization Name will be automatically populated from the case to the work order.
Other fields in Work Orders
Work Order basic information:
- Priority - Displays the priority of the work order. This field contains three options to choose from:
- Low
- High
- Urgent
- Case - Displays the parent case.
- Service Contract - Displays a particular service contract record. (This field can be derived from Cases, if applicable.)
- Asset - Displays the product associated with the selected service contract.
- Work order description - Displays the other details related to the work order. (This can be the same as the case summary, if applicable.)
Work Order Service Details:
The field values are derived from the case if the work order is generated from a case.
- Service type - Displays the type of service that must be carried out. This field contains four options to choose from:
- Scheduled Maintenance
- Service Request
- Incident
- Implementation
- Service Location - Displays the location where the service needs to be performed. This field has two options to choose from:
- Remote
- Onsite
- Client location - Displays the customer’s address.
- Scheduled Start Date/Time - Displays the tentative start date and time for the work.
- Planned duration - Displays the time duration of the work.
- Invoiced - Displays whether an invoice has been created and charged to the customer for the work done.
Item Details:
- Products (Parts) - Displays the products to which the agent can add any part replacement cost as part of Work order fulfillment.
- Services (Labor) - Displays the list of services included in the work order. The value depends on the type of service. If it is derived from a case, the service selected is included in the line item.
Terms & Conditions: Displays the terms and conditions.
Creating a Work Order
You can create a work order from its List View or from cases that are in progress:
From Work Orders’ List View
You can use +Add Work Order to create a work order.
Follow these steps to create a work order:
- Log in to the CRM.
- Go to the Main Menu.
- Go to the Inventory tab.
- Select the Work Orders module.
- Click +Add Work Order.
- Fill in all the necessary details.
- Click Save.
From Cases
You can create a work order from a case by using the More option. This option allows you to add a work order by either creating it from scratch or duplicating one of the recently created work orders.
Follow these steps to add a work order from More in cases:
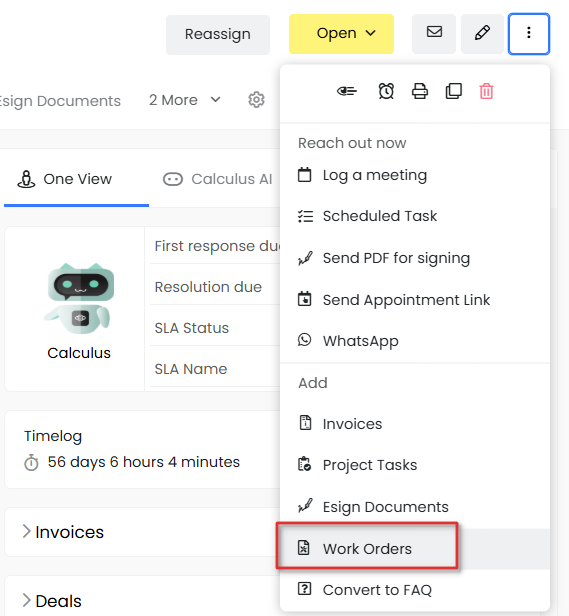
- Log in to the CRM.
- Go to the Main Menu.
- Go to the Support tab.
- Select the Cases module.
- Open a case.
- In the Summary View, click More.
- Click Add or Create.
- Click on Work Orders.
- Enter the necessary details.
- Click Save.
This newly created work order would be linked to the case. It is visible in the Sales Ops widget in the Summary View of the record.
Note:- Work Orders can also be created from Service Contracts and Assets.
- All work orders created can be automated to obtain approval from the manager. To learn how to create an approval, click here.
For a planned maintenance request
A planned maintenance work order is nothing but a scheduled appointment. Here is the process flow for a planned maintenance work order:
- A work order is created from the service contract with the Service type as Scheduled Maintenance.
- The location is set to Onsite or Remote, depending on the service's location.
- When a service is completed, the number of service requests pending for the customer is reduced.
- Any part replaced to fulfill a service request is billed at the cost of the part (product) as per the price book.
- Any additional services performed during the service request are billed at the service cost (labor) as per the price book.
Note: Service appointments can be generated from a service contract and scheduled based on the terms of service. Here, work orders are not included.
For an on-demand service request
Vtiger process flow for on-demand service requests:
- A case is created to register the request with the Service type as Service Request.
- A work order is initiated from the case and dispatched to fulfill the service request and linked to the service.
- The location is set to Onsite or Remote, depending on the service's location.
- The service (labor) is billed according to the service cost defined in the price book.
- Any additional service performed during the service request is billed at the service cost as per the price book.
Adding Line Items to a Work Order
You can add new Line Item records for a new product or service, or you can add a new section in the existing work order by editing the Item Details block.
Each line item in a work order represents the work to be completed and the products that are needed or replaced to finish the job.
How to add a new Product or Service
Follow the steps mentioned below to add line items to a record:
- Log in to the CRM.
- Go to the Main Menu.
- Go to the Inventory tab.
- Select the Work Orders module.
- Select and open the record to which you want to add line items. The Summary View opens.
- Click Edit. The Edit page opens.
- Go to the Line Items section.
- Enter or select the following information to add the Line Items:
- Add Product or Service row: Click to add the product or service to the Deal record.
- More: Click More next to the line item number.
- Add Product Row: Add a new product line next to an existing line item.
- Add Service Row: Add a new service line next to an existing line item.
- Click Save.
You can add any product or service of your choice to the work order and define the taxes. Refer to the Work Orders Configuration section in this document to understand Tax management, Price books, and other related topics.
How to add a new Section
Follow the steps mentioned below to add line items to a record:
- Log in to the CRM.
- Go to the Main Menu.
- Go to the Inventory tab.
- Select the Work Orders module
- Click Edit.
- Go to the Item Details block.
- Enter or select the following information to add Sections:
- Add section: Click to add a new Section.
- More: Click More next to the line item number.
- Add Section: Click to add a new section to group related line items.
- Click Save.
Apply Tax to All Line Items
When using the Individual Tax mode, taxes are calculated separately for each line item in an inventory record. To simplify tax updates across multiple items, the Apply for all items option lets you apply the same tax percentage to all applicable line items at once.
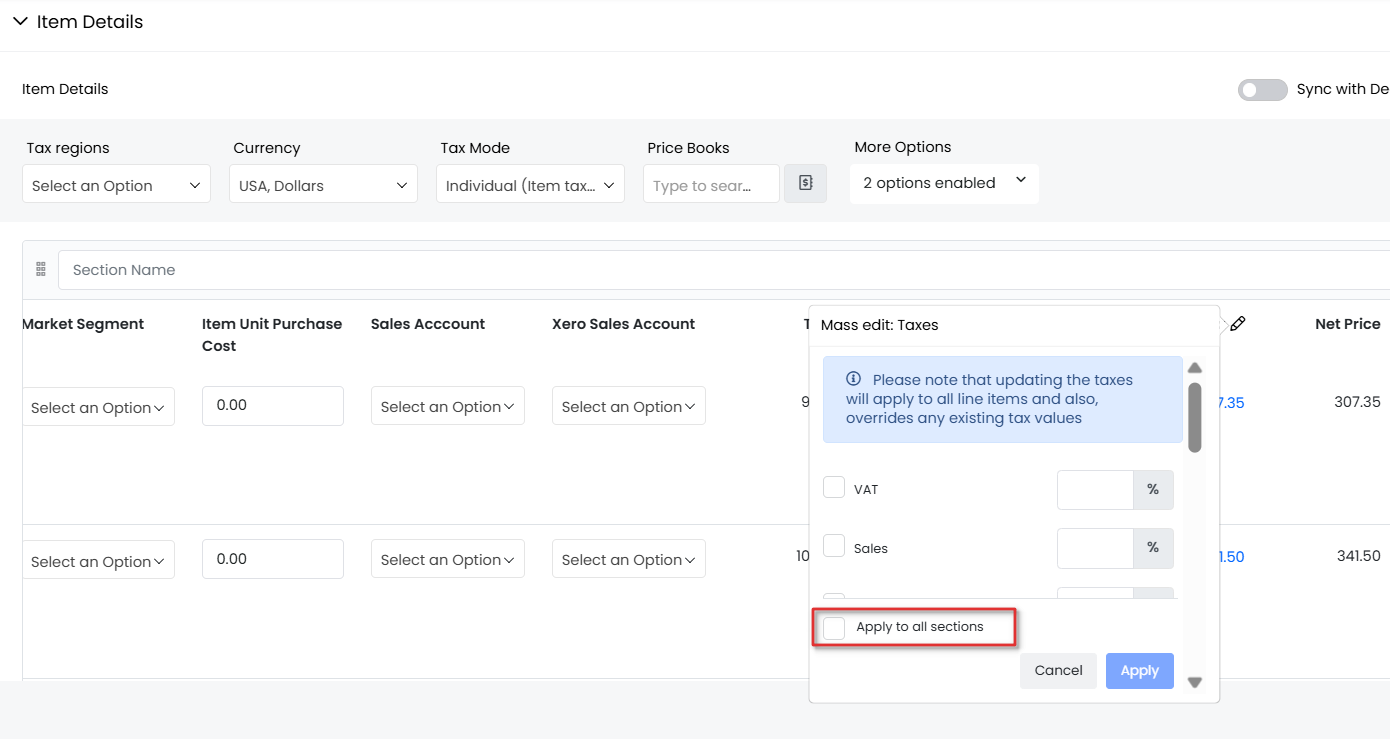
For example, when the Individual Tax mode is enabled, the CRM applies the selected tax to each product individually. If you modify the tax percentage for a specific line item, the Apply to all sections option appears. By selecting this option, the updated tax percentage is applied to all line items for which that tax is enabled.
This feature helps maintain consistency and reduces the need to manually update tax values for every item in the record.
Product Linking by Name
When adding line items to a Work Order, you can specify products using just the Product Name.
- If you create an Inventory record with a Product Name for a line item that already exists, the API links that product to the Inventory record without requiring the Product ID.
- If the Product Name you provide in the Line Item block does not exist, the CRM will automatically create a new product with the given name and link it to the Inventory record.
- The CRM allows you to link multiple line items to existing products based on the Product Name (without needing Product IDs).
Key Benefits:
- Eliminates the need to retrieve or manage Product IDs.
- Speeds up record creation and simplifies product management.
- Ideal when Product Names are available but IDs are not.
Work Order Configuration
You can configure fields such as taxes, Tax regions, Shipping Charges (if applicable), and Terms and Conditions from the Settings > Inventory Management section.
Note: Only those with the Admin role can configure these fields.
Taxes
The following is the Tax information available:
- Tax Regions: You can set up taxes based on specific regions. Regions are set up in the Tax Settings screen.
- Currency: It is the same as the currency defined in a deal. Work order line item currency defaults to the same as the record-level currency. If the currency is changed using Configure, it will be reflected in all line items.
- Tax mode:
- Group Taxes: If there are multiple products or services in the inventory, group taxes help in populating tax rates according to specific tax calculations.
- Individual Taxes: You can enable this option while creating a work order. You can apply taxes for individual items in a work order by clicking Configure in the work order.
Note: The default Tax mode is set based on the option set in the Tax Management page by the administrator. This can be overridden on a Work Order level from the Work Order Configuration pop-up.
Price Books
Price Books allows you to define different prices for your products and services. Prices of these items can vary at any time, depending on the customers and their needs.
There are two ways in which you can add a price book to the line items in a work order:
- You can add a price book that applies to all line items by clicking Configure and selecting the desired price book.
- You can add different prices for individual line items by clicking the Price Book icon.
When a Price Book is selected or changed, the system updates the unit price for all line items based on only one of the selected Price Books, i.e., either the group price or the individual price.
To know more about Price Books, click here.
Discounts
You can apply two types of discounts on the line items in a work order:
- Group Discounts: Similar to Group Taxes, Group Discounts are applied to products or services at the work order level.
- Individual Discounts: Unlike group discounts, Vtiger CRM allows you to apply discounts on an individual item based on its List Price.
Shipping Charges
Shipping Charges are the additional amount charged by the company’s sales team for shipping the product to the customer.Adjustments
Adjustments allow you to round the total amount to the next or previous value, based on the decimal point.
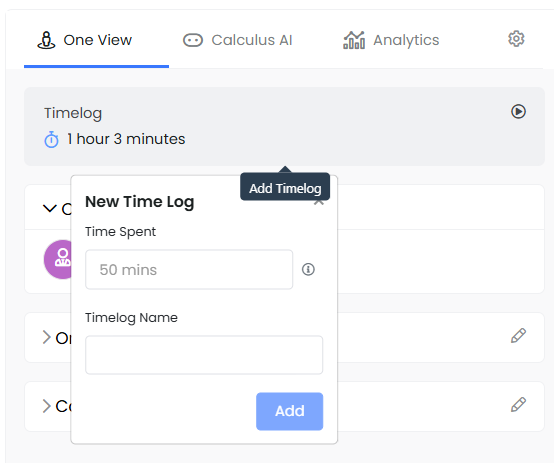
Logging Time for a Service
Field service agents can log time to track the number of hours spent on a particular client.
Here are a few situations for which time can be logged:
Log time for a Case
An agent can start or stop a timer to log the time spent on a case. The total time spent on a case can be used for invoicing the service related to the case.
Log time for a Work Order
An agent can start or stop a timer to log the time spent on a work order. You can use the total time spent while invoicing the service related to the work order.
Log time for a Service Appointment
An agent can check in once they arrive at the work location and begin the work. On completion of the work, he can check out and add a service completion note. Time spent on the service is added as a time log entry related to the work order and appended to the total time spent on the work order.
Note: You cannot start a timer on a closed work order record, but you can link an existing timelog record to a closed record.
Actions Possible on a Work Order
You can perform the following actions on or from a work order:
Creating a service appointment
You can create a service appointment from work orders for on-site services and meetings.Follow these steps to create a service appointment:
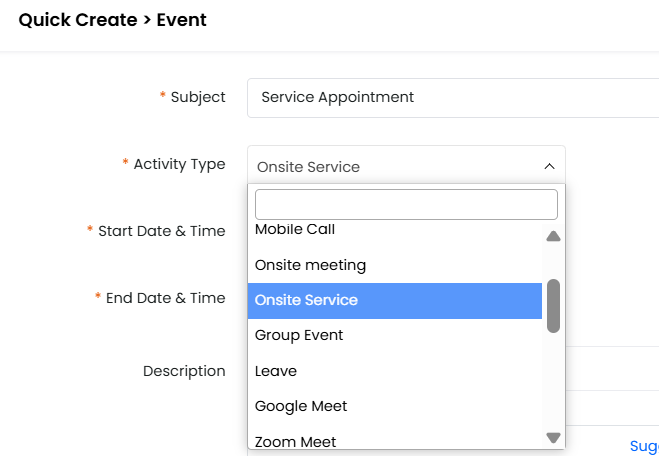
- Log in to the CRM.
- Go to the Main Menu.
- Select the Work Orders module.
- Select a work order record.
- Click the Service Appointments widget on the side panel.
- Click Add.
- Fill in all the mandatory fields.
- Click Save to schedule the appointment.
- Click Save and Continue to enter other information.
Sharing a work order
You can share a work order with a customer by sending a link to the work order or by attaching the work order itself.
As a link
Follow these steps to share the work order as a link:
- Log in to the CRM.
- Go to the Main Menu.
- Select the Work Orders module.
- Select a work order record.
- Click More in the Summary View.
- Select Share.
- Select Share as a link.
- A mail compose window opens with the work order link.
- Enter the recipient's details and click Send.
As an attachment
Follow these steps to share the work order as an attachment:
- Log in to the CRM.
- Go to the Main Menu.
- Select the Work Orders module.
- Select a work order record.
- Click More in the Summary View.
- Select Share.
- Select Share as an attachment.
- A mail compose window opens with the work order attachment.
- Enter the recipient's details and click Send.
Generating related documents
Adding documents
Use Vtiger’s Documents module to solve the problems of organizing and sharing! It acts as a repository for all the documents that you create or that are shared with you by your customers or sales team.
Follow these steps to add a document:
- Log in to the CRM.
- Go to the Main Menu.
- Select the Work Orders module.
- Open a work order record.
- Click More in the Summary View.
- Click Add or Create.
- Select Documents.
- Here, you see three options on your screen:
- Select Documents
- To add an existing document, select this option.
- Hover over and select a record.
- Click Add Selected located below the list.
- Create Documents
- To add a new document, select this option.
- Fill in all the necessary details.
- Click Save.
- Upload Documents
- To upload a new document, select this option.
- Fill in all the fields.
- Click Upload.
- Select Documents
- The linked document will be visible in the Documents widget of the Summary View for the work order record.
- To know more about documents, click here.
Generating a timelog
Follow these steps to generate a work order:
- Click the Menu icon.
- Go to the Inventory tab.
- Select the Work Orders module.
- Open a work order record.
- Click More in the Summary View.
- Select Add or Create.
- Select Timelogs.
- Fill in all the necessary details.
- Click Save to create the timelog.
- Click Save and Continue to add more information.
The newly created timelog will be linked to the work order.
Generating an invoice
An invoice is a non-negotiable itemized statement issued for the products or services rendered to the customer.
Follow these steps to generate an invoice:
- Log in to the CRM.
- Go to the Main Menu.
- Select the Work Orders module.
- Open a work order record.
- Click More in the Summary View.
- Click Add or Create.
- Click Invoices.
- Enter all the necessary details.
- Click Save to create the invoice.
This newly created invoice will be linked to the work order.
Generate an Esign Document
Follow these steps to generate an Esign Document:
- Log in to the CRM.
- Go to the Main Menu.
- Select the Work Orders module.
- Click More in the Summary View.
- Select Add or Create.
- Select Esign Documents.
- Fill in all the necessary details.
- Click Save to create the esign document.
- Click Save and Continue to add more information.
The ESign document will be created and linked to the work order.
Export
Exporting is a process of saving the work order as a PDF on the local machine or sending the work order link as a PDF via email.
Follow these steps to export a work order:
- Log in to the CRM.
- Go to the Main Menu.
- Select the Work Orders module.
- In the List View, select the Work Order records.
- Click Export.
- Select any one of the following options:
- Export Selected Records - This option will export only the selected records.
- Export data in the current page - This option will export the records on the current page.
- Export All Data - This option exports all data from all pages of the Work Orders module.
The exported record will be saved on your local system.
Printing is a process of obtaining the work order as a hard copy.
Follow these steps to print a work order:
- Log in to the CRM.
- Go to the Main Menu.
- Select the Work Orders module.
- Open a work order record.
- Click More.
- Click Print.
- You can perform any of the following options:
- Edit & Export - You can edit the work order and export it to your local system.
- Email with PDF - You can email the work order record as a PDF to the contact.
- Print - You can print the work order and keep a hard copy.
- Save as PDF - You can save the work order as a PDF on your local system.
When you try to print a work order, you can see that the work order has been presented in a certain template. Vtiger CRM offers a set of templates to select if the default template is not to your liking.
How do I change the template of a work order?
There are two ways to change the template of a work order: from the Print Work Order screen and from the Settings widget.
Print Work Order screen
Follow these steps to change the template of a work order from the Print Work Order screen:
This is a temporary change and will remain in effect only until the work order is printed.
- Log in to the CRM.
- Go to the Main Menu.
- Select the Work Orders module.
- Open a work order record.
- Click More.
- Click Print.
- Select the template you want from the list of all templates.
- You can perform any of the following options:
- Edit & Export - You can edit the work order and export it to your local system.
- Email with PDF - You can email the work order record as a PDF to the contact.
- Print - You can print the work order and keep a hard copy.
- Save as PDF - You can save the work order as a PDF on your local system.
Settings widget
Follow these steps to change the template of the work order from the Settings widget:
This is a permanent change and will be applied to the work order immediately.
- Log in to the CRM.
- Go to the Main Menu.
- Select the Work Orders module.
- Open a work order record.
- Go to the Settings Widget.
- Click the Template applied drop-down.
- Select the template of your choice.
The template will be applied to the work order instantly.
One View
The One View widget is a one-stop destination for viewing all important modules related to work orders.
One View widget in the Work Orders module will show the following details:
- Related Company details - The Parent company’s details are shown in this widget.
- Related Contact details - Parent contact details
- Related Cases - Related Cases details from which the work order is created
- Related Assets - Related Asset details generated from the work order
- Related Invoices - Related Invoices
- Related Service Appointments - Related Service appointments generated for the work order
- Related Documents - Documents related to the work order
- Related Esign - Related Esign Documents generated by the work order
To learn more about One View, click here.
Creating Reports
The following reports can be created using Timelogs, Cases, Work Orders, Invoices, and Service appointments modules.
- Time logged by Case
- Time logged by Time period
- Time logged by Work Order
- Cases related to the Service Contract
- Work orders related to the Service Contract
- Agent service visits report
- Agent service calendar
- Invoices due by the Work order
To know more about Reports, click here.
Views in the Work Orders
List View in Work Orders
By default, the List View is the screen that is visible when you click the Work Orders module. This view sorts and lists all work orders based on the last modified work order.Columns in List View
The columns that are visible by default in the List View are :- Subject - Displays the name of the work order.
- Status - Displays the current status of the work order.
- Priority - Displays the priority set for the work order. It can be Urgent, High, or Low.
- Contact Name - Displays the name of the contact linked to the work order.
- Total - Displays the charge that the customer must pay to avail of the work order.
Actions in the List View
You can perform quick actions, such as Edit, Delete, Export, and Comment, on the work order’s records in the List View.To learn more about List View actions in Vtiger CRM, click here.
Summary View a Work Order
Summary View is the view that appears when you click a particular record from the List View. Summary View displays a collection of all key information for the selected record.The Summary View displays data in separate sections for easy viewing.
Each section provides a specific functionality.
Actions in the Summary View
- Follow: You can follow a work order record to get updates on all the activities performed on that record.
- You can add tag names to a record to easily identify it.
- Reminder: You can set a reminder to follow up on the work order.
- Print: You can print a work order or save it as a PDF for future reference.
- Duplicate: You can duplicate a current record and have all the details reflected in a new record.
- Delete: You can delete a record using this option.
- Reach out now -You can get in touch with the contact via Email, Call, or SMS.
- Reach out later - You can schedule an email, event, or task with a contact.
- Add or Create - You can add or create other modules related to a work order.
- Share - You can share the work order as a link or as an attachment.
Widgets
- One View - All the modules related to the work order are displayed here.
- Activity-All the activities made on the work order are displayed here. Here, you can add comments related to the work order. Additionally, by enabling the Updates toggle in the Filters, you can view recent updates on the record.
- Tasks - All the tasks related to the work order are displayed here. You can also create a new task by clicking +.
- Service Appointments - All the on-site meetings and services related to the work order are displayed here. You can also create a new service appointment by clicking the + sign.
- Analytics - You can view all metrics related to the work order in various formats, including charts and mini-lists. You can also create new ones here.
- Time Logs - You can track the time spent on a work order here. To create a new time log, click +.
- Documents - You can create a new document or add an existing document to the work order. All the related document details are displayed here.
- Sales Ops - You can view the invoices linked to the work order or create a new invoice.
- Settings - You can change the work order template here.
Limitations
- If a Work order is related to a Case, the used units of a service contract are updated when a Case is closed, and not when a work order is closed. The admin must find a way through workflows to achieve this upon completion of a work order.
- Only one case can be invoiced at a time. Multiple cases are not available for invoicing.