Articles in this section
Managing your Events
Feature Availability
Vtiger Editions: One Pilot | One Growth | One Professional | One Enterprise | One AI
Introduction
In Vtiger CRM, Events help you organize and track important interactions with customers, prospects, and team members. You can schedule calls, meetings, visits, and seminars all neatly grouped by Activity Type. Vtiger provides default event types and also allows you to create your own based on your needs.
Using Events in Vtiger, you can:
- Create a variety of Event types: Use default options or set up custom Activity Types based on your business processes.
- Schedule recurring Events: Set up meetings or tasks that repeat regularly, and Vtiger automatically creates future instances.
- Set reminders and notifications: Ensure attendees stay informed with alerts about upcoming Events.
Use Case
As a sales representative, when you conduct a demo meeting with a customer, you can create an Event record by selecting the Activity Type as Meeting and documenting all relevant meeting details within the record.
Benefits of Events in Vtiger CRM
The benefits of using the Events module are:
- Better Scheduling: Organize meetings and calls directly in the CRM to stay on track.
- Easy Collaboration: Invite participants and integrate virtual meetings for seamless communication.
- Timely Follow-Ups: Get reminders to ensure punctuality and consistent follow-ups.
- Custom Event Types: Use default or custom event types to fit specific business needs.
In this article, you will learn about:
- Accessing an Event
- Creating an Event
- Integrating Video Conferencing Tools in Events
- Creating a Recurring Events
- Creating a Custom Event
- Sending an Event Invite
- Sending Reminder Email
- Merging Events
- Meeting Recordings and Transcript
- Actions in an Event Record
- Viewing Events
Key Terminology
| Field name | Description |
| Events | Events are scheduled activities in Vtiger CRM used to manage interactions. |
| Subject | Displays the name of the Event. |
| Assigned To | Displays the name of the user who is the owner of the Event. |
| Start Date & Time | Displays the date and time at which the Event starts. |
| Due Date & Time | Displays the date and time at which the Event ends. |
| Status | Displays the status of the Event. |
| Activity Type | Displays the type of Event. |
Creating an Event
You can create an event in the following ways:
- Using the + Add Event button in the Events List, Kanban, or Calendar Views
- Using Quick Create
- From another record within the CRM
Now, we will learn about each method in detail.
Creating an Event using the Add Event button
To create an Event, you can use the Add Event button on List, Kanban, or Calendar Views in the Events module. The example below shows how to create an Event from the List View. The steps will remain the same in the Kanban and Calendar Views.
Follow these steps to create an Event:
- Log in to the CRM.
- Click the main Menu.
- Go to Essentials > Events. The Events Page opens.
- Click +Add Event. The Add Event pop-up window opens.
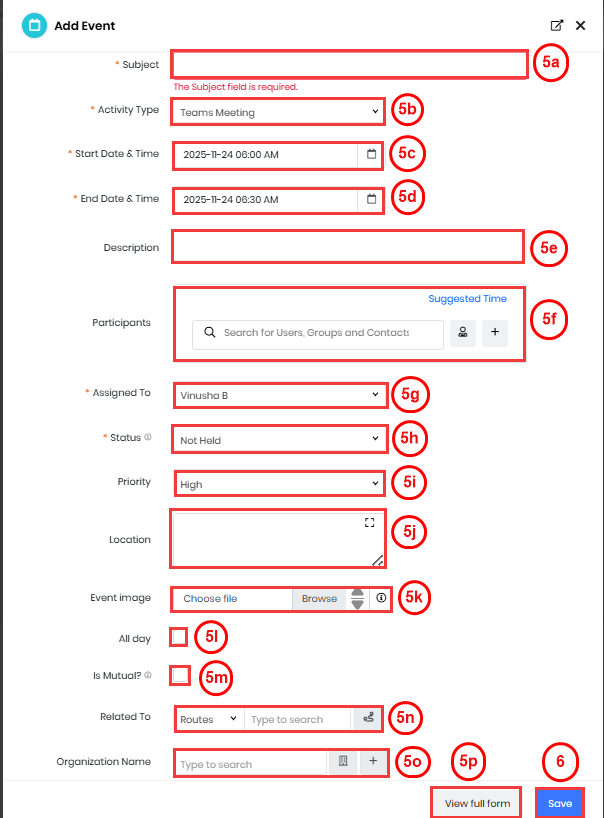
- Enter or select the following details to create a new event:
- Subject - Enter the subject of the event.
- Activity Type - Select the type of activity from the drop-down menu, such as Call, Meeting, Google Meet, Leave, etc.
- Start Date & Time - Specify when the event should start by selecting the appropriate date and time.
- End Date & Time - Define when the event will conclude by setting the end date and time.
- Description - Provide a detailed explanation of the event, outlining its purpose.
- Participants - Add participants who will be attending the event. You can select participants by clicking the User icon and, if necessary, quickly create new contacts by clicking the Plus icon.
- Assigned To - Choose the individual or team to whom the event should be assigned from the drop-down.
- Status - Indicate the current status of the event by selecting options such as Held, Incomplete, Planned, etc.
- Priority - Specify the priority of the event, whether it is High, Medium, or Low Priority. So you can prioritize tasks accordingly.
- Location - Add the Location.
- Event Image - Add an image for the event by clicking Browse and selecting one from your device.
- All Day - Select this checkbox if the event will last all day.
- Mutual - Enable this checkbox if the event is mutual
- Related To - If the event is associated with any module, such as Deals or Internal Tickets, you can select it from the dropdown menu and select the particular record in the search bar.
- Organization Name - Add the name of the organization.
- View full form - Click to enter or select details for the following sections:
- Event Details
- Reminder Details
- Recurrence Details
- Description Details
- Related To
- Invitees
- Click Save.
Note:
- When an Event is marked as all-day, its Start Date and Time are automatically set nine hours apart based on your business hours.
- Events can be marked as Held from the List and Calendar Views, as well as from the Actions page and an Event record’s Edit view, but future Events cannot be marked as Held.
Creating an Event Using Quick Create
Quick Create allows you to create an Event by entering only the essential details. This feature can be accessed from any screen in the CRM, saving you significant time.
Follow these steps to create an event using Quick Create:
- Log in to the CRM.
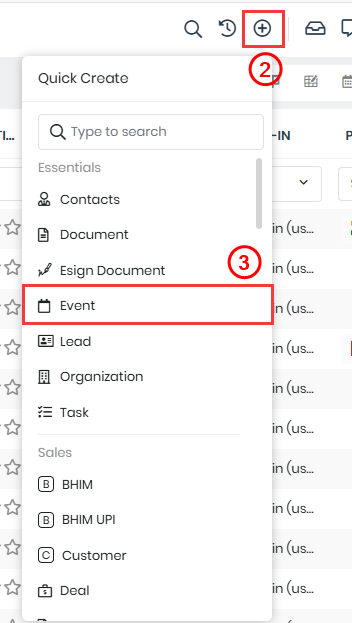
- Click the Quick Create icon on your screen's top right side.
- Select Events. The Events page opens.
- Click the View full form button at the bottom.
- Enter or select the following information to create an event:
- Events Details
- Reminder Details
- Recurrence Details
- Description Details
- Related To
- Invitees
- Click Save.
To learn more about Quick Create, click here.
Creating an Event from other module records
You can create an Event from a Deal, Contact, Organization, or Quotes record.
Follow these steps to create an event from other module records:
- Log in to the CRM.
- Click the main Menu.
- Go to Deals (or Contacts, Organizations, Quotes). The List View opens.
- Select a record. The Summary View of the record opens.
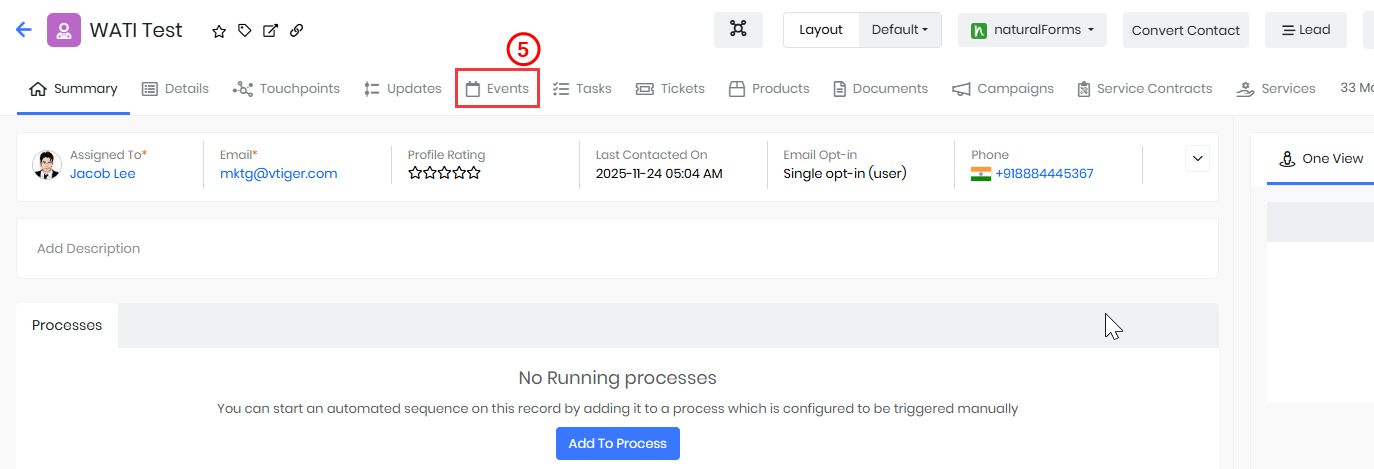
- Click the Events tab. The Events List View appears, displaying all previously added Events for that record.
- Click the +Add Events button. The Quick Create > Event window opens.
- Click the View full form button at the bottom.
- Enter or select the following information to create an event:
- Events Details
- Reminder Details
- Recurrence Details
- Description Details
- Related To
- Invitees
- Click Save.
Accessing an Event
Follow these steps to access an Event:- Log in to the CRM.
- Click the main Menu.
- Go to Essentials > Events. The Events Page opens.
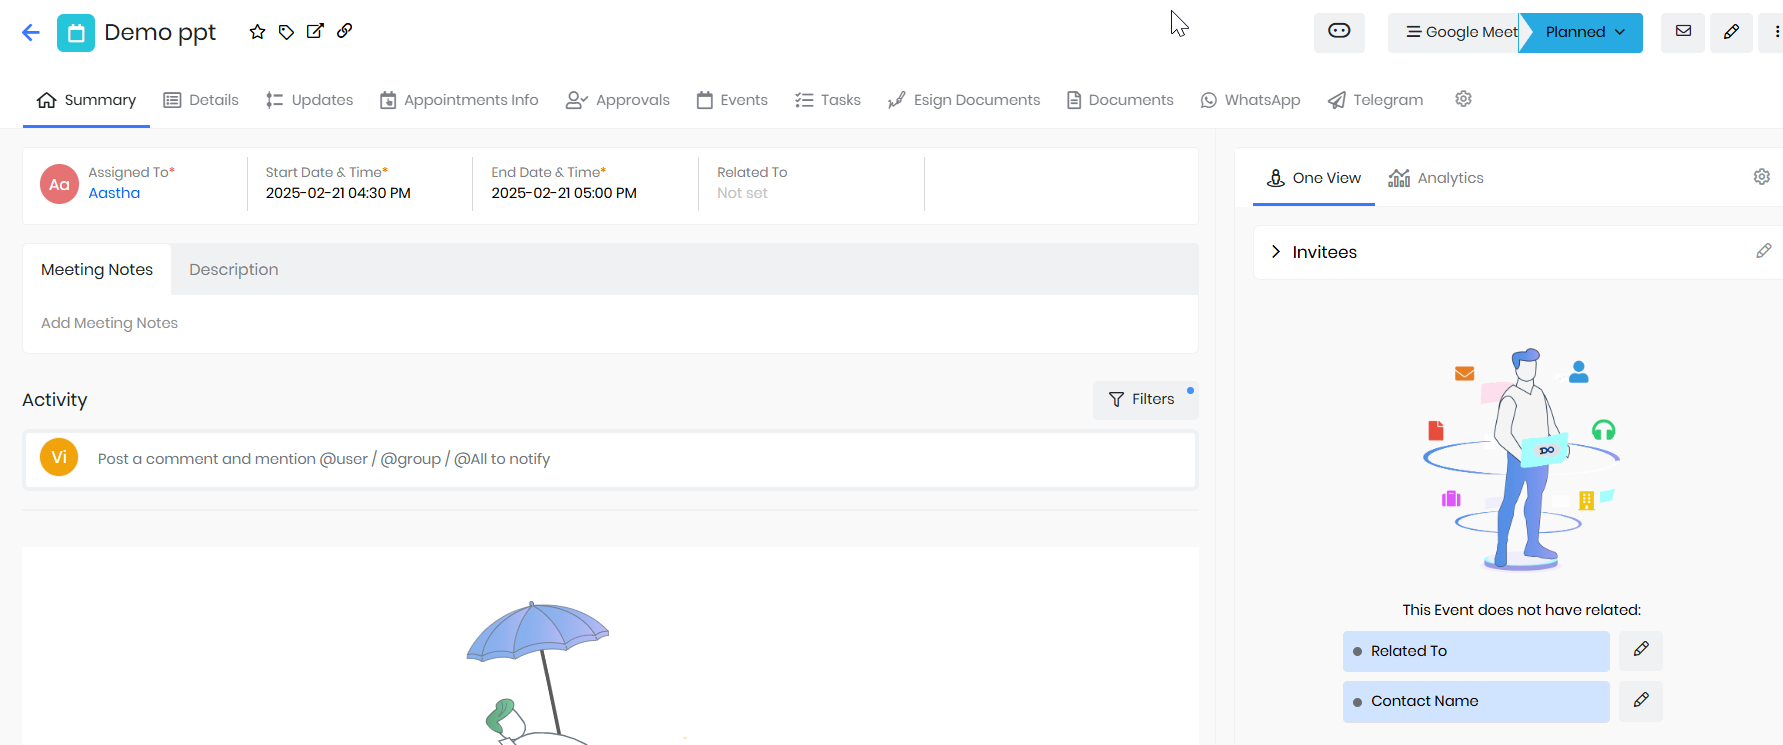
- Click on an Event record. The Summary View of the Event opens.
- View or access the following in an Event:
- Follow – Click to receive updates and notifications.
- Tag – Categorize the Event using labels for easy identification.
- Open in New Window – Click to open the Event in a separate window.
- Copy Link – Click to get a shareable link of the Event.
- Summary – Get an overview of key Event details.
- Details – View comprehensive information about the Event.
- Update – View all the updates related to the Event.
- One AI – Utilize AI-powered insights for the event.
- Mail – Click to compose an email.
- Edit – Click to make changes to the Event information.
- More – Access additional actions and settings for the event, like Delete, Duplicate, Set Remainder, etc.
- Google Meet Details – View meeting links and joining information.
- Recordings and Transcripts – Access recorded sessions and transcripts for Google Meet, Jio Meet, and Teams.
- Meeting Notes – Review notes captured during the Event.
- Description – Read or update the Event’s detailed description.
- One View – View all key related records, Event-related information.
- Analytics – View the Event data and insights for better decision-making.
- Activity Section – Track Event-related actions, interactions, and updates.
- Filter Option – Refine Event data display based on selected criteria.
Integrating Video Conferencing Tools in Events
Vtiger’s integration with video conferencing tools allows you to create virtual meeting Events within Vtiger CRM and generate meeting links with a few clicks. To enable this, you must first install the Conference Add-on from Vtiger’s Add-ons.
To know more about Conference Add-on, click here.
Installing the Conference Add-on
Follow these steps to install the Add-on:
- Log in to the CRM.
- Click User Menu on the top right corner of the screen.
- Click Settings. The Settings page opens.
- Go to the Extensions section.
- Click Add-ons. The Add-ons page opens.
- Select Conference.
- Click Install.
Now, you can sign into multiple video-calling applications, such as JioMeet, Google Meet, Teams Meeting, etc., and use them inside Vtiger CRM.
Creating an Event with a Video Conference Link
Follow these steps to create an Event with a Video Conference Link:
- Log in to the CRM.
- Click the main Menu.
- Go to Essentials > Events. The Events Page opens.
- Click + Add Event. The Add Event popup window opens.
- Click the View full form button at the bottom.
- Enter or select the following information to create an Event:
- Events Details
- Remainder Details
- Recurrence Details
- Description Details
- Related To
- Invitees
- In the Activity Type dropdown, under the Event Details section, choose a video conferencing tool (e.g., JioMeet, Google Meet, Teams Meeting).
- Add participants in the Invitees section.
- Click Save.
- A pop-up with Would you like to send email to new invitees? Opens. Choose one of these options:
- Don’t send - Do not send an email notification to the invitees.
- Send - Send email notification to the invitees.
Note: If you select Google Meet for the first time, a pop-up will open asking for Gmail authentication. You must authenticate using your Gmail account.
Creating a Recurring Event
Recurring Events are Events that keep occurring at a fixed frequency.
For example, let us say you have a new project lasting two months, and you have a status update meeting every Monday for the next two months. Instead of creating a meeting event every Monday, you can create a recurring event.
Follow these steps to create a recurring event:
- Log in to the CRM.
- Click the main Menu.
- Go to Essentials > Events. The Events Page opens.
- Open an existing Event. You can also create a new one.
- Click Edit on the top right.
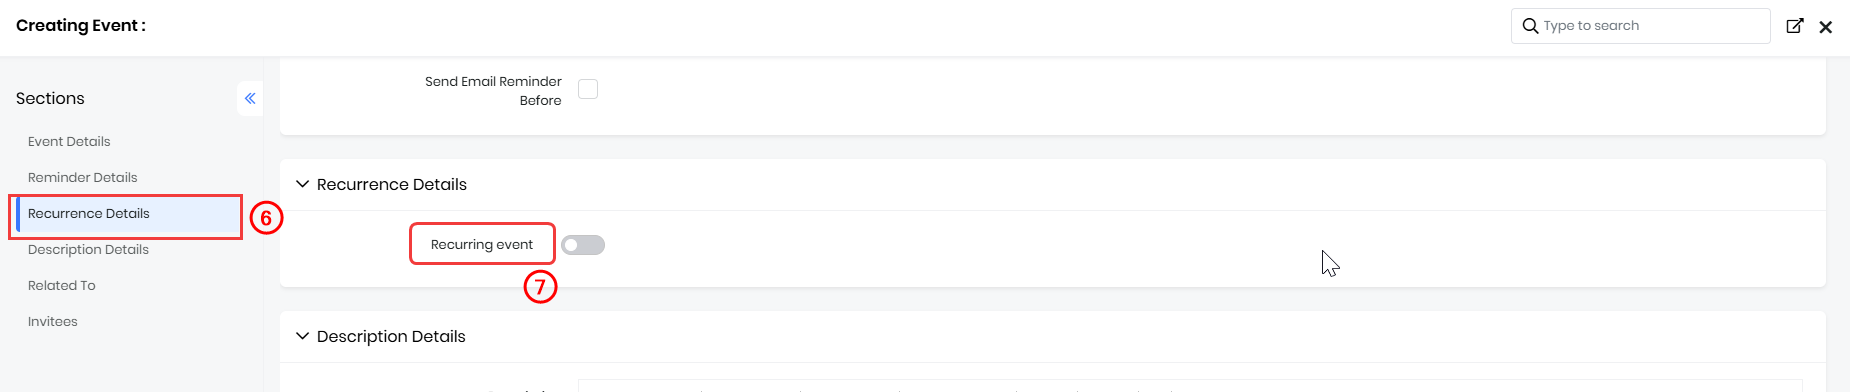
- Go to the Recurrence Details section.
- Enable the Recurring Event toggle button.
- Enter or select the following information:
- Frequency - Choose whether to schedule the recurring event in days, weeks, months, or years.
- Repeat - Choose when the event must occur. For example, every 2 weeks.
- On - Choose the days in which the event must occur.
- Number of recurrences - Choose the number of times the event must recur. The date until the event recurs is automatically shown.
- Click Save.
Creating a Custom Event
The default Event Types available in Vtiger CRM are:
- Call
- Meeting
- Mobile Call
- Onsite Meeting
- Onsite Service
- Group Event
You can create custom event types by configuring Picklist Field Values for the Activity type in the Events module.
Use case
Adding a custom event type like Product Demo in Vtiger CRM allows the sales team to track and report on demos separately from other Events.
Follow these steps to configure Picklist Field Values in Events:
- Log in to the CRM.
- Click the User Menu on the top right corner of the screen.
- Click Settings. The Settings page opens.
- Go to Configuration > Picklist Field Values. The Picklist Field Values page opens.
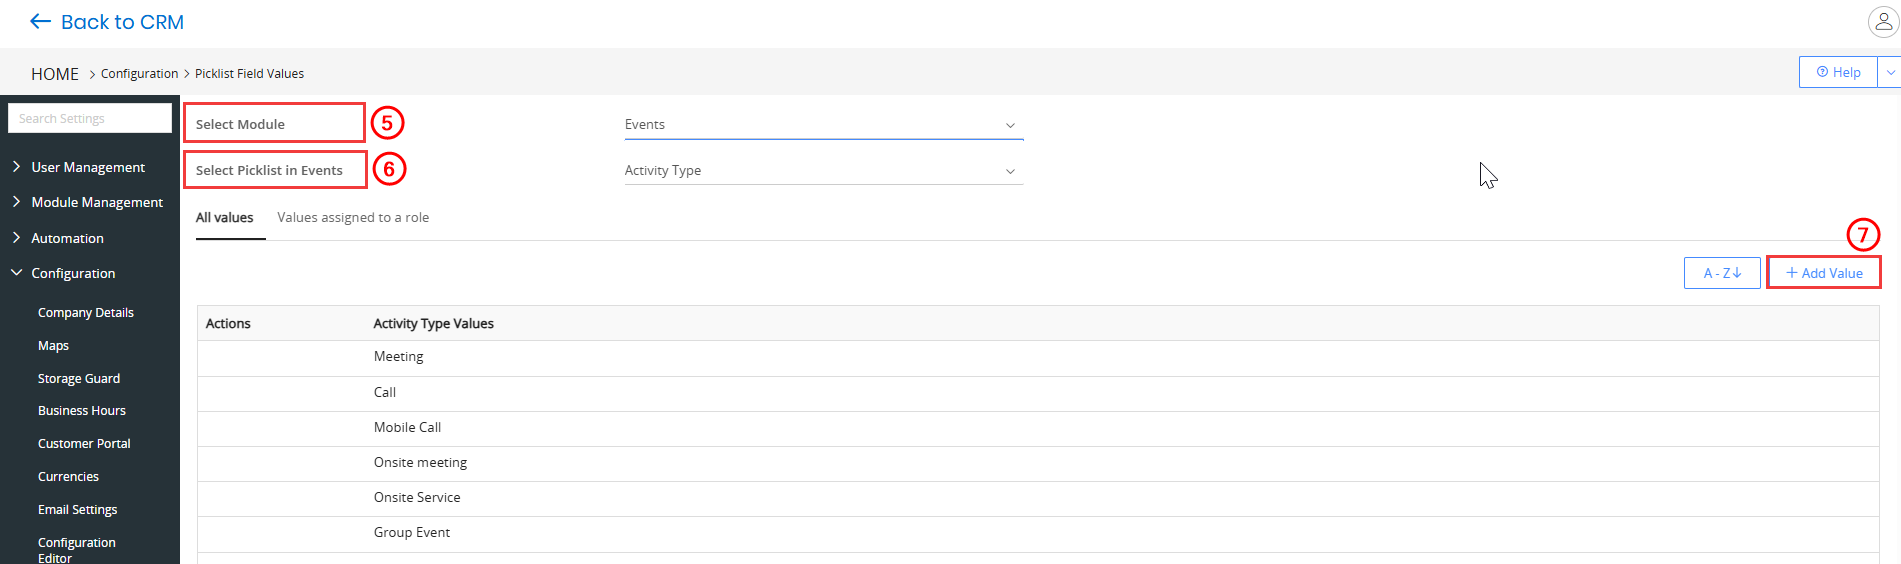
- Select Events from the Select Module drop-down.
- Select Activity Type from the Select Picklist in the Events drop-down.
- Click Add Value to add new event types. A pop-up with Add Item to Activity Type opens.
- Enter or select the following information:
- Item Value
- Who can assign this value to a record
- Select Colour
- Click Save.
Sending an Event Invite
You might want multiple invitees when the Activity Type is a Meeting or Group Event.
Follow these steps to add invitees and send invites:
- Log in to the CRM.
- Click the main Menu.
- Go to Essentials > Events. The Events Page opens.
- Open an existing Event or create a new one.
- Click Edit. The edit page opens.
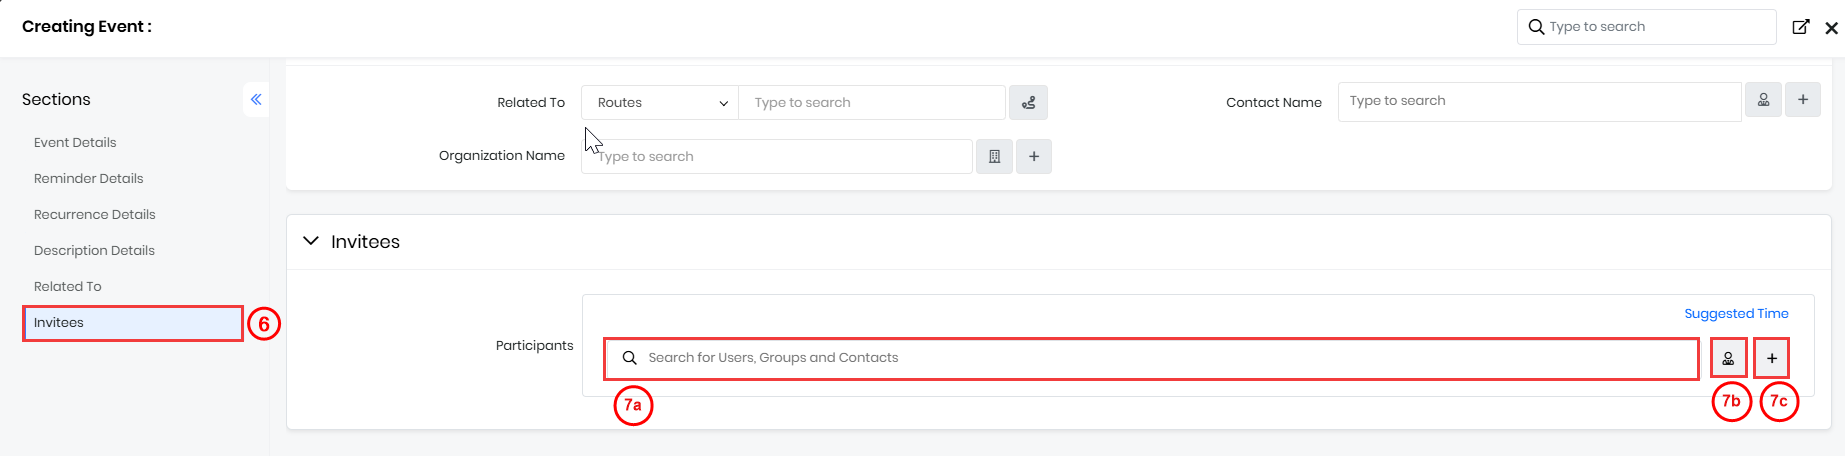
- Go to the Invitees session. You can add invitees in the following ways:
- Enter the invitees' names in the search bar.
- While searching, the CRM also looks up Partner Contacts, so you can select and invite them directly from the Invitees field.
- Click the User icon to select invitees from the contact list.
- Click the + icon to create a new contact.
- Enter the invitees' names in the search bar.
- Click Save. A pop-up with Would you like to send email to new invitees? Opens. Choose one of these options:
- Don’t send - Do not send an email notification to the invitees.
- Send - Send email notification to the invitees.
When you click Send, an email notification is sent to the invitees. The email contains three options: Yes, No, and Maybe. The invitee must confirm their presence in the meeting using one of these options.
Adding Non-Contacts as Event Participants
You can invite people who are not yet Contacts in your CRM by adding them as new Contacts while creating or editing an event. The following actions are supported:
- Add unknown participants as Contacts during event creation.
- Send invites using just an email ID, and instantly convert that email into a Contact record.
Let us see how it works.
1. Adding a Contact While Creating an Event
When you type the first few letters of a name that doesn’t match an existing Contact:
- The Add Contact window appears.
- The system auto-fills the Last Name field with the characters you typed.
- You can save the participant as a new Contact and fill in more details later.
2. Adding a Contact Using an Email ID
- When you enter an email that’s not linked to any existing Contact, the system checks for availability.
- If it’s not found, the Add Contact window opens.
- The Email field is automatically filled with the ID you entered.
- You can quickly save the new Contact and update additional information later.
Sending a Reminder Email
You might want multiple invitees when the Activity Type is a Meeting or Group Event.
Follow these steps to add invitees and send invites:
- Log in to the CRM.
- Click the main Menu.
- Go to Essentials > Events. The Events Page opens.
- Open an existing Event or create a new one.
- Click Edit. The edit page opens.
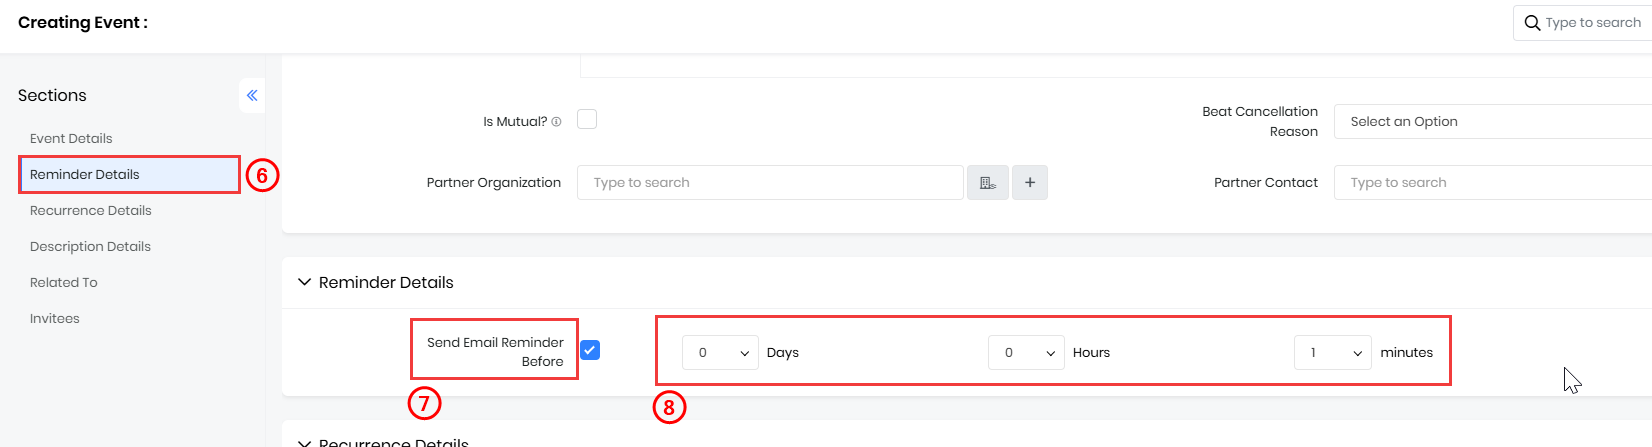
- Go to the Reminder Details session.
- Enable the Checkbox next to Send Email Reminder Before.
- Specify the timing (days, hours, and minutes) for the reminder email to be sent before the meeting.
- Click Save.
Merging Events
When you have two or more duplicate Events or Events with similar information, you can merge them into one. While merging events, you must choose a single event name, due date, and other field values. You can pick field values from one of the records being merged.
Follow these steps to merge Events:
- Log in to the CRM.
- Click the main Menu.
- Go to Essentials > Events. The Events Page opens.
- Select two or more Events in the List View.
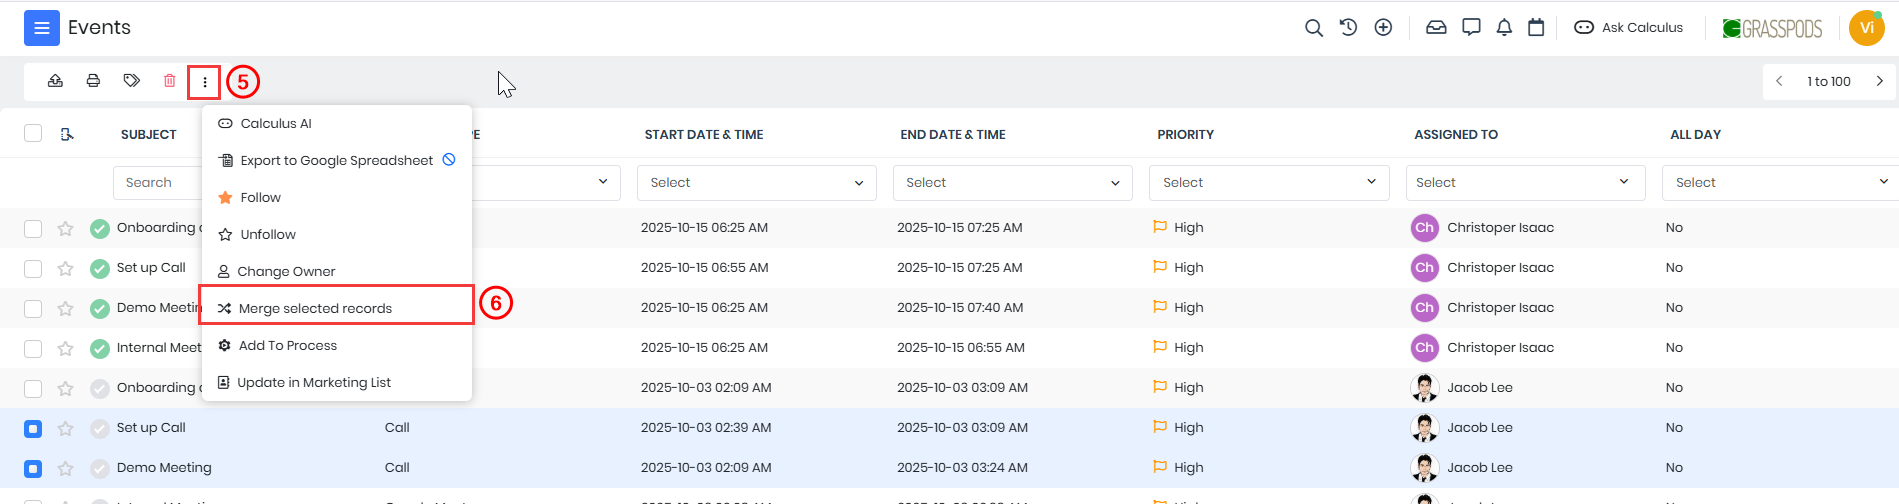
- Click More. A list of options is displayed.
- Click the Merge Selected record option. A pop-up with List Record Merge opens.
- Select the fields from the selected record that should be present for the merged task. Choose the event name, start time, due date, etc., for the merged task.
- Click Merge.
Generating Meeting Recordings and Transcripts
Meeting recordings and transcripts for Microsoft Teams Meetings and Google Meet are available in an Event record under the Recordings & Transcripts tab.You can download both Teams and Google Meet recordings and transcripts from Vtiger CRM once all prerequisites and permissions are enabled.
Enabling Recordings and Transcripts for Event Type - Microsoft Teams
Meeting records and transcripts for Microsoft Teams Meetings are available in an Event record's Recordings & Transcripts tab, and you can download these. You can enable recordings and transcripts in Microsoft Teams as an admin user.
Follow these steps to enable recordings and transcripts in Microsoft Teams: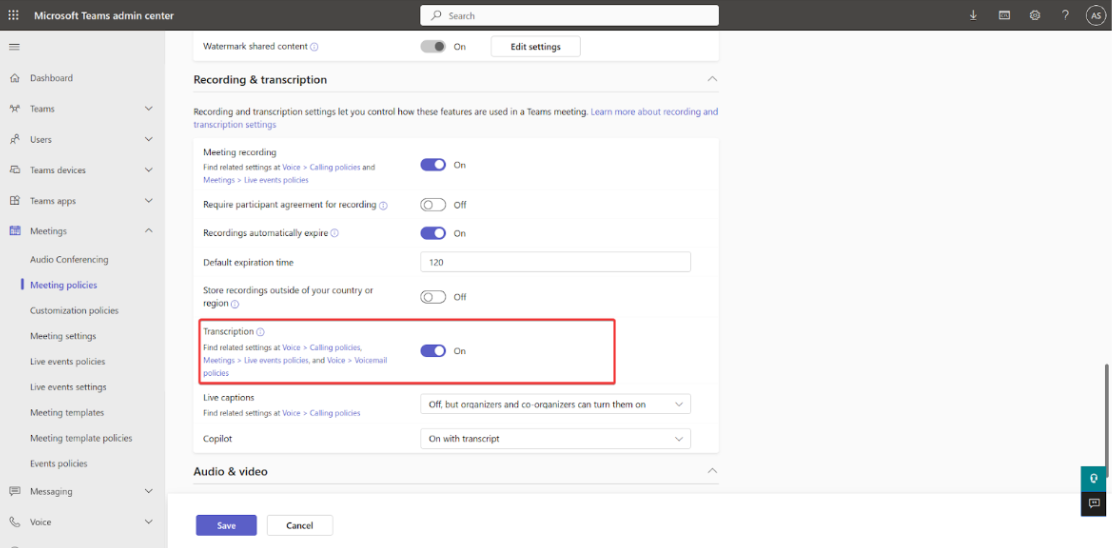
- Log in to the Microsoft Teams Admin Center.
- Select Meetings from the left sidebar.
- Click Meetings Policies.
- Select any custom default policy or Global Policy Link.
- Go to the Recording & transcription section.
- Enable Transcription.
- Click Save.
Enabling Recordings and Transcripts in Vtiger CRM
Once you have enabled recordings and transcripts in Microsoft Teams and Google Meet, you must enable them in Vtiger CRM to store them in the Event records.Follow these steps to enable recordings and transcripts in Vtiger CRM:
- Log in to the CRM.
- Click the main Menu.
- Go to Essentials > Events. The Events Page opens.
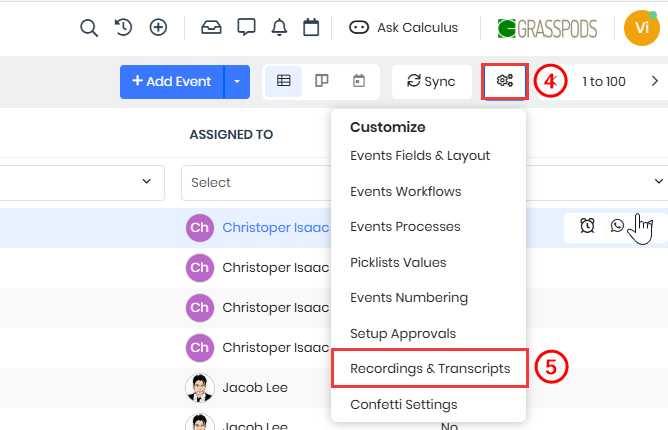
- Click Settings on the Events page.
- Select Recordings and Transcripts. The Recordings and Transcripts page opens.
- Enable the Download transcripts only for Team meetings toggle.
- Click Save.
The recordings and transcripts will be available in Vtiger CRM after the Events are held.
Downloading Recordings and Transcripts
When the Download Recordings and Transcripts feature is enabled, recordings and transcripts for each event will automatically download outside of business hours once the meeting status is marked as held.Follow these steps to download recordings and transcripts:
- Log in to the CRM.
- Click the main Menu.
- Go to Essentials > Events. The Events Page opens.
- Open the Event record for which you want to download the recording and transcripts. The Summary View of the record opens.
- The Recordings and Transcripts tab will display all downloaded recordings and transcripts.
Note: They will only appear in the Events module when the Conference Add-on is installed. You can download only ten recordings per day.
Actions in an Event Record
Follow these steps to perform the following actions in an Event record:
- Log in to the CRM.
- Click the main Menu.
- Go to Essentials > Events. The Events Page opens.
- Open an existing Event record.
- Perform the following actions in an Event record:
- Mail - Send an email directly from the Event record.
- Edit - Click to make changes to the Event information.
- More - Access additional options or settings related to the Event record
- Followers - View and manage users following the Event record for updates.
- Create Reminder - Set a reminder or schedule a follow-up action related to the event.
- Print - Generate a printable version of the Event details.
- Duplicate - Create a copy of the current Event record.
- Delete - Click to Delete the Event Record.
- Reach out now - Contact event participants via call, chat, etc.
- Attachment - Upload or attach files relevant to the Event, such as documents.
- Add or Link - Associate related records, such as contacts, accounts, or documents, with the Event.
Viewing Events
You can access all your Events from four viewing options: List View, Kanban View, Calendar View, and Summary View. By default, Events are displayed in List View. You can easily switch between the List, Kanban, and Calendar Views using the icons at the top right, next to the +Add Event button.List View

The List View provides a comprehensive list of all your Events. You can sort these Events by date, name, event number, and more by clicking the column headers. In this view, you can mark an Event as Held, Merge, Edit details, and even create Custom lists of Events.
To learn more about the List View, click here.
Summary View
The Summary View provides a detailed snapshot of an individual Event, allowing you to see all essential information on a single page. In this view, you can:
- Access key details specific to the Event, including date, participants, and status. You can perform actions like editing details or marking as held.
- Use the Activity section to view information related to the Event's updates and comments.
- Use Calculus AI to gain deeper insights into the Event, and the filter option allows you to refine the data shown, such as internal comments and updates.
- Use the One View to learn about all the details of the Event, bringing together all relevant information into a single, easily accessible place for efficient management.
Kanban View

The Kanban View displays Events as individual cards arranged in columns based on their current status, giving you a visual, easy-to-navigate layout. Each column represents a specific status—such as Held, Planned, Not Held, or Canceled making it simple to track the progress of Events at a glance.
To learn more about the Kanban View, click here.
Calendar View

The Calendar View offers a clear layout of your daily schedule, displaying Events based on time. You can navigate past and future Events using the left and right arrows at the top of the screen. In the Calendar View, clicking on an Event will reveal details such as the owner, start time, end time, and status.
Additionally, you can take several actions on an Event in calendar view, including:
- Adding a comment or sticky note to the Event record.
- Opening the Event record in a new window.
- Marking the Event as Held.
- Editing the time, assignee name, status, and other details
Troubleshooting Tips
Authentication Issues
If you are experiencing authentication issues with services such as Google, Jio, Teams, Webex, or Zoom, follow these steps to revoke access and re-authenticate:
- Log in to the CRM.
- Click The main Menu.
- Go to Essentials > Events. The Events Page opens.
- Click the Sync button. The Sync page opens.
- Click Revoke Access.
This will reset the connection, allowing you to re-authenticate.
Preventing Duplicate Event Records
If duplicate Events are being created in your CRM, setting up a Duplicate Prevention check can help prevent users and external applications from creating duplicate records.
Follow these steps to set up duplicate prevention for Events:
- Log in to the CRM.
- Click the User Menu in the top-right corner of the screen.
- Click Settings. The Settings page opens.
- Go to Module Management.
- Select Module Layouts & Fields. The Module Layout & Fields page opens.
- Select the Events module from the Select Module drop-down.
- Click the Duplicate Prevention tab.
- Turn on the Enable duplicate check toggle button.
- Select the fields (maximum three) based on which you want to run the duplicate check.
- Enable either of the following settings:
- Consider as duplicate only if all of the unique fields match - A record is considered a duplicate if all the fields defined in the previous step match.
- Consider as duplicate if at least one of the unique fields match - A record is considered a duplicate if at least one field defined in the previous step matches.
- Enable Check closed records also for duplicates to run the duplicate check on closed records. Disable it to ignore closed records while checking for duplicates.
- Enable Ignore blank values to avoid searching for duplicates on empty field names. Disable it otherwise.
- Choose an action to take if a duplicate record is found while syncing with an external application.
- Prefer latest record - The most recently modified record (CRM or external) will be retained.
- Prefer internal record - The record existing in the CRM will be retained.
- Prefer external record - The record in the external application will be copied and retained.
- Click Save.
Error when creating Meeting Events
If you receive an error while creating a meeting event, it may indicate a scheduling conflict. This commonly occurs when one or more invitees have a meeting scheduled for the same date and time. Adjust the event’s time slot to avoid conflicts with other meetings on invitees' schedules.