Articles in this section
Creating Service Contracts
Feature Availability
Vtiger Editions: One Pilot | One Professional | One Enterprise | One AI
Introduction
A Service Contract is an agreement between you and your customers to provide service on the product for a limited period. As per the agreed contracts, your support center is supposed to offer service for the product for an agreed period. It boosts the level of customer satisfaction and builds healthy trading relationships.
Calculating Service Instances
The Used Units’ field in the Service Contracts module defines the number of Service Instances resolved by your Support Center. The field value is computed based on the Status field of the Cases module and the Tracking Unit field for the Service Contracts module.| Tracking Unit | Case Status | Used Units |
| Incidents | Closed | Used Units +1 |
| Re-opened | Used Units -1 | |
| Days | Closed | Days value in the Case Used Units + Days of Case |
| Hours value in the Case Used Units+ (Hours of Case/24) | ||
| Reopened | Days value in the Case Used Units - Days of Case | |
| Hours value in the Case Used Units - (Hours of Case/24) | ||
| Hours | Closed | Days value in the Case Used Units + Hours of Case |
| Days value in the Case Used Units + (Days of Case *24) | ||
| Reopened | Hours value in the Case Used Units- Hours of Case | |
| Days value in the Case Used Units-(Days of Case *24) |
Tracking Related Record Details
You can keep track of the following details in the Service Contracts Module:| Related Records | Actions |
| Esign Documents | To associate existing Case records. |
| Documents | To associate existing documents with the Service Contract record. |
| Cases | The case registered with a request for service is linked here. |
| Activities | Add or link a Service Appointment activity here. |
| Work Order | The associated Work order is listed here. |
Benefits
The benefits of Service Contracts are:
- Cost Savings: You can benefit from long-term contracts, which often come with discounted rates or bulk pricing, resulting in cost savings compared to one-time services.
- Reduce risk: You can outline terms related to warranties, liabilities, and service level agreements (SLAs), reducing the risk if services don’t meet agreed-upon standards.
- Efficient Billing and Invoicing: You can automate billing schedules, invoice based on contract terms, and ensure accurate billing.Import and Export Service Contracts: You can easily import and export Service Contracts with the help of Excel spreadsheets, .csv files, and .vcf files.
In this article, you will learn about:
- Creating Service Contracts
- Adding Service appointments
- Importing and Exporting Service Contracts
Key Terminology
| Key Term | Definition |
| Service Contract | A Service Contract is an agreement between you and your customers to provide service on the product for a limited period. |
| Service appointment | A service appointment is the time scheduled for a service provider, such as a technician, mechanic, or any professional offering a service, to visit a client or customer to perform a specific task or service. |
| Work Order | The work to be performed on a customer asset, or a service to be completed as per the customer’s request, is considered a Work Order. |
Creating Service Contracts
You can create a service contract from Quick Create (every screen of the CRM) and the Service Contracts module (using the Add Service Contract button).
Creating a Service Contract from the Service Contracts module
Review the fields on the screen and keep the data you want to enter ready before you start creating a Service Contract.
Follow these steps to create a Service Contract from the Service Contracts module:
- Log in to the CRM.
- Click the main Menu.
- Go to the Help desk.
- Go to Agent Enablement.
- Click Service Contracts. The Service Contracts page opens.
- Click + Add Service Contracts. The Creating Service Contract window opens.
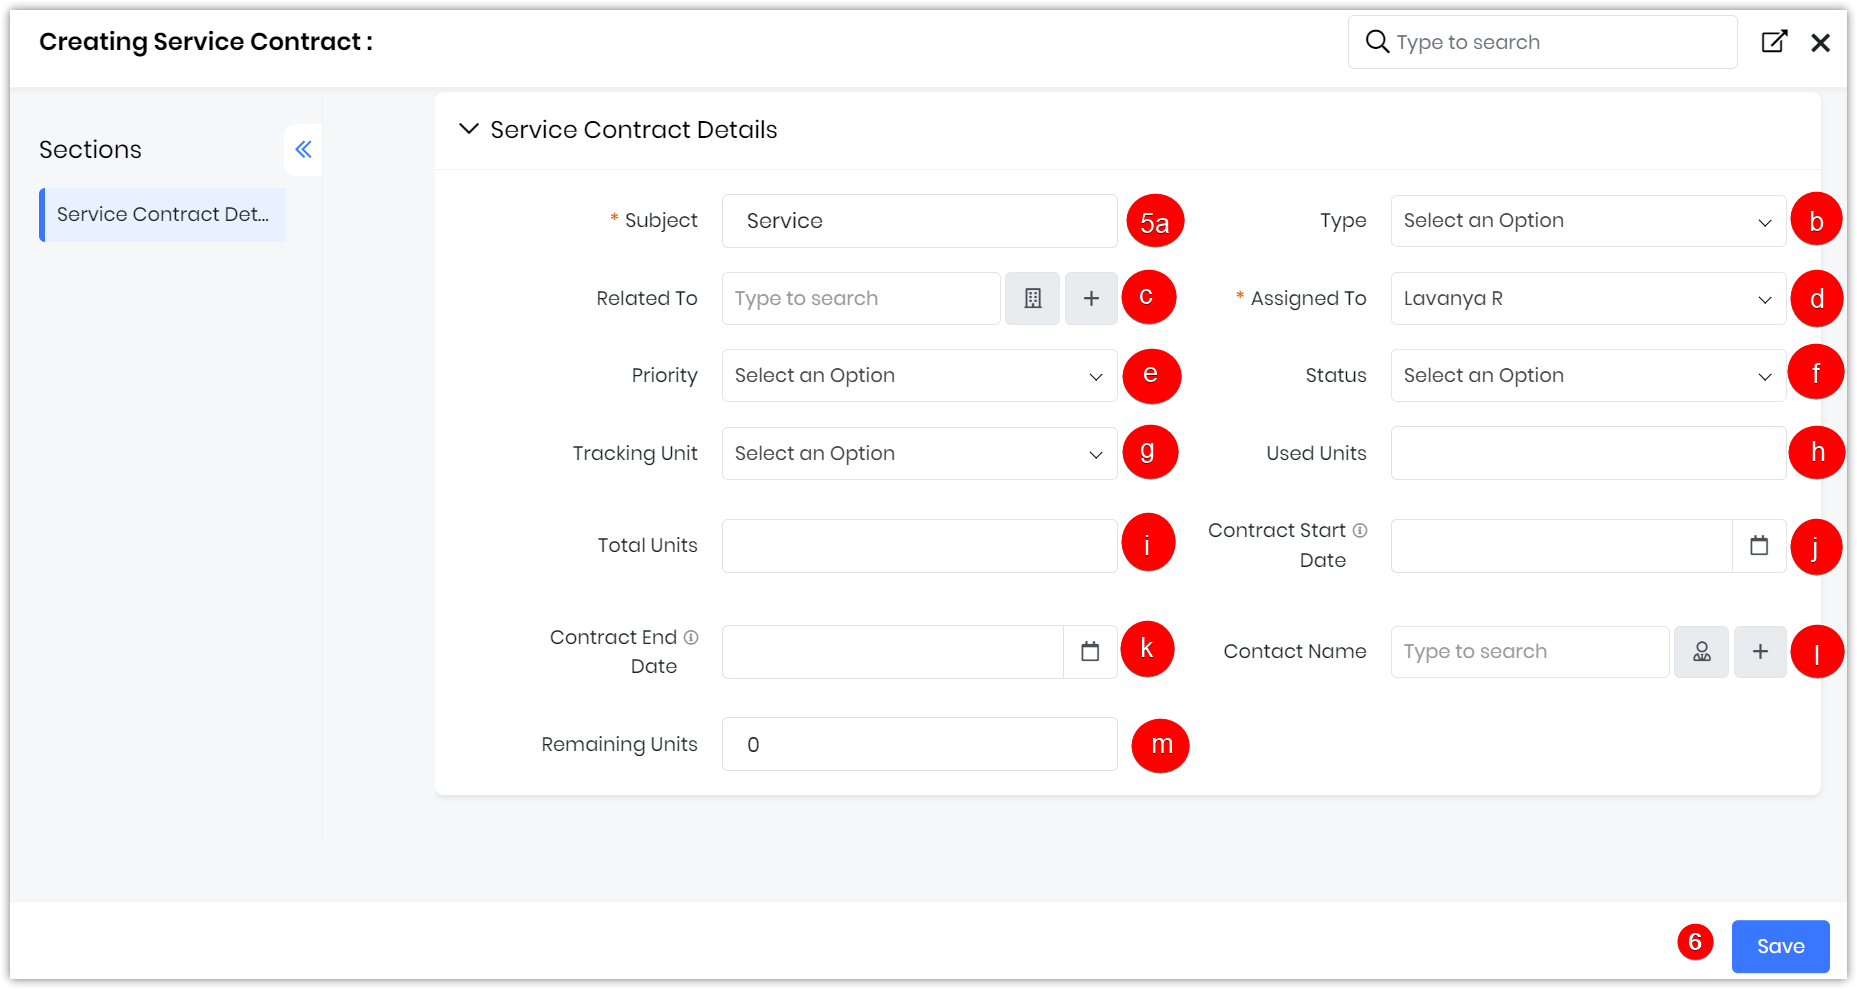
- Enter or select the following information:
- Subject - Type the subject name.
- Type - Enter the type of the contract.
- Related To - Select the Related To field.
- Assigned To - Select to whom the contract is assigned.
- Priority - Select the priority.
- Status - Select the status of the contract.
- Tracking Unit - Select an Option (Hours, Days, Incidents).
- Used Units - Automatically updated when the Status field of the Case associated with the Service Contract is set to Closed.
- Total Units - Enter the number of service instances you would offer.
- Contract Start Date - Enter the date on which the Service contract begins.
- Contract End Date - Enter the date on which the Service contract ends.
- Contract Name - Enter the name of the Contract.
- Remaining Units - Enter the remaining units.
- Click Save.
Creating a Service Contract using Quick Create
You can create a Service Contract by using the Quick Create icon, which is available in all CRM screens. You can enter basic details and return later to enter the rest. This might be helpful if you are running out of time.
Follow these steps to create a Service Contract using Quick Create:
- Log in to the CRM.
- Click the +Quick Create icon on the top right corner.
- Scroll down to Service Contract or type Service Contracts in the Search field.
- Click Service Contract. The Creating Service Contract window opens.
- Enter or select the following information:
- Subject - Type the subject name.
- Type - Enter the type of the contract.
- Related To - Select the Related To field.
- Assigned To - Select to whom the contract is assigned.
- Priority - Select the priority.
- Status - Select the status of the contract.
- Tracking Unit - Select an Option (Hours, Days, Incidents).
- Used Units - Automatically updated when the Status field of the Case associated with the Service Contract is set to Closed.
- Total Units - Enter the number of service instances you would offer.
- Contract Start Date - Enter the date on which the Service contract begins.
- Contract End Date - Enter the date on which the Service contract ends.
- Contract Name - Enter the name of the Contract.
- Remaining Units - Enter the remaining units.
- Click Save.
Adding an Event to a Contract
You can create Service Appointments for agents who work at the customer site based on the work order assigned.
Follow these steps to add an event to a Contract:
- Log in to the CRM.
- Click the main Menu.
- Go to the Help desk.
- Go to Agent Enablement.
- Click Service Contracts. The Service Contracts page opens. (Usually the List View page.)
- Select the Service Contract record for which you want to create the appointment. The record Summary View opens.
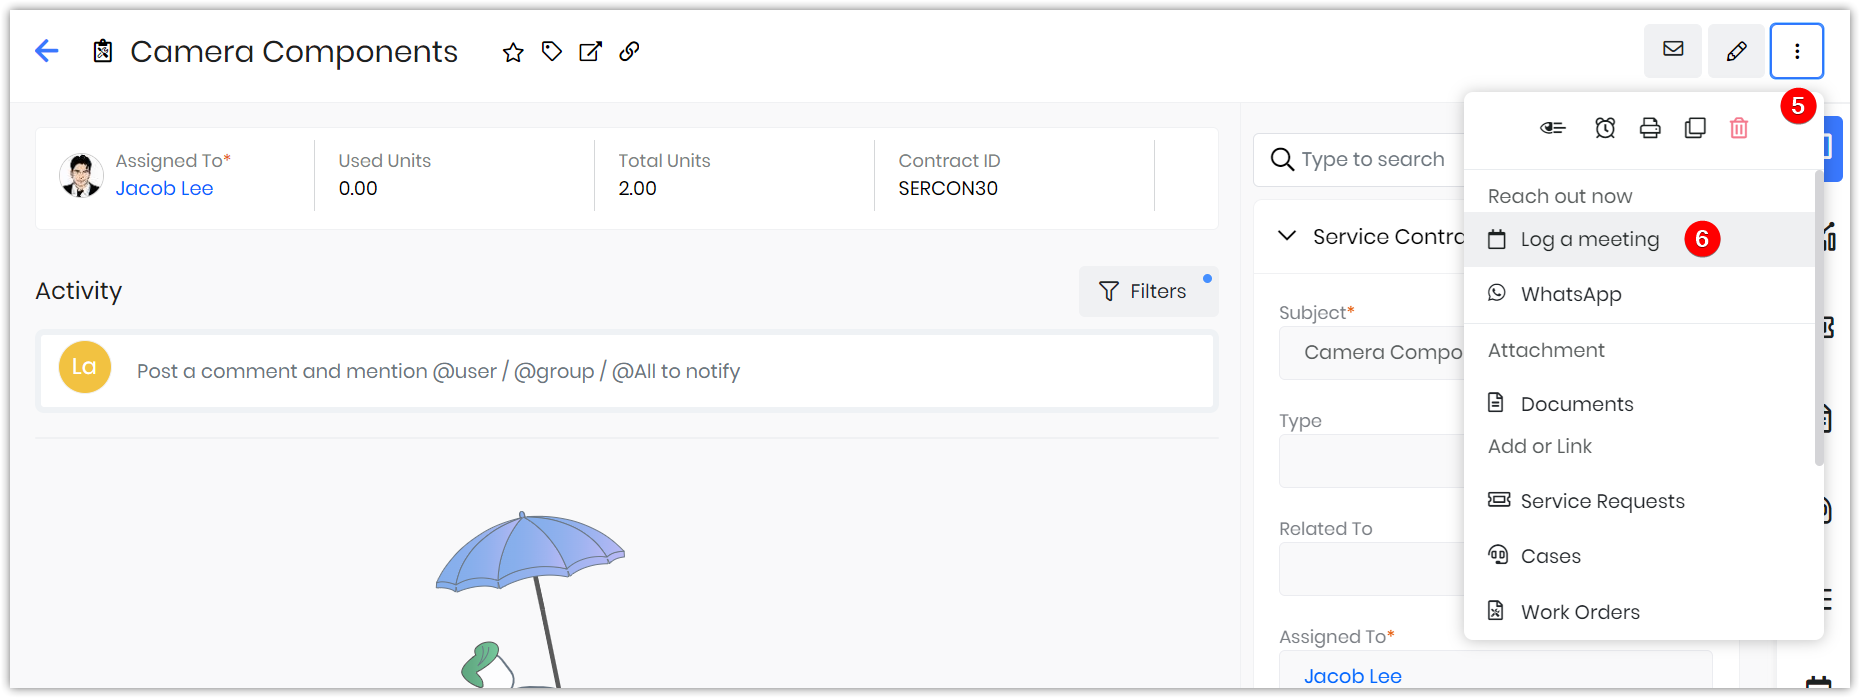
- Click More (Ellipse or three dots).
- Click Reach out Now > Log a Meeting. The Quick Create > Event window opens.

- Enter or select the following information:
- Subject - Enter the subject of the event.
- Activity Type - Select the type of activity from the drop-down menu, such as Call, Meeting, Google Meet, Leave, etc.
- Start Date & Time - Specify when the event should start by selecting the appropriate date and time.
- End Date & Time - Define when the event will conclude by setting the end date and time.
- Description - Provide a detailed explanation of the event, outlining its purpose.
- Participants - Add participants who will be attending the event. You can select participants by clicking the User icon and, if necessary, quickly create new contacts by clicking the Plus icon.
- Click Save.
Creating a Work Order from a Service Contract
You can create a Work Order and assign it to a Service Contract.
Follow these steps to create a Work Order from a Service Contract record:
- Log in to the CRM.
- Click the main Menu.
- Go to the Help desk.
- Go to Agent Enablement.
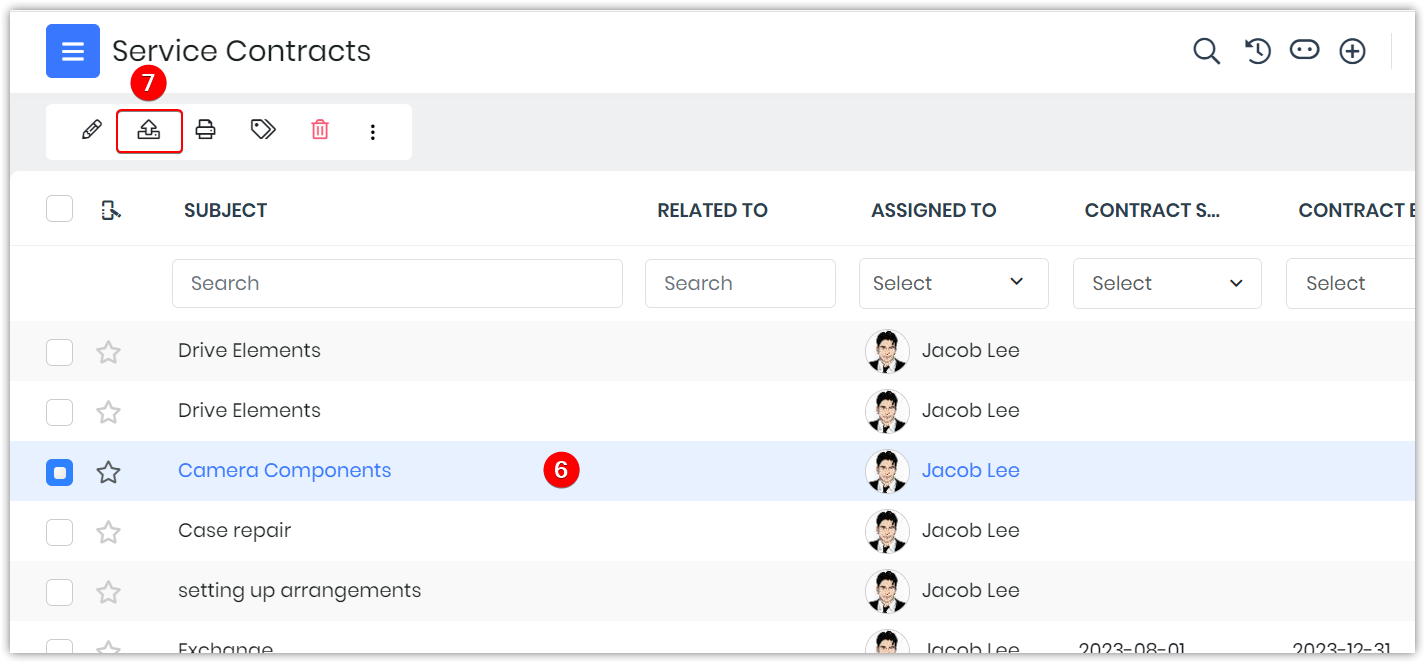
- Click Service Contracts. The Service Contracts page opens. (Usually the List View page.)
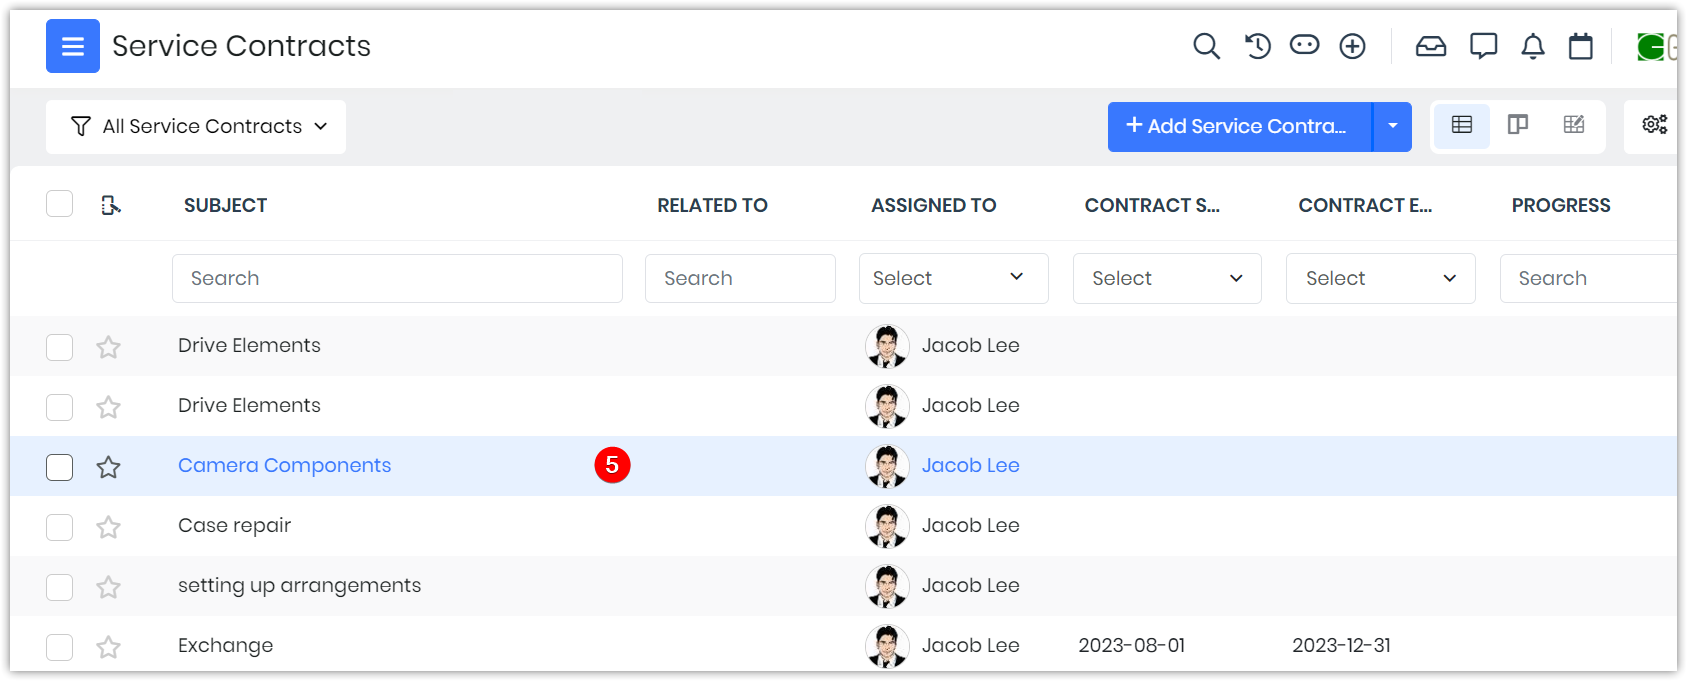
- Select the desired Service Contract record for which you need to create a Work Order. The Summary View opens.
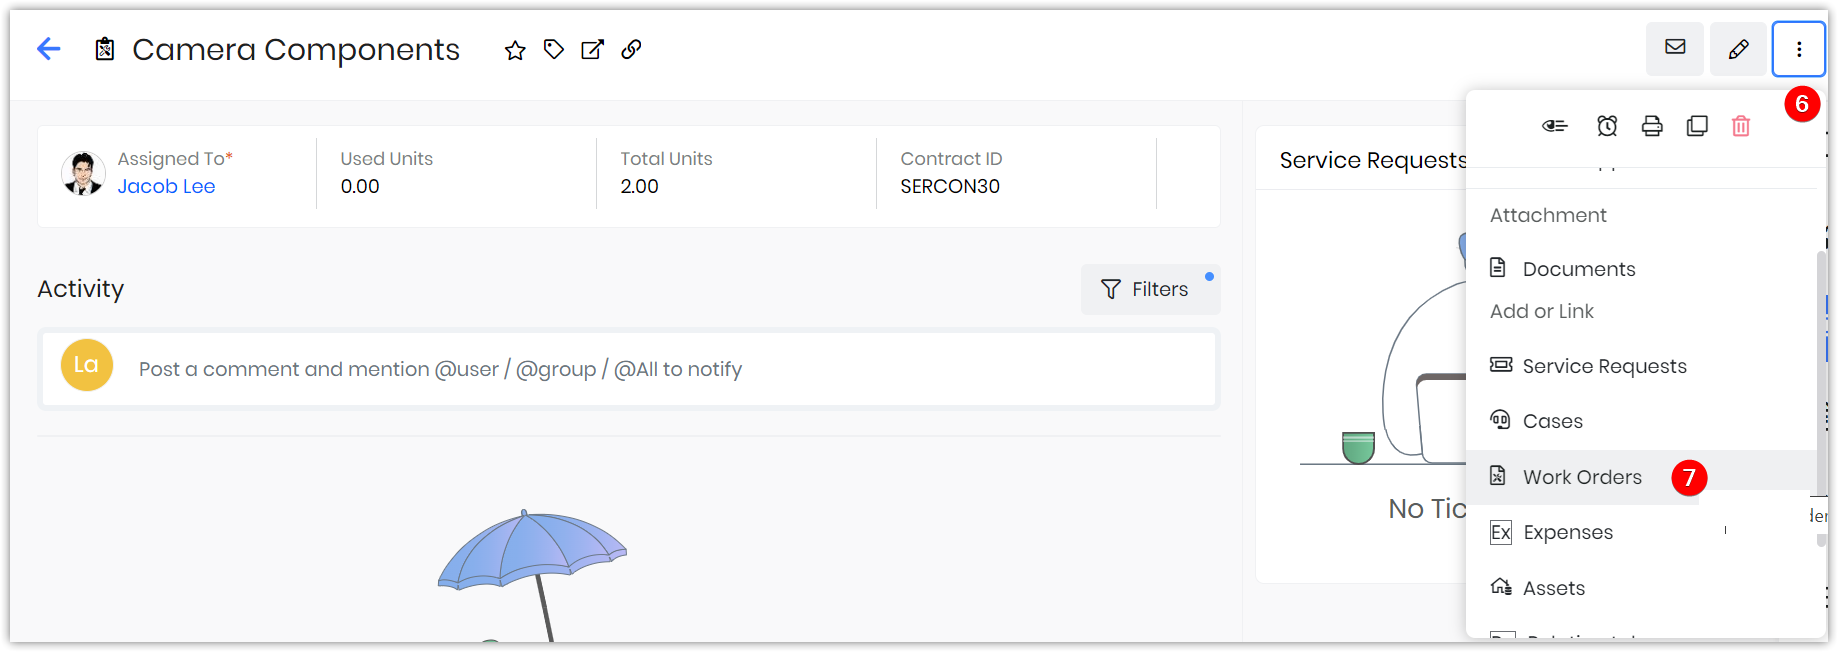
- Click More (Ellipse or three dots) on the top right corner of the screen.
- Select Attachment > Work Orders. A pop-up window displays the following message - What do you want to do?
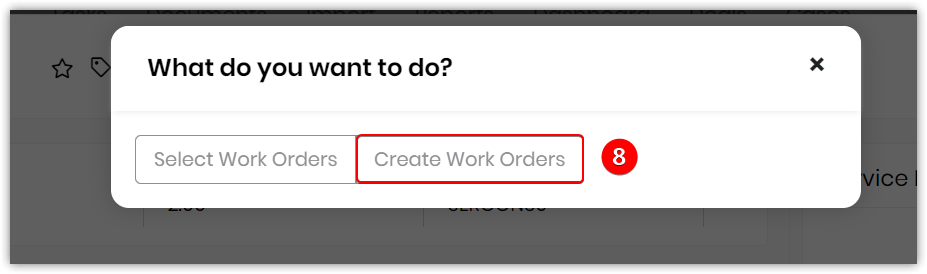
- Click Create Work Orders. The Creating Work Order window opens.
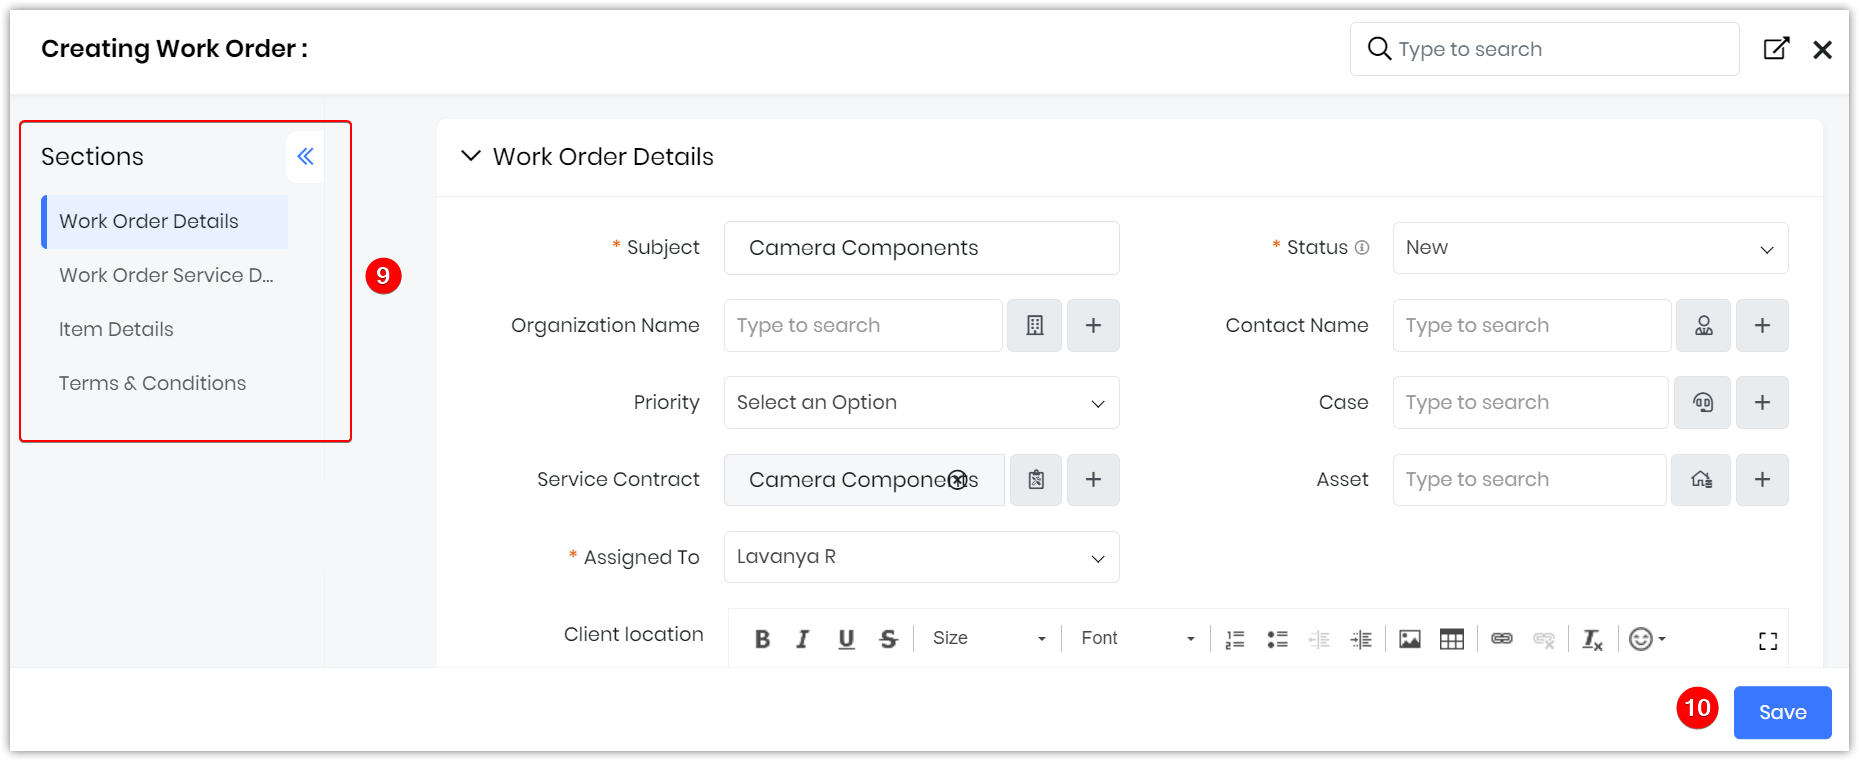
- Enter or select all the necessary details for the sections listed below:
- Work Order Details
- Work Order Service Details
- Item Details
- Terms & Conditions
- Click Save.
Importing and Exporting Service Contracts
Importing Service Contracts
Vtiger CRM lets you import Service Contracts from external sources in the form of .csv and .vcf files. This feature saves time and effort when you have to import thousands of records instantly.
To learn how to import or export documents into Vtiger, click here.
Exporting Service Contracts
You can export Service Contract data to a spreadsheet using the Export option.
Follow these steps to export your data:
- Log in to the CRM.
- Click the main Menu.
- Go to the Help desk.
- Go to Agent Enablement.
- Click Service Contracts. The Service Contracts page opens. (Usually the List View page.)
- Select the records that you wish to export.
- Click Export. The Export window opens.
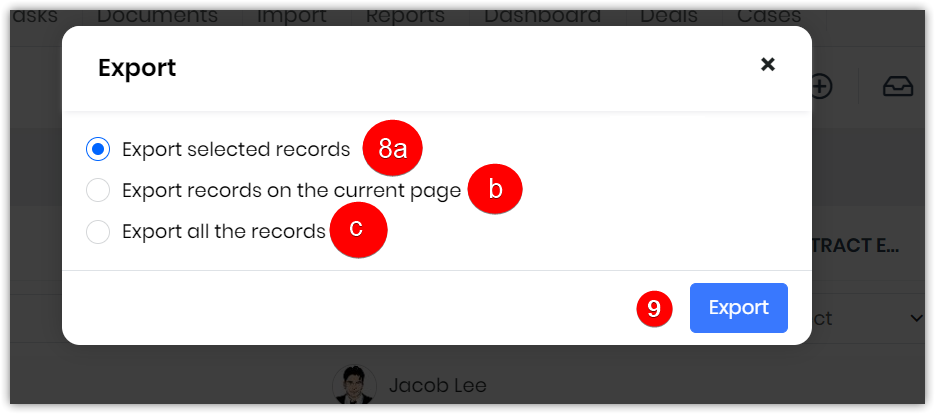
- Select from one of the following options -
- Export selected records - Click on the radio button to export the records selected in the List View.
- Export data on the current page - Click on the radio button to export all the records that are on the current list view page.
- Export all data - Click on the radio button to export all records in the Service Contracts module.
- Click Export.
An Excel sheet containing data will be generated and can be downloaded.
Viewing Service Contract Details
List View in Service Contracts
The List View sorts and lists all Service Contracts based on the last created or modified contract.Columns in List View
Some of the columns that are visible by default in the List View are :- Subject - Displays the name of the contract.
- Related To - Displays the name of the module the contract is related to.
- Assigned To - Displays the name of the user to whom the contract is assigned.
- Contract Start Date - Displays the start date of the contract.
- Contract End Date - Displays the end date of the contract.
- Assigned To - Displays the user to whom the contract is assigned.
- Status - The status of the contract.
List View Actions
You can perform various quick actions, such as Edit, Delete, Email, and Follow, on Service Contract records in the List View.To learn more about the List View and related actions in Vtiger CRM, click here.
Summary View in Service Contracts
Summary View is the view that appears when you click a particular record in the List View. The Summary View displays a collection of all the key information of the record. The Summary View displays different tabs at the top, the Activity section, filters, Calculus AI, etc. The tabs display related modules such as Events, Cases, Service Requests, Tasks, etc.Summary View Actions
- Follow: You can follow any Service Contract record to get updates on all the activities performed on that record.
- Tag: You can add tag names to the record to easily identify it.
- Open in a new tab: You can open the record in a new tab.
- Link: You can copy the link of the record to share.
- Email: You can send an email
- Edit: You can edit a record.
- More icon: You can perform many other actions using the More icon, such as Reach out Now, Attach or Link (Documents, Service Requests, Cases, etc.)
Kanban View
The Kanban View displays data as separate blocks of data called Kanban cards. And each Kanban card in a module Kanban View is referred to by the module name.
To learn more about the Kanban View in Vtiger CRM, click here.
Grid View
Grid View is a table-like layout that shows data in rows and columns, similar to a spreadsheet. It allows you to view and edit multiple records simultaneously on the same page. You can edit specific field details in a record, just like editing a cell in a spreadsheet. The view resembles the List View but allows for additional actions, such as editing, rearranging columns, and bulk updates.To learn more about the Grid View in Vtiger CRM, click here.
Calendar View
The Calendar View for Service Contracts the following for Service Contracts:- Start Date
- End Date
- Completion Date
- Created Time
- Modified Time
To learn more about the Calendar View in Vtiger CRM, click here.