Articles in this section
Configuring SMS Gateways in Vtiger
Introduction
Vtiger CRM supports the integration of the following SMS gateways:
- Textanywhere
- Clickatell
- IndiaSMS
- SMS99
- Twilio
- SolutionInfini
- Gupshup
- ZoomConnect
- TextLocal
- Mvaayoo
- MSG91
- LabsMobile
- Kaleyra.io
- Other Provider - SMPP -You can also connect to more SMS providers like SMS country via the SMPP interface in Vtiger
Note: If your SMS provider is not listed on this page, you may still be able to connect it to Vtiger. This is possible only if your SMS provider supports the SMPP interface to send SMS messages.
Installing SMS Messages
Follow these steps to install the SMS Messages module
- Log into your CRM account.
- Click the Main Menu.
- Click Add-ons
- Locate SMS Messages.
- Click Install
- Click Yes to confirm the installation.
Configuring the TextAnywhere Gateway
You are required to register and activate your Textanywhere account before you get started. To sign up, click here. After successfully filling up the registration form, you will be personally contacted by Textanywhere support member who will activate your account during the phone call. You can only expect a call during normal UK business hours. Once your account has been activated, you can proceed with the steps necessary to configure Textanywhere in your Vtiger CRM.
Prerequistes
Here are the prerequisites before configuring the TextAnywhere SMS Provider in the CRM:
- A valid and active TextAnywhere account.
- Access to the Admin Panel in TextAnywhere.
- The Client ID and Client Pass Key (API credentials) generated from the Developer Toolkit settings.
- Administrator access in the CRM to configure SMS Providers.
- SMS Add-on enabled in the CRM.
- A valid Originator (sender name or number) approved in your TextAnywhere account, if required.
Note: Configuring this Gateway requires you to navigate between Vtiger CRM and the Textanywhere website. Log in to both applications and keep them open in separate tabs.
Configuring TextAnywhere involves the following steps:
- Step 1: Copying the Client ID and Client Pass Key.
- Step 2: Setting Up the SMS Provider Using the Client ID and Pass Key
The following section explains each step in detail.
Step 1: Copying the Client ID and Client Pass Key.
- Log in to your TextAnywhere account.
- Go to the Admin Panel.
- Go to Developer Toolkit Settings to access the API credentials.
- Copy the Client ID and Client Pass Key.
Step 2: Setting Up the SMS Provider Using the Client ID and Pass Key
- Log in to the CRM.
- Click the User Menu.
- Go to Settings > Extension.
- Click SMS Provider Configuration. The SMS Provider configuration page opens.
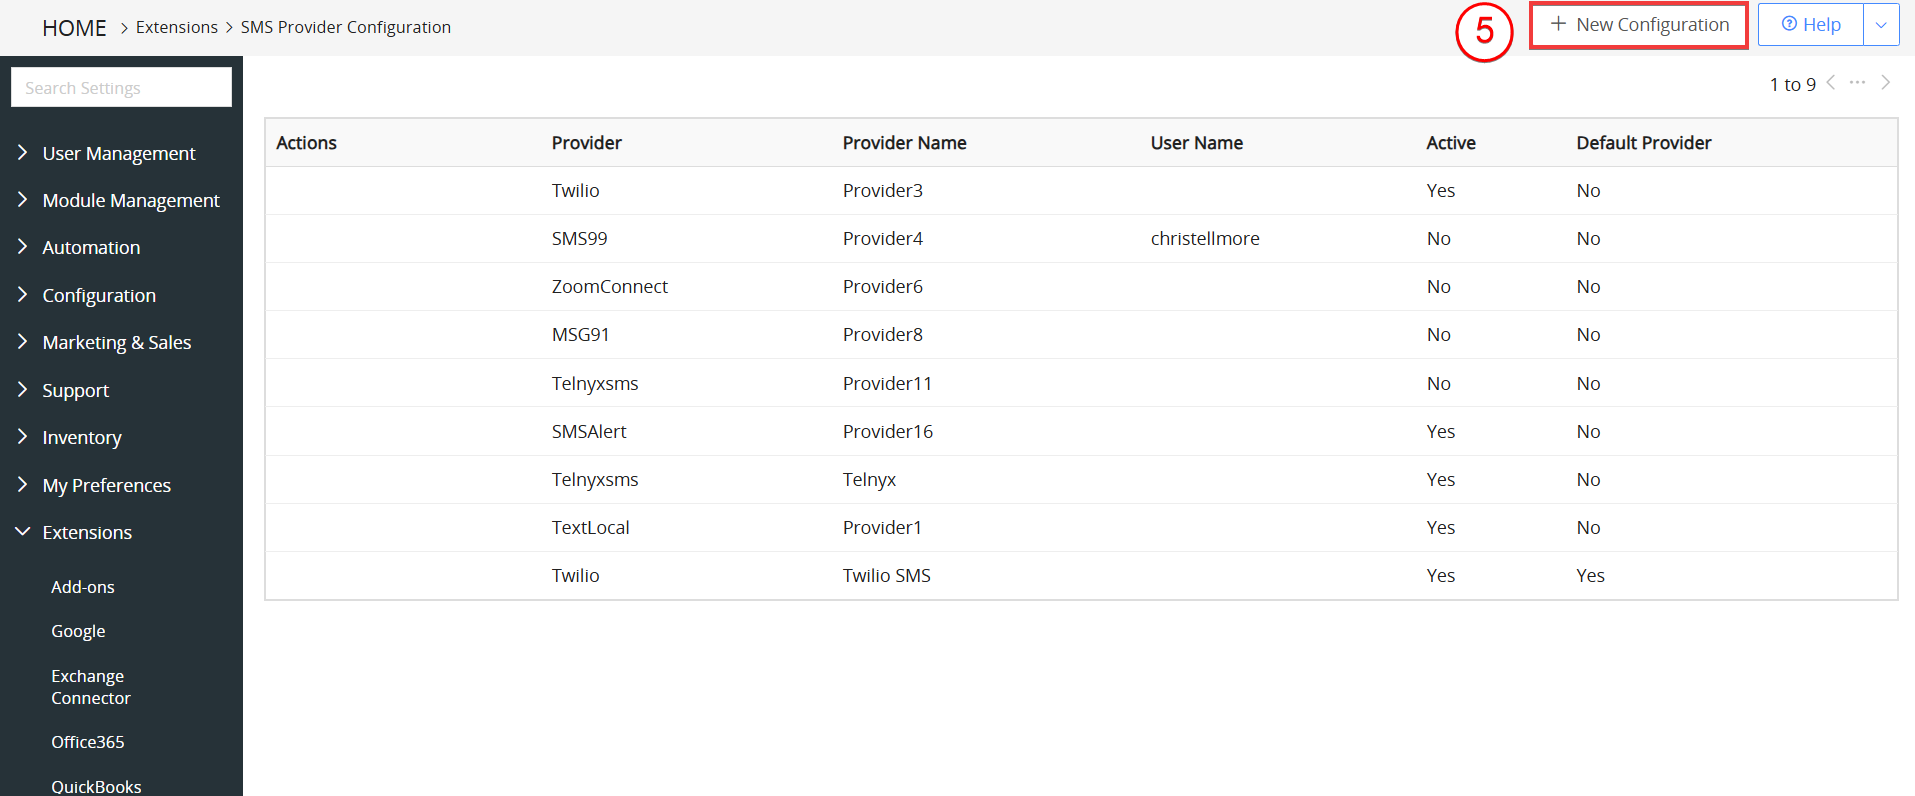
- Click +New Configuration.
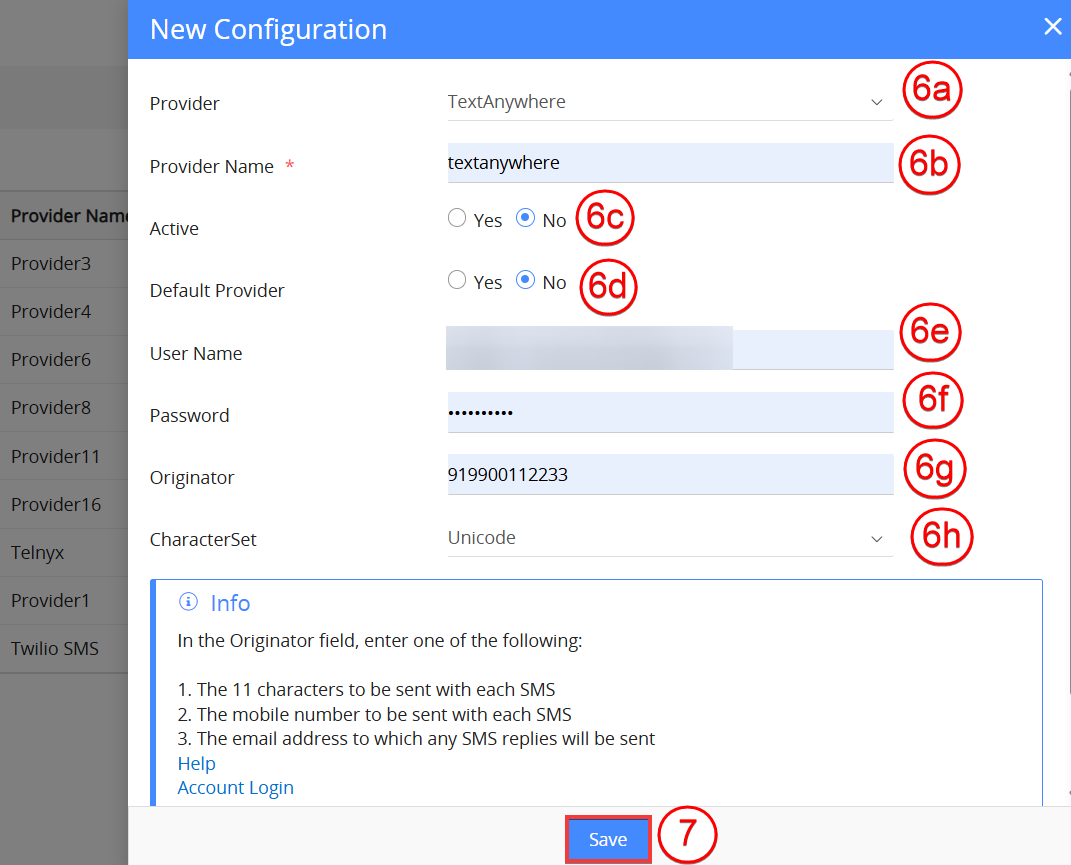
- Enter or select the following information:
- Provider: Select TextAnywhere from the SMS Provider drop-down list.
- Provider Name: Enter a name for the provider.
- Active: Select Yes to enable the provider.
- Default Provider: Select Yes to set it as the default SMS provider.
- User Name: Paste the Client ID copied from TextAnywhere.
- Password: Paste the Client Pass Key copied from TextAnywhere.
- Originator: Enter the sender name or number that will appear as the SMS sender to recipients.
- Character Set: Select the character encoding format (such as GSM or Unicode) to define how the message text is encoded and displayed.
- Click Save.
Note:
- Send 11 characters with the message: Your message can appear to come from your choice of 11 characters. For example, “Acme Co Ltd”. With this option, recipients cannot reply to your message. If you wish to use this option, enter your desired 11 characters in the Originator field of Vtiger.
- Send a mobile number with the message: Your message can appear to come from your chosen telephone number. For example, “447836123456”. With this option, recipients can reply back to the given number. If you wish to use this option, enter your chosen telephone number into the Originator field of Vtiger.
- Have replies returned to your email: If you would like to have any replies to your sent message returned to you as emails, enter the email address into the Originator field of Vtiger. Selecting this option will send your messages from one of the TextAnywhere reply-path mobile numbers. Any replies are then received into the TextAnywhere system and automatically sent to your chosen email address.
- In GSM, messages over 160 characters will be sent and charged as multiple messages.
- If you need any assistance while setting up or using the TextAnywhere module, please email [email protected] or call +44 (0) 845 122 1302
Sending SMS Message
SMS messages can be sent instantly or using predefined templates for consistency. Consider the Contacts module as an example to send an SMS message.
Follow these steps to send an sms message from a Contact record:
- Log in to the CRM.
- Go to Essentials > Contacts. The Contacts List View opens.
- Hover over a Contact record to send an SMS.
- Click the Send SMS icon. The Send SMS window opens.
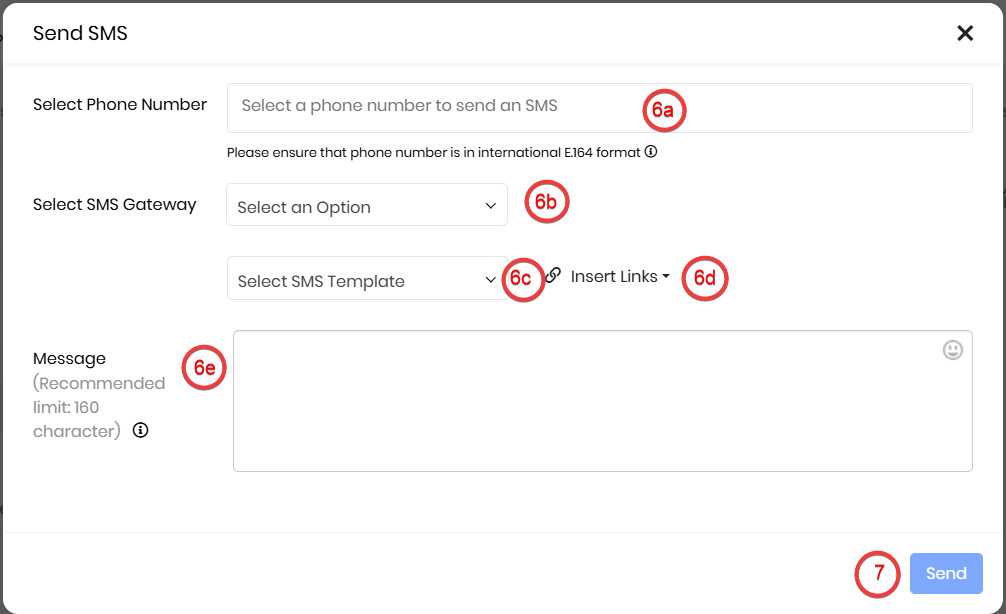
- Enter or select the following information:
- Select Phone Number: Choose the contact’s phone number to which the SMS will be sent.
- Select SMS Gateway: Select the configured SMS provider through which the message will be delivered.
- Select SMS Template: Choose a predefined message template to auto-fill the SMS content.
- Message: Enter or edit the message content as required.
- Click Send.
Once the SMS is sent, a record is automatically created in the SMS Messages module.
Configuring Clickatell Gateway
To configure the Clickatell gateway in your Vtiger CRM account, you’ll need to register and activate your Clickatell account. After the activation, you’ll need to contact Clickatell support team to get your unique Api_id and MO details. Once you have the details ready, you can proceed ahead to activate your Clickatell gateway in Vtiger CRM.
Notes: MO is usually set to 1.
Follow these steps to configure your Clickatell gateway in Vtiger CRM
- Log in to your CRM account.
- Click the Main Menu.
- Click Essentials.
- Look for Conversations.
- Click SMS Messages.
- Click the Settings icon. The Customize pop-up opens.
- Click Server Configuration.
- Click the New Configuration tab on the top right corner of the screen. The New Configuration window opens.

- Now configure the following details in the New Configuration window.
- In the New Configuration popup, select Clickatell from the Provider dropdown.
- In the Active field, click the radio-button Yes
- In the User Name field, provide your Clickatell account username
- In the password field, provide your Clickatell account password
- In the api_id field, provide your unique API ID. You’ll need to contact Clickatell to get the Api_id
- In the from field, provide the mobile number you’ve provided during the Clickatell registration. Make sure you provide your country code preceding the mobile number.
- In the mo field provides the value 1
- In the Unicode field, provide UTF8 or GSM.
- After the configuration, click Save
To know more about the features and benefits of this integration, please check Clickatell + Vtiger CRM.
Configuring IndiaSMS Gateway
You are required to register and activate your India SMS account before you get started. After registration, India SMS team will provide you the login details and URL by activating your account. Once you have all the details ready, you can proceed with the steps necessary to configure IndiaSMS gateway in Vtiger CRM.
Here’s how to configure your IndiaSMS gateway in Vtiger CRM
- Log in to your CRM account.
- Click the Main Menu.
- Click Essentials.
- Look for Conversations.
- Click SMS Messages.
- Click the Settings icon. The Customize pop-up opens.
- Click Server Configuration.
- Click the New Configuration tab on the top right corner of the screen. The New Configuration window opens.

a. In the New Configuration popup, select IndiaSms from the Provider dropdown
b. In the Active field, click the radio-button Yes
c. In the User Name field, provide your IndiaSms account username
d. In the password field, provide your IndiaSms account password
e. In the from field, enter the Sender ID provided by IndiaSms.
f. In the character set field provides UTF8 or GSM
Note!
- You can send SMS from IndiaSMS only to Indian customers.
- The phone number of the customer specified shouldn’t be in DND mode.
To know more about features and benefits of this integration, please check IndiaSMS + Vtiger CRM
Configuring SMS99 Gateway
Send Bulk SMS to your Indian customers using sms99, a leading provider of Bulk SMS services & Marketing SMS services in India.
Here’s how to configure your SMS99 gateway in Vtiger CRM
- Log in to your CRM account.
- Click the Main Menu.
- Click Essentials.
- Look for Conversations.
- Click SMS Messages.
- Click the Settings icon. The Customize pop-up opens.
- Click Server Configuration.
- Click the New Configuration tab on the top right corner of the screen. The New Configuration window opens.

a. In the New Configuration popup, select SMS99 from the Provider dropdown
b. In the Active field, click the radio-button Yes
c. In the User Name field, provide your SMS99 account username
d. In the password field, provide your SMS99 account password
e. In the from field, enter the Sender ID provided by SMS99.
To know more about features and benefits of this integration, please check SMS 99 + Vtiger CRM
Configuring Twilio Gateway
Faster than e-mail and less likely to get blocked, text messages are great for timely alerts and notifications.
Here’s how to configure your Twilio gateway in Vtiger CRM
- Log in to your CRM account.
- Click the Main Menu.
- Click Essentials.
- Look for Conversations.
- Click SMS Messages.
- Click the Settings icon. The Customize pop-up opens.
- Click Server Configuration.
- Click the New Configuration tab on the top right corner of the screen. The New Configuration window opens.

a. In the New Configuration popup, select Twilio from the Provider dropdown
b. In the Active field, click the radio-button Yes
c. In the Account SID field, provide your Twilio API Credentials from your account.
d. In the Auth Token field, provide your Twilio Auth Token
e. In the From field, enter the Sender ID.
From field can be set with alphanumeric value (Ex : TM-COMPANY or VM-IT123) if provider supports Alphanumeric sender-id
Configuring Solutions Infini Gateway
Engage your customers via messaging the most trusted communication means.
Here’s how to configure your Solutions Infini gateway in Vtiger CRM
- Log in to your CRM account.
- Click the Main Menu.
- Click Essentials.
- Look for Conversations.
- Click SMS Messages.
- Click the Settings icon. The Customize pop-up opens.
- Click Server Configuration.
- Click the New Configuration tab on the top right corner of the screen. The New Configuration window opens.

a. In the New Configuration popup, select SolutionsInfini from the Provider dropdown
b. In the Active field, click the radio-button Yes
c. In the API Key field, provide your Solutions Infini API Credentials from your account.
d. In the Sender ID field, provide your Solutions Infini Sender ID.
e. In the Character Set field, select Auto Detect, GSM or Unicode (Other Languages)
To know more about features and benefits of this integration, please check Solution Infini + Vtiger CRM
Configuring Gupshup Gateway
You are required to register and activate your Gupshup account before you get started. After registration, Gupshup team will provide you the login details and URL by activating your account. Once you have all the details ready, you can proceed with the steps necessary to configure Gupshup gateway in Vtiger.
Here’s how to configure your Gupshup gateway in Vtiger.
- Log in to your CRM account.
- Click the Main Menu.
- Click Essentials.
- Look for Conversations.
- Click SMS Messages.
- Click the Settings icon. The Customize pop-up opens.
- Click Server Configuration.
- Click the New Configuration tab on the top right corner of the screen. The New Configuration window opens.

- In the New Configuration popup, select Gupshup from the Provider drop-down.
- In the Active field, click the radio-button Yes.
- In the User ID field, provide your Gupshup account user id.
- In the Password field, provide your Gupshup account password.
- Copy this Real-Time Delivery URL and paste it in the Gupshup account Real-time Delivery URL field.
NOTE!
1. Messages can be sent only if the message text matches an approved templates in your Gupshup account.
2. Message type should be set to ‘Unicode_Text’.
To know more about the features and benefits of this integration, please check GupShup + Vtiger CRM
Configuring ZoomConnect Gateway
ZoomConnect is a simple and reliable bulk SMS service provider that helps with marketing campaigns and general information communication.
Register to the ZoomConnect gateway and activate your account before you get started.
Follow these steps to configure your ZoomConnect gateway in Vtiger CRM
- Log in to your CRM account.
- Click the Main Menu.
- Click Essentials.
- Look for Conversations.
- Click SMS Messages.
- Click the Settings icon. The Customize pop-up opens.
- Click Server Configuration.
- Click the New Configuration tab on the top right corner of the screen. The New Configuration window opens.

|
|
|
|
|
|
|
|
|
|
|
|
|
|
|
9. Click on the Save button.
To know more about features and benefits of this integration, please check Zoom Connect + Vtiger CRM
Configuring TextLocal Gateway
TextLocal is a bulk SMS service provider which helps with marketing campaigns and general information communication.
Register to the TextLocal gateway and activate your account before you get started.
Follow below steps to configure your TextLocal gateway in Vtiger CRM
- Log in to your CRM account.
- Click the Main Menu.
- Click Essentials.
- Look for Conversations.
- Click SMS Messages.
- Click the Settings icon. The Customize pop-up opens.
- Click Server Configuration.
- Click the New Configuration tab on the top right corner of the screen. The New Configuration window opens.

|
|
|
|
|
|
|
|
|
|
|
|
|
|
|
|
|
|
|
|
|
9. Click on the Save button.
Configuring Mvaayoo Gateway
Mvaayoo is a bulk SMS service provider which helps with marketing campaigns and general information communication.
Register to the Mvaayoo gateway and activate your account before you get started.
Follow below steps to configure your Mvaayoo gateway in Vtiger CRM
- Log in to your CRM account.
- Click the Main Menu.
- Click Essentials.
- Look for Conversations.
- Click SMS Messages.
- Click the Settings icon. The Customize pop-up opens.
- Click Server Configuration.
- Click the New Configuration tab on the top right corner of the screen. The New Configuration window opens.

|
|
|
|
|
|
|
|
|
|
|
|
|
|
|
|
|
|
|
|
|
Configuring MSG91 Gateway
MSG91 is a bulk SMS service provider which helps with marketing campaigns and general information communication.
Register to the MSG91 gateway and activate your account before you get started.
Follow below steps to configure your MSG91 gateway in Vtiger CRM
- Log in to your CRM account.
- Click the Main Menu.
- Click Essentials.
- Look for Conversations.
- Click SMS Messages.
- Click the Settings icon. The Customize pop-up opens.
- Click Server Configuration.
- Click the New Configuration tab on the top right corner of the screen. The New Configuration window opens.

|
|
|
|
|
|
|
|
|
|
|
|
|
|
|
|
|
|
|
|
|
|
|
|
9. Click on the Save button.
Configuring LabsMobile Gateway
LabsMobile is a bulk SMS service provider which helps with marketing campaigns and general information communication.
Register to the LabsMobile gateway and activate your account before you get started.
Follow below steps to configure your LabsMobile gateway in Vtiger CRM
- Log in to your CRM account.
- Click the Main Menu.
- Click Essentials.
- Look for Conversations.
- Click SMS Messages.
- Click the Settings icon. The Customize pop-up opens.
- Click Server Configuration.
- Click the New Configuration tab on the top right corner of the screen. The New Configuration window opens.

| Field | Description |
| Provider | Select LabsMobile from the drop-down menu. |
| Active | Enable Yes to activate LabsMobile provider. |
| User Name | Enter your LabsMobile User ID. |
| Password | Enter your LabsMobile account password. |
| Sender | Enter your Sender name. |
| Character Set | Select the desired character set. |
Sending an SMS Message from Vtiger CRM
After configuring your SMS Gateway, you can send messages from Leads, Contacts, and Organizationsmodules. You can send messages to an individual or to multiple individuals simultaneously by selecting multiple records in the List View.
Sending an SMS from the List View
Follow these steps to send an SMS message from the List View:
- Log in to the CRM.
- Go to the module from where you want to send an SMS message. For example, Leads, Contacts, or Organizations. The List View opens.
- Note: You can send SMS messages to multiple people or organizations by selecting multiple records in the List View.
- Click on the record to whom you want to send the SMS. The Summary View opens.
- Click the More icon (three vertical dots) on the top right of the record.
- Click Reach Out Now > SMS. The Send SMS window opens.
- Enter or select the following information:
- Select Phone Number:
- Select SMS Gateway:
- Select SMS Template:
- Insert Links:
- Message: Compose your message
- Click Send.
Sending an SMS from the Summary View
Follow these steps to send an SMS message from the Summary View of record:
- Log in to the CRM.
- Go to the module from where you want to send an SMS message. For example, Leads, Contacts, or Organizations. The List View opens.
- Click on the record to whom you want to send the SMS. The Summary View opens.
- Click the More icon (three vertical dots) on the top right of the record.
- Click Reach Out Now > SMS. The Send SMS window opens.
- Enter or select the following information:
- Select Phone Number:
- Select SMS Gateway:
- Select SMS Template:
- Insert Links:
- Message: Compose your message
- Click Send.