Articles in this section
AI Widgets in Vtiger CRM
Feature Availability
Vtiger Editions: One Professional | One Enterprise | One AI
Introduction
AI Widgets in Vtiger CRM enhance user productivity by providing AI-driven insights. These widgets can be added to the Summary View or List View of a module, allowing users to access real-time AI recommendations and perform quick actions.
Admins can add AI Widgets within various CRM modules, such as Deals, Cases, or Contacts, to provide contextual assistance. Once added, Users can leverage these Widgets for different functionalities, such as generating summaries, assisting with responses, analyzing data, or performing quick actions.
Note: AI Widgets are only available if Calculus AI is installed. They can only be added by admins.
Use Case
Overview: John, a sales representative, was managing a high-value Deal with Technova Corporation in the Negotiation stage. Keeping track of past interactions and determining the best course of action was challenging. Manually reviewing conversation histories was inefficient and often led to missed follow-up opportunities.
To streamline Deal management, the Admin added two AI widgets—Deal Summary and Next Best Action—within the Summary View of the Deals module in Vtiger CRM.
Challenges:
- Manual Deal Review: Sales reps spent excessive time reviewing past emails, call logs, and notes to understand Deal status.
- Inefficient Decision-Making: Without AI-driven insights, determining the most effective next step was difficult.
- Delayed Follow-Ups: The lack of clear recommendations led to inconsistencies in Deal progress and reduced conversion rates.
Solution: AI Widgets Implementation
The Admin added two AI widgets to enhance Deal management:
- Deal Summary Widget: Automatically generates a concise summary by analyzing past emails, call logs, and notes, allowing sales reps to quickly understand Deal details.
- Next Best Action Widget: Analyzes past interactions to recommend the optimal next step, ensuring timely and effective engagement with stakeholders.
Agent Usage:
- Deal Summary Widget: When John opens the Technova Corporation Deal record, he can use the widget to get a quick overview.
- Example: Technova Corporation - Negotiation stage. The client initially showed interest, but recent interactions indicate concerns about pricing. A proposal was sent two days ago. Awaiting a response from the client’s decision-maker.
- Next Best Action Widget: When John selects this widget, it suggests the most appropriate next step based on historical data and past interactions.
- Example: John should follow up with the client’s decision-maker within the next 24 hours to address pricing concerns. If necessary, John can offer a tailored discount to ease the decision-making process. Based on past trends, engaging decision-makers directly has led to a 20% higher closing rate.
By leveraging AI-driven insights, John can efficiently manage Deals, reduce manual effort, and improve conversion rates.
Benefits of AI Widgets
The following are the benefits of the AI Widgets in Vtiger CRM:
- Improved Productivity: Provides actionable insights, reducing manual effort.
- Better Decision-Making: AI-driven recommendations help users take the most effective actions based on data insights.
- Increased Sales Opportunities: Identifies upsell and cross-sell opportunities to maximize revenue potential.
In this article, you will learn about:
- Adding an AI Widget
- Editing an AI Widget
- Deleting an AI Widget
- Using an AI Widget
Key Terminology
|
|
|
|
|
|
|
|
|
|
|
|
|
|
|
|
|
|
|
|
|
Adding an AI Widget
Follow these steps to add an AI Widget to a module:
- Log in to your CRM account.
- Click the User Menu on the top right corner of the CRM screen.
- Click Settings. The Settings page opens.
- Go to Module Management.
- Click Module Layouts & Fields. The Module Layouts & Fields page opens.
- Enter or select the following information to add an AI Widget:
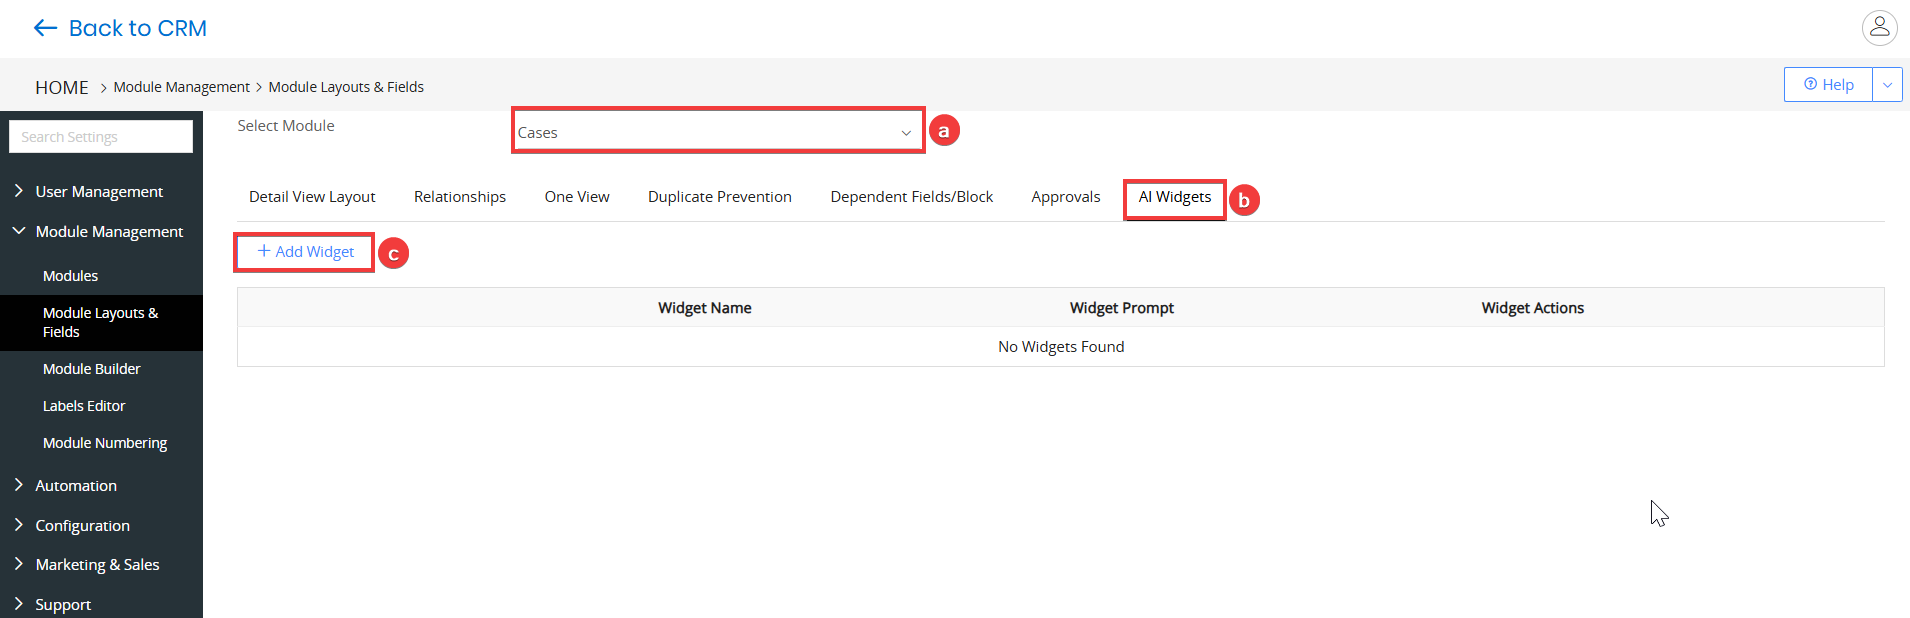
- Select Module - Select the module from the drop-down where you want to add the AI widget.
- AI Widget - Click the AI Widget tab.
- +Add Widget - Click to add a new AI Widget for the respective module. The Add AI Widget popup window opens.
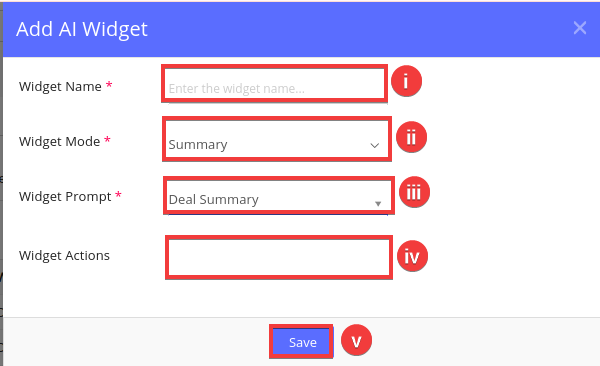
- Widget Name – Enter a name for the Widget.
- Widget Mode – Choose the desired view mode from the drop-down menu:
- Summary
- List
- Widget Prompt – Choose a prompt from the drop-down menu. The available prompt options will depend on the selected Widget Mode.
- Widget Actions – Define the actions the Widget should perform.
- Save – Click to save the Widget.
The AI Widget will now be available in the record based on the selected module.
Editing an AI Widget
You can edit an existing AI Widget based on your needs.
Follow these steps to edit an AI Widget:
- Log in to your CRM account.
- Click the User Menu on the top right corner of the CRM screen.
- Click Settings. The Settings page opens.
- Go to Module Management.
- Click Module Layouts & Fields. The Module Layouts & Fields page opens.

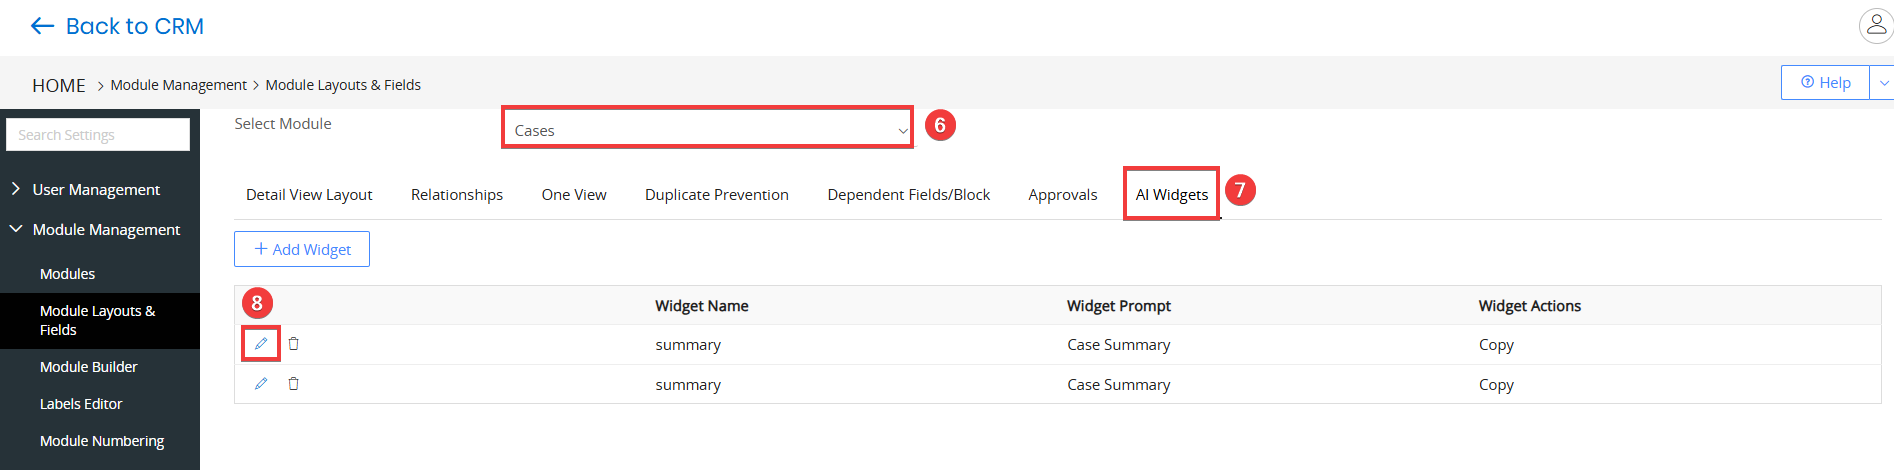
- Select the module from the drop-down for which you want to edit the AI Widget.
- Click AI Widget tab.
- Click Edit icon. The Edit Pop-up window opens.
- Widget Name – Edit the name for the widget.
- Widget Mode – Choose the desired view mode from the drop-down menu.
- Widget Prompt – Select a prompt from the drop-down menu. The available prompt options will depend on the selected Widget Mode.
- Widget Actions – Define the actions the widget should perform.
- Save – Click to save the changes.
The AI Widget will work according to the updates made.
Deleting an AI Widget
Follow these steps to delete an AI Widget:
- Log in to your CRM account.
- Click the User Menu on the top right corner of the CRM screen.
- Click Settings. The Settings page opens.
- Go to Module Management.
- Click Module Layouts & Fields. The Module Layouts & Fields page opens.
- Select the module from the drop-down for which you want to delete the AI Widget.
- Click AI Widget tab.
- Click Delete icon. A confirmation pop-up window opens with the message Are you sure you want to delete the Widget?

- Yes – Click to confirm and delete the AI Widget.
- No – Click to cancel and keep the AI Widget.
Using the AI Widget
For your understanding, we will use the AI Widget for Deals.
Follow these steps to use the AI Widget:
- Log in to your CRM account.
- Click the User Menu.
- Go to Sales.
- Click Pipeline Management > Deals. The Deals page opens.
- Using the AI Widget in List View – If you have selected List View while adding the AI Widget, the AI Widget will be displayed at the top of the List View.
- If you create a prompt with List View as the mode and Raw Text as the Output Type and then add it to the AI Widget, the widget displays the information as an info banner at the top of the List View. To learn more about Prompt Builder, click here.
- If you create a prompt with List View as the mode and Record as the Output Type and then add it to the AI Widget, the widget displays the response as a horizontal set of record cards above the list. To learn more about Prompt Builder, click here.
- Using the AI Widget in Summary View – If you have selected Summary View while adding the AI Widget, the AI Widget will appear within the Summary View of the record.
- Using the AI Widget in List View – If you have selected List View while adding the AI Widget, the AI Widget will be displayed at the top of the List View.
Reference
Ask Calculus AI
Module Management - Module Layouts & Fields
Calculus AI- Your Smart Assistant with AI Technology
Natural Language Query
Calculus GPT