Articles in this section
Creating Credit Notes
Feature Availability
Vtiger Editions: One Professional | One Enterprise | One AI
Introduction to Credit Notes
A credit note is an amount that must be paid back to the customer as credits on the invoice or as refunds.
Situations in which the customer will be given credits are:
- If there was a delay in the delivery of the product
- If the wrong product was shipped
- If there was an error in invoice pricing
- If the customer returns the product
- If the product was defective
How do Credit Notes fit in the post-sales journey?
When the customer returns a product after it has been delivered or if there is a pricing error in the invoice, then monetary credit will be allocated to the customer’s account.
Credit Note Status
A Credit Note can be in the following statuses:- Open: By default, a newly created Credit Note record is in the Open state
- Void: Mark the credit note as void to nullify the credit note.
- Fully Redeemed: All available credits are applied to one or more invoices.
- Partially Paid: A portion of the credits has been applied to one or more invoices.
The Credit Notes module is a part of the Inventory Add-ons. To use this module, you must first install the Inventory Add-on by navigating to Settings > Add-ons.
Example of using a credit note
Let’s say you generated an Invoice with the following items:


Benefits of Using Credit Notes
The benefits of using Vtiger Credit Notes are:- Prevents the creation of negative invoices.
- Create a credit note with a click from an invoice.
- Apply credit towards partially paid or unpaid invoices, or create a refund payment.
- Credit notes can be applied to multiple invoices.
- Set up approval for credit notes to ensure they are only extended after obtaining the supervisor’s approval.
Creating a Credit Note
You can create Credit Notes from:
- The Credit Notes page
- Quick Create (available on all screens in the CRM)
From the Credit Notes page
You can use the +Add Credit Note button to create a new CN. You can find it in the top right corner of the credit notes’ List View.
Follow the steps below to create a Credit Note:
- Log in to the CRM
- Click the main Menu.
- Go to Inventory.
- Select Order Fulfillment > Credit Notes. The Credit Notes page opens.
- Click + Add Credit Note.
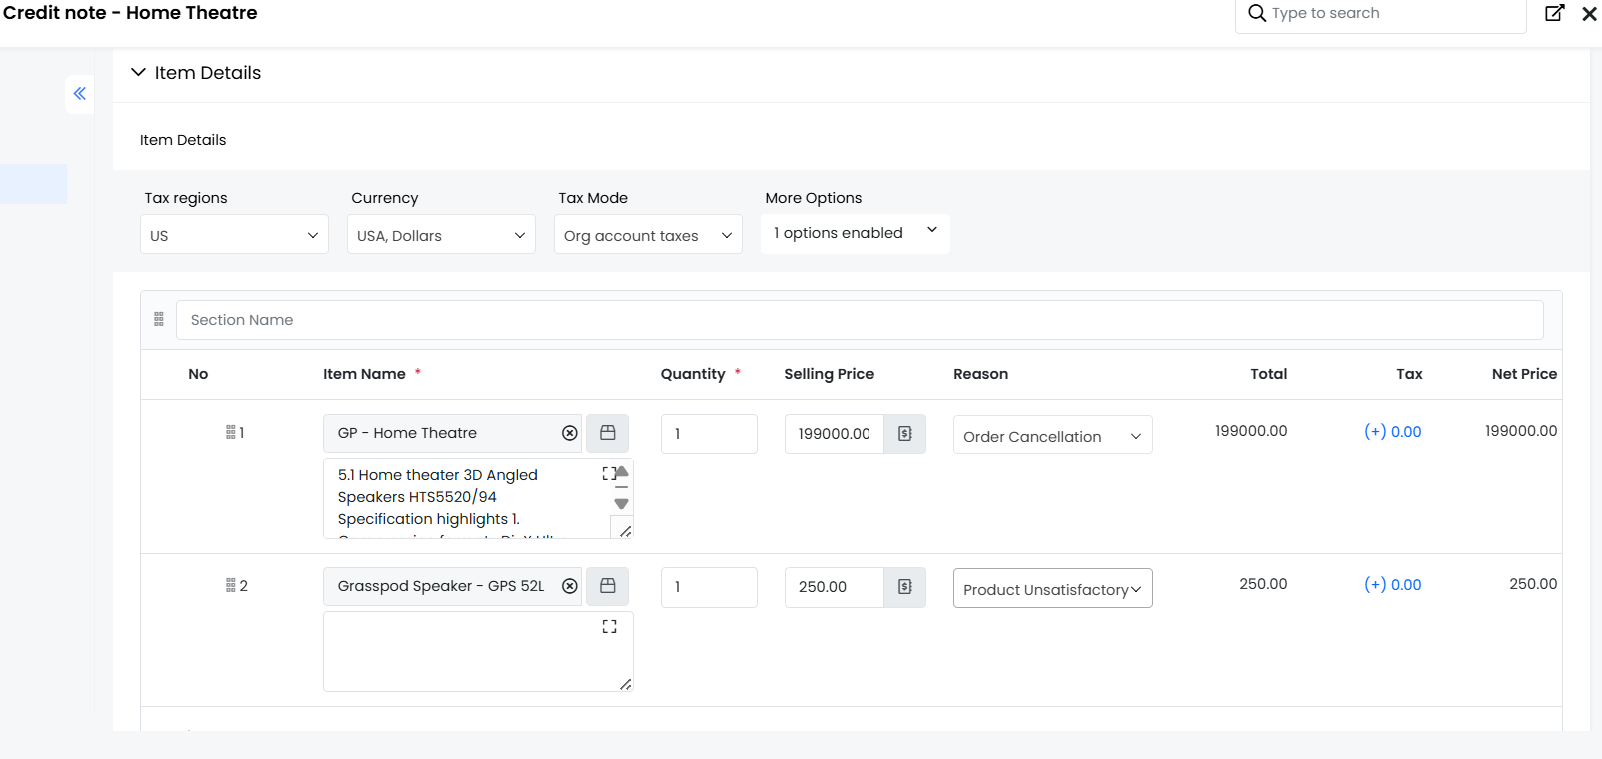
- Enter or select information for the following sections:
- Credit Note Details
- Item Details
- Terms & Conditions
- Click Save.
This newly created record will be visible in the List View of the Credit Notes page.
From Quick Create
You can use the + Quick Create button (available on all CRM screens) to create a new Credit Note.Follow the steps below to create a Credit Note:
- Log in to the CRM
- Click Quick Create (+ icon).
- Look for Credit Note in the Search field, or go to Order Fulfilment > Credit Note.
- Click Credit Note. The Creating Credit Noteopens.
- Enter or select information for the following sections:
- Credit Note Details
- Item Details
- Terms & Conditions
- Click Save.
This newly created record will be visible in the List View of the Credit Notes page.
From an Invoice (Add or Link an invoice)
When an item is rejected or not supplied to the customer, you can create a Credit Note for that particular invoice from the Invoices module. You can also link an existing Credit Note to an Invoice.
Follow the steps below to create a Credit Note:
- Log in to the CRM
- Click the main Menu.
- Go to Inventory.
- Select Order Fulfillment > Invoices. The Invoices page opens.
- Select the Invoice to add the Credit Note. The Summary View opens.
- Click More (three dots) on the top right.
- Click Credit Notes. The Creating Credit Note window opens.
- During the step, you can copy text and Conditions from the Invoice to the Credit Note.
- Read the note and click yes or no.
- Scroll down to the Add or Link section.
- Enter or select information for the following sections:
- Credit Note Details
- Item Details
- Terms & Conditions
- Click Save.
Configuring a Credit Note
You can configure Taxes, Tax regions, Shipping Charges (if any), and Terms and Conditions from the Settings > Inventory Management section.
Note:
- These actions are limited to the Admin role.
- Refer to the Tax Management article to learn how to set up Taxes and other Settings.
- Tax regions: Taxes can be set based on a region. Regions are set up in the Tax Settings screen.
- Currency: It is the same as the currency defined in the Deal. The credit note’s line item currency is the same as the record-level currency.
- Tax mode:
- Group Taxes: If there are multiple products/services in the inventory, group taxes help in populating tax rates according to specific tax calculations.
- Individual Taxes: You can enable this option while creating a credit note. You can apply taxes for individual items in a Credit Note by clicking the Configure button in the credit note.
- Note: The default Tax mode is set based on the option set in the Tax Management page by the administrator. This can be overridden at the credit note level from the Credit Note Configuration pop-up.
- Price Books: Price Books enable you to set distinct prices for products and services.
- The prices of the items can vary at times depending on the customers and their needs. When a Pricebook is selected or changed, the system updates the unit prices of all line items based on the selected Price Book.
- To learn more about Price Books, click here.
- Discounts
- Group Discounts: Similar to Group Taxes, Group Discounts are applied to Products (or) Services on the Credit Note level.
- Individual Discounts: Unlike group discounts, Vtiger CRM offers the option to apply Discounts on an individual item based on its List Price.
- Shipping Charges: Shipping Charges are the additional amount charged by the company’s sales team for shipping the product to the customer.
- Adjustments: This option allows you to round the total amount to the next or previous value, based on the decimal point.
Note: You can customize and add or remove fields by going to Module Layouts and Fields under Settings.
Adding Line Items to a Credit Note
You can add new Line Item records, like a product/service or a new section in the existing Credit Note, by editing the Item Details block.
Adding a Product or Service
Follow these steps to add a product/service:
- Log in to the CRM.
- Click the main Menu.
- Go to the Inventory tab.
- Go to Order Fulfillment > Credit Notes. The Credit Notes page opens.
- Click +Add Credit Note. The Creating Credit Note window opens.
- Enter or select information for the following:
- Credit Note Details
- Item Details
- Add Product or Service row: Click to add the product or service to the Deal record.
- More: Click More next to the line item number.
- Add Product Row: Add a new product line next to an existing line item.
- Add Service Row: Add a new service line next to an existing line item.
- Terms & Conditions.
- Click Save. The newly created CN will be available in the List View
- Open the recently created CN. The Summary View opens.
- Click the Details tab.
- Go to the Item Details block.
- Click Add row.
- Select the Product or Service to add.
Adding a new Section
Follow these steps to add a section:
- Log in to the CRM.
- Click the main Menu.
- Go to the Inventory tab.
- Go to Order Fulfillment > Credit Notes. The Credit Notes page opens.
- Select the Credit Note you want to edit. The Summary View opens.
- Click Edit.
- Go to the Item Details block.
- Enter or select the following information to add Sections:
- Add section: Click to add a new Section.
- More: Click More next to the line item number.
- Add Section: Click to add a new section to group related line items.
- Click Save.
Note:
- Invoices and Credit Notes are matched based on the organization they are linked to.
- You can also create a credit note directly from invoices and apply the credit amount. To learn more about this, click here.
Apply Tax to All Line Items
When using the Individual Tax mode, taxes are calculated separately for each line item in an inventory record. To simplify tax updates across multiple items, the Apply for all items option lets you apply the same tax percentage to all applicable line items at once.
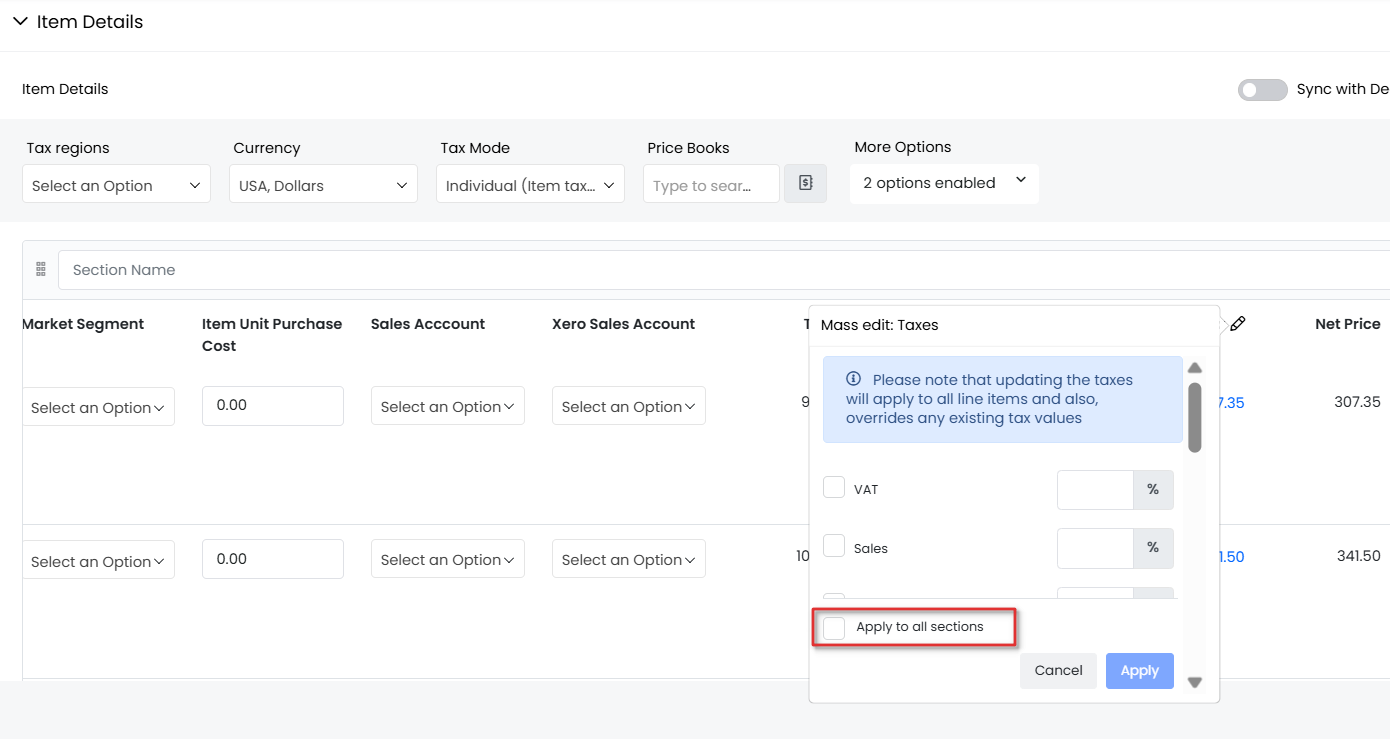
For example, when the Individual Tax mode is enabled, the CRM applies the selected tax to each product individually. If you modify the tax percentage for a specific line item, the Apply to all sections option appears. By selecting this option, the updated tax percentage is applied to all line items for which that tax is enabled.
This feature helps maintain consistency and reduces the need to manually update tax values for every item in the record.
Applying Credits to Unpaid Invoices
You can apply available credits from a Credit Note to any of the open invoices of the related customer. If a customer has two or more invoices linked, you can use credits to offset all or part of the open invoices.
You can also apply the credit to an invoice:
- During Invoice creation - Item Details block > Apply Credit field
- Created invoice - Record view > More > Apply Credits.
- You need to first create a Credit Note to apply the credit amount. You cannot reopen a fully redeemed Credit Note record.
- A user without edit permissions cannot apply credits to an Invoice
- A Credit Note is marked as closed if all the credits are applied to invoices.
Follow these steps to apply the credit amount to an invoice:
- Log in to the CRM.
- Click the Menu icon.
- Go to the Inventory tab.
- Go to Order Fulfillment > Invoices. The Invoices List View opens.
- Open the invoice record to which you want to apply the credit amount.
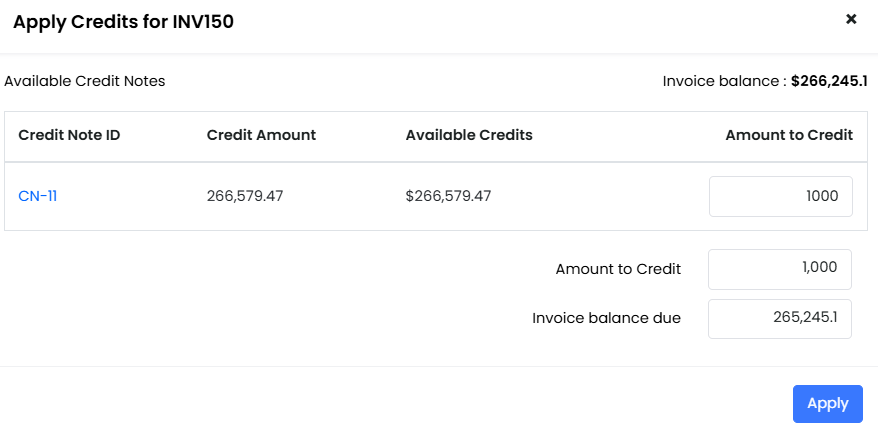
- In the Summary View, click the Apply Credits button. A list of all the credit notes applicable to the current invoice will be displayed.
- Select the credit note from which you want to apply the credit amount.
- Enter the amount you want to apply to the invoice in the Amount to Credit field.
- Click Apply. The credits will be applied to the invoice, and the credit note will be associated with it.
The credit note will be visible in the Sales Ops widget in the Invoices’ Summary View.
Note:
- The status of the credit note will be changed to ‘Partially redeemed’ or ‘Fully redeemed’ based on the credit amount you have applied to invoices. You can see the status in the Credit Notes’ List View.
- A user without edit permission cannot apply credits.
- A Credit Note is marked as closed if all the credits are applied to invoices.
- After applying the credits to an invoice, the following fields will be updated:
- Applied Credits and Available credits fields in the credit note.
- The Balance field in an invoice record.
Consider this Example
Consider that one of your salespeople has raised two invoices and linked them to Nancy Edwards' Contact record.- Invoice 1: Balance Amount = $3500
- Invoice 2: Balance amount = $5000
- Invoice 1: $3500 - $1000 = $2500
- Invoice 2: $5000 - $1000 = $4000
Applying Refunds for Invoices
You can refund your customer using a Credit Note, provided there are no open invoices.
Follow these steps to provide a refund:
- Log in to the CRM.
- Click the Main Menu icon.
- Go to the Inventory tab.
- Go to Order Fulfillment > Credit Notes. The Credit Notes List View opens.
- Open the Credit Note record.
- Click the Refund button in the top right corner of the Summary View.
- Enter the amount you want to provide as a refund.
- Enter or select the necessary details.
- Click Save.
- Click Save and Continue and revisit the record later to add more information.
A payment record is created and linked to a credit note. It will be available in the Payments widget in the Summary View of the Delivery Note record.
Note:
- The payments module must be installed before you process a refund. Go to Settings > Extension Store to install the Payments extension.
- You can also refund the credits from the Payment module > Payment to Customer.
- If you have partially refunded, the available credits are reduced according to the Credit Note.
- If you have fully refunded the amount, the Credit Note record is closed.
- To learn more about Payments, click here.
Deleting a Credit Note
You can delete a record only if all the available credits are unused. If there are any invoices or payment records linked to CN, you must first unlink them and then proceed with the deletion action.
Follow these steps to delete a record:
- Log in to the CRM.
- Click the main Menu.
- Go to Inventory.
- Go to Order Fulfillment > Credit Notes. The Credit Notes List View opens.
- Open the Credit Note record. The Summary View opens.
- Click More.
- Click the Delete icon.
Note: If any invoice or payment record is unlinked from a Credit Note, it will revert the applied credits.
Actions Possible on a Credit Note
You can perform the following actions on the Credit Note:
- Share
- Export
- Change the template of a credit note
Sharing a credit note
You can share a credit note with a customer by sending a link to the credit note or by attaching the credit note itself.
As a link
Follow these steps to share the credit note as a link:
- Log in to the CRM.
- Click the main Menu.
- Go to Inventory.
- Go to Order Fulfillment > Credit Notes. The Credit Notes List View opens.
- Open the Credit Note record. The Summary View opens.
- Click More.
- Click Share as link. A mail compose window opens with the credit note link.
- Enter the recipient's details.
- Click Send.
As an attachment
Follow these steps to share the credit note as an attachment:
- Log in to the CRM.
- Click the main Menu.
- Go to Inventory.
- Go to Order Fulfillment > Credit Notes. The Credit Notes List View opens.
- Open the Credit Note record. The Summary View opens.
- Click More.
- Click Share as attachment. A mail compose window opens with the credit note attachment.
- Enter the recipient's details.
- Click Send.
Exporting a Credit Note
Follow these steps to export a credit note:
- Log in to the CRM.
- Click the main Menu.
- Go to Inventory.
- Go to Order Fulfillment > Credit Notes. The Credit Notes List View opens.
- Hover over a record to display the radio button on the left side.
- Click the radio button.
- Click the Export button.
- Select any one of the following options:
- Export Selected Records - This option will export only the selected record.
- Export data on the current page - This option will export the records from the current page.
- Export All Data - This option exports all data from all pages of the Exports module.
The exported record will be saved on your local system.
Printing a Credit Note
Follow these steps to print a credit note :- Log in to the CRM.
- Click the main Menu.
- Go to Inventory.
- Go to Order Fulfillment > Credit Notes. The Credit Notes List View opens.
- Open the Credit Note record you want to print. The Summary View opens.
- Click More.
- Click the Print button.
- You can perform any of the following actions:
- Edit & Export - You can edit the credit note and export it to your local system.
- Email with PDF - You can email the credit note record as a PDF to the contact.
- Print - You can print the credit note and keep a hard copy.
- Save as PDF - You can save the credit note as a PDF on your local system.
Changing the template of a Credit Note
You can change the template of a Credit Note from the Print Credit Note screen and the Settings widget.
From the Print Credit Note screen
This is a temporary change only until the credit note is printed.
Follow these steps to change the template of a credit note:
- Log in to the CRM.
- Click the main Menu.
- Go to Inventory.
- Go to Order Fulfillment > Credit Notes. The Credit Notes List View opens.
- Open the Credit Note record. The Summary View opens.
- Click More.
- Click the Print button.
- Select the template you want from the list of all templates.
- Perform any of the following actions:
- Edit & Export- You can edit and export the credit note to your local system.
- Email with PDF- You can email the credit note record as a PDF to the contact.
- Print- You can print the credit note and keep a hard copy.
- Save as PDF - You can save the credit note as a PDF file on your local system.
This is a permanent change and will be applied to the credit note immediately. Follow these steps to change the template of the credit note from the settings widget:
- Log in to the CRM.
- Click the main Menu.
- Go to Inventory.
- Go to Order Fulfillment > Credit Notes. The Credit Notes List View opens.
- Open the Credit Note record. The Summary View opens.
- Go to the Settings Widget.
- Click the Template applied drop-down.
- Select the template of your choice.
The template will be applied to the credit note instantly.
Viewing Credit Note Details
Credit Notes List View
List view sorts and lists all the CNs based on the last modified date of each CN.Columns in the List view
The columns that are visible by default in the List View are :- Name- Displays the name of the CN.
- Status- Displays the current status of the credit note.
- Applied Credits- Displays the credit amount that is applied to the invoice.
- Refund - Displays the credit amount that is refunded to the customer.
- Available Credits- Displays the total amount left after all the credits are applied.
List View Actions for Credit Notes
You can perform various quick actions, such as Commenting, Exporting, Printing, and emailing, in the Credit Notes List View.To learn more about List View actions in Vtiger CRM, click here.
Credit Notes Summary View
The Summary View is the view that appears when you click a particular record from the List View. The Summary View displays a collection of all the key information of the record.
Summary View can be divided into four sections. Each section has a particular functionality.
- Summary View Actions
- Follow: You can follow any CN record to get updates on all the activities performed on that record.
- Tag: You can add tag names to the record to easily identify it.
- Print: You can print the CN or save it as a PDF for future reference.
- Duplicate: You can duplicate the current record and have all the details reflected in a new record.
- Delete: You can delete a record by clicking this button.
- Credit Note Document: The generated Credit Note, along with the template, will be displayed here.
- Widgets
- Activity-All the activities made on the credit note are displayed here. Here you can add comments related to the credit note.
- Analytics-You can view all the metrics related to the credit note in the form of charts, mini lists, etc. You can also create new ones here.
- Sales Ops - All related invoices will be displayed here.
- Payments - All related payment records will be displayed here.
- Settings- You can change the template of the CN here.
Details View
You can view and edit all the information about the CN record by clicking the Deep Dive button in the Summary View of the record.Grid View
Grid View is a table-like layout that shows data in rows and columns, similar to a spreadsheet. It allows you to view and edit multiple records simultaneously on the same page. You can edit specific field details in a record, just like editing a cell in a spreadsheet. The view resembles the List View but allows additional actions, such as editing, rearranging columns, and bulk updates.